
Vegetables and Salads
- Oven-Braised Artichokes with Potatoes and Onions
- Fried Artichokes
- Broccoli or Cauliflower with Lemon, Capers, and Black Olives
- Broccoli Rabe (Rapini), Cauliflower, or Broccoli with Tomatoes and Black Olives
- Roasted Cauliflower with Tahini Sauce
- Carrots and Chickpeas in a Chermoula Sauce
- Leeks Vinaigrette
- Batter-Fried Eggplant Slices
- Elizabeth Minchilli’s “Vaguely Middle Eastern” Eggplant Salad
- Fava Beans or Green Peas Braised with Prosciutto
- Green Beans with Tomato and Olive Oil
- Braised Wild Mushrooms
- Eastern Mediterranean Stuffed Peppers
- Crispy Oven-Roasted Kale
- Peperonata
- Potato Latkes for Hanukkah (or All Year Round)
- Oven-Roasted Winter Squash with Pancetta and Rosemary
- Gratin of Tomatoes and Zucchini
- Slow-Roasted Tomatoes with Capers and Olives
- Shakshouka (Spicy Tomatoes and Peppers)
- Marinated Feta and Tomato Salad
- Potato and Caper Salad from the Island of Pantelleria
- Sicilian Orange and Red Onion Salad (Insalata di Arance)
- Winter Salad of Brussels Sprout Leaves
- Tabbouleh
- Fattoush, Dakos, Panzanella, and Other Bread Salads
- Bean, Lentil, Chickpea, Farro, and Other Hearty Salads
I’ve included here many suggestions for specific vegetables and what I think are good and easy ways to prepare them, but there are also some very general techniques to think about when using olive oil in the kitchen. If you’re like me, you frequent farmer’s markets and the best produce stands, where you fuss over the gorgeous array and end up taking home far more vegetables than you can ever use in a week’s time. Not to worry, however; there are many ways to handle them.
I do want to offer one bit of preliminary advice, one of those little kitchen trucs my mother taught me, but it took me years of throwing out limp, over-the-hill vegetables before I realized that she was actually right for a change. This is my kitchen maxim:
Take care of the vegetables as soon as you get them home and the rest will take care of itself.
What this means in practice: Do all the prep work necessary. Rinse the greens and dry them. Scrub the carrots and potatoes (but don’t peel them). Get rid of any fading bits and pieces—wilting yellow leaves, bruised or moldy scraps, excess greenery, and so forth. Then tuck away the potatoes and onions (never together) and the garlic in a cool, dark place, and refrigerate the rest of your provender—except for eggplants and tomatoes, which should be used in a day or two to take full advantage of their summery flavors. Neither takes well to the refrigerator’s chill.
We all know we should be eating more vegetables, and I’m not sure why we find it so hard to do that—except that it’s easier to throw a steak on the grill and bake a potato than it is to do the slightly more busy prep work that vegetables require. But if you take my mother’s advice, you’ll be halfway there already. That, and the judicious application of delicious olive oil, will make vegetable cooking a breeze and a delight.
We should all take a lesson from the Greeks as far as vegetable cooking is concerned. Greek cooking authority Diane Kochilas confirms that olive oil is an absolute necessity when Greeks cook vegetables—and they cook a powerful amount too. Greeks, she claims, eat on average a pound of vegetables a day. Vegetables often cooked in oil, yes, but also always with a final addition of oil at the end to finish the dish. This is olive oil as it was meant to be—both cooking fat and flavoring agent. “Let the vegetable juices cook down,” she advises, “until there’s nothing left but the oil, caramelizing and reducing the juices to something very flavorful.”
Following are several general techniques that are applicable to a variety of produce and that sometimes generate even better results when you can combine two or three or even four vegetables—no more than that, though, lest the flavors get a little muddied and confused.
Many vegetables, for instance, take well to oven-roasting. Think of a selection of summer vegetables—eggplant, tomatoes, peppers both sweet and hot, and onions—cut into rather large pieces, tossed with a generous glug or two of olive oil, a good sprinkle of sea salt, several turns of the pepper mill, and maybe some aromatics, especially garlic and perhaps dried oregano or fennel pollen. The whole tray is then slid into a preheated 375°F oven and roasted until the more slow-cooking eggplant pieces are roasted through and tender and the onions and peppers are starting to crisp nicely and brown on the edges. Pile the vegetables on a handsome pottery tray and serve it as a deconstructed ratatouille or caponata.
In wintertime, a similar technique works with certain of the cabbage family—Brussels sprouts, split in half, are terrific roasted in the oven, but other cabbage-y vegetables, even a firm head of green cabbage cut into wedges, will also do nicely as long as they are well rubbed with oil to keep them from burning. For color contrast, add some good chunks of squash or carrots as well as some quarters of red onion; don’t forget the garlic, and again, be generous with the olive oil. Seasoning? Thyme, rosemary, and bay leaves all come to mind. For extra crunch, add a handful of walnut halves or broken pecans scattered throughout. A few potatoes, peeled and chunked, are also good with this. Beets, too—although you may wish to roast peeled beets separately so that they don’t color all the other vegetables with their virulent pink, then combine them just as you’re serving.
Another great technique is what I call steaming-and-sautéing, from the kitchens of Italy and Greece, both champion consumers of vegetables. Markets year-round in these countries are full of a gamut of greens, from wild dandelions and amaranth greens in the early spring through spinach and chard and on into the sturdy, often bitter greens of autumn and winter (broccoli rabe, kale, collards). In North America, the mixture sold as “braising greens,” which usually includes kale and broccoli rabe (aka rapini), is also a great choice.
Rinse the greens, discard any thick, inedible stems, chop the leaves coarsely, then steam until tender in a small amount of water, enough to keep them from catching on the bottom of the pan. Keep the initial steaming to a minimum, just long enough to tenderize the greens. Drain the greens thoroughly, even squeezing out handfuls of liquid (which could go in the stockpot if you’re so inclined), and chop them again.
When it’s time to serve, the greens are tossed in a sauté pan with plenty of olive oil in which some chopped garlic has been stewed, perhaps with a sprinkling of ground or crushed red chile pepper, and a spritz of fresh lemon juice added at the very end. And that’s all it takes. The beauty of this: A cook can steam enough for a week of meals and keep the drained greens in the fridge until dinnertime. Then it’s just a quick sauté and they’re ready for the table. In old-fashioned trattorie in Italy you can order a mista di verdura cotta, a mix of cooked greens, as a starter: It will consist of three or four different greens, cooked separately and arranged on a plate, with more fresh olive oil and lemon juice to dress each one.
Greens prepared like this also make a great sauce for pasta—especially short chunky pasta shapes like orecchiette, the ear-shaped pasta from Puglia that is traditionally cooked and served with broccoli rabe or another of the spicy winter greens Mediterranean cooks love.
Stir-fried vegetables are not something you’ll find very often in Mediterranean kitchens, but there’s every reason in the world to include them in an olive oil–based cuisine, especially as the technique is also a quick, easy way to get a tasty meal on the table. It doesn’t have to be Chinese to be stir-fried, although a Chinese wok is the perfect vessel for this ancient technique. The most important trick? The vegetables must all be cut roughly the same size beforehand. Then keep the vegetables refrigerated until ready to use. This ensures that they’ll all cook at the same rate and be done at the same time. Keep in mind, though, that dense root vegetables like carrots and turnips, no matter how they’re cut, are going to take longer than tender onions and peppers, which really have only to yield up their liquid in order to be done. With stir-frying, you won’t need much oil—just a couple of tablespoons to start off with (you can add more if necessary as the vegetables cook).
One secret to success in stir-frying is to keep your batches small. Don’t try to do too much at once. If you’re cooking a large amount, do the vegetables in batches and combine them all at the end. Another secret is to keep it simple. Don’t add every leftover that’s in your refrigerator—think about the combination and what goes well with what. (Maybe that leftover mashed squash isn’t such a great idea, after all?) Onion, garlic, ginger, peppers (sweet and hot), and one or two other vegetables (broccoli? carrots? fresh or dried mushrooms? leeks? eggplant?) should be plenty. A couple spoonfuls of broth or just plain boiling water will help the cooking along; a handful of freshly chopped green herbs thrown in at the very end of cooking, just as you turn off the heat, is a great idea, and another tablespoon or so of good olive oil on top makes a fine garnish.
Stir-fried vegetables make a great topping for pasta or rice; or serve them along with a plate of beans, again topped with olive oil, for a robust vegetarian supper. Or add slivers of chicken breast or fresh wild-caught shrimp as you start to cook. Remove them when they’re done and set aside while you do the vegetables, then add them back at the end.
A final technique I want to mention is a little old-fashioned, but I’d like to see it revived, as it’s a nice way to keep vegetables on hand for several days or even weeks. This is the old French method called à la grecque, although I’m not sure the Greeks ever had much to do with it. The classic recipe calls for a broth made up of equal quantities of olive oil, dry white wine, and water (say, a half a cup of each to start with), with about half that amount (a quarter of a cup) white wine vinegar, combined with a few cloves of garlic and some dried aromatics (coriander seeds are always part of the recipe, plus bay leaves, black peppercorns, maybe a small red chile pepper, fennel or dill seeds, even star anise or Szechwan peppercorns). Bring this to a simmer and then add your vegetables—carrots cut into batons, baby onions or larger ones quartered, scallions, small mushrooms whole or quartered, cauliflower broken into florets, quartered artichoke hearts, small fennel bulbs cut in half, even peeled whole cloves of garlic. Simmer the vegetables in the broth—do it in batches, one vegetable at a time—until they are just barely tender, still with a little crispness, then transfer them to a bowl and boil down the broth to a syrup. Cover the vegetables with the syrup and chill, then bring them to room temperature to serve as an hors d’oeuvre, or warm them up a bit more to serve as a side dish. You could also combine a number of vegetables à la grecque to make a composed salad. In essence, what you’ve made is a very light pickle. Because of the acid, the vegetables will keep for a week or even ten days in the refrigerator with no problems.

Oven-Braised Artichokes with Potatoes and Onions
Artichokes in North America—at least in the part of North America where I live—are usually so hideously expensive that I can’t imagine buying them except for very special occasions. For the price of a single artichoke at Whole Foods, I can buy a dozen at any Italian street market, and they are almost always much fresher and tastier too. So I look for recipes that let these crown jewels of the vegetable kingdom be extended, and potatoes and onions are excellent for that purpose.
If you can’t find small artichokes, use just four of the giant ones from California.
Makes 6 to 8 servings
- 8 small yellow-fleshed potatoes (yellow Finns are fine)
- 8 small, very firm artichokes
- 1 lemon, for preparing the artichokes, plus ⅓ cup freshly squeezed lemon juice, plus lemon wedges, for serving
- 1 medium yellow onion, halved and thinly sliced
- 2 garlic cloves, thinly sliced
- Sea salt and freshly ground black pepper
- 2 tablespoons finely minced fresh herbs (chives, thyme, flat-leaf parsley)
- 2 bay leaves
- ⅓ cup plus 2 tablespoons olive oil
Peel the potatoes and slice into approximately ¼ inch slices. Toss the potatoes into a bowl of water as you finish to keep them from darkening.
Prepare the artichokes as described in the sidebar, rubbing the cut surfaces with half a lemon and using the other half to acidulate a bowl of water. Cut the artichokes into quarters (or smaller if they are very large) and remove their center chokes if necessary. Toss in the bowl of acidulated water as you finish each one.
Preheat the oven to 375°F.
Drain the potatoes and artichokes and combine in a bowl with the onion slices and the garlic. Add salt and pepper, the minced herbs of your choosing, the bay leaves, broken in half, and ⅓ cup of the oil. Toss to mix everything well and coat the vegetables with olive oil. Spread the mixture in a gratin dish (one that is safe to use on the stovetop) in which they will just fit without a great deal of overlap.
Set the gratin dish over medium heat and, when the oil starts to sizzle, add the lemon juice and boiling water to come about halfway up the sides of the dish. Trickle the remaining 2 tablespoons oil over the top. Cover the dish securely with aluminum foil and carefully transfer to the oven. Roast for about 30 minutes, then remove the foil and spoon some of the juices over the vegetables. Raise the heat to 400°F and return the gratin dish to the oven, uncovered. Cook until most of the liquid has boiled away and the vegetables are sizzling in the oil, about 15 minutes longer.
Serve immediately, with lemon wedges to squeeze on top.
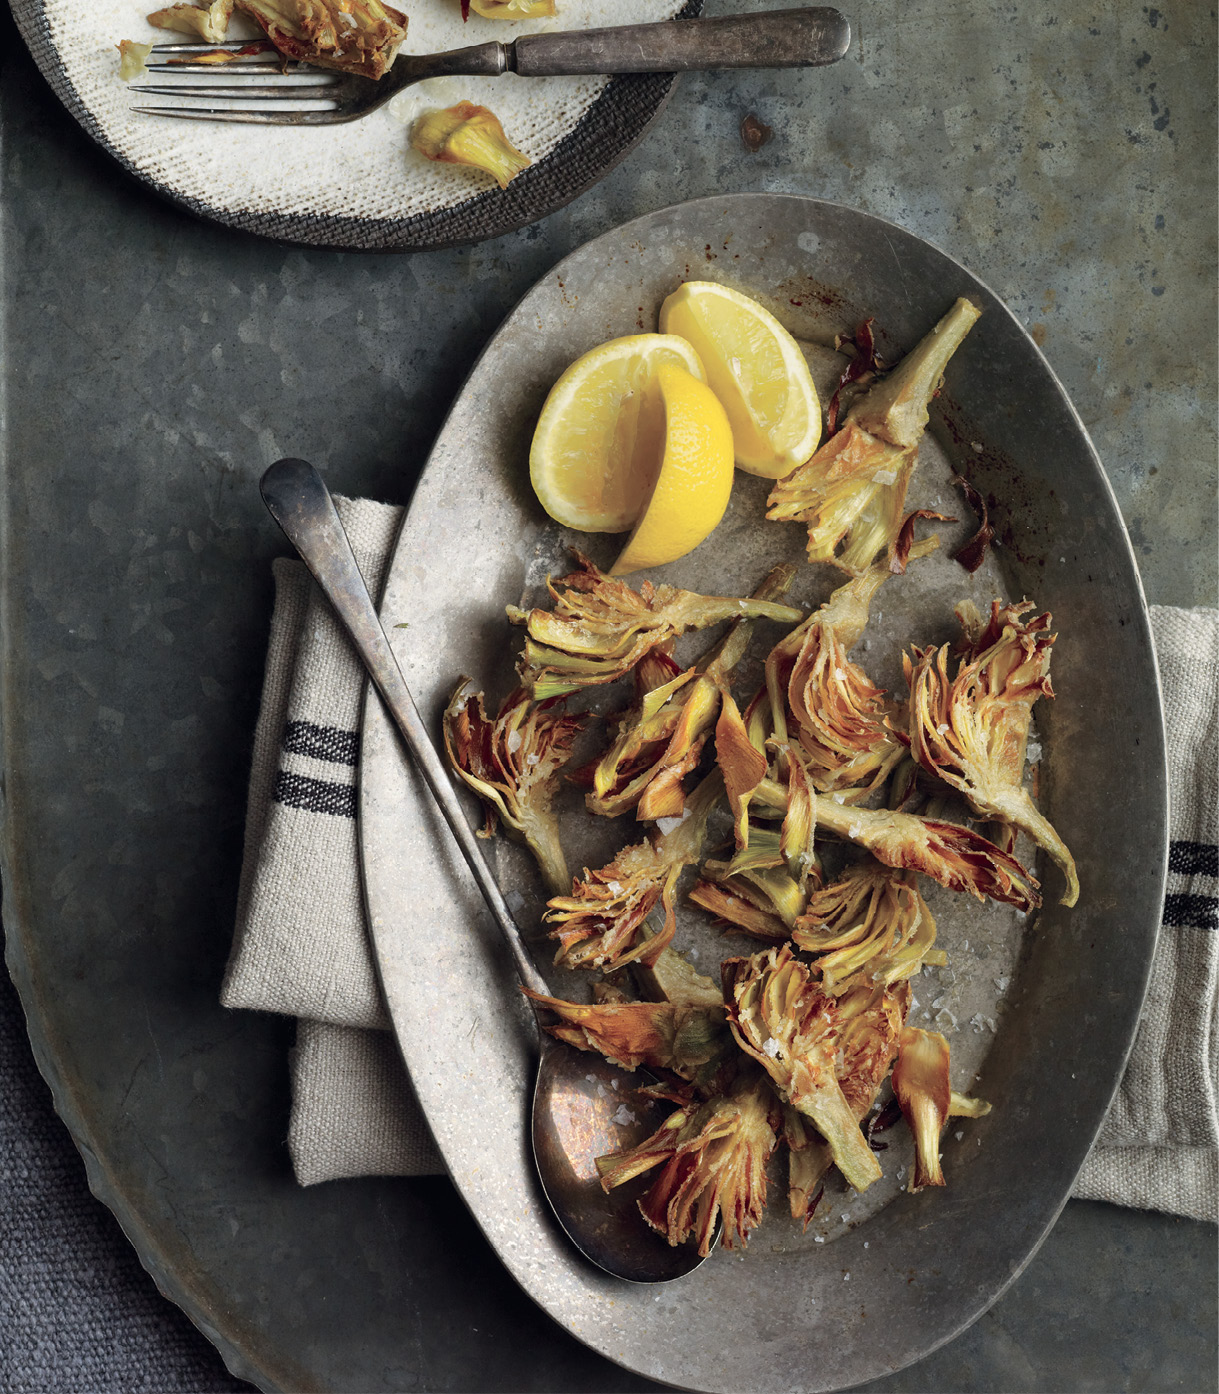
Fried Artichokes
I include this recipe for anyone who has access to really good artichokes that don’t require a second mortgage on your house to purchase. For so long California has been the only home for artichokes on this continent, but more and more farmers are beginning to realize that it doesn’t require a Monterey Bay climate to succeed with these prickly thistles. I can even sometimes find them in farmer’s markets in Maine in the early summer. When I do, I like to fry them in olive oil to serve with simple fried rabbit—an old Tuscan tradition that is very pleasing.
If you find small artichokes, they will not have an internal choke that has to be removed. If you must use larger artichokes, prepare them according to the instructions in the sidebar and slice them into quarters, then again into eighths.
Makes 4 servings as an accompaniment to fried rabbit or chicken
- 1 cup olive oil
- 1 cup unbleached all-purpose flour
- Sea salt and freshly ground black pepper
- 12 small tender artichokes, prepared as described in the sidebar
- Lemon wedges, for serving
Have ready a wire rack covered with paper towels for draining the artichokes.
Put the oil in a deep skillet or wok over medium heat to warm up to 360°F. (Please use a frying or candy thermometer, if you have one; it’s important to be accurate with deep-fat frying.)
Toss the flour in a bowl with plenty of salt and pepper.
Drain the artichokes and cut them into smaller sections if necessary. Add them to the bowl of flour and toss to coat each section of artichoke well.
As soon as the oil has reached 360°F (a small cube of bread will brown in just under a minute), add the artichoke pieces to the oil. Depending on the size of your pan, you may wish to do this in batches. Fry until the artichokes are golden, then remove with a slotted spoon and transfer to the rack to drain.
When the artichokes are done, serve them immediately, with the lemon wedges. If you’re serving them with fried rabbit or chicken, keep the artichokes warm in the oven while you prepare the meat, then serve both, piled up on a platter, with the lemon wedges to garnish.

Broccoli or Cauliflower with Lemon, Capers, and Black Olives
The finishing sauce of lemon, capers, and black olives can be used to delicious effect with any number of greens, including all of those mentioned under steaming-and-sautéing, above. Simply steam them as described and finish in the sauce of lemon, capers and black olives.
Makes 4 to 6 servings
- About 1 pound broccoli or cauliflower
- ½ cup pitted black olives, coarsely chopped
- 1 heaping tablespoon salt-packed capers, rinsed and drained
- 2 tablespoons finely chopped flat-leaf parsley
- Grated zest and juice of 1 lemon
- Sea salt
- Pinch of crushed red chile pepper
- 2 garlic cloves, crushed and chopped
- ⅓ cup olive oil, preferably a deep-flavored oil from Italy or Greece
Trim the broccoli, if using, and cut the spears into 1-inch lengths. If using cauliflower, break the head apart into florets.
On a chopping board, combine the olives, capers, parsley, and lemon zest and chop together to mix well.
Bring a pot of water large enough to hold the broccoli or cauliflower to a rolling boil. Add a big pinch of salt and, when it returns to a boil, add the broccoli or cauliflower. Cook until just barely tender, about 6 minutes (less if using very small cauliflower florets).
Meanwhile, in a skillet large enough to hold all the ingredients, warm the chile pepper and garlic in the oil over medium-low heat until hot, 3 or 4 minutes. The chile and garlic should be starting to melt in the oil, rather than sizzling and browning. Stir in the lemon juice and cook for another 2 minutes, then add the olive-caper mix, give it a stir, take it off the heat, and set aside.
Drain the broccoli or cauliflower well, shaking the colander. Combine the broccoli or cauliflower with the olive-caper dressing in the skillet and set the skillet back over medium heat. Warm it up to serving temperature, taste to make sure the seasoning is right, and then serve.
Notes: You could also add 4 or 5 anchovy fillets, chopped, to the skillet with the crushed chile pepper and garlic. As the oil warms, crush the anchovies into the oil.
Pitted green olives could be used instead of black ones—just be sure they are olives with plenty of flavor.
Broccoli Rabe (Rapini), Cauliflower, or Broccoli with Tomatoes and Black Olives
In this dish from Puglia, the heel of Italy’s boot, broccoli rabe is braised in a small amount of liquid along with onions, tomatoes, little hot chile peppers, and black olives. It is also very successful with cauliflower or broccoli, the head broken into florets—in fact, a combination of cauliflower and broccoli works well and looks pretty. Traditionally this is served with a topping of grated cheese to make a great vegetarian main course, but if you plan to serve this as a contorno, or accompaniment, to fish or meat, the cheese topping seems to me excessive.
This is also an excellent “sauce” for pasta—short, curly shapes are best.
Makes 4 to 6 servings
- 1½ pounds broccoli rabe, cauliflower or broccoli
- 1 medium red onion, thinly sliced
- ⅓ cup olive oil, plus a little more if using cheese, preferably from southern Italy
- 1 dried red chile pepper, crumbled
- Sea salt
- 15 to 20 small cherry or grape tomatoes, halved
- 15 to 20 pitted black olives, coarsely chopped
- ¼ cup boiling water, or more as needed
- ⅓ cup freshly grated pecorino or parmigiano reggiano cheese (optional)
Trim the broccoli rabe and discard any yellow or wilted leaves. Cut into 2-inch lengths. If using broccoli or cauliflower, cut into florets.
Combine the onion with the oil in a pan that can be put under the broiler. Set over medium-low heat. As the onion starts to sizzle, add the chile and salt to taste. Now stir in the vegetable pieces and add the halved tomatoes and black olives. Add about ¼ cup boiling water, then cover the pan, reduce the heat, and cook for about 10 minutes. Check the vegetables for doneness, piercing the thick parts with the point of a knife. If they need to cook a little longer, you may wish to add a little more boiling water to keep the vegetables from scorching.
If you wish to serve this as a pasta sauce, simply cook any kind of short, curly pasta until it is almost but not quite done, then drain and toss into the pan with the vegetables, letting the pasta finish cooking with the vegetables. (A ladleful of pasta water taken from the pot before draining and added to the vegetables with the pasta will help make a creamy sauce.)
If you decide instead to use the cheese topping, turn the broiler on to high. When the vegetables are done, sprinkle the cheese over the top, dribble on a little more olive oil, and run under the broiler just long enough to melt the cheese. Serve immediately.
Roasted Cauliflower with Tahini Sauce
This is a recipe developed by my daughter Sara and often served during cauliflower season at her restaurant, Porsena, in New York’s East Village. It comes from her cookbook, Olives and Oranges.
Makes 4 to 6 servings
- 1 large head cauliflower, cored and broken into florets
- 6 tablespoons olive oil
- Sea salt and freshly ground black pepper
- ¼ cup plus 1 tablespoon tahini paste
- Juice of 1 lemon (about 3 tablespoons)
- 1 garlic clove, minced to a paste
- ¼ cup finely chopped flat-leaf parsley
Preheat the oven to 400°F.
In a large bowl, toss together the cauliflower with the oil, generously sprinkling it with salt and pepper. Spread the oily cauliflower out on a rimmed baking sheet and transfer to the hot oven. Roast, stirring and turning a couple of times, until the cauliflower is browned and tender, about 35 minutes.
Meanwhile, in a blender puree the tahini paste, 6 tablespoons water, lemon juice, and garlic, adding a pinch of salt. Transfer to a serving bowl large enough to hold all the cauliflower.
As soon as the cauliflower is done roasting, remove it from the oven and toss it in the bowl with the tahini sauce, adding the parsley. Serve immediately, while hot, or set aside to cool to room temperature.

Carrots and Chickpeas in a Chermoula Sauce
Chermoula is a great example of the many simple, highly flavored Mediterranean sauces that can be used in a variety of ways. Chermoula, which comes from Morocco, is often used as a splendid way to dress fish. But here I use it with plain carrots—not overcooked, just braised to the tender point. Try it with other vegetables too, especially root vegetables (turnips take on a new flavor dimension); or marinate fish fillets in chermoula before roasting in the oven for an impressively flavorful dish.
If you use red wine to braise the carrots, they will take on a nice, deep ruby color—a pretty contrast to the pale chickpeas.
You will have more punch from the spices if you toast the cumin and coriander seeds in a dry skillet over medium heat until the fragrance rises and the seeds begin to smoke, then grind them to a fine powder in a spice grinder.
Makes 6 or more servings
- For the carrots:
- 2 to 3 pounds carrots, peeled and cut into irregular 2-inch chunks
- ¼ cup olive oil
- Water or red wine, to cover the carrots
- For the chermoula:
- 3 garlic cloves, crushed with the flat blade of a knife
- 1 bunch cilantro, finely minced
- About ⅓ cup finely minced flat-leaf parsley
- 1 teaspoon harissa, or to taste
- 1 teaspoon sea salt
- 1 teaspoon mild paprika, preferably Spanish pimentón dulce
- 1 teaspoon ground toasted cumin seeds (see headnote)
- ½ teaspoon ground toasted coriander seeds (see headnote)
- Pinch of saffron
- ½ cup olive oil
- 2 tablespoons freshly squeezed lemon juice or red wine vinegar, or more to taste
- Ground hot red chile pepper (optional)
- 1 cup cooked chickpeas
- 1 cup cooked chopped spicy or bitter greens (optional)
To make the carrots: If the carrots are very thick, halve or quarter each chunk lengthwise. Put the carrots in a saucepan with the oil and cook over medium-high heat, stirring, until the carrots start to brown along the edges. Add water or red wine just to cover them and cook, partially covered, until they are barely tender, 10 to 15 minutes.
To make the chermoula: Chop the garlic, cilantro, and parsley together to make a very fine mince. Transfer to a bowl and stir in the harissa, salt, paprika, cumin, and coriander. Crumble the saffron into the mixture, then beat in the oil and lemon juice. Taste and adjust the seasoning. If it’s not spicy enough (but you don’t want to overpower the sweetness of the carrots), add a little chile pepper or more harissa.
As soon as the carrots are done, drain them and, while they are still hot, pour the chermoula sauce over. Stir gently to cover the carrot pieces with the sauce. Set aside to marinate for at least 30 minutes before serving.
Add cooked chickpeas and/or optional cooked spicy greens, if you wish. Serve at room temperature or a little warmer but neither piping-hot nor chilled from the refrigerator.
Leeks Vinaigrette
Leeks are very good prepared à la grecque (see introduction), and they are almost required in a good stir-fry. Leeks vinaigrette (poireaux à la vinaigrette) are a French classic, as good as a first course as they are for a side dish with, for example, a robust roast of pork.
Makes 6 servings
- 6 fat leeks, or 12 slender ones
- Sea salt
- 2 teaspoons French-style mustard
- ¼ cup aged red wine vinegar
- Freshly ground black pepper
- ½ cup olive oil
- Finely chopped flat-leaf parsley or fresh tarragon, for garnish
Trim the root end and the tough green upper parts of the leeks, then slit them lengthwise from top to bottom but leave about an inch at the root end. Rinse very carefully under running water, opening the leaves up to let the water run through. Because leeks are blanched before harvesting, they often have a little mud in between the leaves. Remove all the mud and sand.
Bring liberally salted water to a boil in a skillet large enough to hold the full length of the leeks. When the water boils, add the leeks and cook until tender, 5 to 6 minutes. Remove from the heat and immediately add cold water to the pan to stop the leeks from cooking, then drain the leeks carefully but thoroughly.
In a bowl, whisk together the mustard and vinegar, adding a pinch of salt and some ground pepper. Gradually whisk in the olive oil to make a smooth, creamy sauce for the leeks.
Arrange the leeks on a serving platter and spoon the vinaigrette over them. Garnish with chopped herbs. These are best served at room temperature. Chilling is not advised.
Batter-Fried Eggplant Slices
Andalusian cooks serve their traditional salmorejo (see recipe) from Cordoba with plain, unbattered eggplant sticks—a little like fat french fries—fried in the region’s best extra-virgin olive oil (see Eggplant Fries). But in other regions, eggplant sticks (or slices or cubes) are dipped in a light batter before frying. Vary the seasonings in the batter, if you wish—use basil or mint, finely chopped, instead of the parsley; add a pinch of ground red chile pepper (my favorite is piment d’Espelette); or increase the quantity of grated cheese to make a decidedly cheesy coating. You could also use a very mild-flavored beer in place of the carbonated water. Lemon wedges served with the eggplant are a nice touch.
makes 4 to 6 servings
- 1 medium eggplant (about 1 pound)
- 1 large egg
- ½ cup carbonated water (or beer)
- 4 to 6 tablespoons unbleached all-purpose flour
- 2 to 3 tablespoons finely grated pecorino or parmigiano reggiano cheese
- 1 teaspoon sea salt
- 1 garlic clove, crushed with the flat blade of a knife
- ⅓ cup chopped flat-leaf parsley or other fresh green herb
- Freshly ground black pepper
- 1 to 2 cups olive oil
Slice the eggplant horizontally or on the diagonal into ¼-inch-thick slices.
Beat the egg in a bowl with the carbonated water until fully combined, then beat in 4 tablespoons of the flour, 1 tablespoon at a time. The batter should be as thick as heavy cream. If it is too thin, beat in another tablespoon or two until the batter is just thick enough to cling to the eggplant slices. Add the grated cheese and salt.
Chop the garlic and parsley together to make a fine mince and stir it into the batter, then add the pepper. Set the batter aside to rest for at least 30 minutes.
Have ready a wire rack covered with paper towels. When you’re ready to fry the eggplant slices, set the oil to heat in a deep-sided frying pan. The amount of oil depends on the size of the pan but should be at least 1 inch deep. Heat the oil until a deep-fry thermometer reads 350°F. (At that temperature, a small cube of bread should sizzle and turn golden in about a minute.)
When the oil is hot, dip an eggplant slice in the batter, coating it on both sides. Hold it up to let the excess drip off and then slide it quickly into the hot oil. Don’t do more than 4 or 5 slices at a time in order to maintain the temperature of the oil. Watch the temperature carefully and control it by raising or lowering the heat under the pan. Brown the eggplant slices on both sides, then transfer to the rack to drain.
When all the eggplant slices are done, sprinkle with a little more salt, if you wish, and serve immediately, while the batter is still crisp and crunchy.

Elizabeth Minchilli’s “Vaguely Middle Eastern” Eggplant Salad
Elizabeth Minchilli is an enthusiastic gastronaut who divides her time between Rome and an olive farmlet in Umbria. She is apt to whip together something quite spectacular for lunch without really thinking about it. This eggplant “salad” is a good example. It works brilliantly as a first course on a hot summer day.
Makes 4 to 6 servings
- Small pinch of crushed red chile pepper
- 1 or 2 garlic cloves, crushed with the flat blade of a knife
- ½ cup plain whole-milk yogurt or Greek yogurt
- About ⅔ cup olive oil
- 2 large eggplants, cut into ½-inch-thick logs or batons
- Sea salt and freshly ground black pepper
- ½ medium red onion, very thinly sliced
- ½ cup coarsely chopped pitted black olives
- ¼ cup coarsely chopped mint leaves
- 1 teaspoon crushed coriander seeds
- ¼ cup coarsely chopped roasted almonds
Several hours in advance, mix together the crushed chile and garlic with the yogurt. Stir in 2 tablespoons of the oil and set aside, refrigerated or in a cool place, to thicken slightly.
Preheat the oven to 400°F.
Put the eggplant logs in a bowl and add the remaining ½ cup oil or enough to coat the logs thoroughly, turning and mixing with your hands. Spread the logs out on a baking sheet. Sprinkle with salt and pepper and transfer to the hot oven. Roast until the eggplant is tender and browned, 40 to 45 minutes, then remove from the oven and let cool.
Arrange the cooled (but not chilled) eggplant on a platter. Top with the sliced onion, the olives, and the mint, then spoon the yogurt mixture over the top and scatter the crushed coriander seeds and chopped almonds over the yogurt.
Fava Beans or Green Peas Braised with Prosciutto
I confess that I add this old-fashioned Roman recipe for fava beans or peas to almost every cookbook I write just because it is so easy and so good. But you must have very tender, young, just-picked beans or peas because the success of the recipe depends on these sweethearts, and if they come from your own garden, it’s all the better. You can do this with just favas, just peas, or a mixture of both. Do keep in mind that in Rome there is no question of peeling the individual fava beans—they are so small and tender that there’s no need to do that. Make sure the beans you select are the same.
In Rome they often use slices from a piece of lean guanciale (cured pork cheek), but prosciutto is easier for most North Americans to come by. If prosciutto is not available, use a good quality of slab bacon; if you wish, blanch the bacon in boiling water beforehand to rid it of any overly smoky flavor, which will detract from the sweetness of the vegetables.
Makes 6 servings
- 1 medium white onion, halved and thinly sliced
- ½ garlic clove, crushed with a knife and chopped
- 2 or 3 slices prosciutto, diced
- ⅓ cup olive oil
- 3 to 4 pounds tender young fava (broad) beans or peas, shelled
- 1 cup light chicken broth or water, or more as needed
- Sea salt and freshly ground black pepper
- 1 tablespoon minced flat-leaf parsley
Combine the onion, garlic, and prosciutto in a saucepan with the olive oil. Cook over medium-low heat, stirring occasionally, until the onion is soft but not beginning to brown and the prosciutto is releasing some of its fat. This will take 10 to 15 minutes.
Stir in the shelled beans and add the broth and a very little salt—the prosciutto may add plenty of salt to the dish. Add a couple of turns of ground pepper and raise the heat to a fast boil. Cook the vegetables quickly, uncovered, to retain their bright color and flavor. By the time the beans are tender, there should be just a few tablespoons of syrupy sauce in the bottom of the pan. If necessary, add a little more boiling broth or water while cooking.
When done, serve immediately, sprinkled with the parsley and with chunks of crusty country-style bread to sop up the juices.
Green Beans with Tomato and Olive Oil
Called loubiya bi zeit, this is a standard offering in Lebanese kitchens. Something similar happens all over the Mediterranean, only the basic seasoning changes. At the western end of the Med, the red pepper and cumin would be dropped in favor of fresh herbs, chopped basil, parsley, or even a little very finely chopped rosemary.
Makes 4 to 6 servings
- ¼ cup olive oil
- 2 teaspoons cumin seeds
- 2 garlic cloves, finely chopped
- ½ medium yellow onion, thinly sliced
- Sea salt and freshly ground black pepper
- 1 tablespoon tomato paste or concentrate
- 1 tablespoon Aleppo pepper or similar Middle Eastern crushed red chile pepper
- 1½ pounds green beans
- 1 (28-ounce) can whole peeled tomatoes, drained and crushed or chopped
Heat the oil in a saucepan over medium-high heat; add the cumin seeds and cook, stirring often, until fragrant, about 1 minute.
Add the garlic and onion, season with salt and pepper, and cook, stirring often, until soft and lightly browned, about 12 minutes.
Add the tomato paste and Aleppo pepper, and cook, stirring occasionally, until the tomato paste is lightly caramelized, about 2 minutes. Add the green beans, tomatoes, and 1 cup water and bring to a boil. Reduce the heat to medium-low and cook, partially covered, stirring occasionally, until very tender. Let sit off the heat for at least 15 minutes before serving to allow the flavors to meld.
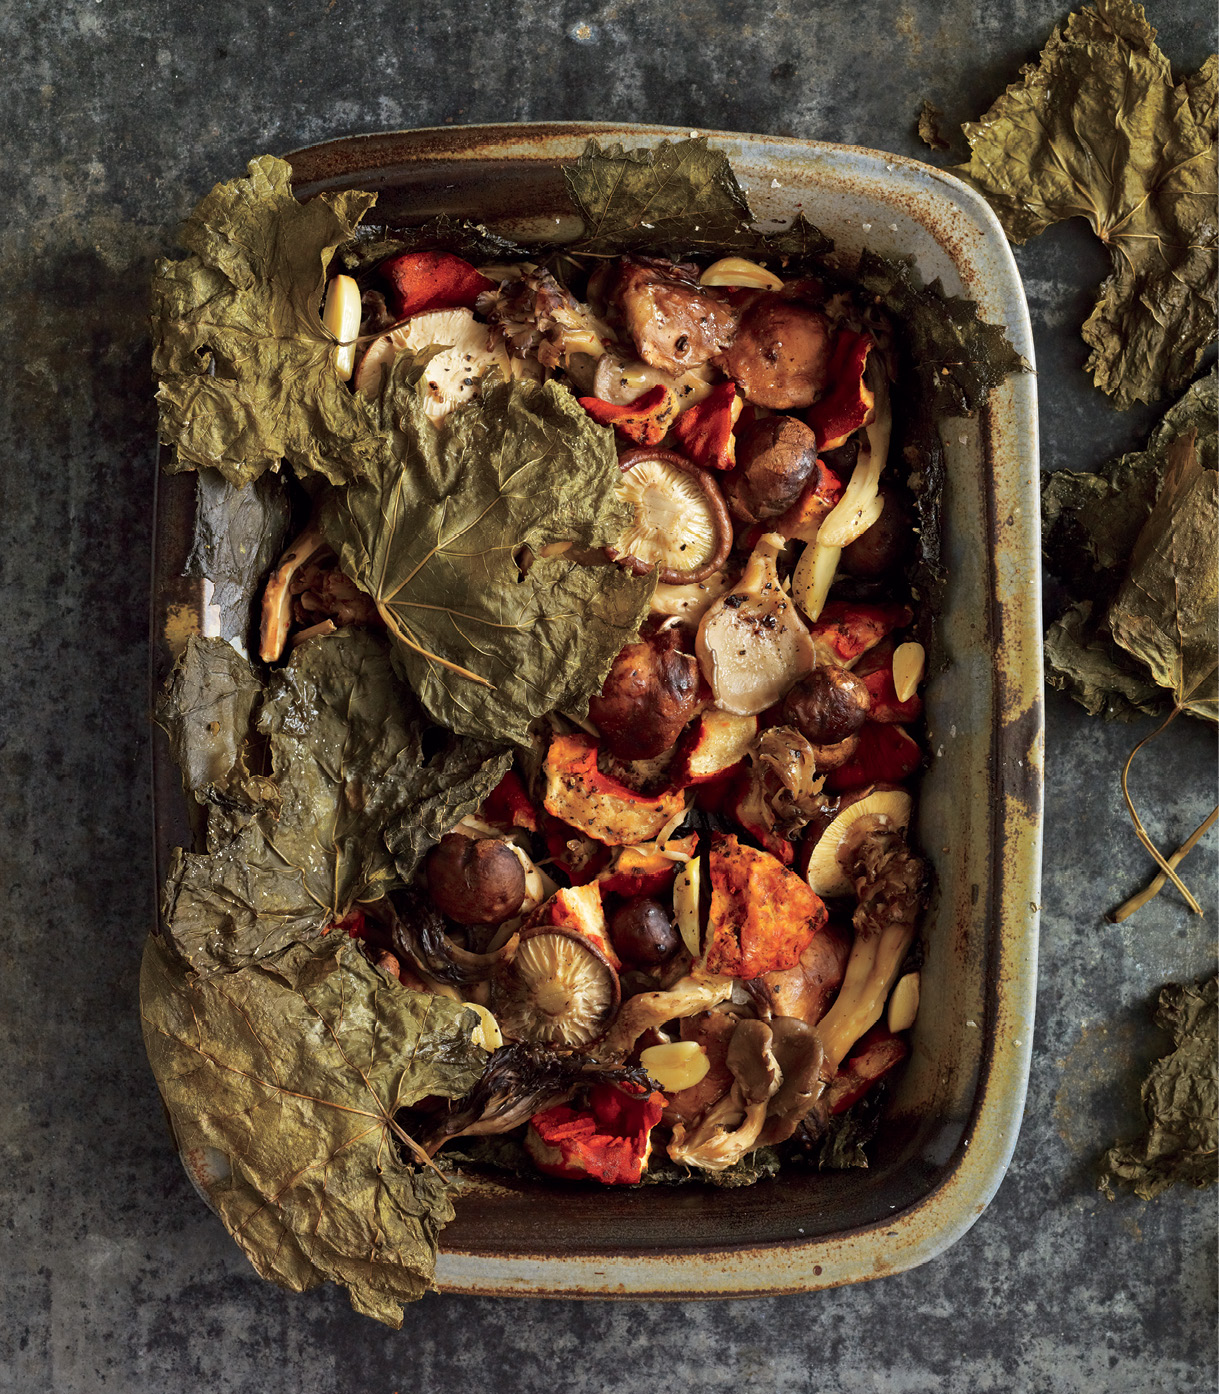
Braised Wild Mushrooms
In Summer Cooking, the great British food writer Elizabeth David introduced her recipe for mushrooms baked in grape leaves with the following observation:
“Many people who have a vine growing in their gardens will be glad to know of this excellent dish.”
Indeed, it is an excellent dish, the grape leaves adding a slightly green and pleasantly acidic flavor to the mushrooms. Mrs. David suggests, unusually for her, that it can be made with canned grape leaves and ordinary store-bought cultivated mushrooms[1]. But the dish reaches an epiphany if the mushrooms are wild ones, gathered in some warm and sunny woodlot, and the leaves come from a vine growing over your garden shed. And if you don’t have a grapevine in your backyard, or perhaps you don’t even have a backyard, look for a neighbor with a vine and then just go over some dark night and remove a dozen or so leaves—no one will even notice they’re gone.
Makes 4 to 6 servings
- 12 fresh grape leaves
- Sea salt
- ⅓ to ½ cup olive oil
- About 4 pounds fresh mushrooms, preferably wild porcini or cèpes, cleaned and trimmed, caps left whole but stems thickly sliced
- Freshly ground black pepper
- 4 garlic cloves, peeled and split in half
Preheat the oven to 325°F.
Blanch the grape leaves in boiling salted water, immersing them for about 2 minutes, then draining thoroughly.
Spread a thin film of the oil over the bottom of a shallow baking dish, one with a tight-fitting cover. Arrange 8 of the grape leaves over the bottom and sides of the dish and pour another thin film of the oil over the top. Scatter the sliced stems of the mushrooms over the grape leaves, then arrange the flat caps, spore side down, on top. Scatter more salt over the mushrooms along with plenty of pepper. Distribute the garlic cloves in and around the mushroom caps. Cover the caps with the remaining 4 grape leaves, put the lid on the dish (or secure aluminum foil tightly around it), and transfer to the oven. Bake for 35 minutes to 1 hour—smaller mushrooms will take less time. Remove the lid when the mushrooms are tender and cooked through, raise the oven heat to 375°F, and return the dish to the oven for an additional 10 minutes. When ready to serve, remove the top layer of grape leaves.
Note: You could treat small sweet onions in a similar fashion, first peeling them but otherwise leaving them whole.
1 I’m sure, if Mrs. D. were alive today, she would have a different opinion.
Eastern Mediterranean Stuffed Peppers
Fresh red, yellow, or green sweet peppers, when hollowed out, make fine little receptacles for a savory filling. And the peppers themselves act as flavorful foils for whatever you put in them. This rice or bulgur filling is perfect for vegetarians.
Makes 6 to 8 servings
- For the filling:
- 1 medium yellow onion, minced
- 3 or 4 scallions, white and green parts, minced
- ⅓ cup olive oil
- ¼ cup pine nuts
- ½ cup long-grain rice or medium-cut bulgur
- 2 medium ripe tomatoes, peeled, seeded, and chopped; or 2 canned tomatoes, drained and chopped
- Sea salt and freshly ground black pepper
- ¼ teaspoon ground allspice, or to taste
- ¼ teaspoon ground cinnamon, or to taste
- ½ teaspoon crushed red chile pepper (optional)
- 2 tablespoons chopped fresh mint leaves
- 3 tablespoons black currants, soaked in hot water and drained
- For the peppers:
- 4 large firm sweet peppers, preferably red and yellow
- ¼ cup olive oil
- ⅓ cup unseasoned dry bread crumbs
To make the filling: Gently sauté the onion and scallions in the oil over medium heat until they are thoroughly softened but not brown. Add the pine nuts and continue cooking for a few minutes longer, until the pine nuts are golden. Add the rice and stir to coat thoroughly. Stir in the tomatoes, add salt and pepper, and then add ¼ cup very hot water. Mix well, cover the pan, and cook over low heat until all the liquid has been absorbed and the grain has started to soften, about 10 minutes. Remove from the heat, stir in the allspice, cinnamon, crushed chile pepper if using, the mint, and the drained currants. Set aside, covered, for 10 minutes, before using the mixture to stuff the peppers (see Note).
To make the peppers: Preheat the oven to 350°F.
Cut the peppers in half lengthwise and remove the seeds and internal white membranes.
Spread a thin film of the oil over the bottom of a roasting pan large enough to hold all the pepper halves side by side. Fill each half with the filling, allowing room for the grain to expand. When all the peppers are filled, sprinkle their tops with the bread crumbs and a thin thread of olive oil, adding the remainder of the oil to the pan. Bring water to a boil and add it to a depth of about ½ inch in the pan.
Slide the pan into the oven and bake for 1 hour. If the peppers aren’t brown on top, increase the heat to about 425°F and dribble a little more oil over the tops. Return to the oven for 10 minutes or so, until the tops are brown.
The peppers may be served hot from the oven, but they are almost better left to cool to room temperature before serving.
Note: It’s a good idea to sauté a tablespoon of the filling in a little oil in order to test the seasoning before filling the peppers.
Crispy Oven-Roasted Kale
This must be the healthiest snack imaginable—good-for-you kale with good-for-you olive oil, and a little salt to perk things up. What could be better?
Makes 6 to 8 servings
- 1 bunch green kale (about 1 pound), rinsed, thoroughly dried
- ¼ cup olive oil
- Sea salt
Preheat the oven to 350°F. While the oven is heating, strip the kale leaves from the stems or central ribs and discard the ribs. Stack the leaves and slice them about ¼ inch thick, then add the sliced kale to a bowl. Toss with the oil until the leaves are thoroughly coated.
Spread the oil-coated leaves on a baking sheet, making a fairly even layer. Transfer to the oven and bake for about 10 minutes, removing the sheet and tossing the kale a couple of times. The kale should be crispy but not burned—watch it carefully and remove from the oven as soon as it reaches that stage. Sprinkle with sea salt and serve immediately.
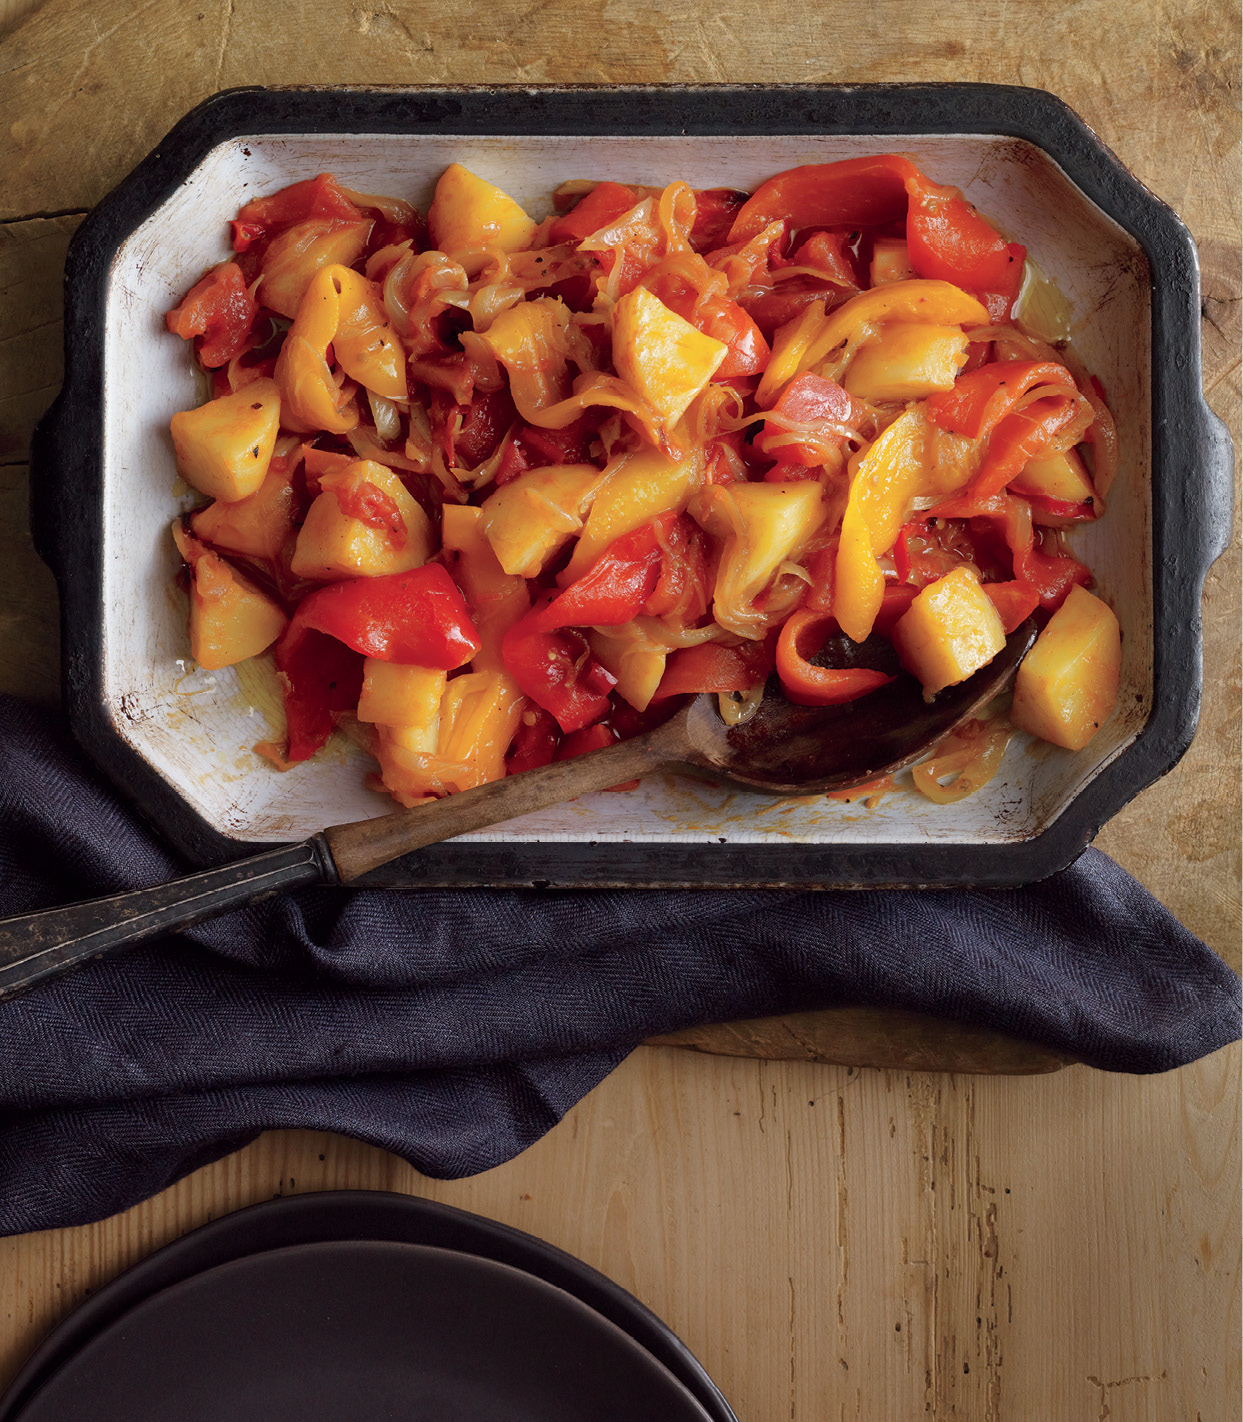
Peperonata
Peperonata is found in one form or another all over rural Italy. This one has hot red chile peppers, indicating it’s from Lucania, aka Basilicata—a part of Italy that’s famous for the presence of hot peppers in its cuisine.
Makes 4 servings as a main course, 6 to 8 as a contorno
- 2 medium yellow onions, halved and thinly sliced
- ⅓ cup olive oil
- 2 medium potatoes, peeled and sliced or cut into chunks
- Sea salt and freshly ground black pepper
- 6 sweet peppers, preferably red and yellow
- 1 pound ripe red tomatoes, diced, to make 1 cup (or use canned, drained plum tomatoes, chopped to make 1 cup)
- 1 fresh or dried red chile pepper, or more to taste
Combine the onions and oil in a skillet large enough to hold all the ingredients and set over medium-low heat. Cook, stirring occasionally, until the onions begin to soften, then stir in the potatoes along with salt and pepper and continue cooking and stirring for about 10 minutes, until the potatoes are tender enough to pierce with the point of a knife.
While the onions and potatoes are cooking, peel the sweet peppers, using a vegetable peeler to remove the thin skin on the outside. Cut the peppers into long, 1-inch-wide strips, discarding the seeds and white membranes.
As soon as the potatoes are tender, add the pepper strips to the pan, stirring carefully to mix well without breaking up the potatoes. Let cook for about 15 minutes, or until the peppers are beginning to soften, then stir in the tomatoes. If you’re using a fresh chile, cut it in half, discard most of the seeds and white membrane (which is where a lot of the heat is located), cut it into very thin slices, and add to the pan; if using a dried chile, break it, shake out and discard most of the seeds, and crumble into the pan. Stir once more and let cook for another 15 minutes. At this point, the tomato sauce will have thickened and all the vegetables will be very soft. If there is still a lot of liquid in the pan, raise the heat and boil rapidly until the liquid is reduced to a syrupy sauce.
Remove from the heat and serve immediately. Peperonata is also often served at room temperature.
Variation: To make a heartier dish, to serve as a main course at supper for instance, break 5 or 6 eggs into a bowl and beat them lightly with a fork. When the vegetables are tender, pour the beaten eggs over them and cook briefly, stirring and lifting the vegetables to let the egg slide underneath. If you wish, run the skillet under a preheated broiler to brown the top of the frittata lightly before serving.
Potato Latkes for Hanukkah (or All Year Round)
Hanukkah, of course, is the feast par excellence for olive oil, and it’s no surprise that it comes in the middle of the olive harvest—or what would have been the olive harvest back in the time of the Jerusalem temple where the miracle supply of olive oil was found to keep the candelabra burning for eight days. Those ancient Israelites knew what they were doing—no other oil will suffice, and the very idea of low-fat latkes, promoted in diet magazines, is ridiculous. They’re supposed to be as fat as possible!
Makes 4 to 6 servings
- 2 large russet potatoes, peeled
- 1 tablespoon freshly squeezed lemon juice
- 1 large yellow onion
- 2 tablespoons unbleached all-purpose flour
- 2 large eggs, beaten with a fork
- Sea salt and freshly ground black pepper
- Olive oil, for frying
- ⅛ teaspoon baking powder
Arrange a clean, lightly dampened kitchen towel over a colander and set the colander in the sink. Using the large holes of a grater, grate the potatoes into the towel. When the potatoes are grated, squeeze the towel firmly, extracting as much of the starchy juice as you can. Transfer the grated potatoes to a bowl and add the lemon juice, stirring to mix well.
Using the same grater, grate the onion directly into the bowl with the potatoes. Sprinkle the mixture with the flour and toss to distribute the flour evenly. Mix in the eggs, along with salt and pepper. This may be done ahead, even a day ahead, but refrigerate the bowl (covered) and don’t add the baking powder until just before frying.
When you’re ready to fry the pancakes, add the oil to a heavy-duty skillet (black cast iron is perfect for this) to a depth of about 1 inch. Heat the oil over medium-high heat until it is just below the smoking stage—about 360°F. (Use a thermometer for accuracy.) Stir the baking powder into the potatoes, mixing well. Use a soup ladle or large soupspoon to drop the potatoes into the hot oil, about ¼ cup at a time. Flatten the cakes gently with the back of the spoon. Fry on one side until brown and crisp, then turn and fry on the other side. Remove from the pan and drain on paper towels.
Potato latkes are traditionally served with applesauce and a small dollop of sour cream.
Oven-Roasted Winter Squash with Pancetta and Rosemary
Winter squash varieties that work well in this recipe include butternut, acorn, kabocha, and big blue Hubbards, but don’t forget pumpkins, especially cheese pumpkin and rouge vif d’Étampes.
If you use bacon instead of pancetta, the dish will have a pleasantly smoky flavor. If you don’t want that flavor, however, blanch the bacon before dicing by setting a chunk of slab bacon in a pot of simmering water for 5 or 6 minutes. This will cut down a lot on the smoky flavor. If you like the smoky flavor and want to emphasize it, use Spanish pimentón de la Vera, a smoky paprika, for the chile pepper in the dish.
Makes 8 servings as a side dish
- 5 tablespoons olive oil, plus more for the dish
- ¾ cup chicken or vegetable broth
- ⅓ cup diced pancetta or bacon
- About 3 pounds winter squash, peeled and cut into 1-inch dice
- 1 medium red onion, very thinly sliced
- 1 tablespoon chopped fresh rosemary leaves
- Pinch of ground red chile pepper, mild or hot to taste
- Sea salt and freshly ground black pepper
- 1 cup fresh bread crumbs
- ½ cup finely grated parmigiano reggiano cheese
Preheat the oven to 375°F and use a little oil to grease a 9 by 13-inch baking dish. Bring the broth to a simmer in a saucepan.
Set a skillet over medium-high heat and combine the pancetta with 1 tablespoon of the oil. Cook, stirring, until the pancetta pieces have started to crisp and brown and give off some of their fat.
Combine the squash in a bowl with the sliced onion and rosemary. Add the ground chile pepper, salt and black pepper, and then 2 tablespoons of the oil. Toss with your hands to combine thoroughly and make sure all the squash dice are coated. Finally, stir in the browned pancetta with its oil and toss again. Transfer to the prepared baking dish, add the hot broth, cover the dish (with aluminum foil if necessary), and set it in the oven.
Bake the squash for about 40 minutes, or until it is tender and a knife pierces it easily. Remove the dish from the oven and raise the oven temperature to 425°F. Scatter the bread crumbs and grated cheese over the squash and dribble the remaining 2 tablespoons oil on top.
Return the dish to the oven and bake for an additional 10 or 15 minutes, until the crust is golden.
The dish can be served immediately, but it’s better if allowed to cool a bit to something hotter than room temperature but not steaming hot.

Gratin of Tomatoes and Zucchini
Late in the summer, when tomatoes are at their peak of ripeness, the best thing to do with them is slice them onto a plate, pour over a generous glug of olive oil, add a few strategic drops of very good aged wine vinegar and a sprinkle of crunchy sea salt, and take the plate outside for a feast under the nearest shade tree, preferably with a water view to enjoy. Second best is to layer them with equally thick slices of real honest-to-god buffalo milk mozzarella plus an abundance of dark green basil leaves and oil-vinegar-salt for an insalata caprese, one of the most ingenious flavor combinations in the Italian kitchen. Third best is to bake them, as in this recipe: sliced tomatoes, sliced zucchini, sliced red onion, a scattering of chopped garlic and basil, and a few blobs of ricotta on top. The olive oil will pull this all together into a feast for the eyes and the palate.
Use smaller tomatoes for this, so that the slices almost match the zucchini slices in size.
Makes 4 to 6 servings
- ½ cup olive oil, plus more for the dish
- 2 pounds small ripe tomatoes, sliced about ¼ inch thick
- 3 dark green zucchini, sliced about ¼ inch thick
- ½ medium red onion, sliced about ¼ inch thick
- Sea salt and freshly ground black pepper
- 3 garlic cloves, chopped
- ½ bunch of basil, leaves only, coarsely chopped
- ½ to ¾ cup ricotta cheese (see headnote)
- ¼ cup dry bread crumbs
- ¼ cup freshly grated parmigiano reggiano cheese
Preheat the oven to 375°F.
Spread a thin film of oil over the bottom of an oval gratin dish.
Arrange alternating slices of tomato, zucchini, and red onion in the dish, stacking them on a diagonal. If there is excess onion at the end, scatter the remainder over the top, along with a sprinkling of salt and pepper and the garlic bits. Arrange the basil on top.
Set aside 1 tablespoon of oil and dribble the remainder over the contents of the gratin dish. Add dabs of the ricotta all over, then sprinkle with the bread crumbs and grated cheese. Spoon the remaining 1 tablespoon oil over the top. Slide the gratin dish into the oven and bake for 45 minutes to 1 hour, until the top is brown and bubbly.
Serve as soon as you remove the dish from the oven, or set aside to eat later—it’s as good at room temperature as it is piping-hot.
Slow-Roasted Tomatoes with Capers and Olives
This is a long, slow recipe, but fortunately the cook is not required to do anything at all except occasionally peek in the oven to see how things are going. Just be prepared: It will take a good 3 hours before the tomatoes are ready.
You will need small tomatoes for this, not tiny grape tomatoes but the smallest size of plum tomatoes. These are delicious as a side with any kind of roast meats or fleshy fish—they’re terrific with swordfish. But they also can be used almost as is, with pasta, especially short, stubby pasta shapes. Just break the tomatoes up a bit and mix them more thoroughly with the capers and olives to make more of a sauce.
A Tuscan olive oil or a Coratina oil from Puglia will marry well with the intense flavor of these tomatoes.
Makes 4 to 6 servings
- 2 pounds small ripe plum tomatoes
- ½ cup olive oil
- Pinch of sugar
- Pinch of sea salt
- 2 or 3 garlic cloves, coarsely chopped
- ¼ cup salt-packed capers, thoroughly rinsed and drained
- ½ cup pitted black olives, preferably salt-cured olives
- 2 tablespoons freshly squeezed orange juice
- 1 teaspoon crushed red chile pepper
- Freshly ground black pepper
Preheat the oven to 250°F.
Cut the tomatoes in half lengthwise. Use a little of the oil to spread a thin film over the bottom of a roasting dish and set the tomatoes, cut side up, in the dish. Sprinkle each half with a little sugar and a little salt, then pour the rest of the olive oil over the tomatoes. Transfer to the oven and bake for about 1 hour.
Remove from the oven and sprinkle just a bit more salt and sugar, along with the chopped garlic, over the tomatoes, which should have settled in the pan and collapsed a bit as their juices evaporate. Give them a stir, just moving them around a bit with a wooden spoon, then return to the oven for another hour.
After the second hour, give them another stir. By now they may be thoroughly collapsed and you can stir in the capers, olives, orange juice, chile pepper, and black pepper. Continue roasting for another hour, then remove from the oven and transfer to a serving bowl with all the juices. Or chop the tomatoes further and use them as a sauce. They’re as great atop pasta as they are over steamed farro or a bulgur or rice pilaf.

Shakshouka Spicy Tomatoes and Peppers
There’s a famous restaurant in the old city of Jaffa called Dr. Shakshouka, an intriguingly old-fashioned kind of place where shakshouka, not surprisingly, is a featured attraction, most often served with eggs cooked right in the extremely tasty sauce. Israelis claim the dish for their own, but when I started investigating, I found it was almost ubiquitous all along the southern shore of the Mediterranean—even on the remote island of Pantelleria, part of Italy but almost in Tunisia, where there’s a local favorite called sciakisciuka, which turns out to be very similar. Pantescans like to say the Arabs brought it from North Africa, and why not? Except . . . the two key ingredients are peppers and tomatoes, which were utterly unknown to the Arabs and everyone else in the Mediterranean until sometime well after 1492. So much for culinary history!
This is my adaptation of a number of Libyan, Egyptian, and Israeli ways of creating a robust dish that is served in Israel with eggs poached right in the sauce. It is equally good with fish fillets or fish cakes cooked in it. I could easily imagine this as the centerpiece for a breakfast buffet.
Makes 4 to 6 servings
- 3 sweet red peppers, cored and coarsely chopped
- 4 to 6 garlic cloves, chopped
- ⅓ cup olive oil
- 1 large or 2 medium tomatoes, peeled and coarsely chopped, plus 2 tablespoons tomato paste or concentrate; or 1 (28-ounce) can tomatoes with their juices
- 1 tablespoon mild paprika
- 1 teaspoon ground cumin, or more to taste
- 1 or 2 teaspoons medium-hot ground or crushed chile pepper (Aleppo pepper is best)
- 1 teaspoon ground coriander
- 1 teaspoon ground caraway
- ½ teaspoon ground turmeric
- Pinch of sugar
- Sea salt and freshly ground black pepper
- ½ salt-preserved lemon, slivered, or a spritz of lemon juice
- 6 eggs; or 1½ pounds peeled fresh shrimp; or 1½ pounds salmon or other fish fillets
- ¼ cup chopped fresh cilantro (optional)
- 1 tablespoon za’atar (optional)
Gently sauté the chopped peppers and garlic in the oil over medium heat until the vegetables are very soft, about 15 minutes.
If you’re using fresh tomatoes, stir them in. They will give off quite a lot of liquid. Cook until most of the liquid has evaporated, then stir in the tomato concentrate, along with the paprika, cumin, ground chile, coriander, caraway, and turmeric. Add 1 cup water along with the sugar and salt and pepper, and cook down for another 15 minutes or so to bring all the flavors together and thicken the sauce slightly.
If you’re using canned tomatoes, add them to the peppers and garlic along with the paprika, cumin, ground chile, coriander, caraway, turmeric, sugar, salt, and pepper, but do not add additional water.
Taste and adjust the seasoning. If you add more chile or paprika, cook down again to get rid of the raw pepper flavor. When the sauce is ready, stir in the slivered salt-preserved lemon, if you have it (and if not, a good spritz of lemon juice will be fine).
If you want to cook eggs in the sauce (as they do in Jaffa), crack the eggs, one at a time, into a teacup, and slide the egg into the simmering sauce, first making a little indentation in the surface with a big serving spoon. Add each of the eggs—you should be able to get 6 in—and cook until the eggs are done to your taste. They are best, in my opinion, when the yolks are still a little runny, to contribute to the sauce.
Before serving, sprinkle a little minced cilantro and/or za’atar on the eggs, if desired.
Instead of eggs, you could add shrimp, being careful not to overcook them—they really only need about 1 minute in the simmering sauce. Or add fish fillets. Or arrange the fish fillets in an oiled baking dish and spoon the sauce over. Then transfer to a preheated 325°F oven and bake for 15 or 20 minutes, no more.
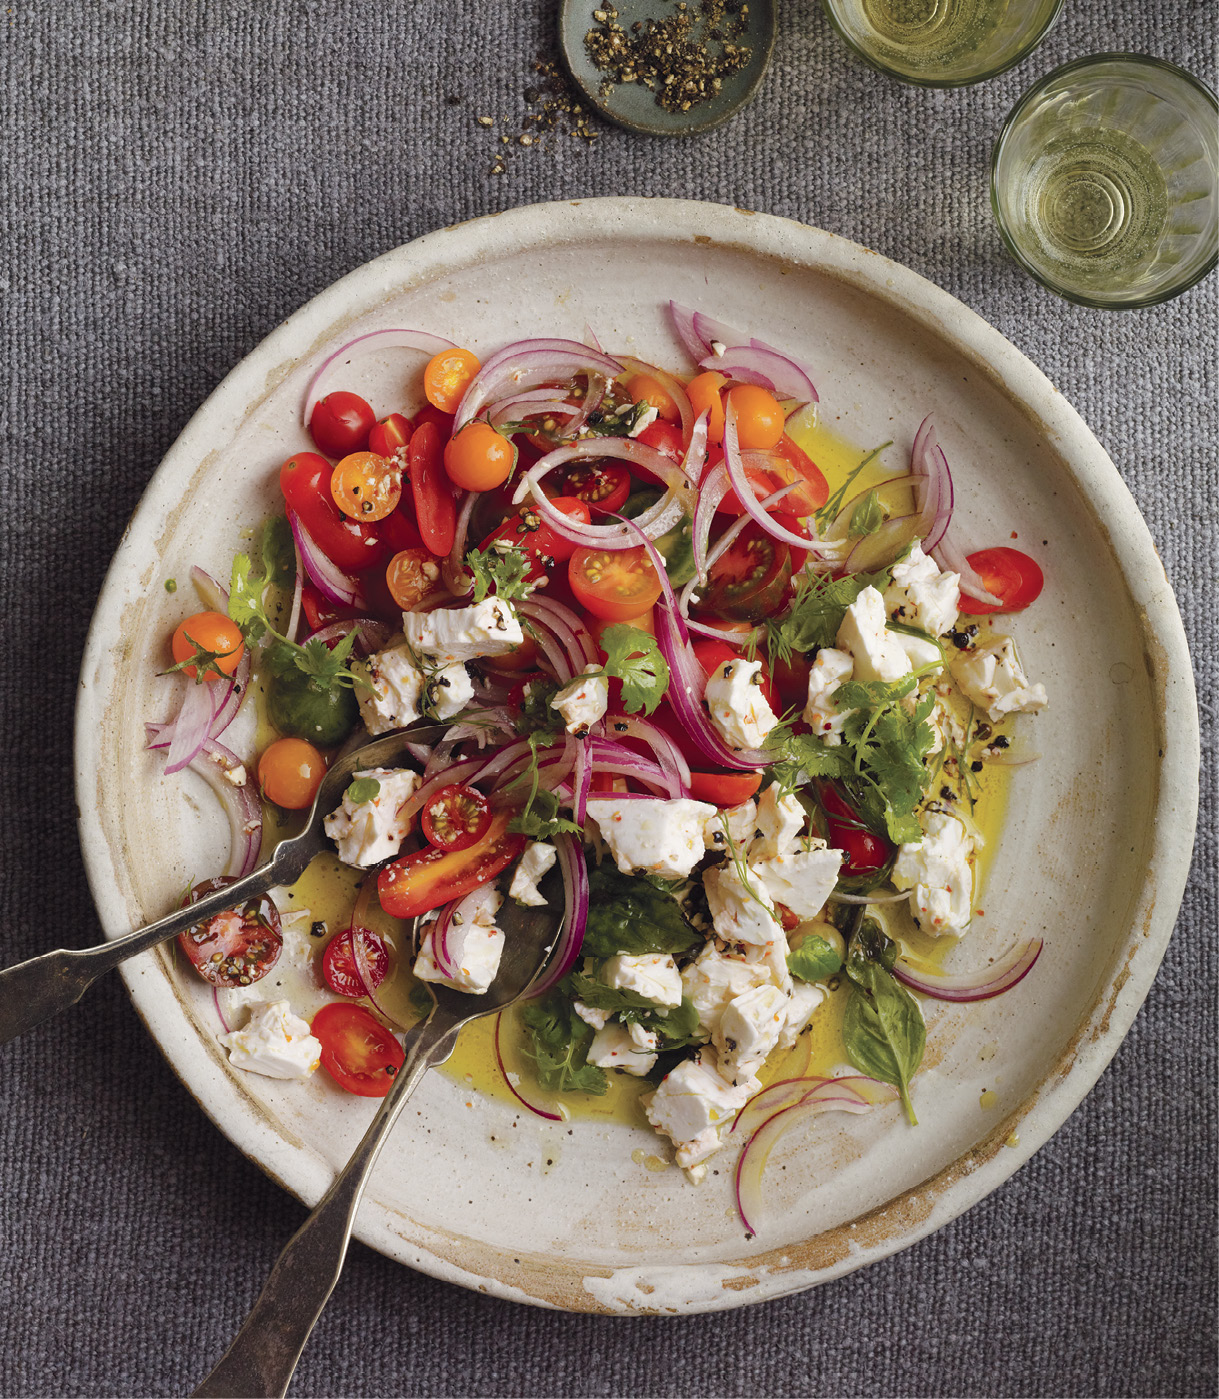
Marinated Feta and Tomato Salad
Feta is best for this treatment because its rough texture readily absorbs flavors from the marinade. It’s often quite salty, so don’t add any salt at all until you’ve tasted the final product. Other cheeses to consider are ricotta salata from southern Italy, a firm-textured chèvre from Provence, or Montenebro from Catalonia, in Spain. Crack the peppercorns in a mortar if you have one; otherwise, put them in a paper bag, set the bag on a bread board or wooden counter, and pound them gently with a rolling pin. The idea is to have roughly cracked but not crushed or ground peppercorns.
Makes 4 servings
- ¼ pound Greek barrel-aged feta cheese (½ to ⅔ cup when broken up, as in the recipe)
- ⅓ cup olive oil, preferably very fruity Greek oil from Kalamata olives
- 1 to 2 tablespoons red wine vinegar
- 1 small dried red chile pepper, seeded and crumbled
- Handful of coarsely chopped fresh basil, cilantro, or dill
- 1 tablespoon coarsely cracked black peppercorns
- Sea salt (optional)
- 1 pound small ripe tomatoes (cherry, grape, or currant)
- 1 small red onion, halved and very thinly sliced
Break the cheese into small, irregular clumps if you can; otherwise, dice it not more than 1 inch to a side. Add the cheese pieces to a mason jar large enough to hold the cheese with the marinade. Combine in a small bowl the oil, vinegar, crumbled chile, green herbs, and peppercorns. Pour this mixture over the cheese in the jar, cover, and set aside in a cool place (not the refrigerator) for several hours or overnight.
When ready to serve, taste the cheese mix and adjust the seasoning, adding salt if it seems necessary.
Halve the little tomatoes and toss them in a salad bowl with the onion slivers. Pour the cheese and its marinade over the top. Bring the bowl to the table and toss just before serving.
Potato and Caper Salad from the Island of Pantelleria
You will probably never find an olive oil from Pantelleria, the little island in the middle of the ocean between Sicily and Tunisia, unless you take a ferry from Trapani and go there to get it yourself. The closest to the soft, delicate oils from the Biancolilla olive produced on the island are the Valle Trapanesi DOP oils from the western coast of Sicily, the area between Trapani and Marsala.
Capers from Pantelleria are world-renowned for their quality, but any salted capers will do if you can’t find those from the island. Just be sure they are well rinsed before using. Vinegar- or brine-packed capers won’t work well in this salad.
Pickled samphire, aka saltwort or salicornia, is made from a wild green that grows along the edge of the sea, on both the Atlantic and Pacific coasts. In Britain, pickled samphire is a treasure, and it is occasionally available in gourmet shops in North America. If you find it, by all means snatch it up for use in this and other salads. And if you can’t find it, use pickled dilly beans instead. The flavor will be different but still quite acceptable.
Makes 2 to 4 servings
- 1 pound small, yellow-fleshed potatoes
- ⅓ cup salted capers, well rinsed and tossed dry
- 8 small ripe tomatoes (cherry tomatoes are fine), halved or quartered
- 8 to 10 salt-cured black olives, pitted and coarsely chopped
- 1 small red onion, halved and thinly sliced
- Pickled samphire if available; otherwise use pickled dilly beans, slivered
- ¼ to ⅓ cup olive oil
- Sea salt and freshly ground black pepper
- Pinch of dried oregano
Bring a pan of lightly salted water to a rolling boil. Add the potatoes and cook, uncovered, until just tender, 20 to 25 minutes. Drain and let cool until they are still very warm but you can handle them.
Peel the potatoes and slice them or cut them in chunks. Add to a bowl along with the capers, tomatoes, olives, onion slices, pickles, and oil. Toss gently to mix the ingredients, then taste and add salt and pepper. Spoon the potato salad onto a serving platter and sprinkle with the oregano. Serve immediately, while still a little warm or at least at room temperature. Do not refrigerate.
Note: Some Pantescan cooks use green olives rather than black, and some add a garnish of fresh basil or a very small amount of red wine vinegar. It’s traditional to serve this salad with a type of small dried fish made on the island. The fish is shredded and the bones discarded, then the fish shreds are dressed with a little olive oil and served as an accompaniment to the salad. To mimic this flavor, try adding chopped anchovies or shredded dried cod to the salad.
Sicilian Orange and Red Onion Salad (Insalata di Arance)
A famous salad from Sicily, this combination of sweet blood oranges, pungent onions, and salty olives and anchovies, surprising as it may seem to North American palates, actually works very well. A similar salad from southern Spain uses shredded dried cod instead of the anchovies.
Makes 2 servings
- 4 small oranges, preferably Sicilian Tarocco blood oranges
- 12 to 16 black olives, preferably salt-cured, pitted and halved
- 4 very thin slices red onion
- 6 anchovy fillets
- 3 tablespoons olive oil, preferably Sicilian
- Freshly ground black pepper
Peel the oranges thoroughly, cutting away the white pith as well as the outside membrane that covers the orange. Slice the oranges as thinly as you can manage on a plate to catch the juices.
Arrange the orange slices in a circle on a serving dish or on two salad plates. Distribute the olive halves over the oranges, then the red onion slices, and finally arrange the anchovy fillets on top.
Pour the orange juice over the salad, holding back any seeds. Spoon the oil over the salad and then sprinkle with pepper.
Cover lightly with plastic wrap and set aside at room temperature to let the flavors develop for at least 30 minutes before serving.
Note: Tarocco blood oranges are prized in Sicily for their deep orange flesh, liberally flecked with crimson, and their distinctive acid-sweet flavor balance. They are now grown in Florida and California but are not always widely available. If you cannot find these or other blood oranges (Moro and Sanguinello are two other varieties), use ordinary Florida juice oranges, but taste them before using. Tangy acidic oranges are to be preferred over sweet navel oranges, but if navels are all you can get, add lemon juice to taste to the orange juice on the plate.
Winter Salad of Brussels Sprout Leaves
Who would believe that Brussels sprouts, the vegetable that generations of North American children have grown to hate, would become newly chic? Yet, along with kale and a few other farmer’s market winter vegetables, Brussels sprouts are the new darlings of young chefs. Here the crisp leaves are teased apart and served as a fine salad.
Makes 4 servings
- 1 pound Brussels sprouts
- 1 bunch flat-leaf parsley, finely chopped
- 2 or 3 scallions, thinly sliced, white and green parts
- ¼ cup roasted sunflower seeds
- 3 tablespoons olive oil
- ½ teaspoon Dijon-style mustard
- 1 tablespoon red wine vinegar
- Sea salt and freshly ground black pepper
Trim the Brussels sprouts of their stubby stems, then pull away as many whole leaves as you can. Coarsely chop the hearts of the sprouts. Combine the sprouts with the parsley, scallions, and sunflower seeds in a salad bowl and toss with the oil.
In a small bowl, stir the mustard into the vinegar and add to the salad, along with salt and pepper to taste. Toss and serve.
Tabbouleh
Like most dishes that have been around for a couple of centuries or so, tabbouleh exists in many variations, but for me the classic will always be the way we had it in Lebanon in the early 1970s. It was very different from the New York deli version of soggy bulgur with green herbs scattered throughout. Instead it was a fresh and vibrant salad, with fragrant chopped parsley and mint as a base and bulgur added for substance. Good fruity Lebanese olive oil and the juice of freshly squeezed lemons added brightness, and cinnamon and allspice contributed their distinctive, slightly musky aromas. The result was a pyramid of complex and contrasting textures and flavors that was thoroughly satisfying.
Makes about 4 cups (6 to 8 servings)
- ½ cup medium-cut bulgur
- 1 pound ripe tomatoes, diced
- 1 bunch scallions, white and green parts, thinly sliced
- 3 large bunches flat-leaf parsley, finely chopped (3 cups)
- 1 or 2 bunches mint, leaves only, finely chopped (1 cup)
- ½ cup olive oil, preferably Lebanese (or Greek or Palestinian)
- Juice of 1 lemon (about ¼ cup)
- ¼ teaspoon ground allspice (optional)
- ¼ teaspoon ground cinnamon (optional)
- Sea salt and freshly ground black pepper
- Pinch of crushed red chile pepper (optional)
- Large crisp romaine lettuce leaves, for serving
Cover the bulgur in a bowl with cold water to a depth of about 1 inch. Let soak for 20 to 30 minutes. When the grains are plump, drain them, squeezing out as much water as you can; then turn the bulgur grains into a clean kitchen towel and squeeze out the remaining water. Each grain should be plump and moist but with no trace of liquid left.
Add the bulgur to a salad bowl with the diced tomatoes and scallions and mix with your hands, squeezing slightly to release the flavors. When the salad is well mixed, stir in the parsley, mint, and oil. Squeeze the lemon juice into a small bowl and add the allspice and cinnamon, if using, stirring to mix well before adding to the salad. (Otherwise, just squeeze the lemon juice right onto the salad.) Add plenty of salt and pepper, and a small pinch of chile pepper as well, if you wish.
Taste the salad—it should have lively flavors of lemon and mint, undercut by the musky tones of the bulgur and spices. Adjust the seasoning, then arrange the salad heaped on a platter and surrounded by overlapping romaine leaves. Use the leaves as edible scoops for the salad.
Notes: Purslane is often used in tabbouleh. If you can find it (it may be growing as a weed in your garden), add a handful of plump purslane leaves along with the scallions.
In Palestine and Israel, tabbouleh is sometimes served garnished with bright red pomegranate seeds—a handsome presentation.
Fattoush, Dakos, Panzanella, and Other Bread Salads
Mediterranean kitchens are a treasure trove of bread salads, from Tuscan panzanella to Lebanese fattoush to Cretan dakos made with crunchy barley rusks—and half a dozen others scattered around the shores. It’s a thrifty way of using up stale or leftover bread, and the bread soaks up the delicious salad juices and becomes soft and savory. This Lebanese fattoush saved me many times from fainting with hunger after getting lost in the library stacks at the American University of Beirut when I was a student. After hours of wandering in the library, I would stagger out into the daylight and head for home, where a bowl of fattoush, made by our Lebanese housekeeper, often awaited me.
Makes 6 servings
- 2 small rounds Arab pita bread, preferably a couple of days old
- ¾ cup olive oil, preferably Greek, Lebanese, or Palestinian
- 1 or 2 garlic cloves, crushed and chopped
- Sea salt
- Juice of 1 lemon (about ¼ cup)
- 8 radishes, halved or sliced
- 8 scallions, white and green parts, sliced
- 3 medium tomatoes, cut into thick chunks
- 2 medium cucumbers, preferably thin-skinned Middle Eastern or Armenian cukes, sliced
- 2 plain brine-pickled cucumbers (not sweetened, not heavily flavored with garlic or dill), sliced
- 1 small head romaine lettuce, coarsely chopped
- ½ cup coarsely chopped fresh mint leaves
- ½ cup coarsely chopped flat-leaf parsley
- Freshly ground black pepper
- 2 tablespoons ground sumac
Preheat the oven to 400° to 450°F. Split the rounds of Arab bread and set the 4 separated rounds on a baking sheet. Sprinkle the rounds with 2 tablespoons of the oil and transfer to the oven. Bake until the breads are crisp and toasted, then remove from the oven and set aside.
Add the garlic and about ½ teaspoon salt to a small bowl and crush together, using the back of a spoon, to a paste. Stir in the lemon juice and remaining 10 tablespoons olive oil.
Break up the toasted bread into small pieces and put most of the pieces in the bottom of the salad bowl, reserving a few for the top of the salad. Pile on the radishes, scallions, tomatoes, cucumbers, pickles, lettuce, mint, and parsley. Beat the garlic-lemon dressing with a fork to mix well, then pour over the salad. Grind the black pepper over the top and sprinkle on the sumac. Garnish with the reserved bits of toasted bread.
Take the salad bowl to the table and toss the ingredients together just before serving to keep the bread from getting soggy.

Bean, Lentil, Chickpea, Farro, and Other Hearty Salads
Salads made from legumes and/or grains can make delightful main courses, especially for vegetarians or anyone trying to cut back on overconsumption of meat. But for the rest of us, a little meat or fish added will also contribute to the appeal of the dish. Think of something as simple as chopped bits of salami or a grilled fresh sausage, very thinly sliced and stirred in. Or leftovers—chunks of roast chicken or ham or shredded roast pork sound delicious, and the remains of an oven-roasted halibut or swordfish could add a lot. But, as with most salads, be judicious. The focus should be on the grains or the beans, alone or in combination, and the rest is a savory garnish.
Almost any kind of legume can be turned into a salad—tiny green French lentils or equally small gray ones from Umbria, fat white cannellini beans, sulphur or soldier beans from Maine, anasazi or pinto beans from New Mexico, little pale green flageolets; the list is almost limitless. One good source for dried beans in an enormous variety is www.ranchogordo.com in California. Although their selection is focused on beans of the Southwest, they are constantly expanding their offerings, which do include some Italian and New England beans.
Farro is a popular grain for salads—and I have to insist that, many translations to the contrary notwithstanding, farro is not usually spelt (Triticum aestivum spelta), but a much more interesting, antique variety of hard durum wheat called emmer (T. turgidum dicoccum). (Spelt is in a different branch of the vast wheat family, and in many regions outside of France and Germany it’s considered a grain for animals.) Other types of wheat that can be cooked as whole berries (kamut, for instance) are also appropriate, as are transformed wheat products like couscous (especially large-grain Middle Eastern couscous) and bulgur.
Whatever you select, cook it in the simplest way possible, soaking overnight if necessary and then boiling in salted water and a spoonful of olive oil until tender but not mushy. Drain thoroughly before mixing in the salad.
A salad is best made when the grains or legumes are still quite warm and will absorb other flavorings rapidly, but that’s not to say that you can’t refrigerate or even freeze part of your harvest and keep it for later use. Let’s say you’ve soaked 2 cups of beans overnight and cooked them until tender. You should have enough for 8 servings. If that’s too much, freeze half the beans with some of their cooking liquid and use them another day—or in another recipe.
4 to 6 servings
- To 2 to 3 cups cooked, drained beans, you might add:
- 1 garlic clove, minced
- ¼ cup finely chopped flat-leaf parsley
- 1 medium red sweet pepper, seeded and chopped
- 1 small fresh green chile pepper, seeded and finely chopped
- 1 medium yellow or red onion, chopped; or 4 scallions, thinly sliced; or 3 or 4 shallots, chopped
- 2 medium ripe tomatoes, finely chopped; or a handful of little grape tomatoes, halved
- 1 bunch very firm radishes, halved or sliced
- For aromatics, think about adding:
- ¼ cup slivered fresh basil, chervil, tarragon, cilantro, or other fresh green herbs—chives and lovage are two I especially like
- ¼ cup chopped fresh mint leaves
- 1 teaspoon ground cumin
- ¼ teaspoon ground allspice
- ½ to 1 teaspoon crushed or ground red chile pepper—piment d’Espelette, Aleppo pepper, or smoky pimentón de la Vera
Don’t feel you must include all of the suggested ingredients. Sometimes, indeed often, it’s better to err on the side of discretion. Less is more, as Mies van der Rohe so tellingly noted.
Again, be cautious and judicious with your seasoning. Of course you will add a good sprinkling of sea salt and freshly ground black pepper, and then several healthy glugs of olive oil. Most of these salads can take well to a robust oil such as a Koroneiki from Greece, a Moraiolo from Umbria, or a Picual from Spain. And finally, a good spritz of lemon juice.
Toss this all together to mix well and set aside for at least 30 minutes (but do not refrigerate) for the flavors to develop and meld together.
Note: Keep in mind that a blend of different beans, or of legumes and grains (chickpeas and bulgur wheat, for instance), can also make an eminently satisfying dish.