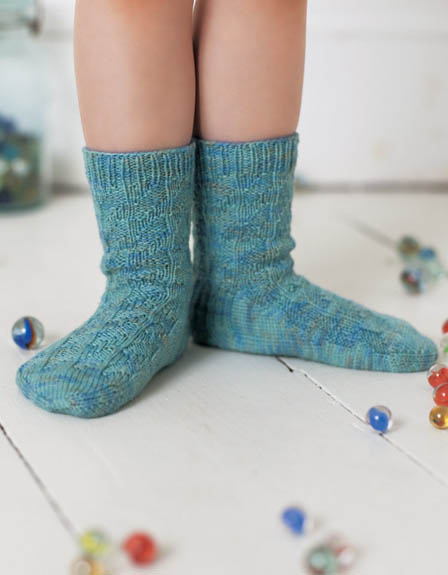
Seagrass
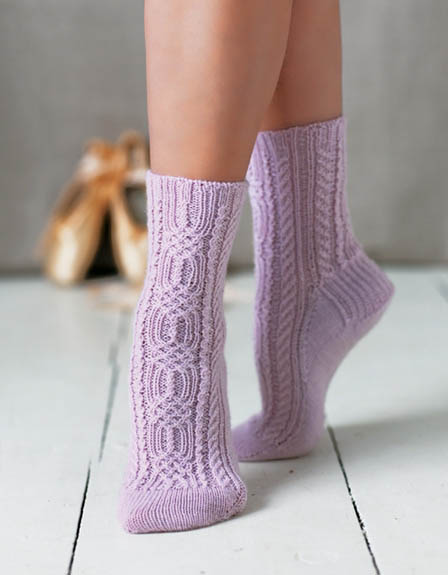
I could sit forever and watch the ocean move and shift and change as hours drift by, light changes, and tides move in and out. This gently undulating pattern makes me think of seaweed being pulled gently to and fro by the tide. The colors of Dream in Color yarn never cease to astound me. Not really tonal but not truly variegated either, their subtlety charms and delights me as I knit along. It’s soothing to see the colors and the pattern fall away from your needles as you knit.
| Child’s Sizes |
SMALL |
LARGE |
| Finished Foot Circumference |
53⁄4" (14.5 cm) |
71⁄4" (18.5 cm) |
| Yarn |
Dream in Color Smooshy, 100% superfine Australian merino superwash, 4 oz (114 g)/450 yds (411 m) [Yarn band gauge: 6.5–8 stitches = 1" (2.5 cm) in stockinette stitch on US 1–3 (2.25–3.25 mm) needles]; Beach Fog: 1 skein |
| Guage |
8 stitches and 11 rows = 1" (2.5 cm) in stockinette stitch |
| Needle |
US 2 (2.75 mm) 40" (100 cm) circular, or size needed to obtain correct gauge |
| Notions |
3 stitch markers (including 1 locking stitch marker), darning needle |
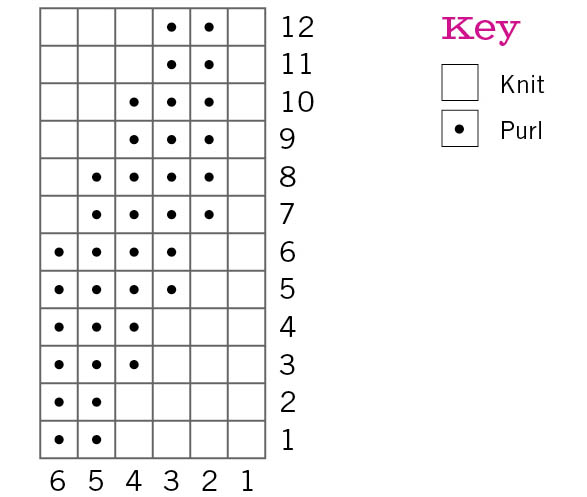
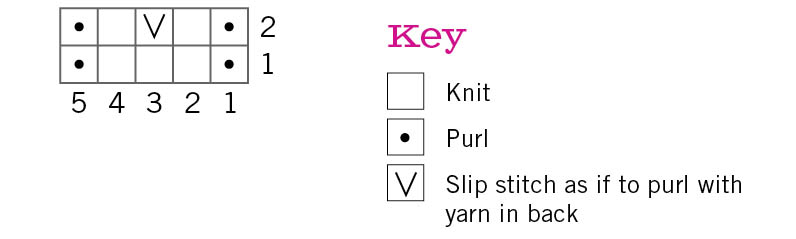
Pattern Stitches
Seagrass (multiple of 6): See the Seagrass Chart.
Rounds 1–2: *K4, P2; repeat from *.
Rounds 3–4: *K3, P3; repeat from *.
Rounds 5–6: *K2, P4; repeat from *.
Rounds 7–8: *K1, P4, K1; repeat from *.
Rounds 9–10: *K1, P3, K2; repeat from *.
Rounds 11–12: *K1, P2, K3; repeat from *.
Ribbing: *K1,P1; repeat from *.
Stockinette: Knit every round.
Casting On and Shaping the Toes
Cast On. Follow the instructions for casting on stitches to cast on 12 stitches for sock B and 12 stitches for sock A.
Round 1. Follow the instructions for knitting Round 1 (in chapter 2) to knit the first round on both socks. You now have 6 stitches on side 1 (instep) for each sock and 6 stitches on side 2 (sole) for each sock.
Round 2 (increase)
- SIDE 1 (INSTEP), sock A: K1, M1R, knit to 1 stitch before the end, M1L, K1.
- SIDE 1 (INSTEP), sock B: K1, M1R, knit to 1 stitch before the end, M1L, K1.
- ROTATE: Rotate your work and arrange your stitches on the needles so that you are ready to work the sole stitches on side 2 of both socks.
- SIDE 2 (SOLE), socks B and A: Repeat the side 1 increases on both socks.
- Each sock now has 16 stitches (8 on each side of each sock).
- ROTATE: Rotate your work and arrange stitches so that you are ready to begin the next round.
Next Rounds
- Work Round 2 increases:
| |
 3 more times 3 more times |
 5 more times 5 more times |
- Each sock now has:
| |
28 sts |
36 sts |
Next Round (even). Knit both sides of socks A and B with no increases.
Next Round (increase). Repeat Round 2.
Next Rounds
- Repeat the last 2 rounds (knit even and increase):
| |
4 more times |
5 more times |
- End your work back at the marker having just finished side 2, sock A.
- Each sock now has a total of:
| |
48 sts |
60 sts |
- Each side of each sock now has:
| |
24 sts |
30 sts |
Knitting the Feet
Round 1
- SIDE 1 (INSTEP), socks A and B: Work the Seagrass Chart, beginning at the lower right.
- SIDE 2 (SOLE), socks B and A: Knit to end (stockinette stitch).
Next Rounds. Repeat the previous round, continuing to work the Seagrass Chart on side 1 of each sock and keeping side 2 in stockinette, until the socks measure the appropriate length (see Toe-to-Gusset Length, below). End your work having just finished side 2, sock A. You are back at your marker and ready to begin the gusset increases.
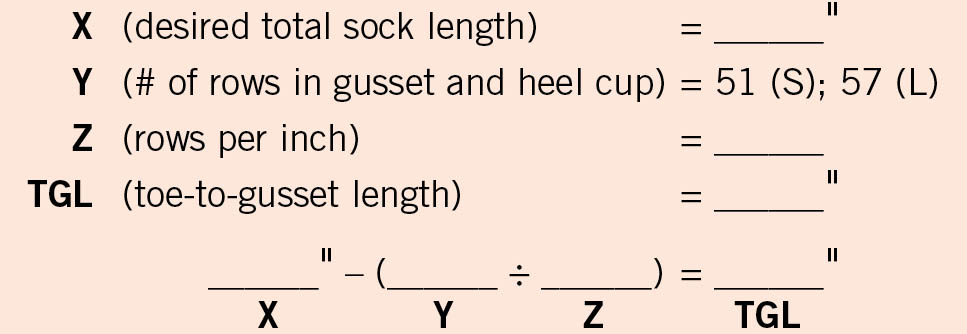
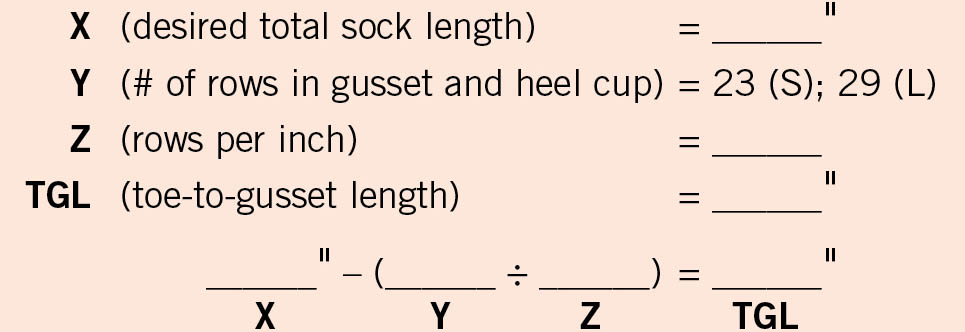
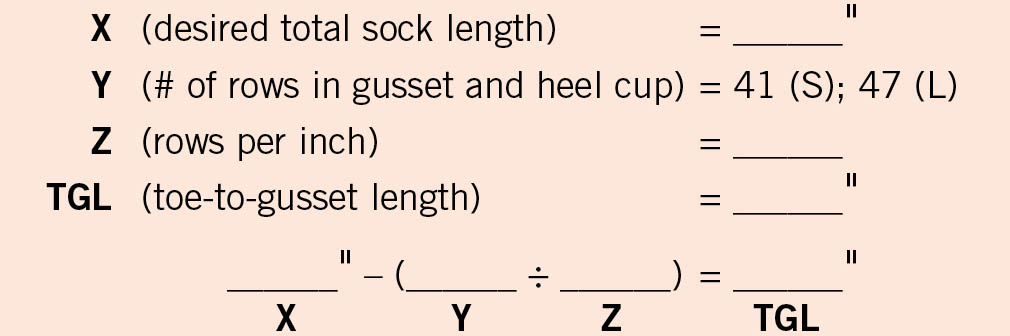
TOE-TO-GUSSET LENGTH
Use this handy formula. Note: For Z, measure on side 2 of sock.
For more information, see Toe-Up Math.
Increasing for the Gussets
Round 1 (increase)
- SIDE 1 (INSTEP), socks A and B: Continue to work the Seagrass Chart as established.
- SIDE 2 (SOLE), socks B and A: K1, M1R, knit to last stitch of each sock, M1L, K1.
Round 2 (even)
- SIDE 1 (INSTEP), socks A and B: Continue to work the Seagrass Chart as established.
- SIDE 2 (SOLE), socks B and A: Work in stockinette stitch as established.
Next Rounds
- Repeat Rounds 1 and 2:
| |
11 more times |
14 more times |
- Side 1 (instep) of each sock still has:
| |
24 sts |
30 sts |
- Side 2 (sole) of each sock now has:
| |
48 sts |
60 sts |
Shaping the Heel Cup, Sock B
Set Up. This is a partial round, worked only on side 1 (instep) of both socks.
- SIDE 1 (INSTEP), socks A and B: Work the Seagrass Chart as established.
- ROTATE: Rotate work and arrange stitches so that you are ready to begin working the heel on side 2 of sock B.
NOTE: While shaping the heel cup and working the heel flap, you temporarily switch to working the socks individually. You first work side 2 of sock B back and forth in short rows, then you work side 2 of sock A in a similar manner. When the heels are completed, you return to knitting the socks together in rounds (in the Knitting the Legs section below). For information about short rows and wrapping stitches, see Tips for Shaping the Heel.
Side 2, Row 1 (right side)
- Knit:
| |
12 sts |
15 sts |
- Place marker 1.
- Knit:
| |
23 sts |
29 sts |
- Slip 1 as if to purl, bring yarn to the right side to wrap stitch, place marker 2 on left-hand needle, slip stitch back to left-hand needle. Turn work to the wrong side.
Side 2, Row 2 (wrong side). Purl to 1 stitch before marker 1, slip 1 as if to purl, bring yarn to right side to wrap stitch, slip stitch back to left-hand needle. Turn work to the right side.
Side 2, Row 3 (right side). Knit to 2 stitches before previously wrapped stitch, slip 1 as if to purl, bring yarn to right side to wrap stitch, slip stitch back to left-hand needle. Turn.
Side 2, Row 4 (wrong side). Purl to 2 stitches before previously wrapped stitch, slip 1 as if to purl, bring yarn to right side to wrap stitch, slip stitch back to left-hand needle. Turn.
Next Rows. Repeat Rows 3 and 4 until all but the 4 center stitches have been wrapped. End having just completed:
| |
Row 3 |
Row 4 |
For Child’s Large Only
Next Row. Knit 3 stitches, slip 1 as if to purl, bring yarn to right side to wrap stitch, slip stitch back to left-hand needle. Turn.
Working the Heel Flap, Sock B
NOTE: Continue to work back and forth in rows on side 2, sock B only. During the first two rows of the heel flap, you will be lifting and working the wraps that you created in the heel-cup shaping steps above. For information on lifting and working wraps on the right and wrong side, see Tips for Working Wrapped Stitches.
Side 2, Row 1 (wrong side). Purl, lifting the wraps and purling them together with their respective stitches as you come to them, to 1 stitch before marker 1. Then, lift the wrap of the stitch before marker 1, slip both stitch and wrap to the right-hand needle as if to purl, remove marker, slip both stitch and wrap back to the left-hand needle, and purl together the wrap and its stitch along with the next stitch (P3tog). Turn.
Side 2, Row 2 (right side). Slip 1 as if to purl. Then knit, lifting the wraps and knitting them together with their respective stitches as you come to them, to 1 stitch before marker 2. Lift the wrap of the next stitch completely over and to the left of the stitch, slip the stitch as if to knit, slip the wrap as if to knit, remove marker, slip next stitch as if to knit, place the 2 slipped stitches and the wrap back on left-hand needle, and knit the 2 slipped stitches together with the wrap through the back loop. Turn.
Side 2, Row 3 (wrong side). Slip 1 as if to purl, purl to 1 stitch before gap, P2tog to close gap. Turn.
Side 2, Row 4 (right side). Slip 1 as if to purl, *K1, slip 1 as if to purl; repeat from * to 1 stitch before gap, ssk to close gap. Turn.
Side 2, Row 5 (wrong side). Slip 1 as if to purl, purl to 1 stitch before gap, P2tog to close gap. Turn.
Next Rows. Repeat Rows 4 and 5 until you have decreased away all of the gusset stitches on side 2 of this sock. End having completed a right-side row.
- Side 2 of sock B now again has:
| |
24 sts |
30 sts |
Shaping the Heel Cup and Working the Heel Flap, Sock A
To shape the heel cup and work the heel flap of sock A, repeat the instructions for sock B above.
Knitting the Legs
In this section you return to working in the round on all stitches for both socks.
NOTE: Pick up an extra stitch at the point where the heel and instep meet to prevent holes from developing. (See Knitting the Legs.)
Next Round
- SIDE 1 (INSTEP), socks A and B: Work across instep stitches according to the Seagrass Chart as established.
- SIDE 2 (SOLE), socks B and A: Work these stitches according to the Seagrass Chart, following the same row in the chart that you used on side 1.
Next Rounds. Continue working in the round, following the Seagrass Chart on all stitches, until the leg measurement from the top of the heel flap is
| |
3½" (9 cm) |
4" (10 cm) |
Next Rounds. Work K1, P1 rib on all stitches for 1" (2.5 cm).
Finishing
Loosely bind off all stitches using your preferred method (see Bind Offs). Weave in loose tails. Block.
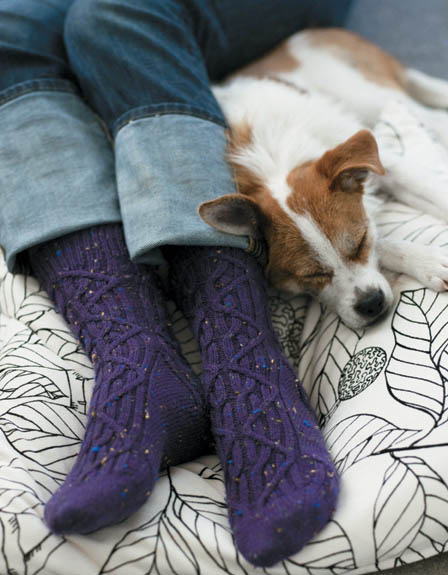
Graphic
One pair of cables traverses the surface of what’s really just a simple rib. The cables in this design convey simple strength. This sock is elegant but not a bit pretentious, so it moves comfortably from blue jeans to work pants. The yarn is a soft, washable tweed from Knit Picks, making these fun and affordable to knit.
| Adult’s Sizes |
SMALL |
LARGE |
| Finished Foot Circumference |
71⁄4" (18.5 cm) |
8" (20 cm) |
| Yarn |
Knit Picks Stroll Tweed, 65% superwash merino wool/25% nylon/ 10% Donegal, 1.75 oz (50 g)/231 yds (211 m) [Yarn band gauge: 7–8 stitches = 1" (2.5 cm) in stockinette stitch on US 1–3 (2.25–3.25 mm) needle]; Plum: 2 skeins for Small; 3 skeins for Large |
| Guage |
8 stitches and 11 rows = 1" (2.5 cm) in stockinette stitch |
| Needle |
US 2 (2.75 mm) 40" (100 cm) circular, or size needed to obtain correct gauge |
| Notions |
3 stitch markers (including 1 locking stitch marker), cable needle, darning needle |
Pattern Stitches
Stockinette: Knit every round.
Graphic: See the Graphic Charts.
Ribbing: *K1, P1; repeat from *.
Casting On and Shaping the Toes
Cast On. Follow the instructions for casting on stitches to cast on 16 stitches for sock B and 16 stitches for sock A.
Round 1. Follow the instructions for knitting Round 1 (in chapter 2) to knit the first round on both socks. You now have 8 stitches on side 1 (instep) for each sock and 8 stitches on side 2 (sole) for each sock.
Round 2 (increase)
- SIDE 1 (INSTEP), sock A: K1, M1R, knit to 1 stitch before the end, M1L, K1.
- SIDE 1 (INSTEP), sock B: K1, M1R, knit to 1 stitch before the end, M1L, K1.
- ROTATE: Rotate your work and arrange your stitches on the needles so that you are ready to work the sole stitches on side 2 of both socks.
- SIDE 2 (SOLE), socks B and A: Repeat the side 1 increases on both socks.
- Each sock now has 20 stitches (10 on each side of each sock).
- ROTATE: Rotate your work and arrange stitches so that you are ready to begin the next round.
Next Rounds
- Work Round 2 increases:
| |
5 more times |
6 more times |
- Each sock now has:
| |
40 sts |
44 sts |
Next Round (even). Knit both sides of socks A and B with no increases.
Next Round (increase). Repeat Round 2.
Next Rounds
- Repeat the last 2 rounds (knit even and increase):
| |
6 more times |
7 more times |
- End your work back at the marker having just finished side 2, sock A.
- Each sock now has a total of:
| |
68 sts |
76 sts |
- Each side of each sock now has:
| |
34 sts |
38 sts |
Knitting the Feet
Round 1
- SIDE 1 (INSTEP), socks A and B: Work the Graphic Chart, beginning at the lower right.
- SIDE 2 (SOLE), socks B and A: Knit to end (stockinette stitch).
Next Rounds. Repeat the previous round, continuing to work the Graphic Chart on side 1 of each sock and keeping side 2 in stockinette, until the socks measure the appropriate length (see Toe-to-Gusset Length, below). End your work having just finished side 2, sock A. You are back at your marker and ready to begin the gusset increases.
TOE-TO-GUSSET LENGTH
Use this handy formula. Note: For Z, measure on side 2 of sock.
For more information, see Toe-Up Math.
Increasing for the Gussets
Round 1 (increase)
- SIDE 1 (INSTEP), socks A and B: Continue to work the Graphic Chart as established.
- SIDE 2 (SOLE), socks B and A: K1, M1R, knit to last stitch of each sock, M1L, K1.
Round 2 (even)
- SIDE 1 (INSTEP), socks A and B: Continue to work the Graphic Chart as established.
- SIDE 2 (SOLE), socks B and A: Work in stockinette stitch as established.
Next Rounds
- Repeat Rounds 1 and 2:
| |
16 more times |
18 more times |
- Side 1 (instep) of each sock still has:
| |
34 sts |
38 sts |
- Side 2 (sole) of each sock now has:
| |
68 sts |
76 sts |
Shaping the Heel Cup, Sock B
Set Up. This is a partial round, worked only on side 1 (instep) of both socks.
- SIDE 1 (INSTEP), socks A and B: Work the Graphic Chart as established.
- ROTATE: Rotate work and arrange stitches so that you are ready to begin working the heel on side 2 of sock B.
NOTE: While shaping the heel cup and working the heel flap, you temporarily switch to working the socks individually. You first work side 2 of sock B back and forth in short rows, then you work side 2 of sock A in a similar manner. When the heels are completed, you return to knitting the socks together in rounds (in the Knitting the Legs section below). For information about short rows and wrapping stitches, see Tips for Shaping the Heel.
Side 2, Row 1 (right side)
- Knit:
| |
16 more times |
18 more times |
- Place marker 1.
- Knit:
| |
17 sts |
19 sts |
- Side 2 (sole) of each sock now has:
| |
33 sts |
37 sts |
- Slip 1 as if to purl, bring yarn to the right side to wrap stitch, place marker 2 on left-hand needle, slip stitch back to left-hand needle. Turn work to the wrong side.
Side 2, Row 2 (wrong side). Purl to 1 stitch before marker 1, slip 1 as if to purl, bring yarn to right side to wrap stitch, slip stitch back to left-hand needle. Turn work to the right side.
Side 2, Row 3 (right side). Knit to 2 stitches before previously wrapped stitch, slip 1 as if to purl, bring yarn to right side to wrap stitch, slip stitch back to left-hand needle. Turn.
Side 2, Row 4 (wrong side). Purl to 2 stitches before previously wrapped stitch, slip 1 as if to purl, bring yarn to right side to wrap stitch, slip stitch back to left-hand needle. Turn.
Next Rows. Repeat Rows 3 and 4 until all but the 4 center stitches have been wrapped. End having just completed Row 4.
Next Row. Knit 3 stitches, slip 1 as if to purl, bring yarn to right side to wrap stitch, slip stitch back to left-hand needle. Turn.
Working the Heel Flap, Sock B
NOTE: Continue to work back and forth in rows on side 2, sock B only. During the first two rows of the heel flap, you will be lifting and working the wraps that you created in the heel-cup shaping steps above. For information on lifting and working wraps on the right and wrong side, see Tips for Working Wrapped Stitches.
Side 2, Row 1 (wrong side). Purl, lifting the wraps and purling them together with their respective stitches as you come to them, to 1 stitch before marker 1. Then, lift the wrap of the stitch before marker 1, slip both stitch and wrap to the right-hand needle as if to purl, remove marker, slip both stitch and wrap back to the left-hand needle, and purl together the wrap and its stitch along with the next stitch (P3tog). Turn.
Side 2, Row 2 (right side). Slip 1 as if to purl. Then knit, lifting the wraps and knitting them together with their respective stitches as you come to them, to 1 stitch before marker 2. Lift the wrap of the next stitch completely over and to the left of the stitch, slip the stitch as if to knit, slip the wrap as if to knit, remove marker, slip next stitch as if to knit, place the 2 slipped stitches and the wrap back on left-hand needle, and knit the 2 slipped stitches together with the wrap through the back loop. Turn.
Side 2, Row 3 (wrong side). Slip 1 as if to purl, purl to 1 stitch before gap, P2tog to close gap. Turn.
NOTE: From this point on, this heel flap is worked in Eye-of-Partridge Stitch (as written out in Rows 4–7) with a 2-stitch garter-stitch border and 1 edge stitch on each side.
Side 2, Row 4 (right side). Slip 1 as if to purl, K2, *slip 1, K1; repeat from * to 3 stitches before gap, K2, ssk to close gap. Turn.
Side 2, Row 5 (wrong side). Slip 1 as if to purl, K2, purl to 3 stitches before gap, K2, P2tog to close gap. Turn.
Side 2, Row 6 (right side). Slip 1 as if to purl, K2, *K1, slip 1; repeat from * to 3 stitches before gap, K2, ssk to close gap. Turn.
Side 2, Row 7 (wrong side). Slip 1 as if to purl, K2, purl to 3 stitches before gap, K2, P2tog to close gap. Turn.
Next Rows. Repeat Rows 4–7 until you have decreased away all of the gusset stitches on side 2 of this sock. End having completed a right-side row.
- Side 2 of sock B now again has:
| |
34 sts |
38 sts |
Shaping the Heel Cup and Working the Heel Flap, Sock A
To shape the heel cup and work the heel flap of sock A, repeat the instructions for sock B above.
Knitting the Legs
In this section you return to working in the round on all stitches for both socks.
NOTE: Pick up an extra stitch at the point where the heel and instep meet to prevent holes from developing. (See Knitting the Legs.)
Next Round
- SIDE 1 (INSTEP), socks A and B: Work across instep stitches according to the Graphic Chart as established.
- SIDE 2 (SOLE), socks B and A: Work these stitches according to the Graphic Chart, following the same row in the chart that you used on side 1.
Next Rounds. Continue working in the round, following the Graphic Chart on all stitches until the measurement from the top of the heel flap is approximately:
| |
5¼" (13.5 cm) |
5¾" (14.5 cm) |
Next Rounds. Work K1, P1 rib on all stitches for 2" (5 cm).
Finishing
Loosely bind off all stitches using your preferred method (see Bind Offs). Weave in loose tails. Block.
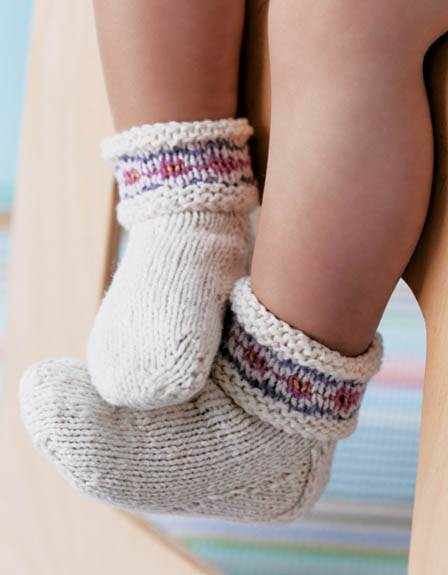
April
Once upon a time I was a mom with growing children. Then one day, I became a grandma, and in my first book is a pair of socks for Aidan. But then it happened again, and another little person was placed in my arms. These socks are in honor of my amazing and beautiful granddaughter April, whose big, stormy eyes and enchanting smile have worked their way deeply into my heart. Knitted in a wonderful yarn from Green Mountain Spinnery, these sweet little ankle socks will keep tiny toes warm and toasty.
| Child’s Sizes |
SMALL |
LARGE |
| Finished Foot Circumference |
5" (12.5 cm) |
63⁄4" (17 cm) |
| Yarn |
Green Mountain Spinnery Cotton Comfort, 80% fine wool/20% organic cotton, 2 oz (57 g)/180 yds (165 m) [Yarn band gauge: 5–7½ stitches = 1" (2.5 cm) in stockinette stitch on US 1–6 (2.25–4.0 mm) needles]
- MC = Unbleached White: 1 skein for Small; 2 skeins for Large
- CA = Peony: 1 skein • CB = Violet: 1 skein • CC = Yarrow: 1 skein
|
| Guage |
6 stitches and 9 rows = 1" (2.5 cm) in stockinette stitch on smaller needle |
| Needle |
US 3 and US 4 (3.25 mm and 3.5 mm) 40" (100 cm) circulars, or size needed to obtain correct gauge |
| Notions |
3 stitch markers (including 1 locking stitch marker), darning needle |
Pattern Stitches
Stockinette: Knit every round.
Garter: Knit 1 round, purl 1 round.
April: See April Color Chart.
Reverse Stockinette: Purl every round.
Casting On and Shaping the Toes
Cast On. Follow the instructions for casting on stitches to cast on 12 stitches for sock B and 12 stitches for sock A.
Round 1. Follow the instructions for knitting Round 1 (in chapter 2) to knit the first round on both socks. You now have 6 stitches on side 1 (instep) for each sock and 6 stitches on side 2 (sole) for each sock.
Round 2 (increase)
- SIDE 1 (INSTEP), sock A: K1, M1R, knit to 1 stitch before the end, M1L, K1.
- SIDE 1 (INSTEP), sock B: K1, M1R, knit to 1 stitch before the end, M1L, K1.
- ROTATE: Rotate your work and arrange your stitches on the needles so that you are ready to work the sole stitches on side 2 of both socks.
- SIDE 2 (SOLE), socks B and A: Repeat the side 1 increases on both socks.
- Each sock now has 16 stitches (8 on each side of each sock).
- ROTATE: Rotate your work and arrange stitches so that you are ready to begin the next round.
Next Rounds
- Work Round 2 increases:
| |
1 more time |
2 more times |
- Each sock now has:
| |
20 sts |
24 sts |
Next Round (even). Knit both sides of socks A and B with no increases.
Next Round (increase). Repeat Round 2.
Next Rounds
- Repeat the last 2 rounds (knit even and increase):
| |
2 more times |
3 more times |
- End your work back at the marker having just finished side 2, sock A.
- Each sock now has a total of:
| |
32 sts |
40 sts |
- Each side of each sock now has:
| |
16 sts |
20 sts |
Knitting the Feet
Round 1
- SIDE 1 (INSTEP), socks A and B: Work in stockinette stitch.
- SIDE 2 (SOLE), socks B and A: Knit to end (stockinette stitch).
Next Rounds. Repeat the previous round, continuing to knit all stitches (stockinette stitch) until the socks measure the appropriate length (see Toe-to-Gusset Length, below). End your work having just finished side 2, sock A. You are back at your marker and ready to begin the gusset increases.
TOE-TO-GUSSET LENGTH
Use this handy formula. Note: For Z, measure on side 2 of sock.
For more information, see Toe-Up Math.
Increasing for the Gussets
Round 1 (increase)
- SIDE 1 (INSTEP), socks A and B: Continue to work in stockinette stitch as established.
- SIDE 2 (SOLE), socks B and A: K1, M1R, knit to last stitch of each sock, M1L, K1.
Round 2 (even)
- SIDE 1 (INSTEP), socks A and B: Continue to work in stockinette stitch as established.
- SIDE 2 (SOLE), socks B and A: Work in stockinette stitch as established.
Next Rounds
- Repeat Rounds 1 and 2:
| |
7 more times |
9 more times |
- Side 1 (instep) of each sock still has:
| |
16 sts |
20 sts |
- Side 2 (sole) of each sock now has:
| |
32 sts |
40 sts |
Shaping the Heel Cup, Sock B
Set Up. This is a partial round, worked only on side 1 (instep) of both socks.
- SIDE 1 (INSTEP), socks A and B: Work in stockinette stitch as established.
- ROTATE: Rotate work and arrange stitches so that you are ready to begin working the heel on side 2 of sock B.
NOTE: While shaping the heel cup and working the heel flap, you temporarily switch to working the socks individually. You first work side 2 of sock B back and forth in short rows, then you work side 2 of sock A in a similar manner. When the heels are completed, you return to knitting the socks together in rounds (in the Knitting the Legs section below). For information about short rows and wrapping stitches, see Tips for Shaping the Heel.
Side 2, Row 1 (right side)
- Knit:
| |
8 sts |
10 sts |
- Place marker 1.
- Knit:
| |
15 sts |
19 sts |
- Slip 1 as if to purl, bring yarn to the right side to wrap stitch, place marker 2 on left-hand needle, slip stitch back to left-hand needle. Turn work to the wrong side.
Side 2, Row 2 (wrong side). Purl to 1 stitch before marker 1, slip 1 as if to purl, bring yarn to right side to wrap stitch, slip stitch back to left-hand needle. Turn work to the right side.
Side 2, Row 3 (right side). Knit to 2 stitches before previously wrapped stitch, slip 1 as if to purl, bring yarn to right side to wrap stitch, slip stitch back to left-hand needle. Turn.
Side 2, Row 4 (wrong side). Purl to 2 stitches before previously wrapped stitch, slip 1 as if to purl, bring yarn to right side to wrap stitch, slip stitch back to left-hand needle. Turn.
Next Rows. Repeat Rows 3 and 4 until all but the 4 center stitches have been wrapped. End having just completed Row 3.
Working the Heel Flap, Sock B
NOTE: Continue to work back and forth in rows on side 2, sock B only. During the first two rows of the heel flap, you will be lifting and working the wraps that you created in the heel-cup shaping steps above. For information on lifting and working wraps on the right and wrong side, see Tips for Working Wrapped Stitches.
Side 2, Row 1 (wrong side). Purl, lifting the wraps and purling them together with their respective stitches as you come to them, to 1 stitch before marker 1. Then, lift the wrap of the stitch before marker 1, slip both stitch and wrap to the right-hand needle as if to purl, remove marker, slip both stitch and wrap back to the left-hand needle, and purl together the wrap and its stitch along with the next stitch (P3tog). Turn.
Side 2, Row 2 (right side). Slip 1 as if to purl. Then knit, lifting the wraps and knitting them together with their respective stitches as you come to them, to 1 stitch before marker 2. Lift the wrap of the next stitch completely over and to the left of the stitch, slip the stitch as if to knit, slip the wrap as if to knit, remove marker, slip next stitch as if to knit, place the 2 slipped stitches and the wrap back on left-hand needle, and knit the 2 slipped stitches together with the wrap through the back loop. Turn.
Side 2, Row 3 (wrong side). Slip 1 as if to purl, purl to 1 stitch before gap, P2tog to close gap. Turn.
Side 2, Row 4 (right side). Slip 1 as if to purl, *K1, slip 1 as if to purl; repeat from * to 1 stitch before gap, ssk to close gap. Turn.
Side 2, Row 5 (wrong side). Slip 1 as if to purl, purl to 1 stitch before gap, P2tog to close gap. Turn.
Next Rows. Repeat Rows 4 and 5 until you have decreased away all of the gusset stitches on side 2 of this sock. End having completed a right-side row.
- Side 2 of sock B now again has:
| |
16 sts |
20 sts |
Shaping the Heel Cup and Working the Heel Flap, Sock A
To shape the heel cup and work the heel flap of sock A, repeat the instructions for sock B above.
Knitting the Legs
In this section you return to working in the round on all stitches for both socks.
NOTE: Pick up an extra stitch at the point where the heel and instep meet to prevent holes from developing. (See Knitting the Legs.)
Next Round
- SIDE 1 (INSTEP), socks A and B: Work across instep stitches in stockinette stitch as established.
- SIDE 2 (SOLE), socks B and A: Work these stitches in stockinette stitch.
Next Rounds. Continue working in the round in stockinette stitch on all stitches until the leg measurement from the top of the heel flap is:
| |
2" (5 cm) |
2½" (6.4 cm) |
Next 4 Rounds. Work all stitches in garter stitch beginning with a purl round.
NOTE: From this point on, the side facing you as you knit is the wrong side of the turned cuff. The April Color Chart is worked in reverse stockinette (purl stitches) so that it appears as stockinette when the cuff is turned down. As you are working the chart, be sure to “strand” the yarn across the side facing you (the wrong side of the cuff). For more information on knitting with more than one color, see Stranding.
Next 11 Rounds. Change to larger needle. Work the April Color Chart in reverse stockinette stitch.
Next 4 Rounds. Change to smaller needle and work all stitches in garter stitch beginning with a knit round.
Finishing
Loosely bind off all stitches using your preferred method (see Bind Offs). Weave in loose tails. Block. Turn cuff to the right side.
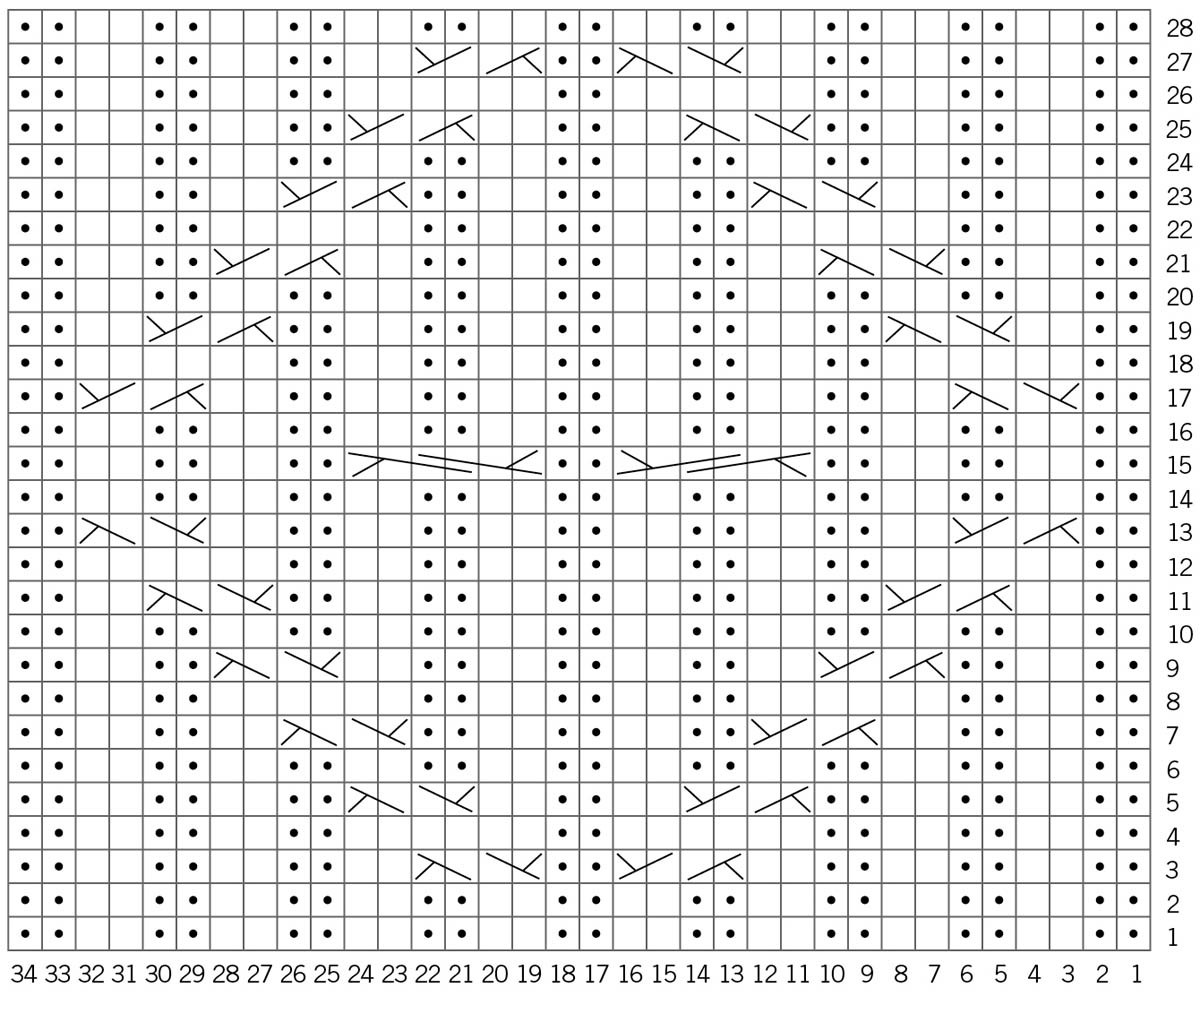
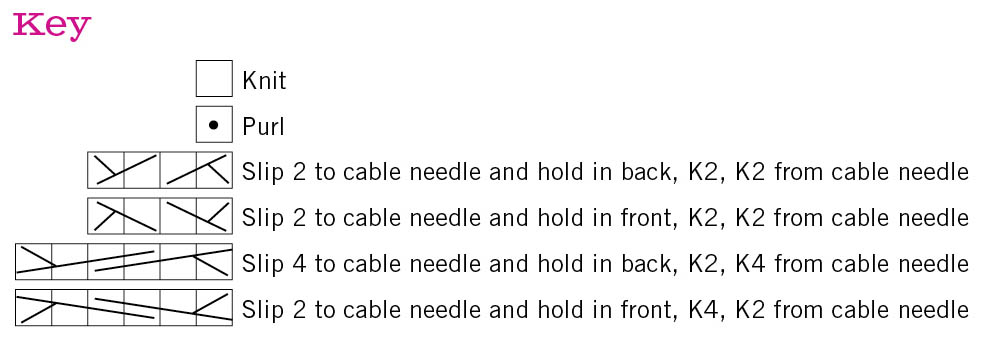
Ballet
This was the first sock I designed for this book—in fact, I designed it long before I began work on the book. I woke up one morning at about 2 A.M. with a sock in my mind. (I keep a notebook beside my bed for just such occasions!) I made a quick sketch, and then, first thing in the morning, I swatched for this sock. Worked in a simple, light-colored yarn, the twisted stitches weave gracefully in and out, reminiscent of a delicate dance.
| Woman’s Sizes |
SMALL |
LARGE |
| Finished Foot Circumference |
7" (18 cm) |
81⁄2" (21.5 cm) |
| Yarn |
Valley Yarns Huntington, 75% merino wool/25% nylon, 1.75 oz (50 g)/218 yds (199 m) [Yarn band gauge: 7–8 stitches = 1" (2.5 cm) on US 2–3 (2.75–3.25 mm) needles]; Pink 4192: 2 skeins for Small; 3 skeins for Larg |
| Guage |
9 stitches and 11 rows = 1" (2.5 cm) in stockinette stitc |
| Needle |
US 1 (2.25 mm) 40" (100 cm) circular, or size needed to obtain correct gauge |
| Notions |
3 stitch markers (including 1 locking stitch marker), cable needle, darning needle |
Casting On and Shaping the Toes
Cast On. Follow the instructions for casting on stitches to cast on 16 stitches for sock B and 16 stitches for sock A.
Round 1. Follow the instructions for knitting Round 1 (in chapter 2) to knit the first round on both socks. You now have 8 stitches on side 1 (instep) for each sock and 8 stitches on side 2 (sole) for each sock.
Round 2 (increase)
- SIDE 1 (INSTEP), sock A: K1, M1R, knit to 1 stitch before the end, M1L, K1.
- SIDE 1 (INSTEP), sock B: K1, M1R, knit to 1 stitch before the end, M1L, K1.
- ROTATE: Rotate your work and arrange your stitches on the needles so that you are ready to work the sole stitches on side 2 of both socks.
- SIDE 2 (SOLE), socks B and A: Repeat the side 1 increases on both socks.
- Each sock now has 20 stitches (10 on each side of each sock).
- ROTATE: Rotate your work and arrange stitches so that you are ready to begin the next round.
Next Rounds
- Work Round 2 increases:
| |
6 more times |
8 more times |
- Each sock now has:
| |
44 sts |
52 sts |
Next Round (even). Knit both sides of socks A and B with no increases.
Next Round (increase). Repeat Round 2.
Next Rounds
- Repeat the last 2 rounds (knit even and increase):
| |
6 more times |
8 more times |
- End your work back at the marker having just finished side 2, sock A.
- Each sock now has a total of:
| |
72 sts |
88 sts |
- Each side of each sock now has:
| |
36 sts |
44 sts |
Knitting the Feet
Round 1
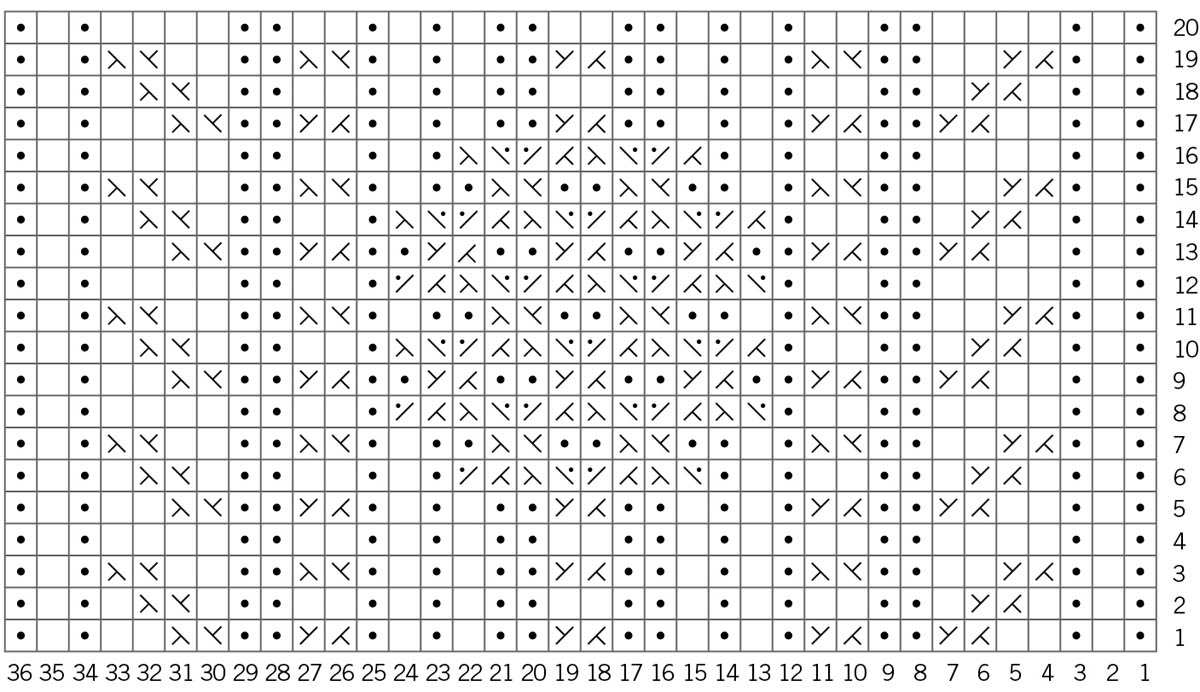
- SIDE 1 (INSTEP), socks A and B: Work the Ballet Chart, beginning at the lower right.
- SIDE 2 (SOLE), socks B and A: Knit to end (stockinette stitch).
Next Rounds. Repeat the previous round, continuing to work the Ballet Chart on side 1 of each sock and keeping side 2 in stockinette, until the socks measure the appropriate length (see Toe-to-Gusset Length, below). End your work having just finished side 2, sock A. You are back at your marker and ready to begin the gusset increases.
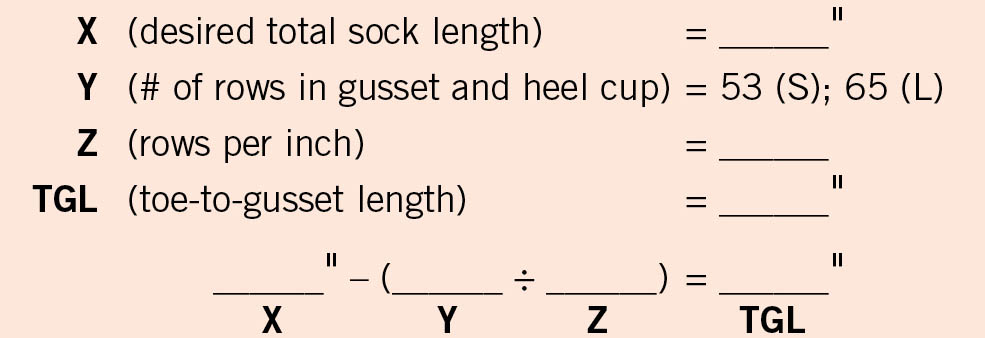
TOE-TO-GUSSET LENGTH
Use this handy formula. Note: For Z, measure on side 2 of sock.
For more information, see Toe-Up Math.
Increasing for the Gussets
Round 1 (increase)
- SIDE 1 (INSTEP), socks A and B: Continue to work the Ballet Chart as established.
- SIDE 2 (SOLE), socks B and A: K1, M1R, knit to last stitch of each sock, M1L, K1.
Round 2 (even)
- SIDE 1 (INSTEP), socks A and B: Continue to work the Ballet Chart as established.
- SIDE 2 (SOLE), socks B and A: Work in stockinette stitch as established.
Next Rounds
- Repeat Rounds 1 and 2:
| |
17 more times |
21 more times |
- Side 1 (instep) of each sock still has:
| |
36 sts |
44 sts |
- Side 2 (sole) of each sock now has:
| |
72 sts |
88 sts |
Shaping the Heel Cup, Sock B
Set Up. This is a partial round, worked only on side 1 (instep) of both socks.
- SIDE 1 (INSTEP), socks A and B: Work the Ballet Chart as established.
- ROTATE: Rotate work and arrange stitches so that you are ready to begin working the heel on side 2 of sock B.
NOTE: While shaping the heel cup and working the heel flap, you temporarily switch to working the socks individually. You first work side 2 of sock B back and forth in short rows, then you work side 2 of sock A in a similar manner. When the heels are completed, you return to knitting the socks together in rounds (in the Knitting the Legs section below). For information about short rows and wrapping stitches, see Tips for Shaping the Heel.
Side 2, Row 1 (right side)
- Knit:
| |
18 sts |
22 sts |
- Place marker 1.
- Knit:
| |
35 sts |
43 sts |
- Slip 1 as if to purl, bring yarn to the right side to wrap stitch, place marker 2 on left-hand needle, slip stitch back to left-hand needle. Turn work to the wrong side.
Side 2, Row 2 (wrong side). Purl to 1 stitch before marker 1, slip 1 as if to purl, bring yarn to right side to wrap stitch, slip stitch back to left-hand needle. Turn work to the right side.
Side 2, Row 3 (right side). Knit to 2 stitches before previously wrapped stitch, slip 1 as if to purl, bring yarn to right side to wrap stitch, slip stitch back to left-hand needle. Turn.
Side 2, Row 4 (wrong side). Purl to 2 stitches before previously wrapped stitch, slip 1 as if to purl, bring yarn to right side to wrap stitch, slip stitch back to left-hand needle. Turn.
Next Rows. Repeat Rows 3 and 4 until all but the 4 center stitches have been wrapped. End having just completed Row 3.
Working the Heel Flap, Sock B
NOTE: Continue to work back and forth in rows on side 2, sock B only. During the first two rows of the heel flap, you will be lifting and working the wraps that you created in the heel-cup shaping steps above. For information on lifting and working wraps on the right and wrong side, see Tips for Working Wrapped Stitches.
Side 2, Row 1 (wrong side). Purl, lifting the wraps and purling them together with their respective stitches as you come to them, to 1 stitch before marker 1. Then, lift the wrap of the stitch before marker 1, slip both stitch and wrap to the right-hand needle as if to purl, remove marker, slip both stitch and wrap back to the left-hand needle, and purl together the wrap and its stitch along with the next stitch (P3tog). Turn.
Side 2, Row 2 (right side). Slip 1 as if to purl. Then knit, lifting the wraps and knitting them together with their respective stitches as you come to them, to 1 stitch before marker 2. Lift the wrap of the next stitch completely over and to the left of the stitch, slip the stitch as if to knit, slip the wrap as if to knit, remove marker, slip next stitch as if to knit, place the 2 slipped stitches and the wrap back on left-hand needle, and knit the 2 slipped stitches together with the wrap through the back loop. Turn.
Side 2, Row 3 (wrong side). Slip 1 as if to purl, purl to 1 stitch before gap, P2tog to close gap. Turn.
Side 2, Row 4 (right side). Slip 1 as if to purl, *K1, slip 1 as if to purl; repeat from * to 1 stitch before gap, ssk to close gap. Turn.
Side 2, Row 5 (wrong side). Slip 1 as if to purl, purl to 1 stitch before gap, P2tog to close gap. Turn.
Next Rows. Repeat Rows 4 and 5 until you have decreased away all of the gusset stitches on side 2 of this sock. End having completed a right-side row.
- Side 2 of sock B now again has:
| |
36 sts |
44 sts |
Shaping the Heel Cup and Working the Heel Flap, Sock A
To shape the heel cup and work the heel flap of sock A, repeat the instructions for sock B above.
Knitting the Legs
In this section you return to working in the round on all stitches for both socks.
NOTE: Pick up an extra stitch at the point where the heel and instep meet to prevent holes from developing. (See Knitting the Legs.)
Next Round
- SIDE 1 (INSTEP), socks A and B: Work across instep stitches according to the Ballet Chart as established.
- SIDE 2 (SOLE), socks B and A: Work these stitches according to the Ballet Chart, following the same row in the chart that you used on side 1.
Next Rounds. Continue working in the round, following the Ballet Chart for all stitches, until the leg measurement from the top of the heel flap is approximately 5" (12.5 cm). The stitch pattern will line up more closely with the ribbing if you end on Row 4 or Row 20 of the Ballet Chart.
Next Rounds. Work the Ballet Rib Chart on all stitches, beginning at the right, until the ribbing measures 1" (2.5 cm).
Finishing
Loosely bind off all stitches using your preferred method (see Bind Offs). Weave in loose tails. Block.
Twisted Baskets
Take a basic basket-weave pattern, and jazz it up a bit with some simple cable twists. Knitted in medium-weight Socks That Rock, these socks knit up in no time and promise luxurious warmth for the most finicky of feet. This is a great pattern choice for a new sock knitter looking for something a little fun.
| Adult’s Sizes |
SMALL |
LARGE |
| Finished Foot Circumference |
71⁄2" (19 cm) |
81⁄2" (21.5 cm) |
| Yarn |
Blue Moon Fiber Arts Socks That Rock Mediumweight, 100% superwash merino, 5.5 oz (155 g)/380 yds (347 m) [Yarn band gauge: 7–8 stitches = 1" (2.5 cm) in stockinette stitch on US 2–3 (2.75–3.25 mm) needles]; Mossay: 1 skein |
| Guage |
7 stitches and 9 rows = 1" (2.5 cm) in stockinette stitch |
| Needle |
US 3 (3.25.mm) 40" (100 cm) circular, or size needed to obtain correct gauge |
| Notions |
3 stitch markers (including 1 locking stitch marker), cable needle, darning needle |
Pattern Stitches
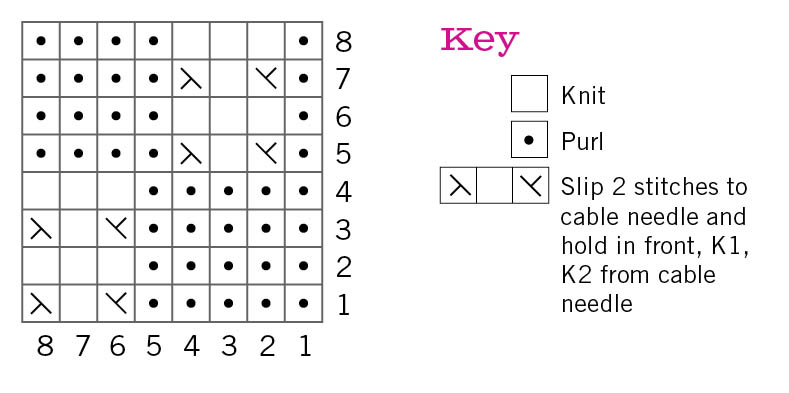
Twisted Baskets (multiple of 8): See the Twisted Baskets Chart.
Stockinette: Knit every round.
Ribbing: *K1, P1; repeat from *.
Casting On and Shaping the Toes
Cast On. Follow the instructions for casting on stitches to cast on 16 stitches for sock B and 16 stitches for sock A.
Round 1. Follow the instructions for knitting Round 1 (in chapter 2) to knit the first round on both socks. You now have 8 stitches on side 1 (instep) for each sock and 8 stitches on side 2 (sole) for each sock.
Round 2 (increase)
- SIDE 1 (INSTEP), sock A: K1, M1R, knit to 1 stitch before the end, M1L, K1.
- SIDE 1 (INSTEP), sock B: K1, M1R, knit to 1 stitch before the end, M1L, K1.
- ROTATE: Rotate your work and arrange your stitches on the needles so that you are ready to work the sole stitches on side 2 of both socks.
- SIDE 2 (SOLE), socks B and A: Repeat the side 1 increases on both socks.
- Each sock now has 20 stitches (10 on each side of each sock).
- ROTATE: Rotate your work and arrange stitches so that you are ready to begin the next round.
Next Rounds
- Work Round 2 increases:
| |
4 more times |
5 more times |
- Each sock now has:
| |
36 sts |
40 sts |
Next Round (even). Knit both sides of socks A and B with no increases.
Next Round (increase). Repeat Round 2.
Next Rounds
- Repeat the last 2 rounds (knit even and increase):
| |
4 more times |
5 more times |
- End your work back at the marker having just finished side 2, sock A.
- Each sock now has a total of:
| |
56 sts |
64 sts |
- Each side of each sock now has:
| |
28 sts |
32 sts |
Knitting the Feet
Round 1
- SIDE 1 (INSTEP), socks A and B: Work the Twisted Baskets Chart, beginning at the lower right. If you are knitting the small size, work three-and- a-half repeats of the stitch pattern across side 1 of each sock; if you are knitting the large size, work four full repeats.
- SIDE 2 (SOLE), socks B and A: Knit to end (stockinette stitch).
Next Rounds. Repeat the previous round, continuing to work the Twisted Baskets Chart on side 1 of each sock and keeping side 2 in stockinette, until the socks measure the appropriate length (see Toe-to-Gusset Length, below). End your work having just finished side 2, sock A. You are back at your marker and ready to begin the gusset increases.
TOE-TO-GUSSET LENGTH
Use this handy formula. Note: For Z, measure on side 2 of sock.
For more information, see Toe-Up Math.
Increasing for the Gussets
Round 1 (increase)
- SIDE 1 (INSTEP), socks A and B: Continue to work the Twisted Baskets Chart as established.
- SIDE 2 (SOLE), socks B and A: K1, M1R, knit to last stitch of each sock, M1L, K1.
Round 2 (even)
- SIDE 1 (INSTEP), socks A and B: Continue to work Twisted Baskets Chart as established.
- SIDE 2 (SOLE), socks B and A: Work in stockinette stitch as established.
Next Rounds
- Repeat Rounds 1 and 2:
| |
13 more times |
15 more times |
- Side 1 (instep) of each sock still has:
| |
28 sts |
32 sts |
- Side 2 (sole) of each sock now has:
| |
56 sts |
64 sts |
Shaping the Heel Cup, Sock B
Set Up. This is a partial round, worked only on side 1 (instep) of both socks.
- SIDE 1 (INSTEP), socks A and B: Work the Twisted Baskets Chart as established.
- ROTATE: Rotate work and arrange stitches so that you are ready to begin working the heel on side 2 of sock B.
NOTE: While shaping the heel cup and working the heel flap, you temporarily switch to working the socks individually. You first work side 2 of sock B back and forth in short rows, then you work side 2 of sock A in a similar manner. When the heels are completed, you return to knitting the socks together in rounds (in the Knitting the Legs section below). For information about short rows and wrapping stitches, see Tips for Shaping the Heel.
Side 2, Row 1 (right side)
- Knit:
| |
14 sts |
16 sts |
- Place marker 1.
- Knit:
| |
27 sts |
31 sts |
- Slip 1 as if to purl, bring yarn to the right side to wrap stitch, place marker 2 on left-hand needle, slip stitch back to left-hand needle. Turn work to the wrong side.
Side 2, Row 2 (wrong side). Purl to 1 stitch before marker 1, slip 1 as if to purl, bring yarn to right side to wrap stitch, slip stitch back to left-hand needle. Turn work to the right side.
Side 2, Row 3 (right side). Knit to 2 stitches before previously wrapped stitch, slip 1 as if to purl, bring yarn to right side to wrap stitch, slip stitch back to left-hand needle. Turn.
Side 2, Row 4 (wrong side). Purl to 2 stitches before previously wrapped stitch, slip 1 as if to purl, bring yarn to right side to wrap stitch, slip stitch back to left-hand needle. Turn.
Next Rows. Repeat Rows 3 and 4 until all but the 4 center stitches have been wrapped. End having just completed Row 3.
Working the Heel Flap, Sock B
NOTE: Continue to work back and forth in rows on side 2, sock B only. During the first two rows of the heel flap, you will be lifting and working the wraps that you created in the heel-cup shaping steps above. For information on lifting and working wraps on the right and wrong side, see Tips for Working Wrapped Stitches.
Side 2, Row 1 (wrong side). Purl, lifting the wraps and purling them together with their respective stitches as you come to them, to 1 stitch before marker 1. Then, lift the wrap of the stitch before marker 1, slip both stitch and wrap to the right-hand needle as if to purl, remove marker, slip both stitch and wrap back to the left-hand needle, and purl together the wrap and its stitch along with the next stitch (P3tog). Turn.
Side 2, Row 2 (right side). Slip 1 as if to purl. Then knit, lifting the wraps and knitting them together with their respective stitches as you come to them, to 1 stitch before marker 2. Lift the wrap of the next stitch completely over and to the left of the stitch, slip the stitch as if to knit, slip the wrap as if to knit, remove marker, slip next stitch as if to knit, place the 2 slipped stitches and the wrap back on left-hand needle, and knit the 2 slipped stitches together with the wrap through the back loop. Turn.
Side 2, Row 3 (wrong side). Slip 1 as if to purl, purl to 1 stitch before gap, P2tog to close gap. Turn.
NOTE: From this point on, this heel flap is worked in Eye-of-Partridge Stitch (as written out in Rows 4–7) with a 2-stitch garter-stitch border and 1 edge stitch on each side.
Side 2, Row 4 (right side). Slip 1 as if to purl, K2, *slip 1, K1; repeat from * to 3 stitches before gap, K2, ssk to close gap. Turn.
Side 2, Row 5 (wrong side). Slip 1 as if to purl, K2, purl to 3 stitches before gap, K2, P2tog to close gap. Turn.
Side 2, Row 6 (right side). Slip 1 as if to purl, K2, *K1, slip 1; repeat from * to 3 stitches before gap, K2, ssk to close gap. Turn.
Side 2, Row 7 (wrong side). Slip 1 as if to purl, K2, purl to 3 stitches before gap, K2, P2tog to close gap. Turn.
Next Rows. Repeat Rows 4–7 until you have decreased away all of the gusset stitches on side 2 of this sock. End having completed a right-side row.
- Side 2 of sock B now again has:
| |
28 sts |
32 sts |
Shaping the Heel Cup and Working the Heel Flap, Sock A
To shape the heel cup and work the heel flap of sock A, repeat the instructions for sock B above.
Knitting the Legs
In this section you return to working in the round on all stitches for both socks.
NOTE: Pick up an extra stitch at the point where the heel and instep meet to prevent holes from developing. (See Knitting the Legs.)
Next Round
- SIDE 1 (INSTEP), socks A and B: Work across instep stitches according to the Twisted Baskets Chart as established.
- SIDE 2 (SOLE), socks B and A: Work these stitches according to the Twisted Baskets Chart, following the same row in the chart that you used on side 1. If you are knitting the small size, there will be only three-and-a-half repeats of the stitch pattern on each side of each sock. When working side 2, make sure you begin with the column of the chart that you left off with on side 1 (column 5).
Next Rounds. Continue working in the round, following the Twisted Baskets Chart for all stitches, until the leg measurement from the top of the heel flap is:
| |
4" (10 cm) |
4½" (11.5 cm) |
Next Rounds. Work K1, P1 rib on all stitches for 1½" (3.75 cm).
Finishing
Loosely bind off all stitches using your preferred method (see Bind Offs). Weave in loose tails. Block.
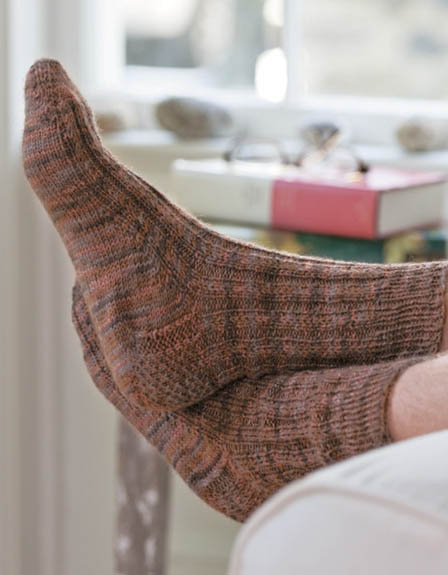
Simplicity
It would probably be appropriate to call this a “guy sock” if only because most guys seem to prefer understated socks with very little flash. In this simple workhorse sock there’s enough going on in the ribbed pattern to keep the knitter from getting bored, which is always a good thing, while the pattern itself remains simple enough for even the most selective of wearers. That’s the nice way to say that this is a great simple sock for fussy folk!
| Adult’s Sizes |
SMALL |
LARGE |
| Finished Foot Circumference |
7" (18 cm) |
81⁄2" (21.5 cm) |
| Yarn |
Schaefer Yarn Heather, 55% merino wool superwash/30% cultivated silk/15% nylon, 4 oz (114 g)/400 yds (366 m) [Yarn band gauge: 7–8 stitches = 1" (2.5 cm) in stockinette stitch on US 1 (2.25.mm) needles]; Elizabeth Blackwell: 1 skein |
| Guage |
8 stitches and 10 rows = 1" (2.5 cm) in stockinette stitch |
| Needle |
US 1 (2.25 mm) 40" (100 cm) circular, or size needed to obtain correct gauge |
| Notions |
3 stitch markers (including 1 locking stitch marker), darning needle |
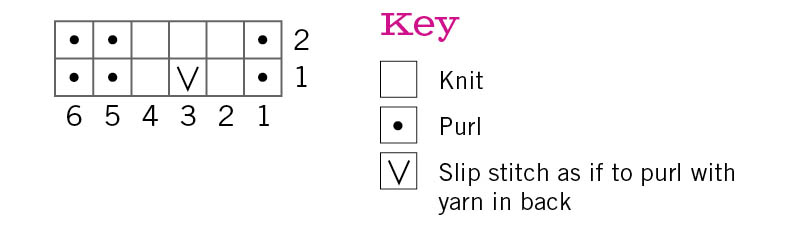
Pattern Stitches
Ribbing: *K1, P1; repeat from *.
Stockinette: Knit every round.
Simplicity: See the Simplicity Charts.
Casting On and Shaping the Toes
Cast On. Follow the instructions for casting on stitches to cast on 16 stitches for sock B and 16 stitches for sock A.
Round 1. Follow the instructions for knitting Round 1 (in chapter 2) to knit the first round on both socks. You now have 8 stitches on side 1 (instep) for each sock and 8 stitches on side 2 (sole) for each sock.
Round 2 (increase)
- SIDE 1 (INSTEP), sock A: K1, M1R, knit to 1 stitch before the end, M1L, K1.
- SIDE 1 (INSTEP), sock B: K1, M1R, knit to 1 stitch before the end, M1L, K1.
- ROTATE: Rotate your work and arrange your stitches on the needles so that you are ready to work the sole stitches on side 2 of both socks.
- SIDE 2 (SOLE), socks B and A: Repeat the side 1 increases on both socks.
- Each sock now has 20 stitches (10 on each side of each sock).
- ROTATE: Rotate your work and arrange stitches so that you are ready to begin the next round.
Next Rounds
- Work Round 2 increases:
| |
5 more times |
6 more times |
- Each sock now has:
| |
40 sts |
44 sts |
Next Round (even). Knit both sides of socks A and B with no increases.
Next Round (increase). Repeat Round 2.
Next Rounds
- Repeat the last 2 rounds (knit even and increase):
| |
4 more times |
6 more times |
- End your work back at the marker having just finished side 2, sock A.
- Each sock now has a total of:
| |
60 sts |
72 sts |
- Each side of each sock now has:
| |
30 sts |
36 sts |
Knitting the Feet
Round 1
- SIDE 1 (INSTEP), socks A and B: Work the Simplicity Chart, beginning at the lower right.
- SIDE 2 (SOLE), socks B and A: Knit to end (stockinette stitch).
Next Rounds. Repeat the previous round, continuing to work the Simplicity Chart on side 1 of each sock and keeping side 2 in stockinette, until the socks measure the appropriate length (see Toe-to-Gusset Length, below). End your work having just finished side 2, sock A. You are back at your marker and ready to begin the gusset increases.
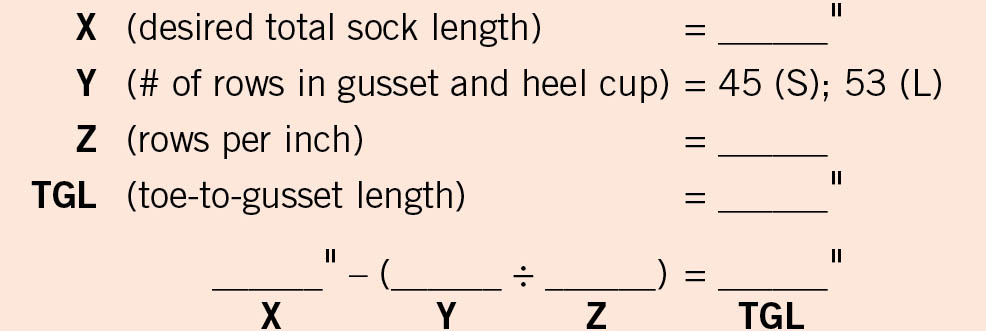
TOE-TO-GUSSET LENGTH
Use this handy formula. Note: For Z, measure on side 2 of sock.
For more information, see Toe-Up Math.
Increasing for the Gussets
Round 1 (increase)
- SIDE 1 (INSTEP), socks A and B: Continue to work the Simplicity Chart as established.
- SIDE 2 (SOLE), socks B and A: K1, M1R, knit to last stitch of each sock, M1L, K1.
Round 2 (even)
- SIDE 1 (INSTEP), socks A and B: Continue to work the Simplicity Chart as established.
- SIDE 2 (SOLE), socks B and A: Work in stockinette stitch as established.
Next Rounds
- Repeat Rounds 1 and 2:
| |
14 more times |
17 more times |
- Side 1 (instep) of each sock still has:
| |
30 sts |
36 sts |
- Side 2 (sole) of each sock now has:
| |
60 sts |
72 sts |
Shaping the Heel Cup, Sock B
Set Up. This is a partial round, worked only on side 1 (instep) of both socks.
- SIDE 1 (INSTEP), socks A and B: Work the Simplicity Chart as established.
- ROTATE: Rotate work and arrange stitches so that you are ready to begin working the heel on side 2 of sock B.
NOTE: While shaping the heel cup and working the heel flap, you temporarily switch to working the socks individually. You first work side 2 of sock B back and forth in short rows, then you work side 2 of sock A in a similar manner. When the heels are completed, you return to knitting the socks together in rounds (in the Knitting the Legs section below). For information about short rows and wrapping stitches, see Tips for Shaping the Heel.
Side 2, Row 1 (right side)
- Knit:
| |
15 sts |
18 sts |
- Place marker 1.
- Knit:
| |
29 sts |
35 sts |
- Slip 1 as if to purl, bring yarn to the right side to wrap stitch, place marker 2 on left-hand needle, slip stitch back to left-hand needle. Turn work to the wrong side.
Side 2, Row 2 (wrong side). Purl to 1 stitch before marker 1, slip 1 as if to purl, bring yarn to right side to wrap stitch, slip stitch back to left-hand needle. Turn work to the right side.
Side 2, Row 3 (right side). Knit to 2 stitches before previously wrapped stitch, slip 1 as if to purl, bring yarn to right side to wrap stitch, slip stitch back to left-hand needle. Turn.
Side 2, Row 4 (wrong side). Purl to 2 stitches before previously wrapped stitch, slip 1 as if to purl, bring yarn to right side to wrap stitch, slip stitch back to left-hand needle. Turn.
Next Rows. Repeat Rows 3 and 4 until all but the 4 center stitches have been wrapped. End having just completed:
| |
Row 4 |
Row 3 |
For Adult’s Small Only
Next Row. Knit 3 stitches, slip 1 as if to purl, bring yarn to right side to wrap stitch, slip stitch back to left-hand needle. Turn.
Working the Heel Flap, Sock B
NOTE: Continue to work back and forth in rows on side 2, sock B only. During the first two rows of the heel flap, you will be lifting and working the wraps that you created in the heel-cup shaping steps above. For information on lifting and working wraps on the right and wrong side, see Tips for Working Wrapped Stitches.
Side 2, Row 1 (wrong side). Purl, lifting the wraps and purling them together with their respective stitches as you come to them, to 1 stitch before marker 1. Then, lift the wrap of the stitch before marker 1, slip both stitch and wrap to the right-hand needle as if to purl, remove marker, slip both stitch and wrap back to the left-hand needle, and purl together the wrap and its stitch along with the next stitch (P3tog). Turn.
Side 2, Row 2 (right side). Slip 1 as if to purl. Then knit, lifting the wraps and knitting them together with their respective stitches as you come to them, to 1 stitch before marker 2. Lift the wrap of the next stitch completely over and to the left of the stitch, slip the stitch as if to knit, slip the wrap as if to knit, remove marker, slip next stitch as if to knit, place the 2 slipped stitches and the wrap back on left-hand needle, and knit the 2 slipped stitches together with the wrap through the back loop. Turn.
Side 2, Row 3 (wrong side). Slip 1 as if to purl, purl to 1 stitch before gap, P2tog to close gap. Turn.
NOTE: From this point on, this heel flap is worked in Eye-of-Partridge Stitch (as written out in Rows 4–7) with a 2-stitch garter-stitch border and 1 edge stitch on each side.
Side 2, Row 4 (right side). Slip 1 as if to purl, K2, *slip 1, K1; repeat from * to 3 stitches before gap, K2, ssk to close gap. Turn.
Side 2, Row 5 (wrong side). Slip 1 as if to purl, K2, purl to 3 stitches before gap, K2, P2tog to close gap. Turn.
Side 2, Row 6 (right side). Slip 1 as if to purl, K2, *K1, slip 1; repeat from * to 3 stitches before gap, K2, ssk to close gap. Turn.
Side 2, Row 7 (wrong side). Slip 1 as if to purl, K2, purl to 3 stitches before gap, K2, P2tog to close gap. Turn.
Next Rows. Repeat Rows 4–7 until you have decreased away all of the gusset stitches on side 2 of this sock. End having completed a right-side row.
- Side 2 of sock B now again:
| |
30 sts |
36 sts |
Shaping the Heel Cup and Working the Heel Flap, Sock A
To shape the heel cup and work the heel flap of sock A, repeat the instructions for sock B above.
Knitting the Legs
In this section you return to working in the round on all stitches for both socks.
NOTE: Pick up an extra stitch at the point where the heel and instep meet to prevent holes from developing. (See Knitting the Legs.)
Next Round
- SIDE 1 (INSTEP), socks A and B: Work across instep stitches according to the Simplicity Chart as established.
- SIDE 2 (SOLE), socks B and A: Work these stitches according to the Simplicity Chart, following the same row in the chart that you used on side 1.
Next Rounds. Continue working in the round, following the Simplicity Chart, until the leg measurement from the top of the heel flap is
| |
5" (12.5 cm) |
5½" (14 cm) |
Next Rounds. Work in K1, P1 rib on all stitches until ribbing measures 2" (5 cm). For the large size, the ribbing lines up more closely with the stitch pattern on the leg if you start with a purl stitch.
Finishing
Loosely bind off all stitches using your preferred method (see Bind Offs). Weave in loose tails. Block.