In spite of repeated efforts to stop knitting socks, I find myself unable to do so. Socks, for now, are my life. I design and knit other things too, but socks pretty much rule me.
That’s a great reason to knit any sock, but there are more reasons to go toe-up. As in my first book, 2-at-a-Time Socks, both socks are started and completed at the same time, which means they’re basically identical. I can cast on and bind off both at one time. By beginning socks at the toe, you can also try them on as you knit them. This ensures that they fit you, or their intended wearer, very well. We can all go to the store and buy socks that fit, or most of us can. I have a pretty small foot for a woman, and commercially made women’s socks are a little big for me. Kids’ socks are made for kids. (Nothing against kids, but I really don’t like their socks.) If I knit my own, my socks always fit. Most significantly, toe-up socks mean that I can begin my socks with a questionable amount of yarn and just stop when I run out. That could mean leftovers from a previous project to make socks for a child, or ankle socks for me. I can knit with partial skeins until I’ve got a few yards left, and then bind off my identical socks.
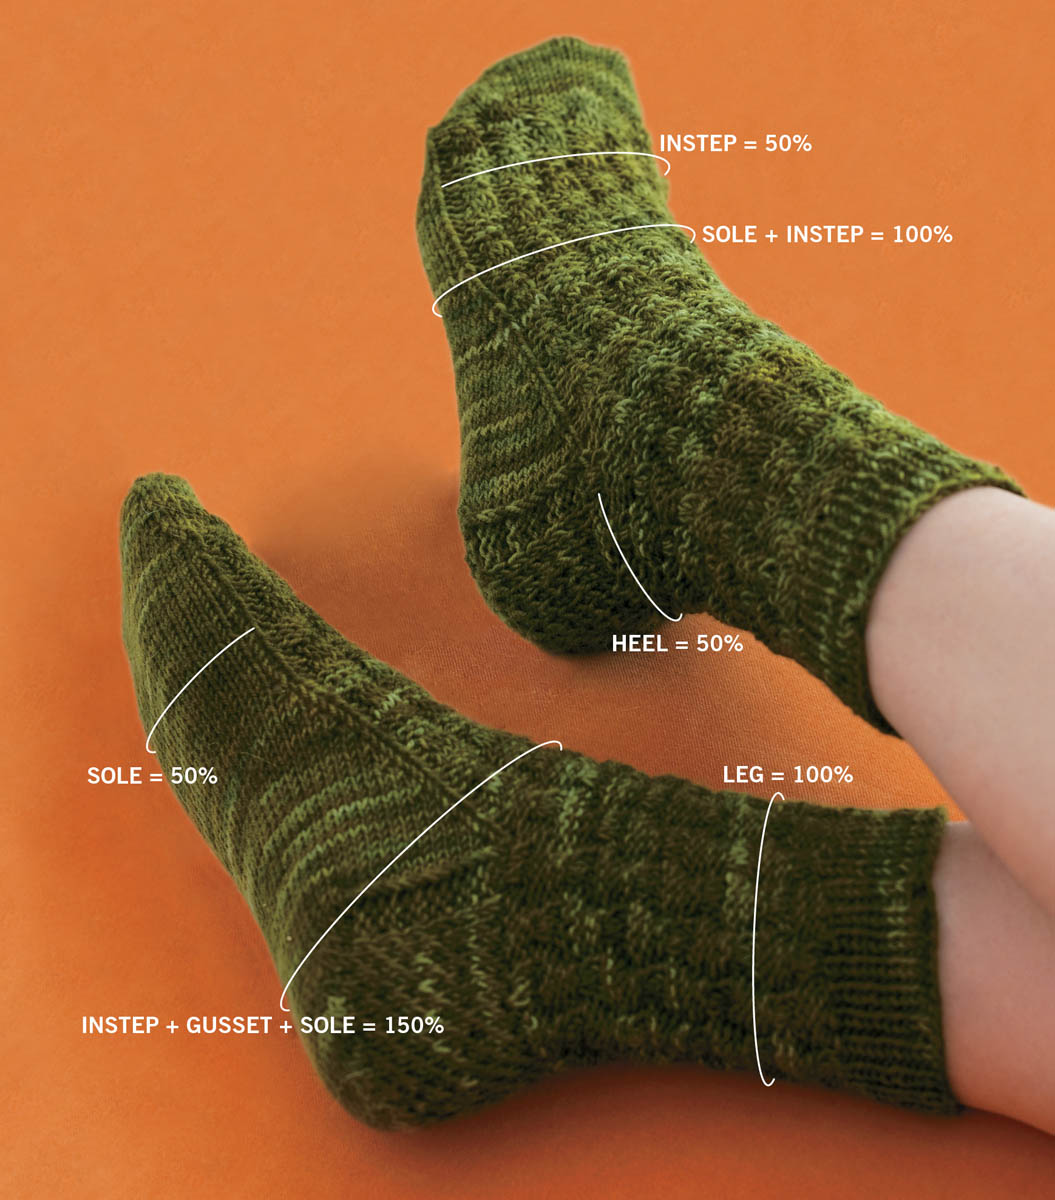
As with top-down socks, you can think of toe-up socks in terms of percentages. After toe increases, the total number of stitches around the foot for each sock equals 100 percent. Instep stitches are generally 50 percent. Soles and heels are usually worked on the other 50 percent. When gussets are added, the total percentage increases to 150 percent. As the heels are created, the number of stitches decreases. The goal is to return to 100 percent as the heel is completed. Using this information, you can adapt any sock pattern to your particular style.
Toe-up socks “my way” differ from top-down socks only in the direction of the knitting. Beginning with a small number of cast-on stitches, increases form the toe. The foot is then knitted for a bit, until it’s time to increase for the gussets (the triangular areas on either side of the heel). Determining how long to knit the foot requires a little bit of math (explained below), but it’s well worth it. Once the gusset has been created, it’s time to make a cup for the heel to sit in. Short rows give the heel a rounded shape. Next, more short rows effectively eat up the added gusset stitches while a heel flap is built. Then it’s back to working in the round on the leg.
The key to the proper fit of a toe-up sock is knowing when to start the gusset increases on the foot. Here’s what you need to know:
Plug the above three pieces of information into the easy mathematical formula (and with individual patterns) to calculate the length of foot before you begin the gusset increases — “toe-to-gusset length.”
Row gauge can vary between knitters even when stitch gauge is the same. Some people disagree with me. If you don’t agree, try this simple experiment. Set five or six knitters down with the same yarn and a few different sizes of needle. Knit until everyone is getting a given stitch gauge, asking them to change needles as needed to meet gauge. After they’ve knitted a few inches at proper stitch gauge, stop and measure everyone’s row gauge. My guess is the row gauges will vary.
Now, do this in reverse. Knit until everyone is getting a stated row gauge. After a few inches, check everyone’s stitch gauge. I bet they are not all getting the same number of stitches per inch. This explains why I can’t give you the numbers. You’ve got to get them yourself!
Let’s take the pattern for Ballet as an example.
When I apply the formula (see box below), I find that I should knit the feet until the socks measure approximately 3.45 inches from the tips of the toes to the needle. Although you can round this measurement a little, it’s best to round down. Socks stretch, and so shorter is generally better than longer. (Metric users can just substitute centimeters for inches.)
X = your desired total sock length
Y = number of rows in gusset and heel cup
Z = your rows per inch, measured on the sole of sock
TGL = toe-to-gusset length
X – (Y ÷ Z) = TGL
Here is my completed formula for figuring the measurement from toe to the beginning of the gusset increases for Ballet in size Small (see here).
X (my desired total sock length) = 8.25"
Y (number of rows in gusset and heel cup) = 53
Z (my rows per inch, measured on the sole of sock) = 11
TGL (toe-to-gusset length) = 3.43"
8.25" − (53 ÷ 11) = 3.43"
X − ( Y ÷ Z ) = TGL
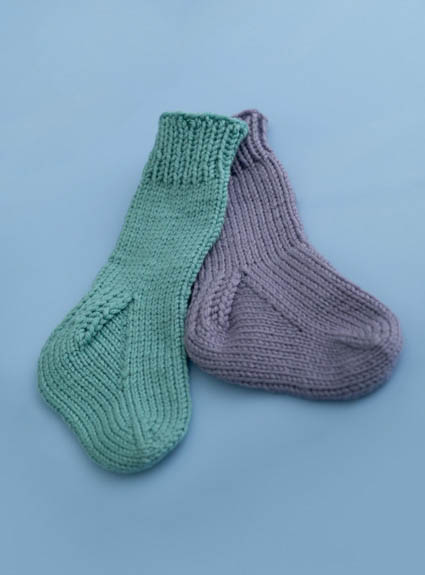
I’ll demonstrate the 2-at-a-time toe-up technique using a worsted-weight yarn in two colors to make it easier to follow along. If you knit these sample socks at a gauge that’s comfortable for you, they should fit a child about two to four years old.
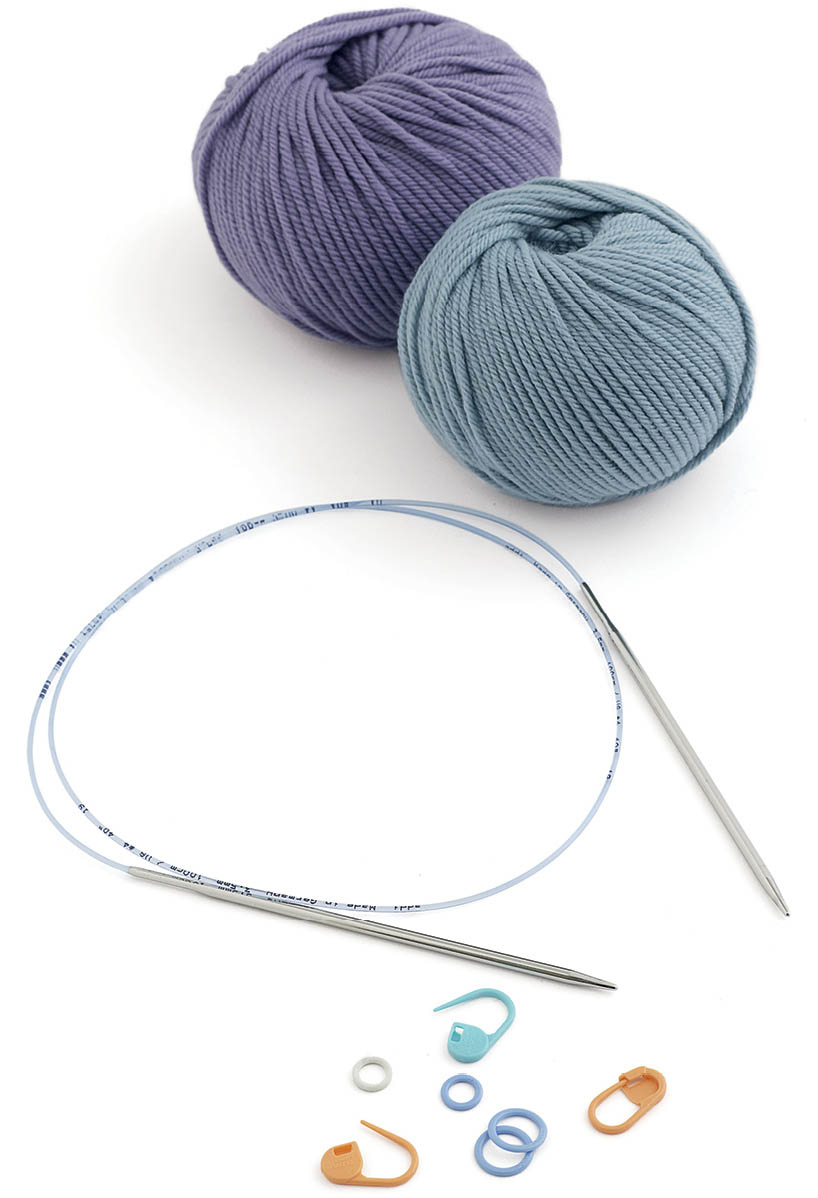
Needles. To get started with your toe-up 2-at-a-time socks, you need a 40" (100 cm) circular needle. I used a US size 5 (3.75 mm), but I knit loosely and you may find it easier to work with a larger needle. Because these are sample socks, getting gauge is not as important as the learning!
Markers. You will need several stitch markers to knit these socks. I recommend a locking stitch marker, because you can easily attach it to the work. A scrap of contrasting-color yarn tied to the work also serves the purpose.
Yarn. You also need about 60 yards each of two different colors of a worsted-weight yarn. The yarn I used for the sample socks is Valley Yarns Valley Superwash, but any worsted-weight yarn will work. The gauge for the actual sample socks is around 6 stitches per inch, although as I said above gauge is not critical here. (This may be the only time you ever hear me say those words! Gauge is always critical in garment construction.)
If you don’t know what to do with your sample socks when they are completed, I’ve got a few ideas for you.
Let’s get started! Knitting two socks at one time from the toes up is simple once you understand the techniques involved. By following along with the step-by-step instructions below, you’ll be knocking out socks in perfect pairs in no time!
In this section, I give the pattern instructions for the sample socks first along with a photo, often followed by an explanation of exactly how to carry out those instructions. As you knit other patterns in the book, you can easily refer back to this section for explanations and visuals whenever you get “stuck.”
The cast-on technique shown here is an adaptation of Judy’s Magic Cast On (© Judy Becker 2006). It shows how to cast two sets of stitches (one for each sock) onto one long circular needle: Half the total number of stitches for each sock are cast on to each half of the circular needle. These stitches become the very tips of the toes of your socks. Next, you knit one round to properly seat those stitches on your needle.
To build your own pair of sample socks, all you need are a 40" circular needle, yarn, and some stitch markers. Here’s what we used to create the sample you’ll be knitting:
| Needle | US 6 (4.0 mm) 40" (100 cm) circular needle or whatever needle size is comfortable with your yarn |
| Yarn | 60 yards (55 m) each of two colors of worsted-weight yarn. (For the sample socks, I recommend using a different color yarn for sock B and sock A, so you can distinguish them more easily. I used Valley Yarns Valley Superwash in Teal for sock B and Misty Lilac for sock A.) |
| Notions | One split-ring or locking stitch marker and two regular stitch markers |
| Abbreviations | K Knit P Purl M1R Make 1 right (see Backward Loop Increases) M1L Make 1 left (see Backward Loop Increases) |
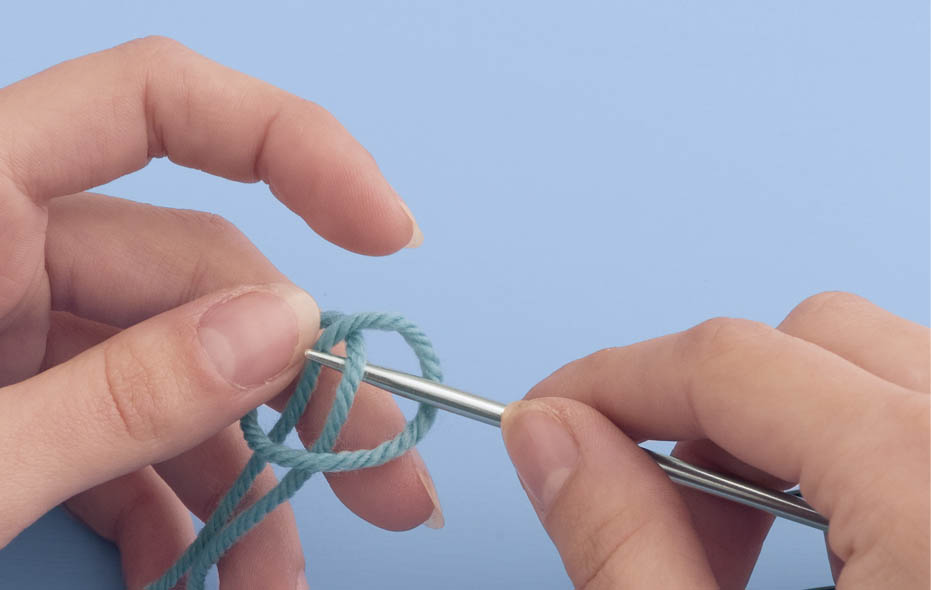
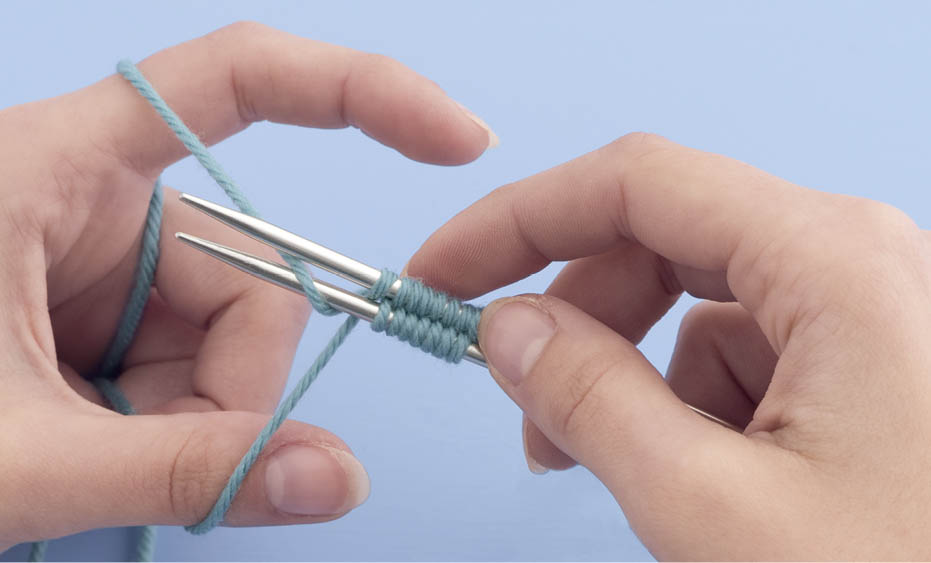
Anchor loop on top needle.
 Once you master this cast on, you may want to try starting with just a loop of yarn on the top needle in place of the slip knot. Just be sure the tail end hangs down the side of the needle that is away from you. This results in a smoother toe, without the little bump that the slip knot leaves.
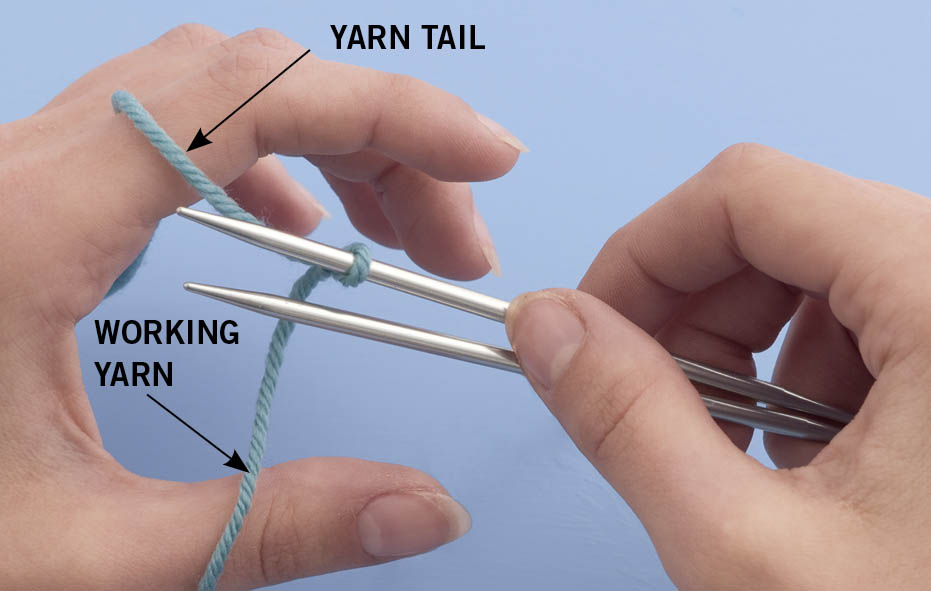
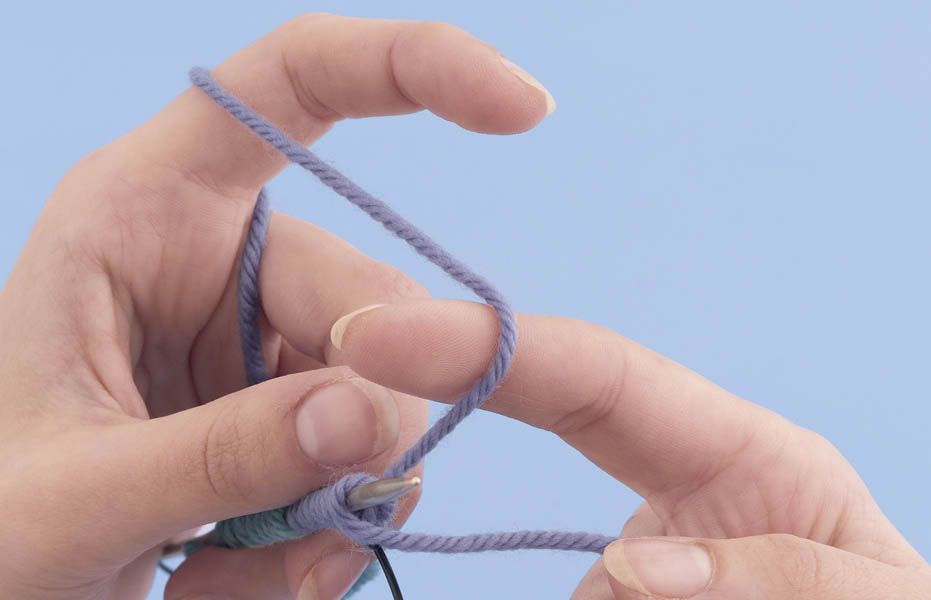
Yarn tail over index finger and working yarn over thumb.
I’ve found that it can be tricky not to default to the long-tail cast on when learning this method. Remember that the yarn tail goes over your finger, not over your thumb.
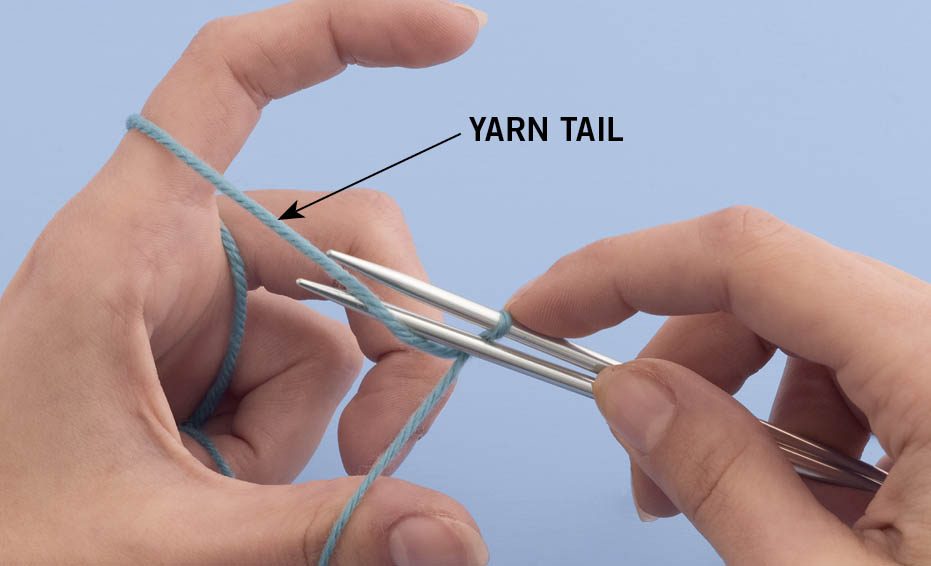
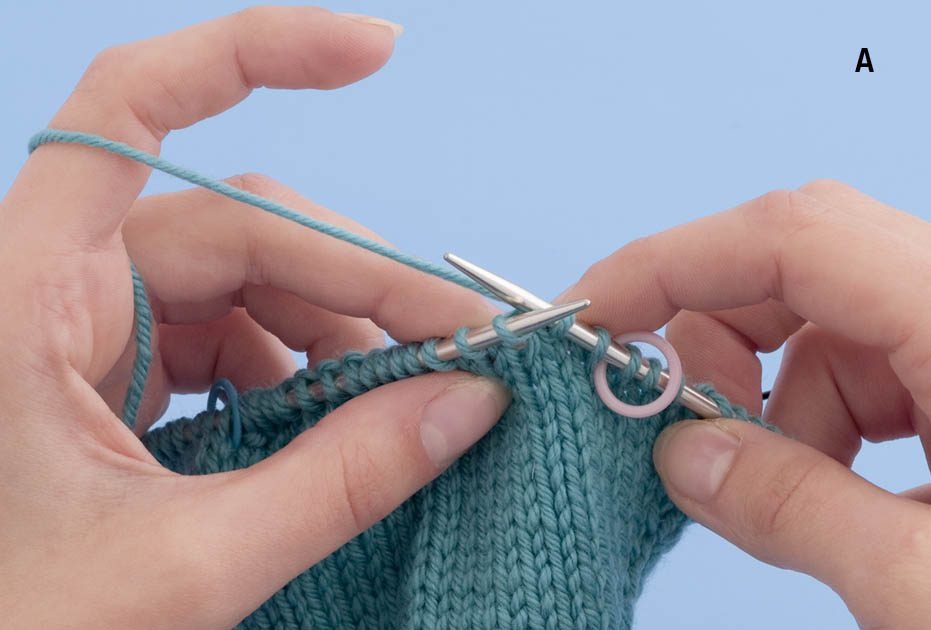
(A) Yarn tail below the bottom needle.

(B) Making the loop.
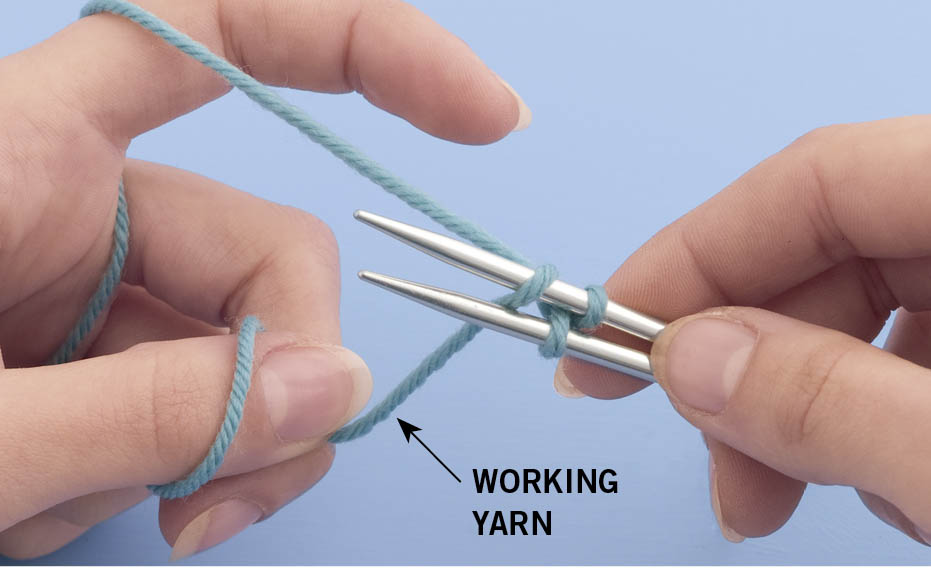
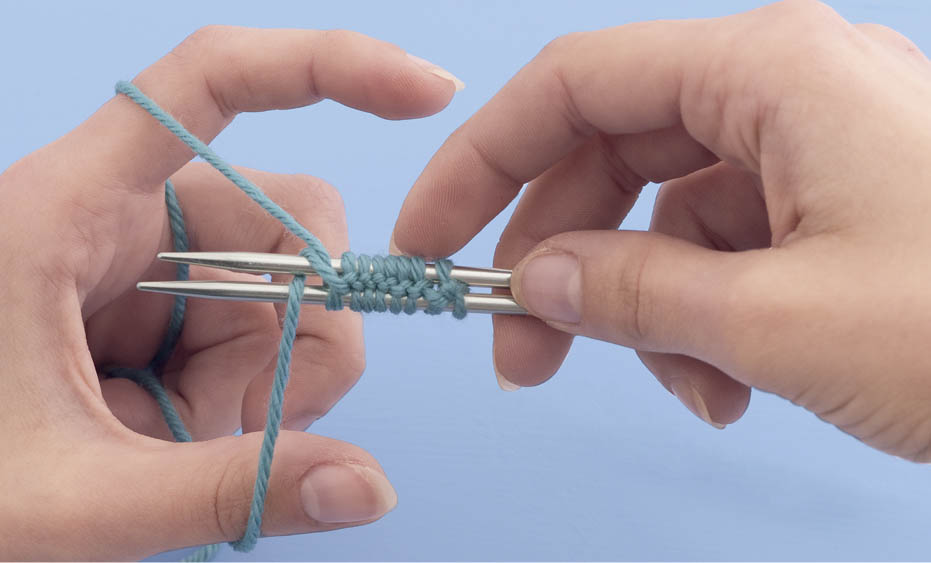
Two stitches on top needle: the cast-on stitch and the anchor loop.
Note that the top yarn strand always wraps around the bottom needle, and the bottom yarn strand always wraps around the top needle. Just remember: “Top around bottom, bottom around top.”
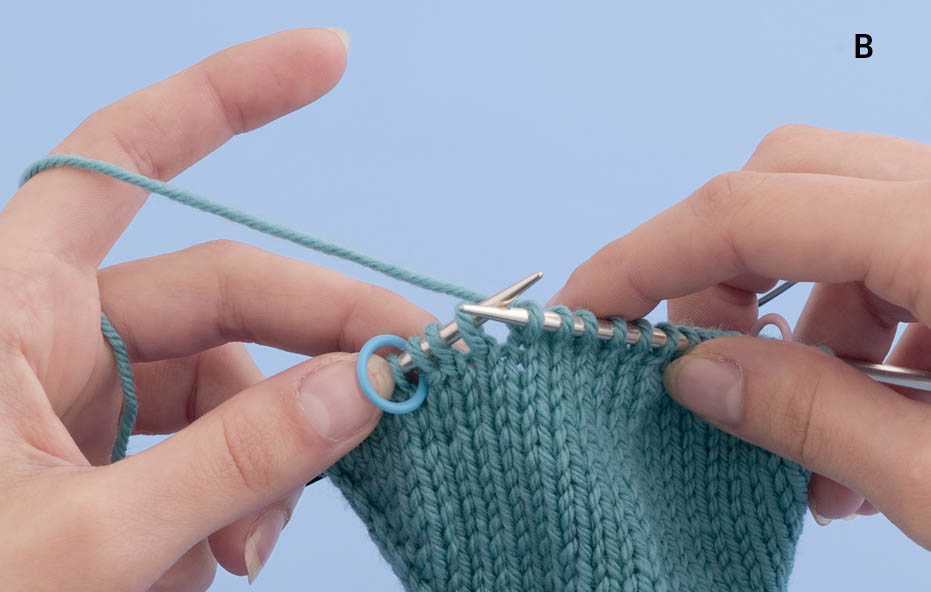
Casting on the final stitch for sock B.
Purl bumps on the opposite side of your work.
Check that your last stitch was cast on to the bottom needle using the yarn tail. If not, you may have made two consecutive loops on the same needle, or you may have used the same yarn strand to make loops on both needles. Carefully check your cast on stitches for irregularities. When checking that you have cast on the correct number of stitches for your sock, be sure to count the stitches on both halves of the circular needle. Also, remember that the anchor loop counts as the first stitch.
On the side of your work facing you, the stitches should look like two rows of offset loops. On the opposite side (which will become the inside of the toe), you’ll see a row of twists that look like purl bumps.
Casting on the first stitches for sock A.

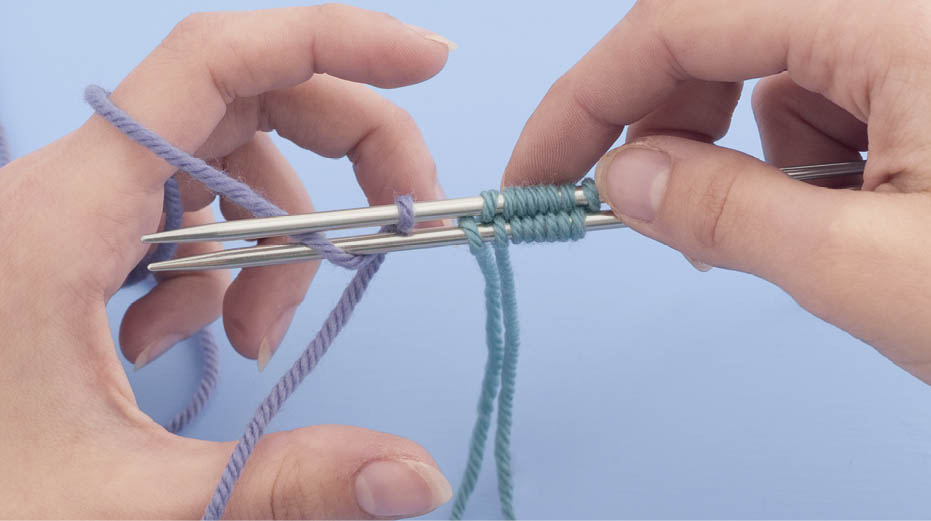
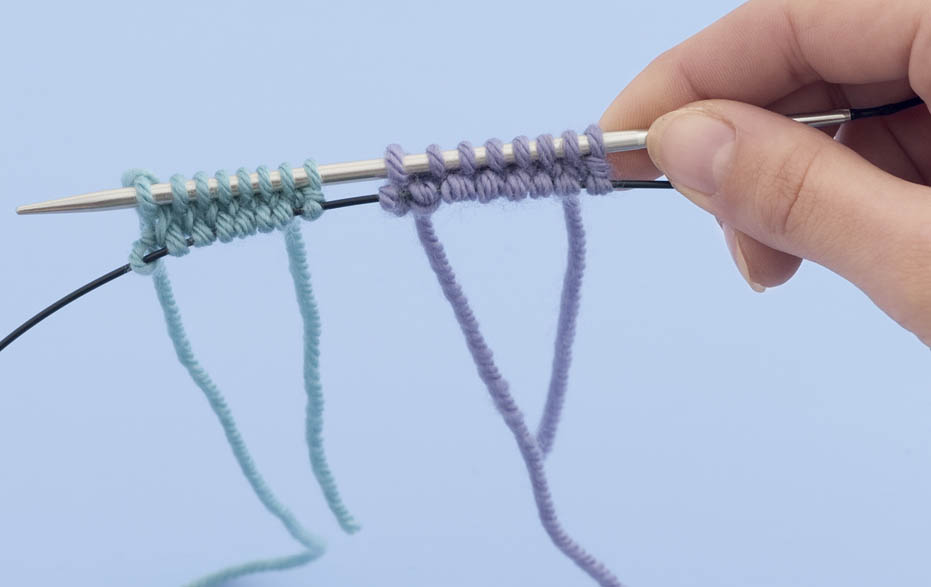
All stitches cast on for sock A (lilac) and sock B (teal).
The sample socks have 16 stitches cast on for each sock: 8 stitches on the top needle and 8 stitches on the bottom needle.

All stitches cast on and work rotated.
The stitches currently on the top of your work are referred to as “side 1” because they are worked first at the start of each round; they will become the insteps (tops of the feet) of your socks. The stitches on the bottom needle are called “side 2”; they will become the soles of your socks.
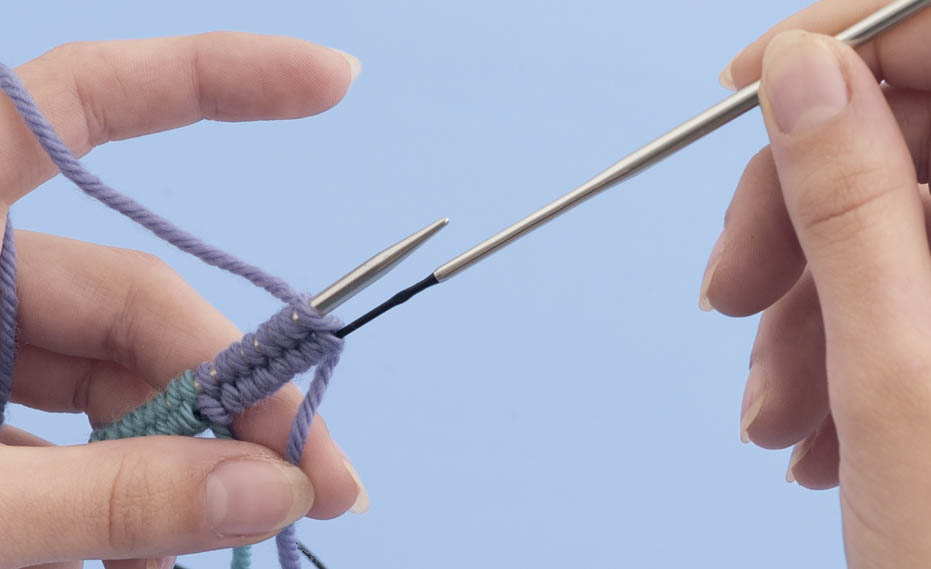
(A) Pull the bottom needle to the right.
When you empty the bottom needle to prepare to knit side 1, all the side 2 stitches lie on the cable.
(B) Yarn tail in place under working strand.
Be certain to “lock” your yarn tail in place behind the working yarn. This is important, because it ensures that your final cast-on stitch is held closed.
The first stitch will probably loosen as you knit it. Pull gently on the tail to snug it back up.
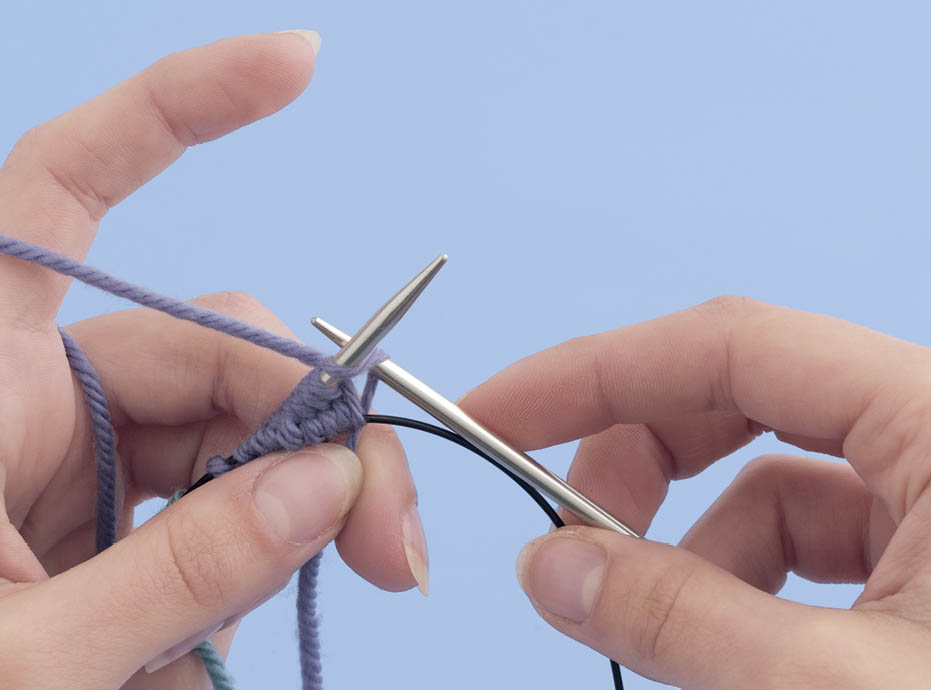
Knitting the first stitch.
It is important to position this marker so it goes into the stitch, not around the needle. It remains in place in that stitch until your socks are complete.
Side 1, sock A stitches complete.
Look at the stitches that you have just worked for sock A. They should appear as stockinette stitches.
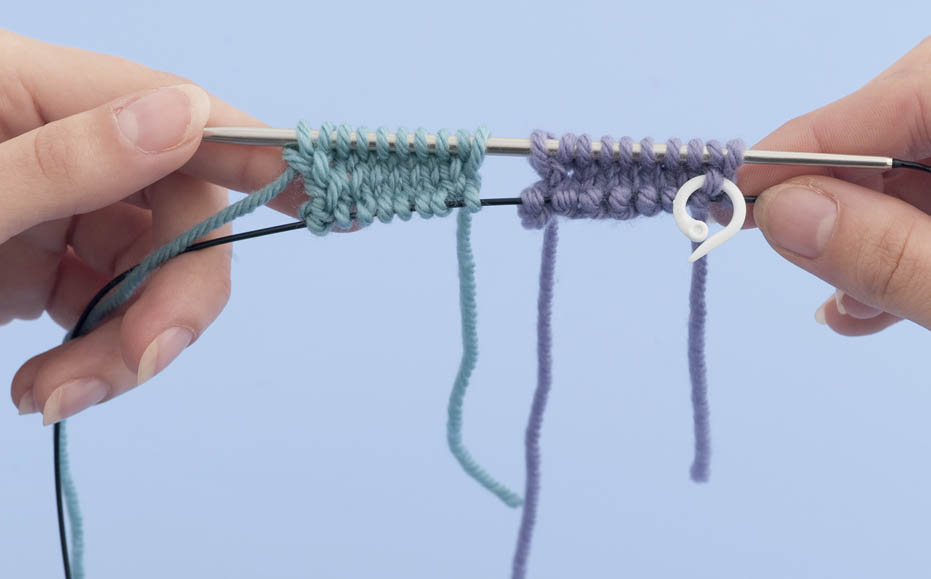
Side 1, of sock B (Teal) and sock A (lilac) complete.
With side 1 of both socks complete, you are ready to rotate your work.
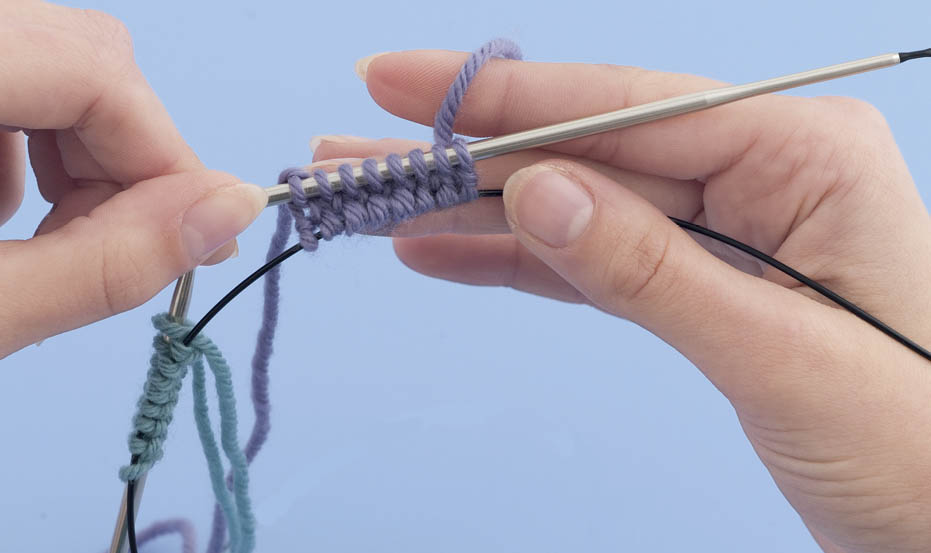
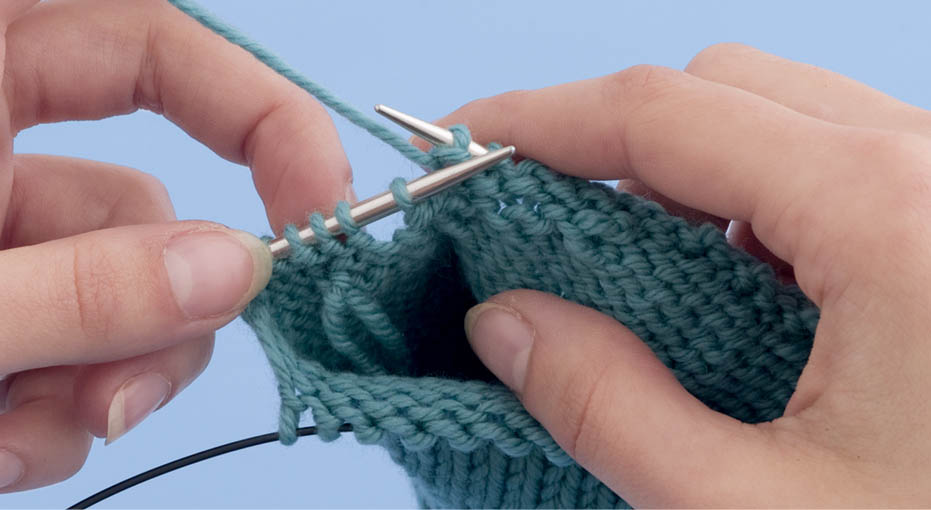
Knit through the back loops of the stitches on side 2, sock B. (See here if you need a refresher on how to knit through the back loop.)

Knitting through the back loops on side 2.
It is important that you knit through the back loops here, because this particular cast on twists the stitches that you cast on for side 2. To untwist them, you knit them through the back loops on the first round only.
Look at the stitches you just worked and check that they appear as stockinette stitches. If you see a row of purl bumps here, you may have been working on the inside of side 1, rather than continuing in the round to work the outside of side 2.
When this first round is complete, you now have what appears to be two rows of stockinette stitches for each sock. These stitches will become the very tip of the toes of your socks.
Note: If you didn’t place a marker into the first stitch on Round 1, then do so now.
Congratulations! You’ve just successfully cast on and worked the first round of your socks. You are now ready to begin Round 2. If you are making the sample socks, continue to Shaping the Toes and step 17 on the page. If you are knitting one of the project socks, return to your sock pattern to proceed.
For increasing on the toes of these socks, I prefer a backward loop increase. I think it’s easier to knit into on the next round than other types of increases. By looping the yarn in different directions you can create either a right-leaning or left-leaning version of this increase (referred to as M1R and M1L). Using these different versions of the increase on opposite sides of a sock gives a more uniform appearance to the two sides. (For instructions on how to make an M1R and M1L increase, see here.)
SIDE 1, sock A: K1, M1R, knit to one stitch before the end of side 1 of sock A, M1L, K1.
SIDE 1, sock B: Drop yarn A; pick up yarn B. K1, M1R, knit to 1 stitch before the end of side 1 of sock B, M1L, K1.
Increases completed on side 1 of both socks.
SIDE 2 (SOLE), sock B: K1, M1R, knit to 1 stitch before the end of side 2 of sock B, M1L, K1.
SIDE 2 (SOLE), sock A: Drop yarn B; pick up yarn A. K1, M1R, knit to 1 stitch before the end of side 2 of sock A, M1L, K1.
Increases completed on both sides of both socks.
You’ve just completed the first increase round of socks A and B. Each sock now has 20 stitches (10 stitches on each side of each sock).
Toe increases completed.
Phew! Your toes are done. Now you can move on to the feet of your sample socks.
To knit the feet, you work in the round on both socks, without any more increases, until your socks are a certain length. For the sample socks, I specify this length. However, as you’ll see, each pattern in this book includes an easy formula for calculating this measurement for custom-fitting socks.
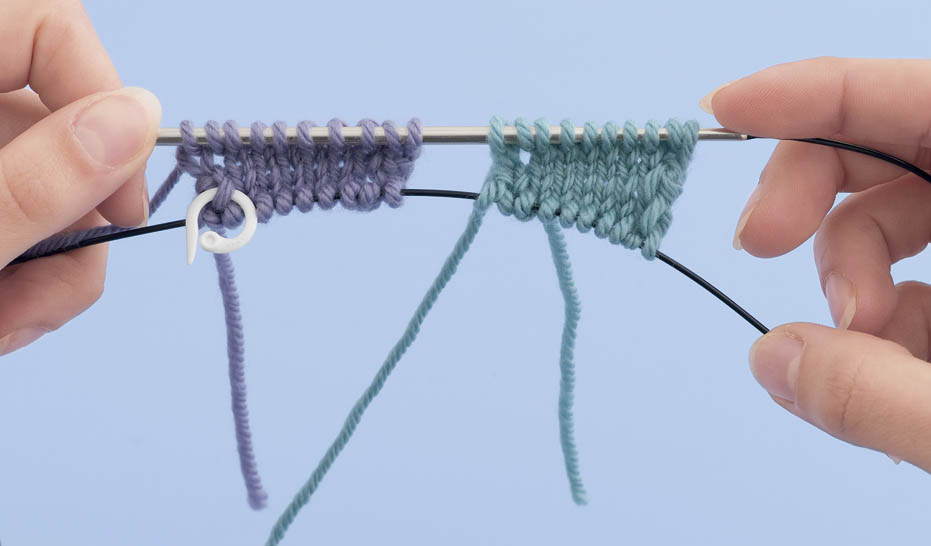
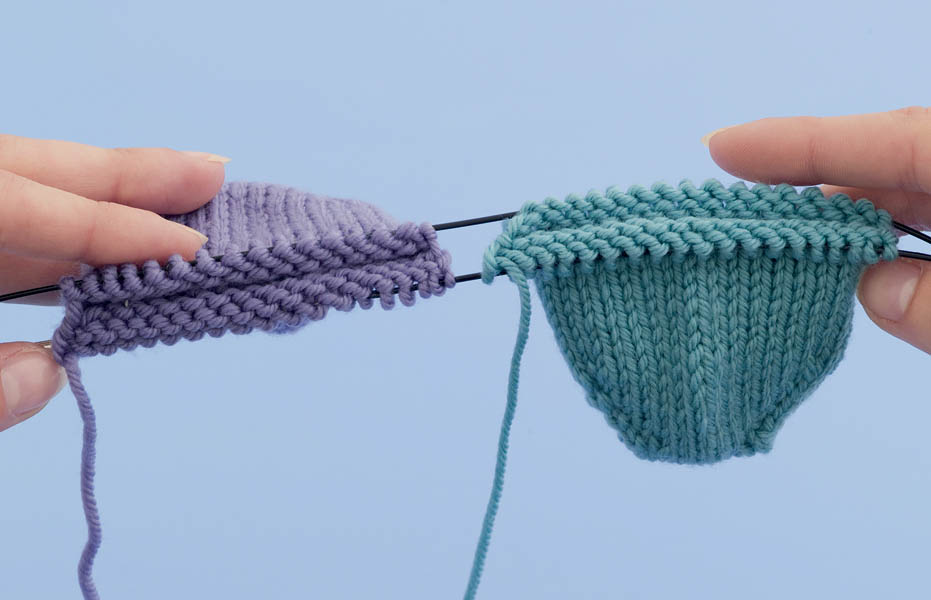
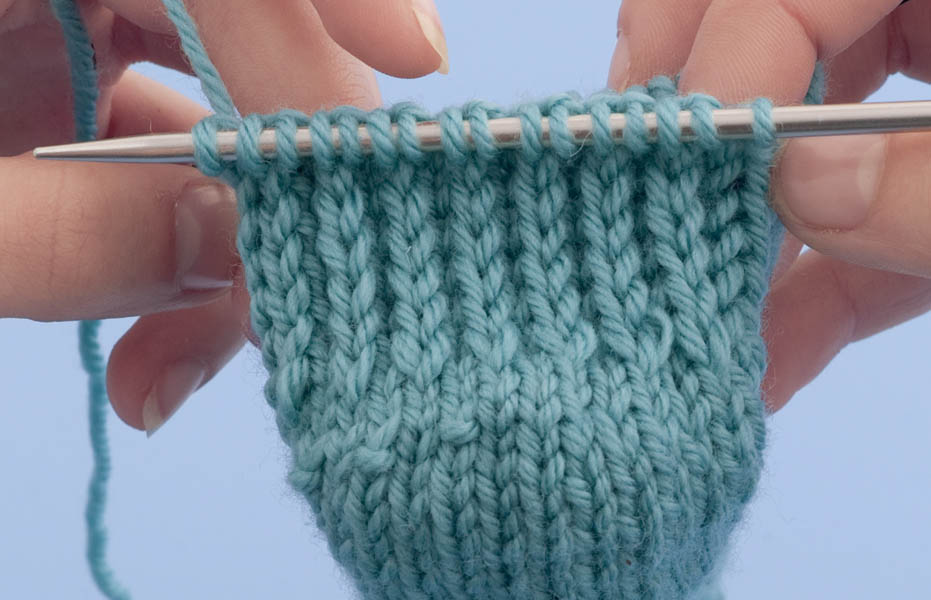
Feet of both socks complete.
Gussets widen the foot of the sock to accommodate your heel; they are the part of the sock where the foot transitions into the leg. When the foot is long enough, you create the gussets by working increases on both sides of the sole stitches only. You increase on alternate rounds until you reach the specified number of gusset stitches for your socks.
SIDE 1 (INSTEP), socks A and B: Work in stockinette stitch as established.
SIDE 2 (SOLE), socks B and A: K1, M1R, knit to last stitch of each sock, M1L, K1.
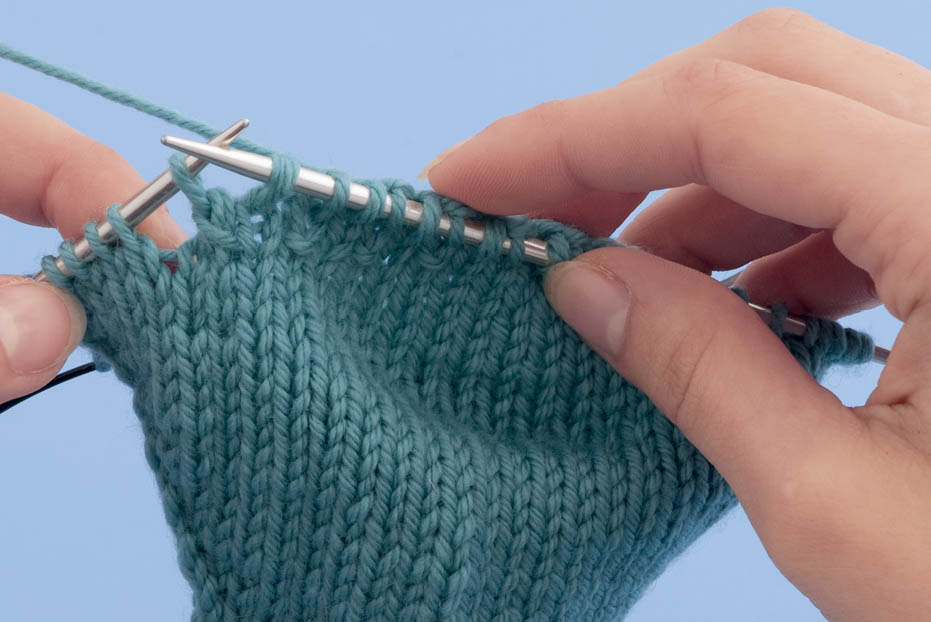
First round of gusset increases completed.
These increases are made only on the sole (side 2) of the socks.
SIDE 1 (INSTEP) of each sock still has 16 stitches.
SIDE 2 (SOLE) of each sock now has 32 stitches.
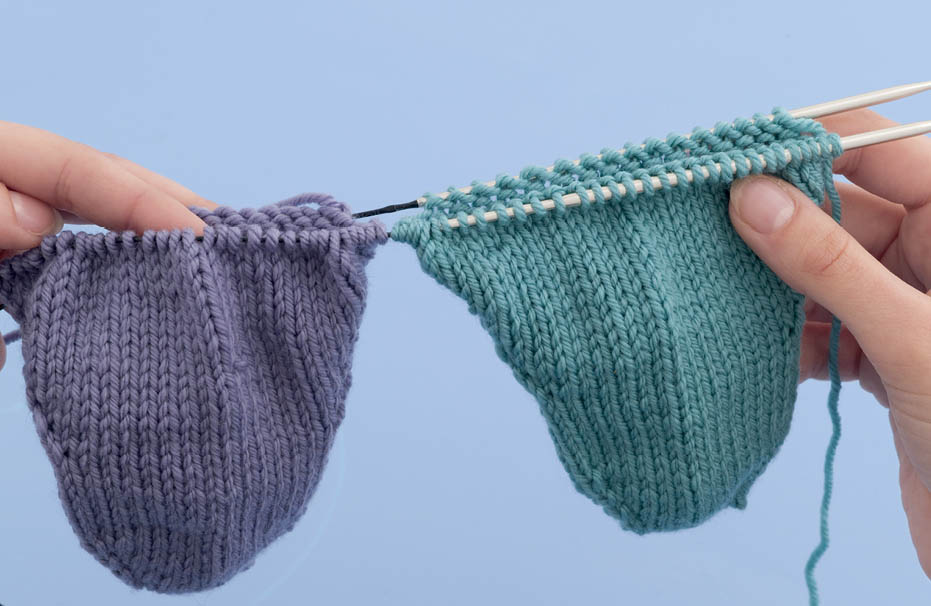
Gusset increases complete.
A heel cup is the rounded shape at the bottom of the heel of a sock. In the patterns in this book, the heel cups are shaped by working “short rows.” The short-row technique is used to add length to a certain section of knitting. On these rows, you work only part way across, and then turn and work back across the same stitches. To shape the heel cup, you work back and forth on the center stitches, working 2 fewer stitches on each row until you are left with a given number of stitches in the center of the heel. To avoid holes at the turns, you wrap a stitch at each turn and then knit (or purl) the wraps together with their stitches on the first two rows after you’ve completed the heel cup.
To avoid potential confusion, I use the terms “right side” and “wrong side” (rather than “front” and “back”) to indicate how to move your yarn as you create the wrap. The “right side” is the side that will eventually be displayed to the public (usually the knit side). The “wrong side” is the side that will be against your skin (usually the purl side). Front and back may be relative, but most of us know right from wrong!
NOTE: Because you use short rows on both the heel cup and heel flap, these sections are worked separately: You first work side 2 of sock B back and forth in rows to the completion of the heel cup and heel flap, then you work side 2 of sock A in a similar manner. At the completion of the heels, you return to knitting the socks together in rounds.
SIDE 1 (INSTEP), socks A and B: Knit to the end. Rotate work and arrange stitches so that you are ready to begin working the heel on side 2 of sock B.
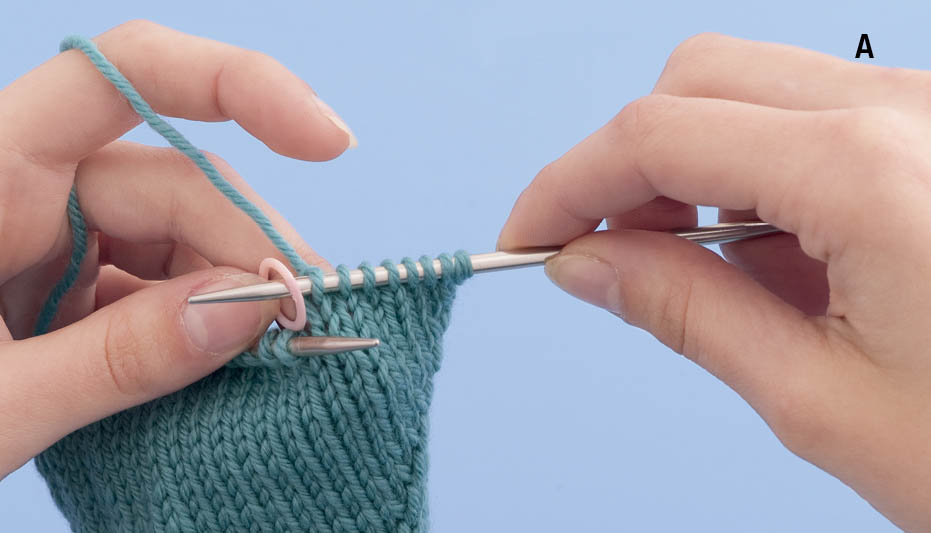
First right-side row is complete.
The stitches between the markers become your heel cup. The stitches on the outside of the markers are gusset stitches, which will be worked later. From this point on, the heel cup is worked back and forth in rows on side 2 (sole) of sock B.
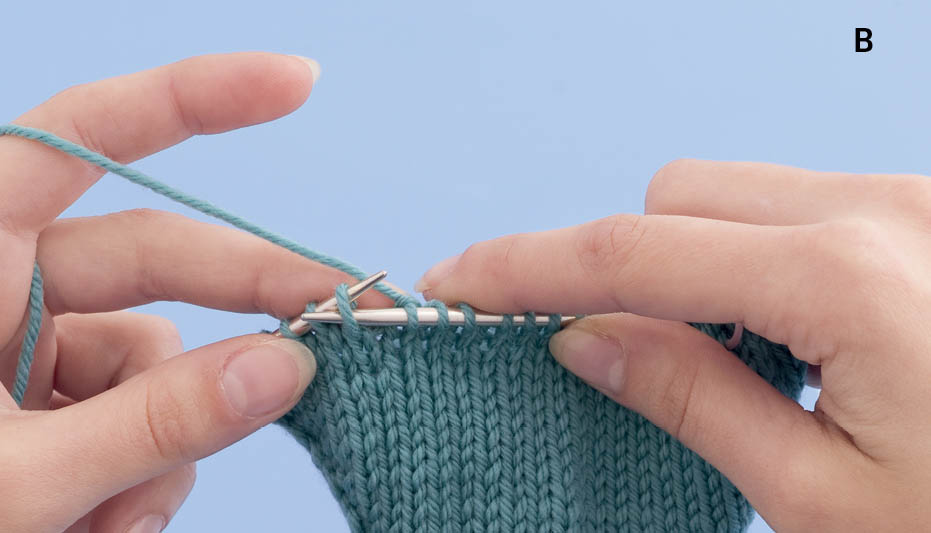
First wrong-side short row is complete.
Knit across the right side to two stitches before previously wrapped stitch.

Purl across the wrong side to two stitches before previously wrapped stitch.

Heel cup for one sock completed and work turned.
Now that the heel cup of sock B is complete, you will move on to building the heel flap of this sock. You will work the heel cup and flap of sock A after you have completed the heel of sock B. You are now ready to work the heel flap. Note: The other sock patterns in this book have different numbers of stitches left unwrapped at the center of the heel.
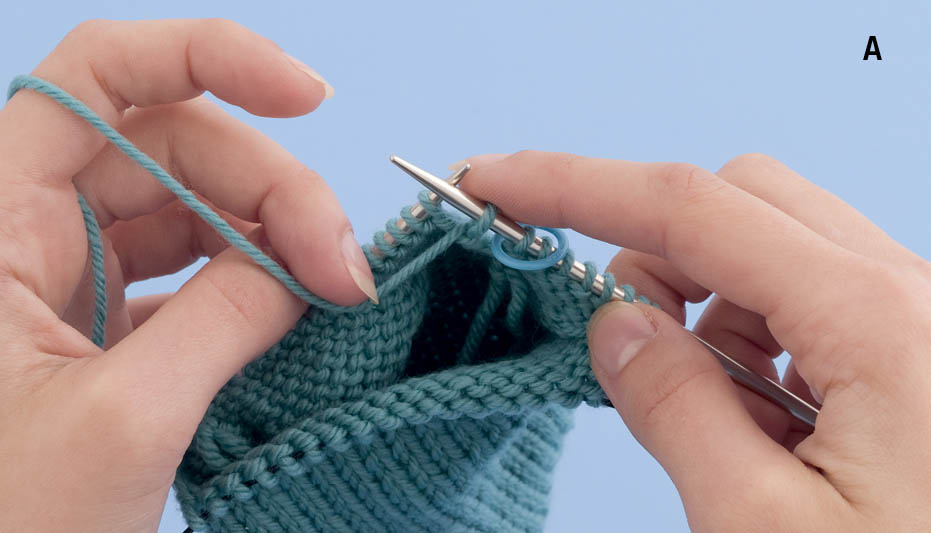
A heel flap is the part of the sock that wraps around the back of your heel. In the patterns in this book, you create heel flaps by working back and forth in short rows on the center heel cup stitches while “eating up” the gusset stitches on either side. Each short row creates a gap between the edge of the heel flap and the gusset stitches. This gap is closed by working the stitches at the edge of the heel flap together with a stitch from the gusset. This gradually decreases the number of stitches down to the number needed for knitting the leg.
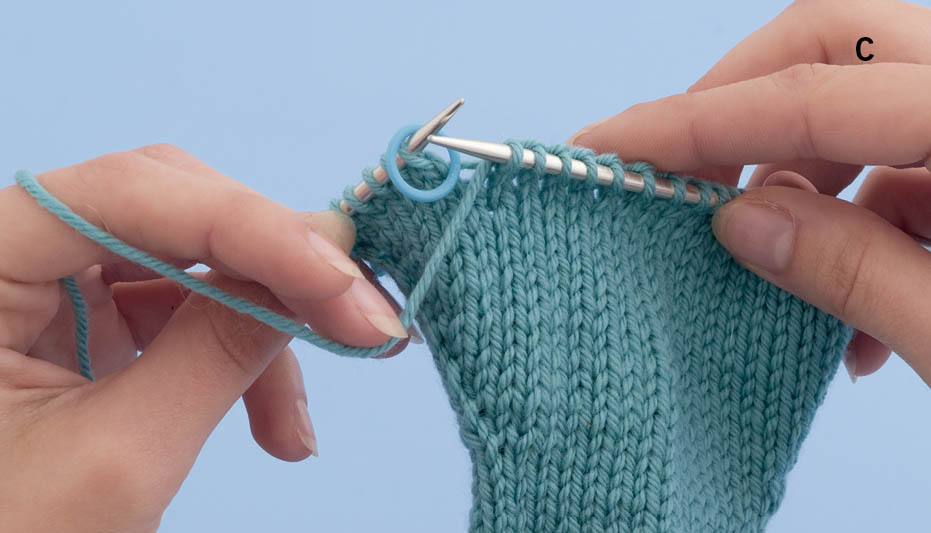
In this section you will lift the wraps you just created and knit (or purl) them together with their respective stitches. You can distinguish the wrapped stitches from regular stitches because they’re wearing a little “noose” around their necks. When you work each stitch together with its wrap, you move the noose and hide it behind the stitch it was wrapped around. The completed wrap should not be visible on the right side of the fabric. You may be able to lift the wraps and knit into the stitch in one step, but most knitters like to use the tip of the right-hand needle to lift the wrap up onto the left-hand needle, and then knit or purl the two together in a way that hides the wrap. (For more information, see Working Wrapped Stitches.)
In this section you will work back and forth in rows on side 2 (sole) of sock B.

Purling 2 stitches together to begin heel flap.

Knitting the 2 slipped stitches together with the wrap through the back loop.
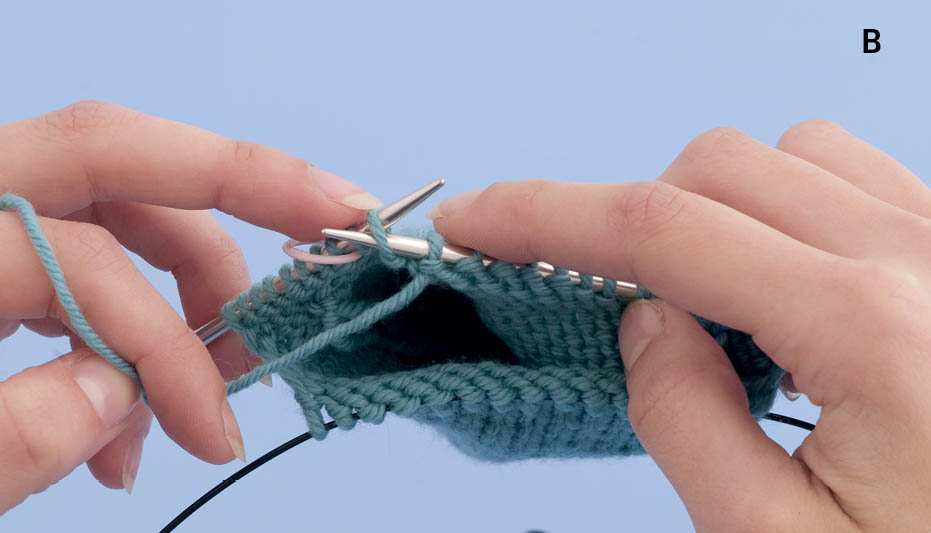
Gap between heel flap and gusset on wrong side.
Note the gap that is present between the first or last stitch of your heel flap and the next stitch of the gusset.
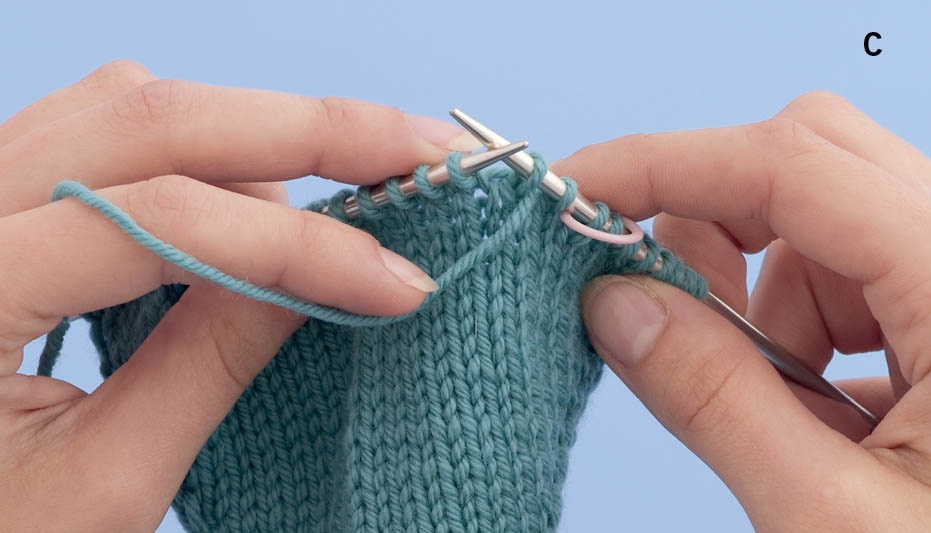
Gap between heel flap and gusset on right side.
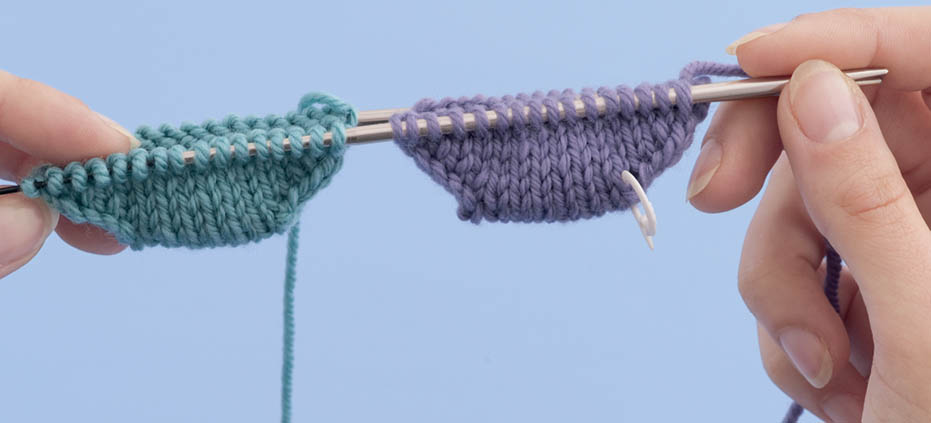
Sock B heel completed.
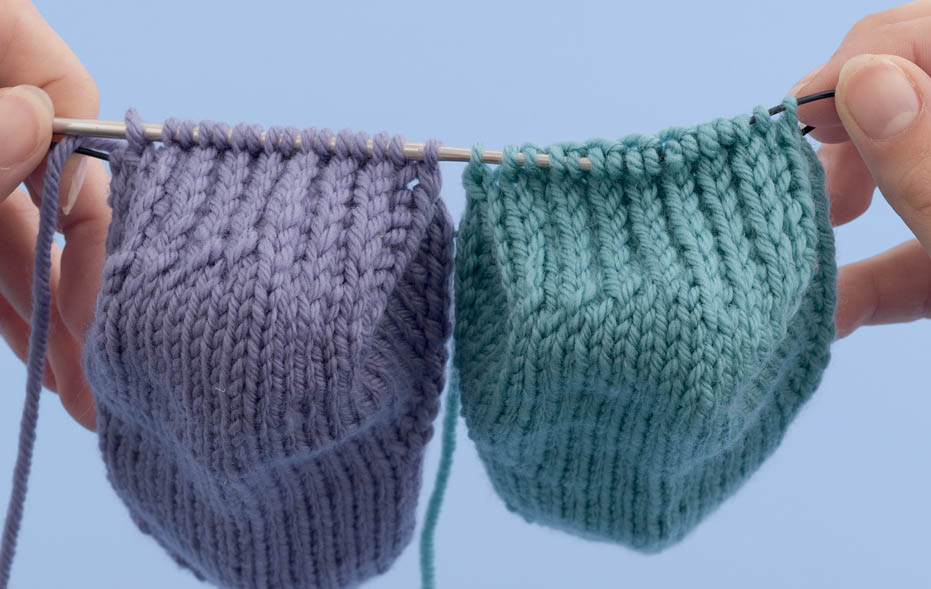
Heels completed on both socks.
Now that the heels are complete, you are ready to begin working the leg and cuff of the socks. You will return to working in the round for both socks. A hole can form at the point where the heel and instep meet. The set-up round below addresses this problem.
SIDE 2, socks B and A: Knit across all stitches of both socks.
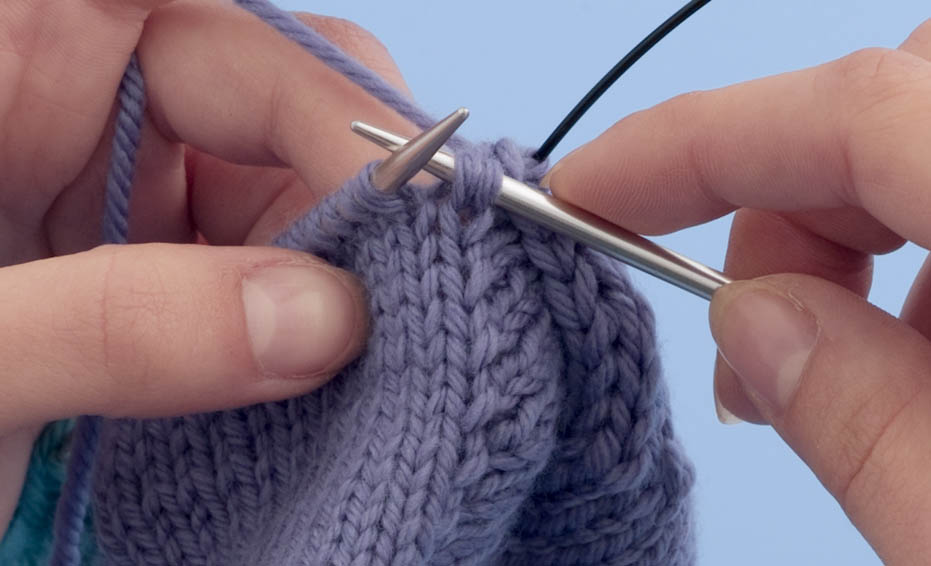
Picking up a stitch where the heel and instep meet.

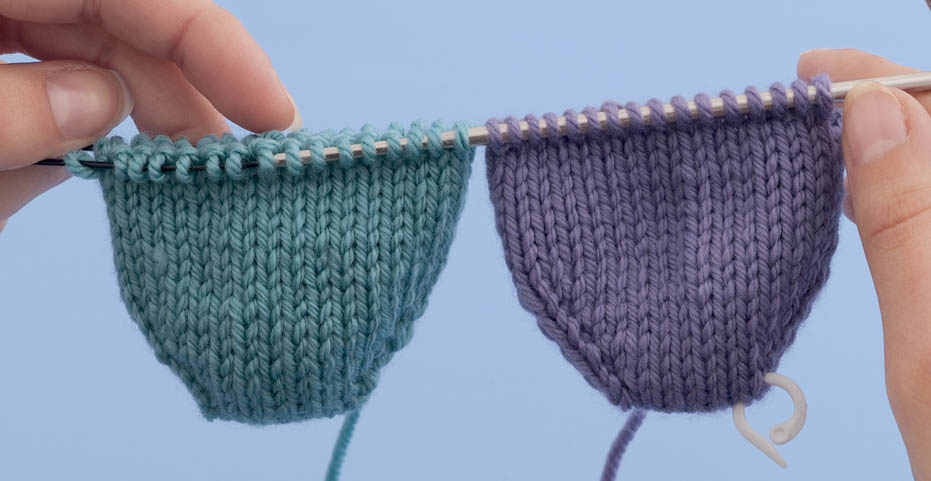
Legs measuring 3 inches.
You’ll find a number of suggested bind offs in the glossary. I recommend that you experiment with different bind offs and find the one that’s best suited to your knitting style. It’s important that your bind off be flexible and not too tight. Socks work best when you can get your feet into them!
Now that you’ve completed your sample socks, it’s time to try your hand at a pattern on the pages that follow. Enjoy!