
Architects Hartman–Cox clad this small church with an economical but attractive siding of plywood and vertical wood battens, all painted white. The roofs are of asphalt shingles and the windows are of wood. The rectangular windows are double hung. (Photo by Robert Lautman. Courtesy of American Wood Council.)
6
EXTERIOR FINISHES FOR WOOD LIGHT FRAME CONSTRUCTION
Roof Overhangs and Rain Protection
Corner Boards and Exterior Trim
Exterior Painting, Finish Grading, and Landscaping
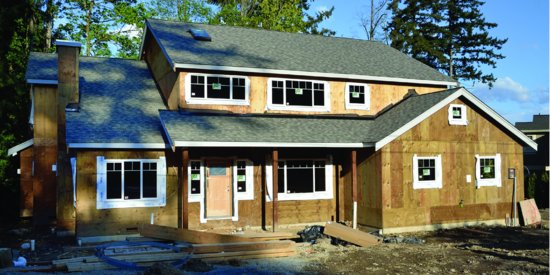
Figure 6.1 With roofing, skylights, doors, and windows installed, the interior of the structure can begin to dry out in preparation for interior finish work.
PROTECTION FROM THE WEATHER
Roofing Underlayment
In the interest of protecting the building structure from weather as quickly as possible, roofing underlayment is installed soon after the roof framing is completed and sheathed. The material most commonly used for this purpose is one or two layers of building felt, made of matted cellulose fibers saturated with asphalt, often referred to simply as “tarpaper.” During this stage of construction, the roofing underlayment serves as a temporary barrier to rain, allowing the structure to begin drying out in preparation for interior work. Once the underlayment is covered by the final roofing, it continues to serve as a permanent backup to the roofing, reducing the chance that wind-driven rain or minor leakage can penetrate into the roof structure. Traditionally, building felt was designated as either 15-lb or 30-lb, referring to the weight of material used to cover 100 square feet (9.2 m2) of roof area. Contemporary standards specify roofing felt as either No. 15 or No. 30. Though still frequently referred to as 15-lb or 30-lb, today's felts actually weigh slightly less than these names suggest. Roofing underlayment membranes made from materials such as polypropylene or polyethylene fabrics may be substituted for traditional building felt. These synthetic roofing underlayments tend to be lighter, more tear-resistant, less sensitive to prolonged exposure to sunlight, and more costly than building felt.
Wall Moisture Barrier
Later during construction, the sheathed walls of the structure are covered with a protective layer intended to repel water and reduce the leakage of air. This layer, variously referred to as a moisture barrier, water-resistive barrier, or weather-resistive barrier, must be applied before siding is installed. Whether it is applied before or after the installation of doors and windows is usually up to the builder. The traditional materials used are the same No. 15 felt used for roofing underlayment or an asphalt-saturated paper with similar water-resistive properties called Grade D sheathing paper.
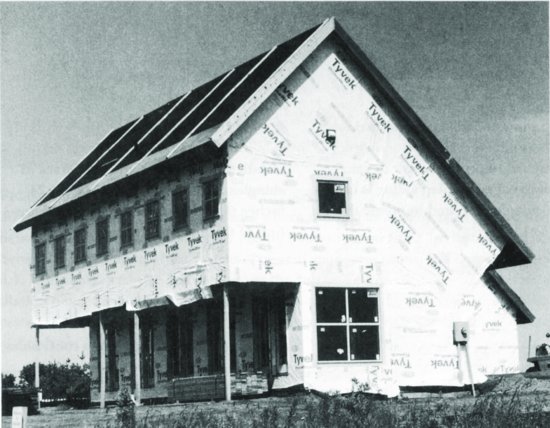
Alternatives to traditional building felts and papers offer greater durability and the potential for increased energy efficiency by reducing air leakage through the building walls and roofs. More airtight housewraps, made of synthetic fibers, are manufactured in sheets as wide as 10 feet (3 m) in order to minimize seams (Figure 6.2). To further reduce air leakage, the seams that remain may be sealed with self-adhering tape provided by the housewrap manufacturer.
Figure 6.2 Building felt covers most of the roof and housewrap completely covers the walls of this house under construction in preparation for the application of roofing and siding. The bottom few feet of the roof sheathing remain exposed, awaiting the application of a waterproof ice barrier material as described later in this chapter. Lightweight housewraps such as seen in this photograph have to a large extent replaced building felt or paper for protecting walls. (Photo by Rob Thallon.)
Walls and roofs may also be sheathed with OSB panels, with a resin-and-paper overlay applied directly to the outer face of the panels in the factory. Once these panels are fastened to the wall or roof framing, panel seams are sealed with self-adhering tape and no additional weather barrier paper or wrap is required. In addition to the labor saved in the elimination of a step, this system has the potential for better air leakage control in comparison to separately applied housewraps. Similar levels of performance can also be achieved with liquid-applied air/weather barrier coatings. These are applied to the wall sheathing in the field using a spray gun or roller, after the panels have been installed over the framing. (The control of air leakage is discussed further in Chapter 7.)
Like roofing underlayment, the wall moisture barrier provides temporary protection from rain and wind during construction and, once finish siding is installed, acts as a permanent secondary line of defense against water infiltration. Although it is important that the wall moisture barrier resist penetration of liquid water, it must (in most climates) nevertheless also allow water vapor (water in a gas state) to pass relatively easily. Especially during cold months, interior humidity that tends to diffuse outward through the wall assembly must not become trapped within the wall; rather, it must be allowed to continue to pass freely through to the exterior.
ROOFING
Finishing the Eaves and Rakes
Before a roof can be shingled, the eaves (horizontal roof edges) and rakes (sloping roof edges) must be completed. Several typical ways of doing this are shown in Figures 6.3, 6.4, and 6.5. When designing eave and rake details, several objectives should be kept in mind: The edges of the roof shingles should be positioned and supported in such a way that water flowing over them will drip free of the trim and siding below. Provision must be made to drain rainwater and snowmelt from the roof without damaging the structure below. In most roof assemblies, the eaves must be ventilated to allow free circulation of air beneath the roof sheathing. And siding, which is not installed until later, must fit easily against or into the eave and rake trim.
Figure 6.3 Two typical details for the rakes (sloping edges) of sloping roofs. The upper detail has no rake overhang, and the lower has an overhang supported on lookouts.
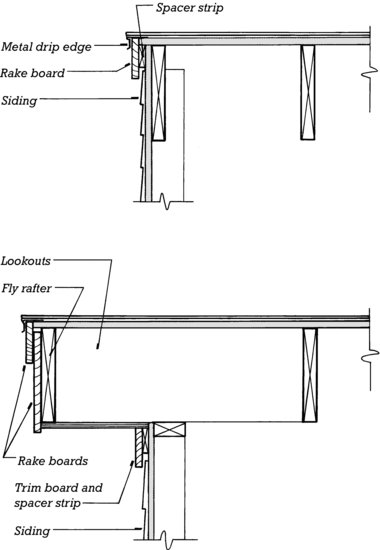
Figure 6.4 Three ways, from among many, of finishing the eaves of a light frame wood building. The top detail has a fascia and gutter, both of wood. The gutter is spaced slightly away from the fascia on blocks or shims to prevent moisture from being trapped between them, where it could lead to decay. The designer may vary the width of the overhang, or may substitute a metal or plastic gutter for the wood one. The sloping line at the edge of the ceiling insulation indicates a vent spacer, as shown in Figure 6.6. The middle detail has no fascia or gutter; it works best for a steep roof with a sufficient overhang to drain water well away from the walls below. The bottom detail is finished entirely in aluminum. It shows wood blocking as an alternative to vent spacers for maintaining free ventilation through the attic.


Figure 6.4 (Continued)

Figure 6.4 (Continued)
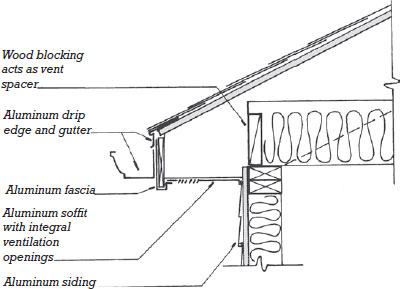
Figure 6.5 An example of a badly done wood eave detail with an aluminum gutter and downspout. The carpentry at the intersection of the eave and the rake shows some poorly fitted joints and badly finished ends, and the soffit is not ventilated at all, which may lead to the formation of ice dams on the roof (see Figure 6.5) unless constructed as an unventilated roof, as explained in the text. (Photo by Edward Allen.)

Roof Drainage
Gutters and downspouts (downspouts are also called rain leaders) are installed on the eaves of a sloping roof to remove rainwater and snowmelt without wetting the walls or causing splashing or erosion on the ground below. External gutters may be made of wood, plastic, aluminum, or other sheet metal and are fastened to the outer edge of the roof eave (Figures 6.3 and 6.4). Internal or concealed gutters, which are recessed into the surface of the roof, are rare. They are difficult to waterproof, and if they do leak, they can cause more damage to the building structure and its finishes than can a leaky external gutter. Gutters are sloped toward the points at which downspouts drain away the collected water. On larger buildings, gutters and downspouts are sized using rainfall intensity data for the location in which the building is located and flow capacity formulas found in building and plumbing codes. At the bottom of each downspout, the water must be conducted away from the building to prevent soil erosion or basement flooding. A simple precast concrete splash block can spread the water and direct it away from the foundation, or a system of underground piping can collect the water from the downspouts and conduct it to a storm sewer, a dry well (an underground seepage pit filled with coarse crushed stone), or a drainage ditch.
Where collection of rainwater from roofs is not required by the building code or other regulations, gutters may be omitted and their associated problems of clogging and ice buildup avoided. Such roofs should be designed with eaves of sufficient depth to protect the wall below from excessive wetting by water falling from the roof edge. To prevent soil erosion and mud spatter from the falling water, the drip line at ground level below should be provided with a bed of crushed stone or other suitable surface material.
Roof Overhangs and Rain Protection
Roof eaves and overhangs play an important role in protecting buildings from the weather. Where ample overhangs are provided, the volume of rain that reaches the building wall is greatly reduced in comparison to walls without such protection, and the chance for water penetration into the walls is much less. The design of walls without overhangs should be approached with caution: These walls are more vulnerable to the effects of weather exposure, such as staining, leaking, decay, and premature deterioration of the windows, doors, and siding.
Ventilated Roofs
In cold climates, snow on a sloping roof tends to be melted by heat escaping through the roof from the heated space below. At the eave overhang, however, the shingles and gutter, which are not above heated space, can be much colder, and the snowmelt can refreeze and begin to build up layers of ice. If left unchecked, eventually an ice dam can form. Meltwater accumulating above the ice dam can then seep between the shingles, through the roof sheathing, and into the building, causing damage to walls and ceilings. Ice dams can be largely eliminated by keeping the entire roof cold enough so that snow will not melt. With a ventilated roof, this is accomplished by continuously passing outside air under the roof sheathing through vents at the eave and ridge. In buildings with an attic, the attic itself is ventilated and kept as cold as possible. Insulation is installed in the ceilings below to retain the heat in the building. Where there is no attic and the insulation is installed between the rafters, the spaces between the rafters are ventilated by means of a continuous airspace between the insulation and the roof sheathing (Figures 6.6 and 6.7).
Figure 6.6 Ice dams form because of inadequate insulation combined with a lack of ventilation, as shown in the top diagram. The lower two diagrams show how insulation, attic ventilation, and vent spacers are used to minimize the melting of snow on the roof. In areas prone to ice damming, building codes also require the installation of a strip of waterproof ice barrier material under the shingles in the area of the roof where ice dams are likely to form.
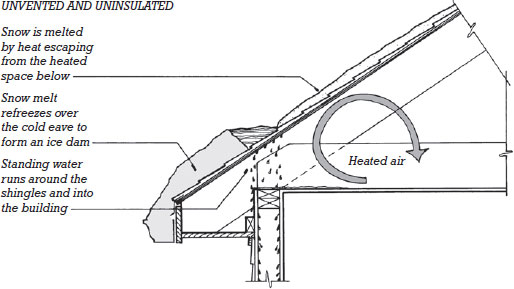
Figure 6.6 (Continued)
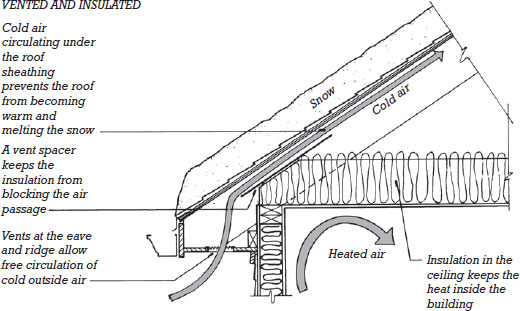
Figure 6.6 (Continued)
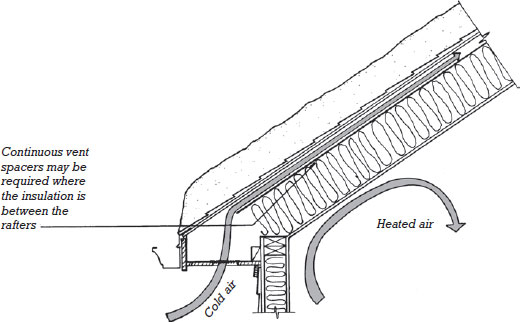
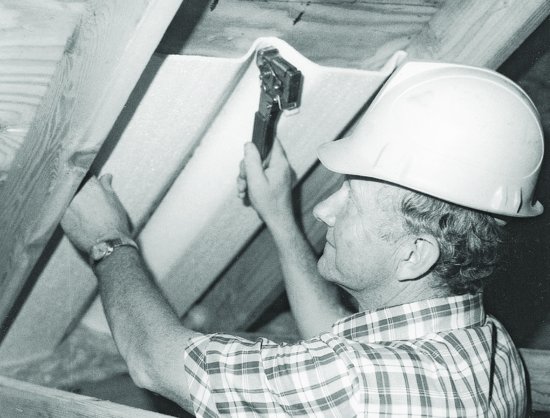
Figure 6.7 To maintain clear ventilation passages where thermal insulation materials come between the rafters, vent spacers of plastic foam or wood fiber are installed as shown here. The positioning of the blocking or vent spacers is shown in Figures 6.4 and 6.6. Vent spacers can be installed along the full slope of a roof to maintain free ventilation between the sheathing and the insulation where the interior ceiling finish material is applied to the bottom of the rafters. (Proper Vent™ is a registered trademark of Poly-Foam Inc.)
Soffit vents create the required ventilation openings at the eave; these usually take the form of a continuous slot covered with screening or a perforated aluminum strip made especially for the purpose (Figure 6.8). As an alternative to soffit vents, panels with hollow ventilation channels can be installed under the lowest several courses of roof shingles. A continuous slot running across the roof sheathing allows exterior air to circulate under the shingles, through the panel, and into the ventilation space under the roof sheathing. Ventilation openings at the ridge can be either gable vents just below the roof line in each of the end walls of the attic, or a continuous ridge vent, a screened cap that covers the ridge of the roof and draws air through gaps in the roof sheathing on either side of the ridge board (Figure 6.9). Building codes establish minimum area requirements for roof ventilation openings based on the floor area beneath the roof being ventilated.
Figure 6.8 A continuous soffit vent made of perforated sheet aluminum permits generous airflow to all the rafter spaces but keeps out insects. The walls of this building are covered with cedar shingles. (Photo by Edward Allen.)
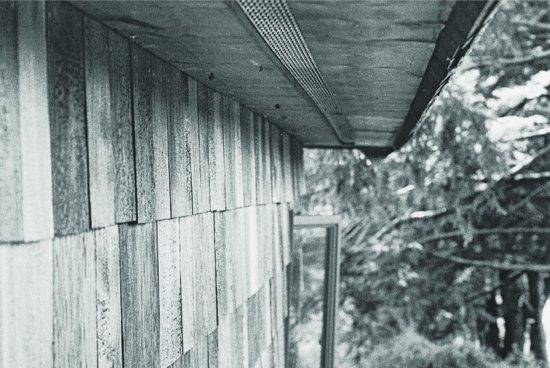
Figure 6.9 This building has both a louvered gable vent and a continuous ridge vent to discharge air that enters through the soffit vents. The gable vent is of wood and has an insect screen on the inside. The aluminum ridge vent is internally baffled to prevent snow or rain from entering even if blown by the wind. The roofing is a two-layered asphalt shingle designed to mimic the rough texture of a wood shake roof. (Photo by Edward Allen.)

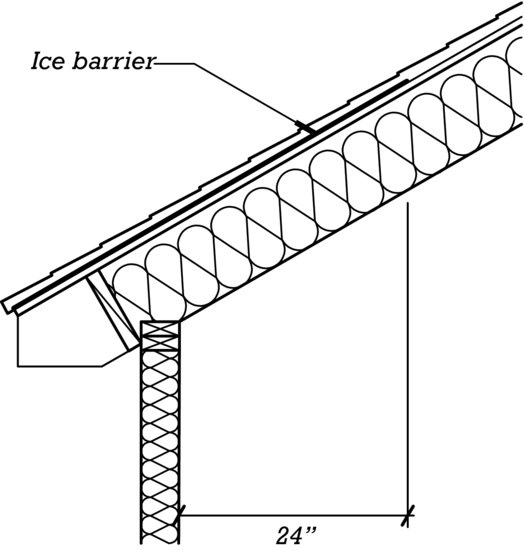
In regions prone to ice damming, building codes also require an ice barrier to be installed along roof eaves. This may be several layers of roofing felt cemented together with asphalt, or more commonly, a self-adhered sheet of polymer-modified bitumen, referred to as rubberized underlayment or by one product of this type's proprietary trade name that has fallen into colloquial usage, ice and water shield. The sheet must extend from the lowest edge of the roof to a line that is 2 feet (600 mm) inside the insulated space of the building (Figure 6.10). The soft, sticky bitumen seals tightly around the shingle nails that are driven through it and prevents passage of water that may accumulate behind an ice dam. Alternatively, the lower portion of the sloped roof may be covered with sheet metal or other roofing material that is sufficiently waterproof to protect the roof from damage if ice damming occurs.
Figure 6.10 In cold climates, building codes typically require that an ice barrier be installed beneath the lowest courses of shingles. This must extend at least 24 inches (600 mm) over the insulated portion of the inhabited space.
Roof ventilation serves other purposes as well. It keeps a roof cooler in summer by dissipating solar heat absorbed by the shingles. A lower roof temperature extends the life of the roofing materials and reduces the heat load on the building interior. For this reason, asphalt shingle manufacturers may require that their shingles be installed on ventilated roofs as part of their product warranty conditions. Roof ventilation also helps dissipate moisture that collects under the roof sheathing that may originate from leaks in the roofing or, in colder months, that may be generated by the condensation of interior humidity that comes in contact with the cold underside of the roof sheathing.
Unventilated Roofs
Unventilated roofs can be constructed with insulated foam panels applied over the roof sheathing or with spray foam or rigid foam insulation boards applied below the sheathing between the roof rafters (Figure 6.11). When unventilated roofs are used in cold climates, protection from ice damming depends on ice barriers and the installation of sufficient insulation to reduce heat flow through the roof assembly, thereby slowing the melting of snow on the roof. Condensation resistance in unventilated roofs depends on the inability of significant quantities of air or water vapor to pass through the air-impermeable foam insulation to the colder layers of the roof assembly.
Figure 6.11 Two ways to build an unventilated roof assembly. In the top diagram, insulated foam panels are installed on top of wood decking. The insulated panels have a plywood or OSB face that provides a surface to hold the nails or staples for attaching the roof underlayment and shingles. The panels themselves are secured with screws long enough to penetrate through the panel into the roof decking or rafters below. In the lower diagram, foam insulation is sprayed against the underside of the roof sheathing. Depending on climate conditions, the thickness of foam insulation required to control condensation may vary from as little as 1 inch to as much as 7 inches (25 to 178 mm). Other types of insulation may be added beneath the foam where necessary to achieve the total required insulation value of the roof.
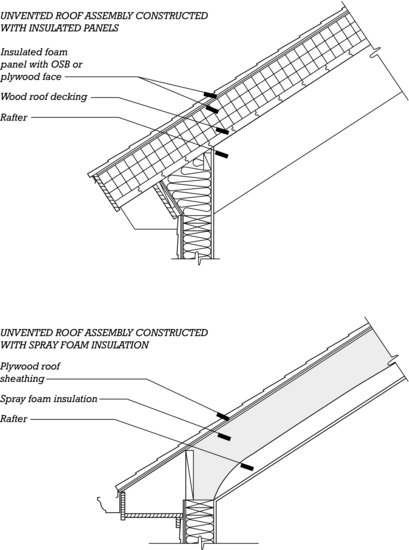
With insulated panels, special care must be taken to seal the panel joints where air leakage is most likely to occur. With spray foam insulation applied under the sheathing, the foam must have low permeability to airflow and, in cold climates, low water vapor permeance as well. With rigid foam boards applied under the sheathing, edges of the boards must be carefully sealed to prevent the leakage of air around the boards. Where high roof temperatures are a concern (due to the lack of ventilation below the roof sheathing), shingles or other roof coverings with high solar reflectance may be considered, or insulated panels with integral ventilation channels may be used to create a ventilated assembly.
Advantages of unventilated roofing systems include simplicity of detailing, a thinner roof profile, less air leakage between the building interior and exterior, and no risk of windblown water entry into the roof assembly through poorly baffled ridge vents. However, the absence of ventilation also leaves this roof type potentially less able to dry out if moisture does find its way into the assembly. Where the potential for condensation is high (for example, in very cold climates or in roofs over high-humidity spaces), such assemblies should be thoroughly analyzed and carefully detailed to ensure that moisture conditions are adequately controlled.
Roof Shingling
Wood light frame buildings can be roofed with any of the materials described in Chapter 16. The least expensive, and most common, are asphalt shingles. These are applied either by the carpenters who have built the frame or by a roofing subcontractor (Figures 6.12, 6.1). Wood shingle and shake roofs, clay and concrete tile roofs, and architectural sheet metal roofs are also common. Low-slope roofing, either a built-up or a single-ply membrane, may also be applied to a light frame building. (See Chapter 16 for more information about these roofing types.)
Figure 6.12 Applying asphalt shingles over roofing felt. Shingles and other roof coverings are covered in detail in Chapter 16. (Photo by Edward Allen.)

WINDOWS AND DOORS
Flashings
Prior to the installation of windows and doors, flashings are installed to prevent water from seeping through gaps around the edges of these components. Flashings may be made of any of a number of corrosion-resistant metals, plastics, synthetic fabrics similar to housewraps, or modified bitumen sheets similar to the rubberized underlayment used for ice barriers on roofs. The choice of materials and the complexity of the detailing vary with the type of door or window frame, the severity of the exposure to wind and rain, and the detailing of the surrounding trim. The most important flashing in a wall opening is the sill flashing or sill pan. Any moisture that penetrates around the edges of the door or window frame tends to fall downward to the bottom of the wall opening. The sill flashing captures this water and ensures that it drains back to the exterior, preventing it from seeping further into the interior of the wall (Figures 6.13, 6.14, and 6.15).
Figure 6.13 Steps in installing a vinyl-clad wood window in a wall covered with housewrap: 1. With a single strip of self-adhering, flexible, waterproof sheet material, a U-shaped flashing is formed along the sill and up onto the side jambs. 2. A bead of sealant is placed around the opening. 3. The window unit is pushed into the opening from the outside. Its exterior flange is bedded in the sealant. 4. One corner of the window unit is anchored with a nail through its flange and into the framing of the wall. With the aid of a level, a measuring tape, and thin wooden wedges, the unit is carefully squared as further nails are driven through the flanges. 5, 6. Strips of self-adhering waterproof sheet are adhered to the window flanges and housewrap over the side jambs and head for airtightness and watertightness.
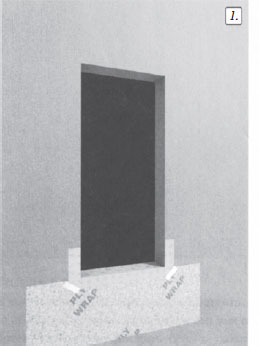
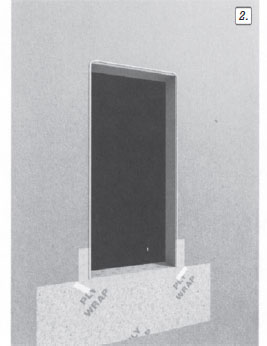
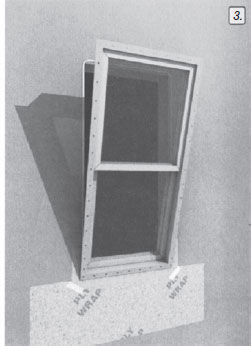
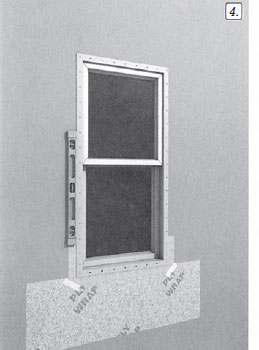
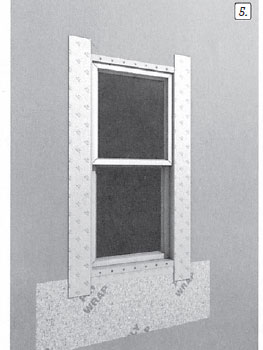
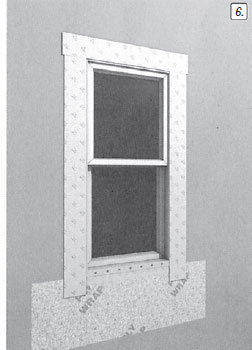
Figure 6.14 Window flashing in a wall exposed to heavy, wind-driven rain. The metal sill pan is made of soldered copper. Underneath the copper is a self-adhered bituminous flashing. Beneath that, and surrounding the entire opening, is a synthetic fabric flashing. Behind the fabric flashing is the wall moisture barrier paper. The window opening itself is temporarily protected with plastic that will be removed before the window is installed.
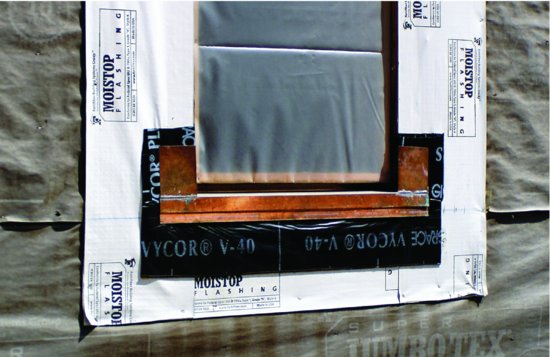
Figure 6.15 Synthetic fabric flashing and window unit installed into a wall opening. Housewrap has not yet been installed over the exterior sheathing. Sill flashing is missing from the installation. (Photo by Edward Allen.)

Installing Windows and Doors
Windows and doors are covered in detail in Chapter 18. Nail-fin or flanged windows are simple to install because they include a continuous flange around the perimeter through which nails are driven into the sheathing and studs (perpendicular to the wall plane) to fasten the units securely in place. The flange also provides a convenient surface for the application of self-adhering flashings. Most plastic-clad, aluminum, and solid plastic windows are manufactured as nail-fin types, as are some, but not all, wood windows. Finless or flangeless windows and most doors do not have nailing flanges. They are fastened through the sides of the window or door frame into the supporting studs (parallel to the wall plane) with long finish nails or screws. The fasteners are either covered by additional trim or they are countersunk, with the resulting holes later filled with putty and painted over. A typical entrance door and details for its installation are shown in Figures 6.16 and 6.17.
Figure 6.16 A six-panel wood entrance door with flanking sidelights and a fanlight above. A number of elaborate traditional entrance designs such as this are available from stock for use in light frame buildings. (Courtesy of Morgan Products, Ltd.)

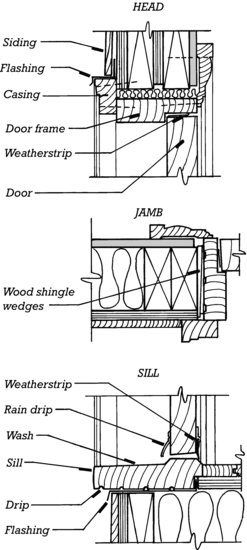
Figure 6.17 Details of an exterior wood door installation. The door opens toward the interior. The flashing in the head intercepts water running down the wall and directs it away from the door and frame. The sill flashing prevents water that penetrates around the door frame from leaking into the floor structure.
Everybody loves window seats, bay windows, and big windows with low sills and comfortable chairs drawn up to them. . . . A room where you feel truly comfortable will always contain some kind of window place.
—Christopher Alexander et al., A Pattern Language, 1977
- The vehicle or binder provides adhesion to the substrate and forms a film over it; it is often referred to as a film-former.
- Solvents are volatile liquids used to improve the working properties of the paint or coating. The most common solvents used in coating materials are water and hydrocarbons, but turpentine, alcohols, ketones, esters, and ethers are also used.
- Pigments are finely divided solids that add color, opacity, and gloss control to the coating material. They also impart hardness, abrasion resistance, and weatherability to the coating.
- Additives modify various properties of the coating material. Driers, for example, are additives that hasten the curing of the coating. Other additives may relate to ease of application, resistance to fading, and other functions.
| Substrate | Surface Preparation | Primer and Topcoats |
| Exterior | ||
| Wood siding, trim, window, doors | Sand smooth, spot-prime knots and pitch streaks Fill and sand surface blemishes after applying the prime coat |
Exterior latex (or alkyd primer where required by difficult substrate conditions) and two coats of latex paint; or two coats of semitransparent or solid stain |
| Concrete masonry | Must be clean and dry, at least 30 days old | Block filler primer and two coats of latex paint |
| Concrete walls | Must be clean and dry, at least 30 days old | Masonry primer where required and two coats of latex paint |
| Stucco | Must be clean and at least 7 days old | Masonry primer where required and two coats of latex paint |
| Iron and steel | Remove rust, mill scale, oil, and grease | General-purpose latex or corrosion-resistant metal primer and two coats of latex or alkyd enamel; or two coats of direct-to-metal latex enamel |
| Aluminum | Clean with a solvent to remove oil, grease, and oxide | Latex metal primer and two coats of latex or alkyd enamel; or two coats of direct-to-metal latex enamel |
| Interior | ||
| Plaster | Conventional plaster must be 30 days old (veneer plaster may be coated with latex paint immediately after hardening) | Interior latex primer and two coats of latex paint |
| Gypsum board | Must be clean, dry, and free from dust | Interior latex primer and one or two coats of latex paint |
| Wood doors, windows, and trim | Sand smooth. Fill and sand small surface blemishes after applying the prime coat. Sand lightly between coats Remove sanding dust before coating |
Interior latex or alkyd enamel primer and one or two coats of latex or alkyd enamel |
| Concrete masonry | Must be clean and dry, at least 30 days old | Masonry primer where required and two coats of latex paint |
| Hardwood floors | Fill surface blemishes and sand before coating. Sand lightly between coats | Oil stain if color change is desired, and two coats of oil or polyurethane varnish |
SIDING
Exterior cladding materials applied to the walls of a wood light frame building are called siding. Many different types of materials may be used: wood boards with various profiles, applied either horizontally or vertically; plywood; wood shingles; metal or plastic materials; fiber-cement panels; brick or stone; and stucco.
Board Siding
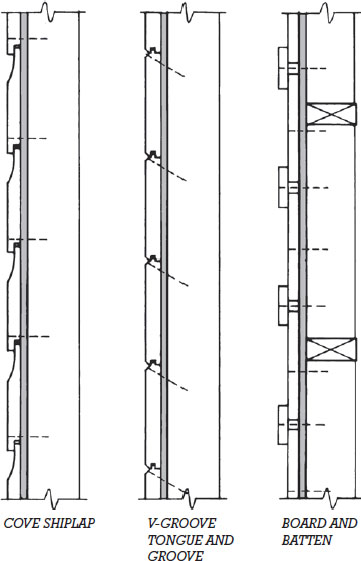
Horizontally applied board siding, made of solid wood, wood composition board, or fiber-cement, is usually nailed through the wall moisture barrier and sheathing, into the studs, ensuring secure attachment. This procedure also allows horizontal sidings to be applied directly over insulating sheathing materials without requiring a nail-base sheathing, a material such as plywood or OSB that is itself dense enough to hold nails. Siding nails, whose heads are intermediate in size between those of common nails and finish nails, are used to give the best compromise between holding power and appearance when attaching horizontal siding. Siding nails should be hot-dip galvanized, or made of aluminum or stainless steel, to prevent corrosion and staining. Ring-shank nails are preferred because of their better resistance to pulling out as the siding boards shrink and swell with changes in moisture content. Nailing is done in such a way that the individual pieces of siding may expand and contract freely without damage (Figure 6.18). Horizontal sidings are butted tightly to corner boards and window and door trim, usually with a sealant material applied to the joint during assembly.
Figure 6.18 Six types of wood siding from among many. The four bevel and shiplap sidings are designed to be applied in a horizontal orientation. Tongue-and-groove siding may be used either vertically or horizontally. Board-and-batten siding may only be applied vertically. The nailing pattern (shown with broken lines) for each type of siding is designed to allow for expansion and contraction of the boards. Nail penetration into the sheathing and framing should be a minimum of 1½ inches (38 mm) for a satisfactory attachment.
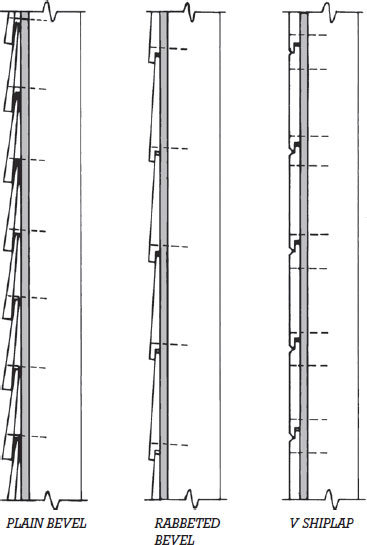
Figure 6.18 (Continued)
More economical horizontal siding boards made of various types of wood composition materials are also available. Some of these have experienced problems in service with excessive absorption of water, decomposition, or fungus growth, resulting in large class-action lawsuits and withdrawal of some such products from the market. Board sidings made from wood fiber in a portland cement binder have proven to perform well in service. They accept and hold paint well, do not decay or support fungus growth, and are dimensionally stable, highly resistant to fire, and very durable.
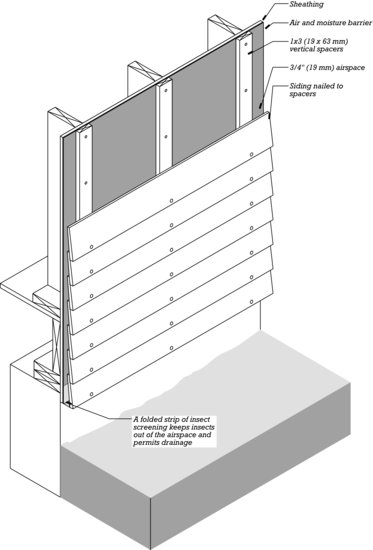
In North America, siding boards are frequently nailed tight to the wall moisture barrier and sheathing. Alternatively, horizontal siding may be nailed over vertical wood spacers called furring strips, usually made from preservative-treated 1 × 3s (19 × 63 mm) or similar lengths of preservative-
treated plywood or plastic that are aligned over the studs (Figure 6.19). Such so-called ventilated or rainscreen cladding allows water that seeps through the siding to readily drain out of the assembly rather than soak further into the wall, permits more rapid drying of the siding should it become soaked, and enhances the wall's capability to dispel water vapor that could otherwise accumulate within the insulated
portions of the wall. With furred siding, special attention must be given to cornerboards and window and door casings to account for the overall thickness of the cladding. Alternatively, several manufacturers sell thin drainage mat materials, which can be sandwiched between the siding and the moisture barrier. These products provide some improvement in drainage and ventilation in comparison to conventional siding installations, but at lower cost and with less impact on the detailing of exterior trim in comparison to siding over vertical furring.
Figure 6.19 A ventilated or rainscreen siding application. Water that penetrates through joints or holes in the siding drains away before it reaches the sheathing. With vertical siding, horizontal wood furring strips are not practical, as they would block the drainage space. Instead, plastic furring strips with crosswise hollow channels may be used. The open channels in the furring allow water to pass through.
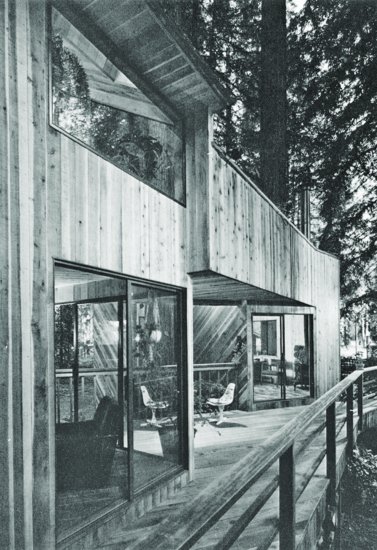
Vertically applied sidings (Figures 6.20 and 6.21) are nailed at the top and bottom plates of the wall framing and at one or more intermediate horizontal lines of wood blocking installed between the studs.
Figure 6.20 A carpenter applies V-groove tongue-and-groove redwood siding to an eave soffit, using a pneumatic nail gun. (Photograph courtesy of Senco Products, Inc.)

Figure 6.21 A completed installation of tongue-and-groove siding, vertically applied in the foreground of the picture and diagonally in the area seen behind the chairs. The lighter-colored streaks are sapwood in this mixed heartwood/sapwood grade of redwood. The windows are framed in dark-colored aluminum. (Architect: Zinkhan/Tobey. Photo by Barbeau Engh. Courtesy of California Redwood Association.)
Heartwood redwood, cypress, and cedar sidings may be left unfinished if desired to weather to various shades of gray. The bare wood will erode gradually over a period of decades and will eventually have to be replaced. Other woods must be either stained or painted to prevent weathering and decay. If these coatings are renewed faithfully at frequent intervals, the siding beneath will last indefinitely.
Plywood Siding
Plywood panel siding (Figure 6.22) is often chosen for its economy. The cost of the material per unit area of wall is usually somewhat less than for other siding materials, and labor costs tend to be relatively low because the large sheets of plywood are more quickly installed than equivalent areas of boards. In some cases, sheathing can be eliminated from the building (with the wall moisture barrier applied directly to the studs) if plywood is used for siding, yielding further cost savings. All plywood sidings must be painted or stained, even those made of decay-resistant heartwoods, because their veneers are too thin to withstand weather erosion for more than a few years. The most popular plywood sidings are those that are grooved to imitate board sidings and conceal the vertical joints between sheets.
Figure 6.22 Grooved plywood siding is used vertically on this commercial building by Roger Scott Group, Architects. The horizontal metal flashings between sheets of plywood are purposely emphasized here with a special projecting flashing detail that casts a dark shadow line. (Courtesy of APA–The Engineered Wood Association.)

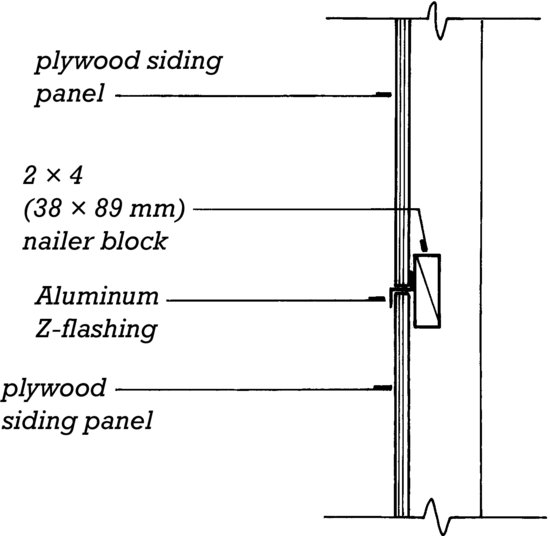
The largest problem in using plywood sidings for multistory buildings is how to detail the horizontal panel joints between sheets. A Z-flashing of aluminum (Figure 6.23) is the usual solution, but remains clearly visible. The designer should include in the construction drawings a sheet layout for the plywood siding that organizes the horizontal joints in an acceptable manner. This will help avoid a random, unattractive pattern of joints on the face of the building.
Figure 6.23 A detail of a simple Z-flashing, the device most commonly used to prevent water penetration at horizontal joints in plywood siding.
Shingle Siding
Wood shingles and shakes (Figures 6.24 through 6.30) require a nail-base sheathing material such as OSB or plywood. Either corrosion-resistant box nails or gun-driven staples may be used for attachment. Most shingles are of cedar or redwood heartwood and do not need to be coated with paint or stain unless such a finish is desired for cosmetic reasons.
Figure 6.24 Applying wood shingle siding over asphalt-saturated felt building paper. The corners are woven as illustrated in Figure 6.26. (Photo by Edward Allen.)
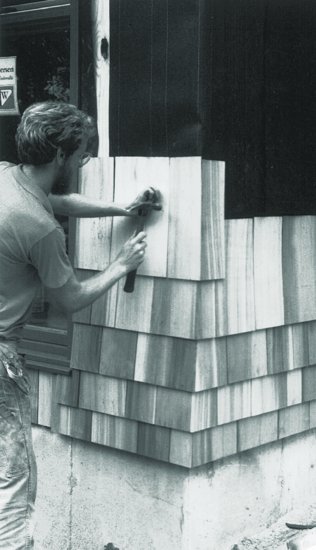
Figure 6.25 A detail of wood shingle siding at the sill of a wood platform frame building. The first course of shingles projects below the sheathing to form a drip, and is doubled so that all the open vertical joints between the shingles of the outside layer are backed up by the undercourse of shingles. Succeeding courses are single, but are laid so that each course covers the open joints in the course below.
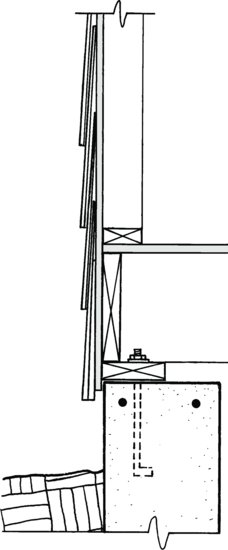
Figure 6.26 Wood shingles can be woven at the corners to avoid corner boards. Each corner shingle must be carefully trimmed to the proper line with a block plane, which is time-consuming and relatively expensive, but the result is a more continuous, sculptural quality in the siding.
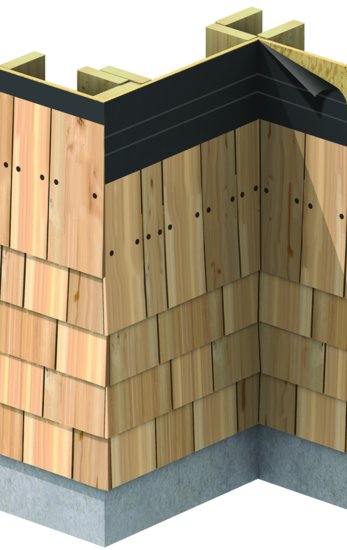
Figure 6.27 Corner boards save time when shingling walls and become a strong visual feature of the building. Notice in this and the preceding diagram how the joints and nail heads in each course of shingles are covered by the course above.
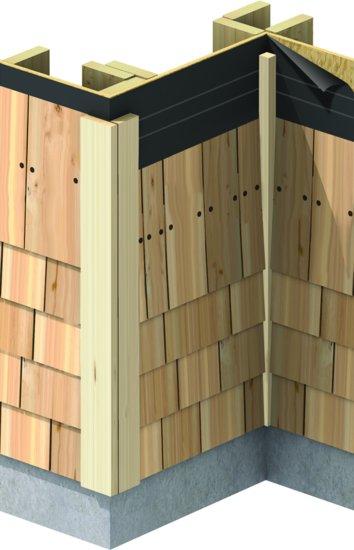
Figure 6.28 Fancy cut wood shingles were often a featured aspect of shingle siding in the late 19th century. Notice the fish-scale shingles in the gable end, the serrated shingles at the lower edges of walls, and the sloping double-shingle course along the rakes. Corners are woven. (Photo by Edward Allen.)
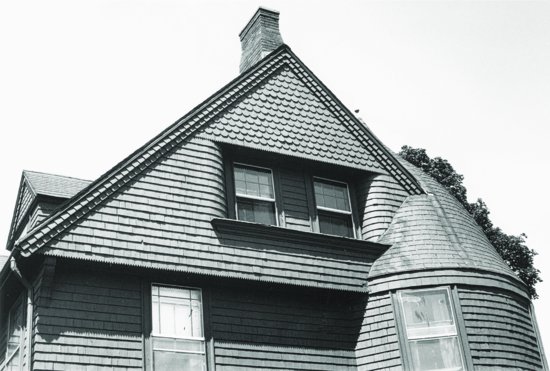
Figure 6.29 Fancy cut wood shingles stained in contrasting colors are used here on a contemporary restaurant. (Courtesy of Red Cedar Shingle & Handsplit Shake Bureau.)

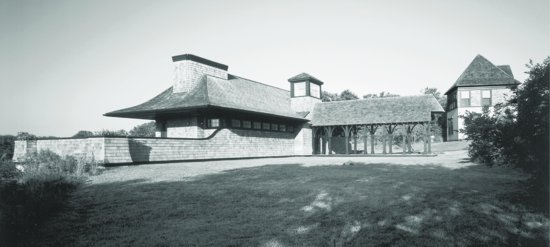
Figure 6.30 Both the roof and walls of this New England house by architect James Volney Righter are covered with wood shingles. Wall corners are woven. (© Nick Wheeler/Wheeler Photographics.)
The application of wood shingle siding is labor intensive, especially around corners and openings, where many shingles must be cut and fitted. Figures 6.26 and 6.27 show two different ways of turning corners with wood shingles. Several manufacturers produce shingle siding in panel form by stapling and/or gluing shingles to wood backing panels in a factory. A typical panel size is approximately 2 feet high and 8 feet long (600 × 2450 mm). Several different shingle application patterns are available in this form, along with prefabricated woven corner panels. Panelized shingles can be applied much more rapidly than individual shingles, which results in sharply lower on-site labor costs and, in most cases, a lower overall cost.
Metal and Plastic Siding
Painted wood sidings are apt to deteriorate unless they are carefully scraped and repainted every 3 to 6 years. Aluminum or vinyl siding, formed of prefinished sheets of aluminum or molded of vinyl plastic, are usually designed to imitate wood sidings and are generally guaranteed against needing repainting for long periods, typically 20 years (Figures 6.31 and 6.32). Such sidings do have their own problems, however, including the poor resistance of aluminum sidings to denting and the tendency of plastic sidings to crack and occasionally shatter on impact, especially in cold weather. Although plastic and aluminum sidings bear a superficial similarity to the wood sidings that they mimic, their details around openings and corners in the wall are sufficiently different that they are usually inappropriate for use in historic restoration projects.
Figure 6.31 Aluminum and vinyl sidings are both intended to imitate wood horizontal bevel siding. Their chief advantage in either case is low maintenance. Nails are completely concealed in both systems.
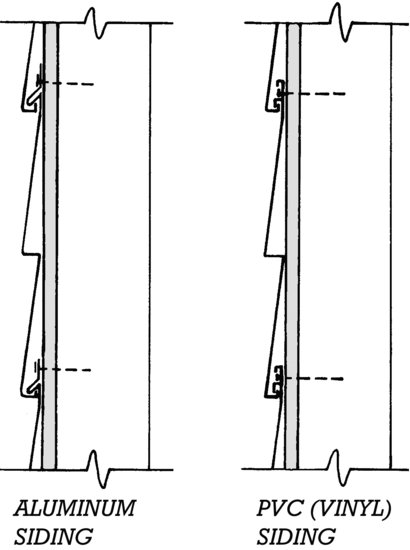
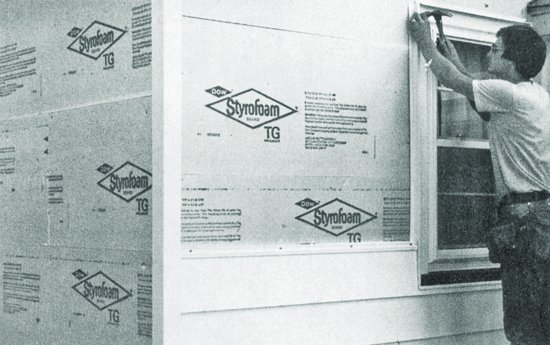
Figure 6.32 Retrofitting aluminum siding over insulating foam sheathing on an existing residence. Special aluminum pieces are provided for corner boards and window casings; each piece has a shallow edge channel to accept the cut ends of the siding. (Photograph provided by The Dow Chemical Company.)
Stucco
Stucco, or portland cement plaster, is a strong, durable, economical, fire-resistant cladding material. It is normally applied in three coats over wire lath, either by hand or by spray apparatus (Figures 6.33 and 6.34). Despite its monolithic appearance, stucco is a porous material and prone to the development of hairline shrinkage cracks. When it is used in locations exposed to heavy wind and rain, significant quantities of water can pass through the material. In such circumstances, stucco is best installed as a rainscreen cladding (Figure 6.19) or with a double-layer wall moisture barrier to provide good drainage and protect the wall construction from water.
Figure 6.33 Applying exterior stucco over woven wire lath, often referred to as “chicken wire.” The workers to the right hold a hose that sprays the stucco mixture onto the wall, while the man at the left levels the surface of the stucco with a straightedge. The small rectangular opening at the base of the wall is a crawlspace vent. (Photo compliments Keystone Steel & Wire Co.)
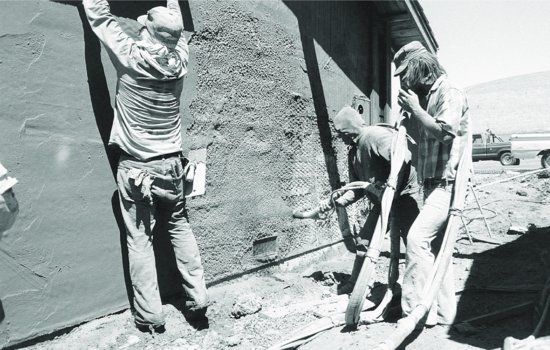
Figure 6.34 This small Los Angeles office building demonstrates the plasticity of form that is possible with stucco siding. Vertical and horizontal joints in the stucco minimize its tendency to shrink and crack as it dries out after curing. Although the building is supported from below on concrete columns and steel girders, it is actually a wood light frame building. (Eric Owen Moss Architects. Photo © Tom Bonner '97.)

Masonry Veneer
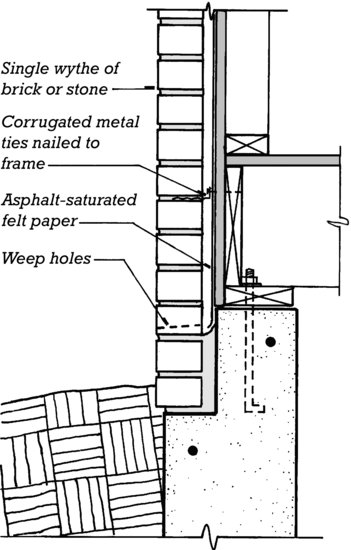
Light frame buildings can be faced with masonry veneer, a single wythe of brick or stone, in the manner shown in Figure 6.35. The corrugated metal ties prevent the masonry from falling away from the building while allowing for differential vertical movement between the masonry and the frame. Like stucco, brick veneer is a porous material. The cavity behind the brick creates a rainscreen-like system that provides a path of free drainage to protect the wood-framed wall from water penetration. Masonry materials and detailing are covered in Chapters 8 and 9.
Figure 6.35 A detail of masonry veneer facing for a platform frame building. The weep holes drain any moisture that might collect in the cavity between the masonry and the sheathing. The cavity should be at least 1 inch (25 mm) wide. A 2-inch (50-mm) cavity is better because it is easier to keep free of mortar droppings that can clog the weep holes.
Artificial Stone
Artificial stone or manufactured masonry is made from mixtures of cement, sand, other natural aggregates, and mineral pigments such as iron oxide. It is cast into any of a great variety of shapes, textures, and colors simulating the appearance of traditional brick and natural stone products but applied as a thin facing. Artificial stone units range in thickness from approximately 1 inch to 2⅝ inches (25–67 mm) and are typically applied over a base of metal lath and portland cement plaster in a manner similar to that of stucco.
Fiber-Cement Panel Siding
Fiber-cement panel siding is made of cement, sand, organic or inorganic fibers, and fillers manufactured into panels usually 4 feet × 8 feet (1219 mm × 2438 mm) in size and ¼ or 5/16 inch (6 or 8 mm) thick (Figure 6.36). They are manufactured with a smooth face or with various textures, and can be painted in the field or provided prefinished. They are attached with nails or screws driven into the wall studs or other solid framing behind the moisture barrier and wall sheathing. Gaps between panels can be sealed with joint sealant or filled with preformed plastic or aluminum trim.
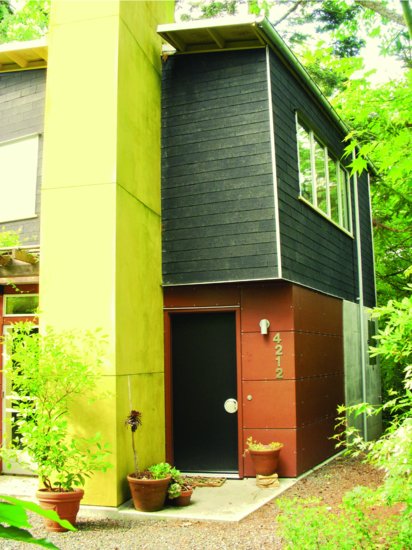
Figure 6.36 This wood-framed house illustrates the use of four siding materials. To the left, the chimney is clad in stucco. Note the horizontal expansion joints spaced at roughly 8 feet (2400 mm). The second story is clad in asphalt shingles. The area around the entry door is covered with fiber-cement panels. The panels were field-painted and fastened with stainless steel washer-head screws that remain visible and make a distinctive pattern. To the right of the fiber-cement panels is a concrete wall with no applied cladding. (Architect: Studio Ectypos, www.studioectypos.com. Photo by Joseph Iano.)
CORNER BOARDS AND EXTERIOR TRIM
Most siding materials require vertical corner boards as well as trim boards around windows and doors. Roof edges require trim boards of various types, including fascias, soffits, frieze boards, and moldings, the exact patterns depending on the style and detailing of the building (Figure 6.37). For most sidings, the traditional choice of material for these exterior trim components is pine. For wood shingles, unpainted cedar or redwood may be preferred. Plastic and metal sidings are trimmed with special accessory strips of the same material. Fiber-cement siding may be trimmed either with wood or with fiber-cement boards made for the purpose.
Figure 6.37 Painters finish the exterior of a house. The painter at the far left is standing on the top of a stepladder—a very unsafe practice. (Courtesy of Energy Studies in Buildings Laboratory, Center for Housing Innovation, Department of Architecture, University of Oregon.)

A high appearance grade of pine is usually chosen for wood trim boards. Traditionally, the boards are back primed before installation, with the application of a prime coat of paint on the back side. This helps to reduce cupping and other distortions of the trim boards with changes of humidity. Fully preprimed trim boards are also available at most lumberyards.
Many historical styles require trim that is ornamentally shaped. The shaping generally takes place at a mill, so that the trim pieces come to the site ready to install.
As appearance grades of lumber have become more costly, substitutes have been introduced to the market, including boards made of high-density plastic foams, wood composites of various kinds, and lumber that has been cut into short pieces to eliminate knots, then reassembled end to end with finger joints and glue. These products tend to be more consistently straight and free of defects than natural, solid lumber. Some of them are not only produced as flat boards, but also molded to imitate traditional trim. They must be painted and are not suitable for transparent finishes. Many are also available preprimed or prefinished.
Figure 6.38 Careful detailing is evident in every aspect of the exterior finishes of this commercial building. Notice especially the cleanly detailed window casings, the purposeful use of both vertical boards and wood shingles for siding, and the neat junction between the sidewall shingles and the rake boards. (Woo & Williams, Architects. Photographer: Richard Bonarrigo.)

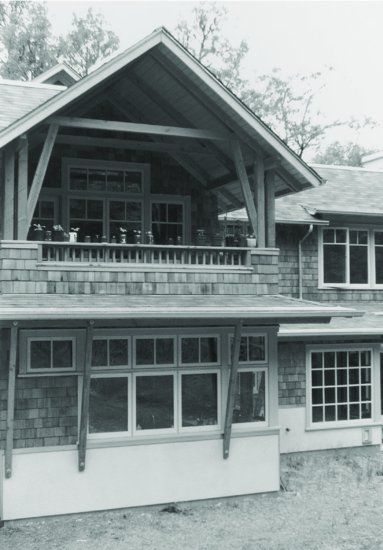
Figure 6.39 This house in a rainy climate is designed to shelter every window and door with a roof overhang. The base of the wall is sided with water-resistant cement board. Special attention to roof overhang proportions, exposed framing details, window muntin patterns, and railing details gives this house a uniquely appealing character. (Photo by Rob Thallon.)
SEALING EXTERIOR JOINTS
After the completion of exterior carpentry work, exposed gaps between siding, trim, frames of doors and windows, and other exterior materials are sealed with joint sealant, traditionally called caulk, to protect against the entry of water. Exterior sealants must have good adhesion to the materials being sealed, remain permanently flexible, and be unaffected by exposure to sunlight. Paintable sealants can be installed before finish painting and then painted over to match adjacent surfaces. Other sealants, such as most silicones, cannot hold paint. These are selected from a range of available premixed colors and then applied after finish painting. Sealant materials and sealant joint design are discussed in detail in Chapter 19.
- Paints and other coatings can be significant emitters of VOCs, and thus require care in selection and specification. Water-based acrylic latex paints generally have lower VOC emissions than solvent-based paints.
- The quality and durability of low- and zero-VOC paints continue to improve.
- Unused paint can be reprocessed to make recycled paint, eliminating paint waste from the waste disposal stream.
- In addition to volatile organic compounds, paints and coatings can emit other toxic or unpleasant-smelling chemicals. Some manufacturers also report their products' emissions of such chemicals and offer products with low emissions in these categories.
- Paints that wear quickly and require frequent recoating may increase VOC emissions over the full life of a facility in comparison to others with higher emissions that are more durable and require less frequent recoating.
EXTERIOR PAINTING, FINISH GRADING, AND LANDSCAPING
The final steps in finishing the exterior of a light frame building are painting or staining of exposed wood surfaces; finish grading of the ground around the building; installation of paving for drives, walkways, and terraces; and seeding and planting of landscape materials. By the time these operations take place, interior finishing operations are also usually well underway, having begun as soon as the roofing, sheathing, windows, and doors were in place.
EXTERIOR CONSTRUCTION
Wood is widely used outdoors for porches, decks, stairs, stoops, and retaining walls (Figure 6.40). Decay-resistant heartwoods, wood that is pressure-treated with preservatives, and moisture-resistant wood/plastic composite planks are suitable for these exposed uses. If nondurable woods are used, they will soon decay at the joints, where water is trapped and held by capillary action. Fasteners must be hot-dip galvanized or stainless steel to avoid corrosion. Wood decking that is exposed to the weather should always have open, spaced joints to allow for drainage of water through the deck and for expansion and contraction of the decking. Plastic composite planks are durable and attractive, although some are not as strong or stiff as wood, and may require more closely spaced joists for support.
Figure 6.40 Exterior carpentry for this residential addition includes ipe decking and painted pine railings and trim. The decking is spaced to allow water to drain through. (Photograph by Michael Craig Moore, AIA.)
KEY TERMS
REVIEW QUESTIONS
1. In what order are exterior finishing operations carried out on a platform frame building, and why?
2. At what point in exterior finishing operations can interior finishing operations begin?
3. Which types of siding require a nail-base sheathing? What are some nail-base sheathing materials? Name some sheathing materials that cannot function as nail bases.
4. What are the reasons for the relative economy of plywood sidings? What special precautions are advisable when designing a building with plywood siding?
5. How does one make corners when siding a building with wood shingles?
6. Specify two alternative exterior coating systems for a building clad in wood bevel siding.
7. What are the usual reasons for premature paint failure on a wood-sided house?
EXERCISES
1. For a completed wood frame building, make a complete list of the materials used for exterior finishes and sketch a set of details of the eaves, rakes, corners, and windows. Are there ways in which each could be improved?
2. Visit a building materials supply store and look at all the alternative choices of sidings, windows, doors, trim lumber, and roofing. Study one or more systems of gutters and downspouts. Look at eave vents, gable vents, and ridge vents.
3. For a wood light frame building of your design, list precisely and completely the materials you would like to use for the exterior finishes. Sketch a set of typical details to show how these finishes should be applied to achieve the appearance you desire, with special attention to the roof edge details.
SELECTED REFERENCES
In addition to the references listed at the end of Chapter 5, the reader should acquire current product information from manufacturers of residential windows, doors, roofing, and siding materials. Many building supply retailers also distribute unified catalogs of windows, doors, and millwork that can be an invaluable part of the designer's reference shelf.
National Roofing Contractors Association. NRCA Steep-Slope Roofing Manual. Rosemont, IL, updated regularly.
This industry-standard reference provides guidelines and recommended details for asphalt shingle roofing and other types of steep-slope roofing.
The Taunton Press, Inc. Fine Homebuilding. Newtown, CT, published monthly; and Journal of Light Construction, Williston, VT, published monthly.
These two magazines are excellent references on all aspects of wood light frame construction, including topics related to exterior carpentry and finishing.
Williams, R. Sam. “Finishing of Wood.” In Forest Products Laboratory, Wood Handbook: Wood as an Engineering Material. Madison, WI, 1999.
This article provides a comprehensive introduction to the topic of wood finishing. It can be viewed online for free on the Forest Product Laboratory's web site, www.fpl.fs.fed.us. The complete handbook is also available in printed form from various publishers.
WEB SITES
Exterior Finishes for Wood Light Frame Construction
Author's supplementary web site: www.ianosbackfill.com/06_exterior_finishes_for_wood_light_frame_construction
Roofing
National Roofing Contractors Association: www.nrca.net
Windows and Doors
Anderson Windows & Doors: www.andersonwindows.com
Fleetwood Windows & Doors: www.fleetwoodusa.com
Pella Windows and Doors: www.pella.com
Quantum Windows & Doors: www.quantumwindows.com
Siding
Cedar Shake & Shingle Bureau: www.cedarbureau.org
James Hardie Fiber Cement Siding: www.jameshardie.com
Portland Cement Association—Stucco (Portland Cement Plaster): www.cement.org/stucco
Vinyl Siding Institute: www.vinylsiding.org
Western Red Cedar Lumber Association: www.wrcla.org
Exterior Painting
Benjamin Moore Paints: www.benjaminmoore.com
Cabot Stains: www.cabotstain.com
Green Seal: www.greenseal.org
Master Painters Institute (MPI): www.paintinfo.com
MPI Specify Green: www.specifygreen.com
Olympic Paints and Stains: www.olympic.com
Sherwin-Williams Coatings: www.sherwin-williams.com
