
Flemish bond brickwork combines simply and directly with cut limestone lintels and sills in this townhouse on Boston's Beacon Hill. (Photo JAMES AUSTIN, CAMBRIDGE (GB).)
8
BRICK MASONRY
Spanning Openings in Brick Walls
HISTORY
Masonry began spontaneously in the creation of low walls by stacking stones or pieces of caked mud taken from dried puddles. Mortar was originally the mud smeared into the joints of the rising wall to lend stability and weathertightness. Where stone lay readily at hand, it was preferred to bricks; where stone was unavailable, bricks were made from local clays and silts. Changes came with the passing millennia: People learned to quarry, cut, and dress stone with increasing precision. Fires built against mud brick walls brought a knowledge of the advantages of burned brick, leading to the invention of the kiln. Masons learned the simple art of turning limestone into lime, and lime mortar gradually replaced mud.
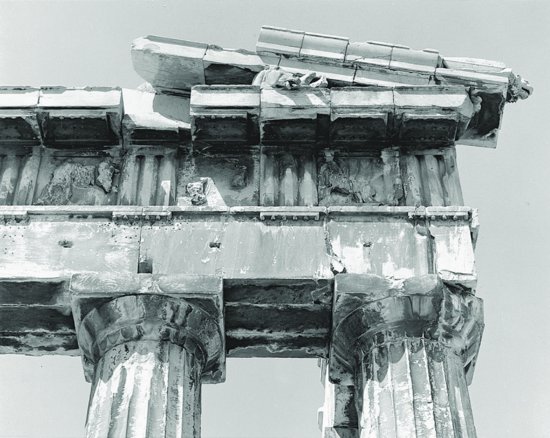
By the fourth millennium BC, the peoples of Mesopotamia were building palaces and temples of stone and sun-dried brick. In the third millennium, the Egyptians erected the first of their stone temples and pyramids. In the last centuries prior to the birth of Christ, the Greeks perfected their temples of limestone and marble (Figure 8.1). Control of the Western world then passed to the Romans, who made the first large-scale use of masonry arches and roof vaults in their temples, basilicas, baths, palaces, and aqueducts.
Figure 8.1 The Parthenon, constructed of marble, has stood on the Acropolis in Athens for more than 24 centuries. (Photo JAMES AUSTIN, CAMBRIDGE (GB).)
Medieval civilizations in both Europe and the Islamic world brought masonry vaulting to a very high plane of development. The Islamic craftsmen built magnificent palaces, markets, and mosques of brick and often faced them with brightly glazed clay tiles. The Europeans directed their efforts toward fortresses and cathedrals of stone, culminating in the pointed vaults and flying buttresses of the great Gothic churches (Figures 8.2 and 8.3). In Central America, South America, and Asia, other civilizations were carrying on a simultaneous evolution of masonry techniques in cut stone.
Figure 8.2 Construction in ashlar limestone of the magnificent Gothic cathedral at Chartres, France, was begun in AD 1194 and was not finished until several centuries later. Seen here are the flying buttresses that resist the lateral thrusts of the stone roof vaulting. (Photo JAMES AUSTIN, CAMBRIDGE (GB).)
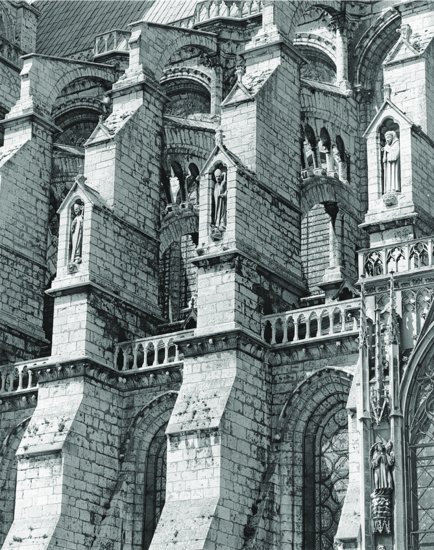
Figure 8.3 The Gothic cathedrals were roofed with lofty vaults of stone blocks. The ambulatory roof at Bourges (built 1195–1275) evidences the skill of the medieval French masons in constructing vaulting to cover even a curving floor plan. (Photo JAMES AUSTIN, CAMBRIDGE (GB).)
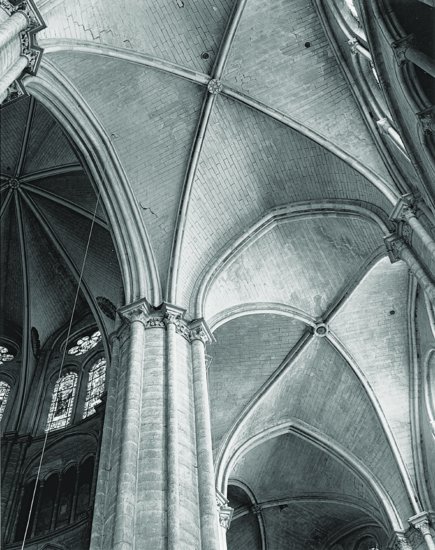
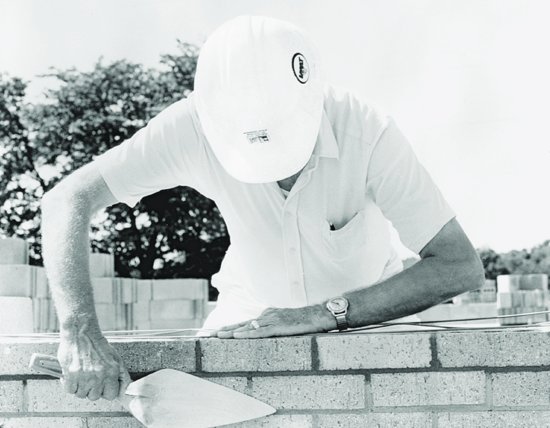
Figure 8.4 Despite the steady mechanization of construction operations in general, masonry construction in brick, concrete block, and stone is still based on simple tools and the highly skilled hands that use them. (Courtesy of International Masonry Institute, Washington, D.C.)
During the Industrial Revolution in Europe and North America, machines were developed that quarried and worked stone, molded bricks, and sped the transportation of these heavy materials to the building site. Sophisticated mathematics were applied for the first time to the analysis of the structure of masonry arches and to the art of stonecutting. Portland cement mortar came into widespread use, enabling the construction of masonry buildings of greater strength and durability.
In the late 19th century, masonry began to lose its primacy among the materials of construction. The very tall buildings of the central cities required frames of iron or steel to replace the thick masonry bearing walls that had limited the heights to which one could build. Reinforced concrete, poured rapidly and economically into simple forms made of wood, began to replace brick and stone masonry in foundations and walls. The heavy masonry vault was supplanted by lighter floor and roof structures of steel and concrete that were faster to erect.
The 19th-century invention of the hollow concrete block helped to avert the extinction of masonry as a craft. The concrete block was much cheaper than cut stone and required much less labor to lay than brick. It could be combined with brick or stone facings to make lower-cost walls that were still satisfactory in appearance. The brick cavity wall, an early-19th-century British invention, also contributed to the survival of masonry, for it produced a warmer, more watertight wall that was later to adapt easily to the introduction of thermal insulation when appropriate insulating materials became available in the mid-20th century.
Other 20th-century contributions to masonry construction include the development of techniques for steel-reinforced masonry, high-strength mortars, masonry units (both bricks and concrete blocks) that are higher in structural strength, and masonry units of many types that reduce the amount of labor required for masonry construction.
. . . and the smothered incandescence of the kiln: in the fabulous heat, mineral and chemical treasure baking on mere clay, to issue in all the hues of the rainbow, all the shapes of imagination that never yield to time . . . these great ovens would cast a spell upon me as I listened to the subdued roar deep within.
—Frank Lloyd Wright, In the Nature of Materials, 1942
If this book had been written as recently as 125 years ago, it would have had to devote little space to construction materials other than masonry and wood. Because the development of other construction materials occurred so late, most of the great works of architecture in the world, and many of the best-developed vernacular architectures, are built of masonry. We live amid a rich heritage of masonry buildings. There is scarcely a town in the world that is without a number of beautiful examples from which the serious student of masonry architecture can learn.
MORTAR
Mortar is as vital a part of masonry as the masonry units themselves. Mortar cushions the masonry units, giving them full bearing against one another despite their surface irregularities. Mortar seals between the units to keep water and wind from penetrating; it adheres the units to one another to bond them into a monolithic structural unit; and, inevitably, it is important to the appearance of the finished masonry wall.
Mortar Ingredients
The most characteristic type of mortar is cement–lime mortar, made of portland cement, hydrated lime, an inert aggregate, and water. The aggregate, sand, must be clean and must be screened to eliminate particles that are too coarse or too fine; ASTM specification C144 establishes standards for mortar sand. The portland cement is the bonding agent in the mortar. Its composition and manufacture are described in more detail in Chapter 13 of this book. (Only portland cement Types I, II, and III are recommended for use in masonry mortars.) Mortar made only with portland cement, however, is “harsh,” meaning that it does not flow well on the trowel or under the brick, so lime is added to impart smoothness and workability. Lime is produced by burning limestone or seashells (calcium carbonate) in a kiln to drive off carbon dioxide and leave quicklime (calcium oxide). The quicklime is then slaked by adding water that chemically combines with it to form calcium hydroxide, called slaked lime or hydrated lime. The slaking process, which releases large quantities of heat, is usually carried out in the factory. The hydrated lime is subsequently dried, ground, and bagged for shipment. ASTM specification C207 governs the production of lime. Water is also an important ingredient in mortar because it is chemically involved in the curing of the cement and lime. Water used in mortar should be clean and free of acids, alkalis, and organic matter. Water that is potable is generally considered suitable for use in mortar.
Blended hydraulic cements, ASTM C595, are combinations of portland cement with other cementitious materials, such as blast furnace slag, that may be used in place of ordinary portland cement alone in the cement–lime mortar mix.
Masonry cements and mortar cements are prepackaged cements that do not require the addition of lime by the mason on the job site. Their main advantages are convenience, consistency (since they are premixed), and good workability. Masonry cements are proprietary formulations that may contain portland cement or blended hydraulic cements, lime, additional plasticizing ingredients, and other additives. Formulations vary from one manufacturer to another, but all must comply with ASTM C91. To achieve a workability equivalent to that of conventional cement–lime mortars, masonry cement mortars are formulated with air-entraining admixtures that result in a higher air content in the cured mortar than cement–lime mortar. This reduces the bond strength between the mortar and the masonry unit to about half that of conventional mortar, which means that the flexural and shear strength of the wall is reduced and the wall is more permeable to water. For these reasons, masonry cements should not be specified for masonry work that requires high strength and low permeability.
Mortar cements are also blends of portland cement, lime, and other additives. However, they are formulated according to ASTM C1329, with limits on air entrainment that enable them to meet bond strength requirements comparable to those of cement–lime mortars. Structural codes treat mortars made with mortar cement as equivalent to traditional cement–lime mortars.
Cements are available in a range of colors. The most common color is light gray, about the same color as ordinary concrete block. Cements are also available in white, as well as in a range of darker grays, all achieved by controlling the ingredients used in the manufacture of the cement itself. In the final mortar mix, a much broader range of colors can be produced either by adding pigments to the mortar at the time of mixing or by purchasing dry mortar mix that has been custom colored at the factory. Packaged mortar mixes can be obtained in shades ranging from pure white to pure black, including all the colors of the spectrum.
Because mortar makes up a considerable fraction of the exposed surface area of a brick wall, typically about 20 percent, the color of the mortar is extremely important in the appearance of a brick wall and is almost as important in the appearance of stone or concrete masonry walls. Small sample walls are often constructed before a major building goes under construction to view and compare different color combinations of brick and mortar and make a final selection.
Mortar Mixes
Mortars mixed with portland cement, blended hydraulic cement, masonry cement, or mortar cement are all specified according to ASTM C270. Four basic mortar types, distinguished primarily by differences in strength, are defined:
- Type N mortar is a general-purpose mortar with a balance of good bonding capabilities and good workability. It is recommended for exterior veneers, nonloadbearing exterior walls, parapets, chimneys, and interior loadbearing walls.
- Type S mortar has a higher flexural bond strength than Type N mortar. It is recommended for exterior reinforced masonry, exterior loadbearing masonry walls, and veneers and walls subject to high wind forces or high seismic loads.
- Type O mortar is a low-strength mortar recommended mainly for interior nonloadbearing masonry and historic restoration work.
- Type M mortar is a high-strength mortar with less workability than Type S or N mortars. It is recommended for masonry construction below grade, masonry subject to high lateral or compressive loads, or masonry exposed to severe frost action.
Because lower-strength mortars are more workable than higher-strength mortars, as a general rule, the lowest-strength mortar that meets project requirements should be chosen. (Workability is a general characterization of wet mortar's usability: a workable mortar is smooth and plastic, easy to spread with a trowel, and adheres well to vertical surfaces.) The majority of mortar for masonry work used in new construction is either Type N or Type S. As a memory aid, the letters used to designate mortar types, in order of decreasing strength, come from taking every other letter in the phrase MaSoN wOrK. (Type K mortar is a very-low-strength mortar used in historic preservation work that is no longer part of the ASTM C270 specification.)
According to ASTM C270, mortar mixes may be specified in one of two ways: either by proportion specification, in which the quantities of ingredients used to prepare the mix are specified, or by property specification, in which the compressive strength and other properties of the hardened mortar as determined by laboratory testing are defined. Proportion specification is the simpler (no laboratory testing is required) and more common method. On large jobs, however, property specification gives the mason more flexibility in the choice of mortar ingredients and can result in an overall cost savings, even after the costs of laboratory testing are considered. These two methods are summarized in Figures 8.5 and 8.6, respectively.
Figure 8.5 Mortar types by proportion specification. The general principle is that the greater the proportion of cement to lime, the greater the compressive strength of the mortar. For each of the four mortar types, the first example is a cement–lime mortar mix consisting of portland cement or blended hydraulic cement, lime, and aggregate. The second and sometimes third examples for each type are mortars made with mortar cement or masonry cement. Note that no added lime is required for these mixes; the necessary lime and other plasticizers are included in the prepackaged ingredients. Note also that a Type M mortar can be made with a Type N cement by increasing the total cement content of the mix with the addition of portland cement or blended hydraulic cement on the job site. In the same way, Type S mortar can be made with Type N prepackaged mortar and added cement.
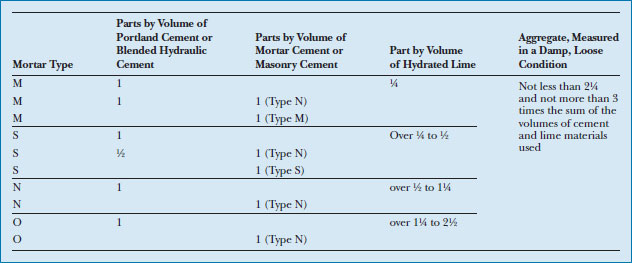
Figure 8.6 Minimum compressive strength for mortar types by property specification. Not shown here, but also included in the ASTM C270 specification, are requirements for maximum air content, minimum water retention (a factor affecting the bond strength of the mortar), and volume ratio of aggregate to cement and lime. When mortar is specified by property, the mason is free to use any mix that meets the specified strength and other requirements as demonstrated through laboratory testing.

Lime Mortar
Modern masonry mortars are made with hydraulic cements, that is, cements that cure by chemical reaction with water, a process called “hydration” and discussed in more detail in the next subsection. Until the late 19th and early 20th centuries, however, mortar was made without portland cement, and the lime itself was the bonding agent. Such traditional lime mortars, made from a mix of lime, sand, and water, continue to find use principally in the restoration of historic structures. Unlike modern hydraulic cements, lime is a nonhydraulic cement, and mortars made with lime as the sole cementing ingredient cure through a reaction with carbon dioxide in the atmosphere. This process, called carbonation, occurs gradually and may continue for many years. Such mortars remain at least partially water soluble and retain some ability to self-heal in the event of hairline cracking caused by movement within the wall. By adding other cementitious materials, lime mortars with greater degrees of hydraulic properties can also be formulated.
Mortar Hydration
Hydraulic cement mortars cure by hydration, not by drying: In a complex set of chemical reactions, they take up water and combine it with the constituents of the cement and lime to create a dense, strong crystalline structure that binds the sand particles and masonry units together. Once hydraulic cements harden, they become water insoluble.
Mortar that has been mixed but not yet used can become too stiff for use, either by drying out or by commencing its hydration. If the mortar was mixed less than 90 minutes prior to its stiffening, it has merely dried and the mason can safely retemper it with water to make it workable again. If the unused mortar is more than 2½ hours old, it must be discarded because it has begun to hydrate. Adding water beyond this time will result in a mortar with reduced final strength. On large masonry projects, an extended-life admixture is sometimes included in the mortar. This allows the mortar to be mixed in large batches and kept for as long as 72 hours before it must be discarded. When working with highly absorptive brick, the mortar may have to be protected from premature drying that could occur when water is drawn out of the mortar by the bricks. In this circumstance, the bricks are slightly dampened just before laying.
Mortar Admixtures
ASTM C1384 defines other admixtures that may be added to mortar to adjust various of its properties, either immediately after it is mixed and in a workable state, or once it has hardened. Set accelerators help keep mortar from freezing when masonry work takes place in very cold conditions, and set retarders help keep mortar from hydrating too quickly in very hot water. Integral water repellents help make masonry walls more watertight and reduce efflorescence (staining that forms on the surface of a wall when excess moisture carries minerals to the wall surface). Other admixtures may be used to improve workability before setting and bond strength in the finished work.
- Mortar is made of minerals that are generally abundant in the earth. Portland cement and lime are energy-intensive to produce. (For more information about the sustainability of cement production, see Chapter 13.)
- Clay and shale, the raw materials for bricks, are plentiful. They are usually obtained from open pits, with the attendant disruption of drainage, vegetation, and wildlife habitat.
- Clay brick can include recycled brick dust, postindustrial wastes such as fly ash, and a variety of other waste products in their manufacture.
- Brick manufacturing plants are usually located close to the sources of their raw materials.
- Brick manufacturing produces few waste materials. Unfired clay is easily recycled into the production process. Fired bricks that are unusable are ground up and recycled into the production process or used as landscaping material.
- Brick manufacturing requires relatively large amounts of water. Water that does not evaporate can be reused many times. Little if any water need be discharged as waste.
- Because of the energy used in its firing, brick is a relatively energy-intensive product. Its embodied energy may range from about 1000 to 4000 BTU per pound (2.3–9.3 MJ/kg).
- The most common energy source for brick kilns is natural gas, although oil and coal are also used. Firing of clay masonry produces fluorine and chlorine emissions. Other types of air pollution can result from improperly regulated kilns.
- Brick made from fly ash, a waste product of coal-fired power generation, and sand need not be kiln-fired. Therefore, the energy required for fly ash brick manufacture is only about 15 percent of that needed for clay brick. The use of fly ash gives this brick type a high recycled materials content and contributes to the diversion of this waste material from landfills or storage ponds. However, although fly ash has been used as an ingredient in a variety of building materials for many decades, the possible long-term environmental impacts of introducing this hazardous material into the building materials product stream continues to be a point of some disagreement.
- Most bricks are sold for use in regional markets close to their point of manufacture. This reduces the energy required for shipping and makes much brick eligible for credit as a regional material.
- Relatively small amounts of waste are generated on a construction site during brick masonry work, including partial bricks, unsatisfactory bricks, and unused mortar. These wastes generally go into landfills or are buried on site.
- Sealers applied to brick masonry to provide water repellency and protection from staining are potential sources of emissions. Solvent-based sealers generally have higher emissions than water-based products.
- Brick masonry is not normally associated with any indoor air quality problems, although in rare circumstances it can be a source of radon gas.
- The thermal mass effect of brick masonry can be a useful component of energy-saving heating and cooling strategies such as solar heating and nighttime cooling.
- Brick masonry is a durable form of construction that requires relatively little maintenance and can last a very long time.
- Construction with brick masonry can reduce reliance on paint finishes, a source of volatile organic compounds.
- Brick masonry is resistant to moisture damage and mold growth.
- When a brick building is demolished, sound bricks may be cleaned of mortar and reused (once their physical properties have been verified as adequate for the new use). Brick waste can be crushed and used for landscaping. Brick and mortar waste can also be used as on-site fill. Much such waste, however, is disposed of offsite in landfills.
BRICK MASONRY
Among the masonry materials, brick is special in two respects: fire resistance and size. As a product of fire, it is the most resistant to building fires of any masonry unit type. Its size may account for much of the love that many people instinctively feel for brick: A traditional brick is shaped and dimensioned to fit the human hand. Hand-sized bricks are less likely to crack during drying or firing than larger bricks, and they are easy for the mason to manipulate. This small unit size makes brickwork very flexible in adapting to small-scale geometries and patterns and gives a pleasing scale and texture to a brick wall or floor.
Brick Forming
Because of their weight and bulk, which make them expensive to ship over long distances, bricks are produced by a large number of relatively small, widely dispersed factories from a variety of local clays and shales. The raw material is dug from pits, crushed, ground, and screened to reduce it to a fine consistency. It is then tempered with water to produce a plastic clay ready for forming into bricks.
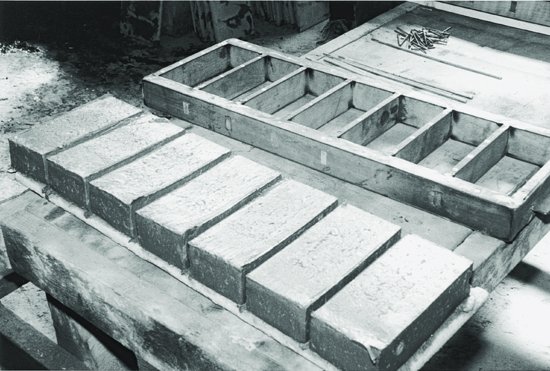
Three major methods are used today for forming bricks: the soft mud process, the dry-press process, and the stiff mud process. The oldest is the soft mud process, in which a relatively moist clay (20–30 percent water) is pressed into simple rectangular molds, either by hand or with the aid of molding machines (Figure 8.7). To keep the sticky clay from adhering to the molds, the molds may be dipped in water immediately before being filled, producing bricks with a relatively smooth, dense surface that are known as water-struck bricks. If the wet mold is dusted with sand just before forming the brick, sand-struck or sand-mold bricks are produced, with a matte-textured surface.
Figure 8.7 A simple wooden mold produces seven water-struck bricks at a time. (Photo by Edward Allen.)
The dry-press process is used for clays that shrink excessively during drying. Clay mixed with a minimum of water (up to 10 percent) is pressed into steel molds by a machine working at a very high pressure.
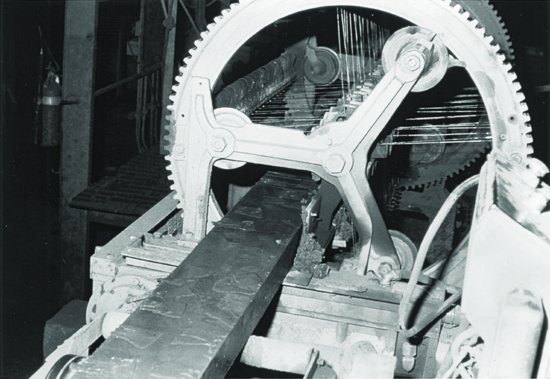
The high-production stiff mud process is the least costly and most widely used today. Clay containing 12 to 15 percent water is passed through a vacuum to remove any pockets of air, then extruded through a rectangular die (Figures 8.8 and 8.9). As the clay leaves the die, textures or thin mixtures of colored clays may be applied to its surface as desired. The rectangular column of moist clay is pushed by the pressure of extrusion across a cutting table, where automatic cutter wires slice it into bricks.
Figure 8.8 A column of clay emerges from the die in the stiff mud process of molding bricks. (Courtesy of Brick Institute of America.)
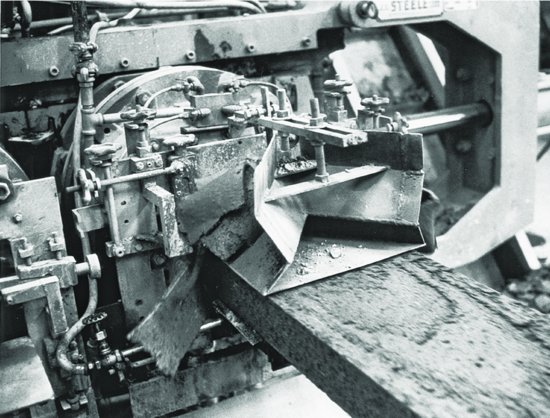
Figure 8.9 Rotating groups of parallel wires cut the column of clay into individual bricks, ready for drying and firing. (Courtesy of Brick Institute of America.)
Bricks produced by the stiff mud process are highly uniform in dimension and shape. Where more variation in appearance among units is desired, the bricks can be tumbled prior to firing. Tumbling softens edges and corners, and introduces a greater individuality in appearance among units.
After molding by any of these three processes, the bricks are dried for 1 or 2 days in a low-temperature dryer kiln. They are then ready for transformation into their final form by a process known as firing or burning.
Firing Bricks
Before the advent of modern kilns, bricks were most often fired by stacking them in a loose array called a clamp, covering the clamp with earth or clay, building a wood fire under the clamp, and maintaining the fire for a period of several days. After cooling, the clamp was disassembled and the bricks were sorted according to the degree of burning each had experienced. Bricks adjacent to the fire (clinker bricks) were often overburned and distorted, making them unattractive and therefore unsuitable for use in exposed brickwork. Bricks in a zone of the clamp near the fire were fully burned but undistorted, suitable for exterior facing bricks with a high degree of resistance to weather. Bricks farther from the fire were softer and were set aside for use as backup bricks, while some bricks from around the perimeter of the clamp were not burned sufficiently for any purpose and were discarded. In the days before mechanized transportation, bricks for a building were often produced from clay obtained from the building site and were burned in clamps adjacent to the work.
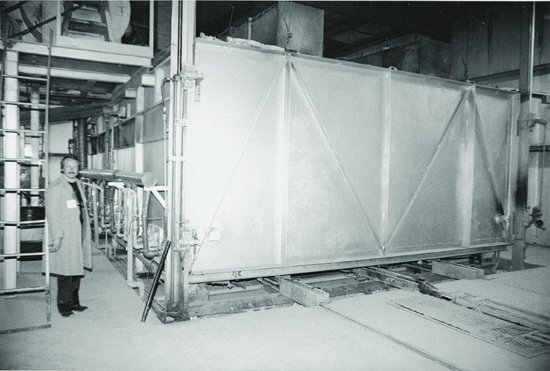
Today, bricks are usually burned in either a periodic kiln or a continuous tunnel kiln. The periodic kiln is a fixed structure that is loaded with bricks, fired, cooled, and unloaded (Figure 8.10). For higher productivity, bricks are passed continuously through a long tunnel kiln on special railcars to emerge at the far end fully burned. In either type of kiln, the first stages of burning are water smoking and dehydration, which drive off the remaining water from the clay. The next stages are oxidation and vitrification, during which the temperature rises to 1800 to 2400 degrees Fahrenheit (1000 to 1300°C) and the clay is transformed into a ceramic material. This may be followed by a stage called flashing, in which the fire is regulated to create a reducing atmosphere in the kiln that develops color variations in the bricks. Finally, the bricks are cooled under controlled conditions to achieve the desired color and avoid thermal cracking. The cooled bricks are inspected, sorted, and packaged for shipment. The entire process of firing takes 40 to 150 hours and is monitored continuously to maintain product quality. Considerable shrinkage takes place in the bricks during drying and firing; this must be taken into account when designing the molds for the bricks. The higher the temperature is, the greater the shrinkage and the darker the color of the brick. Bricks are often used in a mixed range of colors, with the darker bricks inevitably being smaller than the lighter bricks. Even in bricks of uniform color, some size variation is to be expected, and bricks, in general, are subject to a certain amount of distortion from the firing process.
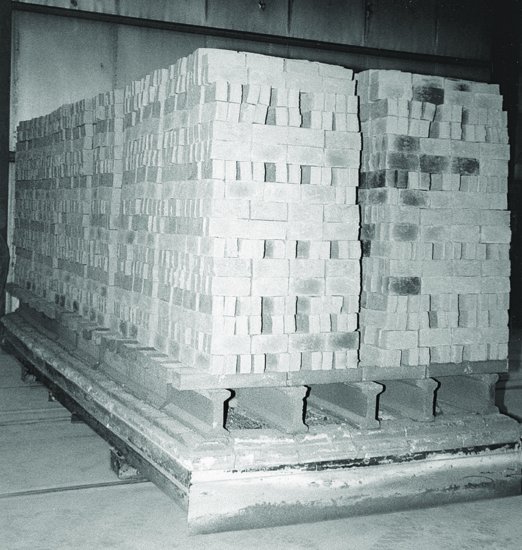
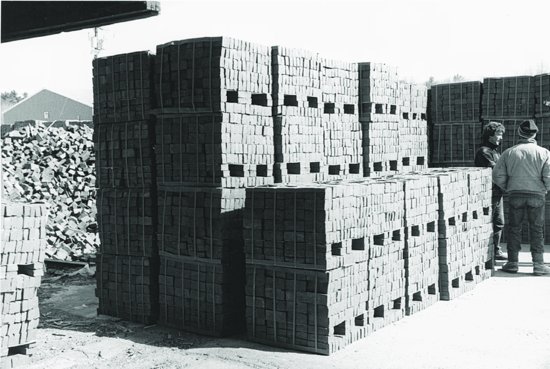
Figure 8.10 Three stages in the firing of water-struck bricks in a small factory. (a) Bricks stacked on a kiln car ready for firing. The open passages between the bricks allow the hot kiln gases to penetrate to the interior of the stack. The bed of the kiln car is made of a refractory material that is unaffected by the heat of the kiln. The rails on which the car runs are recessed in the floor. (b) The cars of bricks are rolled into the far end of this gas-fired periodic tunnel kiln. When firing has been completed, the large door in the near end of the kiln is opened and the cars of bricks are rolled out on the rails that can be seen at the lower right of the picture. (c) After the fired bricks have been sorted, they are strapped into these “cubes” for shipping. (Photo by Edward Allen.)
(a)
(b)
(c)
The color of a brick depends on the chemical composition of the clay or shale and the temperature and chemistry of the fire in the kiln. Higher temperatures, as noted in the previous paragraph, produce darker bricks. The iron that is prevalent in most clays turns red in an oxidizing fire and purple in a reducing fire. Other chemical elements interact in a similar way to the kiln atmosphere to make still other colors. For bright colors, the faces of the bricks can be glazed like pottery, either during the normal firing or in an additional firing.
Fly Ash Brick
Fly ash bricks are made from fly ash, a waste product from coal-fired power generation, and sand. The fly ash acts as the binder in the bricks and the sand as the aggregate. These two ingredients are mixed with water and smaller amounts of other ingredients, compacted into molds, and steam cured. The resulting masonry units are equal in performance and similar in appearance to traditional clay bricks.
In comparison to the tradition kiln brick firing process, steam curing of fly ash bricks requires significantly less energy. As a result, the embodied energy and global warming potential of fly ash bricks is significantly less than that of clay masonry.
Brick Sizes
There is no truly standard brick. The nearest thing in the United States is the modular brick, dimensioned to construct walls in modules of 4 inches (101 mm) horizontally and 8 inches (203 mm) vertically, but the modular brick has not found ready acceptance in some parts of the country and traditional sizes persist on a regional basis. Figure 8.11 shows the brick sizes that represent about 90 percent of all the bricks used in the United States. In practice, the designer, when selecting bricks for a building, usually views actual samples before completing the drawings for the building and dimensions the drawings in accordance with the size of the particular bricks selected (see Figure 8.22). For most bricks in the traditional range of sizes, three courses of bricks plus the accompanying three mortar joints add up to a height of 8 inches (203 mm). Length dimensions must be calculated specifically for the brick selected and must include the thicknesses of the mortar joints.
Figure 8.11 Dimensions of bricks commonly used in North America, as established by the Brick Industry Association. This list gives an idea of the diversity of sizes and shapes available, and of the difficulty of generalizing about brick dimensions. Modular bricks are dimensioned so that three courses plus mortar joints add up to a vertical dimension of 8 inches (203 mm), and one brick length plus mortar joint has a horizontal dimension of 8 inches (203 mm). The alternative dimensions of each brick are calculated for ⅜″ (9.5-mm) and ½ ″ (12.7-mm) mortar joint thicknesses.
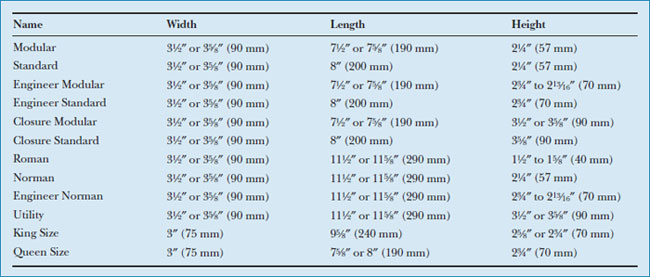
The use of larger bricks can lead to substantial economies in construction. A Utility brick, for example, has the same face height as a standard modular brick, but because it is longer, its in-the-wall cost per square foot is about 25 percent lower and the compressive strength of the wall is about 25 percent higher because of the smaller proportion of mortar. The designer should also consider, however, that a wall built with larger bricks can deceive the viewer regarding the scale of the building.
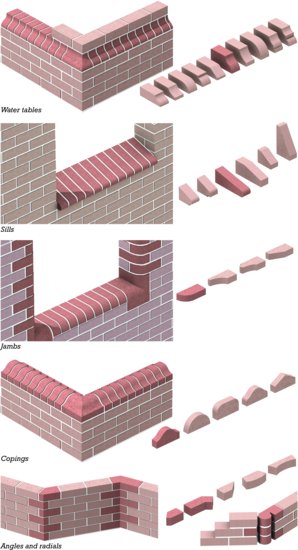
Custom shapes and sizes of brick are often required for buildings with special details, ornamentation, or unusual geometries (Figures 8.12 and 8.13). These are readily produced by most brick manufacturers if sufficient lead time is given.
Figure 8.12 Bricks may be custom molded to perform particular functions. This rowlock water table course in an English bond wall was molded to an ogee curve. (Photo by Edward Allen.)
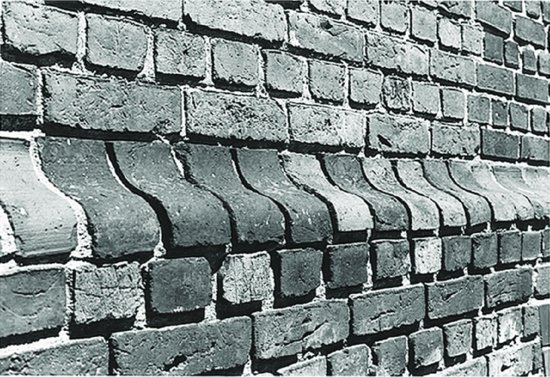
Figure 8.13 Some commonly used custom brick shapes. Notice that each water table, jamb, and coping brick shape requires special inside and outside corner bricks as well as the basic rowlock or header brick. The angle bricks are needed to make neat corners in walls that meet at other than right angles. The hinge brick at the extreme lower right of the drawing is a traditional shape that can be used to make a corner at any desired angle. Radial bricks produce a smoothly curved wall surface of any specified radius. Common shapes not pictured here include voussoirs for any desired shape and size of arch and rounded-edge bricks for stair treads.
Brick Classifications
The bricks most commonly used in building construction are classified as facing brick (ASTM C216), building brick (ASTM C62), or hollow brick (ASTM C652). Facing bricks (also called face brick) are intended for both structural and nonstructural uses where appearance is important. Building bricks are used where appearance does not matter, such as in backup wythes of masonry that will be concealed in the finished work. Both facing bricks and building bricks are specified as solid units. Solid units may, in fact, be genuinely solid, or despite their name, they may be cored or frogged (Figure 8.14), as long as any plane measured parallel to the bearing surface of the brick is at least 75 percent solid. By reducing the volume and thickness of the clay, cores and frogs permit more even drying and firing of bricks, reduce fuel costs for firing, reduce shipping costs, and create bricks that are lighter and easier to handle. (Where genuinely solid bricks are required, specifications should call for 100 percent solid, uncored, unfrogged brick.) Hollow bricks, defined according to ASTM C652, may be up to 60 percent void and are used primarily to enable the insertion and grouting of steel reinforcing bars in single wythes of brickwork (Figure 8.14).
Figure 8.14 From left to right: cored, hollow, and frogged bricks. Cored and frogged bricks are considered solid, as long as they remain at least 75 percent solid. A hollow brick may be up to 60 percent void.

Paving bricks (ASTM C902), used for the paving of walks, drives, and patios, must conform to special requirements not only for freeze-thaw resistance, but water absorption and abrasion resistance as well. Firebricks (ASTM C64) are used for the lining of fireplaces or furnaces. These are made from special fireclays which produce bricks with refractory qualities (resistance to very high temperatures). Firebricks are laid in very thin joints of fireclay mortar.
Choosing Bricks
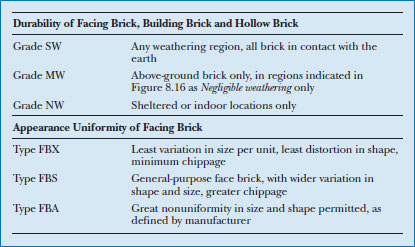
In addition to molding process, color, size, and other aesthetic qualities, durability and appearance uniformity may also be important to brick selection (Figure 8.15). Brick grade establishes minimum requirements for compressive strength and water absorption. The overall durability of the brick and its resistance to weathering can then be related to a map of weathering indices derived from data on winter rainfall and freeze-thaw cycles (Figure 8.16). Grade SW brick is recommended for exterior use in all regions on the map as well as for all brick in contact with the earth. Grade MW brick is recommended for use only above grade, in areas labeled on the map as negligible weathering. Grade NW brick should be used only indoors or in exterior locations protected from the weather.
Figure 8.15 Brick grade and type. Brick grades classify bricks according to their durability and resistance to freeze-thaw action. The grades listed here apply to facing brick, building brick, and hollow brick. Paving brick is graded similarly, but using the designations, in decreasing order of weathering resistance, SX, MX, and NX. Brick types classify bricks according to their uniformity of size and shape. The types listed here apply only to facing brick. Hollow brick is manufactured in types designated HBX, HBS, HBB, and HBA, in decreasing order of uniformity, and paving brick is manufactured in types PX, PS, and PA. Building bricks, which are not visible in the finished construction, are not classified for appearance.
In addition to influencing durability, a brick's compressive strength is also of obvious importance when used in the construction of loadbearing walls and piers. Minimum compressive strengths for building bricks and face bricks range, depending on the grade, from 1500 to 3000 pounds per square inch (psi) (10 to 21 MPa). However, higher-strength bricks are readily available. A compressive strength of 10,000 psi (69 MPa) is not uncommon for bricks used in structural masonry. In high-strength applications, brick strength may exceed 20,000 psi (138 MPa). The strength of constructed brickwork depends not only on the strength of the bricks but also on the strength of the mortar and, when steel reinforced, on the strength and quantity of reinforcing.
Brick type defines limits on the variation in size, distortion in shape, and chippage (extent of physical damage to face or visible corners) among brick units (Figure 8.15). Type FBS is considered a general-purpose face brick and is the most common type sold. Type FBX bricks have more stringent limits on appearance characteristics and are intended for masonry work with very thin joints or for bond patterns demanding very close dimensional tolerances. Type FBA bricks are characterized by significant variations in size and shape, as is typical of handmade brick or brick intentionally manufactured for such effect.
Figure 8.16 Weathering regions of the United States, as determined by winter rainfall and freezing cycles. (Courtesy of Brick Institute of America.)

Laying Bricks
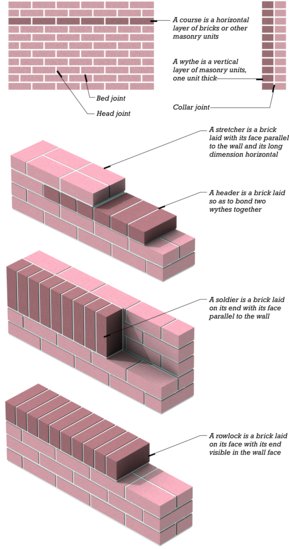
Figure 8.17 shows the basic vocabulary of bricklaying. Bricks are laid in various positions for visual reasons, structural reasons, or both. The simplest brick wall is a single wythe of stretcher courses. For walls two or more wythes thick, headers are used to bond the wythes together into a structural unit. Rowlock courses are often used for caps on garden walls and for sloping sills under windows, although such caps and sills are not durable in severe climates. Architects frequently employ soldier courses for visual emphasis in such locations as window lintels or tops of walls.
Figure 8.17 Basic brickwork terminology.
The problem of bonding multiple wythes of brick has been solved in many ways in different regions of the world, often resulting in surface patterns that are particularly pleasing to the eye. Figures 8.18 and 8.19 show some structural bonds for brickwork, among which common bond, Flemish bond, and English bond are the most popular. On the exterior of buildings, the cavity wall, with its single outside wythe, offers the designer little excuse to use anything but running bond. Inside a building, safely out of the weather, one may use solid brick walls in any desired bond. For fireplaces and other very small brick constructions, however, it is often difficult to create a long enough stretch of unbroken wall to justify the use of bonded brickwork.
Figure 8.18 Frequently used structural bonds for brick walls. Partial closer bricks are necessary at the corners to make the header courses come out even while avoiding alignments of head joints in successive courses. The mason cuts the closers to length with a mason's hammer or diamond saw.
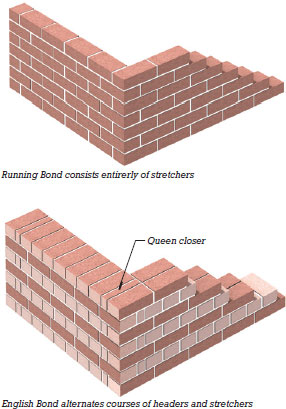
Figure 8.18 (Continued)
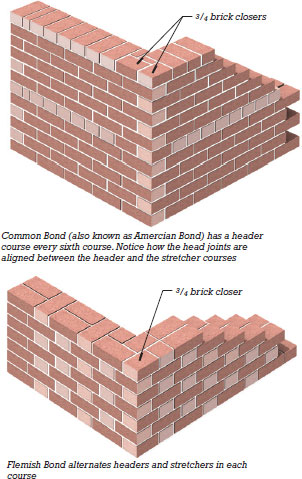
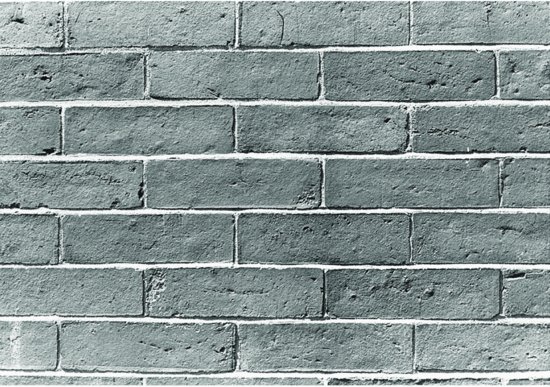
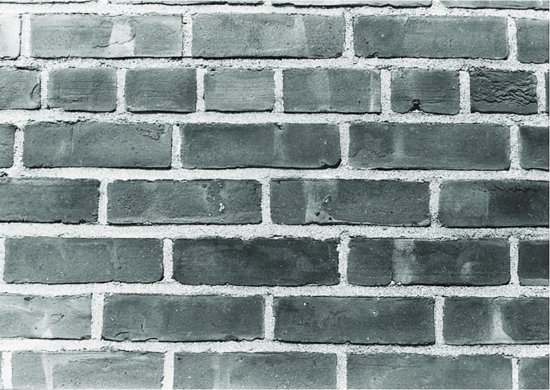
Figure 8.19 Photographs of some brick bonds. (a) Running bond, (b) common bond, and (c) English garden wall bond with Flemish header courses. In the right column, (d ) English bond, (e) Flemish bond, and (f ) monk bond, which is a Flemish bond with two stretchers instead of one between headers. The running bond example shown here is from the late 18th century. Its extremely thin joints require mortar made with very fine sand. Notice in the common bond wall (dating from the 1920s in this case) that the header course began to fall out of alignment with the stretcher courses, so the mason inserted a partial stretcher to make up the difference; such small variations in workmanship account for some of the visual appeal of brick walls. Flemish header courses, such as those used in the English garden wall bond, are often used with bricks whose length, including mortar joint, is substantially more than twice their width; the Flemish header course avoids the thick joints between headers that would otherwise result. The Flemish bond example is modern and is composed of modular sand-mold bricks. The monk bond shown here has unusually thick bed joints, approximately ¾″ (19 mm) high; these joints are difficult for the mason to lay unless the consistency of the mortar is very closely controlled. (Photos by Edward Allen.)
(a)
(b)
(c)
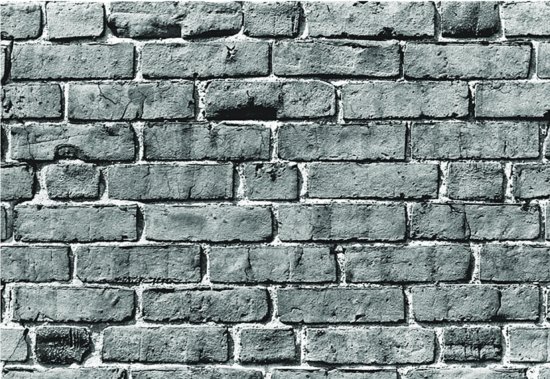
(d )
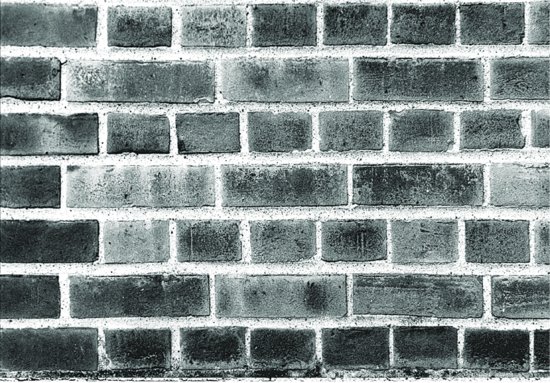
(e)
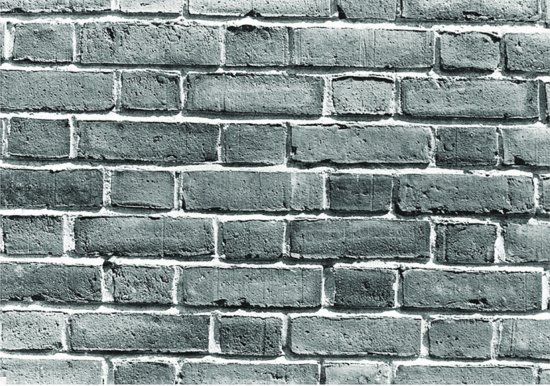
(f)
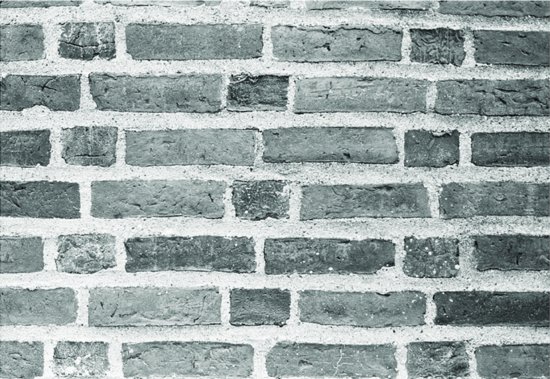
The process of bricklaying is summarized in Figures 8.20 and 8.21. While conceptually simple, bricklaying requires both extreme care and considerable experience to produce a satisfactory result, especially where a number of bricklayers working side by side must produce identical work on a major structure. Yet speed is essential to the economy of masonry construction. The work of a skilled mason is impressive both for its speed and for its quality. This level of expertise takes time and hard work to acquire, which is why the apprenticeship period for brickmasons is both long and demanding.
Figure 8.20 The procedure for building brick walls. This example is a single wythe of running bond.
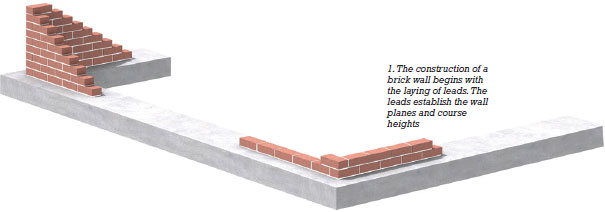
Figure 8.20 (Continued)
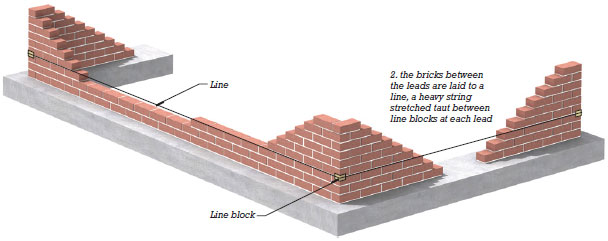
Figure 8.20 (Continued)
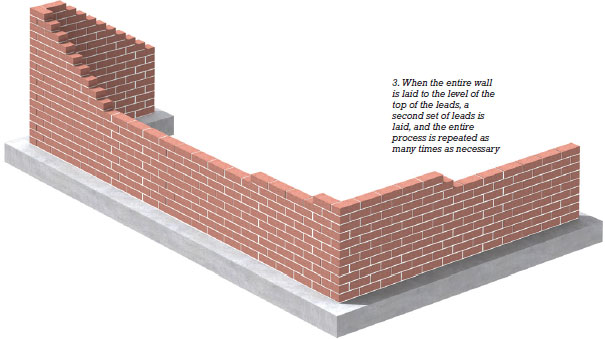
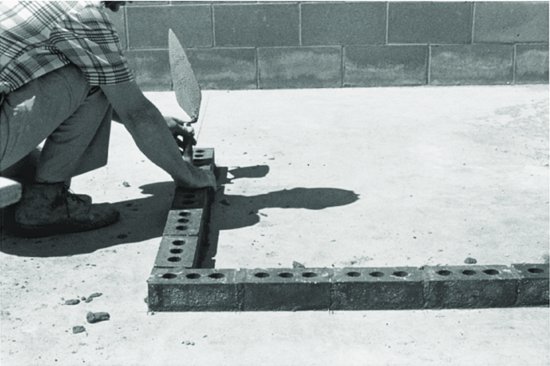
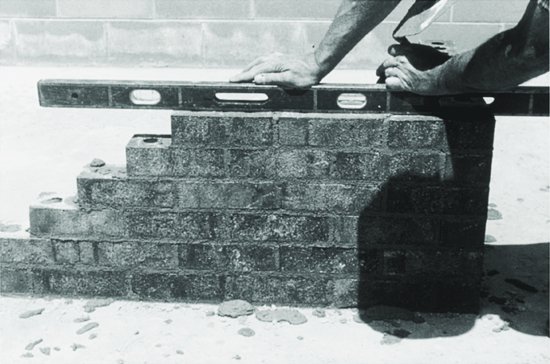
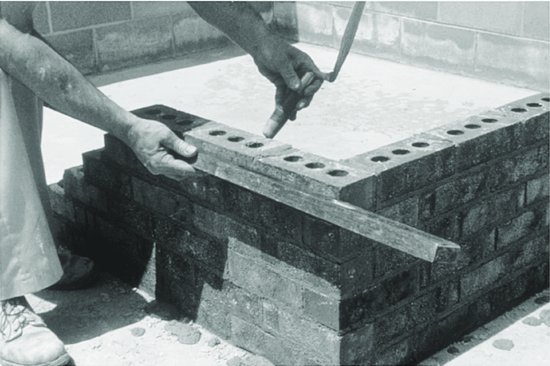
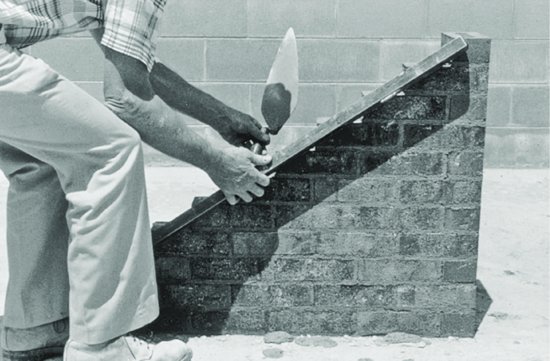
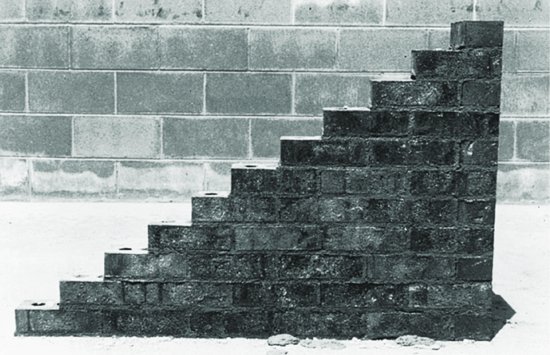
Figure 8.21 Laying a brick wall. (a) The first course of bricks for a lead is bedded in mortar, following a line marked on the foundation. (b, c, d) As each lead is built higher, the mason uses a spirit level to make sure that each course is level, straight, plumb, and in the same plane as the rest of the lead. A mason's rule or a story pole is also used to check the heights of the courses. (e) A finished lead. (f ) A mason lays brick to a line stretched between two leads. When laying to a line, there is no need to use a level or rule. (Courtesy of International Masonry Institute, Washington, D.C.)
(a)
(b)
(c)
(d )
(e)
(f)
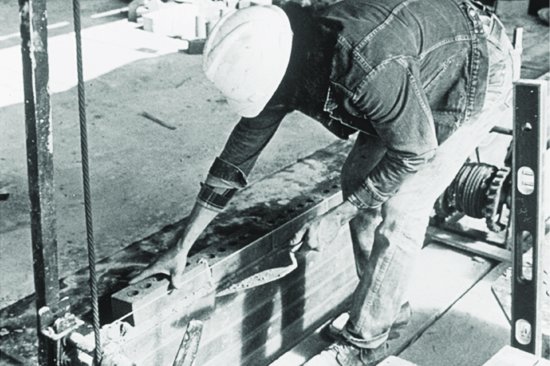
The laying of leads (pronounced “leeds”) is relatively labor intensive. A mason's rule or a story pole that is marked with the course heights is used to establish accurate course heights in the leads. The work is checked frequently with a spirit level to ensure that surfaces are flat and plumb and courses are level. When the leads have been completed, a mason's line (a heavy string) is stretched between the leads, using L-shaped line blocks at each end to locate the end of the line precisely at the top of each course of bricks.
The laying of the infill bricks between the leads is much faster and easier because the mason needs only a trowel in one hand and a brick in the other to lay to the line and create a perfect wall. It follows that leads are expensive compared to the wall surfaces between them, so where economy is important, the designer should seek to minimize the number of corners in a brick structure.
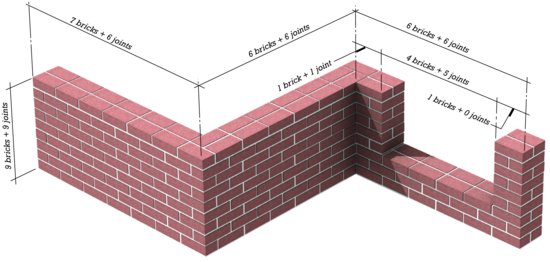
Bricks may be cut as needed, either with sharp, well-directed blows of the chisel-pointed end of a mason's hammer or, for greater accuracy and more intricate shapes, with a power saw that utilizes a water-cooled diamond blade (see Figure 9.25). Cutting of bricks slows the process of bricklaying considerably, however, and ordinary brick walls should be dimensioned to minimize cutting (Figure 8.22).
Figure 8.22 Dimensions for brick buildings are worked out in advance by the architect based on the actual dimensions of the bricks and mortar joints to be used in the building. Bricks and mortar joints are carefully counted and converted to numerical dimensions for each portion of the wall.
I remember the masons on my first house. I was not much older than the apprentice whom I found choking back tears of frustration with the clumsiness of his work and the rebukes of his boss.
Nearly thirty years later, we still collaborate on sometimes difficult masonry walls, fireplaces and paving patterns. I work with bricklayers . . . whose years of learning their craft paralleled my years of trying to understand my profession. We are friends and we talk about our work like pilgrims on a journey to the same destination.
—Henry Klein, architect, at his acceptance of the Louis Sullivan Award for Architecture, 1981, quoted in Blueprints Magazine, 1985.
Mortar joints can vary in thickness from about ¼ inch (6 mm) to more than ½ inch (13 mm). Thin joints work only when the bricks are identical to one another within very small tolerances and the mortar is made with a fine sand. Very thick joints require a stiff mortar that is difficult to work with. Mortar joints are usually standardized at ⅜ inch (10 mm), which is easy for the mason and allows for considerable distortion and unevenness in the bricks. One-half inch (13-mm) joints are also common.
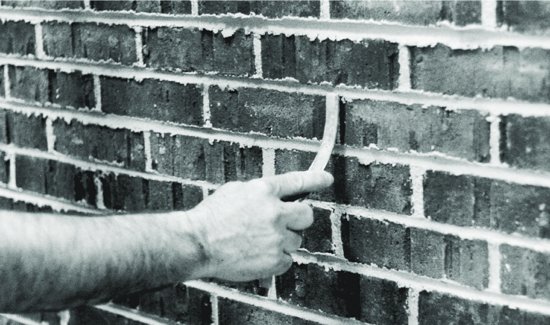
The joints in brickwork are tooled an hour or two after laying as the mortar begins to harden, to give a neat appearance and to compact the mortar into a profile that meets the visual and weather-resistive requirements of the wall (Figures 8.23 and 8.24). Outdoors, the vee joint and concave joint shed water and resist freeze-thaw damage better than the others. Indoors, a raked or stripped joint can be used if desired to accentuate the pattern of bricks in the wall and deemphasize the mortar.
Figure 8.23 (a) Tooling horizontal joints to a concave profile. (b) Tooling vertical joints to a concave profile. The excess mortar squeezed out of the joints by the tooling process will be swept off with a brush, leaving a finished wall. (c) Raking joints with a common nail held in a skate-wheel joint raker. The head of the nail digs out the mortar to a preset depth. (Courtesy of Brick Institute of America.)
(a)

(b)
(c)
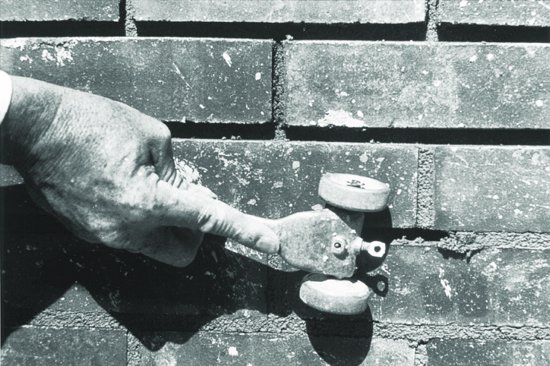
Figure 8.24 Joint tooling profiles for brickwork. The concave joint and vee joint are the only ones suitable for outdoor use in severe climates.

After joint tooling, the face of the brick wall is swept with a soft brush to remove the dry crumbs of mortar left by the tooling process. If the mason has worked cleanly, the wall is now finished, but most brick walls are later given a final cleaning by scrubbing with muriatic acid (hydrochloric acid) or other cleaning agent and rinsing with water to remove mortar stains from the faces of the bricks. Light-colored bricks can be stained by acids and should be cleaned by other means.
Spanning Openings in Brick Walls
Brick walls must be supported above openings for windows and doors. Lintels of reinforced concrete, reinforced brick, or steel angles (Figures 8.25 and 8.26) are all equally satisfactory from a technical standpoint. The near invisibility of the steel lintel is a source of delight to some designers but dissatisfies those who prefer that a building visually express its means of support. Wood is no longer used for lintels because of its tendency to burn, to decay, and to shrink and allow the masonry above to settle and crack.
Figure 8.25 Three types of lintels for spanning openings in brick walls. The double angle steel lintel (top) is scarcely visible in the finished wall. The reinforced brick lintel (center) works in the same manner as a reinforced concrete beam and gives no visible clues as to what supports the bricks over the opening. The precast reinforced concrete lintel (bottom) is clearly visible. For short spans, cut stone lintels without reinforcing can be used in the same manner as concrete lintels.

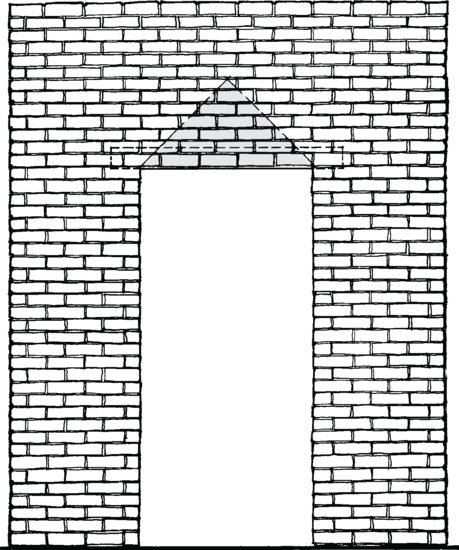
Figure 8.26 Because of corbelling and arching action in the bricks, a lintel is considered to carry only the triangular area of brickwork indicated by the shaded portion of this drawing. The broken line indicates a concealed steel angle lintel.
The corbel is an ancient structural device of limited spanning capability, one that may be used for small openings in brick walls, for beam brackets, and for ornament (Figures 8.27, 8.28, and 8.29). A good rule of thumb for designing corbels is that the projection of each course should not exceed half the course height; this results in a corbel angle of about 60 degrees to the horizontal and minimizes flexural stress in the bricks.
Figure 8.27 Corbelling has many uses in masonry construction. It is used in this example both to span a door opening and to create a bracket to support a beam.
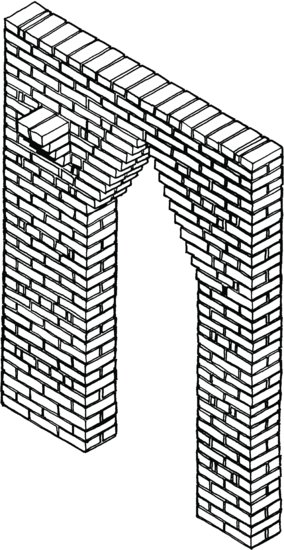
Figure 8.28 Corbelling creates a transition from the cylindrical tower to a hexagonal roof. Cut limestone is used for window sills, lintels, arch intersections, and grotesquely carved rainwater spouts. The building is the Gothic cathedral in Albi, France. (Photo by Edward Allen.)
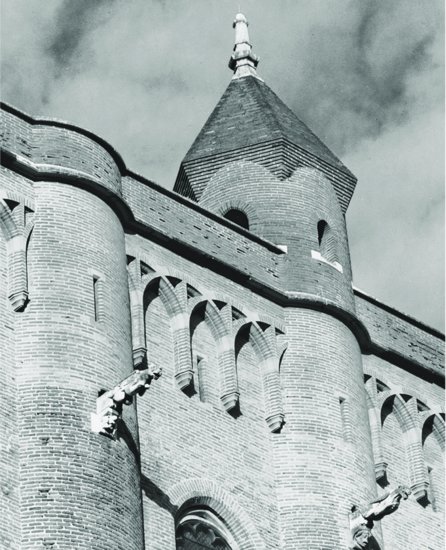
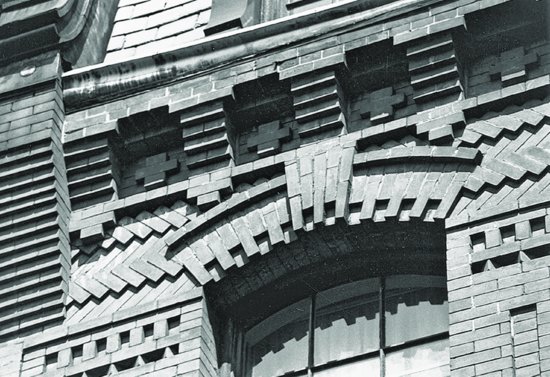
Figure 8.29 All the skills of the 19th-century mason were called into play to create the corbels and arches of this brick cornice in Boston's Back Bay. (Photo by Edward Allen.)
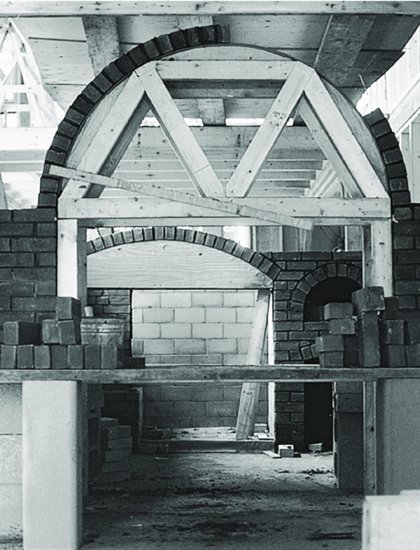
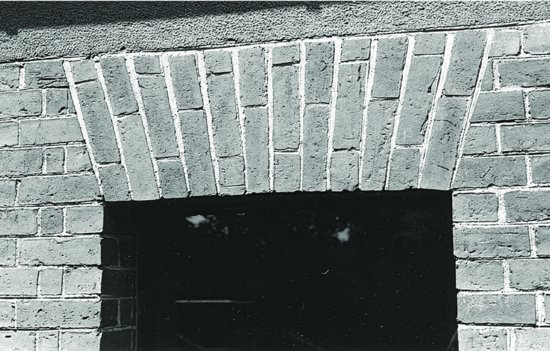
The brick arch is a structural form so widely used and so powerful, both structurally and symbolically, that entire books have been devoted to it (Figure 8.30). Given a centering of wood or steel (Figure 8.31), a mason can lay a brick arch rapidly, although the spandrel, the area of flat wall that adjoins the arch, is time-consuming to construct because many of its bricks must be cut to fit. In an arch of gauged brick, each brick is rubbed to the required wedge shape on an abrasive stone, which is laborious and expensive. The rough arch, which depends on wedge-shaped mortar joints for its curvature, is therefore much more usual in today's buildings (Figures 8.32 and 8.33). A number of brick manufacturers will mold to order sets of tapered bricks for arches of any shape and span.
Figure 8.30 Arch forms and arch terminology in brick and cut stone. The spandrel is the area of wall that is bounded by the extrados of the arch. (Reprinted by permission of John Wiley & Sons, Inc., from Ramsey/Sleeper, Architectural Graphic Standards (7th ed.), Robert T. Packard, A.I.A., ed., copyright © 1981 by John Wiley & Sons, Inc.)
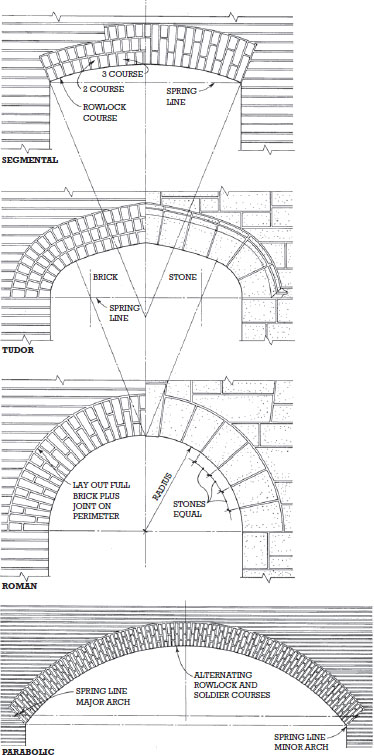
Figure 8.30 (Continued)
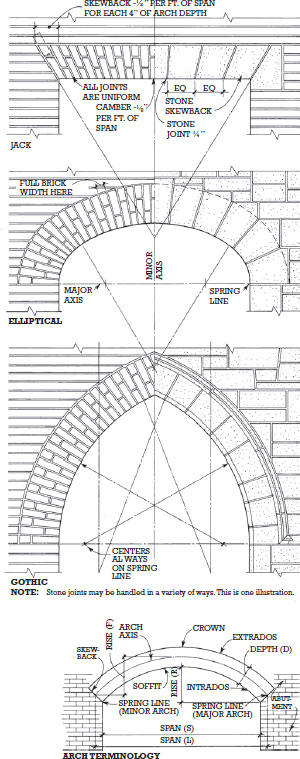
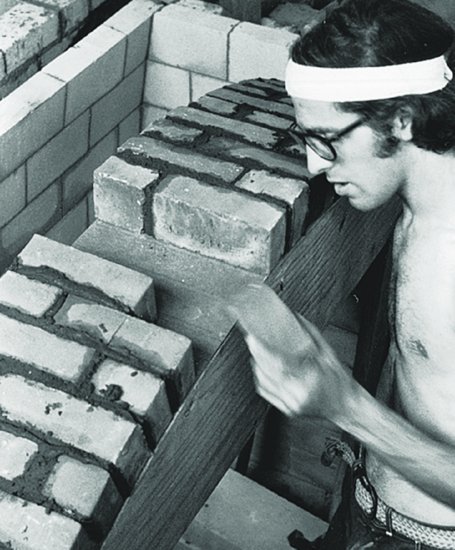
Figure 8.31 (a) Two rough brick arches under construction, each on its wooden centering. (b) The brick locations were marked on the centering in advance to be sure that no partial bricks or unusual mortar joint thicknesses will be required to close the arch. This was done by laying the centering on its side on the floor and placing bricks around it, adjusting their positions by trial and error to achieve a uniform spacing. Then the location of each brick was marked with pencil on the curved surface of the centering. (c) The brick arches whose construction is illustrated in the previous two photographs span a fireplace room that is roofed with a brick barrel vault. The firebox is lined with firebrick and the floor is finished with quarry tiles. (Photo by Edward Allen.)
(a)
(b)
(c)
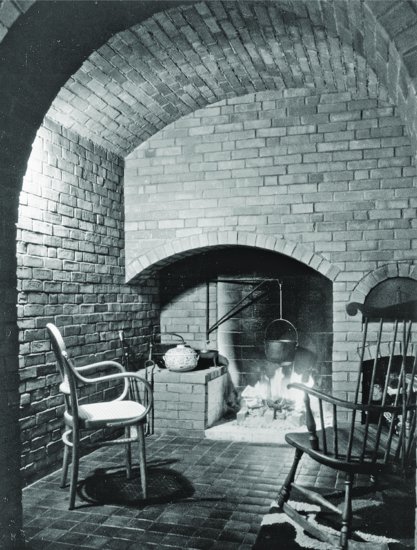
Figure 8.32 A deep semicircular brick arch frames a view of a brick arcade and the harbor beyond at the Federal Courthouse in Boston, Massachusetts. (Architects: Pei, Cobb, Freed and Partners. Photo © 1998 Steve Rosenthal.)
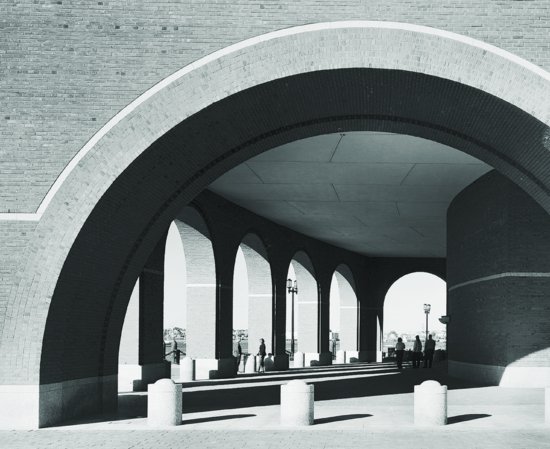
Figure 8.33 A rough jack arch (also called a flat arch) in a wall of Flemish bond brickwork. (Photo by Edward Allen.)
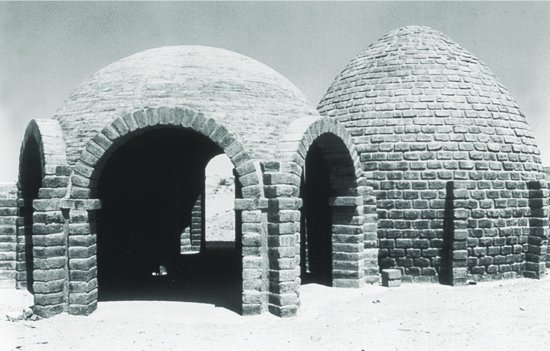
An arch translated along a line perpendicular to its plane produces a barrel vault. An arch rotated about its vertical centerline becomes a dome. From various intersections of these two basic roof shapes comes the infinite vocabulary of vaulted masonry construction. Brick vaults and domes, if their lateral thrusts are sufficiently tied or buttressed, are strong, stable forms. In parts of the world where labor is inexpensive, they continue to be built on an everyday basis (Figures 8.34 and 8.46). In North America and most of Europe, where labor is more costly, they have been replaced almost entirely by less expensive, more compact spanning elements such as beams and slabs of wood, steel, or concrete.
Figure 8.34 (a) Masons in Mauritania, drawing on thousands of years of experience in masonry vaulting, build a dome for a patient room of a new hospital. The masonry is self-supporting throughout the process of construction; only a simple radius guide is used to maintain a constant diameter. The dome is double, with an airspace between to insulate the room from the sun's heat. (b) The walls are buttressed with stack bond brick headers to resist the outward thrust of the domes. (Courtesy of ADAUA, Geneva, Switzerland.)
(a)

(b)
Reinforced Brick Masonry
Reinforced brick masonry (RBM) is analogous to reinforced concrete construction. The same deformed steel reinforcing bars used in concrete are placed in thickened collar joints to strengthen a brick wall or lintel. A reinforced brick wall (Figure 8.35) is created by constructing two wythes of brick 2 to 4 inches (50–100 mm) apart, placing the reinforcing steel in the cavity, and filling the cavity with grout. Grout is a mixture of portland cement, aggregate, and water. ASTM C476 specifies the proportions and qualities of grout for use in filling masonry loadbearing walls. It is important that grout be fluid enough to flow readily into the narrow cavity and fill it completely. The excess water in the grout that is required to achieve this fluidity is quickly absorbed by the bricks and does not detract from the eventual strength of the grout, as it would from concrete poured into formwork. Highly flowable self-consolidating grout, analogous to self-consolidating concrete as described in Chapter 13, can also be used.
Figure 8.35 A reinforced brick loadbearing wall is built by installing steel reinforcing bars in a thickened collar joint, then filling the joint with portland cement grout. The cleanout holes shown here are used in the high-lift method of grouting.
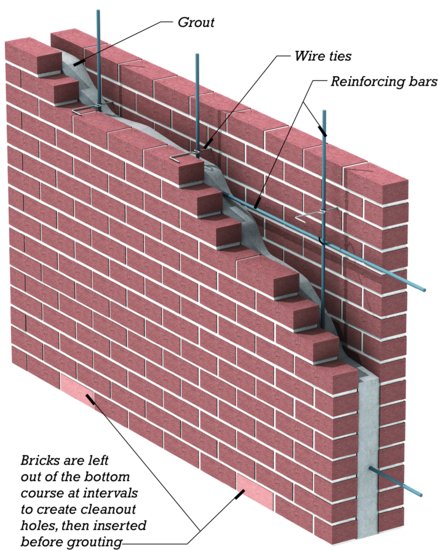
There are two methods for grouting reinforced brick walls: low lift and high lift. In low-lift grouting, the masonry is constructed to a height not greater than 4 feet (1200 mm) before grouting, taking care to keep the cavity free of mortar squeeze-out and droppings, which might interfere with the placement of the reinforcing and grout. The vertical reinforcing bars are inserted into the cavity and are left projecting at least 30 bar diameters above the top of the brickwork to transfer their loads to the steel in the next lift. The cavity is then filled with grout to within 1½ inches (38 mm) of the top, and the process is repeated for the next lift.
In high-lift grouting, the wall is grouted a story at a time. The cleanliness of the cavity is ensured by temporarily omitting some of the bricks in the lowest course of masonry to create cleanout holes. As the bricklaying progresses, the cavity is flushed periodically from above with water to drive debris down and out through the cleanouts. To resist the hydrostatic pressure of the wet grout, the wythes are held together by galvanized steel wire ties laid into the bed joints and across the cavity, usually at intervals of 24 inches (600 mm) horizontally and 16 inches (400 mm) vertically. After the cleanouts have been filled with bricks and the mortar has cured for at least 3 days, the reinforcing bars are placed and grout is pumped into the cavity from above in increments not more than 4 feet (1200 mm) high. To minimize pressure on the brickwork, each increment is allowed to harden for an hour or so before the next increment is poured above it.
The low-lift method is generally easier for small work where the grout is poured by hand. Where groutpumping equipment must be rented, the high-lift method is preferred because it minimizes rental costs.
Although unreinforced brick walls were once adequate for many structural purposes, RBM walls are much stronger against vertical loads, flexural loads from wind or earth pressure, and shear loads. With RBM, it is possible to build bearing wall buildings to heights formerly possible only with steel and concrete frames, and to do so with surprisingly thin walls (Figures 8.36 and 8.37). RBM is also used for brick piers, which are analogous to concrete columns, and, less commonly, for structural lintels (Figure 8.25), beams, slabs, and retaining walls.
Figure 8.36 Twelve-inch (300-mm) reinforced brick walls of constant thickness bear the concrete floor and roof structures of a hotel. (Photo by Edward Allen.)
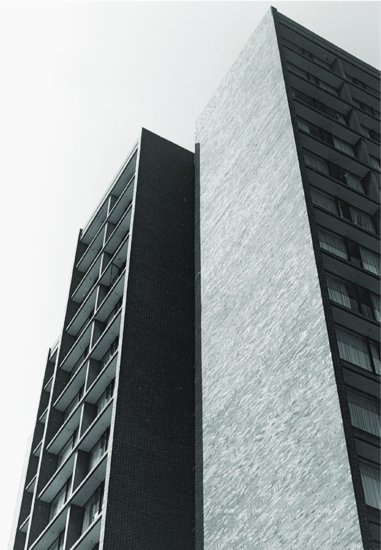
Figure 8.37 Because loads in a building accumulate from top to bottom, the unreinforced brick walls of the 16-story Monadnock Building, built in Chicago in 1891, are 18 inches (460 mm) thick at the top and 6 feet (1830 mm) thick at the base of the building. (Nicholas Janberg, www.structurae.de)

Reinforced brickwork may also be created at a smaller scale by inserting reinforcing bars and grout into the cores of hollow bricks. This technique is especially useful for single-family residential construction and for single-wythe prefabricated curtain wall panels (Chapter 20).
MASONRY WALL CONSTRUCTION
Bricks, stones, and concrete masonry units are mixed and matched in both loadbearing and nonloadbearing walls of many types. Stone and concrete masonry are discussed in Chapter 9, and the more important types of masonry wall constructions are presented in Chapter 10. Figures 8.38 through 8.46 illustrate just some of the richness and stylistic diversity possible with brick masonry construction.
Figure 8.38 Ornamental corbelled brickwork in an 18th-century New England chimney. Step flashings of lead sheet waterproof the junction between the chimney and the wood shingles of the roof. (Photo by Edward Allen.)
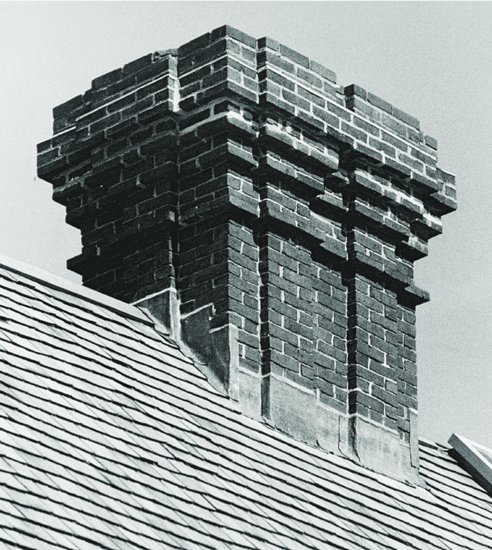
Figure 8.39 In the gardens he designed at the University of Virginia, Thomas Jefferson used unreinforced serpentine walls of brick that are only a single wythe thick. The shape of the wall makes it extremely resistant to overturning despite its thinness. (Photo Wayne Andrews.)
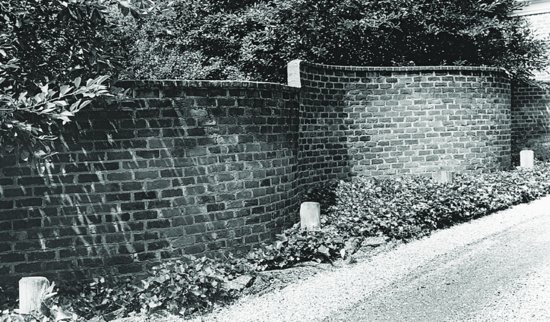
Figure 8.40 Cylindrical bays of brick with stone lintels front these Boston rowhouses. (Photo by Edward Allen.)
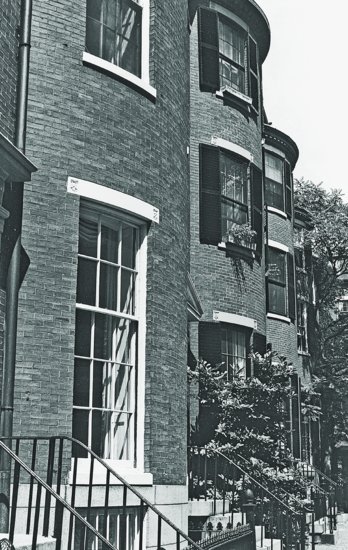
Figure 8.41 Bricks were laid diagonally in two of the courses to create this mouse-tooth pattern. The window is spanned with a segmental arch of cut limestone. (Photo by Edward Allen.)
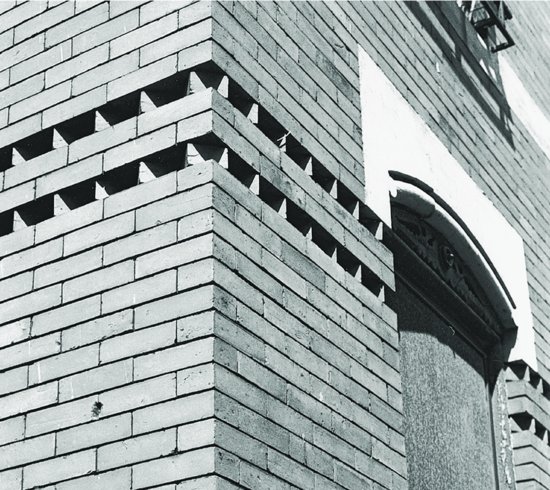
Figure 8.42 Quoins originated long ago as cut stone blocks used to form strong corners on walls of weak masonry materials such as mud bricks or round fieldstones. In more recent times, quoins (pronounced “coins”) have been used largely for decorative purposes. At the left, cut limestone quoins and a limestone water table dress up a common bond brick wall. The mortar joints between quoins are finished in a protruding beaded profile to emphasize the pattern of the stones. At the right, brick quoins are used to make a graceful termination of a concrete masonry wall at a garage door opening. Notice that three brick courses perfectly match one block course. (Photos by Edward Allen.)
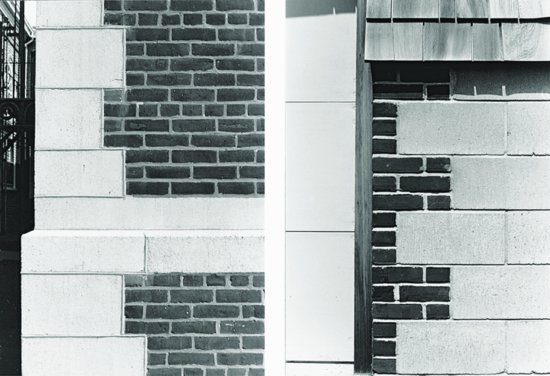
Figure 8.43 Louis Sullivan's National Farmers' Bank in Owatonna, Minnesota, completed in 1908, rises from a red sandstone base. Enormous rowlock brick arches span the windows in the two street facades. Bands of glazed terra-cotta ornament in rich blues, greens, and browns outline the walls, and a flaring cornice of corbelled brick and terra cotta caps the building. (Photo Wayne Andrews.)
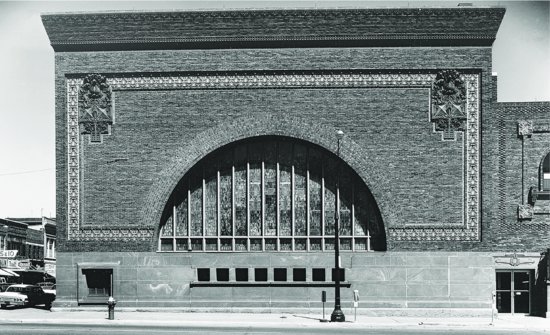
Figure 8.44 Architects Pei, Cobb, Freed employed brick half-domes to mark the entrances to courtrooms in the Boston Federal Courthouse. (Photo © 1998 Steve Rosenthal.)
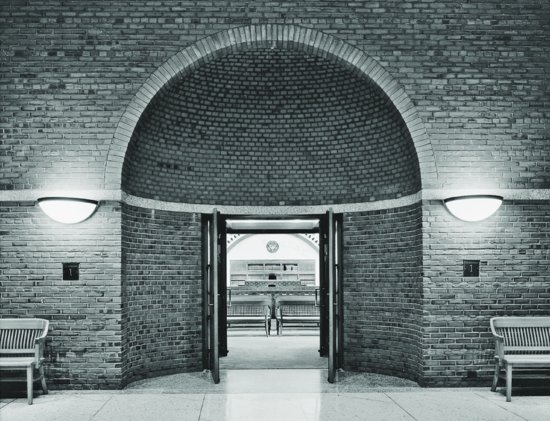
Figure 8.45 Frank Lloyd Wright used long, flat Roman bricks and cut limestone wall copings to emphasize the horizontality of the Robie House, built in Chicago in 1906. (Photo by Mildred Mead. Courtesy of Chicago Historical Society, IChi-14191.)
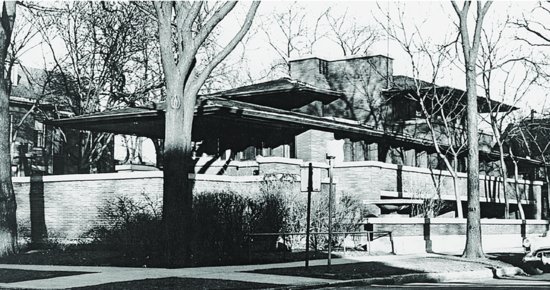
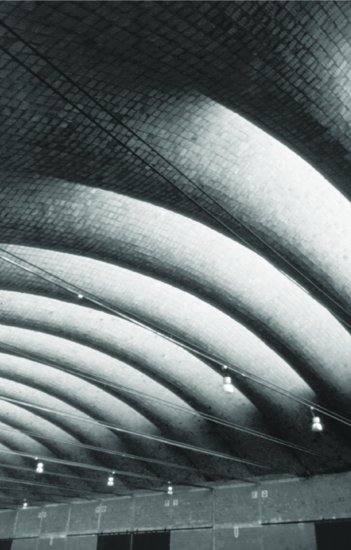
Figure 8.46 During the second half of the 20th century, Uruguayan engineer Eladio Dieste constructed hundreds of industrial buildings with long-span roof vaults of reinforced clay masonry, either bricks or, like the example shown here, hollow clay tiles. The span of this roof is about 100 feet (30 m). (Left) The vaults are long strips with clerestory windows between for daylighting. (Right) Each strip is S-shaped in cross section. This stiffens the vault to prevent buckling and also provides the openings for the windows. (Photo by Edward Allen.)

KEY TERMS
REVIEW QUESTIONS
1. How many syllables are in the word masonry? (Hint: There cannot be more syllables in a word than there are vowels. Many people, even masons and building professionals, mispronounce this word.)
2. What are the most common types of masonry units?
3. What are the molding processes used in manufacturing bricks? How do they differ from one another?
4. List the functions of mortar.
5. What are the ingredients of mortar? What is the function of each ingredient?
6. Why are mortar joints tooled? Which tooling profiles are suitable for a brick wall in a severe climate?
7. What is the function of a structural brick bond such as common or Flemish bond? Draw the three brick bonds from memory.
EXERCISES
1. What is the exact height of a brick wall that is 44 courses high when 3 courses of brick plus their 3 mortar joints are 8 inches (203.2 mm) high?
2. What are the inside dimensions of a window opening in a wall of modular bricks with ⅜-inch (9.5-mm) mortar joints if the opening is 6 bricks wide and 29 courses high?
3. Obtain sand, hydrated lime, several hundred bricks, and basic bricklaying tools from a masonry supply house. Arrange for a mason to help everyone in your class learn a bit of bricklaying technique. Use lime mortar (hydrated lime, sand, and water), which hardens so slowly that it can be retempered with water and used again and again for many weeks. Lay small walls in several different structural bonds. Make simple wooden centering and construct an arch. Construct a dome about 4 feet (1.2 m) in diameter without using centering, as is done in Figure 8.34. Dismantle what you build at the end of each day, scrape the bricks clean, stack them neatly for reuse, and retemper the mortar with water, covering it with a sheet of plastic to keep it from drying out before it is used again.
4. Design a brick fireplace for a house that you are designing. Select the size and color of brick and the color of mortar. Proportion the fireplace according to the guidelines in Chapter 7. Dimension the fireplace so that it uses only full and half bricks. Draw every brick and every mortar joint in each view of the fireplace. Use rowlocks, soldiers, corbels, and arches as desired for visual effect. How will you span the fireplace opening?
SELECTED REFERENCES
Beall, Christine. Masonry Design and Detailing for Architects, Engineers, and Builders (6th ed.). New York, McGraw-Hill, 2012.
This 500-page book is an excellent general design reference on brick, stone, and concrete masonry.
Brick Industry Association. BIA Technical Notes of Brick Construction. McLean, VA, various dates.
This collection of more than 50 bulletins is available in ring-binder format or as free downloads from the Brick Industry Association's web site, www.bia.org. It includes up-to-date information on every aspect of bricks and brick masonry.
Brick Industry Association. Principles of Brick Masonry. Reston, VA, BIA, 1989.
Despite its age, this 70-page booklet still presents a complete curriculum in the fundamentals of clay masonry construction for the student of building construction.
WEB SITES
Brick Masonry
Author's supplementary web site: www.ianosbackfill.com/08_brick_masonry
Brick Industry Association: www.bia.org
General Shale Brick: www.generalshale.com
Glen-Gery Brick: www.glengerybrick.com
International Masonry Institute: www.imiweb.org
