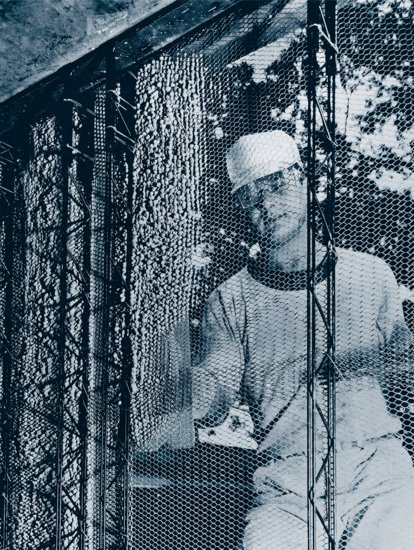
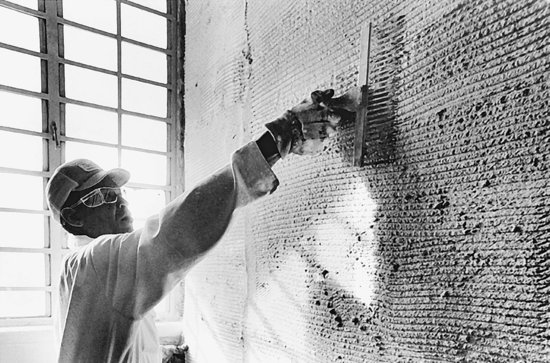
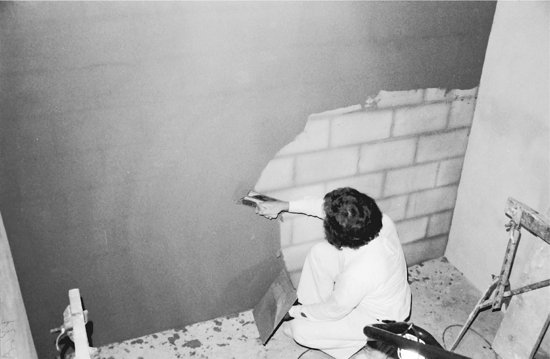
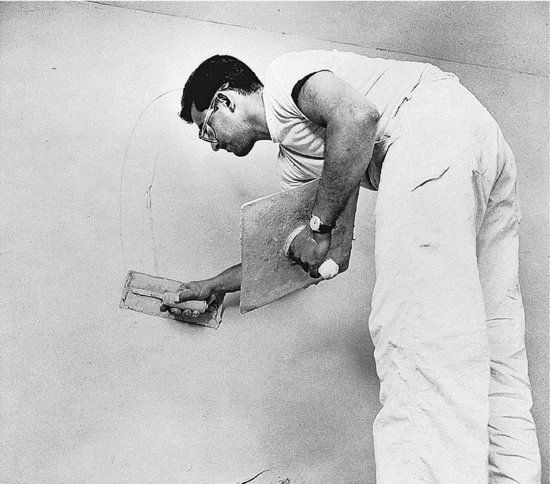
A plasterer applies a scratch coat of gypsum plaster to expanded metal lath. The extrusions of plaster forced through the small openings in the lath will, once the plaster dries, form a strong mechanical bond with the lath. The partition is framed with open-truss wire studs, a type of stud seen in older buildings but no longer used in new construction. Soft-annealed galvanized steel wire was used to make all the connections in this type of partition, minimizing the need for screw fasteners. (Courtesy of United States Gypsum Company.)
23
INTERIOR WALLS AND PARTITIONS
Fire Barriers and Fire Partitions
Smoke Barriers and Smoke Partitions
Gypsum Board Partition Systems
TYPES OF INTERIOR WALLS
Fire Walls
A fire wall is a wall that forms a required separation to restrict the spread of fire through a building, and extends continuously from the foundation to or through the roof. A fire wall is used to divide a single building into smaller units, each of which may be considered as a separate building when calculating allowable heights and areas under the building code. A fire wall must either meet a noncombustible roof structure at the top or extend through and above the roof by a specified minimum distance, 30 inches (760 mm) in the case of the International Building Code (IBC). In this code, a fire wall must also extend horizontally at least 18 inches (450 mm) beyond the exterior walls of the building unless these exterior walls meet certain fire resistance and combustibility requirements. Except in buildings of Type V construction, a fire wall must be framed with noncombustible materials such as steel studs, concrete, or masonry. A fire wall must also have sufficient structural stability during a building fire to allow collapse of the construction on either side without itself collapsing.
Openings in fire walls are restricted in size and aggregate area and must be closed with fire doors or fire-rated glass. The required fire resistance ratings for fire walls under the International Building Code are defined in Figure 1.7.
Shaft Walls
A shaft wall is used to enclose vertical openings that extend through multiple floors of a building, such as for elevators, exit stairs, or vertical runs of ductwork, conduits, or pipes. In the International Building Code, a shaft wall connecting four or more floors must have a fire resistance rating of 2 hours or, if connecting fewer floors, a rating of 1 hour. Walls for elevator shafts must be able to withstand the air pressure and suction loads placed on them by the movements of the elevator cars within the shaft, and should be designed to prevent the noise of the elevator machinery from reaching other areas of the building.
Fire Barriers and Fire Partitions
Fire-rated walls are also used to restrict the spread of fire and smoke within a single building. Depending on the type of separation, the International Building Code requires such walls to be constructed as either fire barriers or fire partitions. Unlike fire walls, these wall types do not necessarily extend from foundation to roof. A fire barrier must extend vertically from the top of one floor slab to the underside of the next. Fire barriers are used to separate different occupancies, and to limit the extent of fire areas (areas bounded by fire-resistant construction, the size and location within the building of which are related to automatic sprinkler requirements). Requirements for a fire partition are less stringent than for fire barriers. For example, in some cases, a fire partition may terminate at the underside of a suspended ceiling. Fire partitions are used to enclose corridors and to separate tenant spaces in mall buildings or dwelling units in hotels, dormitories, and other multidwelling unit buildings.
Openings in fire barriers and partitions are restricted in size and must be closed with fire doors or fire-rated glass. Required fire resistance ratings for the various types of fire barriers and partitions according to the International Building Code are listed in Figures 22.6 and 22.7.
The structural elements that support fire barriers and fire partitions must have a fire resistance rating at least as great as that of the wall being supported. For example, in a building of Type IIB construction, the structure as a whole is permitted to be unprotected. However, columns, bearing walls, and portions of the structure that support a 1-hour rated corridor wall must themselves also be protected with at least a 1-hour fire resistance rating.
Smoke Barriers and Smoke Partitions
In certain institutional occupancies such as hospitals and prisons, where occupants are unable to leave the building in case of fire, special partitions called smoke barriers are required. This type of wall divides floors of buildings in such a way that occupants may take refuge in case of fire by moving to the side of the smoke barrier that is away from the fire, without having to exit the building. A smoke barrier is a 1-hour rated partition that is continuous from one side of the building to the other and from the top of a floor slab to the bottom of the slab on the floor above. It must be sealed at all edges. Penetrations for air ducts must be protected with dampers that close automatically if smoke is detected in the air. Other penetrations, such as those for pipes and conduits, must be sealed as well. Doors through smoke barriers are necessary to allow movement of people in case of fire. They must be close fitting, without grilles or louvers, and must close automatically.
A smoke partition is a wall constructed—like a smoke barrier—to resist the passage of smoke, but without any fire resistance rating. For example, when walls for corridors and elevator lobbies need not be fire-rated, they are constructed as smoke partitions.
Other Nonbearing Partitions
Many of the partitions in a building neither bear a structural load nor are required as fire separation walls. These may be made of any material that meets the combustibility provisions of the building code for the selected type of construction, as explained in the next section.
FRAMED PARTITION SYSTEMS
Partition Framing
Partitions that will be finished in plaster or gypsum board are usually framed with wood or metal studs. Framing with wood studs is permitted by the building code only in buildings of certain combustible construction types, including Types III and V. Partitions in buildings of Type I or Type II (noncombustible) construction must be framed with light gauge metal studs. Partitions in Type IV, Heavy Timber construction, must either be framed with metal studs or constructed with wood members assembled into solid, laminated partitions as specified in the code. With certain limitations, fire-retardant-treated wood is also permitted for partition framing in Types I, II, and IV construction.
Metal partition framing is directly analogous to wood light framing, but constructed of light gauge steel studs and tracks made of galvanized steel sheet metal, usually from 0.018 to 0.030 inches (0.45–0.75 mm) thick (Figures 23.1 and 23.2). Light gauge steel members and framing methods are detailed in Chapter 12. Because of its noncombustibility, metal partition framing is permitted in all building code construction types.
Figure 23.1 Noncombustible partitions are assembled with light gauge steel studs attached to top and bottom track sections (runners), usually with self-drilling screws. Preformed holes in the studs provide openings for wiring, small-diameter piping, or metal bracing.
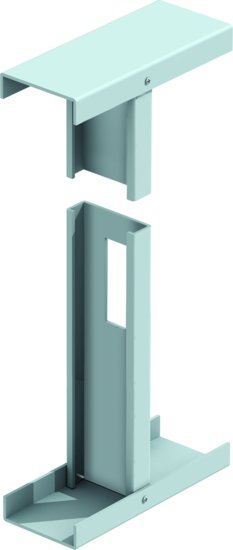
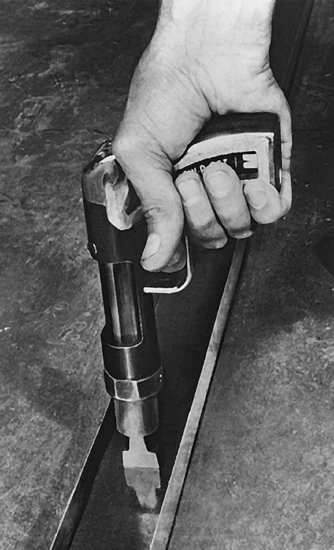
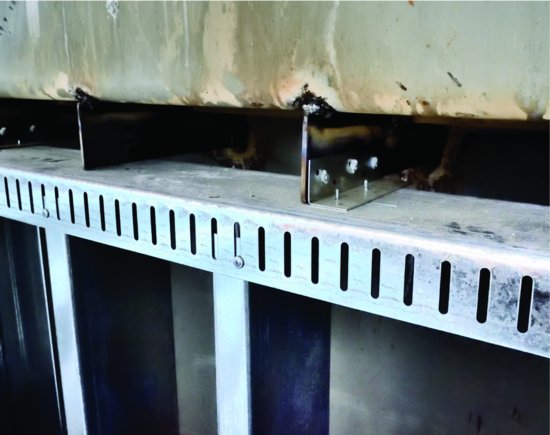
Figure 23.2 (a) Attaching a runner to a concrete floor using powder-driven fasteners. The gun explodes a small charge of gunpowder to drive a steel pin through the metal and into the concrete to make a secure connection. (b) Where a nonloadbearing partition abuts the underside of a structural member, a slotted deflection track isolates the partition from deflections in that member, preventing structural loads from distorting the partition or causing damage to finishes. Note how the screws are fastened at the bottom of the slots, to leave the track free to move downward without impinging on the studs. Deflection tracks can also be made by nesting one track inside another or by leaving studs unattached to the top track and adding metal bracing near the top of the studs to hold them laterally. A sheet metal angle connects the deflection track to a tab welded to the HSS structural steel member above. (c) A twisting motion is used to ease studs into place between the top and bottom runners. The snug fit between the vertical legs of the runners and the flanges of the studs temporarily holds the studs in place until they are fastened. On the right side of the photograph, a stack of gypsum board awaits installation. (Photos (a) and (c) courtesy of United States Gypsum Company; Photo (b) by Joseph Iano.)
(a)
(b)
(c)
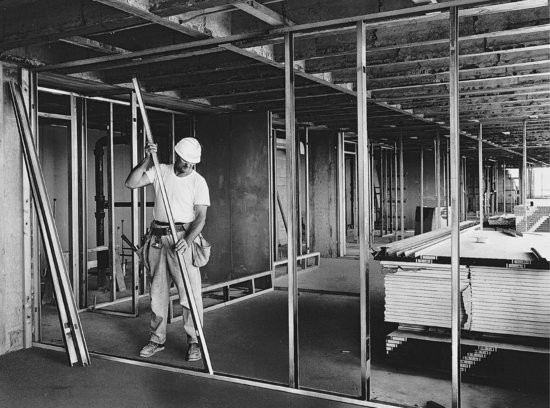
Nonloadbearing partitions must be isolated from movements in the surrounding building structure that could otherwise cause distortion of the partition framing or stresses in partition finishes. Resilient sealant joints may be required where partition ends meet structural walls, columns, or curtain wall framing. Where partition tops abut structural framing or slabs above, deflection tracks isolate the partition from movement in those elements (Figure 23.2b ).
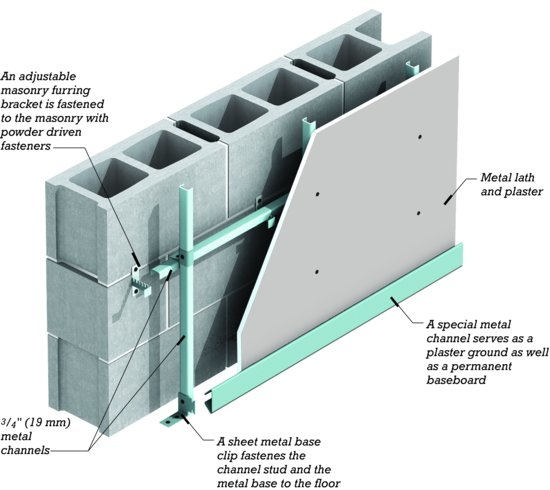
If plaster or gypsum board surfaces are to be applied over a masonry wall, they may be spaced away from the wall with either wood or metal furring strips (Figures 23.3, 23.4, and 23.5). Furring allows the installation of a flat wall finish over an irregular masonry surface, and provides a concealed space between the finish and the masonry for installing plumbing, wiring, and thermal insulation.
Figure 23.3 A furred gypsum board finish over a concrete block wall. The Z-furring channels are attached to the masonry with powder-driven fasteners. The plastic foam insulation is tucked in behind the flange of the channel, and the gypsum board is screwed to the face of the flange. Long slots punched from the web of the channel (not visible in this drawing) help to reduce the thermal bridging effect of the Z-furring channel.
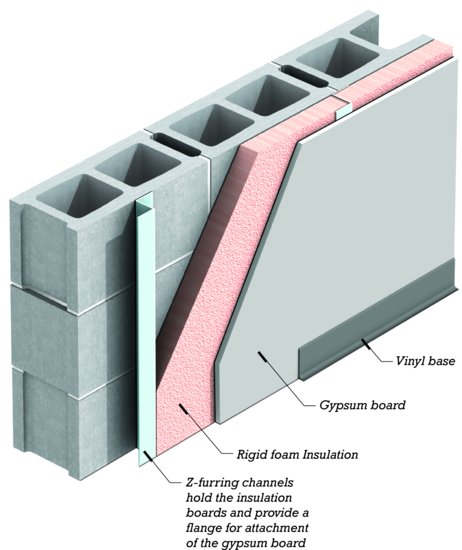
Figure 23.4 A furred gypsum board finish using a standard hat-shaped metal furring hat channel.
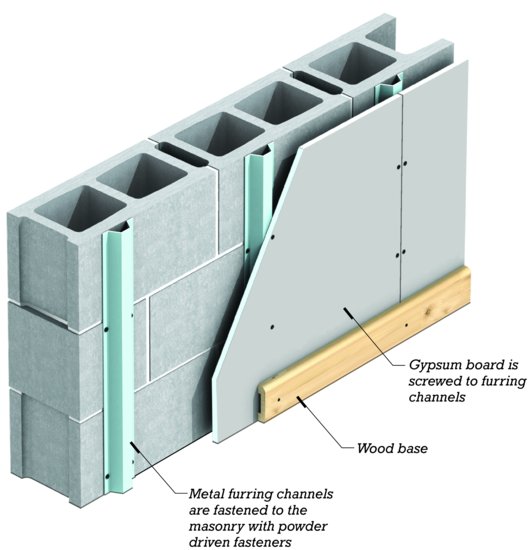
Figure 23.5 A furred plaster finish using adjustable furring brackets. Each bracket has a series of teeth along its upper edge so that a metal channel can be wired securely to it in any of a number of positions, allowing the lather to produce a flat wall regardless of the surface quality of the masonry.
Plaster
Plaster is a generic term that refers to any of a number of cement-like substances that are applied to a surface in paste form and then harden into a solid material. Plaster may be applied directly to a masonry surface or, more generally, to any of a group of plaster bases known collectively as lath (rhymes with “math”). Plastering began in prehistoric times with the smearing of mud over masonry walls or over a mesh of woven sticks and vines to create a construction known as wattle and daub, the wattle being the mesh and the daub the mud. The early Egyptians and Mesopotamians developed finer, more durable plasters based on gypsum and lime. Portland cement plasters evolved in the 19th century. It is from these latter three materials—gypsum, lime, and portland cement—that the plasters used in buildings today are prepared.
Gypsum Plaster
Gypsum is an abundant mineral in nature, a crystalline hydrous calcium sulfate. It is quarried, crushed, dried, ground to a fine powder, and heated to 350 degrees Fahrenheit (175°C) in a process known as calcining to drive off about three-quarters of its water of hydration. The calcined gypsum, ground to a fine white powder, is known as plaster of Paris. When plaster of Paris is mixed with water, it rehydrates and recrystallizes rapidly to return to its original solid state. As it hardens, it gives off heat and expands slightly.
Gypsum is a major component of interior finish materials in most buildings. It has but one major disadvantage—its solubility in water. Among its advantages are that it is durable and light in weight compared to many other materials. It resists the passage of sound better than most materials. It has a very fine grain, is easily worked in either its wet or dry state, and can be fashioned into surfaces that range from smooth to heavily textured. Above all, it is inexpensive, and it is highly resistant to the passage of fire.
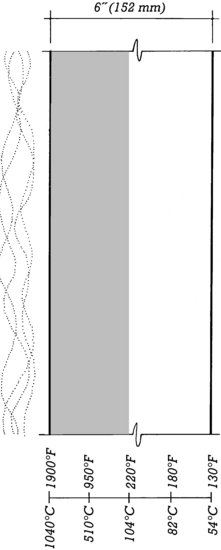
When a gypsum building component is subjected to the intense heat of a fire, a thin surface layer is calcined and gradually disintegrates. In the process, it absorbs considerable heat and gives off steam, both of which cool the fire (Figure 23.6). Layer by layer, the fire works its way through the gypsum, but the process is slow. The uncalcined gypsum never reaches a temperature more than a few degrees above the boiling point of water, so areas behind the gypsum component are well protected from the fire's heat. Any required degree of fire resistance can be created by increasing the thickness of the gypsum as necessary. The fire resistance of gypsum can also be increased by adding lightweight aggregates to reduce its thermal conductivity and by adding reinforcing fibers to retain the calcined gypsum in place as a fire barrier.
Figure 23.6 The effect of fire on gypsum, based on data from Underwriters Laboratories, Inc. After a 2-hour exposure to heat following the ASTM E119 time–temperature curve, less than half of the gypsum on the side toward the fire, shown here by shading, has calcined. The portions of the gypsum to the right of the line of calcination remain at temperatures below the boiling point of water.
For use in construction, calcined gypsum is carefully formulated with various admixtures to control its setting time and other properties. Gypsum plaster is made by mixing the appropriate dry plaster formulation with water and an aggregate, either fine sand or a lightweight aggregate such as perlite or vermiculite. Because of its expansion during setting, gypsum plaster, unlike portland cement plaster, is not prone to shrinkage cracking as it dries.
- Naturally occurring gypsum is not renewable, but it is plentiful and widely distributed geographically.
- The majority of newly extracted gypsum is quarried in surface mines, with attendant loss of wildlife habitat, surface erosion, and water pollution, as well as the problem of disposing of overburden and mine tailings.
- There is increasing use of synthetic gypsum, material recovered from power plant flue gases that would otherwise be sent to landfills, in the manufacture of gypsum construction materials. According to the Gypsum Association, approximately 1.5 million tons (1.4 million metric tons) of synthetic gypsum is used annually to produce about 7 percent of the U.S. construction industry's calcined gypsum. Some synthetic gypsums, however, contain toxic byproducts from the manufacturing processes in which they are produced and cannot be safely recycled into new construction materials.
- The calcining of gypsum involves temperatures that are not much higher than the boiling point of water, which means that the embodied energy of gypsum is relatively low, about 1200 BTU per pound (2.8 MJ/kg) for plaster and 2600 BTU per pound (6.0 MJ/kg) for gypsum board.
- The calcining process emits particulates of calcium sulfate, an inert, benign chemical, as dust.
- The paper faces of gypsum board are composed primarily of recycled newspapers.
- Some manufacturers produce gypsum board products made with as much as 95 percent recycled materials, including synthetic gypsum and recycled postconsumer waste paper.
- Approximately 15 million tons (14 million metric tons) of gypsum board are manufactured annually in the United States. On a typical construction site, about 10 to 12 percent of this material becomes waste.
- Gypsum board waste generated during construction can be minimized by sizing walls and ceilings to make efficient use of whole boards or by ordering custom-sized boards for nonstandard-size surfaces.
- Gypsum board scrap can be permanently stored in the hollow cavities of finished walls, eliminating disposal and transportation costs and reducing the amount of material destined for landfills (though care must be taken not to create interference with the pulling of electrical wires at a later date).
- Some dust is generated by the cutting and sanding of gypsum board and plaster. This dust has not been tied to any specific illnesses, but it is a nuisance and a source of discomfort until the work is done and all the dust has been swept up and removed from the building. Remodeling and demolition also create large quantities of gypsum dust.
- Most installed gypsum products have extremely low emissions. Some joint compounds, however, may emit volatile organic compounds (VOCs).
- Additives used in the manufacture of moisture-resistant and fire-resistant gypsum board are potential sources of VOC emissions.
- Paints, wallcovering adhesives, and other products used to finish gypsum surfaces can be significant emitters of VOCs, and thus require care in selection.
- Gypsum board waste can be recycled back into the manufacture of new gypsum board products. Current efforts limit recycled content to no more than 15 or 20 percent, due to the amount of paper waste that can be safely introduced into the new gypsum without impairing its fire resistance.
- Gypsum board waste from the demolition of older buildings may be contaminated with nails, drywall tape, joint compound, and paint. Gypsum board demolished from buildings constructed prior to 1978 may be coated with lead-based paint. These foreign materials must be removed from the waste; their presence may limit the material's recycling potential.
- Gypsum board waste can be used as a soil amendment and plant nutrient. With the recent advent of mobile grinders, construction site recycling of gypsum board waste for use as a soil amendment on the same building site is feasible.
- Gypsum is an ingredient in many manufacturing and industrial processes. Studies and small-scale tests currently underway to identify potential uses of gypsum board waste in such processes are likely to lead to additional recycling opportunities in the future.
Gypsum plasters are manufactured in accordance with ASTM C28 and fall into two general categories: base-coat plasters, used for the underlying preparatory coats of a plaster application (as explained later), and finish-coat plasters. Base-coat plasters are provided either mill-mixed, also called ready-mixed, with aggregate added at the manufacturing plant; or neat, for use with aggregate added at the job site. The more common base-coat gypsum plasters are:
- Ordinary gypsum plaster, in various formulations suitable for either hand or machine application
- Wood-fibered gypsum plaster, gypsum plaster blended with chopped wood fibers for lighter weight, and greater strength and fire resistance
- Lightweight gypsum plaster with perlite or vermiculite aggregate, for lighter weight and greater fire resistance
- High-strength base-coat plaster, for use under high-strength finish coats
Finish-coat plasters are typically a blend of gypsum plaster and lime. The lime provides superior workability and finishing qualities, while the gypsum provides greater hardness and strength and prevents shrinkage cracking. (For more information about the manufacture of lime and its use in plasters, see Chapter 8.) Common finish-coat plasters include:
- Ready-mixed finish plaster, with factory -blended lime and other ingredients
- Gauging plaster, gypsum plaster for job site mixing with hydrated finishing lime (also called lime putty)
- High-strength gauging plaster, formulated to produce a finish plaster with higher compressive strength
- Keenes cement, a proprietary gauging plaster that produces an exceptionally dense, crack-resistant, low-absorbency finish
- Molding plaster, a fast-setting, fine-textured material for molding plaster ornament and running cornices (see the sidebar on “Plaster Ornament” later in this chapter)
Retarders and accelerators can also be added to plaster mixes on the job site to adjust the setting time to job site temperature and humidity conditions.
Portland Cement Plaster
Portland cement–lime plaster, also known as stucco, is similar to masonry mortar. It is used where the plaster is likely to be subjected to moisture, as on exterior wall surfaces or in commercial kitchens, industrial plants, and shower rooms. Because freshly mixed stucco is not as buttery and smooth as gypsum and lime plasters, it is not as easy to apply and finish. It shrinks slightly during curing, so it should be installed with frequent control joints to regulate cracking.
Plastering
Plaster can be applied either by machine or by hand. Machine application is essentially a spraying process (Figure 23.7). Hand application is done with two very simple tools: a hawk in one hand to hold a small quantity of plaster ready for use and a trowel in the other hand to lift the plaster from the hawk, apply it to the surface, and smooth it into place (Figures 23.8, 23.16, and 23.20). Plaster is transferred from the hawk to the trowel with a quick, practiced motion of both hands, and the trowel is moved up the wall or across the ceiling to spread the plaster, much as one uses a table knife to spread soft butter. After a surface is covered with plaster, it is leveled by drawing a straightedge called a darby across it, after which the trowel is used again to smooth the surface.
Figure 23.7 Spray-applying a scratch coat of plaster onto gypsum lath. (Courtesy of United States Gypsum Company.)
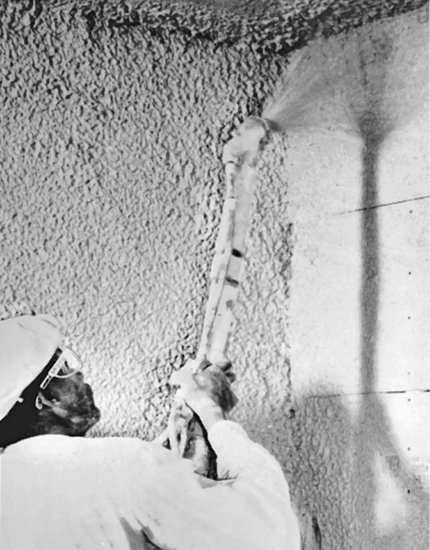
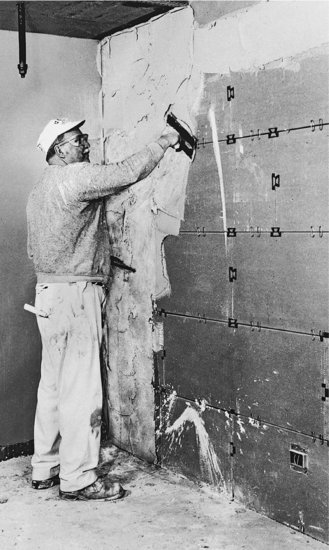
Figure 23.8 Applying a scratch coat over gypsum lath with a hawk (a corner of which is visible behind the plasterer's stomach) and trowel. Notice the wire clips that hold the lath to the open-truss studs and the sheet metal clips that strengthen the end joints between panels. The end joints do not occur over studs. (Courtesy of United States Gypsum Company.)
Lathing
Historically, the most common form of lath consisted of thin strips of wood nailed to wood framing with small spaces left between the strips to allow keying of the plaster. Most lath today is made of either expanded metal or preformed gypsum boards. The skilled tradesperson who applies lath and trim accessories is known as a lather.
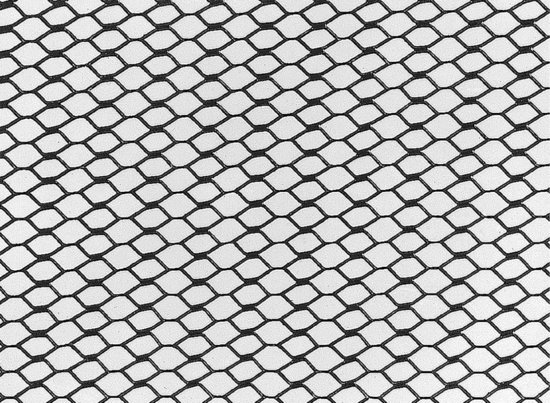
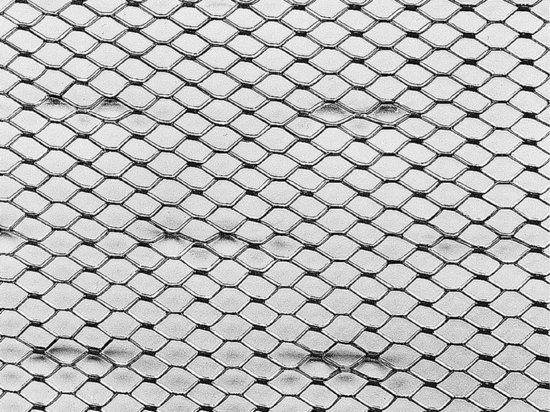
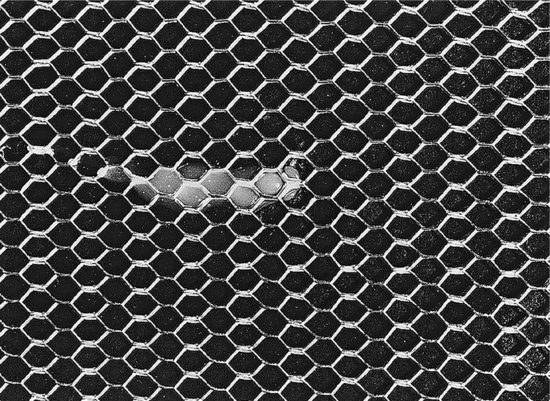
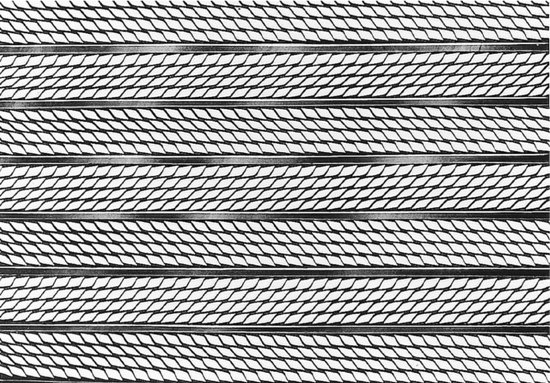
Expanded metal lath is made from thin sheets of steel that are slit and stretched in such a way as to produce a mesh of diamond-shaped openings (Figure 23.9). It is applied to light gauge steel studs with self-drilling, self-tapping screws or to wood studs with large-headed lathing nails. Lath used with portland cement stucco, and likely to be used in a damp exposure, is galvanized to deter corrosion.
Figure 23.9 Five types of expanded metal lath as manufactured by the United States Gypsum Company. (a ) General-purpose diamond-mesh expanded metal lath. (b ) Self-furring diamond-mesh metal lath. Dimples in the lath space it away from solid sheathing behind to allow plaster to key through the openings in the mesh. (c ) Paper-ba ck lath, used for backup walls beneath ceramic tile and for exterior stucco. The water-resistant paper prevents moisture that seeps through the plaster from penetrating further into the wall. (d ) Four-mesh Z-riblath is stiffer than ordinary diamond-mesh lath, making it suitable for ceilings. (e ) Three-eighths-inch (1 0-mm) riblath has V-shaped ribs for exceptional rigidity; it is used for ceilings or concrete formwork where supports are widely spaced. (Courtesy of United States Gypsum Company.)
(a)
(b)
(c)
(d)
(e)
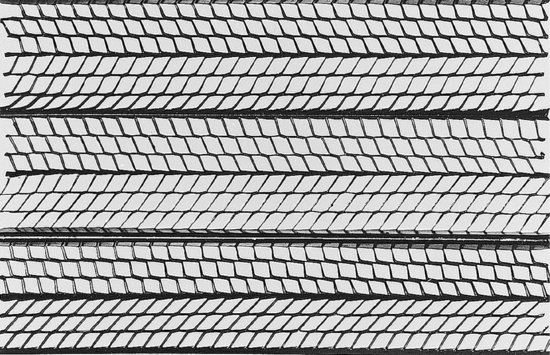
Figure 23.10 Installing gypsum lath over light gauge steel studs with self-drilling, self-tapping screws. The electric screw gun disengages automatically from the screw head when the screw has reached the proper depth. (Courtesy of United States Gypsum Company.)

Gypsum lath is made in gypsum board sheets (see discussion later in this section), usually 16 by 48 inches (406 × 1220 mm) and 3/8 inch (9 .5 mm ) thick. It consists of sheets of hardened gypsum plaster faced with outer layers of a special absorbent paper to which fresh plaster readily adheres and inner layers of water-resistant paper to protect the gypsum core. Gypsum lath is attached to steel or wood studs with screws (Figure 2 3.10). Gypsum lath cannot be used as a base for gauged gypsum-lime finish plasters or portland cement stucco, as these materials will not bond adequately to the paper facing.
Veneer plaster base (gypsum veneer base ) is a paper-faced gypsum board that comes in sheets 4 feet (1220 mm) wide, 8 to 14 feet (2440–427 0 mm) long, and ½ to 5/8 inch (13–16 mm) thick. It is screwed to wood or steel studs, or nailed to wood studs, and used as a base specifically for the application of gypsum veneer plaster (discussed later in this section).
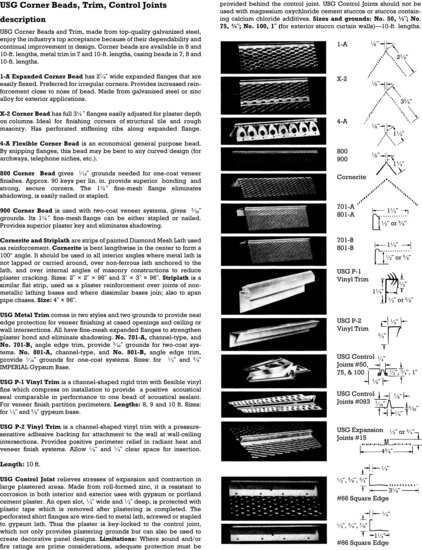
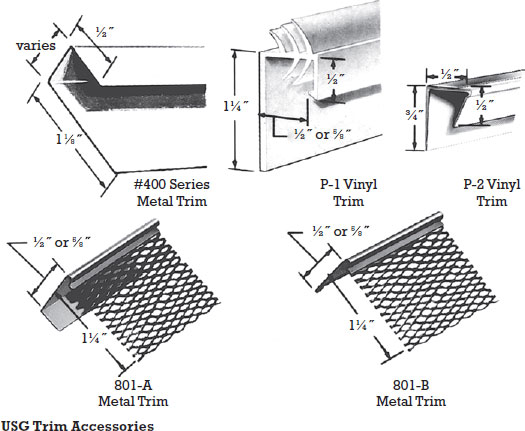
Various lathing trim accessories, most frequently made of galvanized steel, are used at the edges of a plaster surface to make a neat, durable edge or corner (Figure 23.11). These are installed by the lather at the same time as the lath. In very long or tall plaster surfaces, metal control joint accessories are mounted over seams in the lath at predetermined intervals to control cracking. Trim accessories are also designed to act as lines that gauge the proper thickness and plane of plaster surfaces. A straightedge may be run across them to level the wet plaster. In this role, the trim accessories are known collectively as grounds. Trim accessories are made in several different thicknesses to match the required plaster thicknesses over the different types of lath.
Figure 23.11 Trim accessories for lath and plaster construction, as manufactured by the United States Gypsum Company. (Courtesy of United States Gypsum Company.) You can download a PDF of this figure at http://www.wiley.com/go/aflblce6ne.
In lathing I was pleased to be able to send home each nail with a single blow of the hammer, and it was my ambition to transfer the plaster from the board to the wall neatly and rapidly. . . . I admired anew the economy and convenience of plastering, which so effectually shuts out the cold and takes a handsome finish. . . . I had the previous winter made a small quantity of lime by burning the shells of the Unio fluviatilis, which our river affords.
—Henry David Thoreau, Walden, 1854
Trim accessories are also produced as extrusions of plastic or aluminum. The aluminum accessories and some of the plastic ones are designed for improved precision and appearance when used in innovative details for bases, edges, and shadow lines in plaster walls.
Plaster Systems
Plaster over Expanded Metal Lath
Plaster is applied over expanded metal lath in three coats (Figure 23.12). The first, called the scratch coat, is troweled on rather roughly and cannot be made completely flat because the uncoated lath moves in and out considerably under the pressure of the trowel (see the chapter opening photograph). This first coat is scratched while still wet, using a notched darby, a broom, or a special rake, to create a rough surface to which the second coat can bond mechanically (Figure 23.13).
Figure 23.12 Sections through the three common lath-and-plaster systems, reproduced at full scale. Metal lath (left) requires three coats of plaster; the surface of the first coat is scratched for a better bond to the second coat. Gypsum lath (middle) may be finished with three coats or with two, as shown. Veneer plaster (right) usually consists of only a single thin finish coat, although two thin coats may be applied over rougher or more uneven substrates, such as concrete masonry or sitecast concrete.
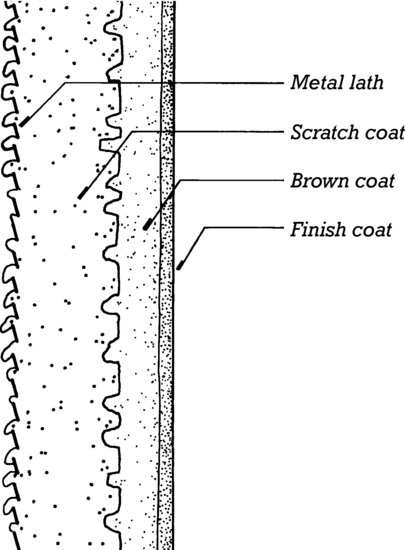
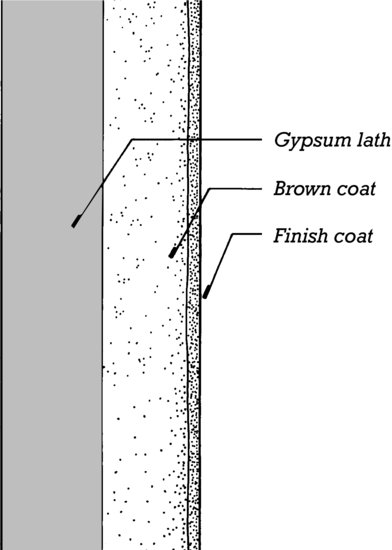
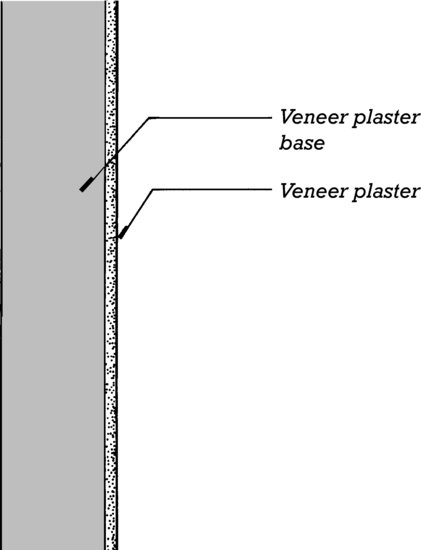
Figure 23.13 Scratching the scratch coat while it is still soft to create a better bond to the brown coat. (Courtesy of United States Gypsum Company.)
After the scratch coat has hardened, it works together with the lath as a rigid base for the second application of plaster, which is called the brown coat. The purpose of the brown coat is to build strength and thickness and to present a level surface for the application of the third or finish coat. The level surface is produced by drawing a long straightedge across the surfaces of the grounds (the edge beads, corner beads, and control joints) to strike off the wet plaster. On large, uninterrupted plaster surfaces, plaster screeds, intermittent spots or strips of plaster, are leveled up to the grounds in advance of brown coat plastering to serve as intermediate reference points for setting the thickness of the plaster during the striking-off operation. Base-coat plasters are used for scratch coats and brown coats.
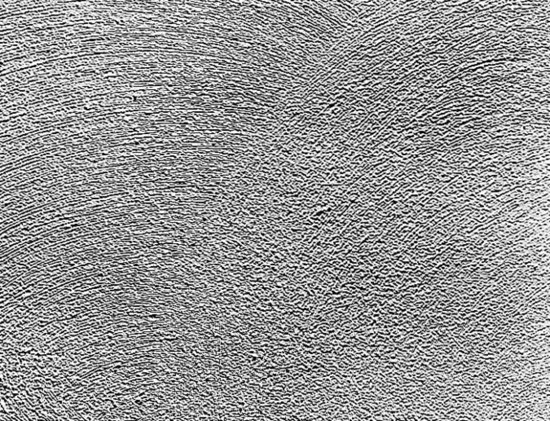
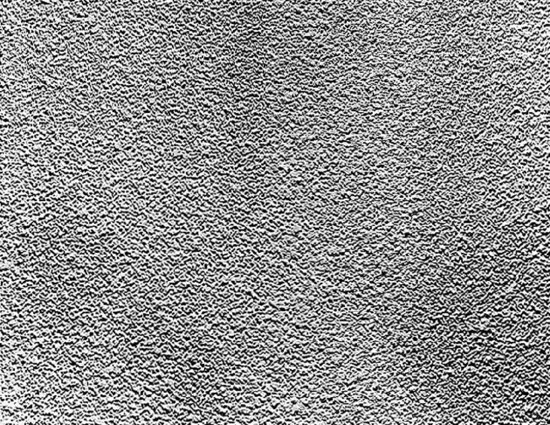
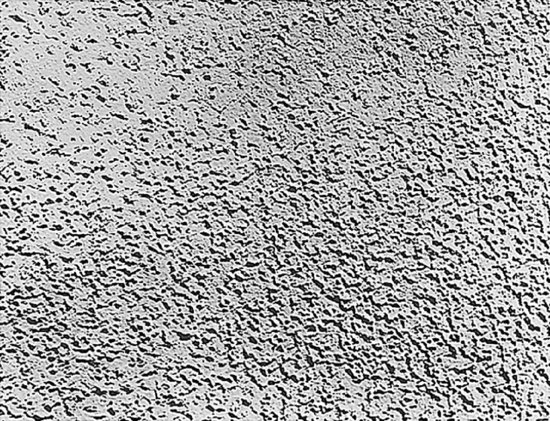
The finish coat is a very thin application of finish-coat plaster, about 1/16 inch (1.5 mm) thick. It may be troweled smooth or worked into any desired texture ( Figures 23.14 and 23.15). The total thickness of the plaster that results from this three-coat process, as measured from the face of the lath, is about 5/8 inch (16 m m). Three-coat work over metal lath is the premium-quality plaster system, extremely strong and resistant to fire. The only disadvantage of three-coat plaster work is its cost, which can be attributed largely to the labor involved in applying the lath and the three separate coats of plaster.
Figure 23.14 A sponge-faced float can be used to create various rough surface textures on plaster. (Reprinted with permission of the Portland Cement Association, from Design and Control of Concrete Mixtures, 12th edition; PHOTO: Portland Cement Association, Skokie, IL.)

Figure 23.15 Three different plaster surface textures from among many: (a) Float finish. (b) Spray finish. (c) Texture finish. (Courtesy of United States Gypsum Company.)
(a)
(b)
(c)
Plaster over Gypsum Lath
The best plaster work over gypsum lath is applied in three coats, but gypsum lath is sufficiently rigid that if it is firmly mounted to the studs, only a brown coat and a finish coat need be applied. The elimination of the scratch coat has obvious economic advantages. Even with three coats of plaster, gypsum lath is often less expensive than metal lath because the gypsum in the lath replaces much of the plaster that would otherwise have to be mixed and applied by hand in the scratch coat. The total thickness of plaster applied over gypsum lath is ½ inch (13 mm).
Plaster Direct-Applied to Masonry
Where plaster is applied directly over brick, concrete masonry, or poured concrete walls, the walls should be dampened thoroughly in advance of plastering to prevent premature dehydration of the plaster. A bonding agent may have to be applied to some smooth masonry surfaces to ensure good adhesion of the plaster. The number of coats of plaster required to cover a wall is determined by the degree of unevenness of the masonry surface. For the best work, three coats totaling 5/8 inch (16 mm) should be applied, but for many walls two coats will suffice (Figure 23.16).
Figure 23.16 Applying a finish coat of portland cement plaster over a concrete masonry partition. The block joints are visible in the base coat of plaster because of a difference in the rate of water absorption between the blocks and the mortar joints (Reprinted with permission of the Portland Cement Association, from Design and Control of Concrete Mixtures, 12th edition; PHOTO: Portland Cement Association, Skokie, IL.)
Veneer Plaster
Veneer plaster is the least expensive of the gypsum plaster systems and is competitive in price with gypsum board finishes in many regions. The veneer base and accessories create a very flat surface that can be finished with a layer of a specially formulated dense gypsum plaster (manufactured to a separate standard, ASTM C587) that is applied in one or, occasionally, two coats usually no more than 1/6 to 1/8 inch (2 –3 mm ) in total thickness (Figures 23.17–23.20). A typical single-coat application is applied in a “double-back” process in which a thin coat is followed immediately by a second “skim” coat that is finish-troweled to the desired texture. The plaster veneer hardens and dries so rapidly that it may be painted the following day. A two-coat application of veneer plaster can also be directly applied to surface of sitecast concrete or concrete masonry walls.
Figure 23.17 Installing veneer plaster base with a screw gun. (Courtesy of United States Gypsum Company.)
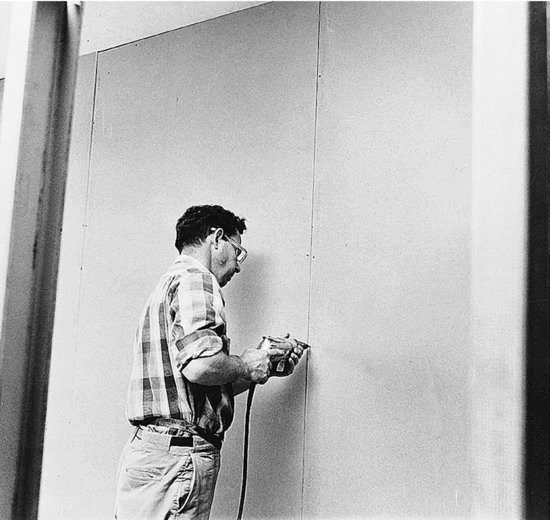
Figure 23.18 Stapling a corner bead to veneer plaster base to create a straight, durable corner. (Courtesy of United States Gypsum Company.)
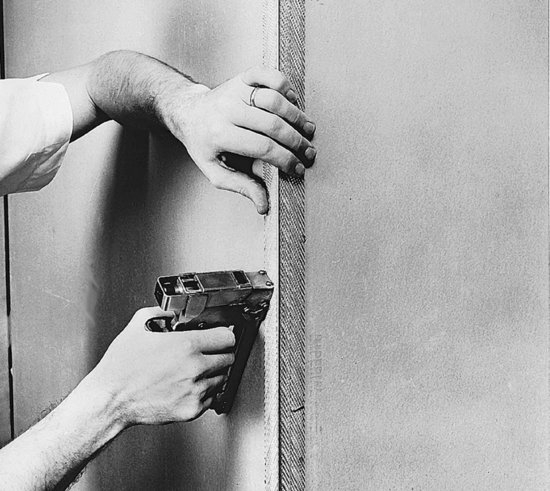
Figure 23.19 Reinforcing the panel joints of veneer plaster base with a self-adhesive glass fiber mesh tape. A panel opening for access to mechanical equipment is visible behind the installer. (Courtesy of United States Gypsum Company.)
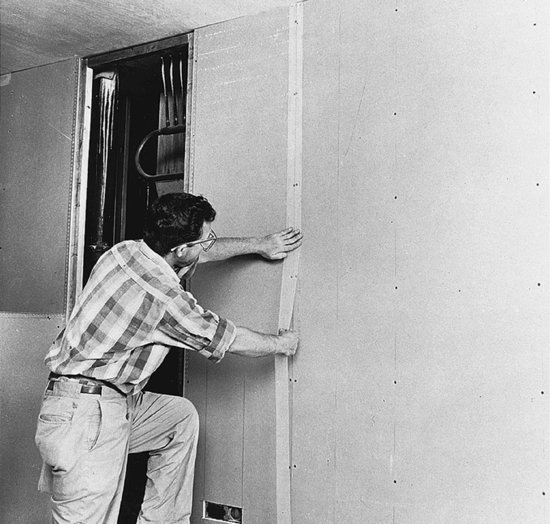
Figure 23.20 Applying veneer plaster with a hawk and trowel. (Courtesy of United States Gypsum Company.)
Stucco
Stucco (portland cement-lime plaster) is applied over galvanized metal lath, using accessories of galvanized steel, or in wet areas or exterior applications, of solid zinc or plastic, which are less prone to corrosion. Whereas gypsum plaster expands during hardening, portland cement stucco shrinks and is prone to cracking as it dries. Stucco walls are therefore provided with control joints at regular intervals to channel the shrinkage into predetermined lines rather than allowing it to occur randomly. The curing reaction in stucco is the same as that of concrete and is very slow relative to that of gypsum plaster. Stucco must be kept moist for a week before it is allowed to dry in order to attain maximum hardness and strength through full hydration of its portland cement binder.
In exterior applications over metal or wood studs, stucco may be applied over sheathing or without sheathing. Over sheathing, two layers of asphalt-saturated building felt or building paper are first applied as an air and moisture barrier. Then a self-furring metal lath, which is formed with “dimples” that hold the lath away from the surface of the wall a fraction of an inch to allow the stucco to key to the lath, is attached with nails or screws (Figure 23.9b ). If no sheathing is used, the wall is laced tightly with strands of line wire a few inches apart and paperbacked metal lath is attached to the line wire, after which stucco is applied to encase the building in a thin layer of what amounts to reinforced concrete.
In exterior applications, where stucco is exposed to wind-driven rain, a thin, tangled filament matting may be inserted directly behind the plaster and lath, to create a drainage space and lessen the risk of water penetration further into the wall assembly.
Stucco is usually applied in three coats over metal lath, with a total thickness of 7/8 inch (22 mm), or in two coats when applied directly to the surface of concrete or concrete masonry, with a thickness of 3/8 to ½ inch (10 mm). It is applied either with a hawk and trowel or by spraying (Figure 6.33). In exterior work, pigments or dyes may be added to give an integral color, and rough textures are frequently used.
Plaster Partition Systems
Types of plaster partitions are detailed in Figures 23.21 and 23.22. These diagrams show some of the ways in which the various trim accessories are used and the precautions taken to isolate the partitions from structural or thermal movements in the frame of the building. For larger, heavier doors, or for doors that are heavily used, the door opening is made stronger and stiffer by framing the jambs with double studs and/or using studs made from thicker sheet metal. As illustrated in Figure 23.21, door frames may also be grouted, either fully or only spot-grouted at the jamb anchors. Although this can strengthen the door-partition assembly, it adds cost and care must be taken to use proper grouting materials and methods to avoid trapping moisture in the door frame and causing corrosion.
Figure 23.21 Three plaster partition systems. (A) Three coats of plaster on metal lath, rated at 1 hour of fire resistance and STC 39. (B) Two coats of plaster over gypsum lath, rated at 1 hour and STC 41. (C) Veneer plaster on light gauge steel studs, rated at 1 hour and ST C 40. Notice especially the provisions for airtightness and structural movement at the top and bottom of each partition. Door frames can also be strengthened by grouting, as shown in (A) and (B). However, care must be taken to avoid introducing excessive moisture that could cause corrosion of the door frame. You can download a PDF of this figure at http://www.wiley.com/go/aflblce6ne.
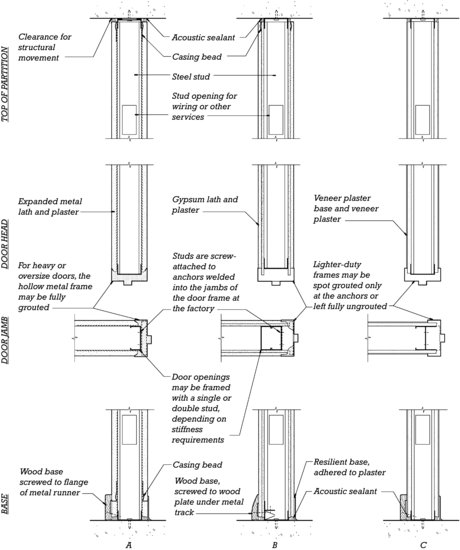
Figure 23.22 Two plaster partition systems. (A) This partition achieves an STC 54 rating by mounting the gypsum lath on one side with resilient metal clips and filling the hollow space in the partition with a sound attenuation blanket. (B) A traditional, solid plaster partition rated only STC 37. Because this assembly requires skilled plasterers to construct and is relatively costly, it is not likely to be seen in contemporary new construction. However, it illustrates the potential of traditional techniques to achieve an unusually thin partition assembly. Both of these partitions are rated at 1 hour. You can download a PDF of this figure at http://www.wiley.com/go/aflblce6ne.
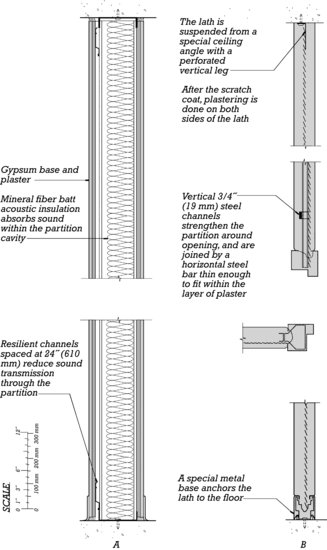
Figure A Removing the flexible rubber mold from a cast plaster ornament. (Courtesy of Dovetail, Inc.)
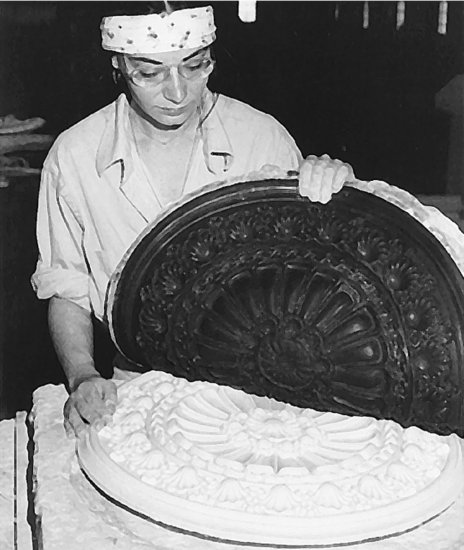
Figure B Running a plaster cornice molding in place. (Courtesy of Dovetail, Inc.)
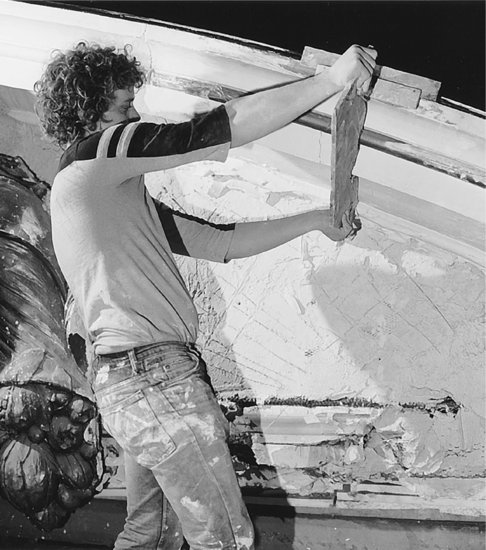
Figure C Sculptor David Flaharty runs a circular plaster medallion on a bench in his shop. (© Brian McNeil.)
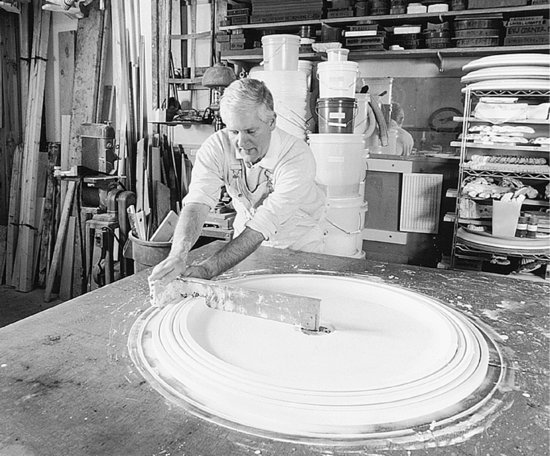
Figure D A close-up of Flaharty's blade and template. The template rides on the sledlike runner of the portion under his hand, which is called the “slipper.” The long portion of the template, called the “stock,” is a radius guide that is fastened to a pin at the end to create the circular form of the medallion. (© Brian McNeil.)
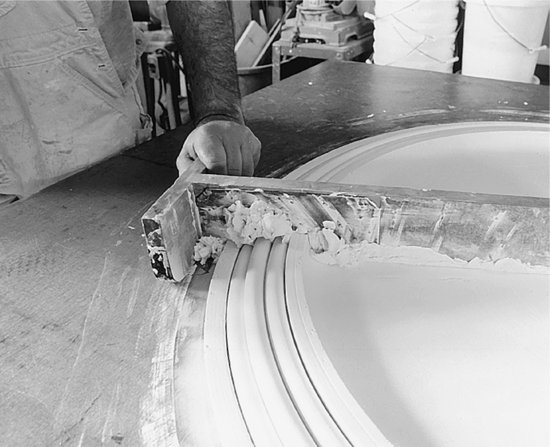
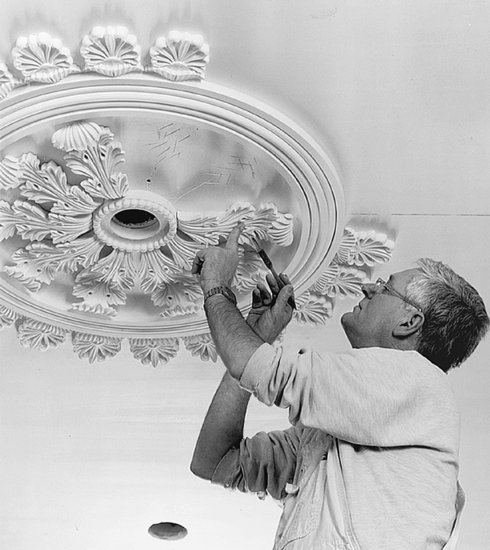
Figure E The medallion having been removed from the bench and glued in place on the ceiling, Flaharty adds cast components to complete the ornament. (© Brian McNeil.)
Gypsum Board
Gypsum board is a prefabricated plaster sheet material that is manufactured in widths of 4 feet (1220 mm) and lengths of 8 to 14 feet (2440–4 270 mm ). It is also known as gypsum wallboard, plasterboard, and drywall. (The term “sheetrock” is a registered trademark of one manufacturer of gypsum board and should not be used in a generic sense.)
Gypsum board is the least expensive of all interior finishing materials for walls and ceilings. For this reason alone, it has found wide acceptance throughout North America as a substitute for plaster in buildings of every type. It retains the fire-resistive characteristics of gypsum plaster, but it is installed with less labor by less skilled workers than lathers and plasterers. And because it is installed largely in the form of dry materials, it eliminates some of the construction delay that may be associated with the curing and drying of plaster.
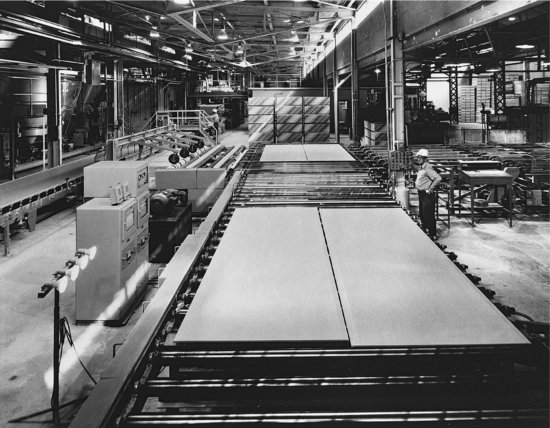
The core of gypsum board is formulated as a slurry of calcined gypsum, starch, water, pregenerated foam to reduce the density of the mixture, and various additives. This slurry is sandwiched between special paper faces and passed between sets of rollers to reduce it to the desired thickness. Within 2 or 3 minutes, the core material has hardened and bonded to the paper faces. The board is cut to length and heated to drive off residual moisture, then bundled for shipping (Figure 23.23).
Figure 23.23 Sheets of gypsum board roll off the manufacturing line, trimmed and ready for packaging. (Courtesy of United States Gypsum Company.)
Types of Gypsum Board
Gypsum board is produced in a variety of types suitable to a wide range of requirements:
- Regular gypsum board is used wherever the unique properties of other special board types are not required.
- For most fire-rated assemblies, Type X gypsum board is required. The core material of Type X board is reinforced with short glass fibers. When exposed to fire, the fibers hold the gypsum in place to continue to act as a barrier to fire rather than permitting it to erode or fall out.
- Type C gypsum board is a proprietary, fire-resistant alternative to Type X board. Often, a thinner board of Typ e C may be substituted for a thicker one of Type X.
- In locations exposed to moderate amounts of moisture, water-resistant gypsum backing board, with facings of water-repellant paper or glass matt and a moisture-resistant core formulation, is used.
- Abuse-resistant or impact-resistant gypsum board provides greater resistance to indentation and penetration and is installed where it is likely to be subjected to rough usage. It may be manufactured with heavier facing paper and backing sheets, have its core reinforced with cellulose fibers, be faced with glass fiber mesh, or be backed with polycarbonate film.
- The common paper facing on gypsum board can, when wetted, provide conditions suitable to the growth of mold spores. Mold-resistant gypsum board combines moisture-resistant cores with chemically treated paper or glass-matt facings that are not conducive to mold growth. Alternatively, panels may be manufactured with strengthened cores that eliminate the need for facing materials of any kind.
- Coreboard is a 1-inch (25.4-mm)-thick panel that is used for shaft walls and solid gypsum board partitions. To facilitate handling, it is fabricated in sheets 24 inches (610 mm) wide.
- Sag-resistant ceiling gypsum board, ½ inch (13 mm) thick, is substantially lighter than, but just as resistant to sagging when used in ceiling assemblies, as 5/8 -inch (15-mm) panels.
- Foil-backed gypsum board can be used to eliminate the need for a separate vapor retarder in exterior wall assemblies. If the back of the board faces a dead airspace at least ¾ inch (19 mm) thick, the bright foil can also act as a thermal radiant barrier.
- Predecorated gypsum board is covered with paint, printed paper, or decorative plastic film during its manufacture. If handled carefully and installed with small nails, it requires no further finishing. This product is used in a number of demountable office partitioning systems.
- Weather-resistant exterior gypsum soffit board is used for exterior soffits, carport ceilings, undersides of exterior canopies, and other sheltered exterior applications.
- Gypsum lath and gypsum veneer base are used in conjunction with plastering systems, as previously discussed.
Most gypsum board product types are manufactured in conformance with ASTM standard C1396. Some related products, such as fiber-cement backing board or glass matt–faced gypsum board, are manufactured to separate standards.
Gypsum board is manufactured with a variety of edge profiles along its longer sides. The most common by far is the tapered edge, which permits sheets to be joined with a flush, invisible seam by means of subsequent joint finishing operations. Rounded and beveled edges are useful in predecorated panels, and tongue-and-groove edges serve to join coreboard panels in concealed locations. The edges of the shorter ends of gypsum board panels are not tapered or shaped, as the individual panels are cut from longer continuous sheets during manufacturing.
Many different thicknesses of board are produced:
- ¼-inch (6.4-mm) board is used as a gypsum backing board in certain sound control applications. Boards of this thickness may also be used for tight-radius bends (Figure 23.28).
- 5/16-inch (8-mm) board is made for manufactured housing, where weight reduction to facilitate shipping is an important consideration.
- 3/8-inch (9.5-mm) board is largely used in double-layer wall finishes. Though less durable than thicker panels, it may also sometimes be applied as a single-layer finish over ceiling joists or wall studs spaced no more than 16 inches (400 mm) apart.
- ½-inch (12.7-mm) board is the most commonly used thickness. It may be applied to studs and joists spaced up to 24 inches (610 mm).
- 5/8-inch (16-mm) board is also limited to stud spacings of not more than 24 inches (610 mm). It is used where additional fire resistance, stiffness, durability, or sound deadening is required.
- ¾-inch (19-mm) Type X board is produced by some manufacturers. It is used to create 2-hour partitions with a single layer of gypsum board on each face and 4-hour partitions that include two layers on each face.
- 1-inch (25.4-mm)-thick board is made as coreboard, for use in shaft wall construction (Figure 23.37).
Installing Gypsum Board
Hanging the Board
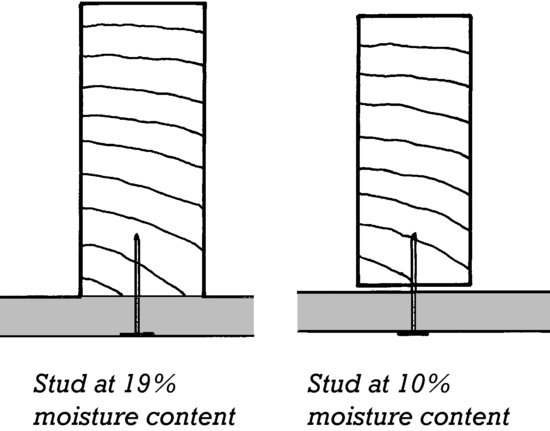
Gypsum board may be installed over either wood or light gauge steel studs, using self-drilling, self-tapping screws to fasten to steel and either screws or nails to fasten to wood (Figure 23.24). Wood studs can be troublesome with gypsum, as they usually shrink somewhat after the board is installed, causing nails to loosen slightly and “pop” through the finished surface of the board (Figure 23.25). Nail popping can be minimized by using fully dried framing lumber, ring-shank nails that have extra gripping power in the wood, and the shortest nail that will do the job. Screws have less of a tendency to pop than nails. When screws or nails are driven into gypsum board, their heads are driven to a level slightly below the surface of the board but not enough to tear the paper surface.
Figure 23.24 Attaching gypsum board to studs with a screw gun. (Courtesy of United States Gypsum Company.)
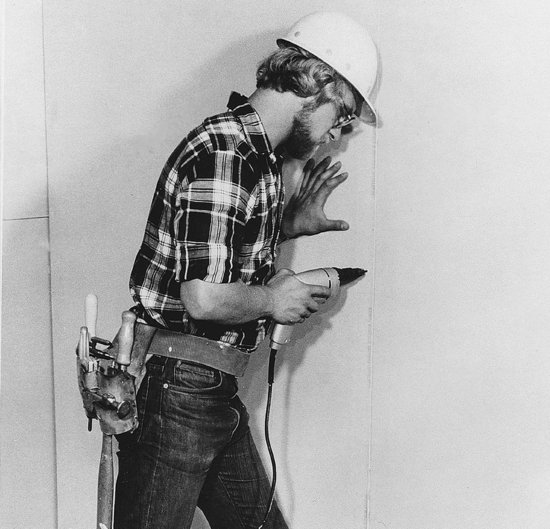
Figure 23.25 When wood studs dry and shrink during a building's first heating season, nail heads may pop through the surface of gypsum board walls. (Courtesy of United States Gypsum Company.)
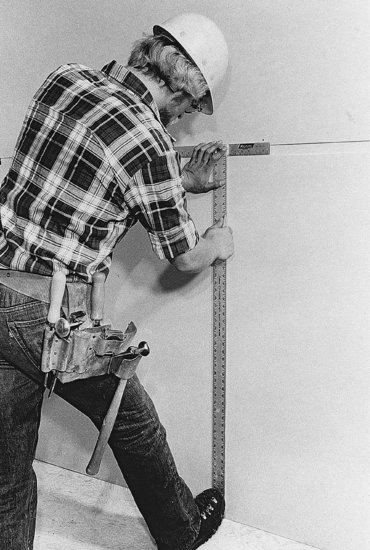
To minimize the length of joints that must be finished and to create the stiffest wall possible, gypsum board is usually installed with the long dimension of the boards horizontal. The longest possible boards are used to minimize end joints between boards, which are difficult to finish because the ends are not tapered. Gypsum board is cut rapidly and easily by scoring one paper face with a utility knife, snapping the brittle core along the score line with a blow from the heel of the hand, and cutting the other paper face along the fold created by the snapped core (Figure 23.26). A large metal T-square is used to make straight cuts that are perpendicular to the edges of the board. Notches, irregular cuts, and holes for electric boxes are made with a small hand saw or small electric router.
Figure 23.26 Cutting gypsum board. (a) A sharp knife and metal T-square are used to score a straight line through one paper face of the panel. (b) The scored board is easily “snapped,” and the knife is used a second time to slit the second paper face. (Courtesy of United States Gypsum Company.)
(a)
(b)
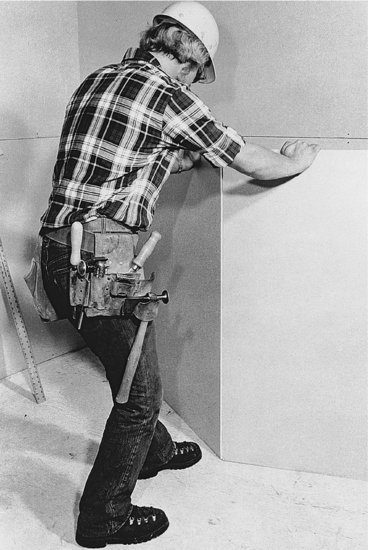
When two or more layers of gypsum board are installed on a surface, the joints between layers are staggered to create a stiffer wall, and a mastic adhesive is often used to join the layers to one another. Adhesive is also sometimes used between the studs and the gypsum board in single-layer installations to make a stronger joint.
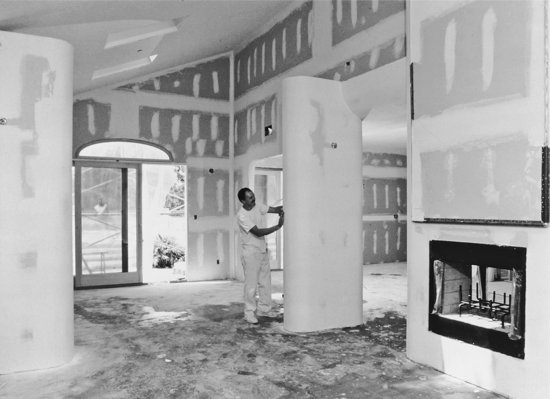
Gypsum board can be curved when a design requires it. For gentle curves, the board can be bent into place dry (Figure 23.27). For somewhat sharper curves, the paper faces are moistened to decrease the stiffness of the board before it is installed. When the paper dries, the board is as stiff as before. Special high-flex ¼-inch (6.5-mm) board is available that can be bent dry to even smaller radii (Figure 23.28).
Figure 23.27 Gypsum board can be curved to a large radius by simply bending it around a curving line of studs (Courtesy of United States Gypsum Company.)
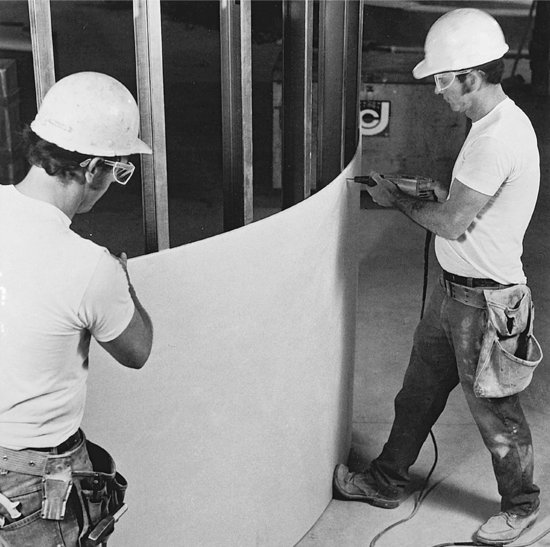
Figure 23.28 Tighter radii of curvature can be achieved by using ¼-inch (6.5-mm) high-flex gypsum board. (Courtesy of United States Gypsum Company.)
Metal trim accessories are required at exposed edges and external corners to protect the brittle board and present a neat edge (Figure 23.29). These are similar to lathing accessories for plaster.
Figure 23.29 Accessories for gypsum board construction, as manufactured by the United States Gypsum Company. (Courtesy of United States Gypsum Company.)
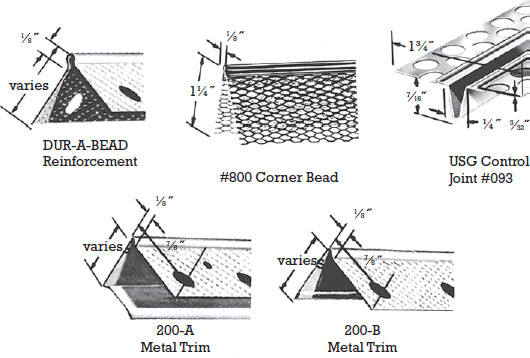
Figure 23.29 (Continued)
Finishing the Joints and Fastener Holes
Joints and holes in gypsum board are finished to create the appearance of a monolithic surface almost indistinguishable from plaster. The finishing process is based on the use of a joint compound that resembles a smooth, sticky plaster. For most purposes, a drying-type joint compound is used; this is a mixture of marble dust, binder, and admixtures, furnished either as a dry powder to be mixed with water or as a premixed paste. In some high-production commercial work, setting compounds that cure rapidly by chemical reaction are used to minimize the waiting time between applications. Joint compounds of different weights and strengths may be used for different stages of the joint finishing process, or a single all-purpose compound may be used for all steps.
The finishing of a joint between panels of gypsum board begins with the troweling of a layer of joint compound into the tapered edge joint and the bedding of a paper reinforcing tape in the compound (Figures 23.30 –23.33). Compound is also troweled over the nail or screw holes. After drying (usually overnight), a second layer of compound is applied to the joint to bring it level with the face of the board and to fill the space left by the slight drying shrinkage of the joint compound. When this second coat is dry, the joints are lightly sanded before a very thin final coat is applied to fill any remaining voids. The final coat is feathered out (tapered down to zero thickness) to create an invisible edge. Before painting, the wall is again sanded lightly to remove any roughness or ridges. If the finishing is done properly, the painted or papered wall will show no signs at all that it is made of discrete panels of material.
Figure 23.30 Finishing a joint between panels of gypsum board. (Courtesy of United States Gypsum Company.)

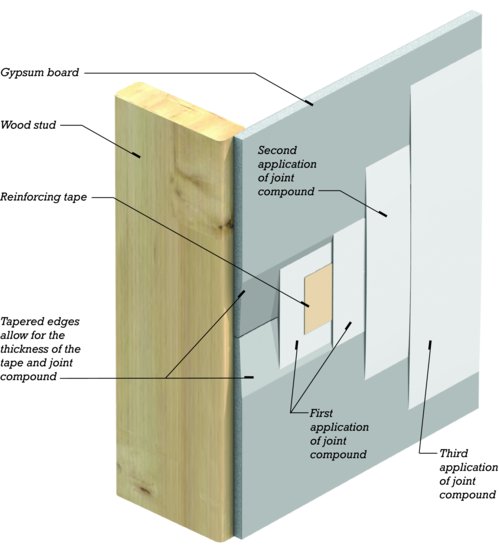
Figure 23.31 Applying paper joint reinforcing tape to gypsum board. (Courtesy of United States Gypsum Company.)
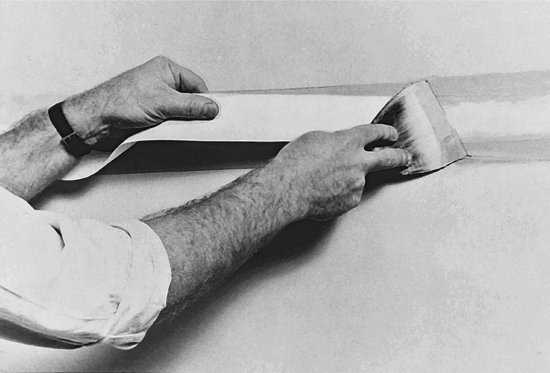
Figure 23.32 An automatic taper simultaneously applies tape and joint compound to gypsum board joints. (Courtesy of United States Gypsum Company.)
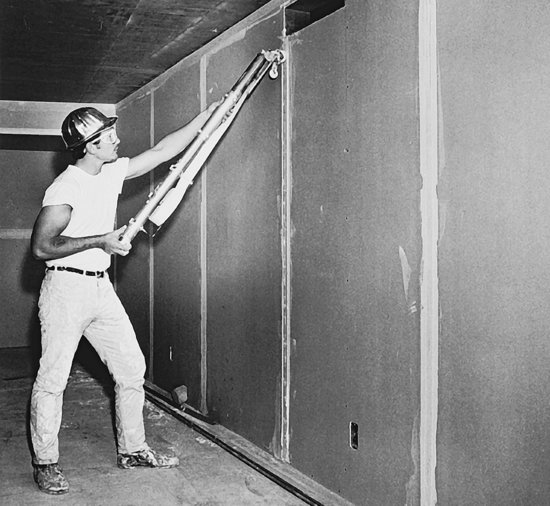
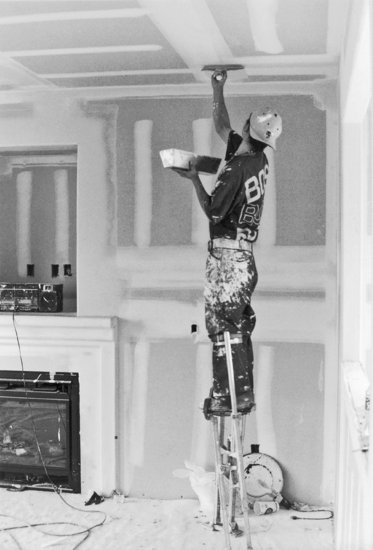
Figure 23.33 Plasterers and drywall finishers often work on stilts to avoid having to erect and move scaffolding. The stilts, which are strapped to the legs of the workers, are sophisticated, stable devices that keep the worker's foot fully supported and parallel to the floor. (Photo by Rob Thallon.)
Gypsum board has a smooth surface finish, but where desired, spray-on textures or textured paints can be applied to give a rougher surface. In residential work, many gypsum board contractors prefer to texture ceilings; the texture conceals the minor irregularities in workmanship that are likely to occur because of the difficulty of working in the overhead position.
Standardized gypsum board finish levels have been developed by the Gypsum Association and are also specified in ASTM C840. These enable the designer to specify quickly and simply the minimum level of finish that is acceptable for any project or portion of a project.
- Level 0, the minimum, consists of just the boards, without taping, finishing, or accessories. It is usually used only for temporary construction or where finishing is postponed until a later date.
- Level 1 requires only that joints be covered with tape set in joint compound. Its primary use is in areas of the building that are not open to view, such as above ceilings, in attics, and in service corridors. Level 1 is also the minimum finish level for fire-resistance-rated gypsum board assemblies, in which applications it may also be referred to as fire-taping.
- Level 2 adds to a Level 1 finish a coat of joint compound over the accessories and fasteners. After joint tape is set in compound, these joints are also immediately wiped with a joint knife a second time to add a thin coat of compound over the tape. A Level 2 finish is appropriate in garages, warehouses, and storage areas, and for boards used as a backer for ceramic tile.
- Level 3 adds a full second coat of compound over tape, accessories, and fasteners after the first coat has dried. It is intended for surfaces that will be textured or covered with heavy wallcoverings.
- Level 4 is designed for surfaces to be finished with flat paints, light textures, or thin wallcoverings. It adds a third distinct coat of joint compound over taped seams, fasteners, and accessories.
- Level 5, the highest, adds a very thin skim coat of joint compound over the entire surface of the board. The skim coat has no measurable thickness, because its purpose is only to fill pores and low spots in the wall to produce a very smooth surface. It is recommended for surfaces that will receive gloss or semigloss paints and for surfaces that will be lit in such a way as to cast shadows that can highlight even slight imperfections.
Gypsum Board Partition Systems
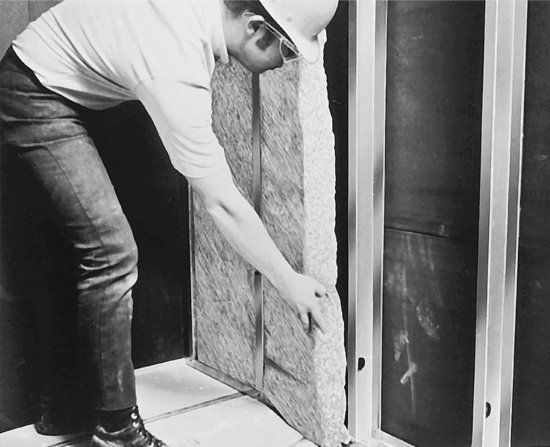
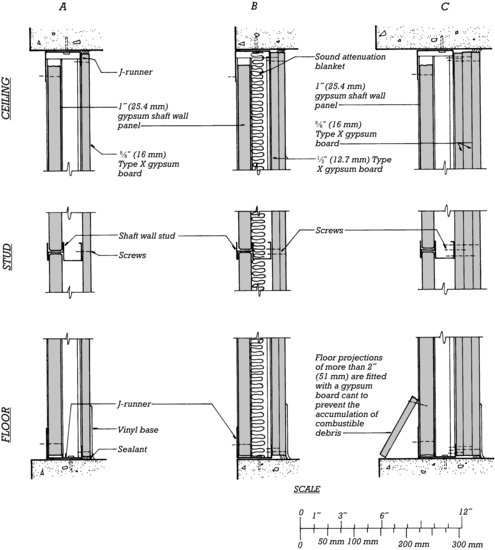
Gypsum board partition assemblies have been designed and tested with fire resistance ratings of up to 4 hours and sound transmission performance of up to at least STC 69. Notice in these details how provisions are made to prevent the gypsum panels from being subjected to structural loadings caused by movements in the loadbearing frame of the building—structural deflections, concrete creep, moisture expansion, and temperature expansion and contraction. Notice also the use of sealant to eliminate sound transmission around the edges of the partitions and sound attenuation blankets to reduce the passage of sound through the partition itself (Figures 23.34 and 23.35).
Figure 23.34 Four gypsum board partition systems. (A) A 1-hour partition, STC 40, using Type X gypsum board over light gauge steel studs. (B) This 1-hour partition on wood studs achieves an STC of 60 to 64 through heavy laminations of gypsum board, a sound attenuation blanket, and resilient channel mounting for one face of the partition. (C) A 2-hour partition with an STC of 48. (D) A 4-hour partition, STC 58. These are representative of a large number of gypsum board partition systems in a range of fire ratings and sound transmission classes. You can download a PDF of this figure at http://www.wiley.com/go/aflblce6ne.
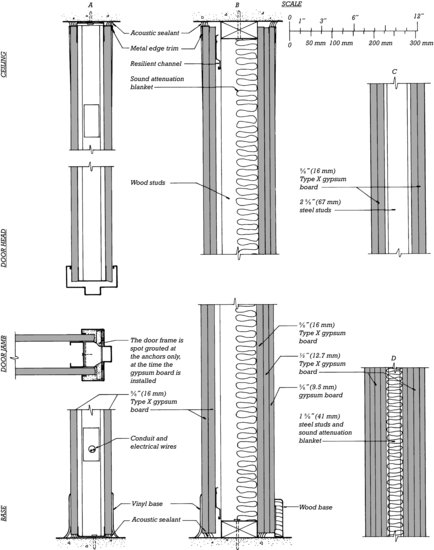
Figure 23.35 Installing a dense, mineral fiber sound attenuation blanket. Conventional glass fiber insulation batts are also sometimes used for the same purpose. (Courtesy of United States Gypsum Company.)
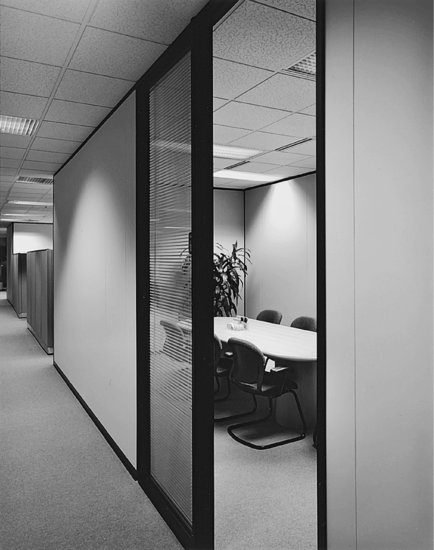
Demountable partition systems of gypsum board use concealed mechanical fasteners that can be disassembled and reassembled easily without damage to the panels (Figure 23.36). These systems are used in buildings where partitions must be rearranged at frequent intervals.
Figure 23.36 Two photographs of relocatable (demountable) partition systems. (Courtesy of United States Gypsum Company.)
Gypsum Shaft Wall Systems
Walls around elevator shafts, stairways, and mechanical chases can be made of any masonry, lath and plaster, or gypsum panel assembly that meets fire resistance and structural requirements . However, gypsum shaft wall systems are lighter in weight, installed dry, and built entirely from the floor outside the shaft, with no need to erect scaffolding inside. Depending on the requirements for fire resistance rating, air pressure resistance, acoustic performance, and floor-to-ceiling height, a variety of designs may be used. Figure 23.37 shows representative shaft wall details, and Figure 22.1 shows a shaft wall being installed.
Figure 23.37 Three gypsum shaft wall systems, all framed with steel C–H studs. The H portion of the stud holds a 1-inch (25-mm) shaft wall coreboard panel, while the C portion accepts the screws used to attach finish layers of gypsum board. (A) A 1-hour system. (B) A 2-hour system, STC 47. (C) A 3-hour system. You can download a PDF of this figure at http://www.wiley.com/go/aflblce6ne.
MASONRY PARTITION SYSTEMS
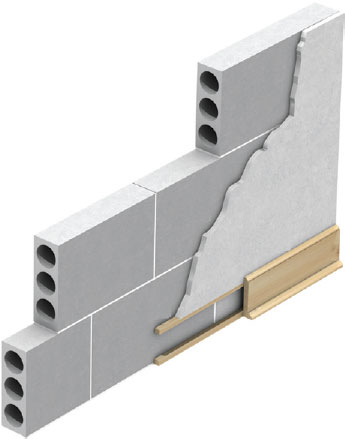
A century or more ago, interior partitions were often made of common brick masonry plastered on both sides. These had excellent acoustic properties and fire resistance ratings but were labor intensive and heavy. Partition systems of hollow clay tile and hollow gypsum tile (Figure 23.38) were developed to meet these objections and continued to be used extensively until the 1950s. Both have now become obsolete in North America, replaced by plaster, gypsum board, and concrete masonry, although they are still frequently encountered in the restoration of older buildings.
Figure 23.38 Masonry partition systems found in existing buildings: hollow clay tiles and plaster (left) and gypsum tiles and plaster (right).
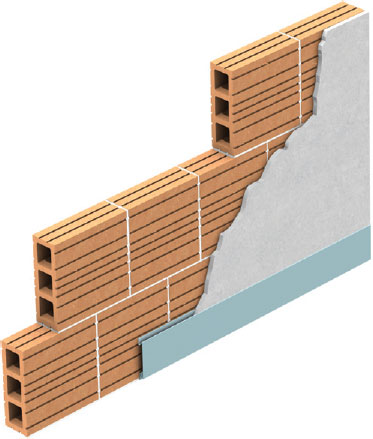
Figure 23.38 (Continued)
Concrete masonry partitions may be plastered or faced with gypsum board but are more often left exposed, either painted or unpainted. Several types of lightweight aggregate may be used to reduce the dead weight of the masonry units. Decorative concrete masonry units, as described in Chapter 9, may also be used. Electrical wiring is relatively difficult to conceal in concrete masonry partitions; the electrician and the mason must coordinate their work, or the wiring must be mounted on the surface of the wall after the mason has finished.
Glazed structural clay tiles make very durable partitions, especially in areas with heavy wear, moisture problems, or strict sanitation requirements (Figure 23.39). The ceramic glazes are nonfading and virtually indestructible.
Figure 23.39 A glazed structural clay tile partition installation. The floor is finished with glazed ceramic tiles. (Courtesy of Stark Ceramics, Inc.)
WALL AND PARTITION FACINGS
The vast majority of gypsum board partitions are finished with several coats of paint. For more information about paints and coatings, see the Chapter 6 sidebar, “Painting.”
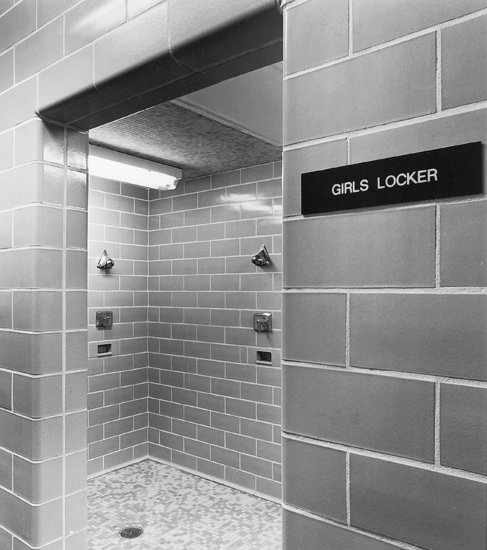
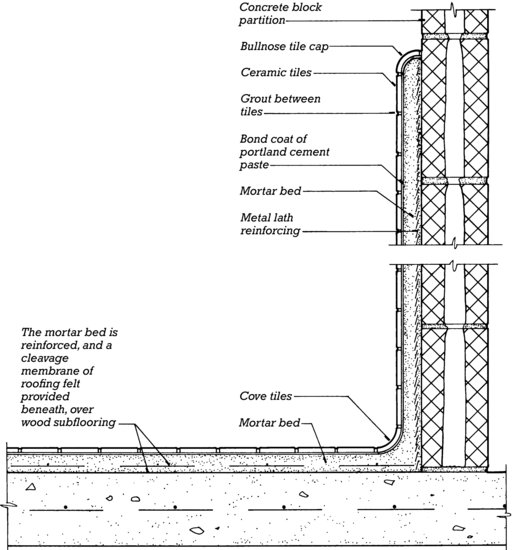
Ceramic tile facings are often added to walls for reasons of appearance, durability, sanitation, or moisture resistance. In a thickset or mortar bed application, tile is applied to a base of portland cement mortar (Figure 23.40).
Figure 23.40 Example details of a thickset ceramic tile installation. Thickset applications are used where the face of the partition or the surface of the floor is cracked, coated, rough, unstable, or so uneven as to make it unsuitable for direct bonding of tile using thin-set methods. Depending on the quality of the substrate, metal reinforcing of the portland cement mortar base may or may not be required, and the mortar base may or may not be isolated from the substrate with a layer of felt paper acting as a slip sheet. Thickset mortar beds for wall tiling are typically ¾ to 1 inch (19–25 mm) thick, while those for floors are typically 1¼ to 2 inches (32–50 mm) thick.
Lower-cost tile wall facings eliminate the mortar base and are thin-set onto tile backing boards, also called backer boards, most frequently made of fiber-reinforced lightweight cement or glass-matt-faced water-resistant gypsum board, similar to the floor tile assembly illustrated in Figure 24.28. Cement backer board is the more water resistant, but is more difficult to cut and handle than lighter-weight gypsum backer board.
Tiles are bonded to the backer board with a variety of compounds, the most common of which are dry-set mortar, latex/polymer modified portland cement mortar, and organic adhesive. Dry-set mortar is a mix of cement, fine sand, and water retention compounds that allow the thin mortar layer to cure properly. Latex/polymer modified portland cement mortar is similar to dry-set mortar, but with additives that improve the cured mortar's freeze-thaw resistance, flexibility, and adhesion. Organic adhesives are various proprietary synthetic polymer adhesives used for light-duty applications. After the tiles have become fully adhered, a cementitious grout of any desired color is wiped into the tile joints with a rubber-faced trowel. Thin-set compounds and grouts formulated with epoxies or furan resins (colorless, highly volatile solvents distilled from wood) may be used for tiling applications where greater strength, impact resistance, or chemical resistance is required.
In showers, steam rooms, and other wet locations, a tile waterproofing membrane is added to the assembly to prevent water from seeping through the tile and into the wall behind. Either liquid-applied or flexible sheet membranes may be used, usually positioned beneath the mortar bed in a thickset application or over the backer board when tile is thin-set.
Facings of granite, limestone, marble, or slate are sometimes used in public areas of major buildings. One method of mounting is shown in Figure 23.41.
Figure 23.41 Attaching a stone facing over a backup of gypsum board and steel studs.
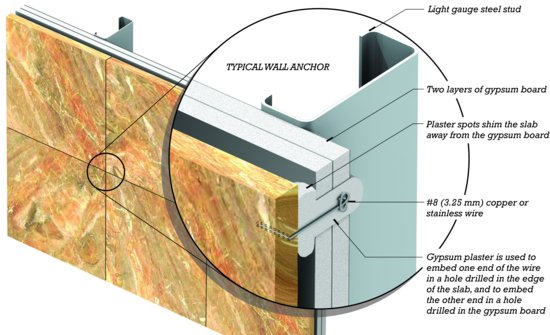
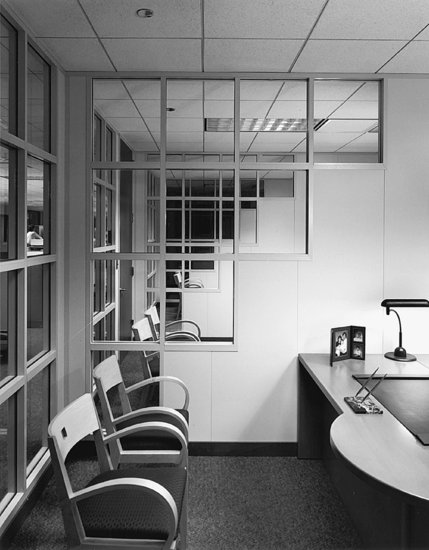
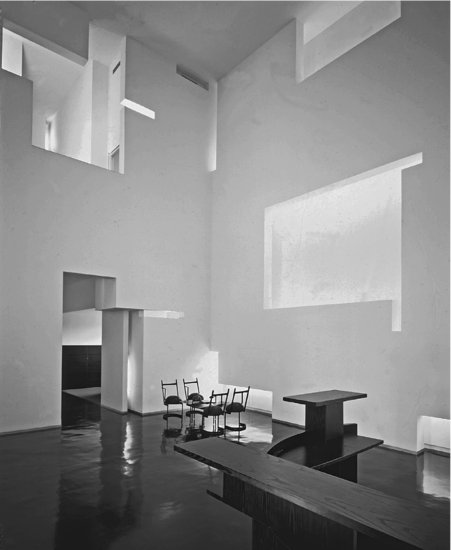
Figure 23.42 Imaginative use of gypsum products is coordinated with concealed sources of light to create this dramatic office space. (Stephen Holl Architects. Photo by Paul Warchol.)
Wood wainscoting and paneling is applied over gypsum wallboard, to gain the acoustic and fire-resistance benefits of the gypsum panels. In noncombustible buildings, wood finishes such as these are subject to the fire and smoke criteria discussed in Chapter 22.
KEY TERMS
REVIEW QUESTIONS
1. What are the major types of interior walls and partitions in a larger building, such as a hospital, classroom building, apartment building, or office building? How do these types differ from one another?
2. Why is gypsum used so much in interior finishes?
3. Name the coats of plaster used over expanded metal lath and explain the role of each.
4. Under what circumstances would you specify the use of portland cement plaster? Keenes cement plaster? Veneer plaster?
5. Describe step by step how the joints between sheets of gypsum board are made invisible.
EXERCISES
1. Determine the construction of a number of partitions in the places where you live and work. What materials are used? What accessories? Why were these chosen for their particular situations? Sketch a detail of each partition.
2. Sketch typical details showing how the various metal lath trim accessories are used in a plaster wall.
3. Repeat Exercise 2 for gypsum board trim accessories.
4. What type of gypsum wall finish system would you specify for a major art museum? For a low-cost rental office building? Outline a complete specification of wall and partition construction for a building you are presently working on.
SELECTED REFERENCES
Gypsum Association. GA-600, Fire Resistance Design Manual. Washington, DC, Author, updated regularly.
Fire resistance ratings and STCs are given in this booklet for a large number of wall and ceiling assemblies that use either gypsum plaster or gypsum board. This and many other useful resources are also available for free download from the Gypsum Association's web site.
Marble Institute of America. Dimension Stone Design Manual. Cleveland, OH, Author, updated regularly.
This binder provides comprehensive guidance on the design, specification, and installation of all types of stone wall facing.
Pegg, Brian, and W. D. Stagg. Plastering: An Encyclopedia (4th ed.). Oxford, Blackwell Publishing/New York, Crown Publishers, 2007.
Techniques of ornamental plastering are covered in complete detail in this 276-page reference work.
Portland Cement Association. Portland Cement Plaster (Stucco) Manual. Skokie, IL, Author, updated regularly.
A complete, illustrated guide to stucco.
Tile Council of North America, Inc. TCNA Handbook for Ceramic, Glass, and Stone Tile Installation. Anderson, SC, Author, updated regularly.
This is the definitive standard for ceramic tile installation materials and methods. More than 100 methods of installation for floors and walls, both interior and exterior, are illustrated and specified. Guidelines for selecting appropriate installation methods based on project requirements are also included.
USG Company. Gypsum Construction Handbook. Chicago, Author, revised regularly.
This manual represents manufacturers' literature at its best—close to 600 well-illustrated pages crammed with every important fact about gypsum wallboard, gypsum plaster, and associated products. Available for purchase or as a free download from the USG web site.
USG Company. SA100—Fire-Resistant Assemblies. Chicago, Author, revised regularly.
Though limited to this company's products, this brochure provides an extensive and easy-to-use listing of fire-rated and acoustically rated wall and ceiling assemblies. Along with many other useful technical documents, it is available for free download from the USG web site.
WEB SITES
Interior Walls and Partitions
Author's supplementary web site: www.ianosbackfill.com/23_interior_walls_and_partitions
Dietrich Metal Framing: www.dietrichindustries.com
Drywallrecyling.org: www.drywallrecycling.org
Georgia-Pacific: www.gp.com/build/
Gypsum Association: www.gypsum.org
Marble Institute of America: www.marble-institute.com
National Gypsum: www.nationalgypsum.com
Portland Cement Association: www.cement.org
Tile Council of North America (TCNA): www.tcnatile.com
USG: www.usg.com