If you’re creating a page for the web, chances are you’ll want to link to other web pages and resources, whether on your own site or someone else’s. Linking, after all, is what the web is all about. In this chapter, we’ll look at the markup that makes links work—links to other sites, to your own site, and within a page. There is one element that makes linking possible: the anchor (a).
<a>…</a>
Anchor element (hypertext link)
To make a selection of text a link, simply wrap it in opening and closing <a>...</a> tags and use the href attribute to provide the URL of the target page. The content of the anchor element becomes the hypertext link. Here is an example that creates a link to the O’Reilly Media site:
<a href="http://www.oreilly.com">Go to the O'Reilly Media site</a>
To make an image a link, simply put the img element in the anchor element:
<a href="http://www.oreilly.com"><img src="tarsierlogo.gif" alt="O'Reilly Media site"></a>
By the way, you can put any HTML content element in an anchor to make it a link, not just images.
Nearly all graphical browsers display linked text as blue and underlined by default. Some older browsers put a blue border around linked images, but most current ones do not. Visited links generally display in purple. Users can change these colors in their browser preferences, and, of course, you can change the appearance of links for your sites using style sheets. I’ll show you how in Chapter 13, Colors and Backgrounds.
When a user clicks or taps the linked text or image, the page you specify in the anchor element loads in the browser window. The linked image markup sample shown previously might look like Figure 6-1.

The href Attribute
You’ll need to tell the browser which document to link to, right? The href (hypertext reference) attribute provides the address of the page or resource (its URL) to the browser. The URL must always appear in quotation marks. Most of the time you’ll point to other HTML documents; however, you can also point to other web resources, such as images, audio, and video files.
Because there’s not much to slapping anchor tags around some content, the real trick to linking comes in getting the URL correct. There are two ways to specify the URL:
Absolute URLs
Absolute URLs provide the full URL for the document, including the protocol (http:// or https://), the domain name, and the pathname as necessary. You need to use an absolute URL when pointing to a document out on the web (i.e., not on your own server):
href="http://www.oreilly.com/"
Sometimes, when the page you’re linking to has a long URL pathname, the link can end up looking pretty confusing (Figure 6-2). Just keep in mind that the structure is still a simple container element with one attribute. Don’t let the long pathname intimidate you.
Relative URLs
Relative URLs describe the pathname to a file relative to the current document. Relative URLs can be used when you are linking to another document on your own site (i.e., on the same server). It doesn’t require the protocol or domain name—just the pathname:
href="recipes/index.html"
In this chapter, we’ll add links using absolute and relative URLs to my cooking website, Jen’s Kitchen (see Figure 6-3). Absolute URLs are easy, so let’s get them out of the way first.

Linking to Pages on the Web
Many times, you’ll want to create a link to a page that you’ve found on the web. This is known as an external link because it is going to a page outside of your own server or site. To make an external link, provide the absolute URL, beginning with http:// (the protocol). This tells the browser, “Go out on the web and get the following document.”
I want to add some external links to the Jen’s Kitchen home page (Figure 6-3). First, I’ll link the list item “The Food Network” to the www.foodnetwork.com site. I marked up the link text in an anchor element by adding opening and closing anchor tags. Notice that I’ve added the anchor tags inside the list item (li) element. That’s because only li elements are permitted to be children of a ul element; placing an a element directly inside the ul element would be invalid HTML.
<li><a>The Food Network</a></li>
Next, I add the href attribute with the complete URL for the site:
<li><a href="http://www.foodnetwork.com">The Food Network</a></li>
And voilà! Now “The Food Network” appears as a link and takes my visitors to that site when they click or tap it. Give it a try in Exercise 6-1.
TRY IT
Working Along with Jen’s Kitchen

exercise 6-1. Make an external link
<ul>
<li><a href="http://www.foodnetwork.com/">The Food Network</a></li>
<li>Epicurious</li>
</ul>
Linking Within Your Own Site
A large portion of the linking you do is between pages of your own site: from the home page to section pages, from section pages to content pages, and so on. In these cases, you can use a relative URL—one that calls for a page on your own server.
Without “http://”, the browser looks on the current server for the linked document. A pathname, the notation used to point to a particular file or directory, (see Note) tells the browser where to find the file. Web pathnames follow the Unix convention of separating directory and filenames with forward slashes (/). A relative pathname describes how to get to the linked document starting from the location of the current document.
Relative pathnames can get a bit tricky. In my teaching experience, nothing stumps beginners like writing relative pathnames, so we’ll take it one step at a time. I recommend you do Exercises 6-2 through 6-8 as we go along.
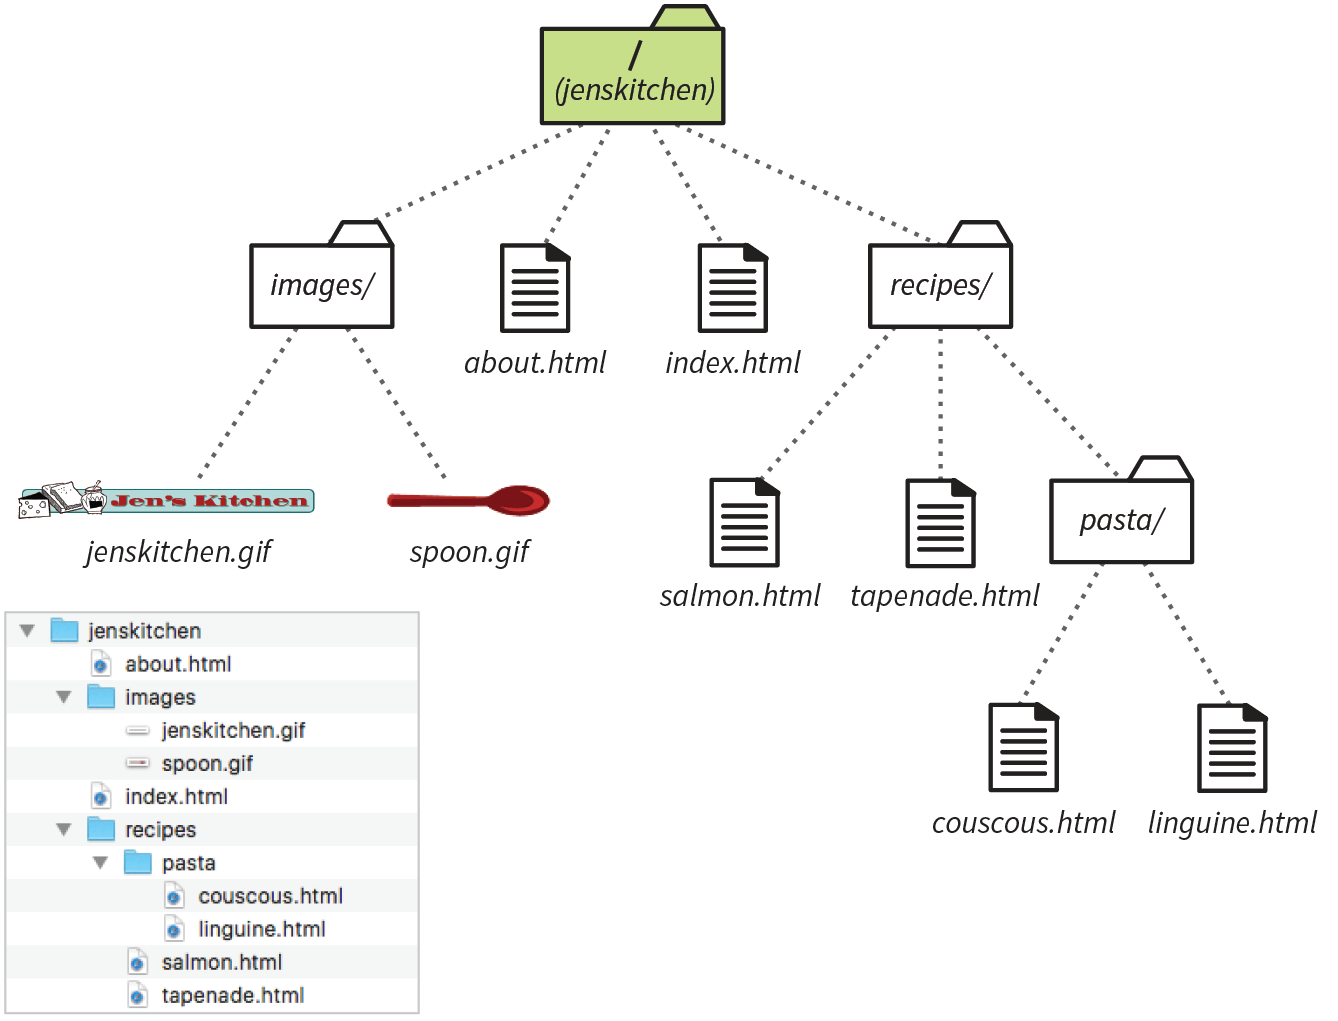
All of the pathname examples in this section are based on the structure of the Jen’s Kitchen site shown in Figure 6-4. When you diagram the structure of the directories for a site, it generally ends up looking like an inverted tree with the root directory at the top of the hierarchy. For the Jen’s Kitchen site, the root directory is named jenskitchen. For another way to look at it, there is also a view of the directory and subdirectories as they appear in the Finder on my Mac.
Linking Within a Directory
The most straightforward relative URL points to another file within the same directory. When linking to a file in the same directory, you need to provide only the name of the file (its filename). When the URL is just a filename, the server looks in the current directory (that is, the directory that contains the document with the link) for the file.
A link to a filename indicates the linked file is in the same directory as the current document.
In this example, I want to make a link from my home page (index.html) to a general information page (about.html). Both files are in the same directory (jenskitchen). So, from my home page, I can make a link to the information page by simply providing its filename in the URL (Figure 6-5):
<a href="about.html">About the site...</a>
Exercise 6-2 gives you a chance to mark up a simple link yourself.

Exercise 6-2. Link in the same directory
<p>Back to the home page</p>
Linking to a Lower Directory
But what if the files aren’t in the same directory? You have to give the browser directions by including the pathname in the URL. Let’s see how this works.
Getting back to our example, my recipe files are stored in a subdirectory called recipes. I want to make a link from index.html to a file in the recipes directory called salmon.html. The pathname in the URL tells the browser to look in the current directory for a directory called recipes, and then look for the file salmon.html (Figure 6-6):
<li><a href="recipes/salmon.html">Garlic Salmon</a></li>

Have a try at linking to a file in a directory in Exercise 6-3.
Exercise 6-3. Link to a file in a directory
<li>Tapenade (Olive Spread)</li>
Now let’s link down to the file called couscous.html, which is located in the pasta subdirectory. All we need to do is provide the directions through two subdirectories (recipes, then pasta) to couscous.html (Figure 6-7):
<li><a href="recipes/pasta/couscous.html">Couscous...</a></li>
Directories are separated by forward slashes. The resulting anchor tag tells the browser, “Look in the current directory for a directory called recipes. There you’ll find a directory called pasta, and in there is the file couscous.html.”
When you link to a file in a lower directory, the pathname contains the names of each subdirectory you go through to get to the file.
Now that we’ve done two directory levels, you should get the idea of how pathnames are assembled. This same method applies for relative pathnames that drill down through any number of directories. Just start with the name of the directory that is in the same location as the current file, and follow each directory name with a slash until you get to the linked filename.

Exercise 6-4. Link two directories down
<li>Linguine with Clam Sauce</li>
Linking to a Higher Directory
So far, so good, right? Now it gets more interesting. This time we’re going to go in the other direction and make a link from the salmon recipe page back to the home page, which is one directory level up.
In Unix, there is a pathname convention just for this purpose, the “dot-dot-slash” (../). When you begin a pathname with ../, it’s the same as telling the browser “back up one directory level” and then follow the path to the specified file. If you are familiar with browsing files on your desktop, it is helpful to know that a “../” has the same effect as clicking the Up button in Windows Explorer or the left-arrow button in the Finder on macOS.
Each ../ at the beginning of the pathname tells the browser to go up one directory level to look for the file.
Let’s start by making a link from salmon.html back to the home page (index.html). Because salmon.html is in the recipes subdirectory, we need to go back up to the jenskitchen directory to find index.html. This pathname tells the browser to “back up one level,” then look in that directory for index.html (Figure 6-8):
<p><a href="../index.html">[Back to home page]</a></p>
Note that the ../ stands in for the name of the higher directory, and we don’t need to write out jenskitchen in the pathname.

Try adding a dot-dot-slash pathname to a higher directory in Exercise 6-5.
Exercise 6-5. Link to a higher directory
<p>[Back to the home page]</p>
But how about linking back to the home page from couscous.html? Can you guess how you’d back your way out of two directory levels? Simple: just use the dot-dot-slash twice (Figure 6-9).
A link on the couscous.html page back to the home page (index.html) would look like this:
<p><a href="../../index.html">[Back to home page]</a></p>
The first ../ backs up to the recipes directory; the second ../ backs up to the top-level directory (jenskitchen), where index.html can be found. Again, there is no need to write out the directory names; the ../ does it all.
Now you try (Exercise 6-6).

Exercise 6-6. Link up two directory levels
<p>[Back to the home page]</p>
Linking with Site Root Relative Pathnames
All sites have a root directory, the directory that contains all the directories and files for the site. So far, all of the pathnames we’ve looked at are relative to the document with the link. Another way to write a relative pathname is to start at the root directory and list the subdirectory names to the file you want to link to. This type of pathname is known as site root relative.
Site root relative links are generally preferred because of their flexibility.
In the Unix pathname convention, a forward slash (/) at the start of the pathname indicates that the path begins at the root directory. The site root relative pathname in the following link reads, “Go to the very top-level directory for this site, open the recipes directory, and then find the salmon.html file” (Figure 6-10):
<a href="/recipes/salmon.html">Garlic Salmon</a>
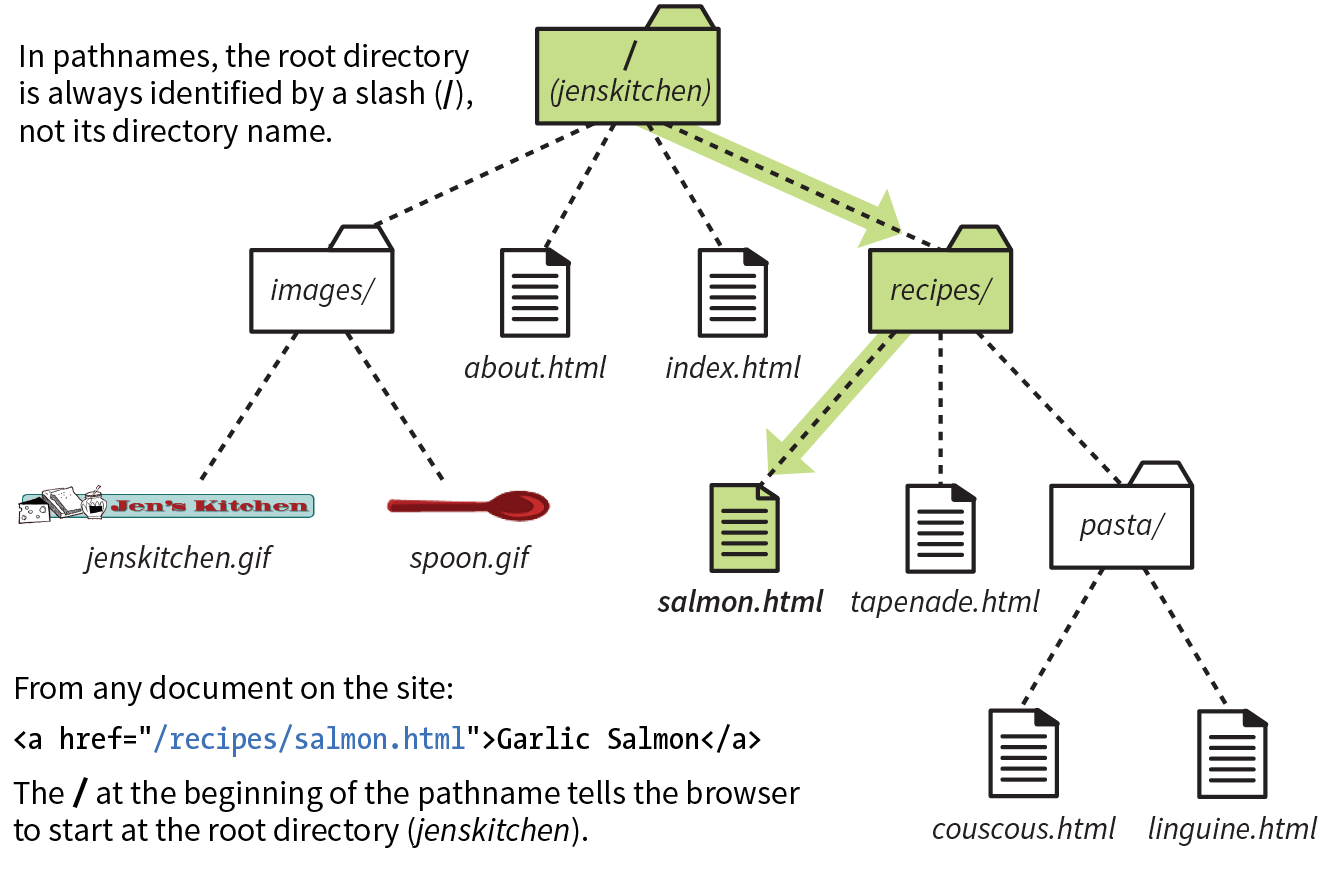
Note that you don’t need to (and you shouldn’t) write the name of the root directory (jenskitchen) in the path—the forward slash (/) at the beginning represents the top-level directory in the pathname. From there, just specify the directories the browser should look in.
Because this type of link starts at the root to describe the pathname, it works from any document on the server, regardless of which subdirectory it may be located in. Site root relative links are useful for content that might not always be in the same directory, or for dynamically generated material. They also make it easy to copy and paste links between documents.
On the downside, however, the links won’t work on your local machine, because they will be relative to your hard drive. You’ll have to wait until the site is on the final server to check that links are working.
WARNING
Site root relative pathnames won’t work on your local computer unless it is set up as a server.
Writing Pathnames to Images
The src attribute in the img element works the same as the href attribute in anchors. Because you’ll most likely be using images from your own server, the src attributes within your image elements will be set to relative URLs.
Let’s look at a few examples from the Jen’s Kitchen site. First, to add an image to the index.html page, you’d use the following markup:
<img src="images/jenskitchen.gif" alt="">
The URL says, “Look in the current directory (jenskitchen) for the images directory; in there you will find jenskitchen.gif.”
Now for the pièce de résistance. Let’s add an image to the file couscous.html:
<img src="../../images/spoon.gif" alt="">
This is a little more complicated than what we’ve seen so far. This pathname tells the browser to go up two directory levels to the top-level directory and, once there, look in the images directory for an image called spoon.gif. Whew!
Of course, you could simplify that path by going the site root relative route, in which case the pathname to spoon.gif (and any other file in the images directory) could be accessed like this:
<img src="/images/spoon.gif" alt="">
The trade-off is that you won’t see the image in place until the site is uploaded to the server, but it does make maintenance easier once it’s there.
Exercise 6-7. Try a few more
NOTE
Most of the pathnames in Exercise 6-7 could be site root relative, but write them relative to the listed document for the practice.
Linking to a Specific Point in a Page
Did you know you can link to a specific point in a web page? This is useful for providing shortcuts to information at the bottom of a long, scrolling page or for getting back to the top of a page with just one click or tap. Linking to a specific point in the page is also known as linking to a document fragment.
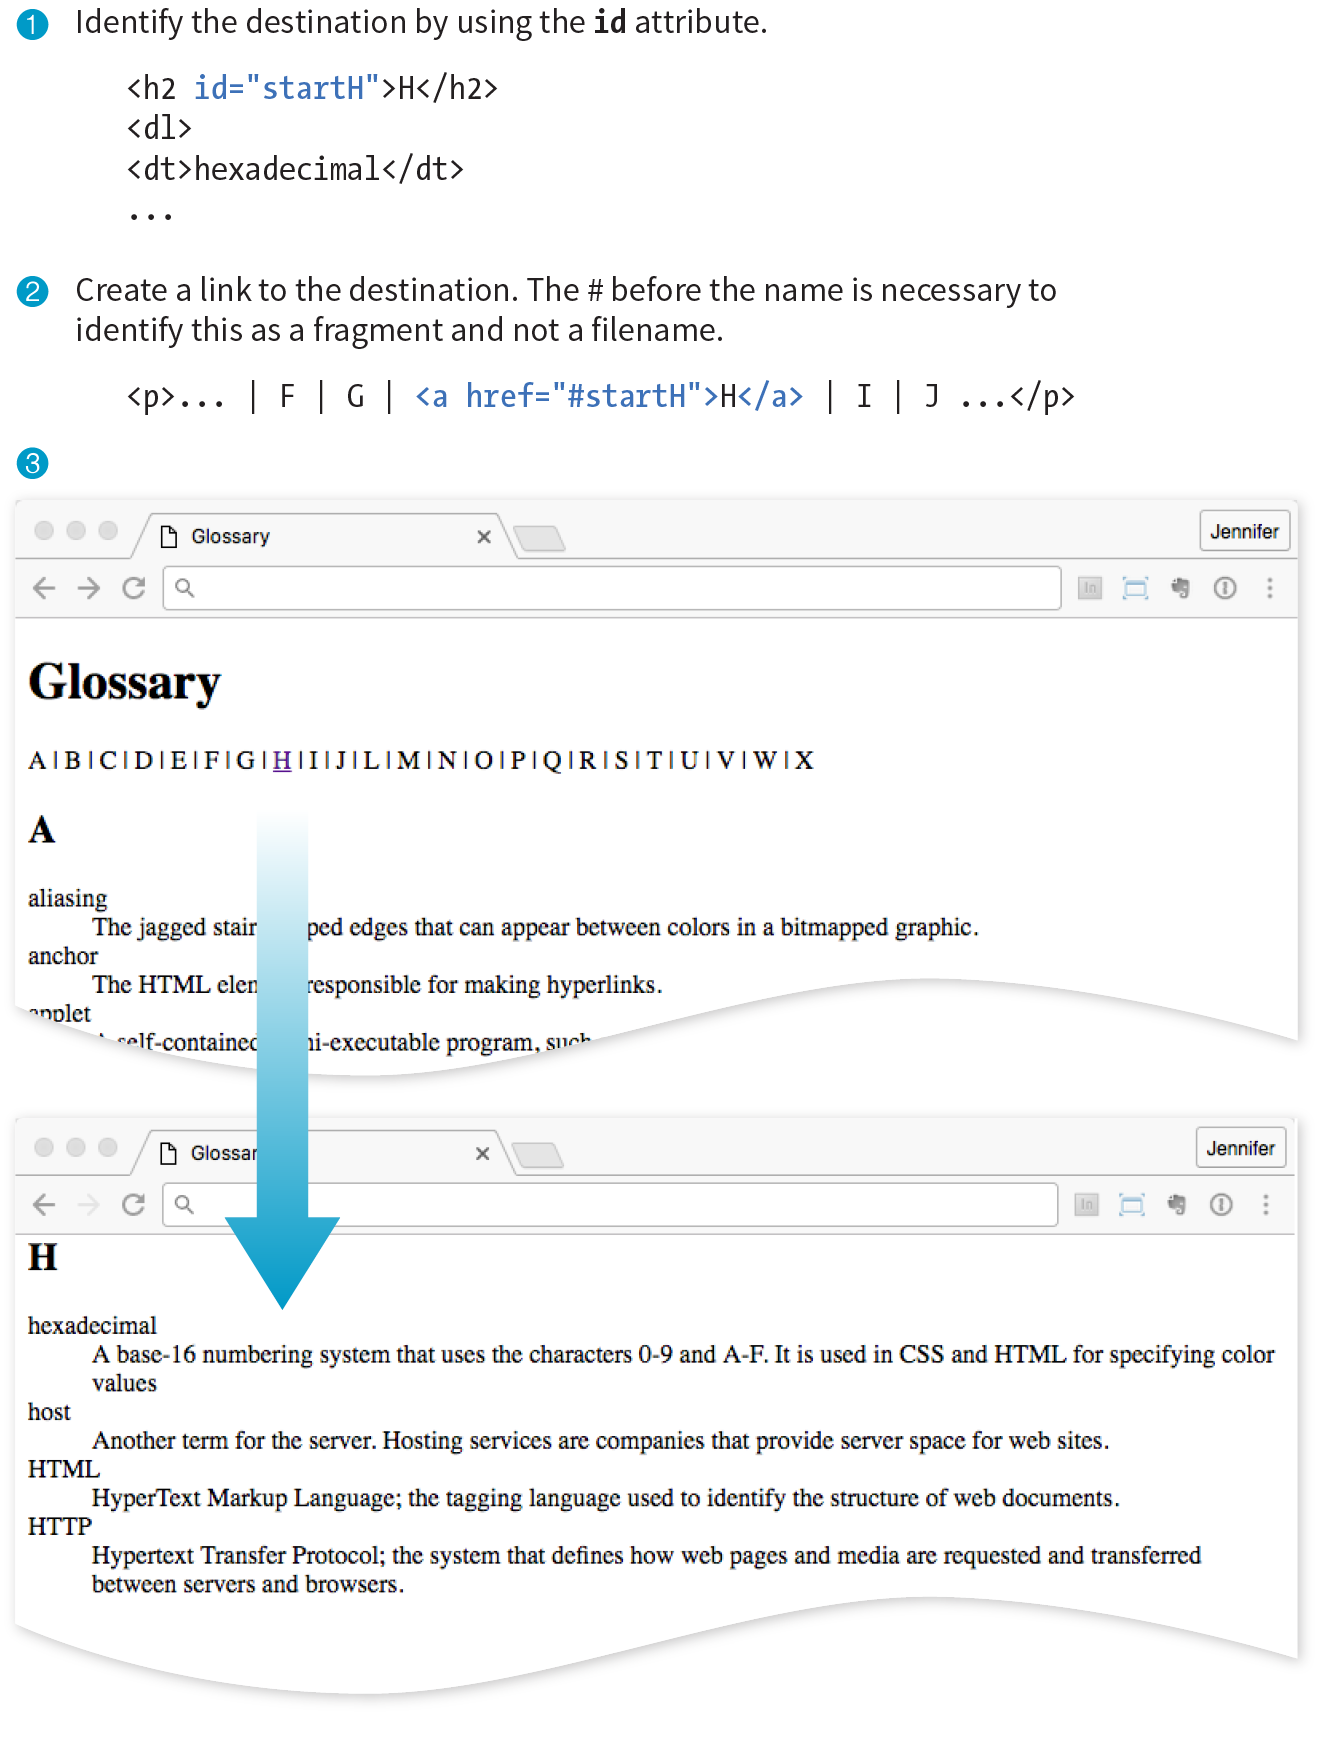
Linking to a particular spot within a page is a two-part process. First, identify the destination, and then make a link to it. In the following example, I create an alphabetical index at the top of the page that links down to each alphabetical section of a glossary page (Figure 6-11). When users click the letter H, they’ll jump to the “H” heading lower on the page.
NOTE
Linking to another spot on the same page works well for long, scrolling pages, but the effect may be lost on a short web page.
Step 1: Identifying the destination
I like to think of this step as planting a flag in the document so I can get back to it easily. To create a destination, use the id attribute to give the target element in the document a unique name (that’s “unique” as in the name may appear only once in the document, not “unique” as in funky and interesting). In web lingo, this is the fragment identifier.
You may remember the id attribute from Chapter 5, Marking Up Text, where we used it to name generic div and span elements. Here, we’re going to use it to name an element so that it can serve as a fragment identifier—that is, the destination of a link.
Here is a sample of the source for the glossary page. Because I want users to be able to link directly to the “H” heading, I’ll add the id attribute to it and give it the value “startH” (Figure 6-11 1):
<h2 id="startH">H</h2>
Step 2: Linking to the destination
With the identifier in place, now I can make a link to it.
At the top of the page, I’ll create a link down to the “startH” fragment 2. As for any link, I use the a element with the href attribute to provide the location of the link. To indicate that I’m linking to a fragment, I use the octothorpe symbol (#), also called a hash, pound, or number symbol, before the fragment name:
<p>... F | G |<a href="#startH">H</a>| I | J ...</p>
And that’s it. Now when someone clicks the H from the listing at the top of the page, the browser will jump down and display the section starting with the “H” heading 3.
Linking to a Fragment in Another Document
You can link to a fragment in another document by adding the fragment name to the end of the URL (absolute or relative). For example, to make a link to the “H” heading of the glossary page from another document in that directory, the URL would look like this:
<a href="glossary.html#startH">See the Glossary, letter H</a>
NOTE
Some developers help their brothers and sisters out by proactively adding s as anchors at the beginning of any thematic section of content (within a reasonable level, and depending on the site). That way, other people can link back to any section in their content.
You can even link to specific destinations in pages on other sites by putting the fragment identifier at the end of an absolute URL, like so:
<a href="http://www.example.com/glossary.html#startH">See the Glossary, letter H</a>
Of course, you don’t have any control over the named fragments in other people’s web pages. The destination points must be inserted by the author of those documents in order for them to be available to you. The only way to know whether they are there and where they are is to “View Source” for the page and look for them in the markup. If the fragments in external documents move or go away, the page will still load; the browser will just go to the top of the page as it does for regular links.
Exercise 6-8 gives you an opportunity to add links to fragments in the example glossary page.
Exercise 6-8.
Linking to a fragment
Targeting a New Browser Window
One problem with putting links on your page is that when people click them, they may never come back to your content. The traditional solution to this dilemma has been to make the linked page open in a new browser window. That way, your visitors can check out the link and still have your content available where they left it.
Be aware that opening new browser windows can cause hiccups in the user experience of your site. Opening new windows is problematic for accessibility, and may be confusing to some users. They might not be able to tell that a new window has opened or they may never find their way back to the original page. At the very least, new windows may be perceived as an annoyance rather than a convenience. So consider carefully whether you need a new window and whether the benefits outweigh the potential drawbacks.
The method you use to open a link in a new browser window depends on whether you want to control its size. If the size of the window doesn’t matter, you can use HTML markup alone. However, if you want to open the new window with particular pixel dimensions, then you need to use JavaScript (see the “Pop-up Windows” sidebar).
To open a new window with markup, use the target attribute in the anchor (a) element to tell the browser the name of the window in which you want the linked document to open. Set the value of target to _blank or to any name of your choosing. Remember that with this method, you have no control over the size of the window, but it will generally open as a new tab or in a new window the same size as the most recently opened window in the user’s browser. The new window may or may not be brought to the front depending on the browser and device used.
Setting target="_blank" always causes the browser to open a fresh window. For example:
<a href="http://www.oreilly.com" target="_blank">O'Reilly</a>
If you include target="_blank" for every link, every link will launch a new window, potentially leaving your user with a mess of open windows. There’s nothing wrong with it, per se, as long as it is not overused.
Another method is to give the target window a specific name, which can then be used by subsequent links. You can give the window any name you like (“new,” “sample,” whatever), as long as it doesn’t start with an underscore. The following link will open a new window called “display”:
<a href="http://www.oreilly.com" target="display">O'Reilly</a>
If you target the “display” window from every link on the page, each linked document will open in the same second window. Unfortunately, if that second window stays hidden behind the user’s current window, it may look as though the link simply didn’t work.
You can decide which method (a new window for every link or reusing named windows) is most appropriate for your content and interface.
Mail Links
Here’s a nifty little linking trick: the mailto link. By using the mailto protocol in a link, you can link to an email address. When the user clicks a mailto link, the browser opens a new mail message preaddressed to that address in a designated mail program (see the “Spam-Bots” sidebar).
A sample mailto link is shown here:
<a href="mailto:alklecker@example.com">Contact Al Klecker</a>
As you can see, it’s a standard anchor element with the href attribute. But the value is set to mailto:name@address.com.
The browser has to be configured to launch a mail program, so the effect won’t work for 100% of your audience. If you use the email address itself as the linked text, nobody will be left out if the mailto function does not work (a nice little example of progressive enhancement).
Telephone Links
Keep in mind that the smartphones people are using to access your site can also be used to make phone calls! Why not save your visitors a step by letting them dial a phone number on your site simply by tapping on it on the page? The syntax uses the tel: protocol and is very simple:
<a href="tel:+01-800-555-1212">Call us free at (800) 555-1212</a>
When mobile users tap the link, what happens depends on the device: Android launches the phone app; BlackBerry and IE11 Mobile initiate the call immediately; and iOS launches a dialog box giving the option to call, message, or add the number to Contacts. Desktop browsers may launch a dialog box to switch apps (for example, to FaceTime on Safari) or they may ignore the link.
If you don’t want any interruption on desktop browsers, you could use a CSS rule that hides the link for non-mobile devices (unfortunately, that is beyond the scope of this discussion).
There are a few best practices for using telephone links:
- It is recommended that you include the full international dialing number, including the country code, for the tel: value because there is no way of knowing where the user will be accessing your site.
- Also include the telephone number in the content of the link so that if the link doesn’t work, the telephone number is still available.
- Android and iPhone have a feature that detects phone numbers and automatically turns them into links. Unfortunately, some 10-digit numbers that are not telephone numbers might get turned into links, too. If your document has strings of numbers that might get confused as phone numbers, you can turn auto-detection off by including the following meta element in the head of your document. This will also prevent them from overriding any styles you’ve applied to telephone links.
<meta name="format-detection" content="telephone=no">
Test Yourself
The most important lesson in this chapter is how to write URLs for links and images. Here’s another chance to brush up on your pathname skills.
Using the directory hierarchy shown in Figure 6-12, write out the markup for the following links and graphics.

This diagram should provide you with enough information to answer the questions. If you need hands-on work to figure them out, the directory structure is available in the test directory in the materials for this chapter. The documents are just dummy files and contain no content. I filled in the first one for you as an example. The answers are located in Appendix A.
- In index.html (the site’s home page), write the markup for a link to the tutorial.html page.
<a href="tutorial.html">...</a> - In index.html, write the anchor element for a link to instructions.html.
- Create a link to family.html from the page tutorial.html.
- Create a link to boot.html from the family.html page, but this time, start with the root directory.
- Create a link back to the home page (index.html) from instructions.html.
- Create a link to the website for this book (learningwebdesign.com) in the file intro.html.
- Create a link to instructions.html from the page usa.html.
- Create a link back to the home page (index.html) from acorn.html.
We haven’t covered the image (img) element in detail yet, but you should be able to fill in the relative URLs after the src attribute to specify the location of the image files for these examples.
- To place the graphic arrow.gif on the page index.html, use this URL:
<img src=" " alt="">
- To place the graphic arrow.gif on the page intro.html, use this URL:
<img src=" " alt="">
- To place the graphic bullet.gif on the friends.html page, use this URL:
<img src=" " alt="">
Element Review: Links
There’s really only one element relevant to creating hypertext links.
|
Element and attributes |
Description |
a |
|
href=""
|
|
target=""
|