The HTML specification defines embedded content as follows:
content that imports another resource into the document, or content from another vocabulary that is inserted into the document
In Chapter 7, Adding Images, you saw examples of both parts of that definition because images are one type of embedded content. The img and picture elements point to an external image resource using the src or srcset attributes, and the svg element embeds an image file written in the SVG vocabulary right in the page.
But images certainly aren’t the only things you can stick in a web page. In this chapter, we’ll look at other types of embedded content and their respective markup, including the following:
- A window for viewing an external HTML source (iframe)
- Multipurpose embedding elements (object and embed)
- Video and audio players (video and audio)
- A scriptable drawing area that can be used for animations or game-like interactivity (canvas)
Window-In-A-Window (iframe)
<iframe>…</iframe>
A nested browsing window
The iframe (short for inline frame) element lets you embed a separate HTML document or other web resource in a document. It has been around for many years, but it has recently become one of the most popular ways to share content between sites.
For example, when you request the code to embed a video from YouTube or a map from Google Maps, they provide iframe-based code to copy and paste into your page. Many other media sites are following suit because it allows them to control aspects of the content you are putting on your page. Inline frames have also become a standard tool for embedding ad content that might have been handled with Flash back in the day. Web tutorial sites may use inline frames to embed code samples on pages.
Adding an iframe to the page creates a little window-in-a-window (or a nested browsing context, as it is known in the spec) that displays the external resource. You place an inline frame on a page similarly to an image, specifying the source (src) of its content. The width and height attributes specify the dimensions of the frame. The content in the iframe element itself is fallback content for browsers that don’t support the element, although virtually all browsers support iframes at this point.
In this very crude example, the parent document displays the web page glossary.html in an inline frame (Figure 10-1). This iframe has its own set of scrollbars because the embedded HTML document is too long to fit. To be honest, you don’t often see iframes used this way in the wild (except for code examples, perhaps), but it is a good way to understand how they work.
<h1>An Inline Frame</h1>
<iframe src="glossary.html" width="400" height="250" >Read the <a href="glossary.html">glossary</a>.
</iframe>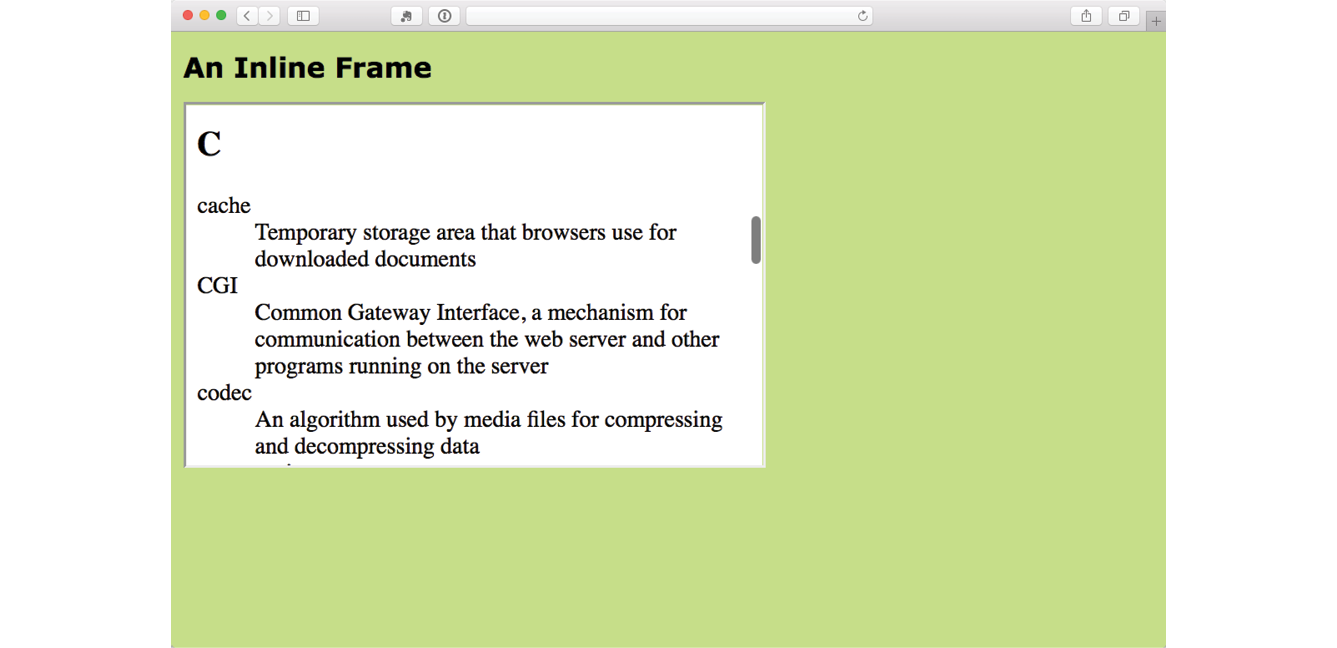
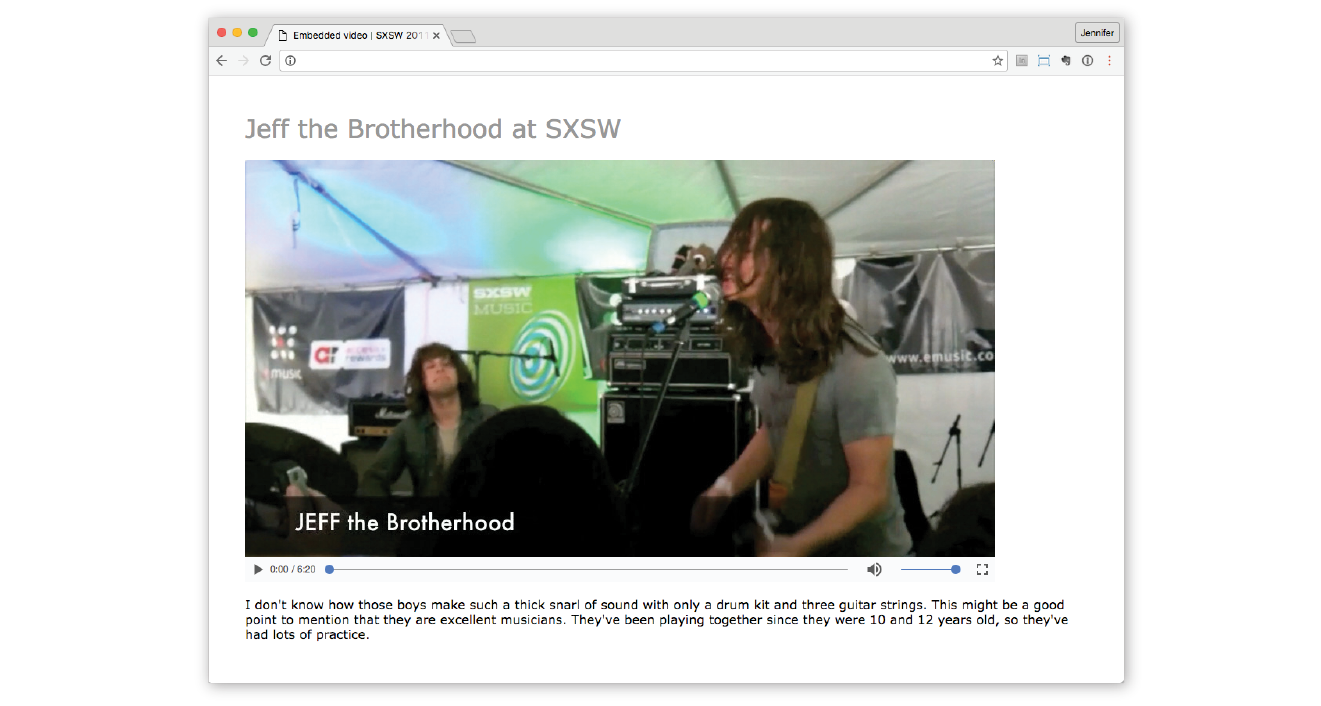
In modern uses of iframe, the window is not so obvious. In fact, there is usually no indication that there is an embedded frame there at all, as shown by the Google Maps example in Figure 10-2.

There are some security concerns with using iframes because they may act like open windows through which hackers can sneak. The sandbox attribute puts restrictions on what the framed content can do, such as not allowing forms, pop ups, scripts, and the like.
Iframe security is beyond the scope of this chapter, but you’ll need to brush up if you are going to make use of iframes on your site. I recommend the MDN Web Docs article “From object to iframe: Other Embedding Technologies” (developer.mozilla.org/en-US/docs/Learn/HTML/Multimedia_and_embedding/Other_embedding_technologies), which provides a good overview of iframe security issues.
To get a feel for how iframes work, use one to embed your favorite video on a page in Exercise 10-1.
exercise 10-1. Embedding a video with iframe
Multipurpose Embedder (object)
<object>…</object>
Represents external resource
<param>
Parameters of an object
In the early days, web browsers were extremely limited in what they were able to render, so they relied on plug-ins to help them display media that they couldn’t handle natively. Java applets, Flash movies, RealMedia (an old web video and audio format), and other media required third-party plug-ins in order to be played in the browser. Heck, even JPEG images once required a plug-in to display.
A plug-in is software that gives a browser functionality that it doesn’t have natively.
To embed those media resources on the page, we used the object and embed elements. They have slightly different uses. The object element is a multipurpose object placer. It can be used to place an image, create a nested browsing context (like an iframe), or embed a resource that must be handled by a plug-in. The embed element was for use with plug-ins only.
To put it frankly, although still in use, object is going out of style, and embed is all but extinct (I’ve tucked it away in a brief sidebar). Media like Java applets and Flash movies are disappearing fast, and modern browsers use APIs to display many types of media natively. In addition, mobile browsers as well as the desktop Microsoft Edge browser don’t support plug-ins.
That said, let’s take a look at the object element. At its most minimal, the object element uses the data attribute to point to the resource and the type attribute to provide its MIME type. Any content within the object element tags will be used as a fallback for browsers that don’t support the embedded resource type. Here is a simple object element that places an SVG image on the page and provides a PNG fallback:
<object data="picture.svg" type="image/svg+xml"><img src="picture.png" alt="">
</object>Additional attributes for the object element are available and vary according to the type of media it is placing. The media format may also require that the object contain a number of param elements that set parameters specific to that type of media.
In this example, param elements specify whether the movie starts automatically (no) or has visible controls (yes):
<object type="video/quicktime" data="movies/hekboy.mov" width="320" height="256">
<param name="autostart" value="false"> <param name="controller" value="true"></object>
Video and Audio
Until recently, browsers did not have built-in capabilities for handling video or sound, so they used plug-ins to fill in the gap. With the development of the web as an open standards platform, and with broadband connections allowing for heftier downloads than previously, it seemed to be time to make multimedia support part of browsers’ out-of-the-box capabilities. Enter the new video and audio elements and their respective APIs (see the “API” sidebar).
The Good News and the Bad News
The good news is that the video and audio elements are well supported in modern browsers, including IE 9+, Safari, Chrome, Opera, and Firefox for the desktop and iOS Safari 4+, Android 2.3+, and Opera Mobile (however, not Opera Mini).
But if you’re envisioning a perfect world where all browsers are supporting video and audio in perfect harmony, I’m afraid it’s not that simple. Although they have all lined up on the markup and JavaScript for embedding media players, unfortunately they have not agreed on which formats to support. Let’s take a brief journey through the land of media file formats. If you want to add video or audio to your page, this stuff is important to understand.
How Media Formats Work
When you prepare audio or video content for web delivery, there are two format decisions to make. The first is how the media is encoded (the algorithms used to convert the source to 1s and 0s and how they are compressed). The method used for encoding is called the codec, which is short for “code/decode” or “compress/decompress.” There are a bazillion codecs out there (that’s an estimate). Some probably sound familiar, like MP3; others might sound new, such as H.264, Vorbis, Theora, VP8, and AAC.
Second, you need to choose the container format for the media. You can think of it as a ZIP file that holds the compressed media and its metadata together in a package. Usually a container format is compatible with more than one codec type, and the full story is complicated. Because space is limited in this chapter, I’m going to cut to the chase and introduce the most common container/codec combinations for the web. If you are going to add video or audio to your site, I encourage you to get more familiar with all of these formats.
Meet the video formats
For video, the most common options are as follows:
MPEG-4 container + H.264 video codec + AAC audio codec. This combination is generally referred to as “MPEG-4,” and it takes the .mp4 or .m4v file suffix. H.264 is a high-quality and flexible video codec, but it is patented and must be licensed for a fee. All current browsers that support HTML5 video can play MPEG-4 files with the H.264 codec. The newer H.265 codec (also known as HEVC, High Efficiency Video Coding) is in development and reduces the bitrate by half, but is not well supported as of this writing.
WebM container + VP8 video codec + Vorbis audio codec. “WebM” is a container format that has the advantage of being open source and royalty-free. It uses the .webm file extension. It was originally designed to work with VP8 and Vorbis codecs.
WebM container + VP9 video codec + Opus audio codec. The VP9 video codec from the WebM project offers the same video quality as VP8 and H.264 at half the bitrate. Because it is newer, it is not as well supported, but it is a great option for browsers that can play it.
Ogg container + Theora video codec + Vorbis audio codec. This is typically called “Ogg Theora,” and the file should have an .ogv suffix. All of the codecs and the container in this option are open source and unencumbered by patents or royalty restrictions, but some say the quality is inferior to other options. In addition to new browsers, it is supported on some older versions of Chrome, Firefox, and Android that don’t support WebM or MP4, so including it ensures playback for more users.
Of course, the problem that I referred to earlier is that browser makers have not agreed on a single format to support. Some go with open source, royalty-free options like Ogg Theora or WebM. Others are sticking with H.264 despite the royalty requirements. What that means is that we web developers need to make multiple versions of videos to ensure support across all browsers. Table 10-1 lists which browsers support the various video options (see the “Server Setup” sidebar).
Meet the audio formats
The landscape looks similar for audio formats: several to choose from, but no format that is supported by all browsers (Table 10-2).
MP3. The MP3 (short for MPEG-1 Audio Layer 3) format is a codec and container in one, with the file extension.mp3. It has become ubiquitous as a music download format.
WAV. The WAV format (.wav) is also a codec and container in one. This format is uncompressed so it is only good for very short clips, like sound effects.
Ogg container + Vorbis audio codec. This is usually referred to as “Ogg Vorbis” and is served with the .ogg or .oga file extension.
MPEG 4 container + AAC audio codec. “MPEG4 audio” (.m4a) is less common than MP3.
WebM container + Vorbis audio codec. The WebM (.webm) format can also contain audio only.
WebM container + Opus audio codec. Opus is a newer, more efficient audio codec that can be used with WebM.
|
Table 10-2. Audio support in current browsers (as of 2017) |
|||||||||
|
Format |
Type |
IE |
MS Edge |
Chrome |
Firefox |
Opera |
Safari |
iOS Safari |
Android |
|
MP3 |
audio/mpeg mp3 |
9.0+ |
12+ |
3.0+ |
22+ |
15+ |
4+ |
4.1 |
2.3+ |
|
WAV |
audio/wav or audio/wave |
– |
12+ |
8.0+ |
3.5+ |
11.5+ |
4+ |
3.2+ |
2.3+ |
|
Ogg Vorbis |
audio/ogg ogg oga |
– |
– |
4.0+ |
3.5+ |
11.5+ |
– |
– |
2.3+ |
|
MPEG-4/AAC |
audio/mp4 m4a |
11.0+ |
12+ |
12.0+ |
– |
15+ |
4+ |
4.1+ |
3.0+ |
|
WebM/Vorbis |
audio/webm webm |
– |
– |
6.0+ |
4.0+ |
11.5+ |
– |
– |
2.3.3+ |
|
WebM/Opus |
audio/webm webm |
– |
14+ |
33+ |
15+ |
20+ |
– |
– |
– |
Adding a Video to a Page
<video>…</video>
Adds a video player to the page
I guess it’s about time we got to the markup for adding a video to a web page (this is an HTML chapter, after all). Let’s start with an example that assumes you are designing for an environment where you know exactly what browser your user will be using. When this is the case, you can provide only one video format using the src attribute in the video tag (just as you do for an img). Figure 10-3 shows a movie with the default player in the Chrome browser.
Here is a simple video element that embeds a movie and player on a web page:
<video src="highlight_reel.mp4"width="640"height="480"poster="highlight_still.jpg"controls autoplay>
Your browser does not support HTML5 video. Get the <a href="highlight_reel.mp4">MP4 video</a>
</video>Browsers that do not support video display whatever content is provided within the video element. In this example, it provides a link to the movie that your visitor could download and play in another player.
There are also some attributes in that example worth looking at in detail:
width="pixel measurement"
height="pixel measurement"
Specifies the size of the box the embedded media player takes up on the screen. Generally, it is best to set the dimensions to exactly match the pixel dimensions of the movie. The movie will resize to match the dimensions set here.
poster="url of image"
Provides the location of an image that is shown in place of the video before it plays.
controls
Adding the controls attribute prompts the browser to display its built-in media controls, generally a play/pause button, a “seeker” that lets you move to a position within the video, and volume controls. It is possible to create your own custom player interface using CSS and JavaScript if you want more consistency across browsers.
autoplay
Makes the video start playing automatically after it has downloaded enough of the media file to play through without stopping. In general, use of autoplay should be avoided in favor of letting the user decide when the video should start. autoplay does not work on iOS Safari and some other mobile browsers in order to protect users from unnecessary data downloads.
In addition, the video element can use the loop attribute to make the video play again after it has finished (ad infinitum), muted for playing the video track without the audio, and preload for suggesting to the browser whether the video data should be fetched as soon as the page loads (preload="auto") or wait until the user clicks the play button (preload="none"). Setting preload="metadata" loads information about the media file, but not the media itself. A device can decide how to best handle the auto setting; for example, a browser in a smartphone may protect a user’s data usage by not preloading media, even when it is set to auto.
Providing video format options
Do you remember back in Chapter 7 when we supplied multiple image formats with the picture element using a number of source elements? Well, picture got that idea from video!
As you’ve seen, it is not easy to find one video format to please all browsers (although MPEG4/H.264 gets close). In addition, new efficient video formats like VP9 and H.265 are available but not supported in older browsers. Using source elements, we can let the browsers use what they can.
In the markup, a series of source elements inside the video element point to each video file. Browsers look down the list until they find one they support and download only that version. The following example provides a video clip in the souped-up WebM/VP9 format for supporing browsers, as well as an MP4 and Ogg Theora for other browsers. This will cover pretty much all browsers that support HTML5 video (see the sidebar “Flash Video Fallback”).
<video id="video" controls poster="img/poster.jpg">
<source src="clip.webm" type="video/webm"> <source src="clip.mp4" type="video/mp4"> <source src="clip.ogg" type="video/ogg"> <a href="clip.mp4">Download the MP4 of the clip.</a>
</video>
Custom video players
One of the powerful things about the video element and the Media Player API is that the system allows for a lot of customization. You can change the appearance of the control buttons with CSS and manipulate the functionality with JavaScript. That is all beyond the scope of this chapter, but I recommend the article “Creating a Cross-Browser Video Player” by Eric Shepherd, Chris Mills, and Ian Devlin (developer.mozilla.org/en-US/Apps/Fundamentals/Audio_and_video_delivery/cross_browser_video_player) for a good overview.
You may also be interested in trying out a prefab video player that provides good looks and advanced performance such as support for streaming video formats. You can implement many of them by adding a line or two of JavaScript to your document and then by using the video element, so it’s not hard to get started. There’s a nice roundup of plug-and-play video player options listed at VideoSWS (videosws.praegnanz.de/).
Adding Audio to a Page
<audio>…</audio>
Adds an audio file to the page
If you’ve wrapped your head around the video markup example, you already know how to add audio to a page. The audio element uses the same attributes as the video element, with the exception of width, height, and poster (because there is nothing to display). Just like the video element, you can provide a stack of audio format options using the source element, as shown in the example here. Figure 10-4 shows how the audio player might look when it’s rendered in the browser.
<p>Play "Percussion Gun" by White Rabbits</p>
<audio id="whiterabbits" controls preload="auto"><source src="percussiongun.mp3" type="audio/mp3">
<source src="percussiongun.ogg" type="audio/ogg">
<source src="percussiongun.webm" type="audio/webm">
<p>Download "Percussion Gun":</p>
<ul>
<li><a href="percussiongun.mp3">MP3</a></li>
<li><a href="percussiongun.ogg">Ogg Vorbis</a></li>
</ul>
</audio>
If you have only one audio file, you can simply use the src attribute instead. If you want to be evil, you could embed audio in a page, set it to play automatically and then loop, and not provide any controls to stop it like this:
<audio src="jetfighter.mp3" autoplay loop></audio>
But you would never, ever do something like that, right? Right?! Of course you wouldn’t.
Adding Text Tracks
<track>…</track>
Adds synchronized text to embedded media
The track element provides a way to add text that is synchronized with the timeline of a video or audio track. Some uses include the following:
- Subtitles in alternative languages
- Captions for the hearing impaired
- Descriptions of what is happening in a video for the sight impaired
- Chapter titles to allow for navigation through the media
- Metadata that is not displayed but can be used by scripts
Clearly, adding text tracks makes the media more accessible, but it has the added bonus of improving SEO (Search Engine Optimization). It can also allow for deep linking, linking to a particular spot within the media’s timeline.
Figure 10-5 shows how captions might be rendered in a browser that supports the track element.

Use the track element inside the video or audio element you wish to annotate. The track element must appear after all the source elements, if any, and may include these attributes:
src
kind
Specifies the type of text annotation you are providing (subtitles, captions, descriptions, chapters, or metadata). If kind is set to subtitle, you must also specify the language (srclang attribute) by using a standardized IANA two-letter language tag (see Note).
label
Provides a name for the track that can be used in the interface for selecting a particular track.
default
Marks a particular track as the default and it may be used on only one track within a media element.
The following code provides English and French subtitle options for a movie:
<video width="640" height="320" controls>
<source src="japanese_movie.mp4" type="video/mp4">
<source src="japanese_movie.webm" type="video/webm">
<track src="english_subtitles.vtt" kind="subtitles" srclang="en"label="English subtitles"
default> <track src="french.vtt" kind="subtitles" srclang="fr" label="Sous-titres en français"></video>
WebVTT
You’ll notice in the previous example that the track points to a file with a .vtt suffix. That is a text file in the WebVTT (Web Video Text Tracks) format that contains a list of cues. It looks like this:
WEBVTT
00:00:01.345 --> 00:00:03.456
Welcome to Artifact [applause]
00:00:06.289 --> 00:00:09.066
There is a lot of new mobile technology to discuss.
00:00:06.289 --> 00:00:13.049
We're glad you could all join us at the Alamo Drafthouse.
Cues are separated by empty line spaces. Each cue has a start and end time in hours:minutes:seconds:milliseconds format, separated by an “arrow” (-->). The cue text (subtitle, caption, description, chapter, or metadata) is on a line below. Optionally, an ID can be provided for each cue on the line above the time sequence.
You can probably guess that there’s a lot more to mastering text tracks for video and audio. Take a look at the following resources:
- “Adding Captions and Subtitles to HTML5 Video” at MDN Web Docs (developer.mozilla.org/en-US/Apps/Fundamentals/Audio_and_video_delivery/Adding_captions_and_subtitles_to_HTML5_video)
- Subtitle tutorial on Miracle Tutorials (www.miracletutorials.com/how-to-create-captionssubtitles-for-video-and-audio-in-webtvv-srt-dfxp-format/)
- The WebVTT specification at the W3C is available at www.w3.org/TR/webvtt1/
If you’d like to play around with the video element, spend some time with Exercise 10-2.
exercise 10-2. Embedding a video player
Canvas
Another cool, “Look Ma, no plug-ins!” addition in HTML5 is the canvas element and the associated Canvas API. The canvas element creates an area on a web page for drawing with a set of JavaScript functions for creating lines, shapes, fills, text, animations, and so on. You could use it to display an illustration, but what gives the canvas element so much potential (and has the web development world so delighted) is that it’s all generated with scripting. That means it is dynamic and can draw things on the fly and respond to user input. This makes it a nifty platform for creating animations, games, and even whole applications—all using the native browser behavior and without proprietary plug-ins like Flash.
It is worth noting that the canvas drawing area is raster-based, meaning that it is made up of a grid of pixels. This sets it apart from the other drawing standard, SVG, which uses vector shapes and paths that are defined with points and mathematics.
The good news is that every current browser supports the canvas element as of this writing, with the exception of Internet Explorer 8 and earlier (see Note). It has become so well established that Adobe’s Animate software (the replacement for Flash Pro) now exports to canvas format.
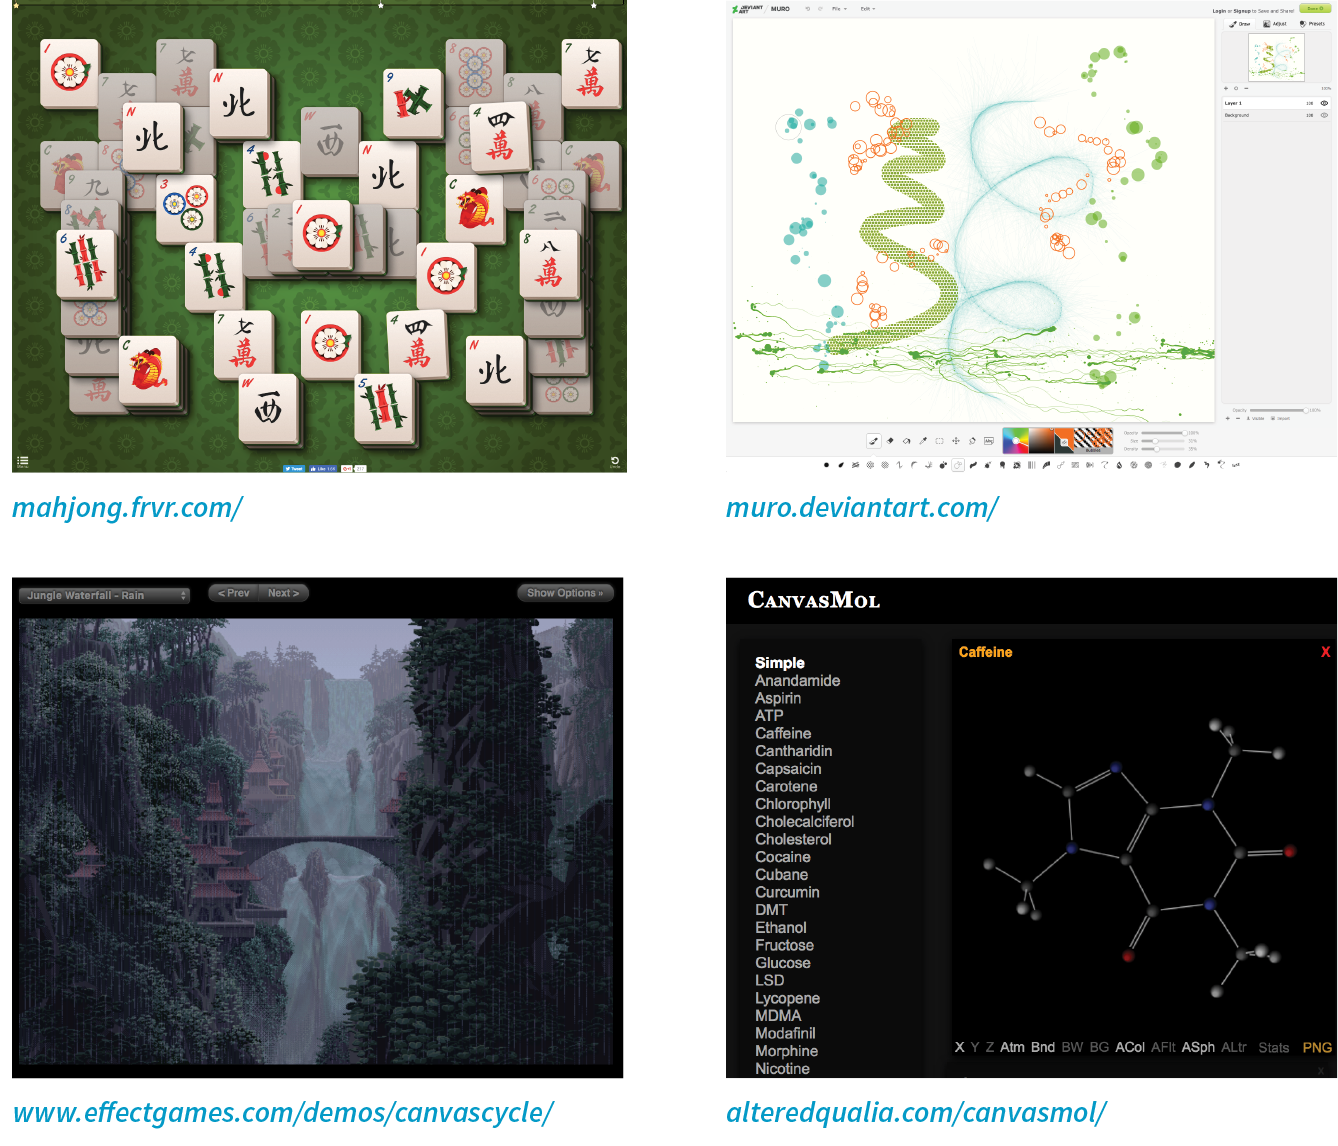
Figure 10-6 shows a few examples of the canvas element used to create games, drawing programs, an interactive molecule structure tool, and an asteroid animation. You can find more examples at EnvatoTuts+ (code.tutsplus.com/articles/21-ridiculously-impressive-html5-canvas-experiments--net-14210), on David Walsh’s blog (davidwalsh.name/canvas-demos), as well as the results of your own web search.
Mastering the canvas element is more than we can take on here, particularly without any JavaScript experience under our belts, but I will give you a taste of what it is like to draw with JavaScript. That should give you a good idea of how it works, and also a new appreciation for the complexity of some of those examples.
The canvas Element
<canvas>…</canvas>
Adds a 2-D dynamic drawing area
You add a canvas space to the page with the canvas element and specify the dimensions with the width and height attributes. And that’s really all there is to the markup. For browsers that don’t support the canvas element, you can provide some fallback content (a message, image, or whatever seems appropriate) inside the tags:
<canvas width="600" height="400"id="my_first_canvas">
Your browser does not support HTML5 canvas. Try using Chrome, Firefox, Safari or MS Edge.
</canvas>The markup just clears a space upon which the drawing will happen. You can affect the drawing space itself with CSS (add a border or a background color, for example), but all of the contents of the canvas are generated by scripting and cannot be selected for styling with CSS.
Drawing with JavaScript
The Canvas API includes functions for creating shapes, such as strokeRect() for drawing a rectangular outline and beginPath() for starting a line drawing. Some functions move things around, such as rotate() and scale(). It also includes attributes for applying styles (for example, lineWidth, font, strokeStyle, and fillStyle).
Sanders Kleinfeld created the following code example for his book HTML5 for Publishers (O’Reilly). He was kind enough to allow me to use it in this book. Figure 10-7 shows the simple smiley face we’ll be creating with the Canvas API.
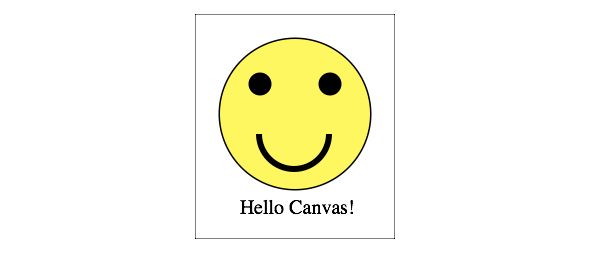
And here is the script that created it. Don’t worry that you don’t know any JavaScript yet. Just skim through the script and pay attention to the inline comments. I’ll also describe some of the functions in use at the end. I bet you’ll get the gist of it just fine.
<script type="text/javascript">
window.addEventListener('load', eventWindowLoaded, false);
function eventWindowLoaded() {
canvasApp();
}
function canvasApp(){
var theCanvas = document.getElementById('my_first_canvas');
var my_canvas = theCanvas.getContext('2d');
my_canvas.strokeRect(0,0,200,225)
// to start, draw a border around the canvas
//draw face
my_canvas.beginPath();
my_canvas.arc(100, 100, 75, (Math.PI/180)*0, (Math.PI/180)*360, false);
// circle dimensions
my_canvas.strokeStyle = "black"; // circle outline is black
my_canvas.lineWidth = 3; // outline is three pixels wide
my_canvas.fillStyle = "yellow"; // fill circle with yellow
my_canvas.stroke(); // draw circle
my_canvas.fill(); // fill in circle
my_canvas.closePath();
// now, draw left eye
my_canvas.fillStyle = "black"; // switch to black for the fill
my_canvas.beginPath();
my_canvas.arc(65, 70, 10, (Math.PI/180)*0, (Math.PI/180)*360, false);
// circle dimensions
my_canvas.stroke(); // draw circle
my_canvas.fill(); // fill in circle
my_canvas.closePath();
// now, draw right eye
my_canvas.beginPath();
my_canvas.arc(135, 70, 10, (Math.PI/180)*0, (Math.PI/180)*360, false);
// circle dimensions
my_canvas.stroke(); // draw circle
my_canvas.fill(); // fill in circle
my_canvas.closePath();
// draw smile
my_canvas.lineWidth = 6; // switch to six pixels wide for outline
my_canvas.beginPath();
my_canvas.arc(99, 120, 35, (Math.PI/180)*0, (Math.PI/180)*-180, false);
// semicircle dimensions
my_canvas.stroke();
my_canvas.closePath();
// Smiley Speaks!
my_canvas.fillStyle = "black"; // switch to black for text fill
my_canvas.font = '20px _sans'; // use 20 pixel sans serif font
my_canvas.fillText ("Hello Canvas!", 45, 200); // write text
}
</script>
Finally, here is a little more information on the Canvas API functions used in the example:
strokeRect(x1, y1, x2, y2)
Draws a rectangular outline from the point (x1, y1) to (x2, y2). By default, the origin of the canvas (0, 0) is the top-left corner, and x and y coordinates are measured to the right and down.
beginPath()
Starts a line drawing.
closePath()
Ends a line drawing that was started with beginPath().
arc(x, y, arc_radius, angle_radians_beg, angle_radians_end)
Draws an arc where (x,y) is the center of the circle, arc_radius is the length of the radius of the circle, and angle_radians_beg and _end indicate the beginning and end of the arc angle.
stroke()
Draws the line defined by the path. If you don’t include this, the path won’t appear on the canvas.
fill()
Fills in the path specified with beginPath() and endPath().
fillText(your_text, x1, y1)
Adds text to the canvas starting at the (x,y) coordinate specified.
In addition, the following attributes were used to specify colors and styles:
lineWidth
Width of the border of the path.
strokeStyle
fillStyle
Color of the fill (interior) of the shape created with the path.
font
The font and size of the text.
Of course, the Canvas API includes many more functions and attributes than we’ve used here. For a complete list, see the W3C’s HTML5 Canvas 2D Context specification at www.w3.org/TR/2dcontext. A web search will turn up lots of Canvas tutorials should you be ready to learn more. In addition, I can recommend these resources:
- The book HTML5 Canvas, Second Edition, by Steve Fulton and Jeff Fulton (O’Reilly).
- If video is more your speed, try this tutorial by David Geary: HTML5 Canvas for Developers (shop.oreilly.com/product/0636920030751.do).
Test Yourself
We’ve looked at all sorts of ways to stick things in web pages in this chapter. We’ve seen how to use iframe to create a “window-in-a-window” for displaying external web resources; object for resources that require plug-ins, video and audio players; and the canvas 2-D scriptable drawing space. Now see if you were paying attention. As always, answers are in Appendix A.
- What is a “nested browsing context,” and how would you create one?
- Why would you use the sandbox attribute with an iframe?
- Name some instances when you might need to know the MIME type for your media file.
- Identify each of the following as a container format, video codec, or audio codec:
a. Ogg
____________________
b. H.264
____________________
c. VP8
____________________
d. Vorbis
____________________
e. WebM
____________________
f. Theora
____________________
g. Opus
____________________
h. MPEG-4
____________________
- What does the poster attribute do?
- What is a .vtt file?
- List at least two differences between SVG and Canvas.
- List the two Canvas API functions you would use to draw a rectangle and fill it with red. You don’t need to write the whole script.
Element Review: Embedded Media
The following elements are used to embed media files of many types into web pages.