In this book, we dive into the realms of deep learning (DL) and cover several deep learning concepts along with several case studies. These case studies range from image recognition to recommender systems, from art generation to object clustering. Deep learning is part of a broader family of machine learning (ML) methods based on artificial neural networks (ANNs) with representation learning. These neural networks mimic the human brain cells, or neurons, for algorithmic learning, and their learning speed is much faster than human learning speed. Several deep learning methods offer solutions to different types of machine learning problems: (i) supervised learning, (ii) unsupervised learning, (iii) semi-supervised learning, and (iv) reinforcement learning.
This book is structured in a way to also include an introduction to the discipline of machine learning so that the reader may be acquainted with the general rules and concepts of machine learning. Then, a detailed introduction to deep learning is provided to familiarize the reader with the sub-discipline of deep learning.
After covering the fundamentals of deep learning, the book covers different types of artificial neural networks with their potential real-life applications (i.e., case studies). Therefore, at each chapter, this book (i) introduces the concept of a particular neural network architecture with details on its components and then (ii) provides a tutorial on how to apply this network structure to solve a particular artificial intelligence (AI) problem.
Since the goal of this book is to provide case studies for deep learning applications, the competency in several technologies and libraries is sought for a satisfactory learning experience.
Our Selected Programming Language: Python 3.x
Our Selected Deep Learning Framework: TensorFlow 2.x
Our Development Environment: Google Colab (with Jupyter Notebook alternative)
A TensorFlow Pipeline Guide showing how to use TensorFlow can be found in Chapter 5, whereas the relevant libraries used with TensorFlow are covered in Chapter 4.
Please note that this book assumes that you use Google Colab, which requires almost no environment setup. The chapter also includes a local Jupyter Notebook installation guide if you prefer a local environment. You may skip the Jupyter Notebook installation section if you decide to use Google Colab.
When learning a new programming discipline or technology, one of the most demoralizing tasks is the environment setup process. Therefore, it is important to simplify this process as much as possible. Therefore, this chapter is designed with this principle in mind.
Python as Programming Language
Python is a programming language created by Guido van Rossum as a side project and was initially released in 1991. Python supports object-oriented programming (OOP) , a paradigm based on the concept of objects, which can contain data, in the form of fields. Python prioritizes the programmer’s experience. Therefore, programmers can write clear and logical code for both small and large projects. It also contains support for functional programming. Python is dynamically typed and garbage collected.
Python is also considered as an interpreted language because it goes through an interpreter, which turns code you write into the language understood by your computer’s processor. An interpreter executes the statements of code “one by one.” On the other hand, in compiled languages, a compiler executes the code entirely and lists all possible errors at a time. The compiled code is more efficient than the interpreted code in terms of speed and performance. However, scripted languages such as Python show only one error message even though your code has multiple errors. This feature helps the programmer to clear errors quickly, and it increases the development speed.
Timeline of Python
In the late 1980s, Python was conceived as a successor to the ABC language.
In December 1989, Guido van Rossum started Python’s implementation.
In January 1994, Python version 1.0 was released. The major new features included were the functional programming tools lambda, map, filter, and reduce.
October 2000, Python 2.0 was released with major new features, including a cycle-detecting garbage collector and support for Unicode.
Python 3.0 was released on December 3, 2008. It was a major revision of the language that is only partially backward compatible. Many of its major features were backported to Python 2.6.x and 2.7.x version series. Releases of Python 3 include the 2 to 3 utility, which automates (at least partially) the translation of Python 2 code to Python 3.
As of January 1, 2020, no new bug reports, fixes, or changes are made to Python 2, and Python 2 is no longer supported.
Python 2 vs. Python 3
One of the common questions a new deep learning programmer might have is whether to use Python 2.x or Python 3.x since there are many outdated blog posts and web articles comparing two major versions. As of 2020, it is safe to claim that these comparisons are not relevant. As you may see in the preceding timeline, the delayed deprecation of Python 2.x finally took place as of January 1, 2020. Therefore, programmers may not find official support for Python 2.x versions anymore.
One of the essential skills for a programmer is to be up to date with the latest technology, and therefore, this book only utilizes the use of Python 3.x versions. For the readers who are only familiar with Python 2.x versions, this preference should not pose a problem since the differences between the syntax used in this book for Python 2.x and Python 3.x are not significant. Therefore, Python 2.x programmers may immediately familiarize themselves with the source code in this book.
Why Python?
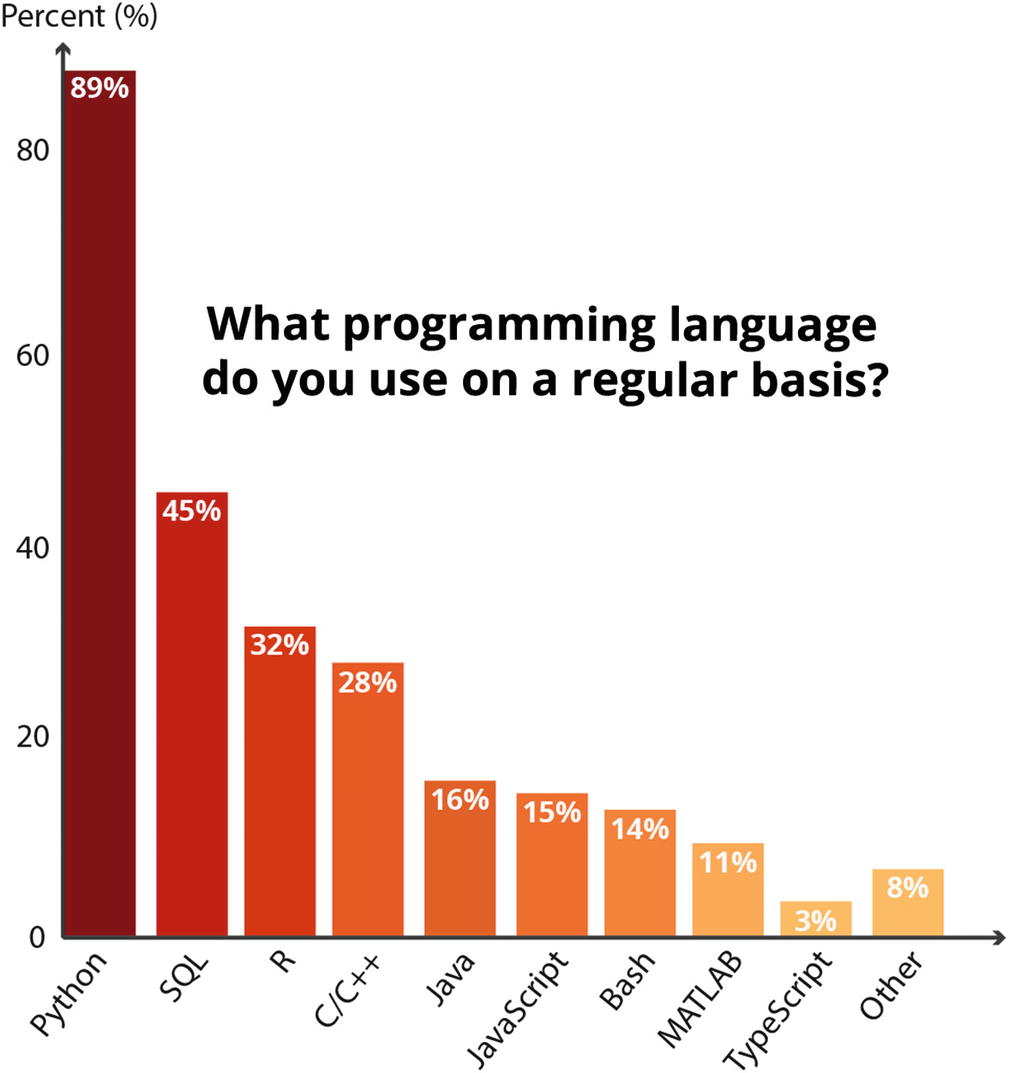
2019 Kaggle Machine Learning and Data Science Survey
There are several reasons for Python’s popularity compared to other languages. A non-exhaustive list of benefits of Python may be the following.
Ease of Learning
One of the main reasons for newcomers to choose Python as their primary programming language is its ease of learning. When compared to other programming languages, Python offers a shorter learning curve so that programmers can achieve a good level of competency in a short amount of time. Python’s syntax is easier to learn, and the code is more readable compared to other popular programming languages. A common example to show this is the amount of code required by different programming languages to print out “Hello, World!”. For instance, to be able to print out Hello, World! in Java, you need the following code:
A Variety of Available Data Science Libraries
Another powerful characteristic of Python compared to other programming languages is its wide variety of data science libraries . The data science libraries such as Pandas, NumPy, SciPy, and scikit-learn reduce the time to prepare the data for model training with their standardized functions and modules for logical and mathematical operations. Furthermore, thanks to the vibrant community of Python developers, as soon as the developers detect a common problem, a new library is immediately designed and released to address this problem .
Community Support
The powerful community support is another advantage of Python over other programming languages. More and more volunteers are releasing Python libraries, and this practice made Python the language with modern and powerful libraries. Besides, a high number of seasoned Python programmers are always ready to help other programmers with their problems on online community channels such as Stack Overflow.
Visualization Options
Data visualization is an important discipline to extract insights from raw data, and Python offers several useful visualization options. The good old Matplotlib is always there with the most customizable options. In addition, Seaborn and Pandas Plot API are powerful libraries that streamline the most common visualization tasks used by data scientists. Additionally, libraries like Plotly and Dash allow users to create interactive plots and sophisticated dashboards to be served on the Web. With these libraries, data scientists may easily create charts, draw graphical plots, and facilitate feature extraction.
Now that we covered why favorite language of data scientists is Python, we can move on to why we use TensorFlow as our machine learning framework.
TensorFlow As Deep Learning Framework
 TensorFlow is an open source machine learning platform with a particular focus on neural networks, developed by the Google Brain team. Despite initially being used for internal purposes, Google released the library under the Apache License 2.0 in November 2015, which made it an open source library.1 Although the use cases of TensorFlow are not limited to machine learning applications, machine learning is the field where we see TensorFlow’s strength.
The two programming languages with stable and official TensorFlow APIs are Python and C. Also, C++, Java, JavaScript, Go, and Swift are other programming languages where developers may find limited-to-extensive TensorFlow compatibility. Finally, there are third-party TensorFlow APIs for C#, Haskell, Julia, MATLAB, R, Scala, Rust, OCaml, and Crystal.
Timeline of TensorFlow
In 2011, Google Brain built a machine learning system called DistBelief using deep learning neural networks.
November 2015, Google released the TensorFlow library under the Apache License 2.0 and made it open source to accelerate the advancements in artificial intelligence.
In May 2016, Google announced an application-specific integrated circuit (an ASIC) built for machine learning and tailored for TensorFlow, called Tensor Processing Unit (TPU) .
In February 2017, Google released TensorFlow 1.0.0 .
In May 2017, Google announced TensorFlow Lite , a library for machine learning development in mobile devices.
In December 2017, Google introduced Kubeflow , which allows operation and deployment of TensorFlow on Kubernetes.
In March 2018, Google announced TensorFlow.js version 1.0 for machine learning with JavaScript.
In July 2018, Google announced the Edge TPU . Edge TPU is Google’s purpose-built ASIC chip designed to run TensorFlow Lite machine learning (ML) models on smartphones.
In January 2019, Google announced TensorFlow 2.0 to be officially available in September 2019.
In May 2019, Google announced TensorFlow Graphics for deep learning in computer graphics.
In September 2019, TensorFlow Team released TensorFlow 2.0, a new major version of the library.
This timeline shows that the TensorFlow platform is maturing. Especially with the release of TensorFlow 2.0, Google has improved the user-friendliness of TensorFlow APIs significantly. Besides, the TensorFlow team announced that they don’t intend to introduce any other significant changes. Therefore, it is safe to assume that the methods and syntax included in this book are to keep their relevance for a long time.
Why TensorFlow?
There are more than two dozens of deep learning libraries developed by tech giants, tech foundations, and academic institutions that are available to the public. While each framework has its advantage in a particular sub-discipline of deep learning, this book focuses on TensorFlow with Keras API. The main reason for choosing TensorFlow over other deep learning frameworks is its popularity. On the other hand, this statement does not indicate that the other frameworks are better – yet, less popular – than TensorFlow. Especially with the introduction of version 2.0, TensorFlow strengthened its power by addressing the issues raised by the deep learning community. Today, TensorFlow may be seen as the most popular deep learning framework, which is very powerful and easy to use and has excellent community support.
What’s New in TensorFlow 2.x
- 1.
Easy model building with Keras and eager execution
- 2.
Robust model deployment in production level on any platform
- 3.
Robust experimentation for research
- 4.
Simplified API thanks to cleanups and duplication reduction
Easy Model Building with Keras and Eager Execution
The TensorFlow team further streamlined the model building experience to respond to expectations with the new or improved modules such as tf.data, tf.keras, and tf.estimators and the Distribution Strategy API.
Load Your Data Using tf.data
In TensorFlow 2.0, training data is read using input pipelines created with the tf.data module . tf.feature_column module is used to define feature characteristics. What is useful for newcomers is the new DataSets module. TensorFlow 2.0 offers a separate DataSets module which offers a range of popular datasets and allows developers to experiment with these datasets.
Build, Train, and Validate Your Model with tf.keras, or Use Premade Estimators
In TensorFlow 1.x, developers could use the previous versions of tf.contrib, tf.layers, tf.keras, and tf.estimators to build models. Offering four different options to the same problem confused the newcomers and drove some of them away, especially to PyTorch. TensorFlow 2.0 simplified the model building by limiting the options to two improved modules: tf.keras (TensorFlow Keras API) and tf.estimators (Estimator API) . TensorFlow Keras API offers a high-level interface that makes model building easy, which is especially useful for proof of concepts (POC) . On the other hand, Estimator API is better suited for production-level models that require scaled serving and increased customization capability.
Run and Debug with Eager Execution, Then Use AutoGraph API for the Benefits of Graphs
Eager execution is an imperative, define-by-run interface where operations are executed immediately as they are called from Python. This makes it easier to get started with TensorFlow, and can make research and development more intuitive.2
Eager execution makes the model building easier. It offers fast debugging capability with immediate runtime errors and integration with Python tools, which makes TensorFlow more beginner friendly. On the other hand, graph execution has advantages for distributed training, performance optimizations, and production deployment. To fill this gap, TensorFlow introduced AutoGraph API called via tf.function decorator . This book prioritizes eager execution over graph execution to achieve a steep learning curve for the reader.
Use Distribution Strategies for Distributed Training
Model training with large datasets necessitates distributed training with multiple processors such as CPU, GPU, or TPU. Even though TensorFlow 1.x has support for distributed training, Distribution Strategy API optimizes and streamlines the distributed training across multiple GPUs, multiple machines, or TPUs. TensorFlow also provides templates to deploy training on Kubernetes clusters in on-prem or cloud environments, which makes the training more cost-effective.
Export to SavedModel
After training a model, developers may export to SavedModel . tf.saved_model API may be used to build a complete TensorFlow program with weights and computations. This standardized SavedModel can be used interchangeably across different TensorFlow deployment libraries such as (i) TensorFlow Serving, (ii) TensorFlow Lite, (iii) TensorFlow.js, and (iv) TensorFlow Hub.
Robust Model Deployment in Production on Any Platform
TensorFlow has always made efforts to provide a direct path to production on different devices. There are already several libraries which may be used to serve the trained models on dedicated environments.
TensorFlow Serving
TensorFlow Serving is a flexible and high-performance TensorFlow library that allows models to be served over HTTP/REST or gRPC/Protocol Buffers. This platform is platform and language-neutral as you may make an HTTP call using any programming language.
TensorFlow Lite
TensorFlow Lite is a lightweight deep learning framework to deploy models to mobile devices (iOS and Android) or embedded devices (Raspberry Pi or Edge TPUs). Developers may pick a trained model, convert the model into a compressed fat buffer, and deploy to a mobile or embedded device with TensorFlow Lite.
TensorFlow.js
TensorFlow.js enables developers to deploy their models to web browsers or Node.js environments. Developers can also build and train models in JavaScript in the browser using a Keras-like API.
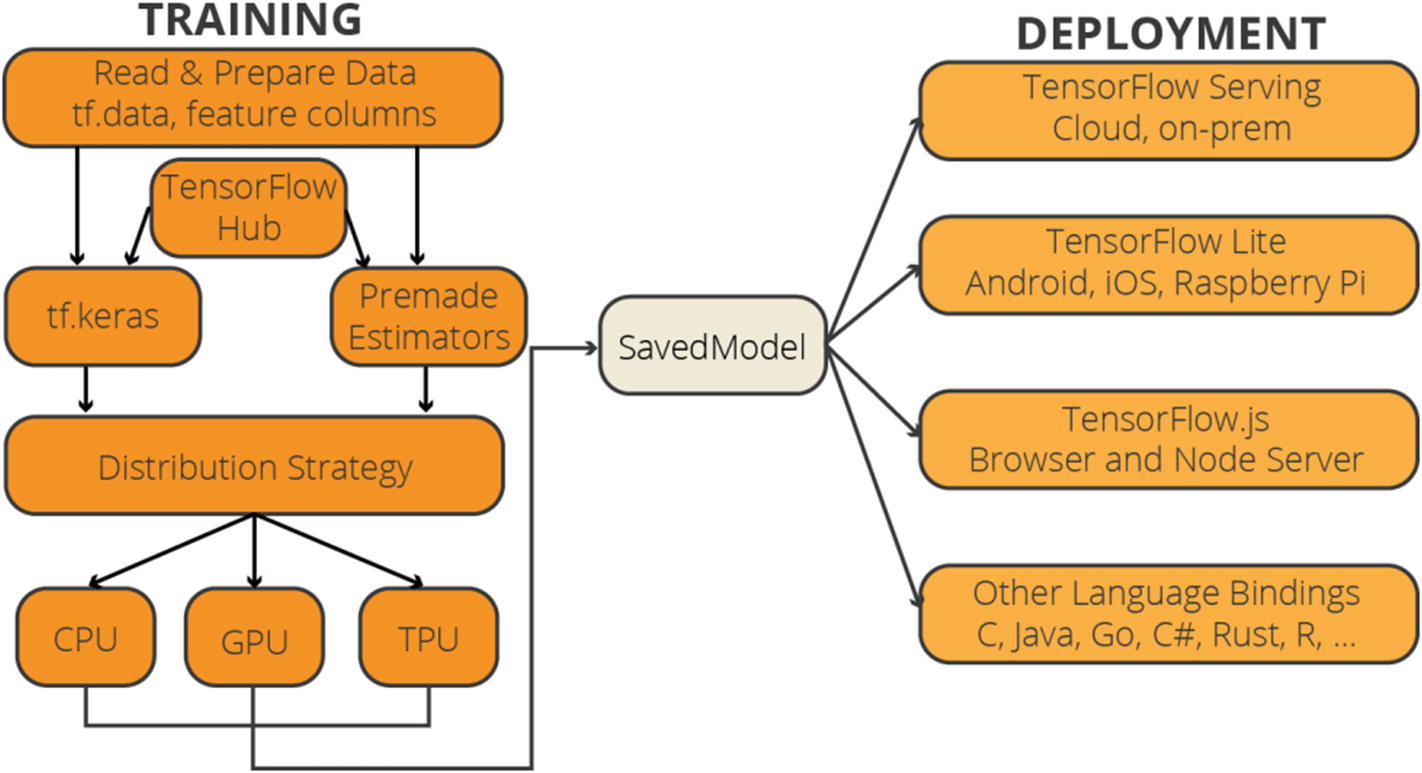
A Simplified Diagram for the TensorFlow 2.0 Architecture3
Improved Experimentation Experience for Researchers
Researchers often need an easy-to-use tool to take their research ideas from concept to code. A proof of concept may only be achieved after several iterations and the concept may be published after several experiments. TensorFlow 2.0 aims to make it easier to achieve this process. Keras Functional API – paired with Model Subclassing API – offers enough capability to build complex models. tf.GradientTape and tf.custom_gradient are essential to generate a custom training logic.
Any machine learning project starts with a proof of concept (POC). Developers need to adopt an agile methodology and use easy-to-use tools to take new ideas from concept to evidence-backed publication. Finally, TensorFlow 2.0 offers powerful extensions such as Ragged Tensors, TensorFlow Probability, and Tensor2Tensor to ensure flexibility and increased experimentation capability.
TensorFlow Competitors
Even though this book uses TensorFlow as the primary deep learning framework, it is essential to provide a brief introduction to competing deep learning frameworks and libraries. Although the total number of deep learning frameworks is more than 20, many of them are not currently maintained by their designers. Therefore, we can only talk about a handful of active and reliable deep learning frameworks, which are covered as follows.
Keras
 Keras
is an open source neural network library written in Python which can run on top of TensorFlow, Microsoft Cognitive Toolkit (CNTK), Theano, R, and PlaidML. François Chollet, a Google engineer, designed Keras to enable fast experimentation with neural networks. It is very user-friendly, modular, and extensible. Keras also takes pride in being simple, flexible, and powerful. Due to these features, Keras is viewed as the go-to deep learning library by newcomers.
Keras should be regarded as a complementary option to TensorFlow rather than a rival library since it relies on the existing deep learning frameworks. In 2017, Google’s TensorFlow team agreed to support Keras in its core library. With TensorFlow 2.0, the Keras API has become more streamlined and integrated. This book takes advantage of TensorFlow Keras API, which makes it much easier to create neural networks.
Keras Official Website: www.keras.io
PyTorch
 PyTorch
is an open source neural network library primarily developed and maintained by Facebook’s AI Research Lab (FAIR) and initially released in October 2016. FAIR built PyTorch on top of Torch library, another open source machine learning library, a scientific computing framework, and a scripting language based on the Lua programming language, initially designed by Ronan Collobert, Samy Bengio, and Johnny Mariéthoz.
Since PyTorch is developed by Facebook and offers an easy-to-use interface, its popularity has gained momentum in recent years, particularly in academia. PyTorch is the main competitor of TensorFlow. Prior to TensorFlow 2.0, despite the issues on the ease of use of its APIs, TensorFlow has kept its popularity due to its community support, production performance, and additional use-case solutions. Besides, the latest improvements with TensorFlow 2.0 have introduced remedies to the shortcomings of TensorFlow 1.x. Therefore, TensorFlow will most likely keep its place despite the rising popularity of PyTorch .
PyTorch Official Website: www.pytorch.org
Apache MXNet
 MXNet
is an open source deep learning framework introduced by Apache Foundation. It is a flexible, scalable, and fast deep learning framework. It has support in multiple programming languages (including C++, Python, Java, Julia, MATLAB, JavaScript, Go, R, Scala, Perl, and Wolfram Language).
MXNet is used and supported by Amazon, Intel, Baidu, Microsoft, Wolfram Research, Carnegie Mellon, MIT, and the University of Washington. Although several respected institutions and tech companies support MXNet, the community support of MXNet is limited. Therefore, it remains less popular compared to TensorFlow , Keras, and PyTorch.
MXNet Official Website: mxnet.apache.org
CNTK (Microsoft Cognitive Toolkit)
 Microsoft released CNTK as its open source deep learning framework in January 2016. CNTK, also called the Microsoft Cognitive Toolkit
, has support in popular programming languages such as Python, C++, C#, and Java. Microsoft utilized the use of CNTK in its popular application and products such as Skype, Xbox, and Cortana, particularly for voice, handwriting, and image recognition. However, as of January 2019, Microsoft stopped releasing new updates to the Microsoft Cognitive Toolkit. Therefore, CNTK is considered deprecated.
Microsoft Cognitive Toolkit Official Website: www.cntk.ai
Final Evaluation
The designers and the maintainers of the abovementioned deep learning frameworks evidently show a shift in the deep learning framework development. Deep learning started as an academic research field in the universities with little to no real-life applications. However, this has changed with the increasing computing power with lower processing costs and with the rise of the Internet. An increasing number of real-life use cases of deep learning applications have been feeding the appetites of the large tech companies. The earlier academic projects such as Torch, Caffe, and Theano have paved the way for the development of deep learning libraries such as TensorFlow, Keras, and PyTorch. The industry players such as Google, Amazon, and Facebook have hired the maintainers of these earlier projects for their own open source deep learning frameworks. Therefore, the support for the earlier projects is nonexistent to very limited, while the new generation frameworks are becoming increasingly more powerful.
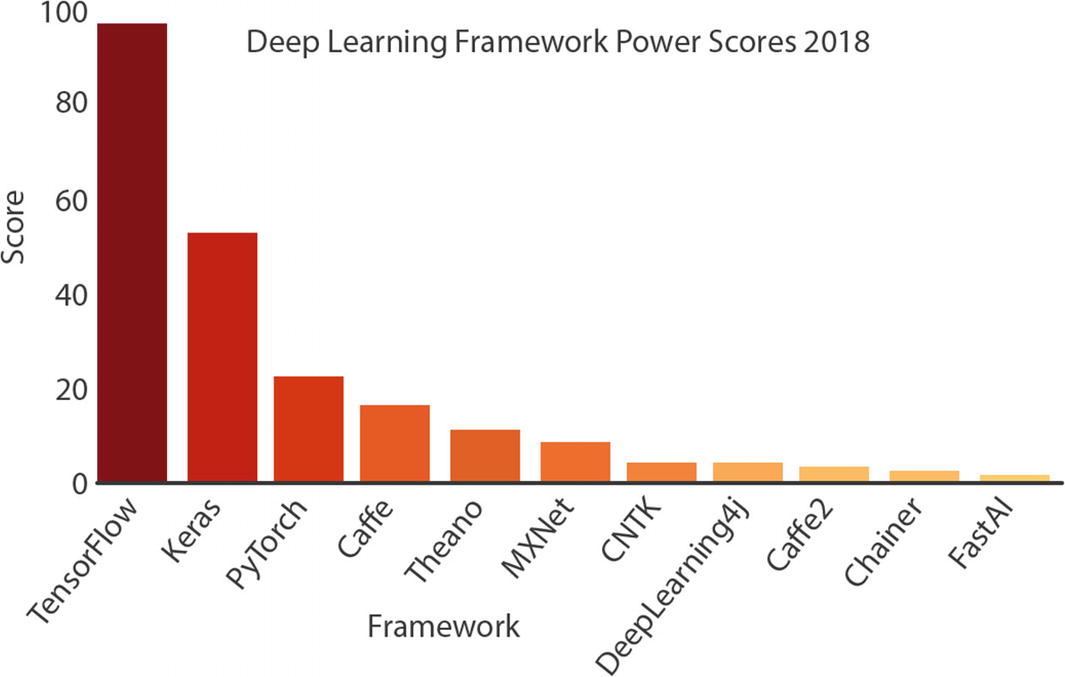
Deep Learning Framework Power Scores 2018 by Jeff Hale4
Therefore, due to its technological advancement and its popularity in the tech community, TensorFlow is the single deep learning framework used in this book. In the next section, we take a look at the new features introduced with TensorFlow 2.0.
Final Considerations
The rising popularity of rival libraries offering easy-to-use modules such as PyTorch was an indication that TensorFlow 1.x was not on the right track. The rise of Keras library with its sole purpose to facilitate the use of TensorFlow – along with a few others – was another indication that TensorFlow must streamline its workflow to keep its existing user base. TensorFlow 2.0 was introduced to mitigate this problem, and it seems that most of the criticism was addressed with both newly introduced APIs and improved existing APIs.
Installation and Environment Setup
Since we addressed the question of why TensorFlow is the selected deep learning framework for this book and why Python is the selected programming language, it is time to set up a programming environment for deep learning.
With interactive running environments, developers can run the part of code, and the outputs are still kept in the memory.
The next part of the code may still use the output from the previous part of the code.
Errors given in one part of the code may be fixed, and the rest of the code may still be run.
A large code file may be broken into pieces, which makes debugging extremely simple.
We can pretty much say that using an interactive programming environment has become an industry standard for deep learning studies. Therefore, we will also follow this practice for the deep learning projects throughout this book.
There are several viable options to build and train models on interactive programming environments for Python TensorFlow programmers. However, we will dive into the most popular options which offer different benefits for their users: (i) Jupyter Notebook and (ii) Google Colab.
Interactive Programming Environments: IPython, Jupyter Notebook, and Google Colab
The Terminal IPython as a REPL
The IPython kernel that provides computation and communication with the front-end interfaces such as IPython Notebook
Developers can write codes, take notes, and upload media to their IPython Notebook. The growth of the IPython Notebook project led to the creation of Project Jupyter, which contains the notebook tool and the other interactive tools for multiple languages (Julia, Python, and R). Jupyter Notebook and its flexible interface extend the notebook beyond code to visualization, multimedia, collaboration, and many other features, which creates a comfortable environment for data scientists and machine learning experts.
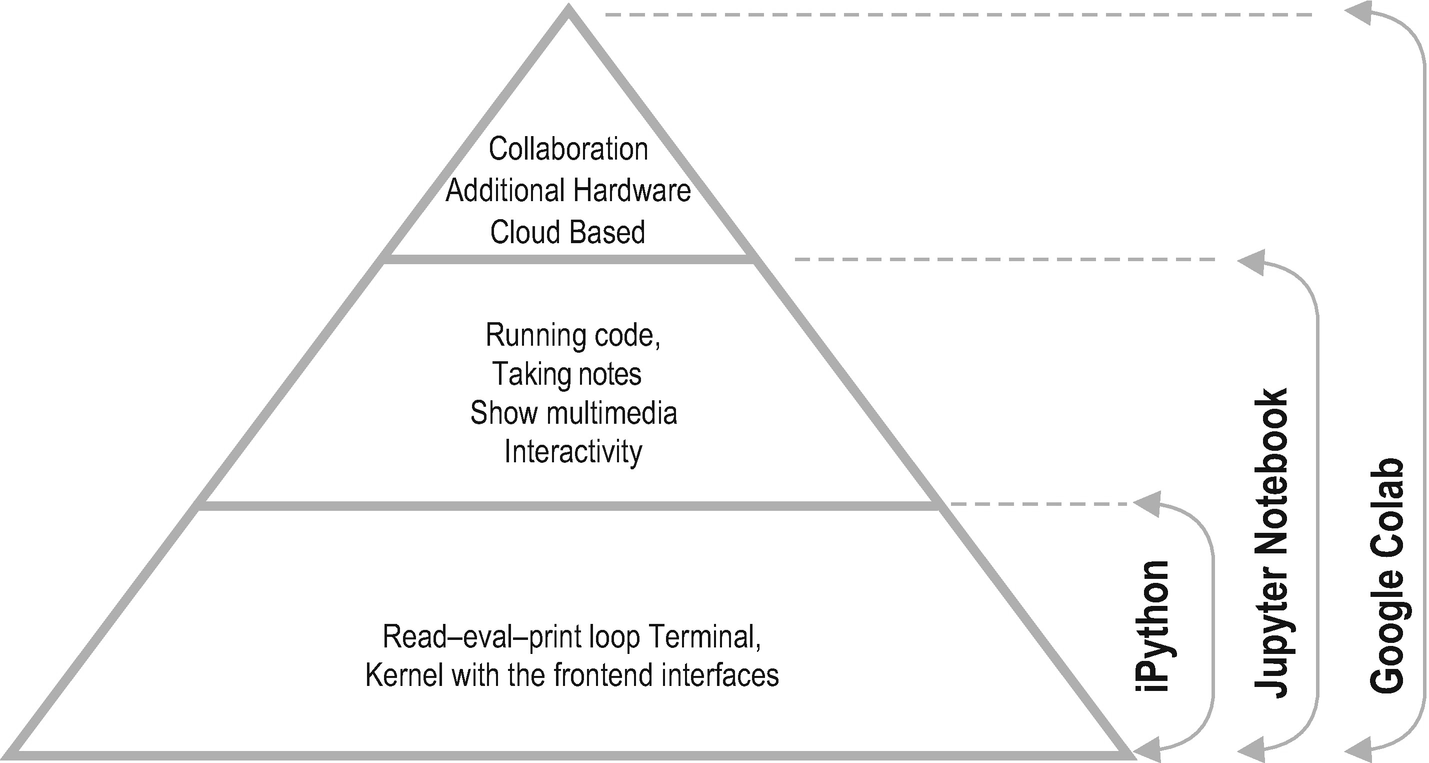
The Relation Between IPython, Jupyter Notebook, and Google Colab
In the next sections, we dive into the details of IPython, Jupyter Notebook, and Google Colab. We will also (i) install Jupyter Notebook with Anaconda distribution and (ii) setup Google Colab.
IPython
Interactive shells (Terminal and Qt Console)
A web-based notebook interface with support for code, text, and media
Support for interactive data visualization and GUI toolkits
Flexible and embeddable interpreters to load into projects
Parallel computing toolkits
IPython Project has grown beyond running Python scripts and is on its way to becoming a language-agnostic tool. As of IPython 4.0, the language-agnostic parts are gathered under a new project, named Project Jupyter. The name Jupyter is a reference to core programming languages supported by Jupyter, which are Julia, Python, and R. As of the implementation of this spin-off decision, IPython, now, only focuses on interactive Python, and Jupyter focuses on tools like the notebook format, message protocol, QT Console, and notebook web application .
Jupyter Notebook
 Project Jupyter is a spin-off open source project born out of IPython Project in 2014. Jupyter is forever free for all to use, and it is developed through the consensus of the Jupyter community. There are several useful tools released as part of Jupyter Project, such as Jupyter Notebook, JupyterLab, Jupyter Hub, and Voilà. While all these tools may be used simultaneously for accompanying purposes, installing Jupyter Notebook suffices the environment requirements of this book.
On the other hand, as an open source project, Jupyter tools may be integrated into different toolsets and bundles. Instead of going through installing Jupyter Notebook through Terminal (for macOS and Linux) or Command Prompt (for Windows), we will use Anaconda distribution, which will make the environment installation on local machines.
Anaconda Distribution
 “Anaconda is a free and open source distribution of the Python and R programming languages for scientific computing, that aims to simplify package management and deployment.”
Environment setup is one of the cumbersome tasks for programming. Developers often encounter unique problems, mainly due to their operating system and its version. With Anaconda distribution, one can easily install Jupyter Notebook and other useful data science libraries.
Installing on Windows
- 1.
Download Anaconda Installer at www.anaconda.com/products/individual by selecting the 64-Bit Graphical Installer for Python 3.x; see Figure 1-5.
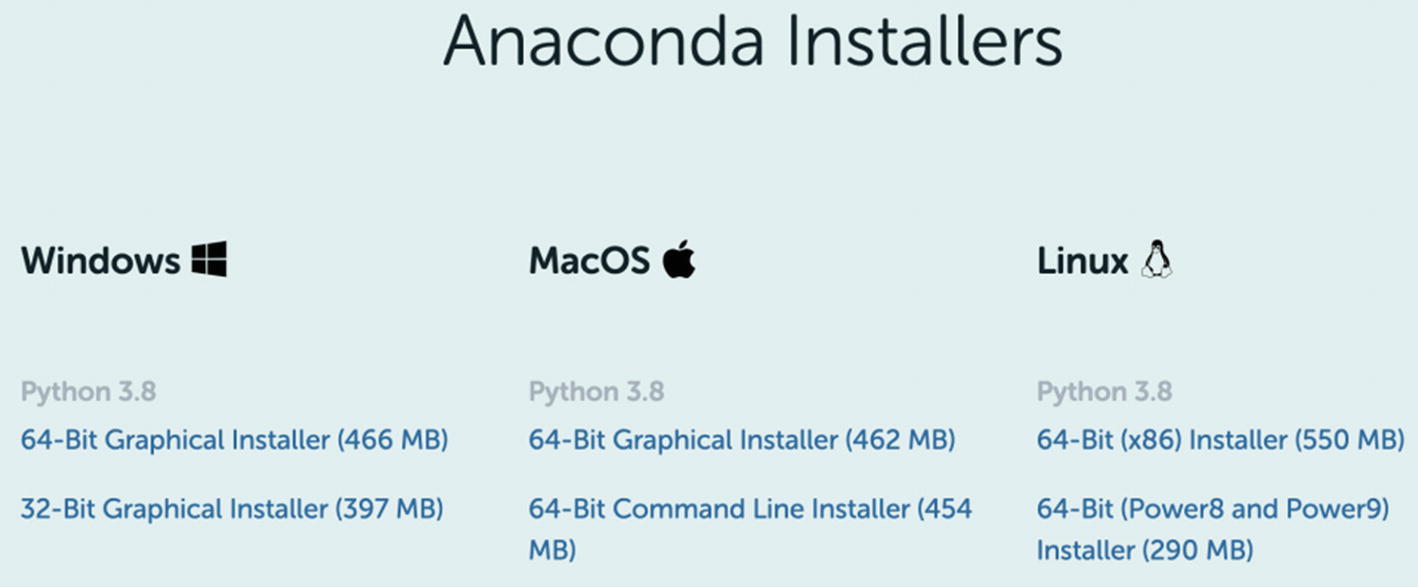
Anaconda Installer Page
- 2.
Double-click the installer to launch.
- 3.
Click the “Next” button.
- 4.
Read the licensing agreement, and click “I agree.”
- 5.
Select an install for “Just Me,” and click the “Next” button.
- 6.
Select a destination folder to install Anaconda and click the “Next” button (make sure that your destination path does not contain spaces or Unicode characters).
- 7.
Make sure (i) “Add Anaconda3 to your PATH environment variable” option is unchecked and (ii) “Register Anaconda3 as my default Python 3.x” option is checked, as shown in Figure 1-6.
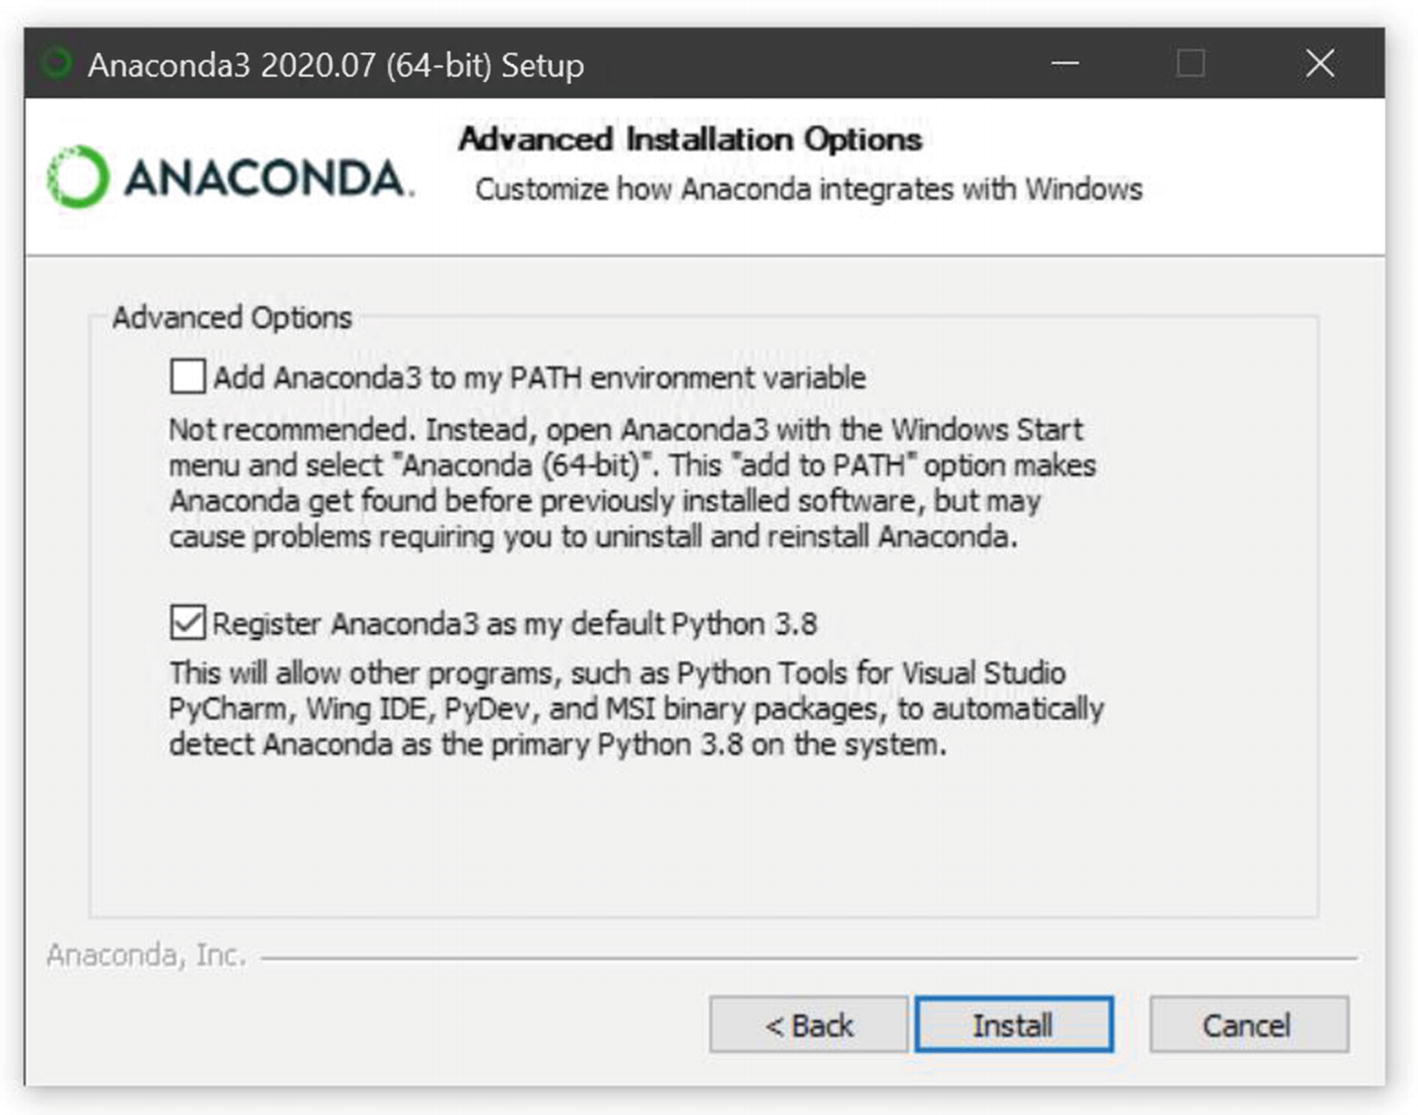
Anaconda Installation Window for Windows OS
- 8.
Click the “Install” button, and wait for the installation to complete.
- 9.
Click the “Next” button.
- 10.
Click the “Next” button to skip installing PyCharm IDE.
- 11.
After a successful installation, you will see the “Thank you for installing Anaconda Individual Edition” message. Click the “Finish” button.
- 12.
You can now open Jupyter Notebook by finding the “Anaconda-Navigator” app on your Start menu. Just open the app, and click the “Launch” button in the Jupyter Notebook card. This step will prompt a web browser on localhost:8888.
Installing on Mac
- 1.
Download Anaconda Installer at www.anaconda.com/products/individual by selecting the 64-Bit Graphical Installer for Python 3.x; see Figure 1-7.
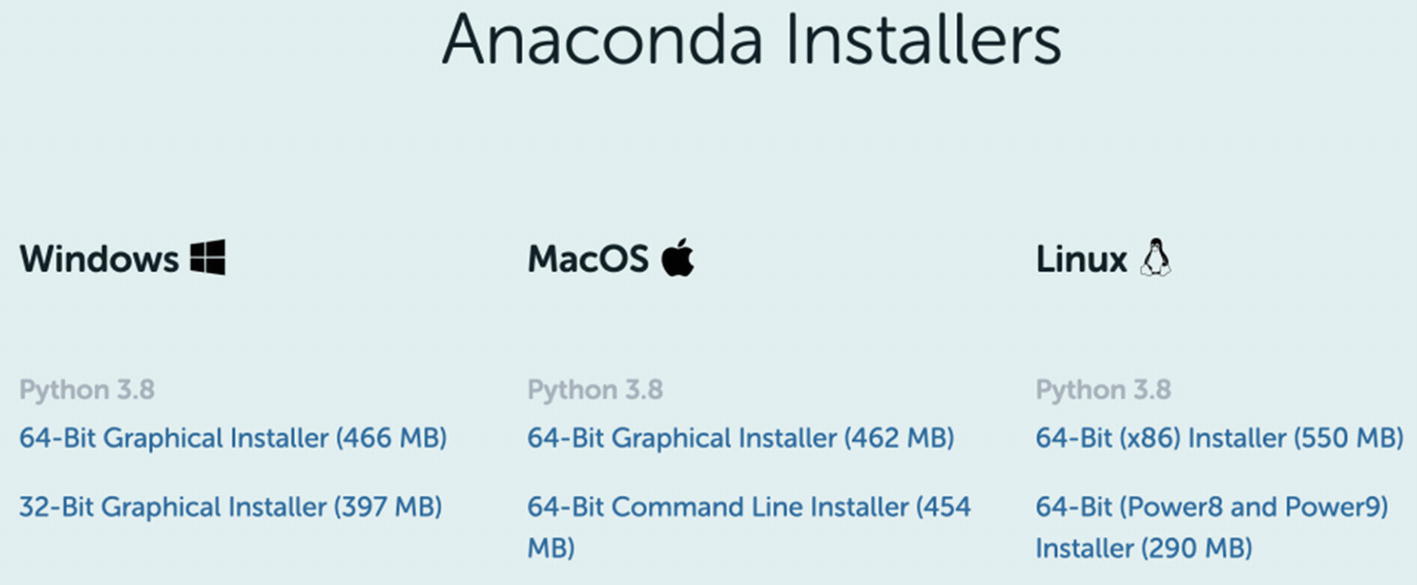
Anaconda Installer Page
- 2.
Double-click the downloaded file, and click the “Continue” button to start the installation.
- 3.
Click the “Continue” buttons on the Introduction, Read Me, and License screens.
- 4.
Click the “Agree” button on the prompt window to agree to the terms of the software license agreement.
- 5.
Make sure “Install for me only” option is selected in the Destination Select screen, and click the “Continue” button.
- 6.
Click the Install button to install Anaconda, and wait until the installation is completed.
- 7.
Click the “Continue” button to skip installing the PyCharm IDE.
- 8.Click the “Close” button, as shown in Figure 1-8, to close the installer.
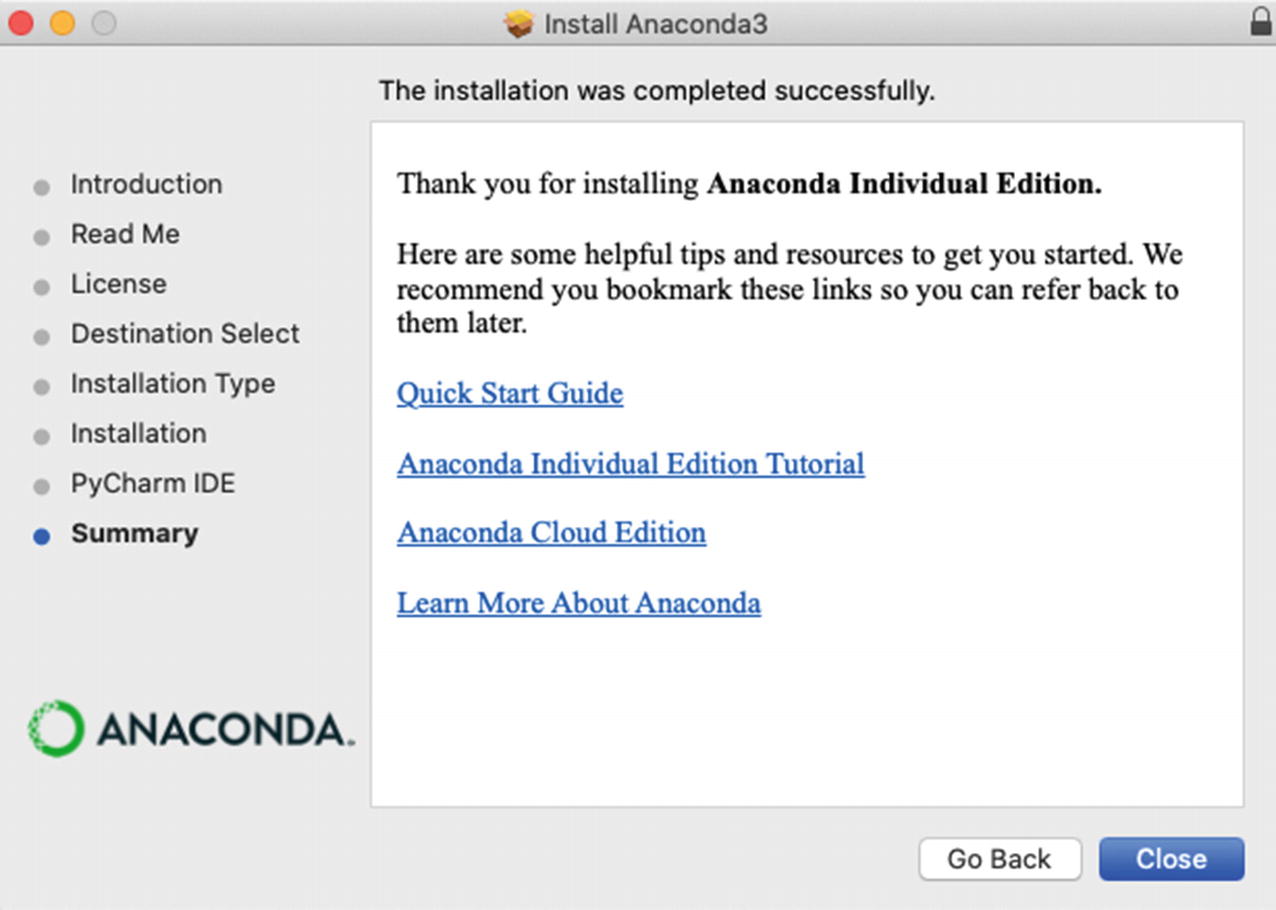 Figure 1-8
Anaconda Installation Window for macOS
- 9.
You can now open Jupyter Notebook by finding the “Anaconda-Navigator” app under your Launchpad. Just open the app and click the “Launch” button in the Jupyter Notebook card. This step will prompt a Terminal and a web browser on localhost:8888.
- 10.
You can create a new IPython Notebook by clicking New ➤ Python3, as shown in Figure 1-9.
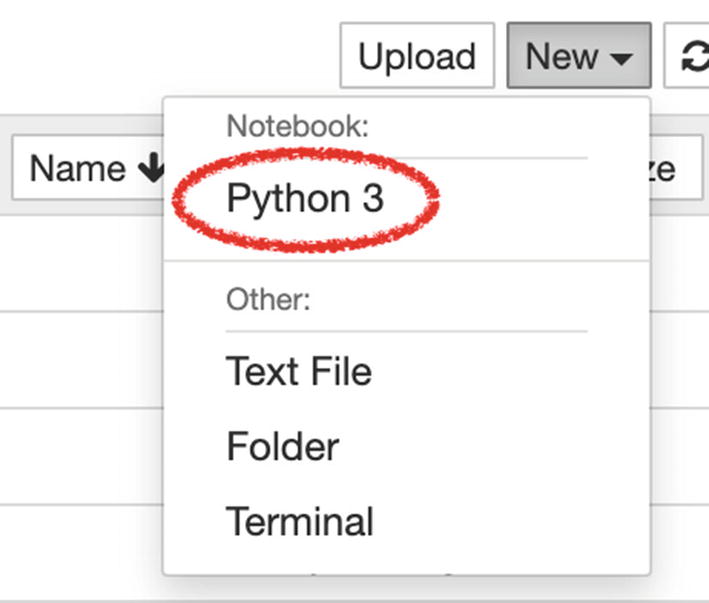
Create a New Jupyter Notebook
Operating System | Alternative Methods to Install TensorFlow |
|---|---|
macOS | For Mac, just open a Terminal window from Launchpad under Other folder and paste the following script: pip install --upgrade tensorflow |
Windows | For Windows, go to the “Start” menu on your Windows machine, search for “cmd,” right-click it and choose “Run as administrator,” and paste the same script mentioned earlier: pip install --upgrade tensorflow |
macOS/Windows | For both macOS and Windows, create a new IPython Notebook, as shown earlier. Copy and paste the following code to an empty cell and click the “Run” button, located on the top of the page: !pip install --upgrade tensorflow Note Beware of the exclamation point!
|
On the other hand, if you would like to use Google Colab, you don’t have to install TensorFlow since Google Colab Notebooks come with preinstalled TensorFlow.
Google Colab
Colaboratory, or Colab for short, is a Google product, which allows developers to write and execute Python code through a browser. Google Colab is an excellent tool for deep learning tasks. Google Colab is a hosted Jupyter Notebook that requires no setup and has an excellent free version, which gives free access to Google computing resources such as GPUs.
As in Anaconda distribution, Google Colab comes with important data science libraries such as Pandas, NumPy, Matplotlib, and – more importantly – TensorFlow. Colab also allows sharing the notebooks with other developers and saves your file to Google Drive. You can access and run your code in the Colab Notebook from anywhere.
In summary, Colab is just a specialized version of the Jupyter Notebook, which runs on the cloud and offers free computing resources.
As a reader, you may opt to use a local device and install Anaconda distribution shown earlier. Using Jupyter Notebook will not cause any problem as long as you are familiar with Jupyter Notebook. On the other hand, to be able to keep this book and the code up to date, I will deliberately use Google Colab so that I can revisit the code and make updates. Therefore, you will always have access to the latest version of the code. Therefore, I recommend you to use Google Colab for this book.
Google Colab Setup
- 1.
Visit colab.research.google.com, which will direct you to the Google Colaboratory Welcome Page; see Figure 1-10.
- 2.Click the “Sign in” button on the right top.
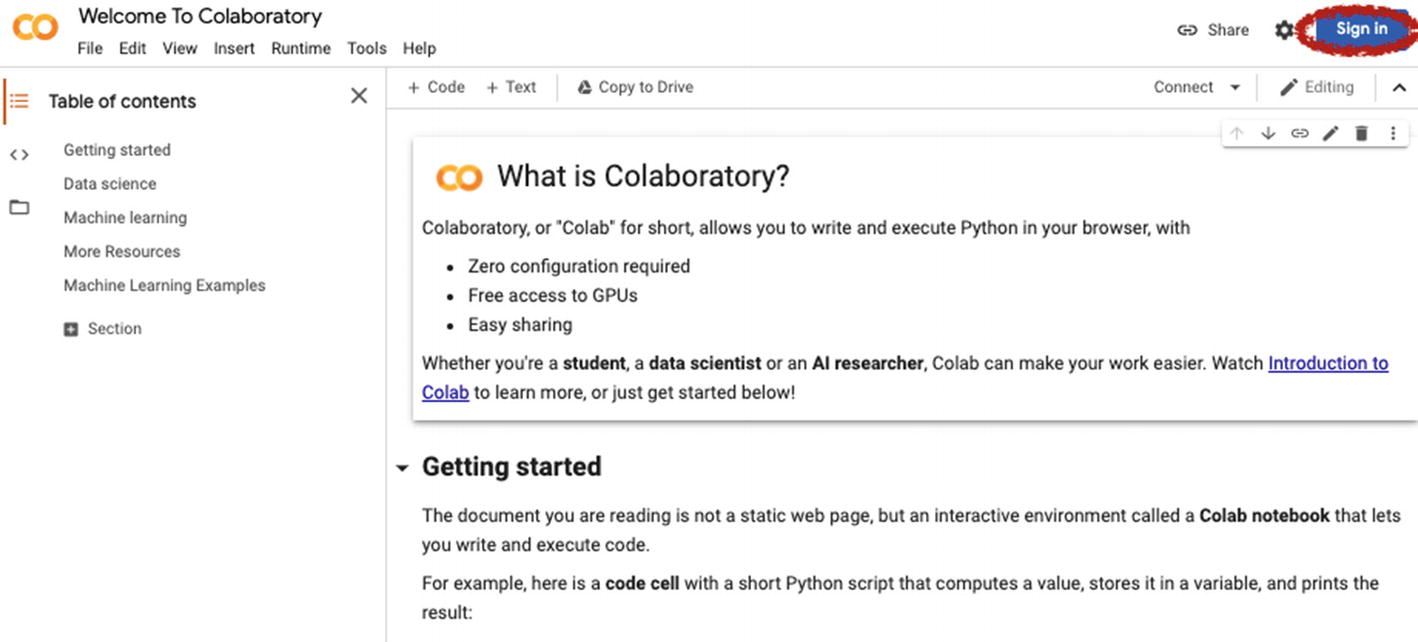 Figure 1-10
A Screenshot of Google Colab Welcome Notebook
- 3.Sign in with your Gmail account. Create one if you don’t have a Gmail account; see Figure 1-11.
 Figure 1-11
Google Sign in Page
- 4.
As soon as you complete the sign-in process, you are ready to use Google Colab.
- 5.You may easily create a new Colab Notebook on this page by clicking File ➤ New notebook. You can see an example Colab notebook in Figure 1-12.
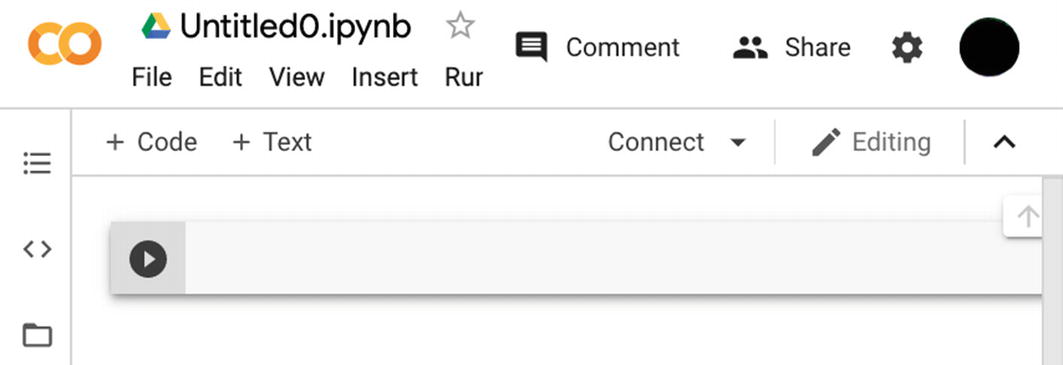 Figure 1-12
A Screenshot of Empty Google Colab Notebook
Hardware Options and Requirements
Deep learning is computationally very intensive, and large deep learning projects require multiple machines working simultaneously with distributed computing. Processing units such as CPUs, GPUs, and TPUs, RAM, hard drives such as HDD and SSD, and, finally, power supply units are important hardware units affecting the overall training performance of a computer.
For projects using enormous datasets for training, having an abundant computing power along with the right set of hardware is extremely crucial. The most critical component for model training with large datasets is the processing unit. Developers often use GPUs and TPUs when the task is too big, whereas CPUs may be sufficient for small to medium-size training tasks.
This book does not contain computationally hungry projects since such projects may discourage and demotivate the reader. Therefore, the average computer suffices the computational power requirements for this book. Besides, if you follow the tutorials with Google Colab, as recommended, the sources offered in Google Colab – which include GPUs, as well – are more than enough for the projects in this book. Therefore, you do not have to worry about your hardware at all.
