Three and a half years after opening Ken’s Artisan Bakery I wanted to work with my staff on a new project, seeing if we could make good pizza in our massive gas-fired bread oven, baking the pies directly on the oven hearth. Pizza is, after all, a kind of bread, so it seemed a natural extension of what we were already good at.
Initial trials went well enough that we decided try it out on the public as a one-night-per-week fun-fest, branding it Monday Night Pizza. At the time, in 2005, Portland was embracing alternatives to the usual dining scene, and creative, nontraditional ventures like Ripe’s underground restaurant, Family Supper, and summertime white-tablecloth dinners in farmers’ fields produced by Plate & Pitchfork put a kind of Portland-specific, rule-bending fun back into going out for dinner. Turning my bakery into a restaurant one night a week was an evolutionary step from the earlier experiment when we operated as a mini-bistro, and it was a way to take advantage of the talents of some of the people working at the bakery at that time.
The bakery made the Oregonian’s top one hundred restaurants that year on the merits of our one-night-per-week pop-up pizza place, and from the first Monday night people were waiting up to an hour for a table, pressed up against the pastry cases and hanging out on the sidewalk with a glass of wine or a beer in hand—the power of pizza! The momentum of Monday Night Pizza birthed Ken’s Artisan Pizza, a wood-fired oven pizzeria in Southeast Portland that I opened with our chef, Alan Maniscalco, in 2006. Alan had worked at the bakery for four years, for a while managing the bread and pastry teams, and he also ran the Monday Night Pizza kitchen before helping me open the pizzeria.
At Ken’s Artisan Pizza we bake pies inspired by the Neapolitan pizzas that Alan and I had each enjoyed during various trips to Italy. Ours are individual pies, about 12 inches in diameter, with a very thin crust. Our cooks toss the dough in the air in a spiraling fashion to get a perfect distribution of thin dough rather than for effect, but the flying disks make great theater too.
The toppings are on the minimal side, as the intention is for the crust, sauce, and toppings to be in balance. We also aim for a slight char on the bottom and perimeter of the crust. A slight char. It isn’t easy. Things happen fast at 750°F (399°C). The whole-milk mozzarella we use is completely melted, a milky ooze with just a touch of brown on top. The tips of the fresh basil leaves that bake on top of the pizza are just a little crisp.
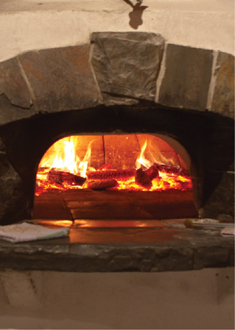
The oven has a big pile of red embers in the back, and you can see its large, dancing flame from the street. We keep thinly split pieces of oak, madrone, and occasionally other hardwoods in a cutout at the base of the oven and constantly feed the oven’s fire through each evening’s service. In the morning, there’s still plenty of heat left for baking croutons and other items before lighting a new flame at noon. The restaurant oven has fire burning in it at least ten hours each day, every day of the week.
This oven, a brick le Panyol model, was built by Timothy Seaton, a third-generation mason who specializes in building wood-burning appliances and serves as chair of the Masonry Heater Caucus for the Hearth, Patio and Barbecue Association, as well as secretary for an international standards organization for wood-burning appliances. Timothy knows his stuff, and he’s a fine craftsman. The interior hearth of the oven is nearly six feet in diameter and was built with plenty of mass to hold and radiate intense heat back onto the baking surface. In the morning the oven is still well over 500°F (260°C)—too hot to bake bread. Yet the temperature of the outside of the oven never exceeds 110°F (43°C). It’s an impressive beast: a white, igloo-shaped inferno in the middle of the restaurant.
When pizzas bake, they are usually placed in the oven with their backs 1½ to 2 feet from the fire. At this point, the temperature is about 750°F (399°C) near the back of the pizza—it’s over 1,000°F (538°C) where the fire is. There is nearly a 100°F (56°C) difference in the temperature of the hearth surface between the front and the back of the pie. Each pizza is rotated as it bakes—and comes out of the oven in about two and a half minutes. The pie is best when the bottom, the top, and the rim of the crust all reach their perfect finished point at exactly the same time. This wood-fired oven is ideal for achieving that type of bake.
How does all of this translate to something you can bake at home? What do I know? First, you can make a great dough. The flavor of the crust will be there. Second, you can use the best-quality ingredients that are not overly expensive. A can of San Marzano tomatoes might be a little pricey, but the cost is less than what you’d pay for an average retail pizza made from mass-market tomatoes, and one 28-ounce can makes enough sauce for five pizzas. Add whole-milk mozzarella packed in brine, a stick of good salami, and fresh basil. And you should already have good olive oil around, along with garlic and chile flakes. If you can get your hands on good-quality dried oregano, that would be great, but if not, don’t stress.
Chapter 13 has four recipes for pizza dough, each making enough dough for five pizzas about 12 inches in diameter. All make a fine pizza, and the different recipes offer different schedule options, from a same-day straight dough to overnight doughs using a poolish or levain. Chapter 14 has recipes for two types of red sauce (smooth and chunky), tomato fillets, and then a variety of topped pizzas and focaccia. I recommend you start by making Pizza Margherita or The New Yorker, and from that point, you can have fun making pizzas with a variety of toppings. Pick your dough recipe, pick your sauce recipe, choose your cheese and toppings, and bake your pizza. Plenty of guidance follows here and within the recipes.
The recipes for pizzas and focaccia in chapter 14 are organized by baking method. Here’s a quick overview so you’ll know what options you’ll have. First, starting, are recipes for baking pizza on a preheated pizza stone; that’s the technique you’ll need to use if you want to make a dazzling Neapolitan or New York–style pizza. Then, starting with Iron Skillet Meat Pie, you’ll find recipes for making deep-dish-style pizza in a cast-iron skillet. This is the ideal if you don’t have a pizza stone or simply want to make a homier pizza that involves a little less work (think late night or just home from a long day at work—you want something good but don’t want to put a lot of work into it, and there are a couple dough balls in the fridge ready to go). Finally, starting on Focaccia Genovese, you’ll find recipes for making focaccia in a skillet or on a baking sheet.
As indicated in the recipe yields in chapters 5, 6, and 9, some of the bread doughs can be used to make focaccia or pizza. Using a cast-iron skillet or a baking sheet is best for many of these doughs. You can make traditional focaccia from the pizza doughs in chapter 13, or a less-traditional focaccia from any bread dough recipe in this book, even if that isn’t indicated in the recipe. Depending on the dough you use, the texture of the focaccia will vary, from lighter, with the poolish, biga, and Saturday Bread recipes, to heartier from the levain bread recipes. Each has its own character. Try not to feel too bound by rules. Use what you have on hand and common sense when pairing dough with toppings.
The pizza doughs in this book use the same method as the bread doughs, so you can use the same basic techniques for autolysing, mixing, and folding, as detailed in chapter 4. I’ll discuss the remaining steps in detail here to give you a fuller description of the process than is possible in the recipes themselves.
Moderately flour a work surface; you’ll need an area about 2 feet wide. With floured hands, carefully ease the dough from the tub onto the floured area. To do this, sprinkle some flour around the edges of the dough tub, tip it slightly, and gently loosen the bottom of the dough if any is sticking to the tub. Don’t just pull the dough out; help it out of the tub. After picking it up and easing it back onto the work surface in a somewhat even shape, sprinkle a dusting of flour over the entire top surface of the dough. Then use a dough knife or plastic dough scraper to divide it into five equal-size pieces. You can eyeball it or use a scale. Each piece should weigh about 350 grams. It’s best not to add in more than two pieces, or the dough will be hard to shape unless you give it a very long rest period. If you need to add a piece of dough to bring up the weight, fold the additional dough into the middle as you shape the dough into a ball, as described in the next step.
You can use the same method for shaping as used to shape bread dough into rounds, as described in “Step 5: Shape the Loaves”. Take care not to degas the dough in this step—there’s flavor in that gas! Here’s a refresher:
1. Stretch one-quarter of the dough at a time up and over the top, pulling each segment out until you get to its maximum stretch, then folding it over the top to the opposite side.
2. Repeat, working your way around the dough and forming it into a round until it holds its shape. Then flip it over and put the seam on the work surface in an area cleared of flour (the clean surface will provide more friction, or grip, so you can add tension to the dough ball in the next step).
3. Cup your hands around the back of the dough ball as you face it. Pull the entire dough ball 6 or 8 inches toward you on the dry, unfloured surface, leading with your pinkies and applying enough pressure so the dough ball grips your work surface and doesn’t just slide across it. As you pull, this will tighten up the ball and add tension to it.
4. Give the dough a quarter turn and repeat this tightening step. Proceed in this way until you’ve gone all the way around the dough ball two or three times. The dough doesn’t need to be super tight, but you don’t want it to be loose either. The dough ball will need time to relax before it can be shaped into pizza. If you are on a short timeline and will be tossing your pie sooner rather than later, shape the dough balls a little looser, with less tension.
5. Repeat the process with the remaining pieces of dough.
If you used the soft white 00 flour, as you shape it you’ll notice how soft and pliable the dough feels. It’s a beautiful thing.
Lightly dust a rimmed baking sheet or a couple of dinner plates with flour. Put the dough balls on the pan or plates with some space between them to accommodate their expansion. Use your hand to lightly oil the tops of the dough balls, or simply dust the tops with flour. Cover with plastic wrap and let sit at room temperature for 30 to 60 minutes (or longer for focaccia, as described below), then put into the refrigerator to chill out. I like to let them sit for at least 30 minutes in the refrigerator before turning them into pizza, because I find it easier to shape cold dough without tearing it.
Any leftover dough balls can be kept in the refrigerator a night or two. You may even find that you prefer the next-day dough, as it develops flavor in the refrigerator.
When I’m making focaccia, I sometimes like to let it develop more than I would if I were using it for bread or pizza. With bread dough, structural needs drive the process. After it’s been shaped, you bake just before the loaves are overproofed (the proteins break down and stop holding on to the fermentation gases, causing the dough to collapse). This isn’t a problem with focaccia, where you aren’t looking for maximum expansion. In fact, overproofing allows the focaccia dough to spread out into shape more easily and hold the finger dents where you want them, while still poofing up around the rim enough to achieve the form I’m looking for. And as you might guess, I like the way the flavors evolve when the dough overproofs, developing a slightly more fermented flavor. So, for focaccia, oil the tops of the freshly shaped dough balls, then cover with plastic wrap and let them sit out at room temperature for 2 hours. Then you can either chill them for later use or make focaccia right away.

Okay, you have your dough balls made up. Now it’s time for sauce. What makes a great pizza sauce? The tomatoes. Most store-bought canned tomatoes have too much acidity to make a great pizza sauce, which is why many recipes for pizza sauce include some sugar. When cooked, maybe these tomatoes can make a nice pasta sauce, but we don’t cook the tomato sauce for pizza. Rather, it cooks on the pie while it’s baking, which allows the sauce to retain a freshness of flavor.
The solution is simple: buy canned San Marzano tomatoes from Italy. These tomatoes are amazing and make the difference between an okay pizza sauce and an excellent one. San Marzano tomatoes are grown and canned near Naples, and they are the only tomatoes allowed on a true Neapolitan pizza. They have a rich, naturally sweet flavor; a high amount of pulp, so they aren’t watery; and very low acidity.
You should be able to find canned San Marzano tomatoes at well-stocked supermarkets. If they aren’t available in your area, use the best canned plum tomatoes you can find. Alternatively, you can buy them online for just a few dollars per 28-ounce can—a lot cheaper than what you’d pay for a large pizza. Go ahead and buy a case of twelve cans; that way you’ll be set for quite a while.
I recommend buying whole San Marzano tomatoes. When you’re ready to make sauce, let the tomatoes drain in a colander for about 10 minutes. After draining, what remains is just the whole tomatoes and a thick pulpy residue that you can use to make your pizza sauce. You can capture the juice in a large bowl set underneath the colander and reserve it for another use; for example, I combine the juice with vinegar and spices and use it to marinate chicken or to make Spanish rice.
At this point you can go simple, just adding salt and maybe some olive oil and then pureeing the tomatoes in a blender. I like to add chopped garlic and some chile flakes for a little zip, along with good-quality dried oregano to give the sauce that East Coast pizza flavor I remember from my childhood. (I use oregano on some of my white pizzas too.) Dried oregano is used in the Campania region of Italy and its capital, Naples, and throughout southern Italy and Sicily. I recommend Calabrian oregano, which you can purchase online. However, it’s fine to use any good-quality dried oregano that has a nice wild pungency to it—or use none at all. The recipes here are my ideals, and suit my taste. At a minimum you can make a fine pizza sauce with just good tomatoes and a little bit of salt.
A Chicago-style pizza sauce, heaped on generously to match the thickness of the crust, is chunky, not pureed. Since I eat a lot of pizza, I like to mix it up, using chunky or smooth sauce according to whim and regardless of crust thickness.
As I developed the pizza and focaccia recipes for this book, I was initially challenged, as others before me, in figuring out how to get the best results using a standard home oven with a pizza stone. I landed on the technique of placing the pizza stone in the upper third of the oven and using a combination of baking and broiling. I was fascinated by how good the pizza baked. I hope you get similar results.
Set your pizza stone on a rack in the upper portion of the oven so the surface is about 8 inches below the broiler. Preheat the oven to the highest heat setting possible; most home ovens only go up to 500°F or 525°F (260°C or 274°C). If you have a pizza oven that goes higher, I recommend making your first pizzas at 600°F (316°C). Save the super-high-temperature baking until after you’ve done this a few times. Also, keep in mind that every oven bakes differently, so pay attention and get the best using what you have.
Once the oven has reached the target temperature, continue heating the pizza stone for 20 to 30 minutes, switching to the broil setting for the last 5 or so minutes. This ensures that the pizza stone will be thoroughly saturated with heat before baking. Then turn the setting back to bake, put your pizza in the oven, and bake for 5 minutes at about 525°F (274°C). Change the setting back to broil and then give your pizza about 2 more minutes; the broiler should finish the top of your pie. This technique should produce an excellent thin-crust pizza with a bit of char on the rim and good browning on the bottom of the crust. Keep a pair of tongs handy to pull the pizza from the pizza stone and onto a plate. (If you don’t have tongs, use the tines of a fork to pierce the crust and pull the pizza onto the plate.)
I should note that the first time I experimented with using my home oven this way, it freaked out—flashing an error code and beeping until I threw the electrical panel’s breaker (unmarked, naturally). I didn’t kill—or even injure—the oven, happily. On my second try I went with just 3 minutes on broil before returning to bake mode, and Mr. Oven was okay with that. I mention this because every home pizza baker needs to find a way to tweak their oven to get the highest possible heat without damaging it. I’m sure what happened with my oven was the result of an internal safeguard that shut it off when the temperature reached higher than the highest bake setting.
The point is to use the highest baking temperature your oven allows, and to place the pizza stone about 8 inches below the broiler coil. Switching to broil for a few minutes before baking (if your oven can handle it!), helps to superheat the pizza stone just before you load your pie in the oven; this will give you that crisp bottom crust with a bit of color to it, even to the point of being pocked with small black spots like we get from the wood-fired oven at my pizzeria. The reason I call for broiling again at the end of the pizza’s baking time is to finish the top of the pizza with very high heat to simulate, as best as possible, a high-temperature commercial pizza oven. Home oven broilers heat up at different speeds, but when they do fire they produce very high heat. Therefore, your pizza can go from perfect to burned pretty quickly, so pay very close attention to this final step of baking. Don’t be afraid of getting a touch of char on the rim of the crust, though. It adds visual drama and a crunchy, slightly bitter taste contrast that I totally love.
When you bake your pie, aim for temperature settings and oven position that will allow the toppings, the bottom of the crust, and the rim of the crust to all reach their perfect point simultaneously. This takes a few tries and it’s worth it.
While the oven is preheating, set up a pizza assembly station. Have the pizza sauce with a large spoon next to where you’ll toss or shape your dough, along with extra-virgin olive oil and your other prepared toppings, such as cut up cheese, salami, and basil leaves. Give yourself about 2 feet of width on the countertop to work with the dough, and leave space for the pizza peel right next to you.
There are many ways to handle the dough to make a pizza. Thin crust is typical of a Neapolitan pizza, and while it takes practice, I can offer a few tips to make it work the first time too.
As mentioned, these pizza doughs are very soft, so it’s best to start with cold dough, just removed from the refrigerator, when shaping pizzas. This makes it less likely that the dough will rip or be troublesome, and also results in a bit more oven spring for a poofy rim.
Set your pizza peel on the work surface next to where you are working your dough. A wood peel is definitely best. Lightly dust the peel with the same flour you used to make your pizza dough. Don’t use cornmeal or other coarse grains.
When working with the pizza doughs in this book, flour is your friend. Generously flour your work surface. Then put a dough ball on the work surface and pat it down onto the flour. Then turn it over and repeat on the other side. Leaving about 1 inch of the outer rim undeflated, punch down the middle, then flip the dough over and repeat.
Using both hands, grab the rim and lift so the crust hangs down vertically, still preserving the outer rim by placing your thumbs about an inch from the perimeter. Let gravity pull the rest of the dough down to stretch it. Run the rim between your hands, working all the way around the circumference of the dough several times. If the dough gets sticky, give both top and bottom another dusting of flour. The easiest way to do this is to keep a floured area on your work surface and just plop the dough down on the flour, then turn it over to dust the other side.
Next, make two fists and position them just inside the rim, with the crust still hanging vertically. Gently stretch and turn the dough repeatedly, still letting the bottom of the dough pull down, expanding the surface. Keep a close eye on the thickness of the dough. You want it thin, but you don’t want it to tear or develop holes. If you end up with a small tear, don’t panic—it’s okay to patch it.
Spread the dough onto the lightly floured peel and run your hands around the perimeter to shape it into a round and work out the kinks. Before topping the pie, give the peel a test shake to make sure the dough slides without sticking.
Once you’ve shaped the dough, spread your sauce over it, not too thickly, using a small ladle or a large serving spoon, and smoothing and spreading the sauce with the back of the spoon. Scatter the toppings over the top, using only moderate amounts so you don’t add more weight than the dough can handle. Before sliding the pie into the oven, do another test to confirm that the pizza will slide off the peel—just give the peel a quick shake. If any part of the dough sticks, first try working it out with a few more quick back-and-forth shakes. If that doesn’t do the trick, you’ll need to gently lift the dough up and toss a bit of flour underneath. Yes, this is difficult, but it’s better to find out in advance and deal with it. The first time or two you try this, have an extra ball of dough on hand. Add only minimal toppings to the first pizza and view it as a test pie, so you can get the feel of the peel and how to transfer the pie to the pizza stone, and see what happens after you put it in the oven.

Once the pizza stone is fully preheated, gently slide the topped pizza onto it. Once you’ve positioned the pizza, still on the peel, over the baking stone, ease the peel back with a stuttered series of wristy flicks. Once you’ve done it a bunch of times, you’ll have a feel for it and can do it more confidently in a single motion. Be relaxed and it will be fine.
The ideal bake includes mozzarella that’s fully melted and slightly browned in spots, a poofy rim with plenty of color, and a crust that’s both blond and brown on the bottom, with a few small black spots (it’s okay to lift one edge and take a peek). At 525°F (274°C), this should take 7 to 8 minutes altogether, including those last 2 to 3 minutes of broiling, but keep a close eye on it. At 600°F (316°C) it should take just 4 to 5 minutes altogether, and you may not need to use the broiler to get the best finish on the top. Every oven is different; just know you have the broiler as an option for finishing the pie. At my pizzeria, we bake the pizzas for 2½ to 3 minutes in a wood-fired oven, in the section of the oven that’s around 700°F to 750°F (371°C to 399°C). Use your eyes, your nose, and your good judgment.
The baking temperature has a specific effect on the pizza. When baking at 500°F (274°C) for a longer time, you’ll get a crisper crust and pizza with less moisture. The hotter the oven and the shorter the baking time, the softer and more moist the pizza. When baked at 700°F (371°C), the result is closer to the real Neapolitan pies, which are baked in a (roughly) 900°F (482°C) oven for just about 90 seconds, and have a lot of moisture in them. This ends up being a matter of taste, and of getting the best from whatever setup you have.
Use tongs or a fork to pull the pizza off the stone and onto a plate, then slide the pizza onto a wood surface so you can cut it. At this stage, I like to drizzle a bit (sometimes a lot if it’s fresh pressed) of best-quality extra-virgin olive oil over the top. Enjoy the aromas while you slice the pizza, then serve it immediately, with olive oil, chile flakes, and sea salt at the table as garnishes. Some Italian traditionalists prefer to serve the pizza unsliced. That’s fine too, but cutting through fresh baked dough on a ceramic plate is more than I want to hassle with. I like to pick up the pieces.


If you don’t have a pizza stone, you can bake pizza in a cast-iron skillet. This is also easier than setting up a pizza peel, dusting it with flour, applying the sauce and toppings, and hoping to scooch the uncooked pizza onto the preheated pizza stone. Any of the pizza doughs in this book will work for the crust. Use a 340- or 350-gram dough ball for a thick crust, or a 200-gram dough ball for a thin crust. If you like a lot of sauce and toppings, go for the thick crust, and if you’re aiming for a Chicago deep-dish style pizza, use a chunky sauce. (You can also use the iron-skillet method to make a basic focaccia—either thick or thin—by topping the dough simply; for example, with just olive oil and seasonings. This is great as a fresh bread with dinner.)
One of the most important keys for success is that the dough be completely relaxed, with very little tension. If you prepare the Same-Day Straight Pizza Dough in the morning for pizza that evening, be sure not to shape the dough balls too tightly, and give the dough balls at least an hour to relax before forming the pizza. Also note that cold dough is easier to shape than dough at room temperature.
About 20 minutes before you want to bake the pizza, position a rack near the bottom of the oven, then preheat the oven to 525°F (274°C). If your oven only goes to 500°F (260°C), that’s fine; the pizza will just take a bit longer to bake. When you’re ready to shape the crust, remove the dough ball from the refrigerator. Holding the rim, stretch the dough to a circle about 9 inches in diameter, then put it in a dry, room temperature 9-inch cast-iron skillet.
Because the skillet isn’t preheated, the pizza will take quite a bit longer to bake than it would on a baking stone; the typical baking time is 15 to 20 minutes. The texture will be different too—this crust will be firmer and generally without floppiness in the middle.

I bet there are as many opinions on this topic as there are pizzerias in New York. Some definitions focus on dough thickness, others on whether it’s cooked in a pan, and yet others on whether its topped with cheese. At a focacceria tipica ligure in Italy, I had focaccia with a crust about ¼ inch thick and topped with tomato sauce and cheese. To me it looked and tasted like pizza. And while some people think of focaccia as being thick, pizza crusts can certainly be thick; pizzas can also be made without cheese and, at least in the United States, you’ll find plenty of pizzas baked in pans.
In this book, the focaccias are baked either in a cast-iron skillet or on a sheet pan, whereas the pizzas are (preferably) baked directly on a pizza stone. Except I’m going to cheat and put cast-iron skillet pizza recipes in this book, so if it has cheese I’m calling it “pizza,” even if it’s baked in a skillet. In terms of ease of execution, pan baking is much simpler than baking on a pizza stone. Spreading the dough out on a pan or in a skillet, covering it with toppings, and putting the pan in the oven may seem less intimidating than pizza baking: tossing the dough, dressing it on the peel, and getting it to slide off easily onto the pizza stone in the oven.
As far as the thickness of focaccia is concerned, I leave it up to you. If you use 200 grams of dough in a 9-inch skillet, the result will be focaccia with thin crust; if you use 350 grams of dough in the same skillet, the result will be a thick crust. Focaccia is great for the variety of toppings you can put on it, which are limited only by your imagination, and for it’s versatility. You can serve it alongside a salad and make a meal of it, or cut it into smaller pieces for snacks. And I love how easy it easy to make. Once you’ve prepared the dough, the only thing you need to dirty is the baking pan, a knife, and a cutting board. You can serve it hot out of the oven, or you can bake it ahead of time as long as there isn’t any cheese on it. Reheating previously baked cheese may be fine for the dorm room, but all the joys of the texture of melted cheese disappear the second time around.
To me, a more defining distinction between pizza and focaccia is the texture of the dough. I want specific physical characteristics for pizza dough: structure that can withstand stretching into a round that I can toss and enough strength that it doesn’t break when being shaped. But with focaccia I can preshape it into a round as for pizza dough, then finish spreading it in or on the pan. This opens the door to using any dough to make focaccia—even whole wheat or rye, which was great for both dipping into hummus and serving with a delicious pork terrine, flavored with apricots and pistachios, that Greg Higgins (of Higgins Restaurant and Bar) gave me.
The flexibility of being able to use virtually any dough for focaccia is great when it comes to the bread recipes in this book, where I always begin with 1,000 grams of flour and call for dividing the dough into two pieces. If you like, you can bake one loaf as directed for bread and divide the remaining dough into one to three portions to use for making focaccia. Shape those portions into balls when you shape the loaf in the bread recipe, using the method detailed there. Here are some pointers on the size of dough balls for focaccia, depending on how you’ll be baking it:
• For thin-crust focaccia baked in a 9-inch skillet, use about 200 grams of dough.
• For thick-crust focaccia baked in a 9-inch skillet, use about 350 grams of dough (the standard size for balls of pizza dough).
• If baking on a sheet pan, use up to 875 grams of dough, which is half the yield of a bread recipe, or whatever fits on your pan, keeping in mind that the thickness will vary depending on the amount of dough and the size of the pan.
As for method, you can basically follow the instructions for either Focaccia Genovese or Zucchini Focaccia, but here’s the process in brief.
1. Once the pieces of dough have been shaped into rounds, let them relax, either at room temperature or in the refrigerator, for at least 1 hour beyond what the recipe specifies for proofing time. You can also store the shaped dough balls in the refrigerator for up to 2 days.
2. Coat the dough ball in flour and decompress it on both sides.
3. Preheat the oven to its highest temperature setting.
4. Stretch the dough until it’s the size and shape you want: round for a skillet; oblong or rectangular for a baking sheet.
5. Top with whatever you like, depending on the dough, what you have on hand, and your desire.
6. Bake until golden brown on both top and bottom and completely cooked inside.
7. Drizzle extra-virgin olive oil over the top if you like, along with any other seasonings, such as small-flake sea salt.
8. No need to wait—you can go right ahead and slice and serve. However, do note most focaccia is very good served at room temperature, so if you’re entertaining, you can bake it up to 1 hour ahead of time.

