
This chapter provides guidelines and instruction in techniques that apply to all of the recipes in this book. The individual recipes differ in schedule, the blend of flours used, the fermentation method, and the complexity of the process. Once you’re familiar with the techniques discussed here, including hand mixing the dough, applying folds, shaping round loaves, using refrigeration to retard the loaves, and baking in Dutch ovens, you can successfully make any bread or pizza dough in this book.
Each bread has its own character. The flavor complexity scale that follows indicates the degree to which different processes result in bread with more complexity of taste.
To decide which bread to make, choose a recipe that works with your schedule. If you have some flexibility in your schedule, then you have more freedom to choose a recipe based on the character you want in your bread. For example, if I’m going to be available during the day, I might choose to make the White Bread with Poolish. If I want to bake first thing in the morning, I’d choose one of the levain breads in part 3 of the book or the Overnight 40% Whole Wheat Bread because they proof overnight in the refrigerator. My personal preference, if the timelines work, is almost always to bake one of the levain breads in part 3.
Once you have become familiar with the recipes, the process, and the timing, you can alter the flour blend as you wish. In the essay “Making a Bread (or Pizza) Dough You Can Call Your Own”, I give specific guidance on how to adjust the types of flour, the amount of water, or hydration, the timing, and more. That information will allow you to transform any recipe in this book to suit your whim or your pantry.
The recipes in chapter 5, Straight Doughs, are accessible to anyone, regardless of experience. Good first recipes for novice bakers are the two Saturday Breads (The Saturday White Bread and The Saturday 75% Whole Wheat Bread). They are the simplest, and yield good bread, and both can be made from start to finish in a single day. The Saturday Breads take seven to eight hours of elapsed time, with an initial fermentation of five hours. While eight hours might seem like a long time, the actual time engaged in making them is perhaps forty-five minutes, including cleanup. They are very simple, especially after you have made them a few times.
The remaining recipes in chapter 5 use a little more water in the dough. These softer doughs are actually easier to hand mix but a little more difficult to shape because wetter dough is stickier. They have a little more flavor from fermentation and also offer more schedule options. You can mix the dough in the evening, shape it into loaves the next morning, and bake an hour or two after that; or you can mix the dough in the afternoon, shape it into loaves in the evening, refrigerate the loaves overnight, and bake them first thing the next morning.
The four straight dough recipes are the simplest in the book. The Saturday Breads are great for days when you wake up and decide, “This would be a good day to make some bread.” But if you think about it the day or night before, I recommend that you move on to chapter 6, Doughs Made with Pre-Ferments. These recipes are equally approachable; they just take a bit of foresight—and they make tastier bread. See Detail 2: Use Pre-Ferments When Time Allows for more on poolish and biga, the two pre-ferments I use in this book. Once you’re familiar with working with pre-ferments, move on to the recipes in part 3 of the book, Levain Bread Recipes.
As mentioned, the recipes in this book are a bit atypical in that ingredients aren’t necessarily listed in the order in which they’re used. Rather, flour is always listed first, followed by water, salt, and yeast, reflecting the relative quantities, or baker’s percentage, of these ingredients in the recipe. Here’s a quick explanation of the information in the different columns of the recipe tables, followed by an example.
FINAL DOUGH MIX QUANTITY: This column (which is just called “Quantity” in the straight dough recipes) gives the quantities of each ingredient you’ll put in your empty 12-quart tub for the final dough mix, to bring the total weight of flour up to 1,000 grams beyond the amount in the poolish, biga, or levain, and add other ingredients as needed. All of the amounts you need to know appear in the various columns and are repeated in the recipe steps for ease of use so you don’t have to turn back to the recipe table to recall the amount.
As I’m sure you’ve figured out by now, I am a strong advocate for measuring ingredients by weight, not volume. However, some home bakers do not own a kitchen scale. For those bakers, I have included approximate volumes of the ingredients you will add to the final dough mix. These volume measurements are not nearly as precise as their corresponding weight measurements; for this reason the volume measurements do not exactly match up to the baker’s percentage column on the left. For a more detailed explanation of the issues that arise from baking by volume, see Weight Versus Volume Measurements.
QUANTITY IN POOLISH, BIGA, OR LEVAIN: This column shows the amount of flour and water in the poolish, biga, or levain used in the recipe. For the breads in chapter 6, made with pre-ferments, the entire amount of pre-ferment is added to the final dough, and therefore the quantities in this column are the same as those in the poolish and biga ingredients lists, which appear above the baker’s percentage table. When making the levain breads in part 3 of the book, you’ll only use a portion of your levain culture in the final dough, so the quantities of flour and water in the levain column will be less than the amounts called for in the ingredients lists for feeding the levain—usually far less. The reason for this is you want enough levain left over to keep the culture going.
TOTAL RECIPE QUANTITY: This column lists the total weight of the ingredient in the recipe. If white flour is 90 percent of the 1,000 grams of total flour, then the amount of white flour will be 900 grams. For straight dough breads, the only other column will be the approximate volume measurements for each ingredient.
BAKER’S PERCENTAGE: All ingredient weights are shown as a percentage of the total weight of flour in the recipe. All of the bread and pizza dough recipes in this book use 1,000 grams of flour altogether, making the math easy to follow and the recipes easy to remember. (See A Note on Baker’s Percentages for more information on baker’s percentages.)
| Final Dough | Baker’s Formula | ||||
| INGREDIENT | FINAL DOUGH MIX QUANTITY | QUANTITY IN POOLISH | TOTAL RECIPE QUANTITY | BAKER’S PERCENTAGE | |
| White flour | 500 g | 3¾ cups + 2 tbsp | 500 g | 1,000 g | 100% |
| Water | 250 g, 105ºF (41ºC) | 1⅛ cups | 500 g | 750 g | 75% |
| Fine sea salt | 21 g | 1 tbsp + 1 scant tsp | 0 | 21 g | 2.1% |
| Instant dried yeast | 3 g | ¾ tsp | 0.4 g | 3.4 g | 0.34% |
| Poolish | 1,000 g | All from recipe above | 50% | ||
The recipes throughout this book use the same basic method for all of the stages, from mixing to baking, outlined in the following pages in eight steps. Even the pizza dough recipes in chapter 13 utilize these steps up through the shaping of dough balls. I think it’s valuable to review the process steps outside of the recipe format to keep the recipes concise and readable. It encourages a better understanding of the techniques to present them separate from the recipe itself. Since the techniques are the same for all of the recipes, once you get it, you can work with the entire book confidently. I encourage you to sit down and read through this chapter before you begin; it’s hard to absorb this information when you are in the middle of making a bread or pizza dough recipe for the first time.
Autolyse is my first step in mixing bread and pizza dough. The flour and water in the recipe are mixed and allowed to rest for a minimum of 15 minutes before the salt and yeast are added. I recommend an autolyse period of 20 to 30 minutes for the recipes in this book. Don’t add the salt during the autolyse, as it will inhibit water absorption by the flour, and one of the goals of this step is to allow complete hydration of the flour before mixing the final dough.
The autolyse step takes about 5 minutes of hands-on time for measuring the flour and water and mixing them by hand. Place your empty 12-quart dough tub on the scale, zero the scale, then add the weight of flour specified in the recipe’s Final Dough Mix column. (Remember, the flour should be at room temperature.)
It’s easy to add too much water, so instead of measuring the amount of water directly into the dough tub with the flour in it, I measure it into an empty container, then pour the correct weight of water into the tub with the flour. Also, some scales, like mine, max out on the weight they can measure before all the water has been added to the flour-filled tub. That’s another reason to weigh the water separately.
The easiest way to measure out water is to use two containers. Keeping your thermometer handy, put one container under the tap and adjust the hot and cold water mix until the water in the container is at the target temperature, for example, 95°F (35°C). Put the empty container on your scale, zero the scale, and pour in water from the first container until you reach the weight of water called for in the recipe. Be precise with the weighing. Being off by as little as 20 or 30 grams can make a big difference in the consistency of the dough.
Working directly in the 12-quart dough tub, mix the flour and water with one hand just until incorporated. Your hand will get sticky with dough. Don’t worry; you need to get used to using your hand as an implement. Even though dough bits are sticking to you (just like they would stick to a dough hook), keep mixing until the flour and water are integrated. Any dough clumps should be pinched through with your hand. After mixing, use your free hand to squeegee the dough that’s stuck to your working hand into the tub. Put a lid on the container and let the dough rest for 20 to 30 minutes. You will know the autolyse mixture is ready when there are no longer any loose bits of dry flour visible in the dough tub.
In all of the recipes in this book (except the poolish and biga recipes, for reasons explained below), the goal is for the final mixed dough to have a temperature of about 78°F (26°C). As mentioned in chapter 2, this seems to be the ideal temperature for both gas production and flavor development. The dough doesn’t need to stay at 78°F (26°C) throughout its development; it just needs to start there. I tested these recipes in my home kitchen, which is usually around 70°F (21°C). Using water at 95°F (35°C), flour at room temperature, and a 20-minute autolyse period, once the dough was completely mixed, it was usually right at 78°F (26°C) during winter. In the summer, I ratchet the water temperature down to 90°F (32°C) to get the same result. All this is to say there’s a relationship between the temperature of the water you use for the autolyse, the temperature of your kitchen, and the length of time you let the autolyse mixture rest before mixing the final dough.
Although I recommend a 20- to 30-minute autolyse, you can extend it to 40 or even 60 minutes if that’s more convenient for you. However, the autolyse mixture will cool down more, so your final mix temperature will be lower and you may need to adjust your water temperature to compensate. Just don’t use water above 110°F (43°C). (As you may recall, temperatures much warmer than that can kill the yeast.) If you miss the target final mix temperature of 78°F (26°C), review the temperature of water you used and the timing of the autolyse period, then adjust next time.
Recipes from this book that use a pre-ferment (a poolish or biga) will rarely have a final mix temperature of 78°F (26°C), especially if your house is cool at night. This is because a large proportion of the dough consists of the pre-ferment, which has developed overnight and will therefore be at room temperature—whatever the overnight temperature of your house is. The overnight temperature in my house is about 65°F (18°C), and while I was testing these recipes, the final mix temperature for doughs made with pre-ferments was usually 73°F to 74°F (about 23°C).
Hand mixing the final dough should take about 5 minutes. I prefer to mix it by hand in the dough tub, rather than kneading it on the counter or using a mixer. It’s simpler, faster, and entails less cleanup, and it’s fully effective. The dough stays in the same tub from the autolyse step until it is divided and shaped into loaves about five or six hours later, depending on the recipe. No fuss, no muss!
To mix the dough, first sprinkle the salt and (in most cases) the yeast evenly over the top of the dough. If making a recipe with a pre-ferment, empty the entire amount of poolish or biga, or the specified quantity of levain, into the dough tub on top of the salt and yeast.
Set up a container of warm water next to your dough station. Hold the dough tub by the rim with your weaker hand and wet your stronger hand in the warm water. Begin to mix by reaching underneath the dough and grabbing about one-quarter of the dough. Stretch this section of dough, then fold it over the top to the other side of the dough. When folding segments of dough, stretch them out to the point of resistance, then fold them back across the entire length of the dough mass. Working your way around the dough, repeat with the remaining quarters of the dough, reaching underneath each time and fully enclosing the salt and yeast inside the folds of dough.

Incorporating the salt and yeast.
Once all of the dough has been folded over itself, continue mixing using the pincer method. Using a pincerlike grip with your thumb and forefinger, squeeze big chunks of dough and then tighten your grip to cut through the dough. Do this repeatedly, working through the entire mass of dough. With your other hand, turn the tub while you’re mixing to give your active hand a good angle of attack.
Dip your mixing hand back into the container of warm water three or four times throughout this process to rewet it and prevent the dough from sticking to you. If you don’t, the dough will be sticky and hard to work. It is normal to feel the granularity of the salt and yeast as you mix; using a moist hand for mixing will help the salt and yeast dissolve.
Cut through the dough five or six times with the pincer method, then fold it over itself a few times, then once again cut through it five or six times and fold over itself a few more times. Repeat this process, alternating between cutting and folding, until you feel and see that all of the ingredients are fully integrated and the dough has some tension in it. For me, this takes 2 or 3 minutes. When you’re new at this, it could take 5 or 6 minutes. Let the dough rest for a few minutes, then fold for another 30 seconds or until the dough tightens up. That’s it for mixing!
The goal of this step is to thoroughly incorporate all of the ingredients. The pincer method, which I learned at the San Francisco Baking Institute, mimics the dough-cutting action of good mechanical mixers. It effectively incorporates the ingredients and distributes the salt and yeast throughout the mix.
At the end of the mix, measure the temperature of the dough with a probe thermometer. In most of the recipes in this book, the target temperature is 77°F to 78°F (25°C to 26°C). Write down the final mix temperature and the time. If the dough temperature is well below 77°F (25°C), it will take longer to rise, in which case you’ll need to follow the recipe instructions regarding how much the dough should expand, rather than the suggested time. Alternatively, you can compensate by placing the dough tub in a warm spot for the rise—75°F to 80°F (24°C to 27°C) should work.
As mentioned in chapter 2, I recommend keeping a log that records water temperature you used, the time the mix ended and the room temperature, how long it took for the dough to double or triple in volume, at what time you divided and shaped the dough into loaves, and what time you baked it, with some comments on how it all came out. You may make adjustments that better suit your schedule for future mixes—a little more yeast if the dough wasn’t ready in five or six hours, or a little less yeast if the dough moved too fast. Use warmer or cooler water next time if your mix temperature was below or well above 78°F (26°C).

Cover the tub and let the dough rise. The amount of time this takes depends on many factors, especially the ambient temperature and the final mix temperature. Regard the visual cues in the recipe as your target, keeping in mind that your dough will have a little more volume in warmer months and a little less volume in cooler months.
Folding the dough helps develop the gluten that gives the dough its strength and contributes to good volume in the final loaf. Think of the three-dimensional web of gluten as the frame of the bread “house.” For the first recipe, the Saturday White Bread, just two folds are needed. Most of the other bread doughs have higher hydration, and many of these slack doughs benefit from three or four folds to give them the strength they need. Each fold takes about 1 minute. You’ll be able to recognize when to apply the next fold based on how relaxed the dough has become: it goes from being a ball with structure to lying flattened out in the tub. With each fold, it firms up a bit. I try to work in all the folds during the first hour or two of the rise.
The action here is just like the folding during mixing in step 2, but after folding, you’ll invert the dough to help it hold its tension. See the step-by-step photos illustrating the folding process for details. To fold the dough, dip your active hand in the container of warm water to wet it so the dough doesn’t stick to you. With your moistened hand, reach underneath the dough and pull about one-quarter of it out and up to stretch it until you feel resistance, then fold it over the top to the other side of the dough. Repeat four or five times, working around the dough until the dough has tightened into a ball. Grab the entire ball and invert it so the seam side, where all of the folds have come together, faces down. This helps the folds hold their position. The top should be smooth.
When the dough relaxes a bit and flattens in the bottom of the tub, repeat the process for the second fold. After each fold, the dough develops more structure, or strength, than it had before and will therefore take longer to completely relax. You can do any subsequent folds called for in the recipe an hour or two later, or you can give the dough all of its folds in the first hour after mixing—whatever is convenient for you. Just don’t fold the dough during the last hour of bulk fermentation.
Folding the relaxed dough

Top row: Dough ready for its first fold, after its first fold, ready for its second fold. Bottom row: Dough after its second fold, ready for its third fold, after its third fold.
When the dough has doubled or tripled (whichever is specified in the recipe), it’s time to divide it. One of the reasons clear Cambro tubs are so handy for bread making is that they allow you to quickly determine when bulk fermentation is complete. For example, if a dough should triple in size during bulk fermentation and it starts out at a little more than 1 quart, it should come up to nearly the 4-quart line once tripled. This step will take just a few minutes once you’ve done it a couple times. At first it may take a little longer.
Lightly flour a work surface; you’ll need an area about 2 feet wide. Working next to the floured area, flour your hands and gently loosen the dough all the way around the perimeter of the tub, taking care not to let the gluten strands tear. (At this point the gluten is more delicate than it was when the dough was first mixed.) Then reach to the bottom of the tub and gently loosen the bottom of the dough from the tub. It’s helpful to toss some flour along the edges to work underneath the dough and help ease its release. Then turn the tub on its side and use your hands to help gently ease the dough out onto the work surface. Sprinkle flour across the middle of the top of the dough, where you’ll cut it, then divide it into two equal-size pieces with a dough knife, plastic dough scraper, or kitchen knife.

The goal of shaping is to form each piece of dough into a medium-tight round while taking care to preserve the gas that has built up in the dough.
Be aware that when your dough pieces are sitting on the floured work surface, the underside of the dough will become the outside of the loaf; this will help you understand the shaping process. The bottom of each piece of dough is sitting on some flour, so it’s not going to be as sticky there. Keeping your hands in contact with that part of the dough is the most important advice I can offer; otherwise the dough will stick to your hands.
Begin by brushing any loose flour off the top of the dough with your hand. Then, using the same technique as in the folding step, stretch and fold one-quarter of the dough at a time up and over the top to form a round, gently pulling each segment out until you get to its maximum stretch, then folding it over the top to the opposite side. Repeat, working your way around the dough and forming it into a ball, until the interior is fully enclosed and you have a round with a little tension in it. Then flip it over so the seam is on the work surface in an area cleared of flour—at this point you want the friction, or grip, of a clean surface. You are now looking at the smooth surface of the loaf, which will face up in the proofing basket and down while the loaf is baking.
Cup your hands around the back of the dough ball as you face it. Pull the entire dough ball 6 or 8 inches toward you on the dry, unfloured surface, leading with your pinky fingers and applying enough pressure so the dough ball grips your work surface and doesn’t just slide across it. As you pull, this will tighten up the ball and add tension to it. You can feel it. It feels good.
Give the loaf a quarter turn and repeat this tightening step. Proceed in this way until you’ve gone all the way around the dough ball two or three times. The loaf doesn’t need to be super tight, but you don’t want it to be loose, either. I am looking for enough tension so that the loaf holds its shape and its gases. If the shaped loaves are too soft, without enough tension, there’s less physical structure to hold on to the gases. Some gas will escape, resulting in bread that’s smaller and a bit heavier than the ideal.
Repeat the shaping process with the second piece of dough and place both shaped loaves seam side down in a proofing container: a flour-dusted wicker proofing basket, a flour-dusted cloth-covered banneton, or, in a pinch, large kitchen bowls lined with lint-free tea towels and generously dusted with flour. You need to use enough flour so that the fully proofed loaf can be removed without sticking but not so much that you end up with a lot of excess flour on the loaf.
Lightly flour the top of the shaped loaves and cover with a kitchen towel or put the proofing baskets in nonperforated plastic bags.
In the baking industry, the term proofing is commonly used to refer to the final rise, after the loaf is shaped. (It is also used to refer to hydrating yeast before the dough mix;.) To achieve the full potential of your loaves, you need to proof them completely. The loaves must reach their physical limit for holding on to their gases before the gluten network begins to break down as the proteins degrade over time. Bake too soon, and you lose the last smidgen of flavor and volume development the bread was capable of, and the loaves will be too tight and will bloom unevenly. Bake too late (overproof) and the loaves will deflate, collapsing and losing volume. (Me and Goldilocks would have been friends.) The timeline for proofing varies by recipe in this book, from a little over one hour for the Saturday Breads to overnight in the refrigerator for most of the levain recipes and the Overnight 40% Whole Wheat Bread. Also keep in mind that a more tightly shaped loaf will hold its proof longer, whereas a loosely shaped loaf will lose its gases more quickly.
Shaping the loaves. First row: Stretching a segment of dough and folding it over itself. Second row: Stretching a second segment of dough and folding it over itself. Third row: Folding the final segment of dough over itself. Fourth row: Cupping hands around the back of the dough ball and pulling it across the unfloured work surface; a finished dough ball.
One mark of a seasoned baker is the ability to bake the bread at that perfect point of the proof every time, and it remains a frequent topic of conversation at my bakery. It’s true not just for breads, but for croissants and brioche, too. We learn by doing, and sometimes the best way to learn is to be willing to have a loaf that’s a bit overproofed. This will help you understand what the limits are.
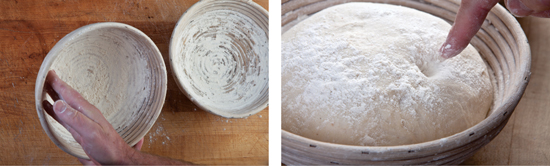
In each recipe I mention the finger-dent test for proofing. It remains the most foolproof method I know. To do the test, poke the rising loaf with a floured finger, making an indentation about ½ inch deep. If it springs back immediately, the loaf needs more proofing time. If the indentation springs back slowly and incompletely, the loaf is fully proofed and ready to bake. If the indentation doesn’t spring back at all, the loaf is overproofed. You’ve waited too long, and the loaf may collapse a bit when you remove it from its basket or put it into the Dutch oven for baking. (Still, occasionally I’m surprised to find that a loaf I thought overproofed holds its form and bakes up just fine.)
The straight doughs made with store-bought yeast, in chapter 5, rise faster than levain breads and also have a shorter window of time for being at the perfectly proofed stage—sometimes as short as 10 to 15 minutes. This is when you need to put the loaves in the oven. You can extend that window by proofing these breads overnight in the refrigerator. The cold dough will develop more slowly, giving you a window of ideal proofing up to a couple of hours.
Position a rack in the middle of the oven. If you bake too close to the bottom of the oven, you run the risk of scorching the bottom of the loaves. Put your 4-quart Dutch oven inside with the lid on. There is no need to place the Dutch oven on a pizza stone; the cast-iron mass serves a similar purpose. Preheat the oven to 475°F (245°C) for at least 45 minutes. The goal is for the Dutch oven to be fully saturated with oven heat before you place the loaf inside.
It’s important to know your oven. Most home ovens run hotter or cooler than the temperature you set them to. Mine runs about 25°F cooler, so when I set it to 500°F I actually get 475°F. The temperatures given in the recipe are, of course, the actual temperature the bread should be baked at, so I recommend that you use an oven thermometer. They only cost a few dollars, and using one will assure you that you’re baking at the proper temperature, allowing you to follow the suggested baking times with confidence.
If you have two Dutch ovens and can fit both of them in the oven at the same time, preheat both of them. If you only have one Dutch oven, each recipe offers specific instructions on how to store the second loaf while the first one bakes. Generally speaking, if your loaves proof at room temperature, you should put the second loaf in the refrigerator somewhere around 15 to 20 minutes before baking the first loaf. If your loaves proof in the refrigerator overnight, keep the second loaf in the refrigerator while the first loaf is baking. Once the first loaf comes out of the oven, reheat the Dutch oven for about 5 minutes before baking the second loaf.
All of the breads in this book bake in covered preheated Dutch ovens for 30 minutes at 475°F (245°C), then the lid is removed while the bread finishes baking, usually 15 to 20 minutes longer. Each recipe specifies baking times.
When working with Dutch ovens, I heartily recommend using oven mitts rather than kitchen towels or pot holders. Oven mitts go partway up your forearms, providing greater protection from the high heat of the Dutch oven and its lid. I act with greater confidence when wearing oven mitts and encourage you to wear them. Once a Dutch oven is out of the oven, I find it helpful to put the mitts on the hot lid handle so I won’t absentmindedly pick it up without first putting a mitt back on. Take every precaution.
To transfer the dough from the proofing basket to the Dutch oven, first carefully invert the proofed loaf from its basket onto a floured countertop, keeping in mind that the top of the baked loaf will be the side that was facing down while it was rising. If the dough sticks to the edges of the proofing basket, use one hand to delicately release the dough—and make a mental note that you need to dust the basket with a bit more flour the next time. Ideally, the weight of the dough should cause it to ease onto the countertop without any assistance. New wicker baskets need a little more flour than seasoned baskets, and they do not need to be cleaned between uses.
Experienced bakers may notice that I don’t call for scoring the loaves with a razor before baking. Because the loaves are baked with the seam side up (the side opposite the smooth top of the shaped loaf in the proofing basket) and after a complete proof, fissures will naturally open on the top of the loaf as it expands in the oven. I love the organic look of the natural splits. It’s the way ciabatta opens up in the oven at my bakery.
Next, very carefully place the loaf in the hot Dutch oven. It’s already resting on the counter right side up, so just carefully drop it into the Dutch oven without flipping it over. Use the sides of your bare hands to pick up the loaf and place it in the pot. Don’t pick it up with your fingertips; it’s delicate at this stage and it’s best to spread the pressure needed to pick it up across the dough. Use mitts to put the lid on the Dutch oven and place it in the preheated oven.
When you remove the lid after 30 minutes of baking, the loaf will be fully risen and you should see one or more attractive splits in the top where the dough expanded. The crust should have a light brown color. Use the time in the recipe as a guideline for how long to bake the loaf uncovered, but be sure to check about 5 minutes before the time has elapsed so you’re in tune with the loaf’s progress. Bake until dark brown all around the loaf. I like to bake until there are spots of very dark brown for the full flavors those bits of crust have. At least once, you should try baking a loaf just shy of the point of burning it—I’m wowed by the way these dark loaves look and taste.
When the bread is fully baked, remove the Dutch oven from your kitchen oven and tilt it to turn the loaf out. Let it cool on a rack or set on its side so air can circulate around it. Let the loaf rest for at least 20 minutes before slicing. The inside of the loaf continues to bake after it’s removed from the oven, and it needs that time to finish. Enjoy the crackling sound of the cooling bread.

If you don’t want to make two loaves of bread, some of the doughs can be used to make pizza or focaccia, as noted after the yield. I actually believe that any dough, even rye, can be used for focaccia, but in the recipes, I only call out the doughs most conventionally suited for this use. For pizza, divide the remaining dough into 340-gram balls and follow any of the pizza recipes in chapter 14. For focaccia, you’ll find guidelines on amounts of dough and preparation methods in the section “Making Focaccia with Bread Dough”. Shape the dough into balls and let them rest in the refrigerator for several hours or up to a couple of days.
I got over my aversion to storing bread in plastic bags many years ago, after trying all the alternatives and realizing nothing else keeps the bread as well. The crust will soften, but the bread won’t dry out. The straight dough breads will keep for two or three days. The breads made with pre-ferments will keep a day longer than that, and the levain breads from this book will keep for five to six days, if you don’t eat it all before then!
From left: Field Blend #2, The Saturday White Bread, Bran-Encrusted Levain Bread.


