EIGHT DETAILS FOR GREAT BREAD AND PIZZA
In this chapter, I’ll explain some key, fundamental elements of artisan baking that define my breads. If you just want to cut to the chase and start baking, turn to chapter 4, Basic Bread Method, and chapter 5, Straight Doughs, and return to this chapter (and the rest of part 1) when you have time. That said, don’t be afraid to read on. The material in this chapter isn’t complicated.
If you think of bread baking as a fermentation craft, then you can orient your thinking to consider the fermentation variables that impact taste and texture. Since this concept may be new for many readers, I want to emphasize that the most important ingredient for making good bread is plenty of time. This does, of course, have its limits. If dough ferments for too long, an excess of alcohol and acidity will develop, masking the sweet flavors of the wheat. In addition, the dough’s physical ability to hold the gases produced by fermentation will break down and it will slowly collapse. Managing dough fermentation to get the best results means finding the perfect balance of rising time, proofing time, dough temperature, ambient temperature, and amount of leavening in the dough. A major focus of this chapter is explaining how to achieve a harmony of these elements.
DETAIL 1: THINK OF TIME AND TEMPERATURE AS INGREDIENTS
Patience is indeed a virtue when it comes to making good bread. Consider time to be a powerful instrument in the baker’s tool kit. Recognizing time as a discrete and crucial element in a recipe is the first detail that sets the best bakers apart. If you manipulate time in proper balance with dough temperature, ambient temperature, and the amount of leavening in the dough, you give yourself a chance to make something special. You need enough time, but not much effort—a little over seven hours for the simplest recipes in this book—to achieve a really good loaf.
In the United States, the traditional approach to baking bread has been to think of the rise as simply a short amount of time—just an hour or two—necessary for gas to build up in the dough to give it structure. I and other good bakers view the rise as an opportunity to build flavor and an appropriate amount of acidity.
Temperature and time have an inverse relationship, and I like the visual image of a seesaw to communicate the need for balance between the two: more of one means you need less of the other. A warm dough develops more quickly, whereas a cooler dough develops more slowly. Specifically, dough temperature affects the metabolic rate of the yeast: warmer yeast replicates more quickly. Once a dough is mixed, the yeast replicates until no oxygen remains in the dough, at which point the yeast cells, as they consume sugars from the flour, begin to produce gases (carbon dioxide and ethanol). Sugar in, gas out. This gas production is what causes the dough to rise.
Bulk fermentation The first rise of the dough after all of the ingredients have been mixed together (flour, water, salt, and yeast, plus any levain or pre-fermented doughs).
Extending the bulk fermentation stage is critical to maximum flavor development. Warmer dough encourages more rapid reproduction of the yeast, and thus faster fermentation. On the other hand, using less yeast when mixing the dough means it will take longer for the yeast to replicate and build up its population to its max: the point where the dough is anaerobic, or completely depleted of oxygen. Up to a point, doughs that take longer to develop (whether due to cooler temperatures, using less yeast, or both) yield breads with a more complex flavor. In fact, this is a key principle that guides me in developing all of my bread recipes: Less yeast and more time yields a better bread.
Another factor in the evolution of dough is bacteria; flour naturally contains both yeast and a wide variety of bacterial spores. As with natural yeast fermentation, it takes time for these naturally occurring bacteria to grow and produce acids and other flavor components. Bacterial growth also contributes to complexity of flavor, by which I mean the way multiple flavor elements in a good bread hit your palate at the same time: flavors from the flour and all of the products the yeast and bacteria produce, including alcohols, acids, and esters (chemical compounds that produce aromas and flavors).
Time is a critical factor in the production of all of these compounds. What we are looking for is the fermentation “sweet spot.” Too much time can throw the flavor elements out of balance, whereas not enough time diminishes their development in the first place. When a dough is overdeveloped, the alcohol becomes too strong, overpowering the sweetness of the wheat. Longer developing time also causes dough to become more acidic. Up to a point, this is a good thing. More acidity in bread means it stays fresh longer, and lactic and acetic acids add valuable and unique flavors, aromas, and sensations. However, too much acidity creates a cloying aftertaste that many people, including me, find disagreeable. The trick is finding the right balance between time and temperature so the dough develops a desirable complexity of flavors without becoming too acid or dominated by alcohols, while simultaneously getting optimal development of the structure of the dough. The gluten that holds gas bubbles to create rise and air pockets breaks down with time, and therefore overproofed dough will collapse. On top of all this, the timing needs to work for your schedule too!
Retarder A cool chamber that literally retards the development of the dough. At my bakery the retarder is a walk-in unit that holds six rolling racks, and we hold the temperature at about 49ºF (9ºC). You can use your refrigerator to retard loaves at home, as many recipes in this book do.
There are several ways to extend fermentation time: you can reduce the amount of yeast in the dough, you can reduce the temperature of the dough or of the area where it’s is fermenting, or you can do both. If I’m working with a levain dough that normally reaches full maturity in an 80°F (27°C) room in three hours, I can put it in the retarder at my bakery at 49°F (about 9°C) and it will instead take twelve hours to completely develop. The extended, cold fermentation yields a better bread with a more complex flavor and a rich, well-rounded aftertaste. While we do use cold bulk fermentation for doughs at the bakery, doing so is less practical at home, where it can be difficult to find room in the refrigerator for the 12-quart Cambro tubs that I recommend. For this book, I adjusted recipes so that overnight doughs are bulk fermented with small amounts of yeast at room temperature. You’ll notice that some doughs in this book are bulk fermented at room temperature and then proofed overnight in the refrigerator at temperatures of 37°F to 40°F (about 3°C to 5°C)—this is because it’s easier to find space in your refrigerator for proofing baskets than a giant dough tub.
As you read this chapter, you might be thinking, “I don’t know what to do with this information.” Here’s the deal: Making good bread is never completely formulaic. No matter how specific I am in writing a recipe, there will be variables that are outside my control or yours. Some flour is more “active” and ferments faster than other flour. Your kitchen may be at 70°F (21°C) and someone else’s might be at 80°F (27°C). That’s why most recipes in other books simply default to a timeline for bulk dough development followed with “or until doubled in size.” The recipes in this book are designed to take the variables into account. Beyond that, in this section I’m trying to help you develop an awareness of how time and temperature affect the taste and development of the dough, and how you can manipulate those variables to produce exceptional bread.
DETAIL 2: USE PRE-FERMENTS WHEN TIME ALLOWS
The recipes in this book use one of two approaches to making bread with a complex flavor profile. The first approach is to make what’s called a straight dough with a slow rise, which means using less yeast and allowing much more time for rising than in traditional recipes—at least five hours between mixing and shaping into loaves. The second approach is enhancing fermentation by adding pre-fermented dough or a levain made up many hours before being included in the final dough mix.
Poolish and biga are examples of commonly used pre-ferments. Both are made with a very small amount of commercial yeast. When using a pre-ferment, you mix 30 to 80 percent of the total flour in the recipe with water and a small amount of yeast ahead of time, let it ferment (usually overnight), and then add the resulting bubbly, fragrant pre-fermented mixture to the rest of the ingredients in the final dough. This process lends greater complexity of flavor to the bread, along with more acidity for longer keeping and richer colors and flavors in the crust. In commercial bakeries, the use of pre-ferments allows for a shorter first rise of the final dough without sacrificing quality, which often works better for production schedules.
Why take this extra step in the home kitchen? For better tasting bread, of course! It will have a little more complexity in flavor than bread from a straight dough, typically. A poolish is particularly suited to making bread with a creamy, slightly nutty character and a crisp, thin crust. Baguette dough is often made with a poolish. A biga, on the other hand, can give breads an earthy, musky flavor profile. At my bakery we use a biga to make ciabatta. Other types of pre-ferments not featured in this book include sponges and so-called old dough (pâte fermentée in French). Some pre-ferments contain salt and some don’t. What all types of pre-ferments have in common, regardless of name and type, is that each allows for the development of alcohol and bacterial fermentation, which add flavor, acidity, and leavening to the dough. There is a sheen to the crumb of breads made with fully developed pre-ferments. This shiny crumb is a visual sign of good bread, and I often look for it before I smell or taste breads.
Straight dough A dough that is made up in a single stage, without pre-fermented dough or a levain culture.
Levain The French word for “sourdough,” referring to a naturally leavened dough culture made from just flour and water, containing billions of active wild yeast cells and naturally occurring bacteria that ferment bread dough and allow it to rise. For thousands of years (about five thousand, according to most respected sources) humans have made leavened bread from just flour, water, and, usually, salt, leavened only by the natural yeast in the air and flour, which work to create a bubbly, fragrant dough.
Pre-ferment A pre-ferment is a portion of the dough mixed up in advance, usually six to twelve hours before mixing the final dough. The recipes in this book that use pre-ferments use either a poolish, which is wetter and has equal amounts flour and water, or a biga, which has less water and is stiffer. Pre-ferments add flavor, leavening, and keeping qualities to the bread.
Biga The term used in Italian baking for a pre-fermented dough culture. While there is no strict definition, it typically implies a mix of a somewhat stiff dough (60 to 70 percent water) made up of just flour, water, and a very small amount of yeast, which is allowed to ferment for six to twelve hours before being added to the final dough mix. The biga builds up a lot of flavor-producing gas (carbon dioxide and alcohol), acids, and bacteria. When it is added to the final dough mix, the result is bread that captures those flavors in a very good way.
Poolish A word used in French baking, the name referring to techniques of Polish bakers who transported their methods to France. Like the Italian biga, a poolish is a pre-ferment added to the final dough mix to enhance flavor, in this case with buttery and nutty notes, and improve keeping due to the acidity that accumulates as the poolish culture develops, typically for six to twelve hours. A poolish often contains 30 to 50 percent of the total flour in a recipe and generally contains equal amounts by weight of flour and water and a tiny amount of yeast.
When using pre-ferments, it’s important to allow them to develop fully but not excessively to attain optimum flavor and leavening. Pre-ferments need a minimum of four hours of development if they are to have a beneficial impact on the bread. When at its peak, a biga will be bubbly and slightly domed on top and smell strongly of alcohol and yeast. An overdeveloped biga will collapse, which is easy to discern. A properly developed poolish will be very bubbly on top, and if you stare at it you will occasionally see bubbles popping when it is at its best. Like a biga, it too will have an alcohol-yeast smell. An overdeveloped poolish will likewise be visibly collapsed.

Top: Mature biga (left) and poolish (right). Bottom: Comparing the texture of biga (left) and poolish (right).
If you use an underdeveloped biga or poolish, you miss out on the flavor benefits and also end up with less vigorous fermentation. The result is a denser bread with lower volume and blander taste. On the flip side, overdoing it with fermentation can lead to an excess of alcohol from fermentation, which will mask the sweet wheat flavors.
The first time you mix one of these pre-ferments, you may be skeptical that such a tiny amount of yeast will be enough. Just follow the recipes and prepare to be amazed. Even after all of these years of commercial baking, I still get off on it. My Overnight Pizza Dough with Poolish recipe leavens enough dough for five pizzas with just a scant ⅛ teaspoon of instant yeast. The tiny amounts of yeast used to start a poolish or a biga are just the beginning. The yeast and the enzymes in the flour are activated by water, and all of the yeast cells bud and duplicate quickly and logarithmically until the yeast has fully populated the poolish or biga. That tiny amount of yeast you began with has expanded an untold number of times—about a gazillion. It’s so cool.
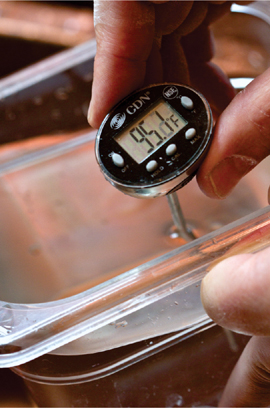
At my bakery, we have to make seasonal adjustments in the amount of yeast we put in our pre-fermented doughs because the nighttime temperatures are cooler in winter and warmer in summer. We use less yeast when it’s warmer, and more yeast when it’s cooler. Alternatively, we could use the same amount of yeast and adjust the water temperature up or down for mixing the pre-ferments.
DETAIL 3: USE THE AUTOLYSE METHOD
Every fermented dough in my bakery—be it bread, pizza, croissant, or brioche dough—uses the autolyse method, where the flour and the liquid in the recipe are mixed and left to rest for at least 15 minutes, and preferably 20 to 30 minutes, before adding salt, yeast, levain, or pre-ferments and mixing the final dough. The autolyse allows the flour to more completely absorb the water and also activates enzymes in the flour; for example, amylase enzymes break down the complex carbohydrates in the flour into simple sugars the yeast can feed on, and protease enzymes naturally degrade the gluten forming proteins, in a way that makes the dough more extensible.
The term autolysis was first applied to this process in the mid-1970s by French baking icon Professor Raymond Calvel, who developed and promoted the technique. In his book Le Goût du Pain, available in English as The Taste of Bread, Calvel wrote about being driven to improve on industrial practices that resulted in overmixed and overoxidized dough. Calvel’s mission was to educate and to restore the quality of French bread baking, which had been in decline since the 1950s. The autolyse method allowed for proper dough development with a shorter mixing time, thereby reducing oxidation and improving the flavor of the bread. Overmixing and oxidation aren’t an issue in home baking, being a by-product of mechanical dough mixers and commercial methods to speed up production. However, the autolyse process is still beneficial for home bakers because it allows for improved gluten development in hand-mixed doughs, resulting in better gas retention and better volume in the finished loaf. When hand mixing, you can feel the difference between a dough that was autolysed and one that wasn’t; autolysed dough already has some of the structure that a dough mixed all at once, without the autolyse, doesn’t have until later in its development.
Another benefit of the autolyse process is that it increases the extensibility of the dough. Extensibility refers to the dough’s ability to be stretched and hold its shape without being so elastic that it snaps back. This isn’t a big issue for the recipes in this book because all have high hydration (that is, a lot of water), which creates a slack dough that is fully extensible. But this benefit is very useful for bakeries that work with stiffer doughs. Imagine trying to shape a couple hundred baguettes from an elastic dough within a fixed period of time—it’s a nightmare! Bread doughs mixed with high-gluten flour tend to be more elastic too, and therefore also benefit from the autolyse.
While I advocate autolysing in the traditional manner described by Calvel, fairly recent developments in the manufacturing of instant dried yeast have led some people to recommend that when instant dried yeast is used in a recipe, it should be included in the autolyse. The benefit is that the yeast will be fully hydrated by the time the final dough mix takes place, resulting in a more vigorous fermentation. If you try this, don’t autolyse for more than about 20 minutes. Once activated, yeast in dough that has no salt will reproduce very quickly, and you’ll lose the flavor benefits of long, slow fermentation.
DETAIL 4: MIX A WET, SLACK DOUGH
There are opposing points of view on how wet doughs should be. I prefer the flavor and texture of breads and pizza doughs made with more water than is typical. I am by no means alone in this. Many good bakers feel the same, including most of those I learned from. My experience is that including a little more water in the dough, say 75 percent instead of 70 percent hydration, results in more gas production, and if fermentation isn’t rushed, those gases provide a lot of flavor. However, these wetter doughs are very slack and need some help building up their physical shape so they don’t fall flat. They are also stickier and a little trickier to handle than stiffer doughs.
There is a property of bread dough called strength that refers to a dough’s ability to hold its form. When dumped onto a baker’s bench or kitchen counter, a dough that has sufficient strength will retain its vertical height. It will also have tenacity and some elasticity. On the other hand, a wet, sticky dough with little strength will relax and collapse like a batter, and it won’t hold its shape when you try to form it into a loaf. All of this is to say that stiffer doughs hold their shape better than wet doughs.
But there’s a catch: wet doughs encourage gas production and flavor development from fermentation more than stiff doughs, which results in more flavorful breads. When properly made, they can also contribute a lighter texture with some big holes. By comparison, dense bread comes from a stiff dough. Therefore, the question is how to develop a wet dough that has enough strength to hold its form and hold on to fermentation gases. While some bakers use ascorbic acid (vitamin C) in very small amounts (measured in parts per million), to add strength to their doughs, I prefer to accomplish this by applying folds (see sidebar,). That way I can give the dough only as much strength as it needs, making a judgment call about how often to fold depending on how loose or tight the dough is as it’s fermenting.
One of my favorite parts of the occasional baking class that I teach is hand mixing a super wet dough made with white flour and hydrated to 80 percent. It looks nothing like a bread dough and seems more like a batter. I pass the dough bucket around the room so everyone can see the texture. Invariably, everyone says that if their final mix looked like this, they would assume they had made a mistake and pitch the entire mass or add flour. I then proceed to demonstrate that with just a few folds over the course of the next 30 minutes, the dough comes together and starts to look like bread dough, albeit a very sticky dough that must be handled at this stage with wet hands.
Wet dough The world of American artisan baking lacks specific definitions for many terms. When I think of a wet or high-hydration dough, I think of dough that is naturally slack and needs folds to give it appropriate strength. Wet dough can’t be defined by hydration percentage because it depends on the flour or blend of flours in the recipe. If all white flour is used, 75 percent hydration would probably result in a wet, somewhat slack dough, and 80 percent would definitely be considered a high-hydration dough. But if mostly whole wheat flour is used, 75 percent hydration would result in a much stiffer dough, because whole wheat flour absorbs more water than white flour. For a mostly whole wheat dough to be considered wet, it would probably need to have at least 82 percent hydration. Another interesting point is that American wheat flour holds more water and has a different quality of gluten-forming proteins than that used by French and Italian bakers. (I haven’t worked with German or other European flours, so I can’t extrapolate further.) The net result is that a wet dough in France would probably contain about 5 percent less water than an American high-hydration dough.

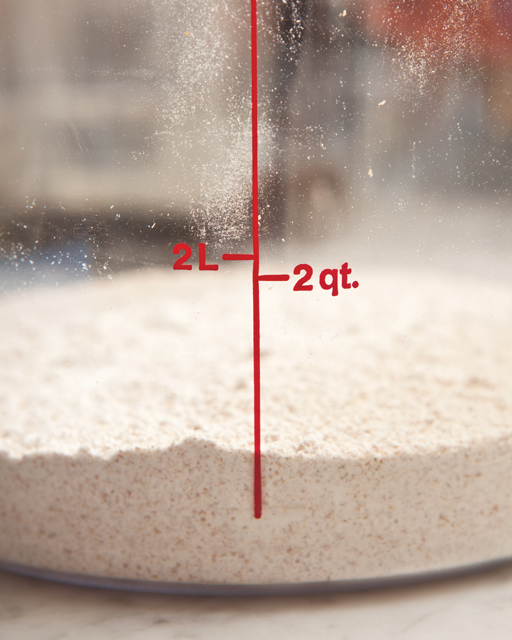
Pain de Campagne dough, 78% hydration, ready for its first fold.
Of course, using high-hydration, slack dough is only one of the secrets to making good bread with a light crumb and big open holes. You still need to allow the dough to ferment completely, both in bulk and after it is shaped. If you bake it too soon, it will be too dense.
DETAIL 5: ALLOW FOR COMPLETE BULK FERMENTATION
The careful reader may notice that many of the recipes in this book call for the dough to expand beyond the oft-repeated “until doubled in size.” Tripled in size is more common here. The amount of expansion depends on the dough. Wet doughs create more gas and therefore expand more than stiff doughs. Maximum flavor development requires allowing enough time for all of the desired biochemical reactions to take place. Every recipe operates on its own ideal timeline. Make sure you give the first rise, or bulk fermentation stage, enough time. Rush it and you lose.
DETAIL 6: HANDLE DOUGH GENTLY
Most home bakers think of kneading dough as a physical act, and the harder you work the dough, the better it is going to be. We don’t do that here. Once the final dough is mixed, treat it gently. Being gentle with the dough will help preserve its gluten structure and retain its gas. This applies throughout: when folding, easing the dough out of the tub, dividing it, shaping it, removing it from proofing baskets, and placing the proofed loaf in the Dutch oven for baking.
When folding the dough, extend the sections only until you feel resistance, and never to the point of tearing it. When turning the dough out of the tub and onto a floured work surface for dividing and shaping, toss some flour around the edges of the tub, then work a floured hand beneath the dough and gently ease it out onto the work surface.
At my bakery, we don’t punch down the dough before dividing and shaping. I prefer to keep the gas, along with all of its flavor compounds, in the dough. To divide the dough, always flour the surface along the dividing line first, then cut it with a dough knife or other sharp edge—even the end of a wide metal spatula. Tearing it breaks up more of the gluten than necessary. And when shaping, avoid overstretching the dough so you don’t run the risk of visibly tearing it. Using sufficient flour to dust the proofing baskets should prevent sticking, but if loaves do stick, be gentle as you ease them out of the baskets. Even when transferring proofed loaves to the preheated Dutch oven, continue to handle them carefully. I use the sides of my hands, rather than my fingertips, to lift the loaves; this spreads the pressure over a broader area.

DETAIL 7: PROOF PERFECTLY TO POINT
After the dough has been shaped into loaves, it undergoes one final rise, called proofing. This can take anywhere from one to sixteen hours, depending on the dough and the ambient temperature. Just as you can slow a dough’s development during bulk fermentation by putting it in a refrigerator or retarder, you can chill shaped loaves to prolong the proofing process. Slowing the rise during either bulk fermentation or proofing (but not both) is critical to achieving the complexity of flavors we look for in the breads at Ken’s Artisan Bakery. It also helps us manage our schedule and bake previously shaped loaves as soon as we get into the bakery in the early morning.
It’s usually difficult for home bakers to put bulk dough in the refrigerator overnight because of the size of the 12-quart dough tubs I call for in this book. It’s easier to put shaped loaves of bread in the refrigerator, so in this book, doughs are chilled only at the proofing stage. Not only do you get improved flavor and better keeping quality from the acidity that develops, but this overnight proof schedule also gives you the chance to bake bread first thing in the morning. It’s a great way to start your day.
The timing works this way: mix the dough in the afternoon, do the bulk fermentation at room temperature following the recipe timing (usually around five hours), and then shape the loaves in the evening. As soon as they’re shaped, wrap them to keep them from drying out, then put them the refrigerator. The chilled loaves don’t need to be warmed to room temperature before baking then next morning. I bake them straight from the refrigerator.
It’s also essential to find the perfect proof point. Don’t overproof or underproof your bread. The finger-dent test, described in detail, is a good indicator here. You’ll know the loaves are optimally proofed if you poke them and the indentation springs back very slowly. You can use this test while the loaves are still in their proofing baskets. If the dough collapses as you remove it from the proofing basket, it has gone too far and won’t have as much baked volume as it would have if you had removed it earlier. Levain breads have a longer window of time during which they are optimally proofed because their fermentation is less vigorous and they evolve more slowly, and perhaps because they have more acidity. Doughs made with commercial yeast have a shorter window, sometimes as narrow as 10 to 15 minutes.
DETAIL 8: BAKE UNTIL DARK BROWN
The goal in baking any bread is to achieve maximum oven spring, ideal flavor and texture of the crust, and complete baking of the interior. I like the crust to be thin and crisp with some pliability to it. If the oven is too hot, the crust will be completely baked before the middle is done. If the oven is too cool, the crust will be thicker and less delicate. The character of the crust also depends on the type of bread. The crust of a levain bread is naturally toothier than the crust of a baguette. Getting the ideal crust depends on full fermentation, proper oven temperature, the proper amount of steam, and not pulling the bread out of the oven too soon.
Baking bread in Dutch ovens, as recommended here, allows the bread to provide its own steam as it releases moisture into its enclosed chamber during the baking. Learning how your oven bakes is essential. Most home ovens aren’t well calibrated, so the actual temperature is often different from what you set. Use an inexpensive oven thermometer to learn what temperature setting delivers 475°F, for example. Most of the bread recipes in this book direct you to bake for 30 minutes with the Dutch oven’s lid on, then another 20 minutes or so with the lid off. If your loaf is done in 30 minutes, your oven is too hot; if it takes an hour, your oven is not hot enough. It’s best to bake bread on a rack in the middle of the oven; too low and the bottom of the loaves may scorch, since many home ovens are hottest at the bottom.
In addition to a thin, crisp crust, I like well-baked loaves, well beyond the blond stage throughout the loaf to dark brown and ochre colors throughout the crust. The point of baking until the crust is dark is to get a caramelized complexity of flavor that permeates subtly into the crumb of the bread. Many bakers know the term Maillard reaction—the chemical process that results in dark coloration during baking, along with the unique flavors and aromas that arise as a result. The Maillard reaction occurs not just in a well-baked bread crust, but in the crust of browned meats and other foods too.

When a bread at my bakery doesn’t come out just right, I ask myself a number of questions to try to understand what went wrong and how to adjust so the problem doesn’t recur. This is a normal part of life for every good baker. Over time things change and adjustments need to be made. And no matter how good the bread, I may ask these questions to see if we can improve upon it:
• Dough temperature: What temperature was the dough at the end of the mix? Is that the target mix temperature for that dough?
• Time of bulk fermentation: How long did it take for the dough to expand to the size indicated in the recipe? Was this period too long or too short?
• Folds: Did the dough get enough folding?
• Room temperature: Colder or warmer than usual?
• Condition of the pre-ferment: At the time the dough was mixed, was the pre-ferment (poolish, biga, levain, etc.), underdeveloped, overdeveloped, or just right?
• Dough strength and hydration: Did the dough feel right? Did it have its usual volume and gas? Was it too sticky or too stiff?
• Scaling: Any possibility that a measurement error occurred? For predictable results you need to measure each ingredient accurately, especially salt and yeast. Keep in mind that for home baking, small amounts of yeast (1 to 2 grams, for example) require either a very accurate scale or conversion to a volume measurement (for example, teaspoons), as given in the recipes.
• Complete proof: Was the bread underproofed or overproofed?
• Proper baking: Was the oven temperature correct? Was there the right amount of steam? Was the baking time adequate?
• Flour: Was it a new flour? Even the same brand and variety of flour purchased from the same place can vary depending on harvest, weather, milling date, and other factors. Some flours produce slower or faster fermentation, and some flours absorb more or less water, which necessitates slight changes in the amount of water in a recipe.
A NOTE ON BAKER’S PERCENTAGES
When I was studying with Jean-Marc Berthomier at l’Institut Paul Bocuse many years ago, I was impressed by his ability to instantly recite the formulas for many different breads. One of the first basics a French baker learns is baker’s percentages, and this knowledge provides a critical foundation for understanding recipes.
All of Jean-Marc’s recipes begin with 1 kilogram, or 1,000 grams, of flour, which is the standard recipe basis in French baking. Each of his bread recipes is a variation on a simple formula: 1,000 grams of flour, 680 grams of water, 20 grams of salt, and 20 grams of fresh yeast. In baker’s percentages, that can be stated as 100 percent flour, 68 percent water, 2 percent salt, and 2 percent fresh yeast. (Note that 3 grams of fresh yeast equals 1 gram of instant yeast, so this would equate to about 7 grams of instant yeast.) In general, all of these breads autolyse for 20 minutes, have a final mix temperature of 75°F (24°C), are fermented at room temperature for 1½ hours, and are shaped and proofed for 1 hour before baking. What often differentiates the recipes is the type of flour used, slight variations in the amount of water, and the shape of the loaf.
Because larger or smaller batches can be made using the same ratios, Jean-Marc could double, halve, or quintuple a bread formula and expect to get the same results. The ratios of the ingredients as measured by weight thankfully remain the same, regardless of batch size.
Understanding a recipe begins with a grasp of the ratios of the ingredients as measured by weight. This was the point of bringing up Jean-Marc’s flour, water, salt, and yeast ratios. If someone describes a dough as being made with solely white flour and 70 percent water, I immediately know from experience what that dough will look like and feel like. The math is easiest when using metric weights. (What’s 2 percent of 3 pounds, 5 ounces? Silence. What’s 2 percent of 1,500 grams? Thirty grams.) You can indeed follow the recipes here without doing any math, but having a basic awareness of baker’s percentages will allow you to experiment with different flour mixes, knowledgeably adjust water in the dough if your flour is more or less absorbent, and simply understand what you are doing.
Manipulating any single detail covered in this chapter can have a significant impact on the final bread, and in fact, many of the differences among breads lie less in ingredients than in these techniques and in whether or how they are applied. This is often reflected in recipes, so knowing how to compare recipes has a very practical use. When I look at a recipe, a number of questions spring to mind: “How is this different from other recipes I already know? What blend of flours is used? What type of leavening and how much? What is the hydration percentage? What temperature of water is used? Is this a novel way to ferment the dough? What temperatures are specified for dough mix, bulk fermentation, and proofing? And how long does the dough develop?”
Two recipes that look alike can in fact be quite different. Always consider the balance between the amount of leavening, dough temperature, and fermentation time when evaluating recipes. Remember the warm-dough-less-yeast/cold-dough-more-yeast seesaw?
To illustrate, consider my recipe for Overnight White Bread. On the surface, this recipe looks very similar to Jim Lahey’s famous no-knead bread recipe. But let’s take a deeper look. This comparison isn’t about which method or bread is better; it’s just interesting because at a quick glance these recipes look very much the same: an easy, no-fuss mix of a soft dough with a small amount of yeast in the evening; shaping into loaves the next morning; and baking in a Dutch oven an hour or two later. However, when you compare our ingredient ratios using baker’s percentages, or when you compare the specified water temperatures, it’s easy to see the differences. In terms of ingredients, my recipe uses only one-third the amount of yeast; it also has 3 percent more water, and the water temperature is at least 30°F (about 16°C) warmer, resulting in a final mix temperature that’s about 18°F (10°C) warmer. As for differences in technique, I call for an autolyse period and I specify applying two folds, preferably in the first hour and a half after mixing the dough. My recipe takes a little bit more work, but not much.
I write this comparison to Mr. Lahey’s well-known bread recipe to show that the differences between recipes are easiest to see and understand when you compare recipes’ baker’s percentages, temperatures, and timelines. Seeing that my bread, which is made on the same schedule, uses one-third the amount of yeast and is mixed with much warmer water is a great illustration of the relationship between the amount of leavening and the temperature of the dough. My dough benefits from a few folds to give it strength. My recipe reflects my personal preference for the flavors developed in warm, wet doughs made with less yeast.