Defensive Zone Coverage
Defensive zone coverage refers to coverage after the offensive team has set up in the zone and all five defensive players are in the zone. This may happen off a face-off in the defensive zone, when the opponent dumps or chips the puck in, after the opposition enters the zone and takes a shot on net, or when the opposition enters the zone and maintains puck possession for several seconds. Following are some key principles to remember in defensive zone coverage:
- Maintain mid-ice positioning. Players are often in such a hurry to get to the outside to apply pressure to the puck carrier that they overcommit and leave space in the most dangerous scoring area—the low slot. Few goals are scored from outside this area, but in defensive play many teams will be caught with too many players covering the outside space. At younger levels two players often go at the puck carrier, not seeing that the other has already committed. When players understand the value of mid-ice positioning, they will be less anxious to jump. Pressuring the puck carrier to deny time and space is important, but only one person at a time should do it.
- Stay between the puck and the net. When checking opponents, players need to make sure they always have great defensive side positioning by staying in a direct line between the puck and the net (figure 10.1). Support players defensively down low below the dots should always be on this line from the puck to the net.
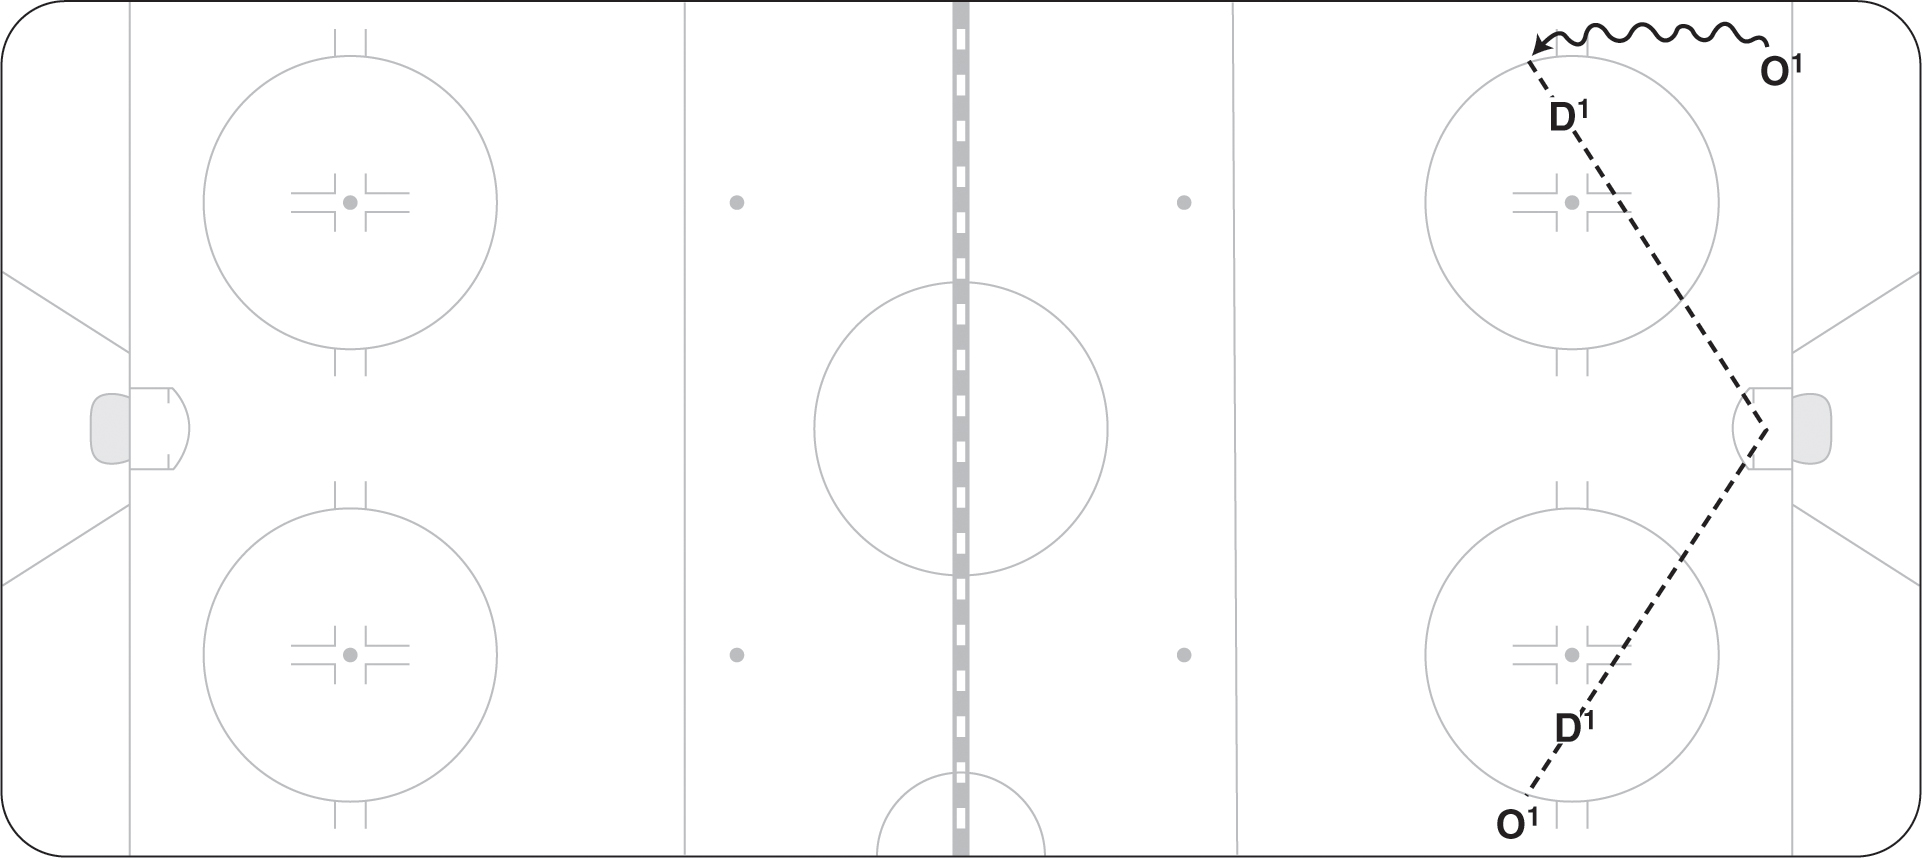
Figure 10.1 Great defensive side positioning requires staying in a direct line between the puck and the net.
- Be ready to block shots. In today’s game, defenders often get into shooting lanes and block shots (primarily with the legs) or discourage opposing players from taking a shot. Although blocking a shot hurts, it takes away good scoring chances. Players who sacrifice their bodies to block shots are respected by teammates and coaches. A player may occasionally sprawl to block a shot, which requires timing, but players who make themselves big in shooting lanes block most of the shots.
- Keep your stick on the ice. In offensive situations, coaches often remind players, “Keep your stick on the ice and be ready for the pass.” We believe that keeping the stick on the ice is even more important in the defensive zone. By having a stick on the ice, players take away passing lanes and often intercept pucks. When you look at a video clip of all five defensive players with their sticks on the ice, it is amazing how much space is covered. But you often see players in defensive zone coverage with their sticks at the waist. This bad habit should be avoided.
- See the puck; see your man. In all sports, defenders need to be able to see where the offensive player is and where their coverage responsibility is. The defender must keep his head on a swivel and look back and forth between the two, because the position of the puck is changing and his check is moving at the same time.
- Find the opponent’s stick on rebounds. When the puck is shot on goal and a rebound occurs, defensive players often try to find the puck, but the free offensive player finds it first and scores. The defender should take the opponent’s stick first and then look to respond to the loose puck. The goaltender should tell the defensive players where the puck is (in the corner, in your feet). This call will help defenders respond after they have covered the stick and taken away any immediate rebound chances. Some defensemen also make the mistake of trying to knock the player down in front. When the puck is in the net area, the priority is stick and body position.
Teams can use several systems in their defensive zone: the 2-3 system, low zone shrink, half-ice overload, or man-on-man coverage. The 2-3 system should be used against teams that have a balanced attack in the offensive zone, whereas the low zone shrink works well against teams who have trouble generating chances from their defense but generate many chances from below the circles. The half-ice overload smothers the offensive team on one side of the ice, but it is not as effective with teams who are good at changing the point of attack. The man-on-man system is based on pressure and players sticking to their checks. If one player loses his check, excellent scoring opportunities result. We recommend that coaches not change from system to system depending on the opponent. They should pick one that is suitable for their level of play and teach it well.
2-3 System
In this system, the two defensemen work with one forward (usually the center) to cover down low, while the wingers cover the slot and higher areas (figure 10.2). Listed here are the key areas of defensive zone coverage, including teaching points for coaches. This should form a basis for teaching your players how to play in your own zone without the puck. You can also use it as a framework for developing your defensive zone drills. While in the defensive zone, all players should have an active stick, meaning that the stick is on the ice and is moving. This tactic takes away shooting lanes and leads to turnovers and transition opportunities.
Playing Low Three on Three
D1, F1, and D2 work together in layers and play the three low zones (hit zone, support zone, and net zone). The first forward back assumes the position of F1 (figure 10.3). Most of the time you want your center in this position (assuming he is the better of the three forwards in defensive play), so an exchange may be made when appropriate.
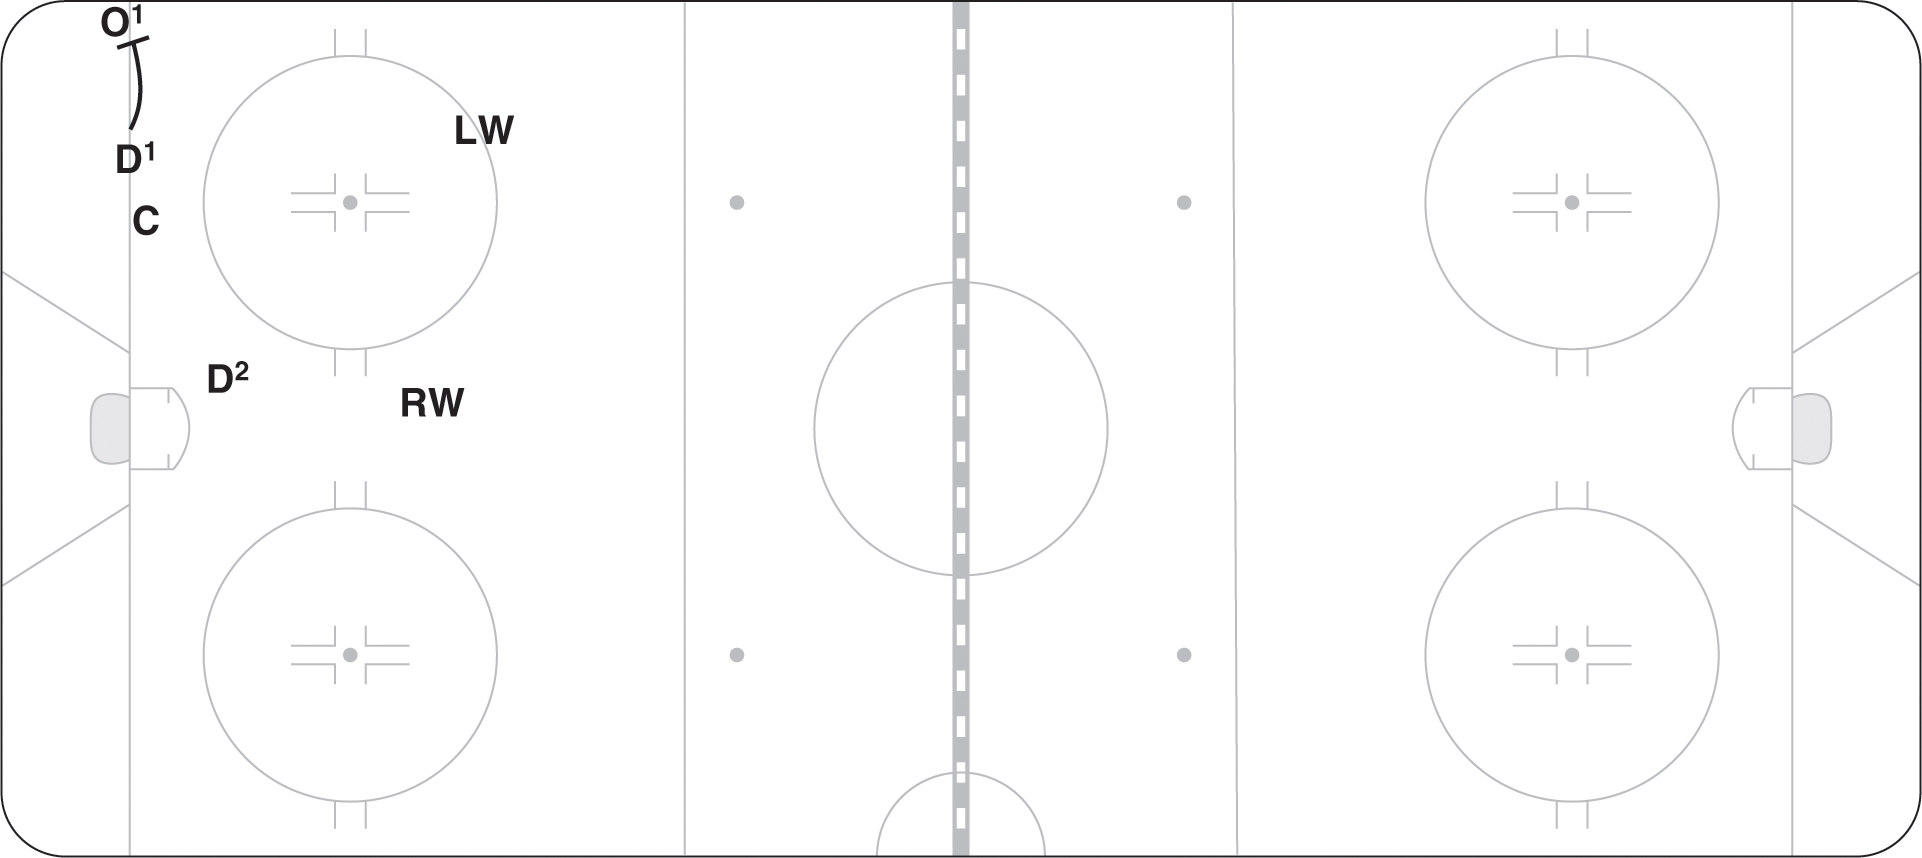
Figure 10.2 In the 2-3 system, the two defensemen work with one forward to cover down low, while the wingers cover the slot and higher areas.
With the new interpretation of the rules at the NHL and amateur levels, body position means everything. Players are less able to create interference, hook, or hold up players, so early defensive positioning is critical.
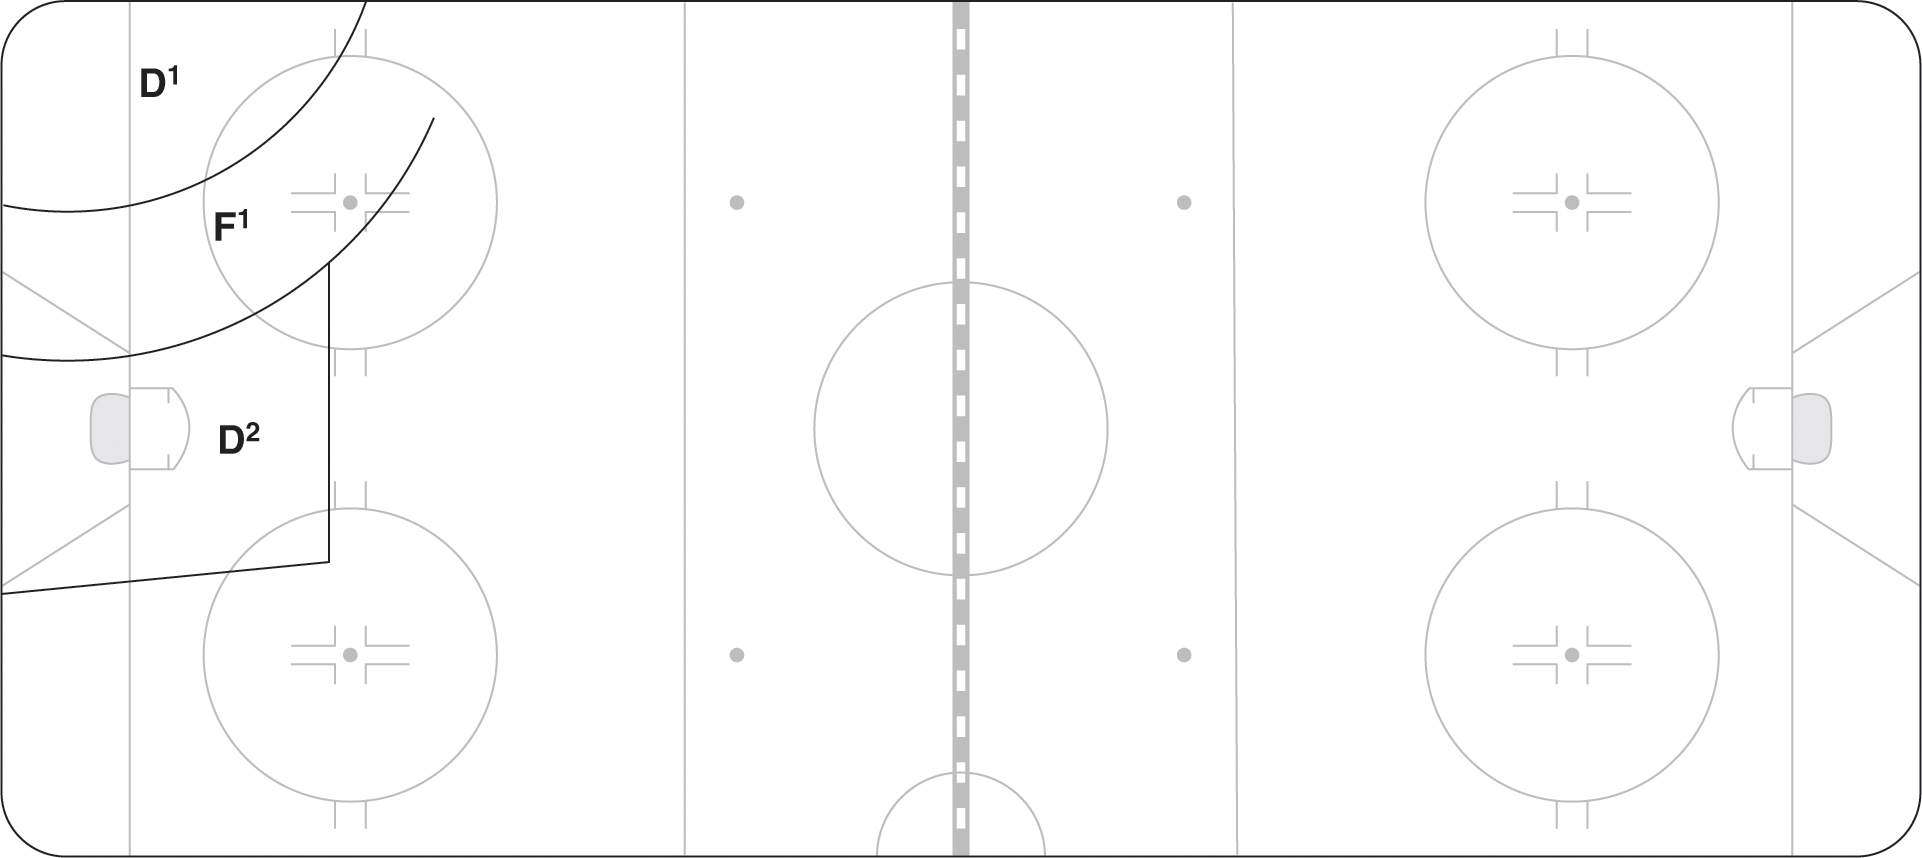
Figure 10.3 Low zone positioning for D1, F1, and D2.
Hit Zone
In this area, the first defensive player quickly closes on the puck carrier and makes contact with the opponent’s body (figure 10.4). He must show patience if the puck carrier has clear possession before he can get there. If the defensive player sees the opposing player’s number, he closes quickly but must be careful of hitting from behind; if the defensive player sees the opposing player’s logo, he contains. By containing, the defensive player holds his position briefly and then cautiously goes at the puck carrier. Containing means keeping the puck carrier in a set space by holding inside position and not letting him get to the net. After the puck is moved or the puck carrier loses possession, the defensive player stays with his check (does not hook) until that player is no longer a passing option. The defensive player then releases that player and moves into one of the other zones. The desired goal is for all defending players to keep their positioning between the opposing players and the goal they are defending.
Support Zone
In this zone (figure 10.4), the defensive player is aware of both the puck carrier and the closest passing option. He makes sure that the puck carrier cannot walk to the net if the first player gets beaten or falls down, and he is ready to take away the opponent’s closest passing option. He must give himself some space to react to the movement of players and the puck. At all times, he tries to stay above the goal line in support coverage. Because teams rarely score from behind the goal line, the team’s defensive positioning should not have players rushing into this area.
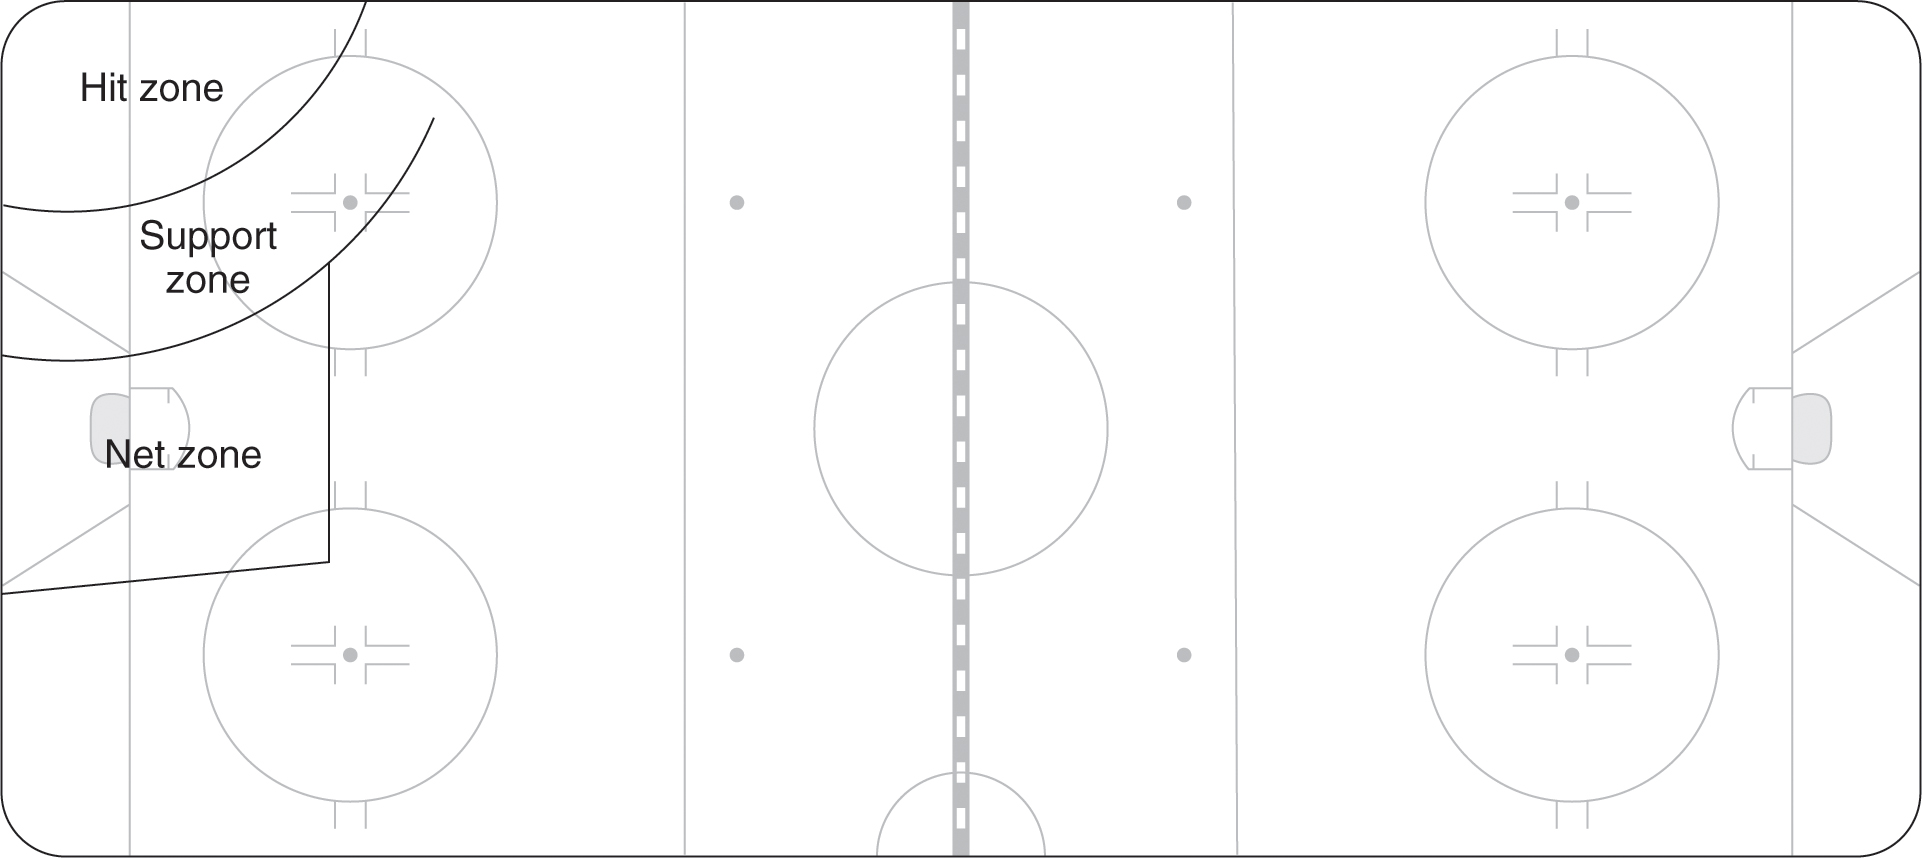
Figure 10.4 The hit zone, support zone, and net zone.
One player, usually a D, must always be in this zone (figure 10.4). He must be aware of the third offensive player and play halfway to any overload shooters (the offensive player on the half of the ice where the puck is). If breakdowns occur, he must be patient and not leave this area unless replaced by a teammate. He keeps his stick on the ice and stays out of the blue crease area, allowing the goaltender to have free movement.
Strong-Side Top Zone
F2 holds inside position at the top of the slot (figure 10.5). F2 must be ready to slide out tighter to his point if the puck carrier has the ability to pass there or cover him tight if he comes into the slot. When players cycle up high out of the corner, F2 must hold the top of the circle and deny inside access. After a pass is made out to the point, F2 must approach the defenseman in the shooting lane to take away a direct shot on net.
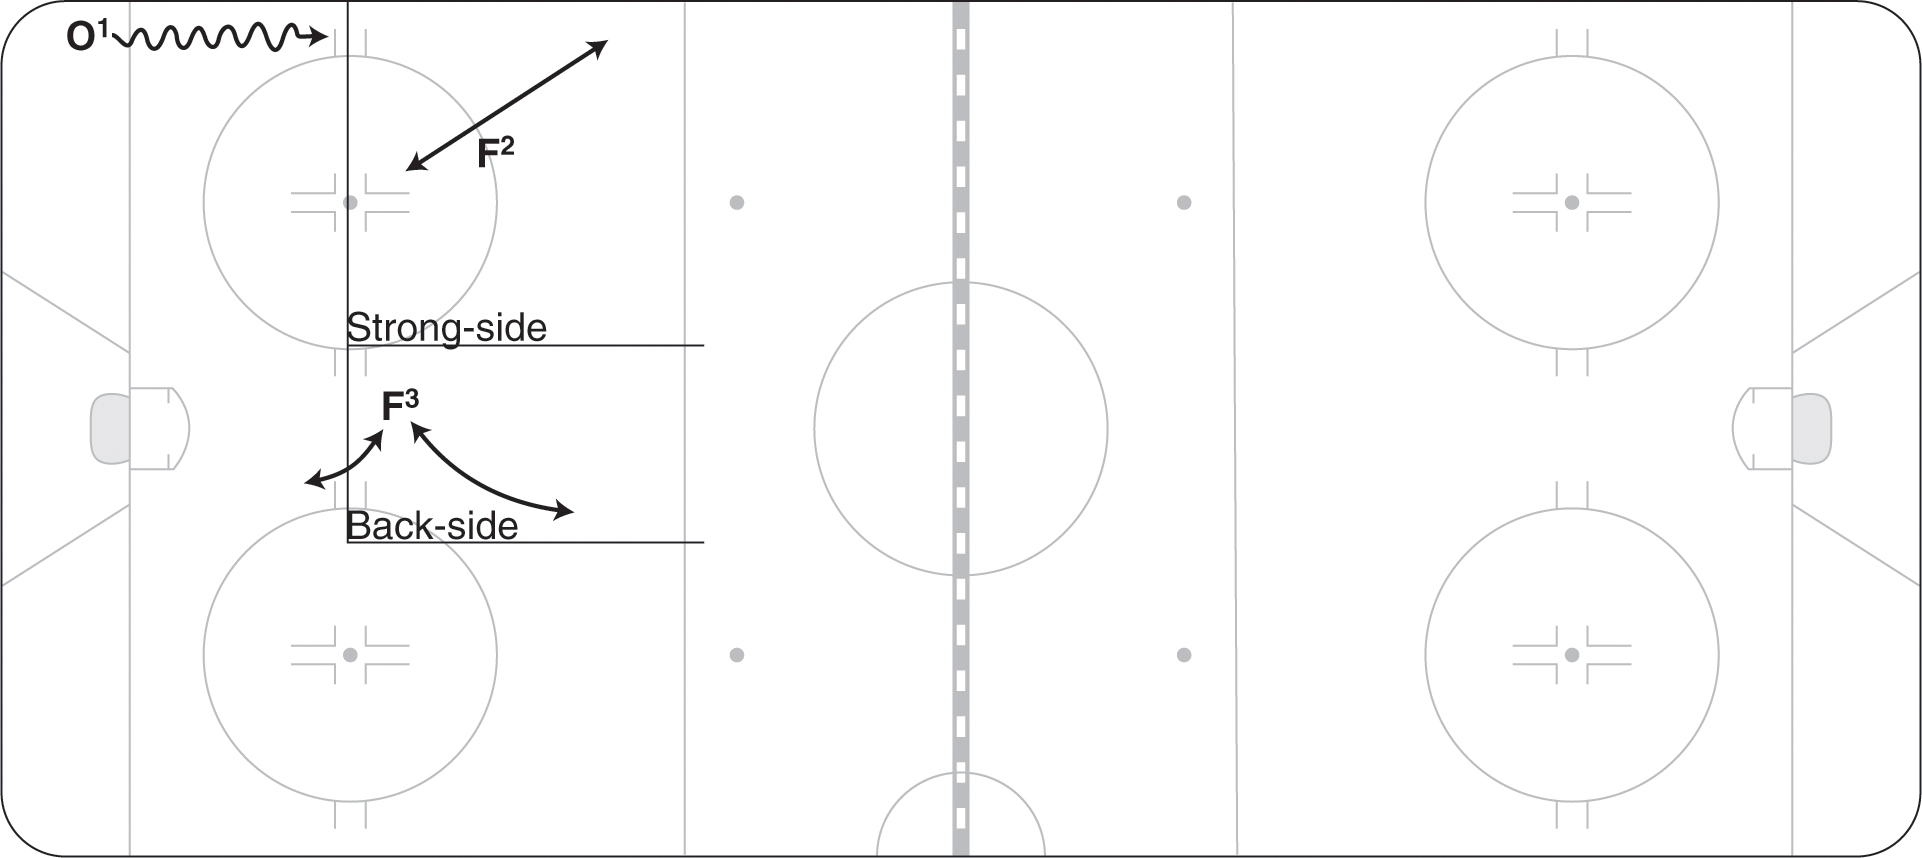
Figure 10.5 F2 covers the strong-side top zone, while F3 covers the back-side slot.
F3 slides down lower on the back side (figure 10.5). If the net D is caught out of position, F3 will protect the low slot. He needs to be aware of the back-side point sliding in. If F3 loses sight of where the back-side defenseman is, then he will have an opportunity to move into a dangerous scoring area for a wide pass outside the vision of the goaltender. F3 must always have his head on a swivel.
Low Zone Shrink
In this system, all five defensive players collapse in tight and basically play the opponent five on three low (figure 10.6). The theory is to take away all plays to the slot by outnumbering the opponent and clogging up the scoring area. Most NHL teams use this collapse around the net style of play when the puck is below the goal line or after a point shot. After the puck is passed back to the defenseman, the wingers who have collapsed in tight move out to block the shooting lane.
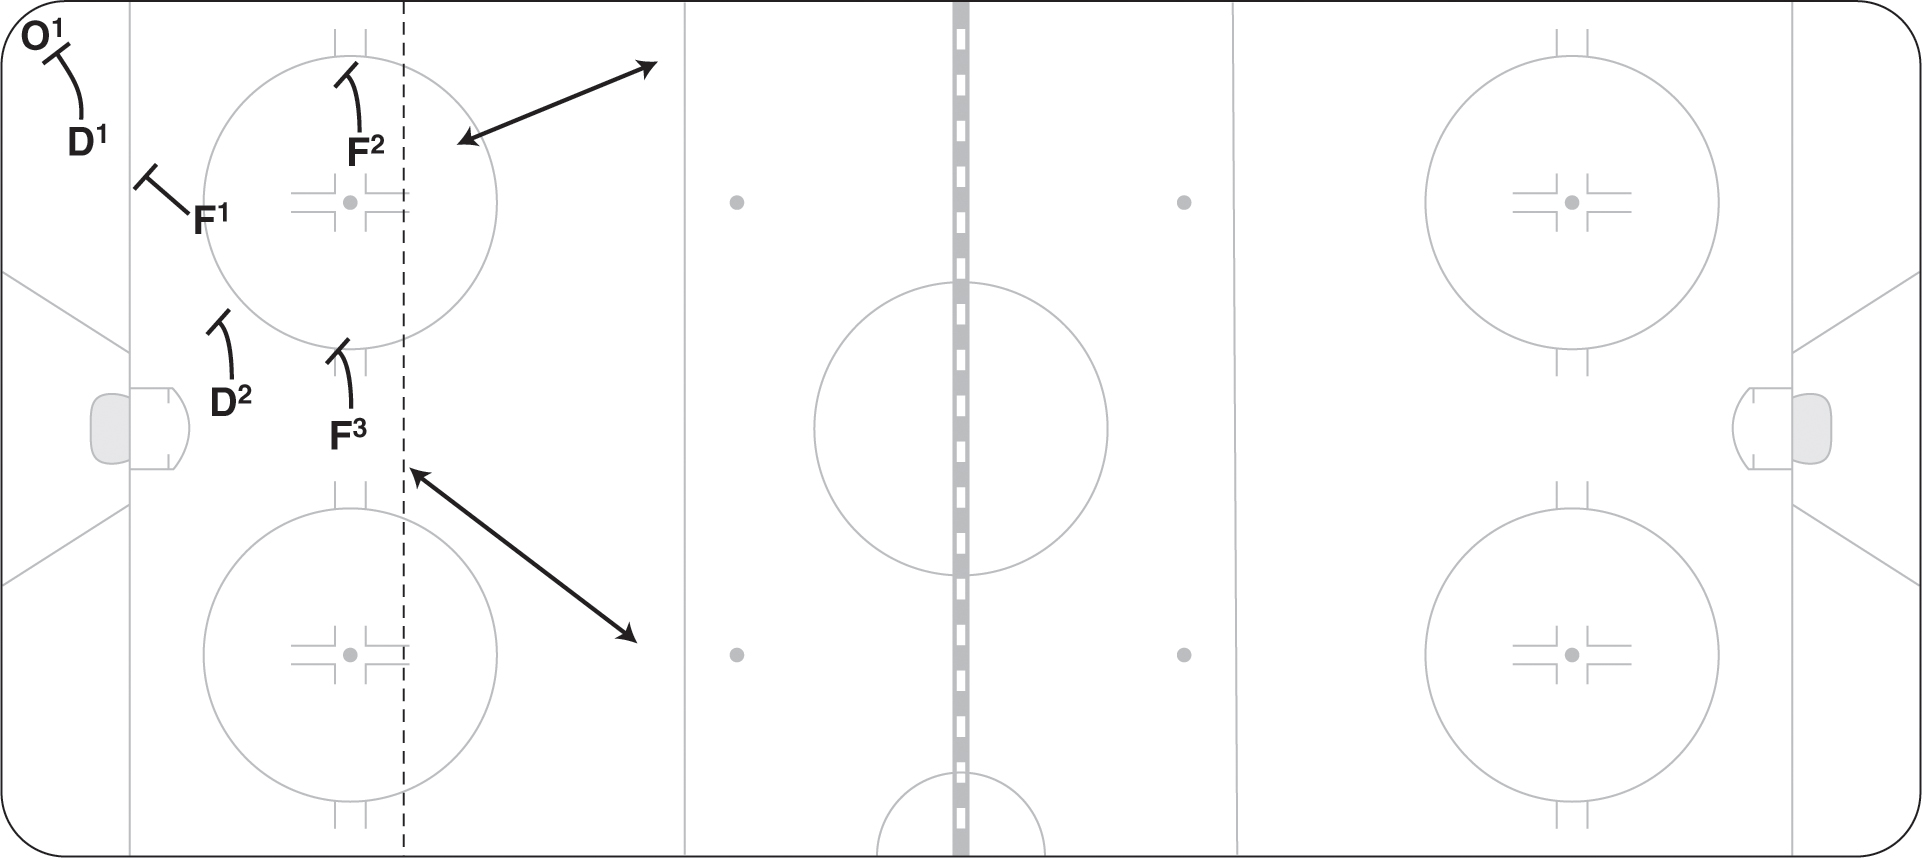
Figure 10.6 The low zone collapse coverage areas.
Playing Low Five on Three
D1, F1, and D2 work together and play the three low zones (hit zone, support zone, and net zone; figure 10.7). The first forward back assumes the position of F1. Most of the time you want your center in this position, so an exchange may be made when appropriate. The other two forwards sink in tight as well. The adjustment from the 2-3 system is that all three low players move tighter to the corner. The cue for the shrink to happen is when the puck carrier is contained in the corner. D2 can now move to the strong-side post and then right into the pile if D1 and F1 have contained the puck in the corner. F3 plays close to the net, covering the low slot, while F2 (who is also collapsed below the dots) tries to deny passes back to the point.

Figure 10.7 Low five-on-three coverage.
When the offensive team moves the puck back to the point, F2 expands out in the shooting lane (figure 10.8). F2 should move quickly but be under control when the defenseman is ready to shoot. F2 should get into the shooting lane when he anticipates a shot. At times he will have to slide and block the shot. F3 holds the slot by moving out slightly. When the opponent passes the puck D to D, F3 moves out in the shooting lane and F2 rebounds back to the low slot.
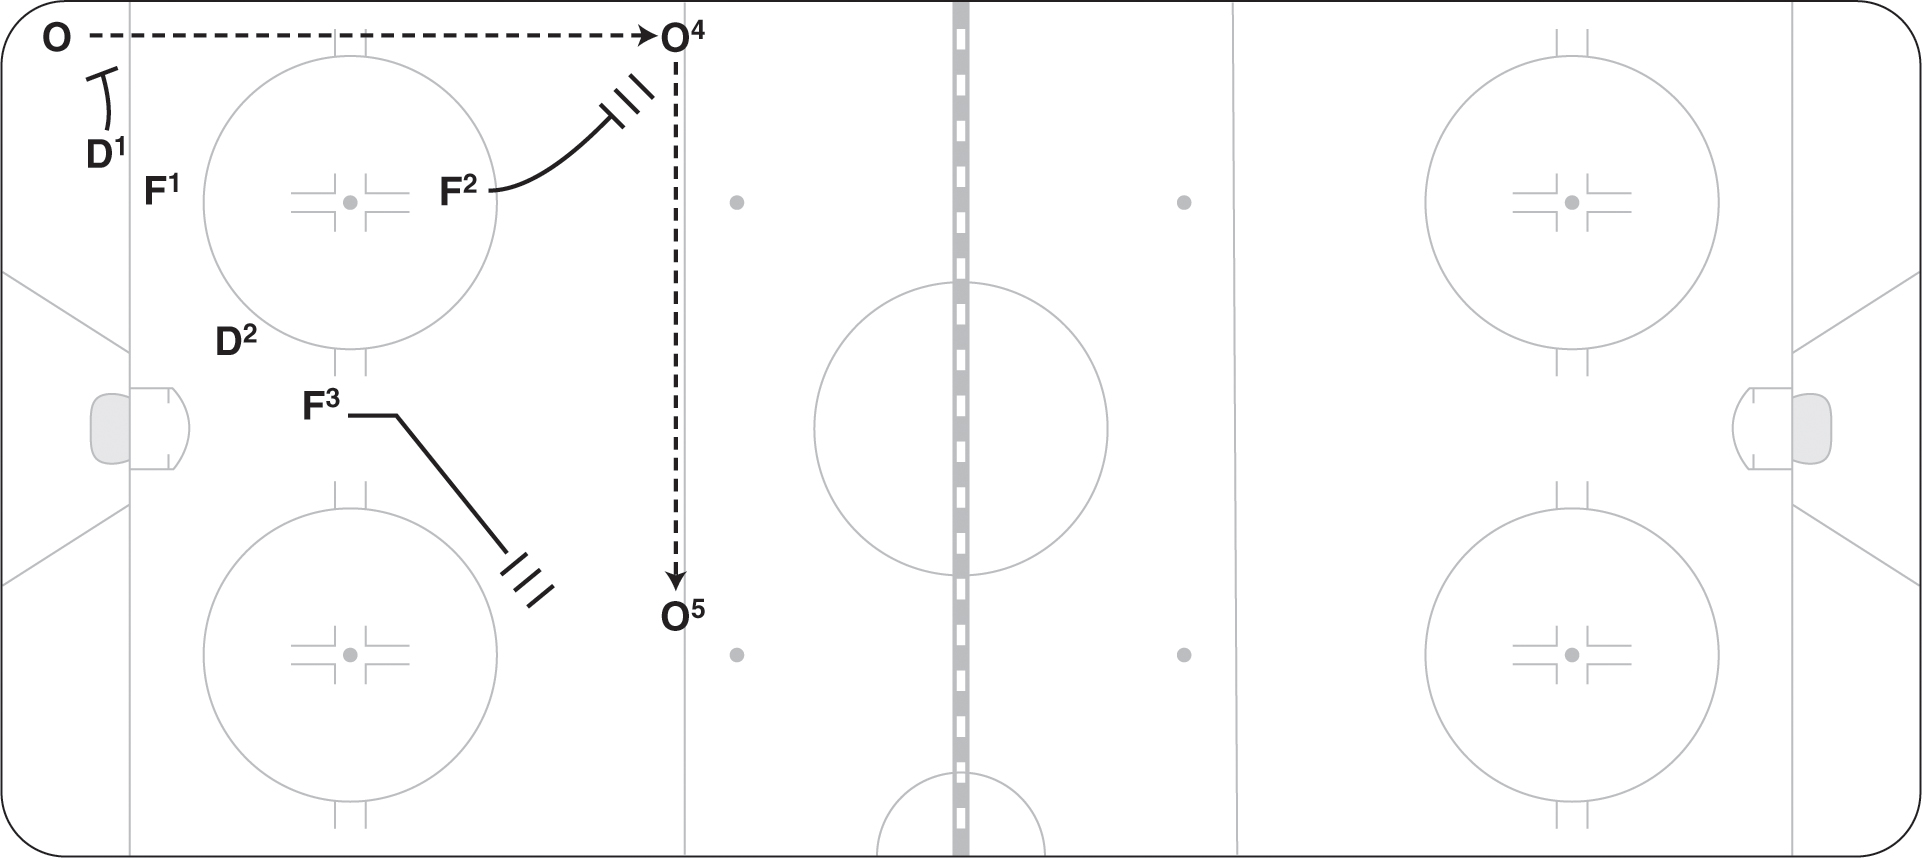
Figure 10.8 High zone coverage.
This system is a blend of the 2-3 and low zone shrink. In this system, the defensive group splits the rink in half, trying to squeeze the offensive team to one-half of the ice (figure 10.9). Plays to the back side are given up but made difficult because of the number of bodies in the way and the difficulty of making the long cross-ice pass. D1, F1, and D2 take care of the strong-side corner and at times will be playing the opponent three on two in that area. These three defensive players squeeze the offensive space that the opponents have to work in, and after the puck is recovered, they either quickly move it up the strong side or escape out the wide side.
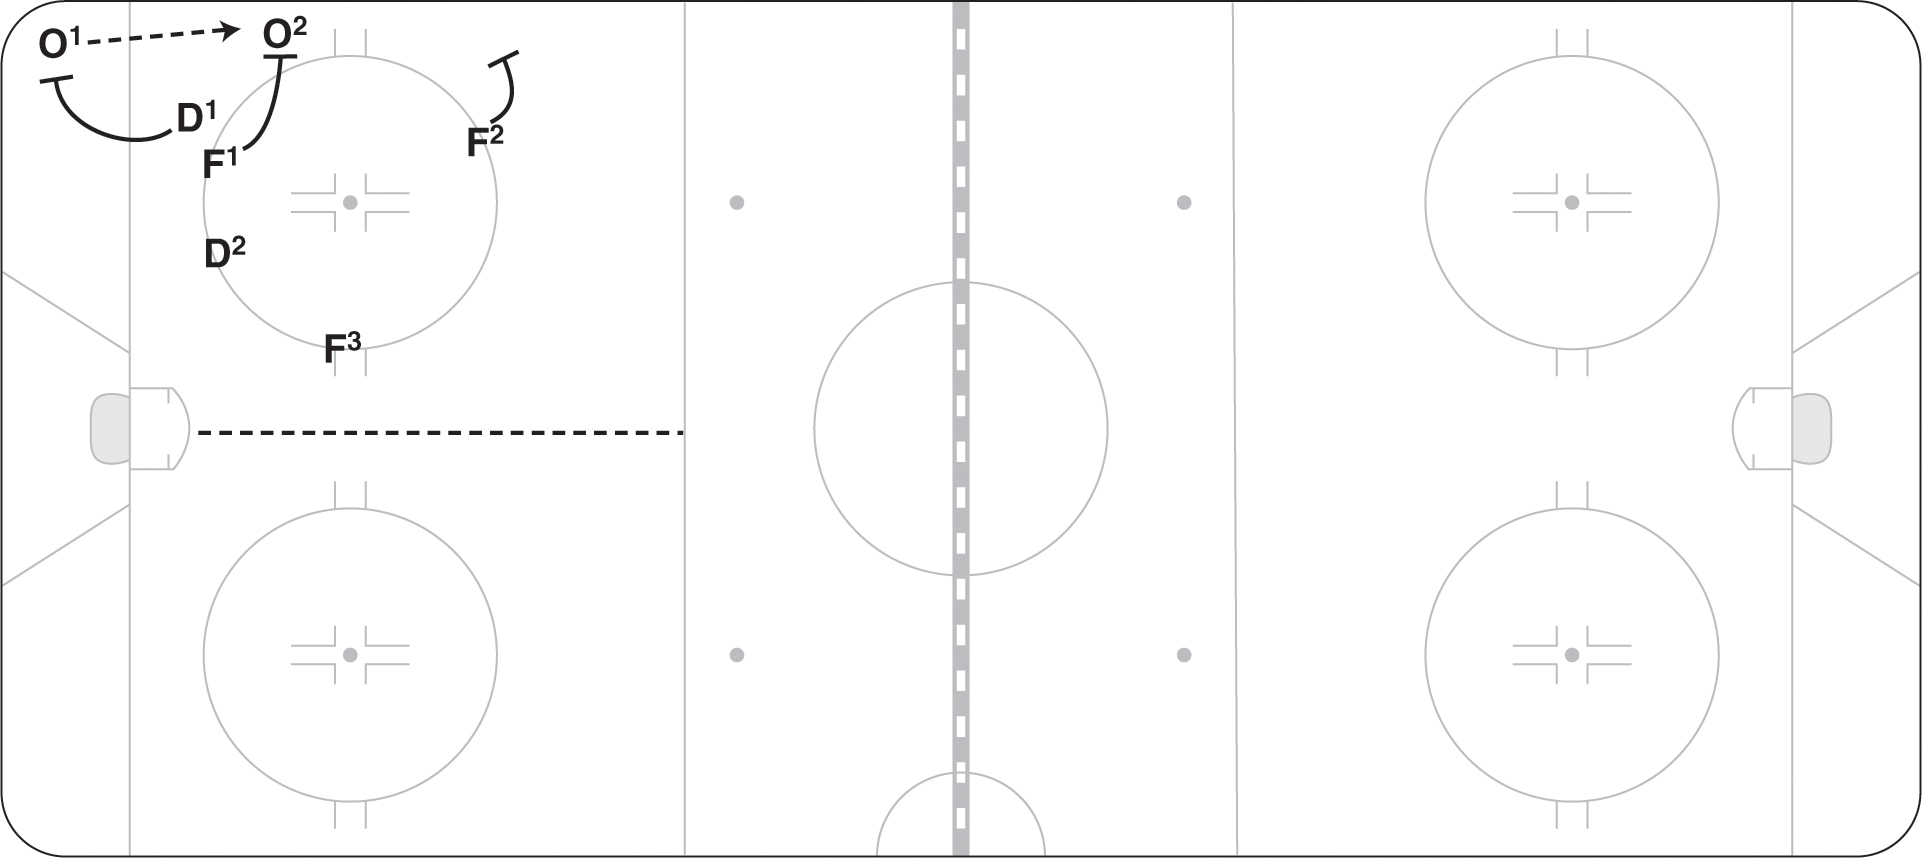
Figure 10.9 In the half-ice overload, the defensive team splits the rink in half.
If the defensive team has three players down in the corner, then the most important player off the puck is F3, who covers the slot but also shades to the strong side. F3 must be aware of the opponent’s third forward and cover anyone who comes to the front of the net while at the same time be looking to see whether the opposing back-side defenseman is moving into the scoring area. The opposition will try to sneak a defenseman down the back side, so F3 has to be aware and alert. F2 takes away the strong-side defenseman by playing much closer to the boards, therefore denying a pass out to the strong-side point. F2 needs to start inside the circle, move out to cut off players cycling up the boards, and have an active stick to cut off passes to the point.
The advantage of this system is that it lessens the ability of the offensive team to find room to move and make plays on the strong side. Many teams like to cycle and then attack the net, but with this system, space to cycle is all but eliminated. When offensive players play against teams that use the half-ice overload, they often complain that they have no time! The one disadvantage is that quick plays to the net may result in a two on one on F3 if the opposing defensemen drive to the front of the net, but this pass is difficult to make.
This system relies on constant puck pressure and denying time and space to the opponent. D1 starts by pressuring the puck carrier and then, after a pass is made, sticks with that player as he tries to get open. The only place D1 won’t follow the player when he doesn’t have the puck is out to the blue line; D2 has tight coverage on any players in the slot. F1 now pressures the pass, and if the puck is moved he sticks to his man (figure 10.10). This continues with D2 in the low zone area, while F2 and F3 have responsibility for the opposing defensemen. F2 and F3 cover the defensemen whether they move in through the slot or slide down the boards. The man-on-man system eliminates confusion with regard to whom a player is covering, but if the opposition is creative and incorporates lots of motion, staying with your check becomes harder. The new rules preventing clutching and grabbing have made it harder to play a true man-on-man system, but it can be effective if the defenders are good skaters. The offensive team has minimal time with the puck before being pressured, and players away from the puck have trouble finding space to get open for a return pass. This system is also simple to learn because of the strict stay-with-your-guy coverage.
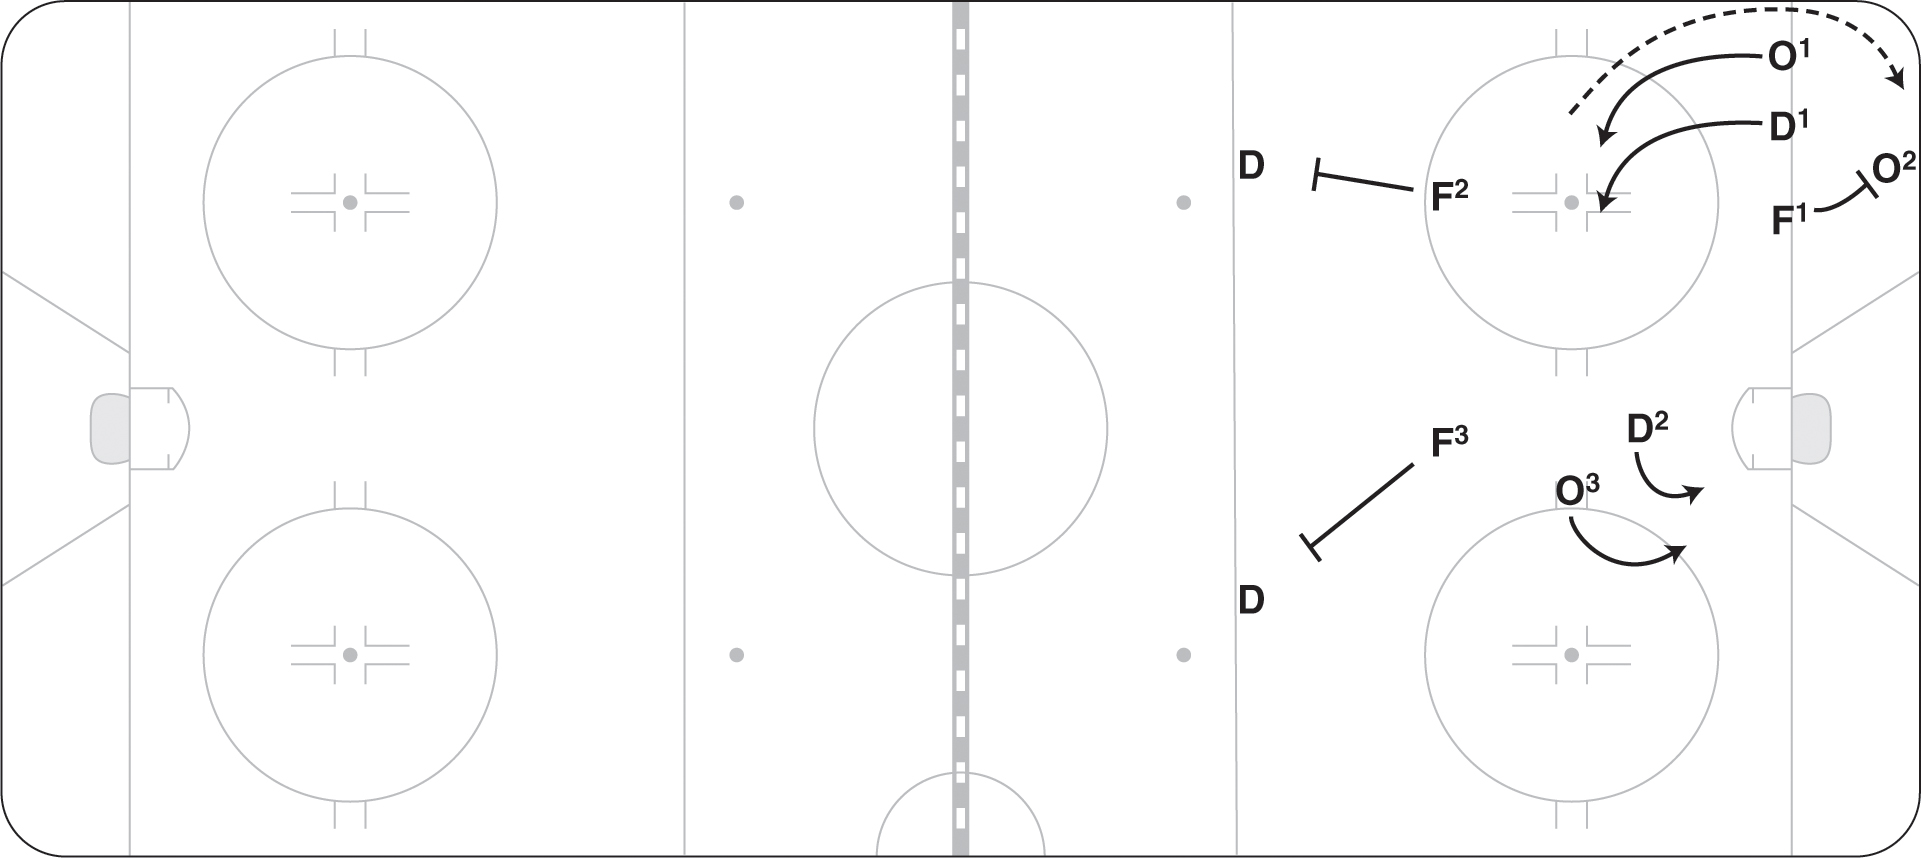
Figure 10.10 Man-on-man coverage.
Situational Guidelines for Defensive Zone Coverage
No matter which system you choose to use defensively, unique situations will always come up that give players trouble in coverage. Listed here are several of them.
Covering Active Ds
When covering active Ds, both F2 and F3 have a responsibility to cover their points if the opposing Ds move into scoring position. More teams are encouraging their defense to be active. If the defenseman whom F2 or F3 is covering moves into the slot, he must be covered tight. If the defenseman slides down the boards, two options are available. F2 or F3 can either cover tight and move down the boards and into the corner with the D or let the D go and hold the inside position (figure 10.11). After the opposing D is down low in the corner, he can be covered by the defending Ds or low forward. F2 or F3 can sink down and play inside but should not get dragged into covering a D in a nonscoring area.
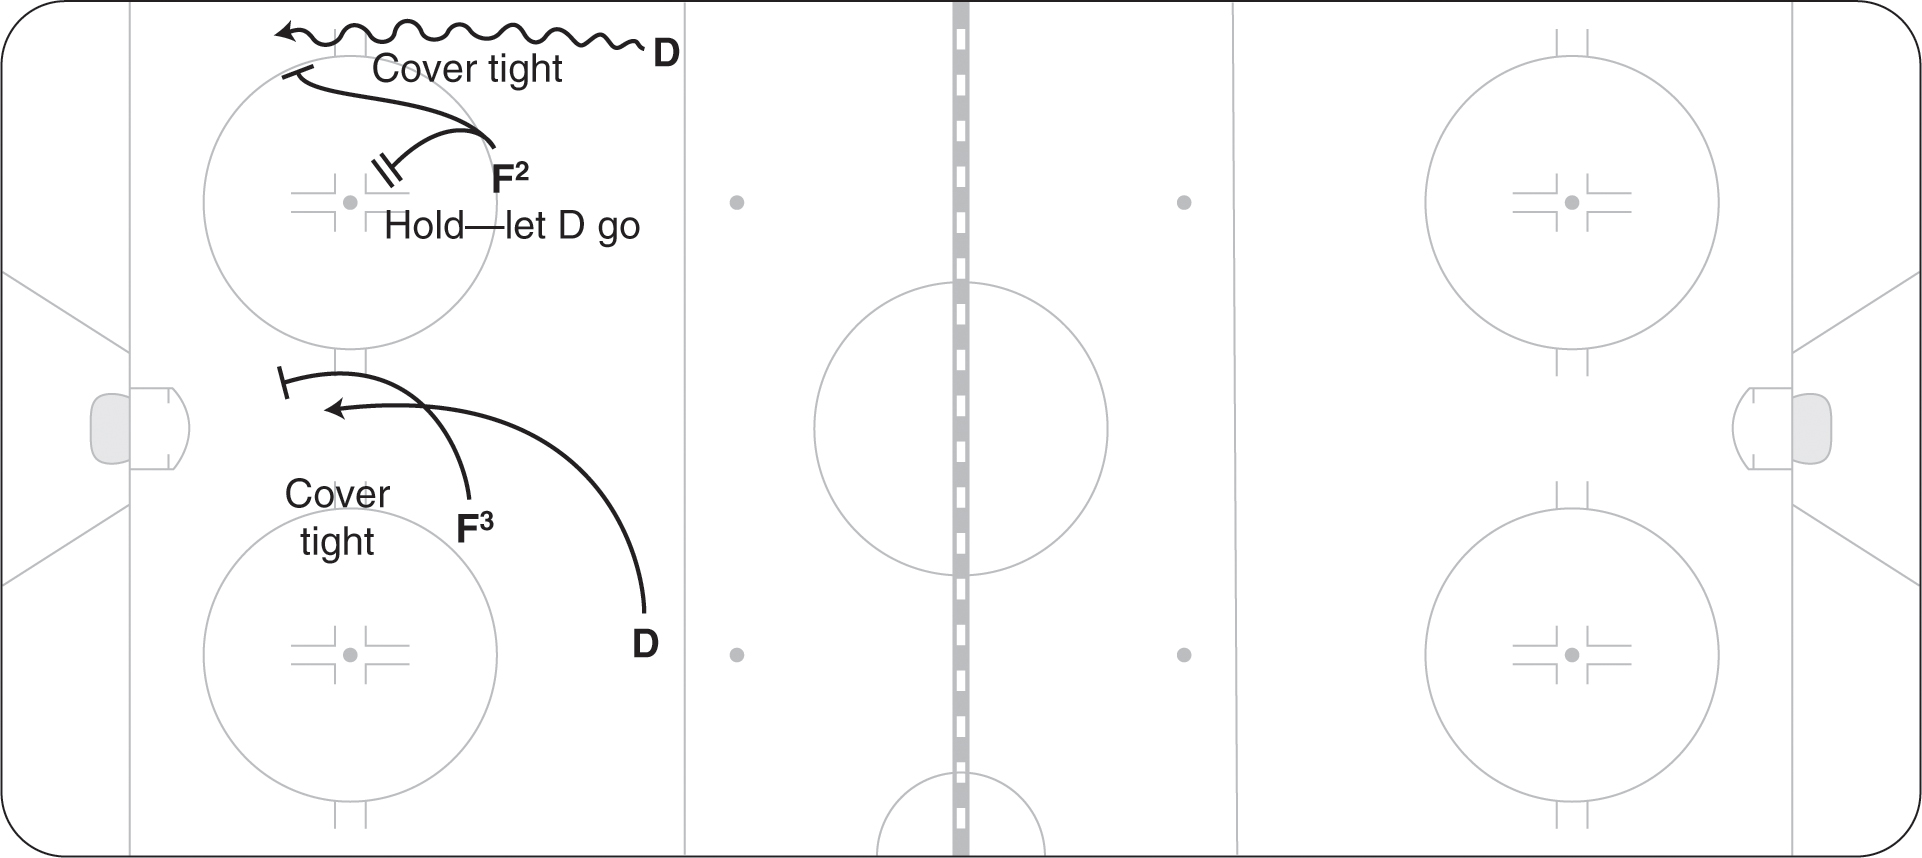
Figure 10.11 Covering active Ds.
If they are worried about the offensive ability of the opposition D, some teams put their wingers higher in defensive zone coverage. They may play as tight as 10 feet (3 m) away when the puck is down low and right on the Ds when the puck is moved high.
Handling a Low Two on One Off a Breakdown
When a breakdown occurs in the corner after a defender falls down or misses his check, the opponent may attack two on one versus the net defender (figure 10.12). The net defender must be patient and hold the net area. As the puck carrier advances, the defender allows the goaltender to take one offensive player while holding the midnet position and defending the pass across. The D at the net must block the passing lane while at the same time forcing the puck carrier to shoot from a wide position.
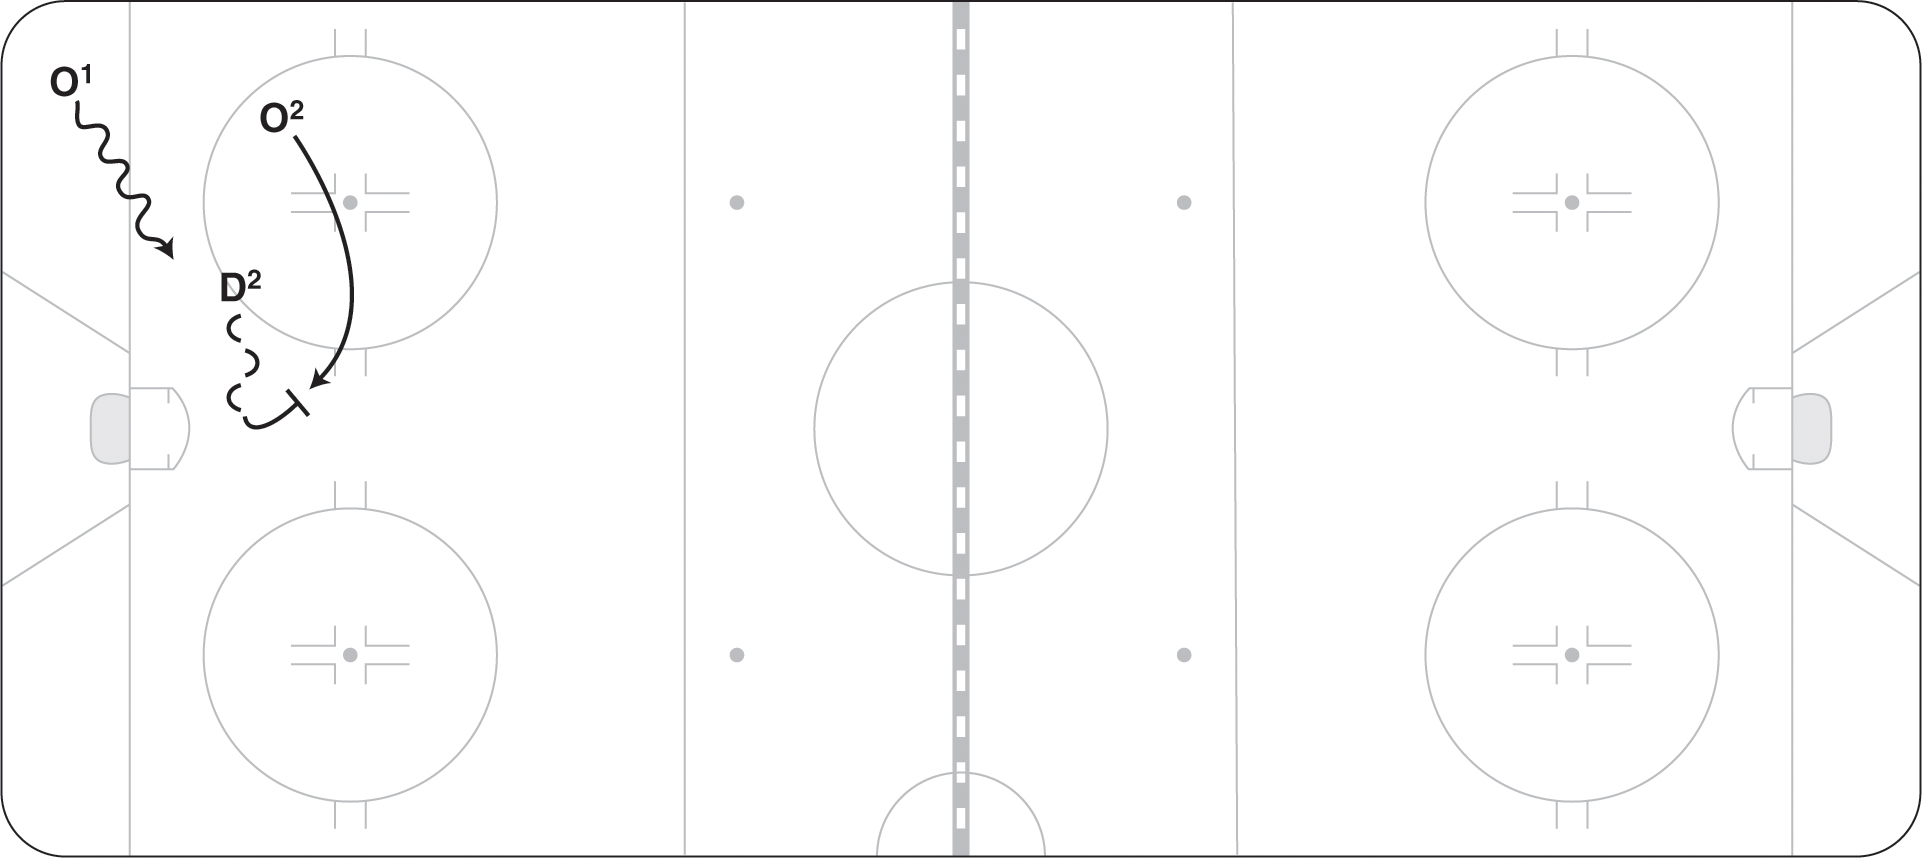
Figure 10.12 Handling a two on one out of the corner.
Defending a Player Behind the Net
First, the defender should recognize that a player is behind the net and intercept the pass. If the situation is even, the defender should pressure the puck carrier right away. When pressuring, he should try to force the puck carrier away from where he got the pass and away from support. If the player is unsure or the opponent has the advantage, he should wait to pressure until all defending players get back to position. RD flushes (for right-shot opponent); C holds mid-ice, aware of the back door; LD holds the back post; and the high wingers sink in tight (figure 10.13). After the flush has started, LW (the side you are forcing them to) will start to slide back out toward his point, while RW stays tight in the slot. In all situations when the opposing team has the puck below the goal line, only one defender should be below the goal line so that the defenders outnumber the opponents in the house (or scoring area) (see 10.13).
Figure 10.13 Defending a player behind the net.
Defending the East–West Cycle
One strategy that offensive teams utilize to break tight defensive zone coverage is to move the puck quickly from side to side behind the net. When this happens, D2 at the net should quickly pressure the puck carrier to take away their time and space (unless a player is open in front). The D pressuring the puck carrier should keep his stick on the puck to take away passes out to the slot. F3 moves to the wide side, and F2 moves into the low slot. D1 and F1 now move across into their layers or shrink coverage (see figure 10.14).
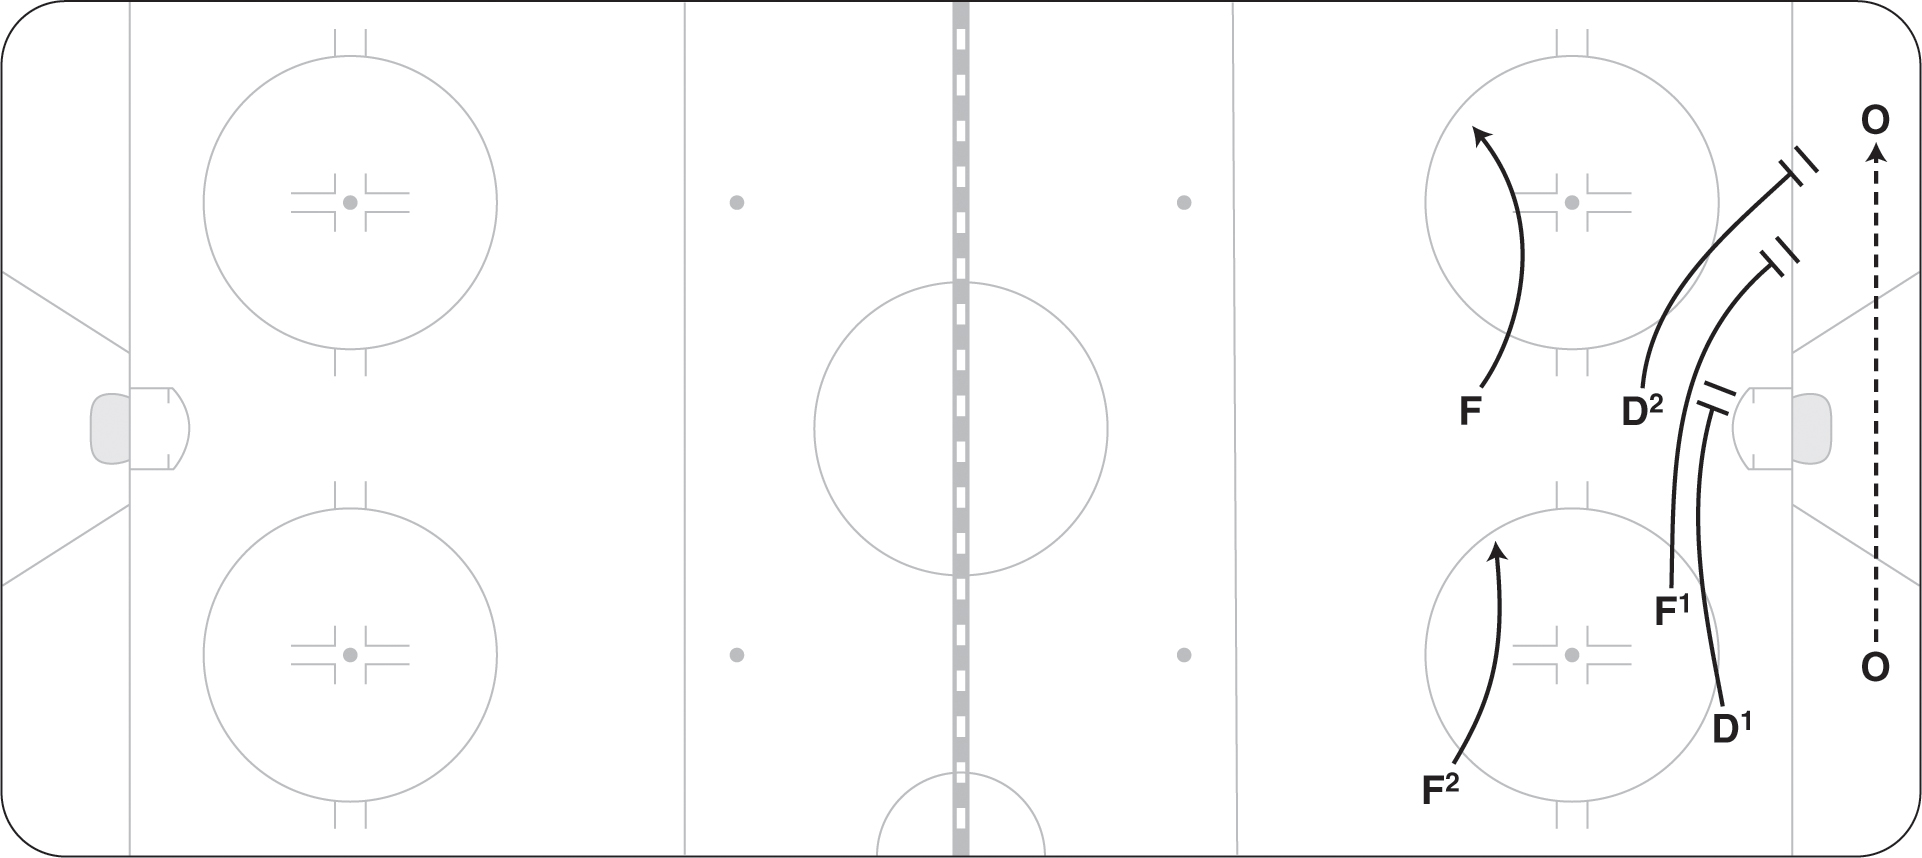
Figure 10.14 Defending the east–west cycle.
Covering the Board Scissor Exchange
When the opposition D slides down the boards and receives an exchange pass from a forward cycling up the boards, coverage can be accomplished in basically two ways. The first is for F2 to move with the D down the boards and cover him tight all the way into the corner (see figure 10.15a). D1, who is moving up with the opposition forward, covers him after the exchange is made.
Because this exchange often happens quickly, we believe that F2 should go after the D only if he can get on him early. If he cannot, he leaves him to the down low coverage F1 to pick up. D1 would still shade the opposition forward on the exchange (see figure 10.15b).

Figure 10.15a F2 stays with D on the scissor cycle.
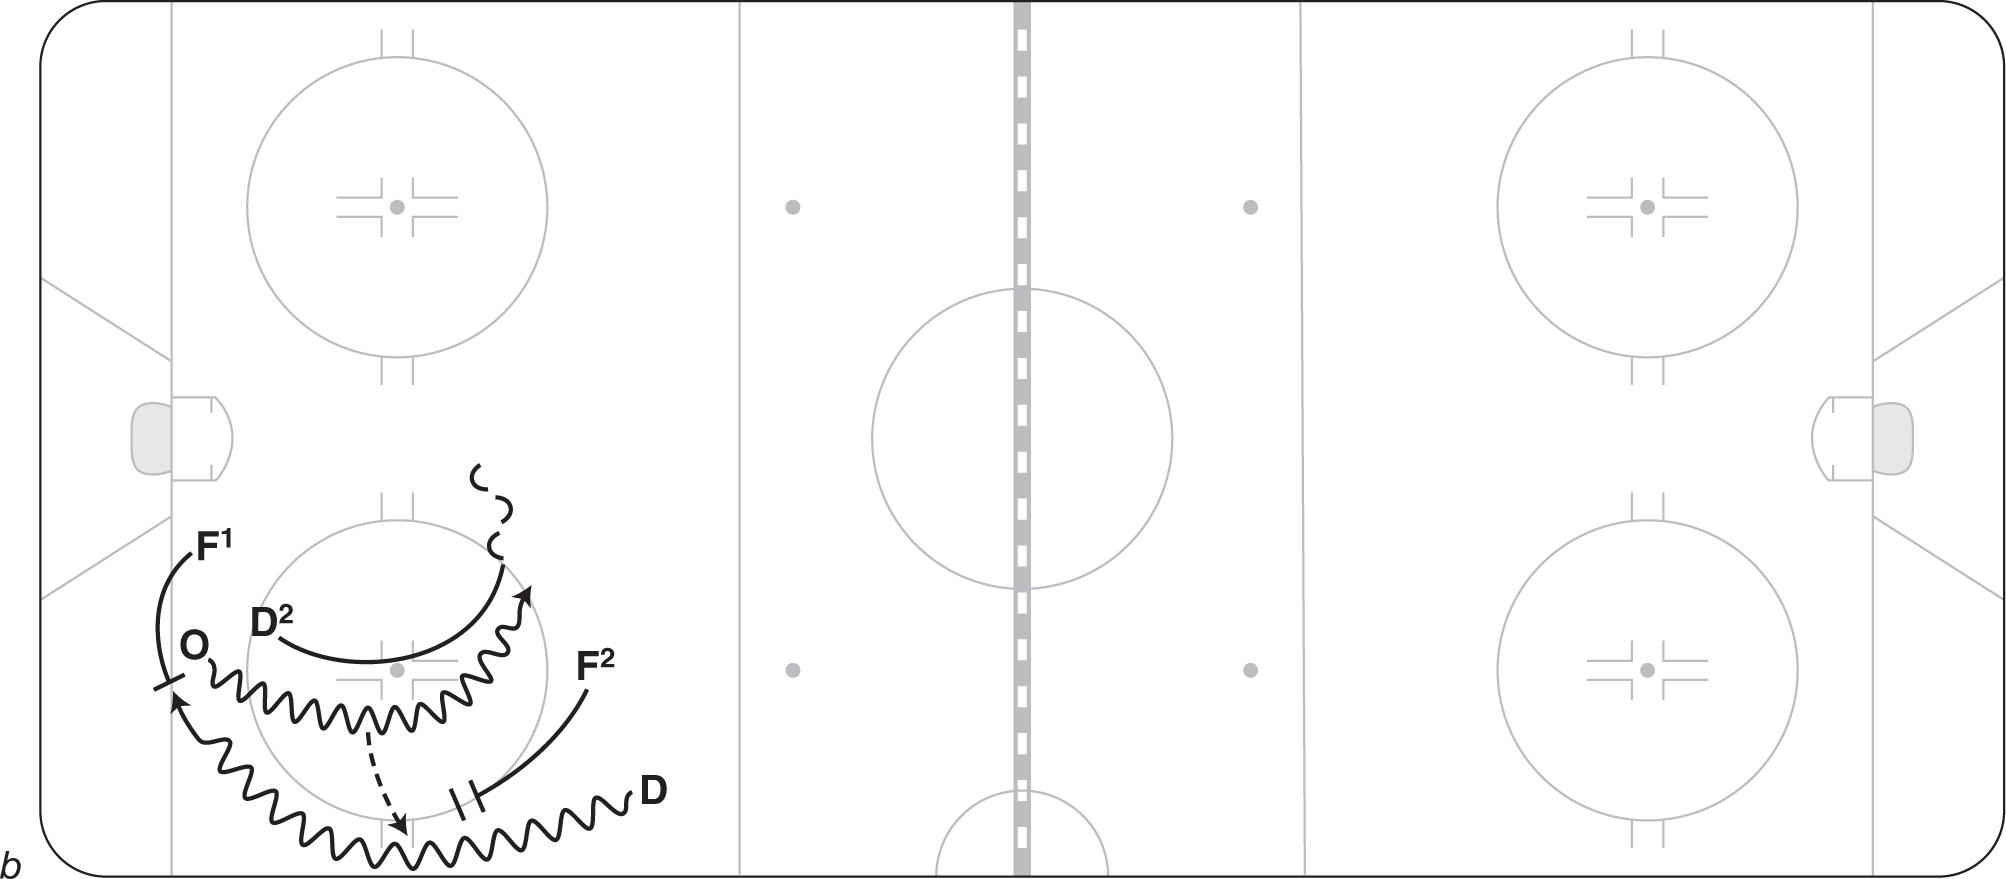
Figure 10.15b F2 switches or hands-off the D on the scissor cycle.
Teams can cover the overload shooter in two ways. Every team in the offensive zone wants to have a player with the puck in the corner, one forward at the net, and one in a shooting overload position. This player is often set up somewhere in the strong-side offensive circle. One option is to have D2, who is responsible for the net area, slide out into the circle and be ready to take away passes to the overload shooter. If this is your coverage choice, then F3 must be aware of any plays to the low net area (see figure 10.16a).
The second option is to have F3 slide over and cover the overload shooter while D2 holds the net front or strong-side post. F2 may also help with the coverage, but he is usually tighter to the boards and the overload shooter is often set up more inside (see figure 10.16b).
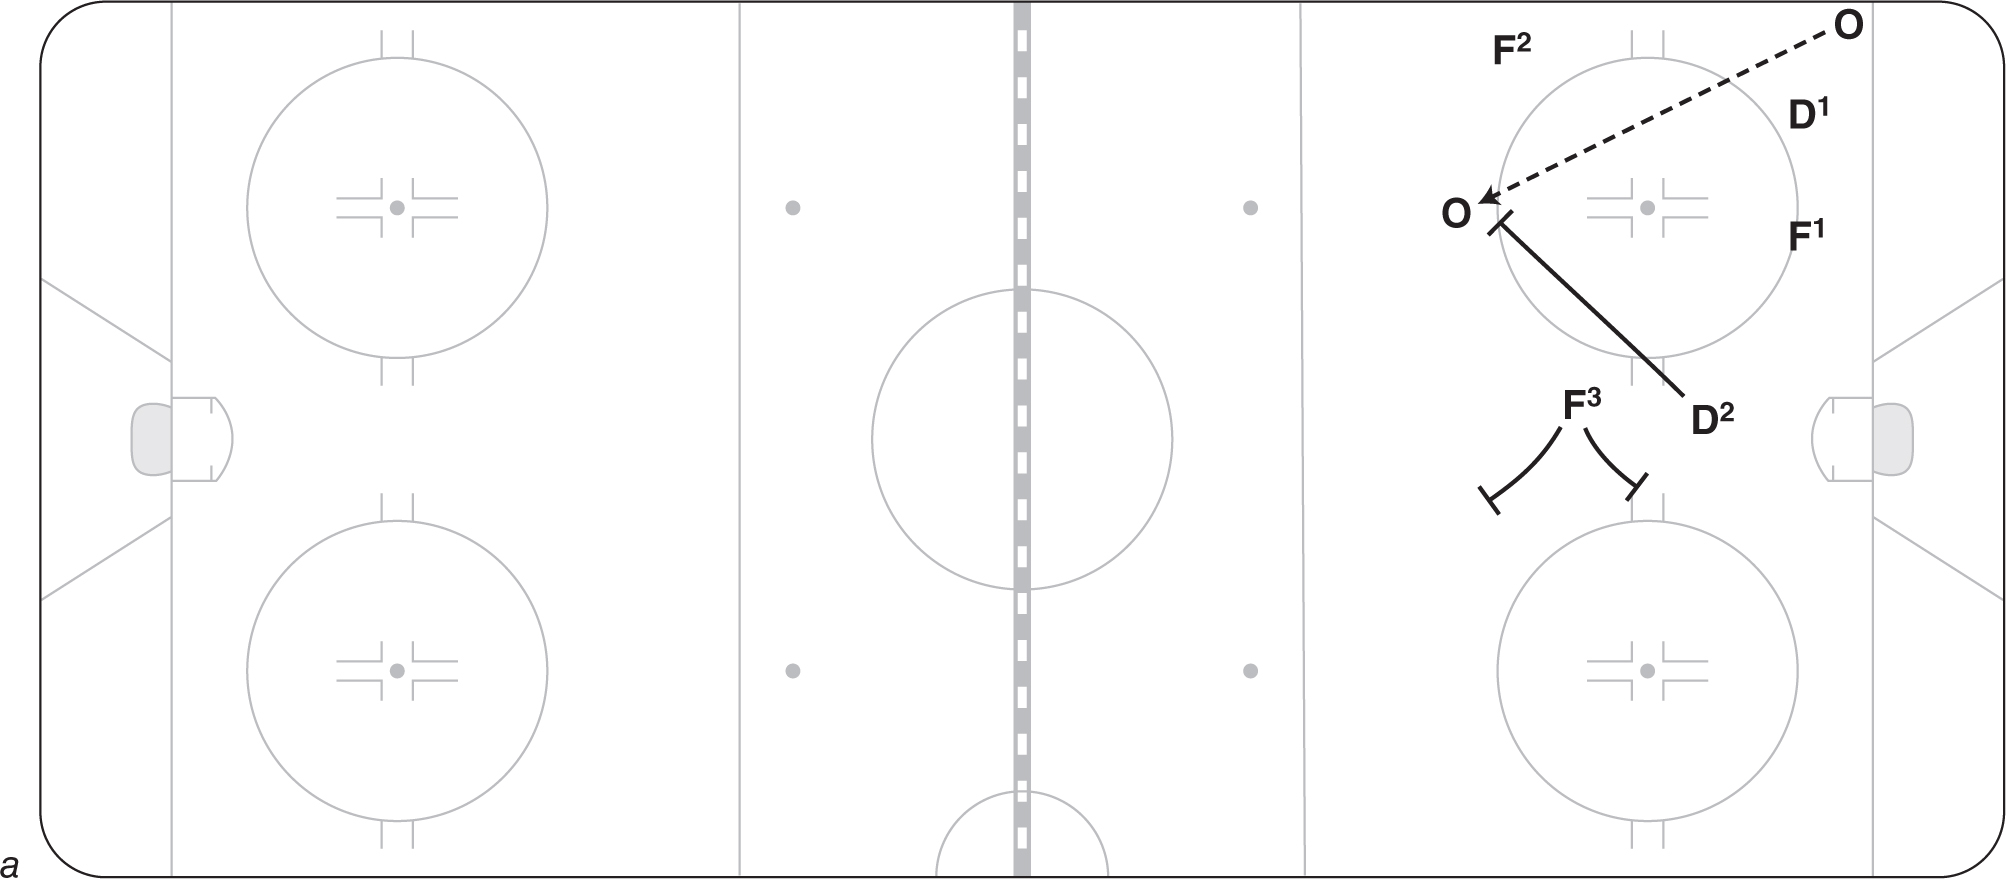
Figure 10.16a D2 covers the overload shooter.
