Penalty Kills
Today’s game of hockey can be characterized by two focuses and two words: special teams. Over the past few seasons, much has changed at all levels of hockey. Most of this change stems from increased attention by officials on the obstruction that had snuck into our game. Players and coaches had become adept at running interference and slowing down not only the game but also its most skilled players. A by-product of this change is a gigantic increase in the volume of penalties and an obvious effect that power plays and penalty kills have on the outcome of each game.
The penalty kill has in many ways turned into an art. Players who in years past may have played a lesser role because of their lack of offensive gifts are now playing a major role in making sure that the opposing power play does not affect their team’s chances of winning. Here are the keys to successful penalty killing:
- Outwork the power play. Most PP units relax to a degree because of the extra man, so be prepared to outwork them.
- Win face-offs. Possession of the puck and a quick clear will not only force the PP unit to go back 200 feet (61 m) for the puck but also frustrate the PP unit, which is what you want.
- Talk. Communication improves positioning and awareness.
- No big hits. Never hit on the penalty kill, as tempting as it is; you should only bump and run. Keep your feet moving and pressure the opponent. Making a big hit takes players out of the play, which you can’t afford when already down one player.
- Have an active stick. Keep it on the ice at all times and in the right passing lane.
- Get body position in shooting lanes and know when to go down to block shots. Blocking shots can be a big boost to the penalty kill.
- When in the zone, pressure the puck in straight lines—rebound back into position quickly after you pressure and lead with your stick as you return.
- Compete hard for loose pucks.
- When clearing the puck, make sure it goes 200 feet (61 m). Try to score only when you have a lane to take the puck into the offensive zone.
- Never get tied up with the player at the net. Most leagues prevent you from moving that player legally, so after he is there, do not create a double screen in front of your goaltender; play around him and have an active stick.
- Players coming out of the penalty box must know where to go. Coaches should set rules for all players coming out of the box when the puck is in your end.
Face-Offs and Penalty Kills
All penalty kills have one thing in common: They start with a face-off. Many pundits of our game see the neutral zone face-off as a throwaway item, especially while killing penalties. We disagree. Every face-off is an opportunity to gain puck possession, and every detail of winning these face-offs must be attended to. For example, lazy positioning can seep into our game. In the neutral zone both defensemen sometimes pull off the line and hang back toward their own end at face-offs.
In this simple example of attention to details, abandoning the left or right side of the face-off increases the opponent’s ability to gain puck possession. Always place players on the penalty kill, including defensemen, tight to the face-off (figure 11.1), so that they can contest for the loose puck and thereby increase your ability to gain possession. Possession of the puck on the penalty kill may last only seconds, but every second decreases your opponent’s ability to score with the player advantage.

Figure 11.1 Always place players tight to the face-off on the penalty kill.
For obvious reasons, the defensive zone face-off becomes a crucial component of a successful penalty kill. Proper possession of the puck in the defensive zone often allows your team to relieve pressure and advance the puck 180 feet (55 m) away from your goal.
A key component of aligning or positioning your players (especially who takes the face-off) has much to do with the center’s strong side. During Ryan Walter’s nine seasons with the Montreal Canadiens, he played a number of those seasons with Guy Carbonneau. Carbo was a right shot, Walter was a left shot, and both were good at winning face-offs on the strong side. What an advantage! On face-offs to the left of the goalie, Walter could easily draw the puck on the backhand; face-offs to the right of the goalie put Guy on his backhand strong side.
The defensive zone penalty-killing face-off alignment has many options. Let’s discuss a few.
Most NHL teams try to have the center draw the puck back toward the corner, hoping that the boards-side defenseman can jump quickly off the line to gain possession of the puck or bump the puck to his partner behind the net (figure 11.2). Ideally, this boards-side defenseman is on his forehand when he approaches the puck. If this is the case, the best option is to lay the puck to the inside winger, who moves quickly toward either the opposite half boards or the opposite side of the net.
On seeing the puck won cleanly, the inside winger races to the corner or the half boards to retrieve a bank pass or slow rim by the boards-side defenseman.
We have found over the years that minor details are important, such as making sure that a right-handed defenseman is on the ice to maximize a won face-off opportunity. (In this case, because the face-off is left of the net, having a defenseman with a right-hand shot on the boards to handle the puck is an advantage if the draw is won cleanly.)

Figure 11.2 A common penalty-kill face-off strategy is to have the center draw the puck back toward the corner.
Never give your opponent soft possession of the puck off the draw. Always make sure that all opposing players are contested for possession of the puck (figure 11.3). If the puck is drawn to the boards, your team should not easily give up possession. Make sure that the boards-side D contests any tied draws hard. You may say that these are small details, but details are important when dealing with the penalty kill.
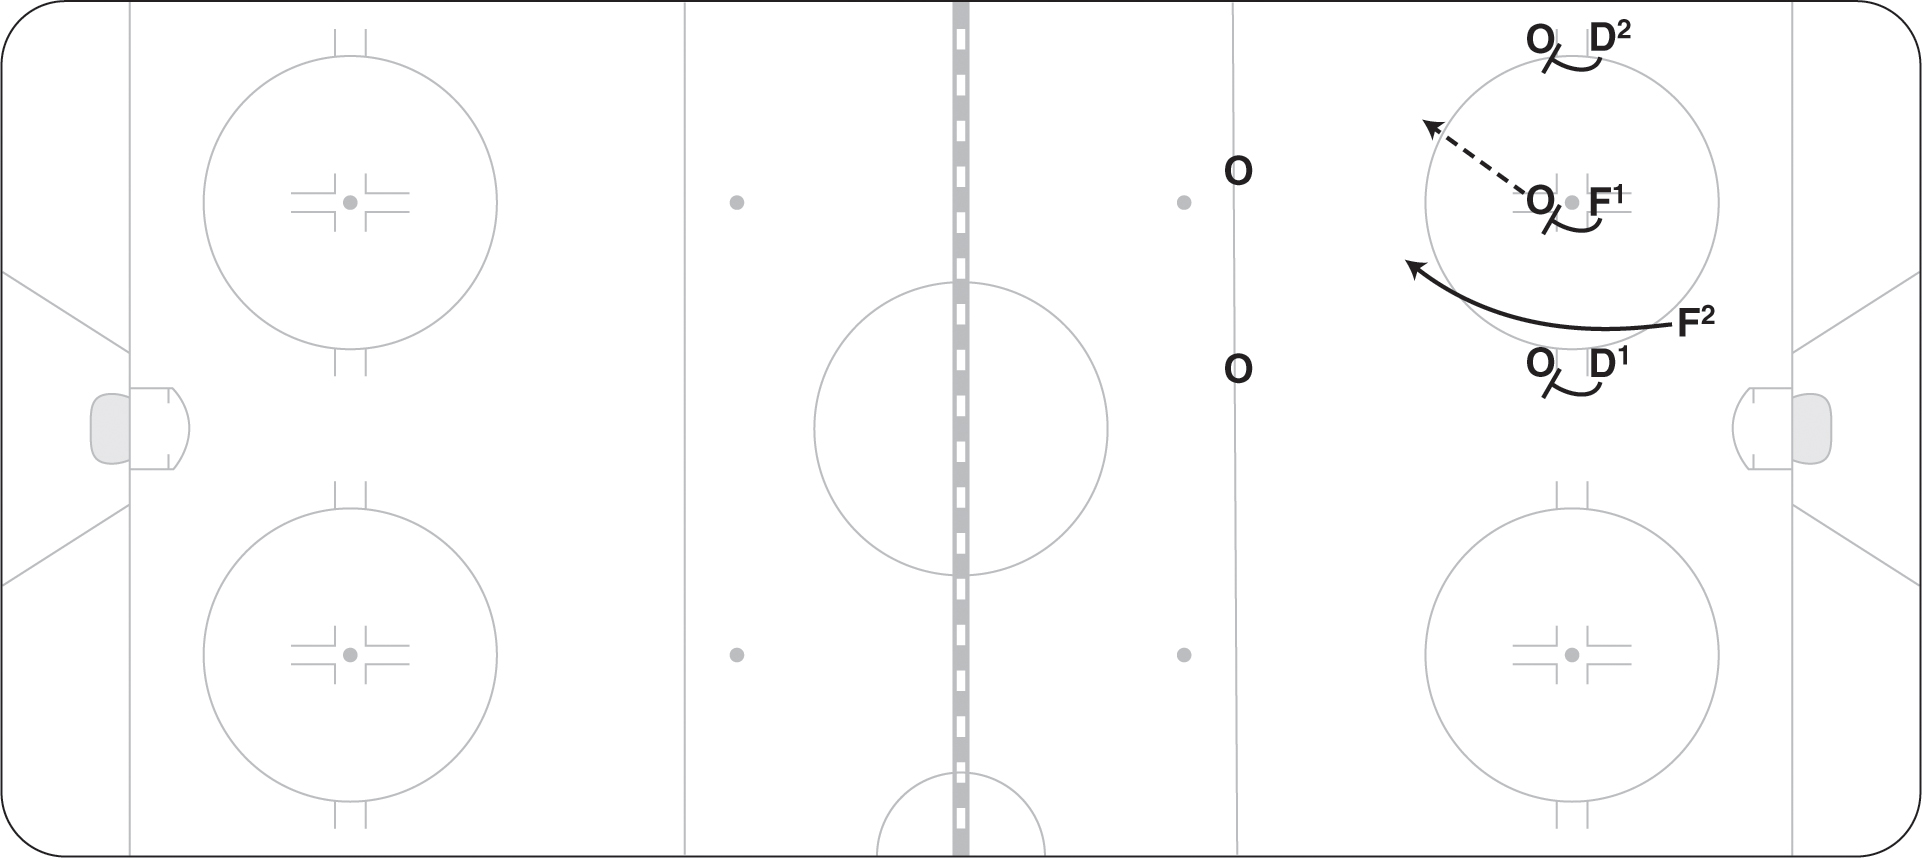
Figure 11.3 Always contest all opposing players off the draw.
There are some other important points to consider about defensive zone PK face-off alignments. We prefer the winger to be inside the pocket of your team’s inside defenseman (figure 11.4), and here’s why. Hundreds of times we have seen this winger jump through toward the center, win a loose puck, and clear it down the ice.
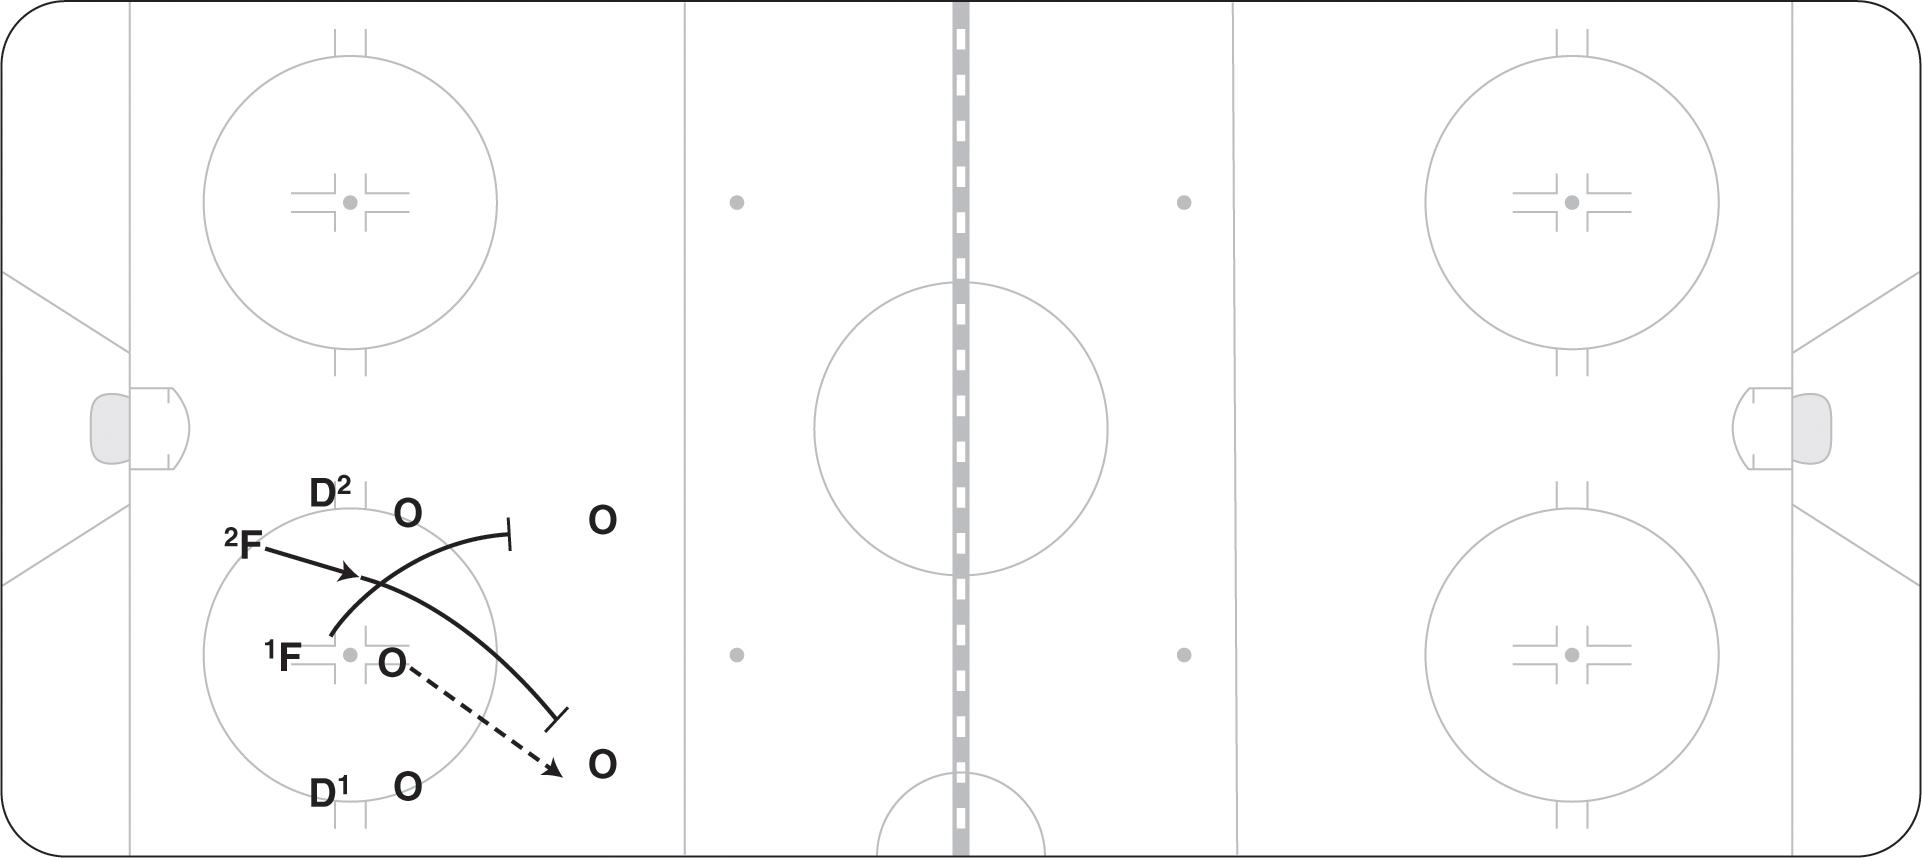
Figure 11.4 The winger should be inside the pocket of your team’s inside defenseman.
We also prefer this alignment because the inside winger has a better chance to jump off the lost face-off and force pressure than the center does. In Montreal off a lost face-off, that inside winger would press the puck hard, and the center would then respond to the secondary positioning (figure 11.5). This alignment works especially well now because face-off interference is called much more tightly. The opposition cannot obstruct this inside winger as much as they could in previous eras of our game.

Figure 11.5 Off a lost face-off, the inside winger can press the puck hard and the center responds to the secondary positioning.
With the game tightening up, the obstruction rule has changed how teams set up their players for face-offs. In this alignment in the past, when the center cleanly won the face-off, the boards-side defenseman would hold up the opposing player a bit, the inside winger would hold up the opposing winger a bit, and the inside defenseman would retreat and slap the puck down the ice (figure 11.6). Obviously, this alignment is still excellent, but both the winger and the boards-side D must be careful on the holdups.
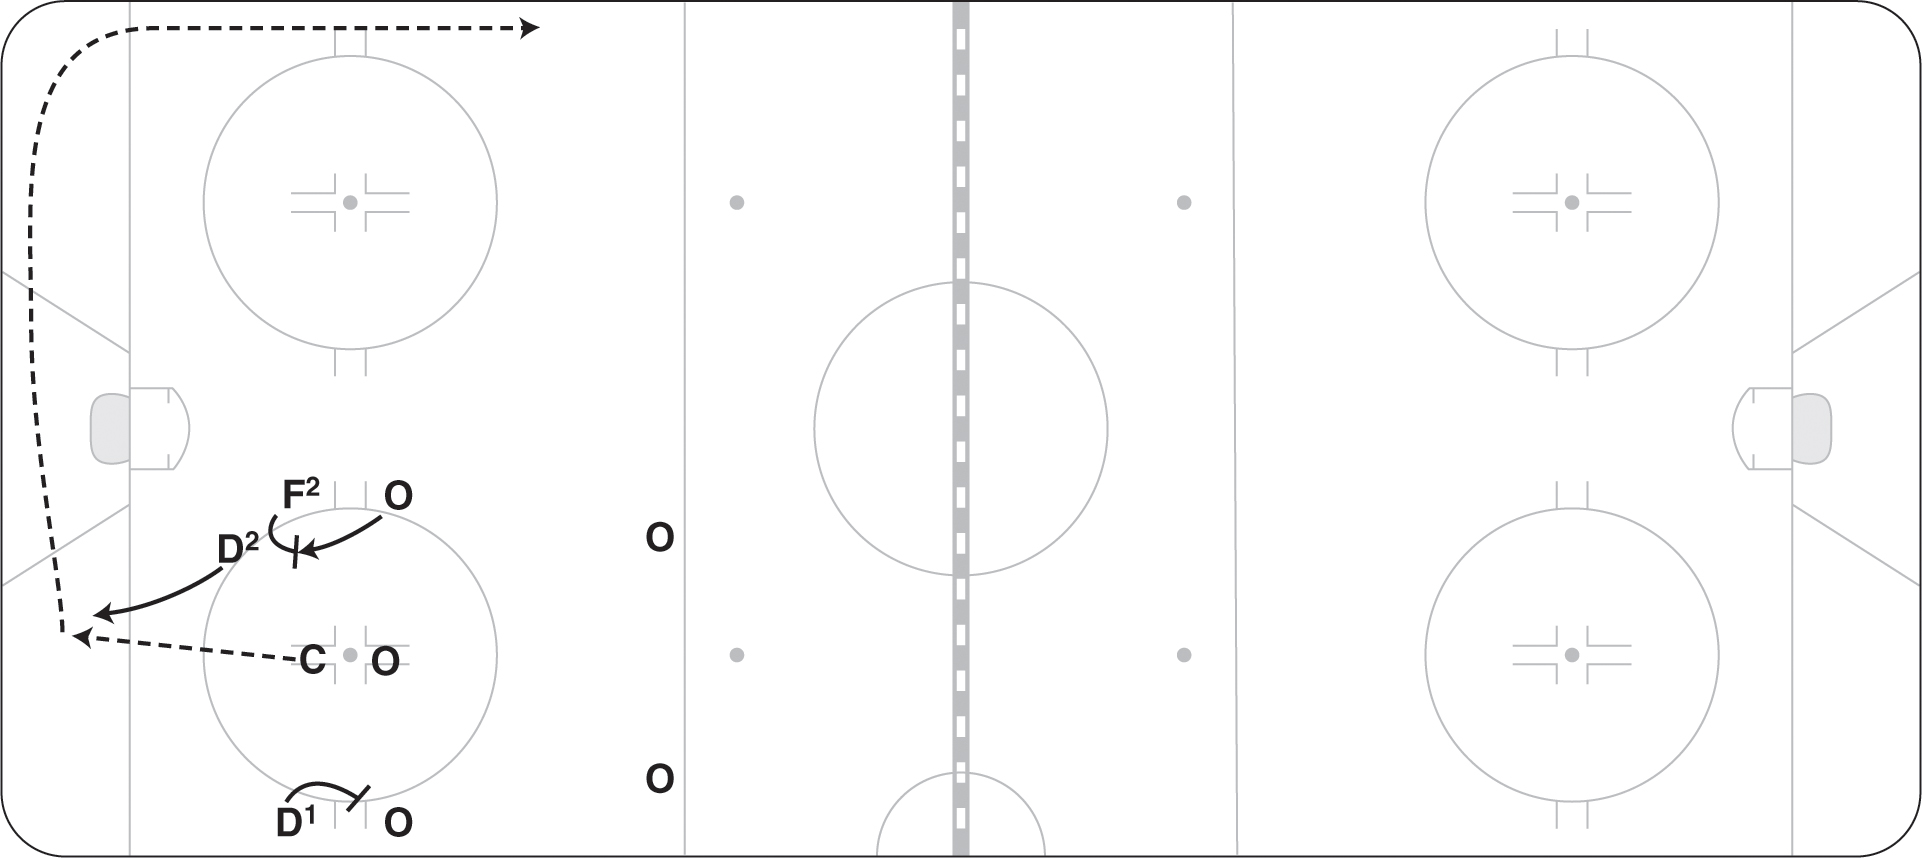
Figure 11.6 The inside D retreats and slaps the puck down the ice.
Another effective way to clear the defensive zone when the face-off is won cleanly is the winger press. In this alignment, the boards-side D rims the puck hard around the boards, and the winger now staying outside presses or runs the opposing D to make sure that the puck departs the zone (figure 11.7).
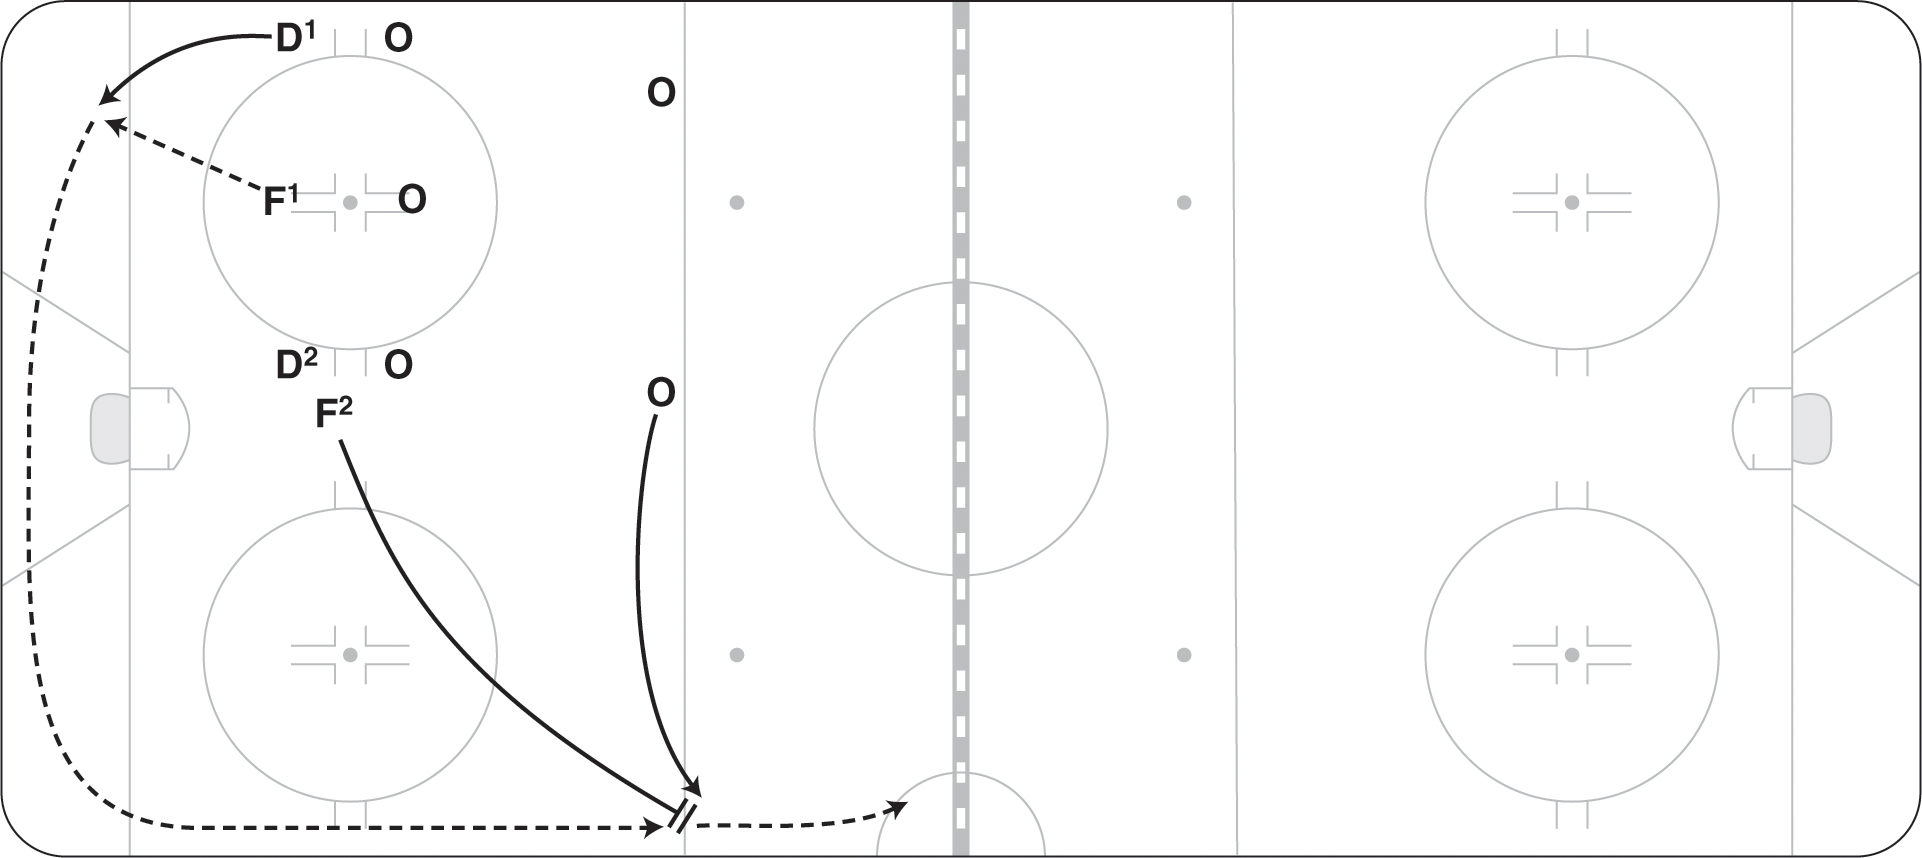
Figure 11.7 The boards-side D rims the puck hard around the boards.
Whatever face-off alignment is used, coaches can see how important it is to have every player on the ice in sync and understanding his role. Remember, the face-off is the only time that hockey players get to play football. Face-offs are a great opportunity for you or your center to call the play and then celebrate when the players on the ice perfectly execute it.
Forechecking and Penalty Kills
Now that you have cleared the puck 200 feet (61 m) from your net (initiating the forecheck) with the help of your expert face-off alignment, let’s look at ways to respond to your opponent’s breakout. Coaches use different styles of up-ice positioning, and it all depends on the objective of their attack. For example, do you want to angle your opponent toward the red line? Do you want to take away speed and a primary passing option? Do you want to pressure deep up ice or meet the attack at the far blue line? Do you want to prevent a long pass and possible breakaway? Your team’s objective determines how your players, especially the two forwards, align themselves on the forecheck.
After clearing the puck or carrying it out of the defensive zone, penalty killers have three options:
- Change to get fresh players on the ice. A change is the priority at any time close to 30 seconds into the shift.
- Pressure the puck when it is dumped down and try to disrupt the breakout.
- Challenge the PP and try to score. Many PP units have a forward on defense and are made up of the team’s best offensive players. On most teams these players lack defensive skills, so the PP unit’s ability to defend is below average. If attempting to score, don’t get fancy—take the puck straight to the net. If you try to make too many plays, the chance of a turnover increases and most likely you will be caught and too tired to react appropriately. If you simplify the attack and go hard to the net, more than likely you will draw a penalty or get a decent scoring chance.
This section describes five forechecking options. In reality, the PK unit rarely disrupts the PP breakout deep in the opposition’s own end; therefore, on the forecheck you should position yourself through the neutral zone so that you are able to pressure the entry.
Tandem pressure is a more aggressive style of forecheck pressure, allowing the forwards freedom to angle and press the puck carrier. This style puts more pressure on the opponent in the neutral zone but can spread out the four penalty killers over two zones.
The forwards-wide approach offers token pressure up ice and creates a four-player alignment across the defending blue line. This setup forces the opposition to chip or dump the puck into the zone and accomplishes its goal of taking the puck out of the power play’s hands so that the PK has an equal chance of retrieving the puck. The forwards-wide approach works well against power plays who prefer to carry the puck into the zone on entries because pressure can be applied on that puck carrier to turn over the puck.
The retreating box (or the backing-up box) keeps all puck possession to the outside and allows angled pressure and no cross-ice passing. The retreating box works well against power plays that dump the puck into the zone because it keeps the PK D farther back into the zone and therefore gives them a better chance at puck retrieval. The retreating box does allow the power play more possession entries but never through the middle. In other words, opponents can skate with speed on the outside of the box and maintain possession of the puck until challenged deeper in the zone.
The same-side press forecheck forces the opponent’s entry toward one side of the ice where all the defending pressure can be applied. This system allows both forwards to angle the direction of the play and allows that strong-side defenseman to step up and make the blue line hard to enter. Teams who move the puck well laterally in the neutral zone may have a chance to break this forecheck, but the same-side press makes it difficult to enter on the strong side.
The passive 1-3 backs up in unison and tries to hold a close gap in the neutral zone. This formation is more passive but has the same goal of getting the power play to dump the puck into the zone (taking the puck out of their hands) and giving the four penalty killers an opportunity to retrieve and ice the puck. This alignment is primarily set up to confront the PP unit at the blue line and force a turnover or dump-in.
- TANDEM PRESSURE
F1 angles and pressures the opposition, trying to get there as soon as the opposing player picks up the puck (figure 11.8). F1 recovers after forcing a pass or stays in the battle if he creates a scramble. F2 angles in on the first pass, making sure he is in position to get back while trying to force the player to unload the puck. D1 and D2 maintain a tight gap, making sure they are aware of any stretch players. F1 fills in the mid-ice lane, while F2 stays up in the middle, skating backward or angling forward and trying to force the entry to one side.

Figure 11.8 Tandem pressure forecheck.
- FORWARDS WIDE
F1 angles and pressures the opposition, trying to get there as soon as the opposing player picks up the puck (figure 11.9). F1 then moves back and takes the wide lane while skating forward. F2 swings and takes the opposite wide lane, also skating forward. D1 and D2 stay up in the middle; they need to have a tight gap and confidence to be tight in the neutral zone.

Figure 11.9 Forwards wide penalty kill forecheck.
- RETREATING BOX
F1 forces the opposition if he can and then skates backward up one side of the ice in line with the dots (figure 11.10). F2 skates backward up the other side. D1 and D2 tighten up in mid-ice. All four players skate backward together. When the opposing puck carrier crosses the blue line, F1 or F2 forces that player to his backhand. Therefore, if the player is a left shot, F2 forces him toward F1. F1 tries to deny the pass back to where he came from.

Figure 11.10 Retreating box forecheck.
- SAME-SIDE PRESS
F1 and F2 wait in the neutral zone for the opposition to break out (figure 11.11). F1 angles the puck carrier to one side with a good stick, preventing passes back. F2 angles across to the same side and goes after the pass or the puck carrier. D1 and D2 tighten up in mid-ice. D2 is ready to challenge passes to the far side, and D1 is ready to retrieve pucks dumped in.

Figure 11.11 Same side press forecheck.
- PASSIVE 1-3
F1 applies pressure only when he is sure he can get the puck and clear it, or he can force the other player as he picks up the puck (figure 11.12). F1 now retreats with a tight gap, initially skating backward, and he then forces the puck carrier to one side. F2 stays in mid-ice behind F1, also skating backward with a tight gap. D1 and D2 stay up; they need to have a tight gap and confidence to be tight in the neutral zone. They also must be aware of any stretch players getting behind them. D1 or D2 must attempt to confront the entry at the blue line by standing up the puck carrier and forcing a dump-in.
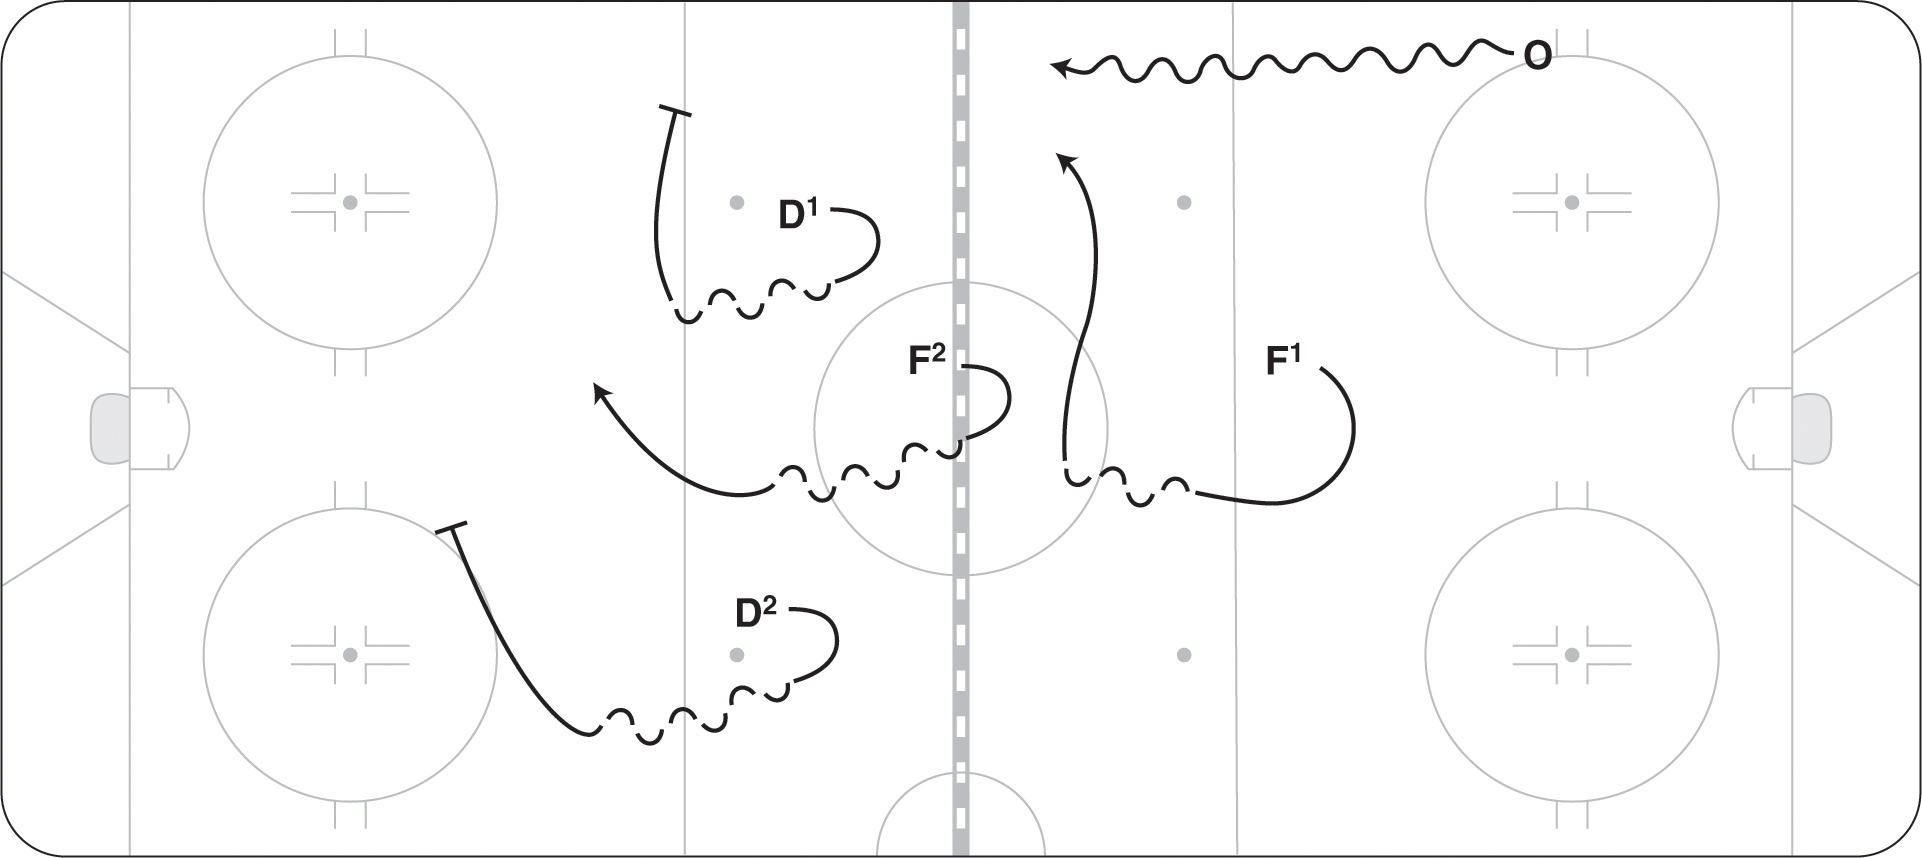
Figure 11.12 Passive 1-3 forecheck.
The entry is one area of the penalty kill where you should focus your time as you develop the special teams unit. If you stall the PP—at your blue line or as soon as they enter your zone—and clear the puck, you have effectively killed about 20 seconds off the clock and have a chance to change, while the PP unit will generally stay out and try to enter again. Teams may challenge the entry by making an immediate stand at the blue line, forcing the puck carrier at the half boards or pressuring the dump-in. Described here are ways to confront the setup of the PP unit, depending on the forecheck used.
- TANDEM PRESSURE
D1 confronts the puck carrier, at the blue line if possible, while F1 goes after any pucks chipped in (figure 11.13). F2 holds the slot. D2 retreats to the net as an option for F1 to bump the puck to. If the PP unit carries the puck deeper, then D1 confronts the puck carrier at the half boards, and F1 seals up top. F2 holds the slot area, and D2 holds the net area. If the puck is dumped in, then D2 goes hard to the dump-in. F1 and D1 also go to the puck. F2 holds the slot area.

Figure 11.13 D1 confronts the entry at the blue line.
- FORWARDS WIDE
D1 and D2 stay up in the middle where the PP unit will try to bring the puck (figure 11.14). If the pass is made to the wide lane, then F1 and F2 challenge the outside lanes. On the dump-in, F2 and D2 go to the corner along with D1. F1 supports the net.

Figure 11.14 D1 and D2 stay in the middle with forwards wide.
- RETREATING BOX
F2 or D1 tries to confront the entry at the blue line (figure 11.15). D2 goes after pucks chipped in, and F1 holds mid-ice. If the PP unit skates the puck in, then D1 or D2 confronts the entry at the half boards. F1 and F2 hold the top positions. If the PP unit dumps the puck in, then D1 and D2 both go to the puck. The closest forward tightens up, and the other forward holds the slot.

Figure 11.15 Pressuring the entry with a retreating box.
- SAME-SIDE PRESS
F1 angles the puck carrier to the outside (figure 11.16). F2 tries to force the entry at the blue line or force the puck carrier to dump the puck. D2 goes after any pucks chipped in. With pressure from F1, F2, and D2, the PP usually cannot skate the puck in unless a pass is made to the wide side. On dump-ins, D1 goes to the corner with support from F1 and D2. F2 holds the slot.

Figure 11.16 Using the same side press.
- PASSIVE 1-3
This setup is similar to the setup of the tandem press. D1 confronts the puck carrier at the blue line if possible, while F2 goes after any pucks chipped in (figure 11.17). F1 holds the slot. D2 retreats to the net or is an option for F2 to bump the puck to. If the PP unit carries the puck deeper, then D1 confronts the puck carrier at the half boards and F1 seals up top. F2 holds the slot area, and D2 holds the net area. If the puck is dumped in, then D2 goes hard to the dump-in. F2 and D1 also go to the puck. F1 holds the slot area.
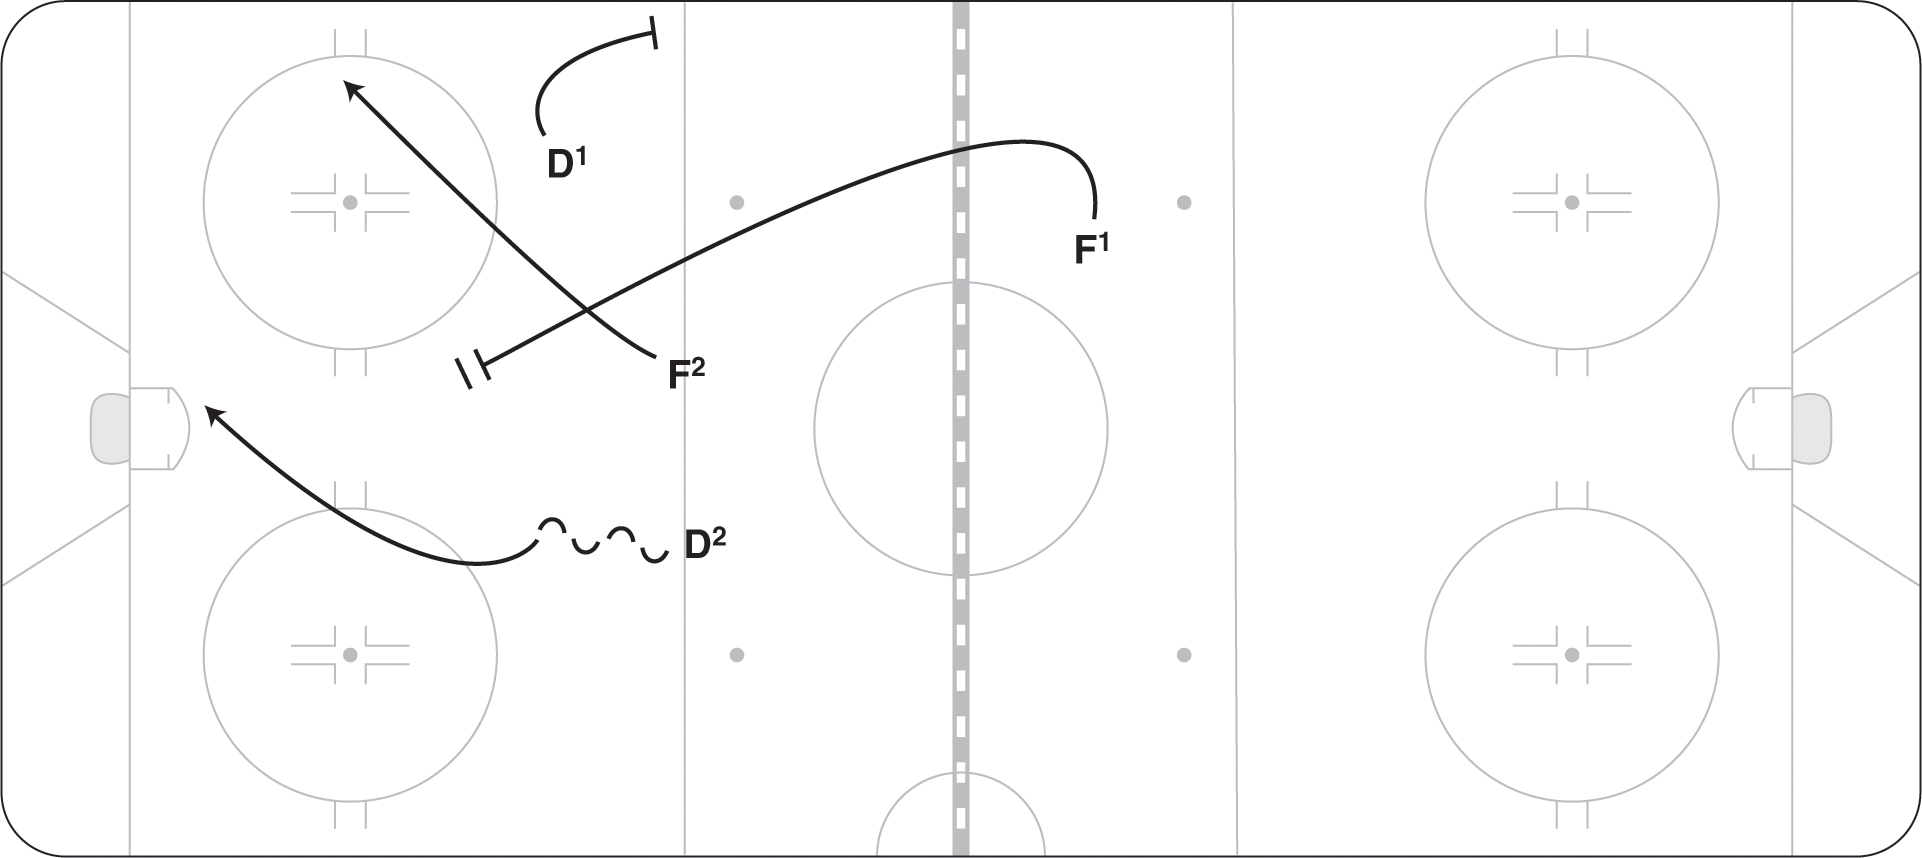
Figure 11.17 Passive 1-3.
- BACKING-UP DIAMOND
Many teams at all levels incorporate the diamond in the way they forecheck and as they back off into the neutral zone. The goal of the diamond formation is to eliminate a direct middle pass to a speed forward and to angle the puck carrier toward the boards with the intent to get the puck out of their hands. Most penalty killers want to press puck carriers into short ice on or before the red line, but accomplishing this task is often a tall order. The secondary goal of the diamond is to force the offensive team to dump the puck in. All power-play units prefer to enter the zone with strong puck possession, so disrupting this puck possession is the primary goal of your PK forecheck alignment (figure 11.18).
The backing-up moving diamond formation is obviously preferable to a standing-still diamond (we see many PKs get into deep trouble here). The forecheck timing and depth of all four players is critical to sustaining movement and backward reactive speed.

Figure 11.18 Penalty killers use a backing-up diamond look.
While in the defensive zone, the penalty-killing unit moves from active contain to contain pressure to all-out pressure, based on the reads of when to pressure. Every coach will be comfortable with a different degree of pressure. Some coaches make a simple rule for their players to read when to press and when not to press. The rule is called “eyes and backsides.” If your player sees that the opposing player with the puck is looking directly at him, he moves into a more passive containing mode. If the player sees an opponent’s backside or number, he applies maximum pressure. Obviously, when a player is turned to get the puck and is not facing mid-ice (backside and numbers), he is not ready to make a play and therefore can be pressured harder. Remember, when one player moves to pressure, each subsequent pass must be pressured.
Scoring Shorthanded
Because many defending teams are using the flip pass or the off-the-wall and out play to ice the puck, PK forwards are getting good at sending the far-side winger to press the puck down ice and potentially get a good offensive bounce. Scoring goals while on the PK used to be rare, but as up-ice and neutral-ice pressure is increasing, turnovers ending in scoring chances are becoming more of the norm (figure 11.19).
The penalty killers should assert more pressure when they know that the puck carrier will have a difficult time controlling the puck and making a good play. Here are some examples:
- The PP has poor control, or a player juggles a pass.
- The player with the puck has no immediate support.
- The player with the puck has his back turned to the net.
- The puck is being rimmed from one player to another along the boards.
- A puck is loose from a rebound or missed shot.
- The ice conditions are poor late in the period.

Figure 11.19 Far-side winger contests the puck.
Following are some situations PK units may face and ways to play them. We describe various power-play options and the way in which the penalty killers should react.
- LOW–HIGH PRESS
When O2 receives a pass from O4 or O1, D1 pressures him up the boards (figure 11.20). D2 is ready to take away any return passes to O1. F1 takes away the passing lane to O4. F2 stays in the slot, aware of passing options to the back side. Players should keep their sticks in the most dangerous passing lane, which could be to the slot player or back-side D.

Figure 11.20 D1 and F1 combine to pressure the half boards.
- CZECH PRESS
F1 forces O4 at the point (figure 11.21). O4 passes back to O2 on the side boards but too high for D1 to pressure. F1 now pressures back on the pass and forces O2 down the boards. D1 is ready to pressure the pass to O1. D2 holds the slot and prevents any cross-ice passes. If the puck is passed back to O4, two options are available: (1) F1 can return up high to pressure, or (2) F2 can pressure, and F1 returns to the slot. F2 would pressure only if he can get there at the same time as the pass.

- DIAMOND FORCE
F1 pressures or stays in O4’s shooting lane as he slides with the puck across the blue line (figure 11.22). D1 moves up slightly, ready to go after O2 if the pass goes there. F2 sinks back into the diamond and is ready to get in the shooting lane of passes to O5. D2 plays the net. Players stay in this formation as long as O4 continues to stay in the middle of the blue line.

Figure 11.22 Diamond force penalty kill pressure.
- FORCING THE BACK OF THE NET
Many teams like to set up behind the net on the PP or take the puck behind. D1 recognizes a chance to pressure and forces O1. D2 holds normal position, avoiding screens or picks, and is ready to challenge the walkout (figure 11.23). F1 slides down to replace D1. F2 moves to the middle of the triangle in front of the net, aware of any opposing Ds coming in from the point. Trying to deny passes to players behind the net is important—players should anticipate that play and cut it off as the pass is made.

Figure 11.23 Forcing the power play out from behind the net.
- TIGHT COLLAPSE
If the puck does end up behind your net, then all players should sink in tight (figure 11.24). They need to be aware of players moving in and have an active stick to take away passing lanes as the puck carrier moves out. D1 or D2 may hold his position or force the puck carrier to one side.

Figure 11.24 Four players execute the tight collapse.
- HIGH BOX PRESS
Many power plays desire to move the puck back to their defensemen to get the puck on net through traffic. Penalty kills are often more passive when this happens because the forwards are working to block the shot by getting in the lane. The high box press allows the forwards to be more aggressive by forcing the power-play defensemen to make quick decisions. This high pressure activates the penalty-kill defensemen to press the play on the half wall and reduces the time and space available to the puck carrier. This high box press increases the chance of both turning the puck over near the half wall and relieving pressure by icing the puck (see figure 11.25).

Figure 11.25 High box press.
The three-on-five penalty kill is a difficult challenge, but at its best, it can be a work of art. The three on five is one area of the team game that, when successful, can create excitement and positive bench momentum for your team. The key to defending the three on five is to have all three players in sync with each other’s movements and the system you implement. Coaches have to decide how tight they want to play it or how aggressive they are going to be. Following are three approaches that coaches like to use.
- INVERTED TRIANGLE
This setup is suited to kill a five on three where the opponent has two Ds up top (figure 11.26). F1 and D1 (D1 could be a defenseman, although some teams like to use another forward) move up and down on their sides as the puck is moved from high to low. F1 and D1 should not go too wide or too high. D2 plays the net area and moves from post to post. D2 must deny the side-to-side pass from O1 to O2. F1 and D1 must be ready to block shots. During five on threes, the key goal is to stay tight and compact and be strong on rebounds.

Figure 11.26 Using the inverted triangle when killing a five on three.
- SPLIT THE DS
This setup is another option to kill a five-on-three penalty when the opponent has two Ds up top (figure 11.27). F1 stays in the middle of the ice, denying any high passes through the middle and any passes between the two Ds. D1 and D2 play the base of the triangle. When the puck is at the bottom with O1, then D1 forces him out wide and D2 covers the net. F1 stays in the low slot. This penalty-kill setup does not give up much down low, and it takes away any D-to-D up-high passes with the stick of F1.

- TRIANGLE, ONE HIGH
This setup is primarily suited to kill a five on three where the opponent has one D up top. F1 stays in the middle of the ice (figure 11.28). When the puck is up top, he stays head to head with the one opposing D. D1 and D2 form the base of the triangle. When the puck is at the bottom with O1, then D1 forces him out wide and D2 covers the net. D1 and D2 must also get in the shooting lanes of O3 and O4 when they have the puck. F1 stays in the low slot. Players should recognize where one-timer shots could come from and have active sticks.

Figure 11.28 One high penalty kill versus five on three.
The three-on-four penalty kill adds its own complexity and is similar to yet different from killing the three on five. The difference is that the defending three must decide whether they are going to take away the top two shooters or stay near the front of the net. Usually the four on three is much easier to kill than the five on three. The PK unit focuses on playing around the man at the net, leaving them three on three against the shooters.
- TRIANGLE, ONE HIGH
Most teams on a four-on-three power play set up in a diamond with one player at the net, so the triangle penalty kill with one high is the most effective system to use. F1 stays in the middle of the ice (figure 11.29). When the puck is up top, he stays head to head with the one opposing D. When the puck is passed, F1 stays in the middle and uses his stick to deny the pass from O2 to O3. D1 and D2 are ready to move out and take the shooting lane away from O2 and O3. D1 and D2 do not tie up with O1 at the net but are ready to defend his stick and get body position if the puck is shot through.

Figure 11.29 Three-on-four diamond with F1 in the middle.
Remember the old adage “Defense wins championships.” Working on your team’s PK structure, getting all players on the same page, and having your goaltender be your best penalty killer are all ways to give your team a better chance to win.