Attack Zone
Cycling. Setting up behind the net. Activating the defense in the offensive zone. Stretching the zone. Exploiting the high seam area. Protecting the puck low to buy time and find players who are open. Getting open off the puck. Screening the goaltender. Making tight plays to sticks at the net. All are tactics and strategies used in the attacking zone.
When an attacking team has possession in the offensive zone, the brilliant coaches in the game of hockey really turn on their creative juices. The goal of every attacking team is to create offensive chances. What constitutes a chance differs from coach to coach, but in essence, a chance is a shot taken from inside the scoring area. Three general philosophies can be used to create these offensive chances:
- Shooting through traffic
- Creating separation
- Creating deception
Taking shots through traffic (players in front of the goaltender) will obviously distract the goaltender or deny him the opportunity to see the puck. Goalies are so good these days that a shot without traffic between the shooter and the goalie is usually a giveaway. All the top offensive teams make sure that one player is always in the net area and moving across the sight lines of the goaltender or planted in front of him. Often this tactic results in the opposition trying to clear the net by moving this player, which results in a double screen or possibly a penalty. Both favor the offensive team.
In the separation tactic, the puck carrier creates the time and space needed to make successful plays and create shots. Players away from the puck have to work to get open and separate from their check. They should move to areas where they can receive a pass and be ready to one time the puck or shoot quickly. Sometimes players off the puck can move into an area and then push off their check or push back into an open space. Separating from your check sounds like a simple task, but we find that many offensive players off the puck skate into their check and essentially check themselves. Smart players, however, always seem to be able to get open, and as a result they always have the puck.
The puck carrier also needs to be deceptive so that the defending team doesn’t know whether he is going to shoot or pass. Deception tactics include faking a shot or pass or simply looking the defender off. Looking the defender off the puck means looking at an option, making a motion to pass in that direction, and then skating or moving in another direction. Usually the defender will turn his feet toward the first look, giving the offensive player room to move by. Coaches often talk about the triple-threat position, and we mention it several times in this book. When an offensive player has the puck, he should always keep it by the hip on his forehand side, which gives him the option of passing, shooting, or making a move on the defender. This triple-threat position creates deception simply by the location of the puck and the options available. All these tactics play themselves out through many practiced and set plays that we will now explore.
Cycling
Many offensive strategies include cycling the puck. Younger, inexperienced players often get the cycling process wrong, so let’s start with this basic tactic. The cycle works best when the player with the puck deep in the offensive zone begins to bring the puck up the boards toward the blue line (figure 4.1). Generally, a defender will press this puck carrier toward the boards and work to remove the puck. The key to the cycle setup is the second offensive forward. This forward mirrors the positioning of the puck carrier but stays 10 or 15 feet (3.0 to 4.6 m) away from the puck carrier on the boards, toward the goal line. This player calls for the puck. Here is where inexperienced players mess up. The tendency is for players to pass into open ice, but the cycle doesn’t work best this way. It works best when the puck is angled off the boards, away from the defender’s stick, so that it bounces off the boards and onto the stick of the second offensive forward. Cycling is an effective tactic when executed correctly.

Figure 4.1 Cycling.
The purpose of the cycle is to keep possession of the puck and take it to the net to create a scoring chance. If the initial player with the puck can gain a lane to the net, he shouldn’t cycle—he should take the puck to the net. Many coaches become upset when players cycle for the sake of cycling and don’t read when to exploit the defenders. If the puck carrier feels pressure and knows the lane is shut down, he should lay the puck back to the corner where he came from. His support player (F2) needs to read this and move to support the cycle pass. After this play is made, F2 may continue the cycle with a pass back to F3.
The three forwards should move in sequence from the boards to the slot to the net and back to the corner to support the cycle, a sequence that accounts for the name. The goal of the cycle is to pull a defender out of position and then attack the net or the seams with a quick pass to the open player. Opponents often get their coverage confused because of the quick rotation of players who cycle with the puck, lay it to the corner, and work to get open. The cycle is not easy to defend continuously, and a missed defensive assignment means an offensive chance. The cycle works best along the side boards but can also be used near the back of the net.
The net cycle (figure 4.2) is another cycling option. If well executed, the net cycle pulls defenders from the front of the net toward the corner or behind the net, and this movement often opens up passing lanes for excellent scoring chances. It is similar to the side board cycle in that one player skates behind the net with the puck and when pressured passes the puck back behind the net. In addition, it forces the goaltender to follow the play behind the net while trying to keep track of options in front, which is difficult.

Figure 4.2 The net cycle.
Off any cycle play, getting the puck to the net quickly is important. Whether the cycle is on the side boards or behind the net, as soon as the first cycle pass is made that player should look to take the puck to the net or shoot the puck at the net right away. Quick plays like this catch the defensive team off guard and catch the goaltender trying to adjust. In most situations a quick shot will result in a rebound because the goaltender is not set. The other players going to the net should have their sticks on the ice ready to play the rebound or make a potential shot pass play.
Playing Behind the Net
Wayne Gretzky played behind the net so effectively that this area became known as his office. Gaining offensive positioning behind the net opens up many opportunities for direct-shot (high-percentage) chances. To use the back of the net effectively, teams should automatically move the puck to this space when they don’t have another option. The offensive player at the net now reads that his teammate is in trouble and moves to the back of the net area. When a pass is made to the back of the net, the offensive team will always get there first because the defensive team never overplays this area. Using the back of the net forces the opposing defense and goaltender to focus on that area while losing track of where players are in front. Sometimes two defenders can be drawn into this area; if the defensemen are unsure who should be covering the player behind the net, both may jump in at the same time. Now at least one offensive player will be open in the dangerous scoring area in front of the net.
One of the most effective plays from behind the net occurs when an offensive defenseman skates hard from the point (blue line) looking to receive a pass in the slot (figure 4.3). If the defenseman pressing the net is unable to receive a clear pass, the second option off this play becomes very dangerous. As this defenseman moves to the front of the net—pulling as many defenders with him as possible—the boards-side forward steps into this soft spot vacuum and often gets to take a dangerous shot through the traffic created by the pressing defenseman.
The second play selection from behind the net (figure 4.4) is also hard to defend. The big decision that defenders must make about the offensive player standing behind the net with the puck is when or how they should flush him out from behind the net. If the defending defenseman attacks the offensive player from one side of the net, two options open up. The first is that players in high-percentage scoring areas may be left open. The second option is for the player with the puck to reverse the flow and create some back-door deception. When flushed out, the player with the puck angles the puck (similar the half-boards cycle) to a teammate filling this flushed-out position. Defenders who were focused on the player being flushed out must now divert their attention back toward the other side of the net. This refocus often opens up back-door or back-side plays.
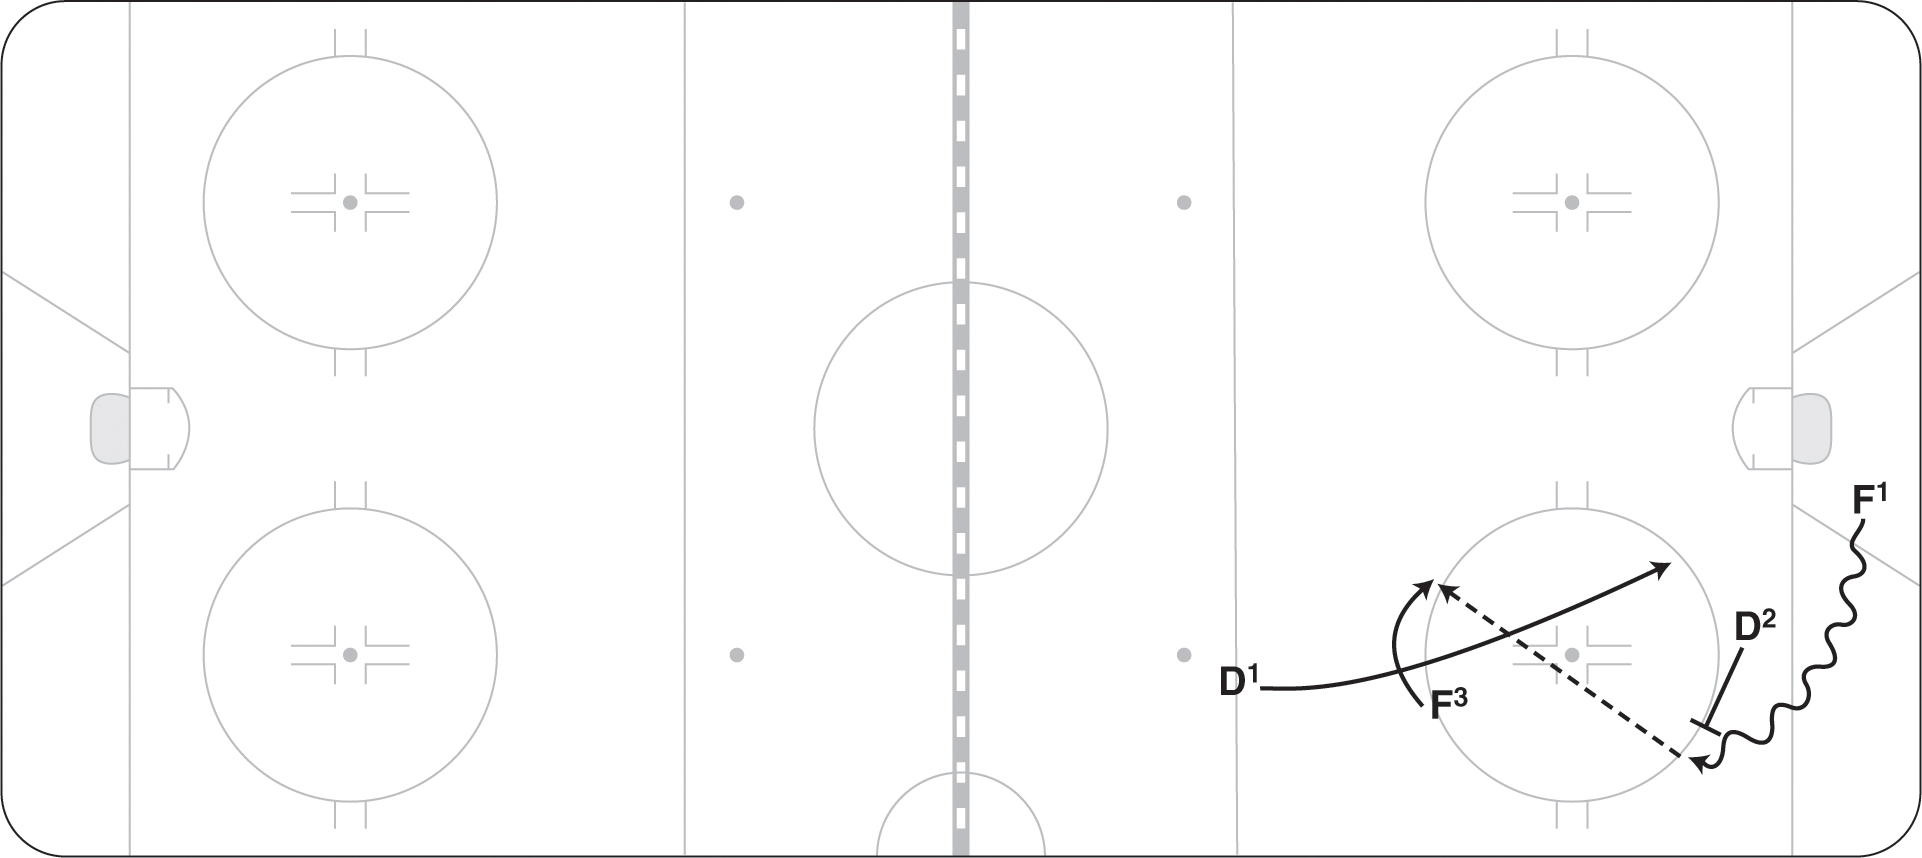
Figure 4.3 Pressing the net.

Figure 4.4 Options for a player being flushed from behind the net.
Activating Defense in the Offensive Zone
As with other aspects of offensive play, coaches have to decide how comfortable they are with getting their Ds involved in the offense. Basically, they need to determine how much risk they want to take. If the offensive team has quality puck possession, allowing the defense to move in offensively presents little risk. You have to teach your players to make good decisions with the puck and trust that they will make a safe play rather than a dangerous play. The key rules for defensemen that will help minimize risk are as follows:
- Only one D at a time goes deep into the offensive zone.
- Ds must read the time of the game and the score; they should be more cautious when moving in offensively late in periods or when their team has the lead.
- The forwards must have quality puck possession for the defense to activate.
- When a D moves in, if a pass is not made, he does not hang out but gets back to the blue line quickly.
- SCISSOR CYCLE
Deception and speed are key offensive weapons to increase offense in our game. When teams can combine these two weapons in our structure, our offensive numbers increase. One play that combines these two tactics is what coaches call the scissor cycle (figure 4.5). The scissor cycle can happen anywhere in the offensive zone, but it may be most effective when F1 generates behind the net speed skating hard toward the blue line. F2 (defenseman or forward) starts near the boards and backs up looking for a one-timer pass, while F3 uses across the blue line speed to slide down the boards to receive a short shuttle or drop pass. Obviously, if F1 can fake a pass to F2 just before dropping the puck to F3, the execution is enhanced by this deception.

Figure 4.5 The scissor cycle.
Stretching the Zone: Low–High Plays
With many teams playing a collapsing defensive style (one in which all five defenders play low in the offensive zone), penetrating the net area in the attacking zone is often difficult without using low–high plays. Low–high plays spread out the defense and create opportunities to get the puck to scoring areas with more time and space. This strategy must be identified before a game as part of the game plan.
Offensive players with the puck make a quick pass to the point (F1 to D1) when they get the puck low or possibly recover a loose rebound in the corner (figure 4.6). D1 can now make a decision to shoot, move the puck to D2, or pass back to one of the forwards. Having the puck move from down low to the blue line creates a gap in the defensive alignment because the defensive wingers try to rush to their point coverage, leaving space between them and their defense. When all five defensive players are down low, the scoring area is crowded; getting the defensive wingers to move out high creates more space in the slot. Each time defenders scramble to defend the high blue line area, offensive players have an opportunity to find more time and space to create better offensive chances low. In addition, the shot from the point, through traffic, is still a primary option to create scoring chances.

Figure 4.6 Stretching the zone.
This section describes special plays made in the offensive zone using an active defense. The plays are all effective and provide a variety of options.
- STRONG-SIDE SLIDE
D1 reads that F1 is cycling out of the corner, so he slides down the boards and receives an exchange pass from F1. The exchange is like a handoff in football; the puck carrier protects the puck and gives it to D1. D1 now has the option of driving the net with the puck or cutting behind the net with possession and looking for a passing option (figure 4.7). F1 should cycle out high and remain in a defensive position until D1 recovers.
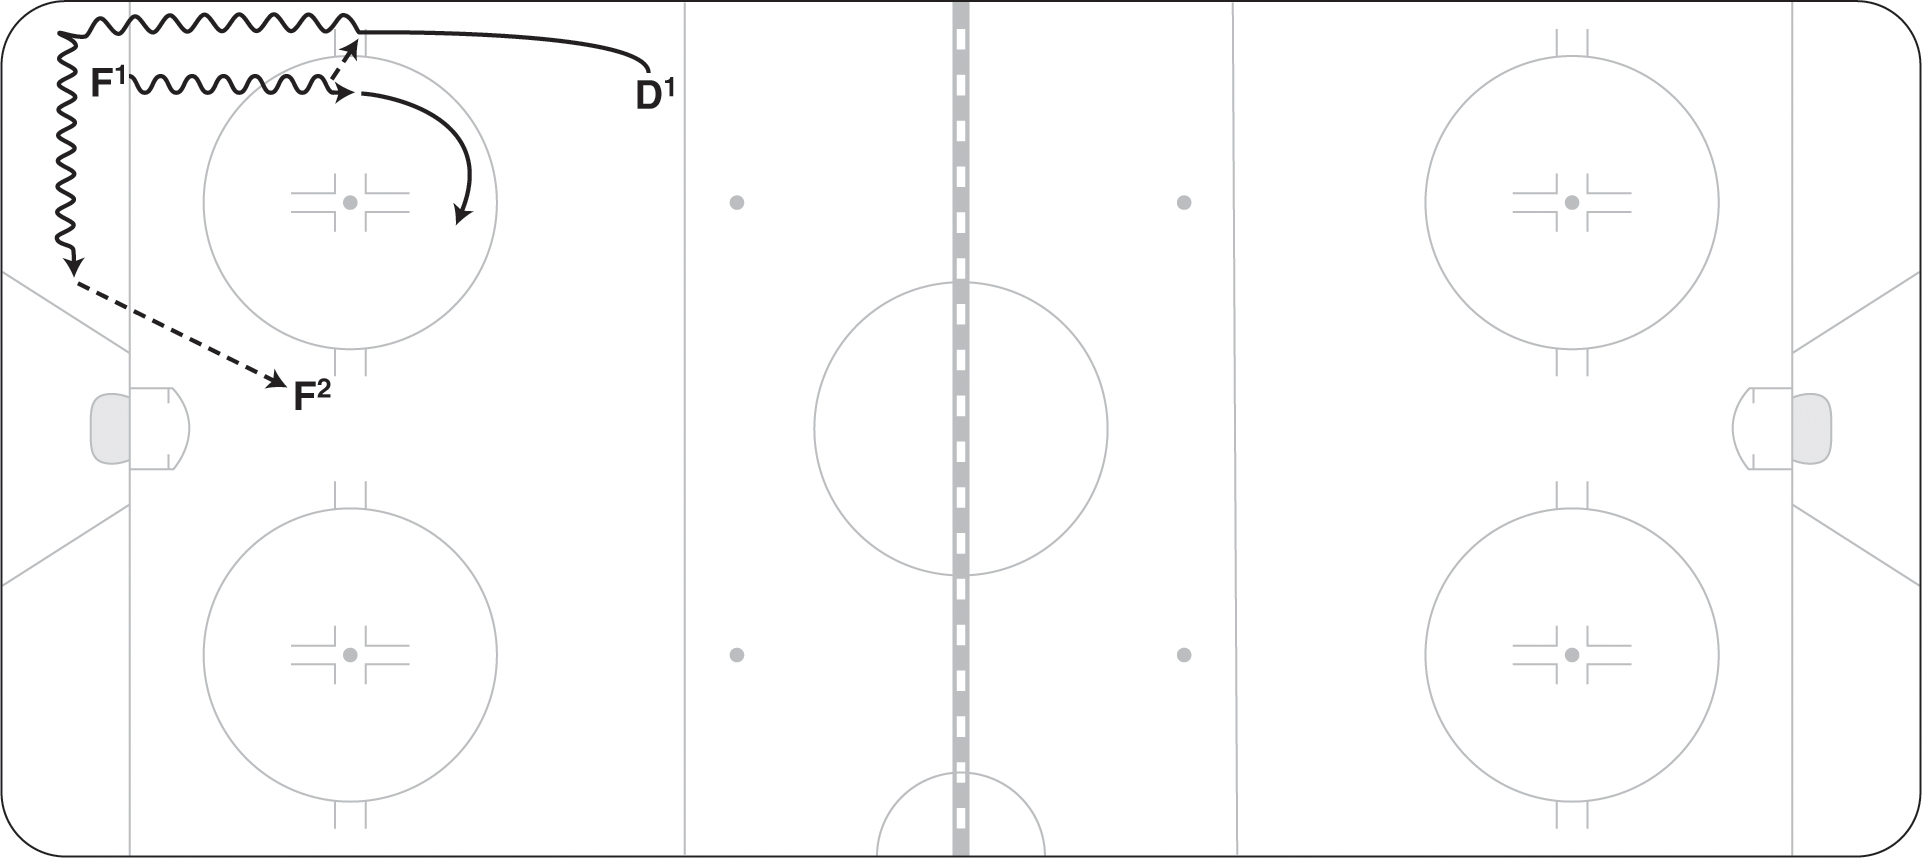
Figure 4.7 Strong-side slide play.
- MIDSEAM PENETRATION
When D1 sees the defensive team overplaying the boards, he should slide into mid-ice and down through the slot toward the net. F1 should use deception by looking as if he will pass to the point and then making a quick pass to D1, who is moving through the middle of the slot. D1 may have an opportunity to shoot quickly or move in deeper (figure 4.8). Again, F1 should move out to a higher defensive position after the pass in case of a turnover.

Figure 4.8 D1 jumps into the midseam.
- BACK-SIDE SLIDE
When the offensive player (F1) has the puck and D2 reads that the defensive team is overplaying one side of the ice, D2 should quickly move down the back side and be ready for the pass. F1 tries to find an open seam to thread the pass through to the wide side. If D2 doesn’t get the pass when moving in, he should get out immediately. Again, this play should be made quickly and with deception so that attention is not drawn to the defenseman moving in. This play is riskier because of the length of the pass and the number of players in the area, but if D2 gets the pass clean he will have a great scoring chance (figure 4.9).
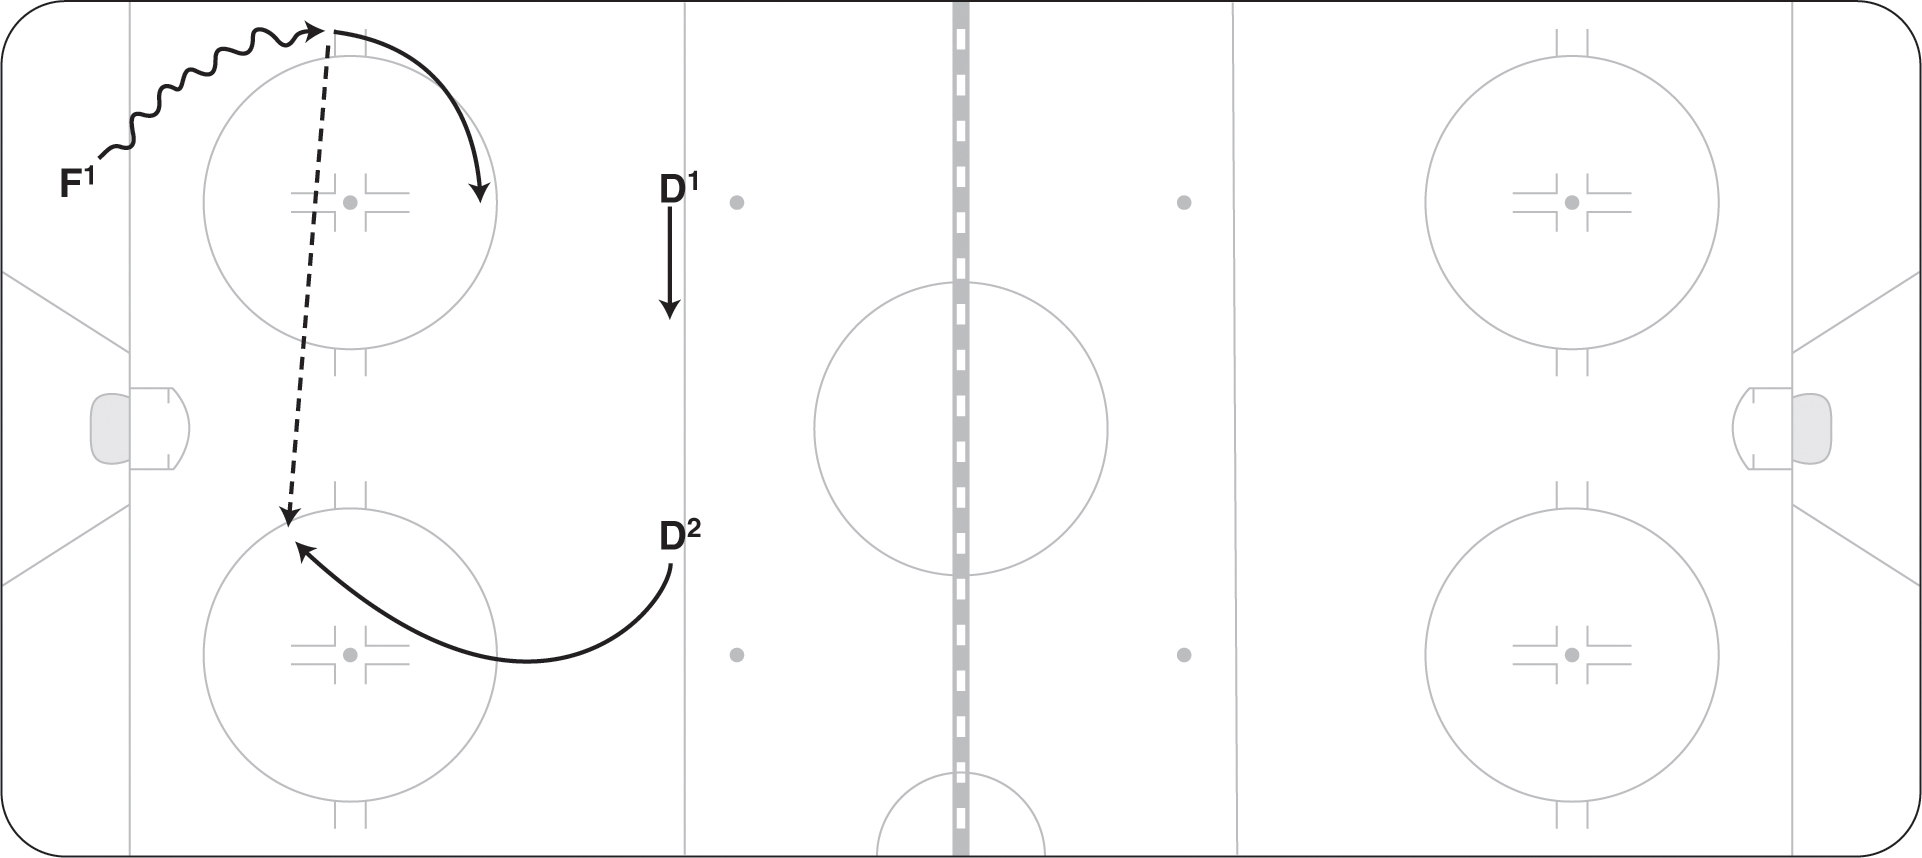
Figure 4.9 Back-side slide option with D2.