Forechecking
A team applies forechecking pressure in three situations. The most common situation occurs when a team dumps or chips the puck in from the neutral zone and then tries to retrieve it while the opponent tries to break out. The second scenario develops when the offensive team takes a shot that creates a rebound. They then forecheck to get the puck back. The final forechecking situation occurs off a turnover. When the offensive team turns the puck over, they need to apply forechecking pressure to get the puck back. Essentially, there are six keys to successful forechecking pressure:
- F1 (the first forechecker in) must get in quickly and establish an angle when pursuing the puck carrier. This action will limit the options for the breakout team. Taking away time and space from the breakout team forces hurried plays and mistakes. The quicker that F1 responds to the puck, the less time the offensive team will have to make a play. Coaches often stress the hit, but we believe that the first priority for F1 should be to put a stick on the puck, preferably while separating the puck carrier from the puck by using his body.
- After the puck is moved, F1 must recover to a high position above the puck while F2 or F3 responds to pressure the pass. If F1 follows through on the hit, he must get off the check right away and move above the circles while observing where the puck is and what is happening.
- He continues to pressure and recover, pressure and recover until the puck is turned over. The response of the second and third player is key to keeping heat on the opposition and forcing a turnover.
- If the defensemen are going to pinch (pressure down the boards), they have to get to the puck before it is under control. Pinching defense must read the play and anticipate when the pass is being made to the winger on the boards. One forward must always be in a position to back up the D. Having the high forward in a position to back up the pinching defense will prevent odd-man rushes the other way.
- Good forecheckers use their sticks to take away passing lanes. They keep their sticks on the ice and in the right lane. The right lane is the one that leads to the best breakout option for the other team. Forecheckers try to take away this option or make it difficult to make the pass by having an active stick. A common mistake with players on the forecheck is that they are in a rush to get in and finish the hit so they lose stick position. Most of the time their stick is in the air when they check.
- Players need to finish hits when appropriate. Physical play on the forecheck often forces the defense to move the puck quicker next time. A hit is not always the best choice. When the forechecker is within striking distance of the pass, he should continue to pressure the puck instead of hitting the first opponent.
Forechecking Systems
This section describes five forechecking systems that a team can use to get the puck back. Which one you use may depend on the level you are coaching. For example, pressure forechecks work well against younger teams who have difficulty making quick decisions or sequential passes. Your choice will also depend on the risk you want to take as a coach. Conservative coaches like to employ a system in which one player is in on the forecheck but all other players are above the puck. Aggressive coaches will have their defense pinching on a regular basis. Again, the key is proper execution. Therefore, any of the five systems could be used from novice to pro. All these forechecking systems can be incorporated off a dump-in, chip-in, or rebound situation.
1-2-2 Forecheck
This forecheck involves hard pressure from the first forward (F1) and then as the puck is moved, quick pressure from F2 or F3 while F1 recovers. When F1 initiates pressure, he should angle the puck carrier to provide F2 and F3 a read on where the puck may go. Some coaches like F1 to stop the puck carrier from getting the back of the net and turn him up the strong-side boards, whereas other coaches encourage F1 to angle—to steer and get a hit to separate the puck from the puck carrier. If F1 pressures the puck carrier and the puck is moved in the direction he is skating, then F1 should avoid finishing the hit and continue on to pressure the pass. Usually in a 1-2-2 system, the defensemen never pinch on direct passes to the opposing wingers but come down on long wide-rim plays (in which the breakout team rims the puck from one corner to the other half boards). F2 and F3 should initially be wide to take away passes to the boards and then react to mid-ice passes as they happen (figure 6.1).

Figure 6.1 The basic 1-2-2 forecheck.
The strength of this system is that the other team is enticed to bring the puck up the boards and then the boards are taken away. In addition, if the opponent breaks out, usually only one forechecker is committed deep in the zone. The weakness in the 1-2-2 system is that the opponent has slightly more time to make plays on the breakout and teams with good passing defensemen can hit the middle of the ice.
As mentioned in the breakout section, the opponent can break out in four ways, so a discussion of forechecking systems should outline how to shut down each breakout. Listed here are the various breakout options and the specifics of how to react when forechecking in a 1-2-2 formation.
Up
F1 pressures O1. F2 and F3 position themselves in line with the dots, even with the opposing wingers, and ready to take away passes up the boards. Initially, the wingers can also line up wider to prevent any quick rim plays, but we prefer that they stay inside to minimize mid-ice space and then move to an outside position. If O1 passes to O4, then F2 closes quickly and F3 moves across, locking the middle (preventing passes to the center) (figure 6.2).

Figure 6.2 The 1-2-2 forecheck versus up.
F1 pressures O1, and on the pass, F3 moves down to take away the pass to O2. F2 moves across to take away the pass up to O5. F1 recovers quickly and locks the middle (figure 6.3). If the puck is moved in the same direction while F1 is chasing O1, then F1 should continue to pressure O2 while F2 and F3 hold their positions.

Figure 6.3 The 1-2-2 forecheck versus over.
F1 forces O1 as he wheels the net, while F2 locks across the middle. F3 backs up while staying inside the dots and is ready to take away the boards. F1 should force only if he is within one stick length of O1. If not, he should cut across the front of the net and pick up O1 on the other side (figure 6.4).

Figure 6.4 The 1-2-2 forecheck versus the wheel.
Reverse
F1 forces O1 as he wheels the net. Then as O1 reverses the puck, F2 closes on the pass. F3 moves across to lock the middle. F1 must recover high on the back side (figure 6.5).

Figure 6.5 The 1-2-2 forecheck versus a reverse.
F1 pressures O1. If the puck is rimmed to the wide side, then D2 moves down to pinch on the winger. F3 covers up for D2 by moving up to the corner of the blue line. If the puck is rimmed up the strong side, then F2 closes down on the winger (figure 6.6).

Figure 6.6 The 1-2-2 forecheck versus a rim.
2-1-2 Forecheck
This type of forechecking system was made famous by the Edmonton Oilers of the 1980s, who used their high-powered attack to pressure teams hard and recover the puck. This system forces the opponent’s defense to handle pressure while also taking away all options up the boards. This system is a physical forecheck because F1 and F2 are in deep and looking to finish hits while the defensemen are set to come down the boards when the puck is moved to the opposition wingers. The 2-1-2 forecheck forces teams to use the middle of the ice to escape the zone. The strength of the system is in applying high pressure and giving the opponent only certain areas to break out of the zone. The weakness of the 2-1-2 system is that at times a defenseman is pinching and a forward is back on defense accepting the rush when the opponent breaks out. Most forwards are weaker than any of the six defensemen at defending the rush. Figure 6.7 shows the details of the system.
F1 pressures O1 to put the puck up the boards or across to his partner. F1 generally has an opportunity to finish his hit on O1. After the puck is moved and F1 has finished the hit, he recovers on the same side of the ice. F2 moves down on the weak side, anticipating a pass to O2. If the puck is moved up to O4, then F2 starts to recover on the same side.
F3 maintains a high position between the two defensemen. When D1 or D2 pinch down on a pass, then F3 moves out to the blue line on that side and backs up the D. If the opposition starts to break out, then F3 will have to back up like a defenseman. F3 is available in a solid defensive position, but after the puck is turned over, he is ready to receive a pass in the prime scoring area.
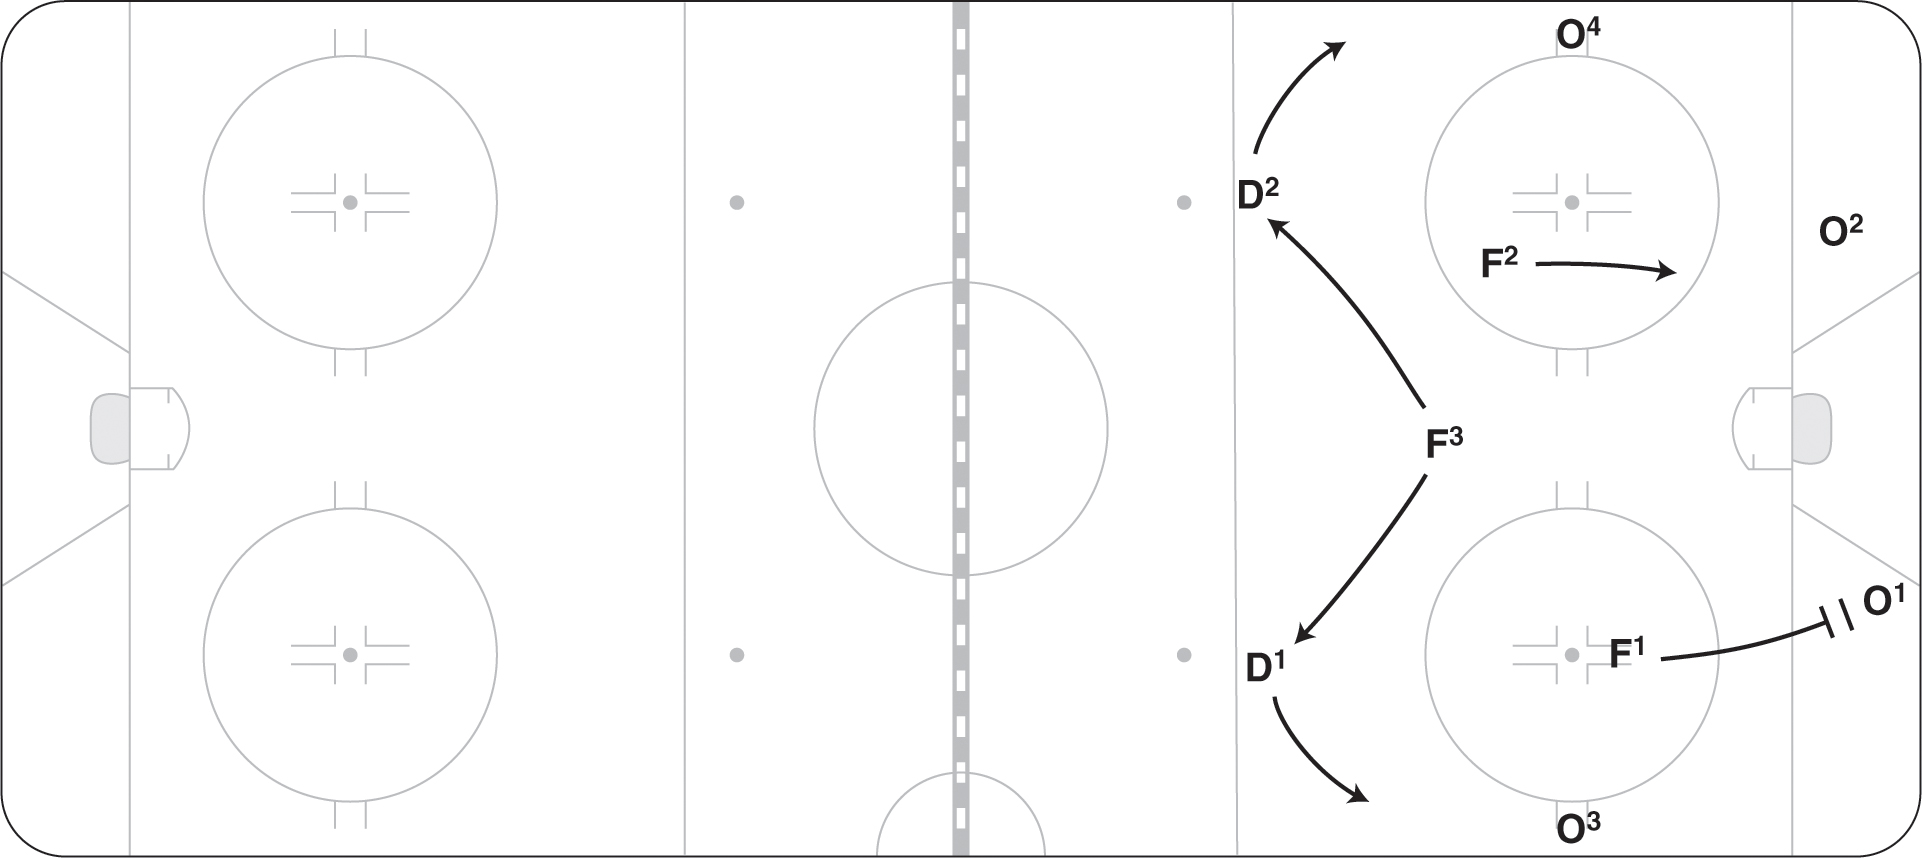
Figure 6.7 The basic 2-1-2 forecheck.
Both defensemen must read the play and anticipate when the puck may move up the boards. When they see that a pass is being made, they should pinch down on the winger (move toward the winger quickly, not letting him get by). They finish hits on the winger but remain in control. When the puck moves away, they get back to the blue line. Sometimes coaches talk about a pre-pinch position in which the defensemen are one-third of the way down the boards when the puck is on that side. This position reduces the distance to pinch on the winger.
Listed here are the various breakout options and the specifics of how to react when forechecking in a 2-1-2 formation.
Up
F1 pressures O1 to move the puck up the boards (figure 6.8). F2 moves down halfway on the wide side ready to close on O2. F3 stays in the middle of the ice. D1 moves down quickly on the pass to O3. F3 fills in for D1.

Figure 6.8 The 2-1-2 forecheck versus up.
F1 pressures O1, and on the pass, F2 closes quickly on O2 (figure 6.9). If O2 passes the puck up the boards to the winger, then D2 moves in and finishes the hit on O4 while F3 fills in on the blue line. If O2 tries to pass to the middle of the ice, then F3 takes away O5.
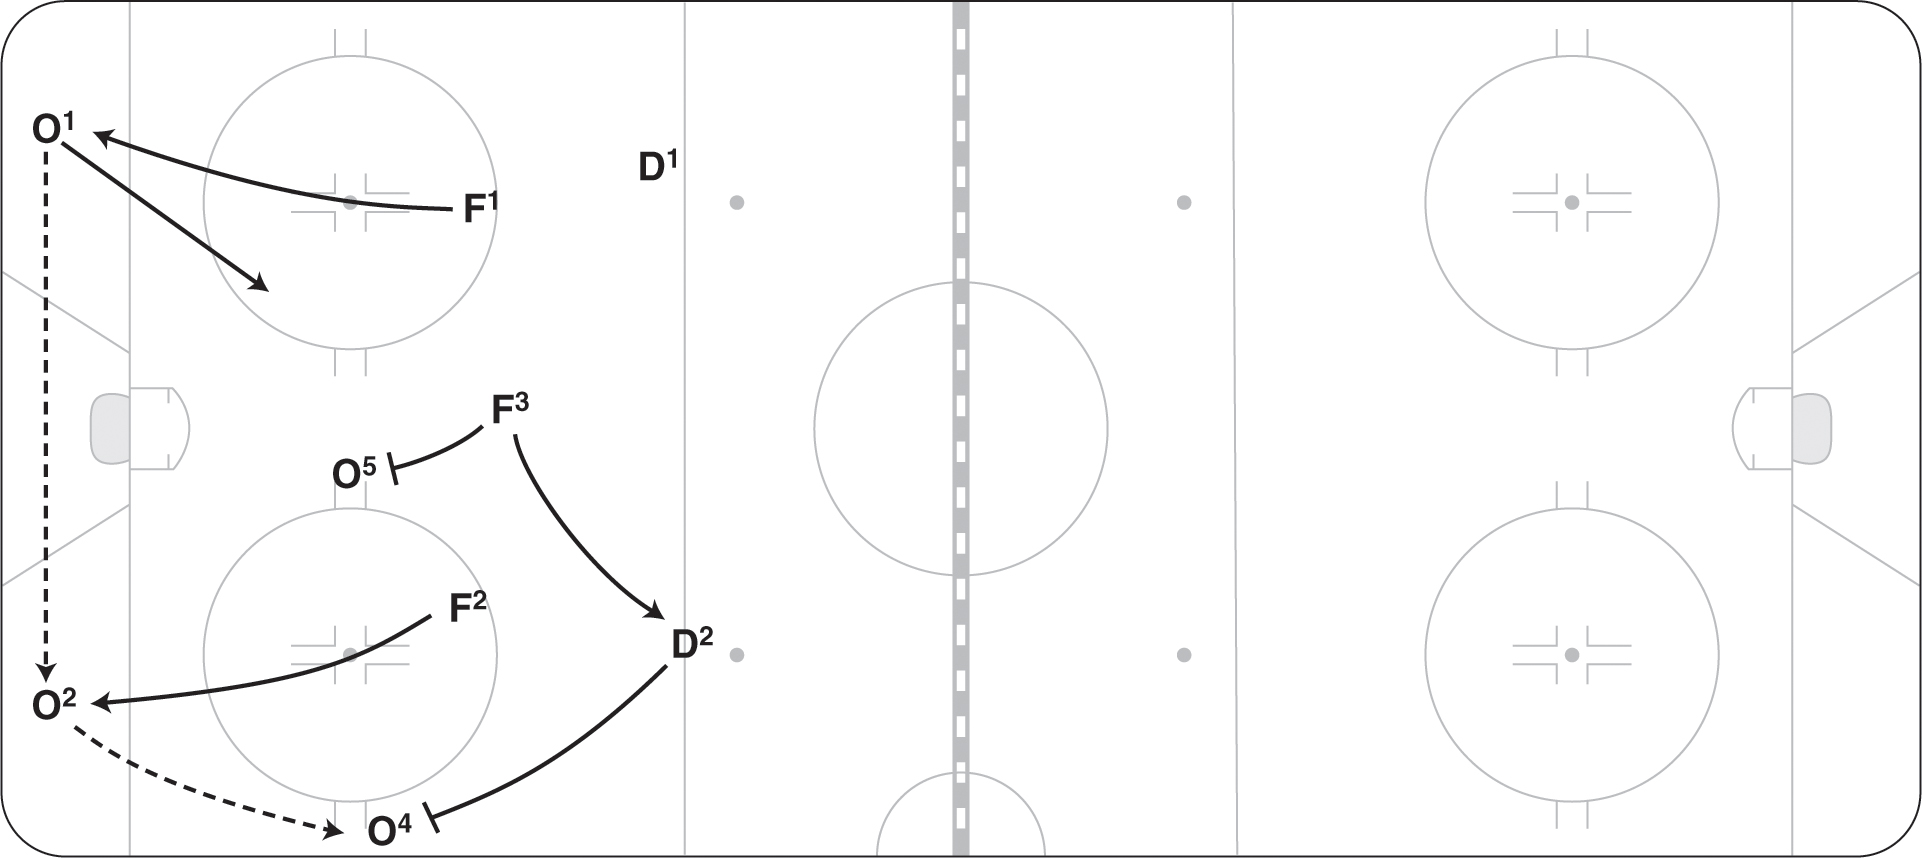
Figure 6.9 The 2-1-2 forecheck versus over.
Wheel
F1 forces O1 as he wheels the net, while F2 moves down to prevent O1 from rounding the net and makes him pass to the boards (figure 6.10). D2 closes down on the board pass, while F3 fills in on the blue line.

Figure 6.10 The 2-1-2 forecheck versus the wheel.
F1 forces O1 as he wheels the net (figure 6.11). F2 is ready to stop O1 from wheeling, and then when he sees the reverse to O2, he moves in quickly to that side. F3 takes away the mid-ice pass and is ready to fill in for D1 if he pinches on a pass to the boards.

Figure 6.11 The 2-1-2 forecheck versus a reverse.
Rim
F1 pressures O1. If the puck is rimmed to the wide side, then D2 moves down to pinch on the winger (figure 6.12). F3 covers up for D2 by moving up to the corner of the blue line. If the puck is rimmed up the strong side, then D1 pinches with F3 again filling in.

Figure 6.12 The 2-1-2 forecheck versus a rim.
In the 2-3 system, the key component is the pressure exerted by F1 and F2. They pressure the defensemen and each pass by skating constantly, finishing hits, and recovering quickly. The harder they work, the more hits they finish, and the quicker they recover, the more effective the system is. The 2-3 system is often referred to as the left-lane lock because one forward (F3) stays back on the left side of the ice—eliminating breakouts up those boards. The reason the left side was originally picked is that left wingers are traditionally better defensively than right wingers, whereas right wingers are traditionally the scorers. The defensemen shift to the right side; the left D plays in mid-ice, and the right D plays the right boards (figure 6.13).
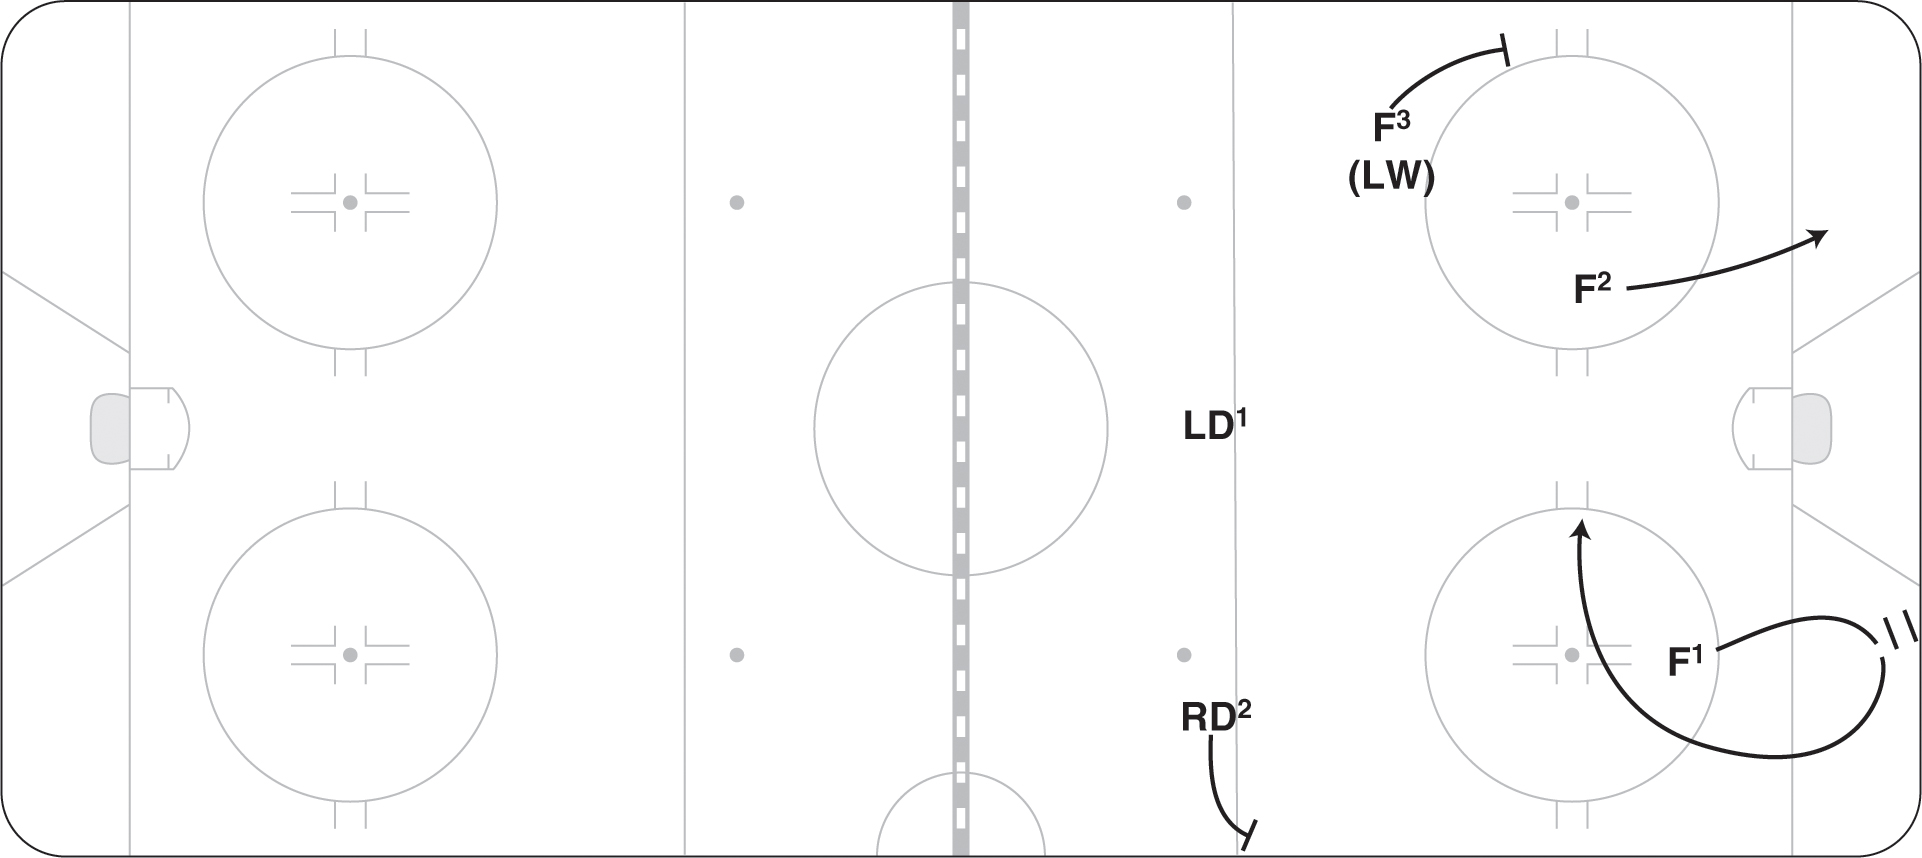
Figure 6.13 The 2-3 system or left-lane lock.
When the puck is turned over, the left winger can move in offensively, but then he has to move back when the puck is in doubt or turned over. The lock player doesn’t always have to be the left winger; teams may decide to use their top defensive player in that role. If you leave it up to the players to read and react to filling the lock position, confusion will occur. The result will likely be either no one there, two players there, or players moving to the area late. Listed here are the various breakout options and the specifics of how to react when forechecking in a 2-3 or left-lane lock system.
Up
F1 pressures O1 to move the puck up the boards (figure 6.14). F2 moves down halfway on the wide side, ready to close on O2. F3 is on the far boards. D2 is in mid-ice. D1 moves down quickly on the pass to O3. D2 covers up for D1, and F3 fills in wide on the blue line.

Figure 6.14 The 2-3 versus up.
F1 pressures O1, and on the pass, F2 closes quickly on O2 (figure 6.15). If O2 passes the puck up the boards to the winger, then F3 moves in and finishes the hit on O4 while D2 fills in on the blue line. D1 moves to mid-ice.
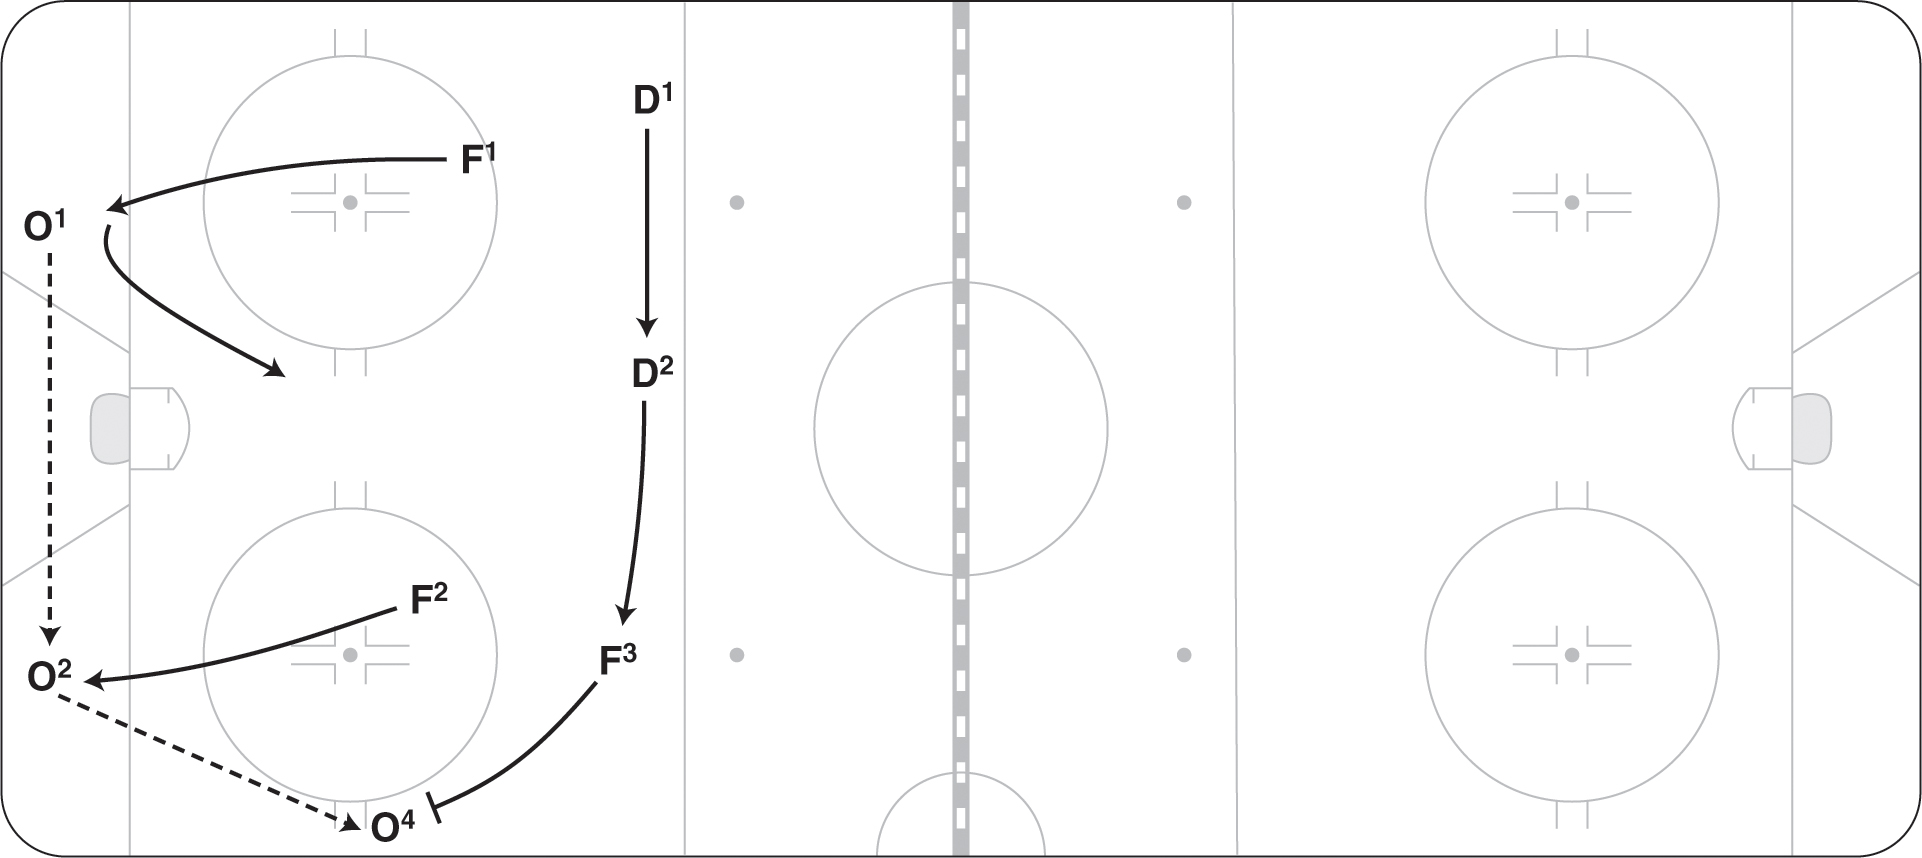
Figure 6.15 The 2-3 versus over.
Wheel
F1 forces O1 as he wheels the net, while F2 moves down to prevent O1 from rounding the net and makes him pass to the boards (figure 6.16). F3 closes down on the board pass, while D2 fills in on the blue line and D1 moves to mid-ice.

Figure 6.16 The 2-3 versus the wheel.
F1 forces O1 as he wheels the net (figure 6.17). F2 is ready to stop O1 from wheeling and then once he sees the reverse to O2 moves in quickly to that side. D1 takes away any pass to the strong-side boards. D2 fills in if D1 pinches on a pass, and F3 stays in mid-ice on the blue line.

Figure 6.17 The 2-3 versus a reverse.
Rim
F1 pressures O1. If the puck is rimmed to the wide side, then F3 moves down to pinch on the winger (figure 6.18). D2 covers up for F3 by moving up to the corner of the blue line. If the puck is rimmed up the strong side, then D1 pinches and D2 again fills in.
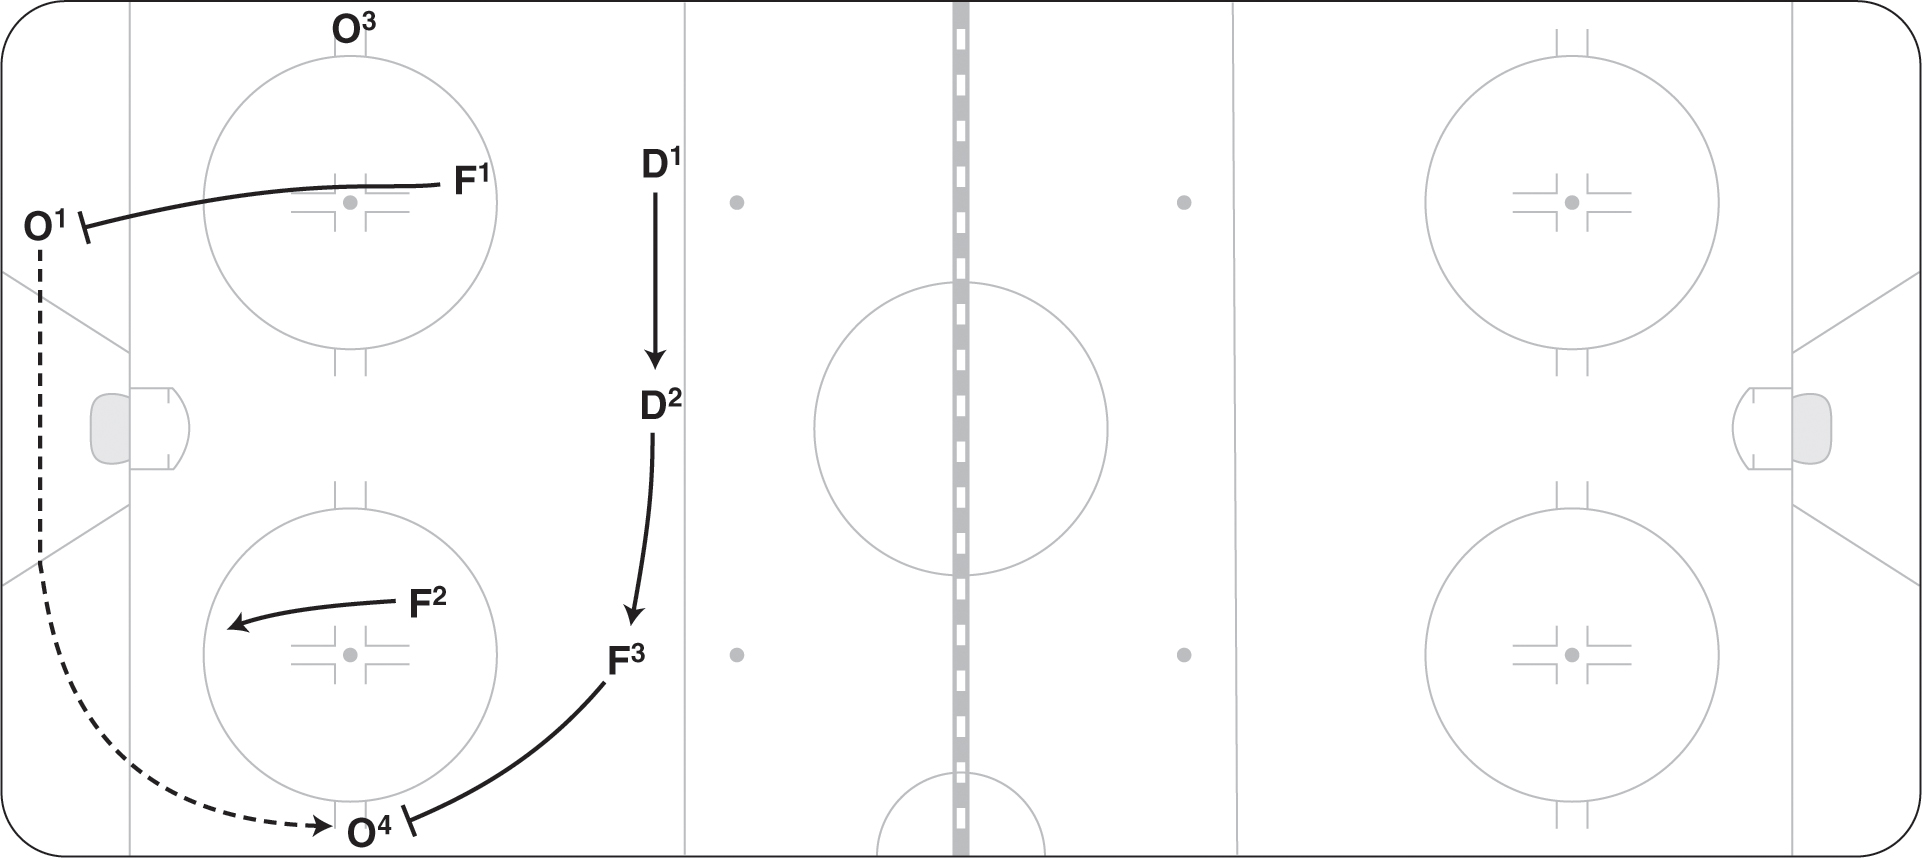
Figure 6.18 The 2-3 versus a rim.
This interesting system was developed in Sweden and is not commonly used in North America. It is similar to the left-wing lock system but different in strategy.
The system is called torpedo because the first two forwards in on the forecheck buzz from corner to corner, pressuring the puck. The third forward (F3), who is usually the center, stays high on one side. The defensive defenseman stays in the center of the blue line and is more of a safety. On the opposite side of F3 is the offensive defenseman. The offensive defenseman and the center have the freedom to pinch down hard on all passes up their boards and move in offensively when F1 and F2 have puck possession. Some coaches allow F3 and D2 to pinch all the way down the boards to the goal line on that side (figure 6.19).

Figure 6.19 The torpedo system.
The advantage of this system is that F1 and F2 always provide pressure on the opposing defense while F3 and D2 shut down passes up the boards. In addition, when the puck is turned over, F1 and F2 have two potential passing options. Offensively, F3 and D2 are always ready to jump in to receive a pass or take a shot. For this system to work effectively, the center (F3) must be good at playing back defensively because if D2 gets caught in the zone, F3 will have to play defense with D1. Few teams are as comfortable with their centers playing back as they are with their defense. In addition, the wingers who get in on the forecheck must be good, quick skaters who can buzz from side to side. As with other systems, the weakness in the torpedo system is that the middle of the ice is available for breakout plays. Although the torpedo is nontraditional and therefore sometimes overlooked, if you have the personnel to fit the descriptions of the positions, trying it is definitely worthwhile.
Diagrams and descriptions for the breakout options have not been included here because the rotations are the same as those used in the 2-3 system. The one variation is that the center is back on the far side and the outside players F3 and D1 pinch aggressively on any passes up the boards. They even try to anticipate the pass being made and pinch early, not giving the wingers any opportunity to get the puck.
Control Forecheck
A control forecheck is used when the opposing players are set up behind their net with full control of the puck. This may happen off a line change or when the opponent gains the net and stops before you can apply pressure. When the opponent stops behind the net, you can forecheck off the control setup in a couple of ways.
Deep Trap
Much as in the neutral zone forecheck, all five players back up and meet the attack at the blue line. F1 takes a shallow angle and steers the puck carrier to one side. The forward on that side (F2) stands up and prevents the team from gaining the red line. F3 can lock across or stay wide. This more conservative strategy forces opponents to move through the neutral zone against a lot of traffic with five defenders in this area. The opposition will have time and space to build up speed, but when they hit the blue line, it will be taken away and turnovers often result (figure 6.20).
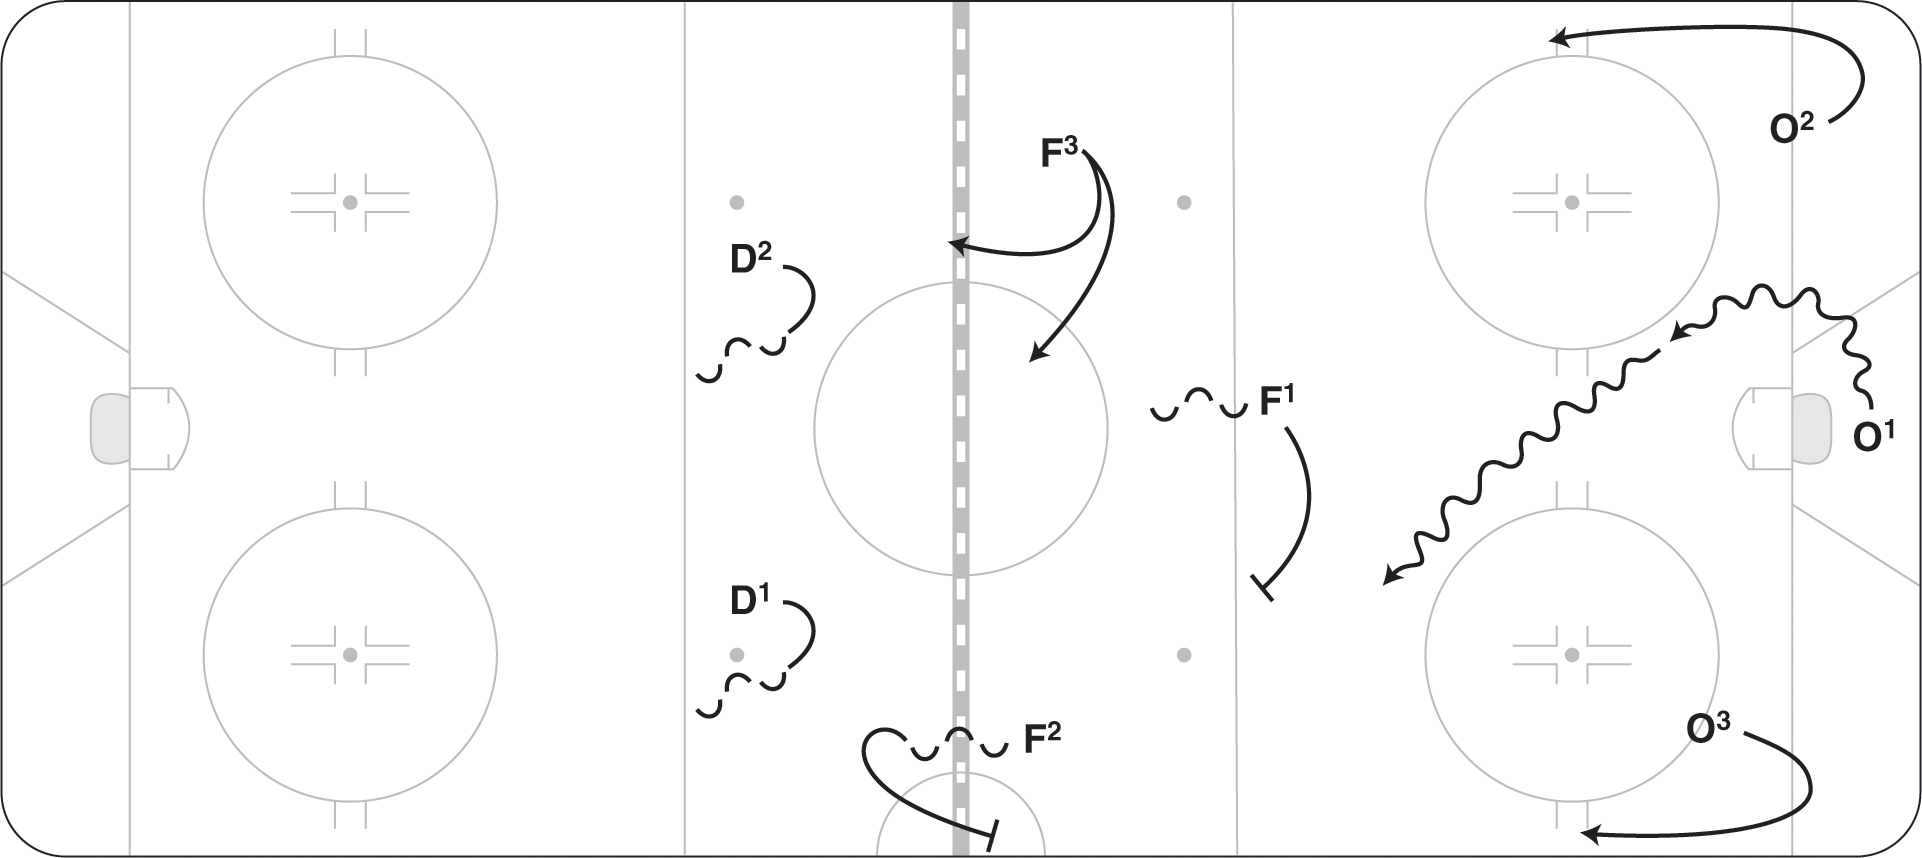
Figure 6.20 The deep trap.
Swing With Speed
Most offensive teams on a control breakout will swing one and sometimes two players behind the net or in the corner to build up speed while also having a stretch forward. One way to neutralize this speed is to move in and swing with the players building up speed. In this case F1 stays in to deter the defense from passing, while F2 and F3 swing with and lock onto the player or players swinging deep. If the opposing D holds onto the puck and moves out from behind the net, F1 would move in on an angle to force the puck carrier to one side. The defense must be aware of any stretch players and eliminate the threat of the long stretch pass. This control forecheck is effective in eliminating the opposition’s speed, but it does open up some areas of the ice for them to make plays (figure 6.21).

Figure 6.21 Swing with speed.
When the other team sets up behind the net, they usually need 5 to 10 seconds to coordinate their control breakout. During this time they are often out of sync. We believe that the forechecking team gains an advantage by striking quickly whenever possible. When F1 sees O1 stop behind the net, F1 should quickly force him to come out one side, ideally on his backhand side. After F1 initiates the force, then F2 also comes in on an angle and confronts O1, doubling up the pressure. This quick flush will create some confusion and panic. F3, D1, and D2 move back to take away any longer passes that O1 might make (figure 6.22).
