Neutral Zone Forechecking
Teams and coaching staffs constantly talk about how much pressure they want to apply versus how passive they want to be in the neutral zone area. Whether the forecheck starts off a face-off, a turnover, or a puck that is dumped out of the zone, there is a lot of space to cover in the neutral zone. Therefore, a strategy must be employed to shut down possession plays through this area.
If you pressure, opponents have less time and may make mistakes, or they may take advantage of the extra space to work with. Conversely, if you sit back, opponents have more time to read and make a play but less space to work with. What do you do? Coaches have several options when designing the neutral zone forecheck.
All neutral zone forechecking systems must allow the ability to shift quickly as the puck moves from one side to the other. The key player is F1 with regard to his angle and stick placement. With his stick on the ice and proper skating angles, F1 can take away passing lanes from the opposition and steer them into a space where they don’t want to go. F1 can also move the stick into different lanes to take away options. When the puck is moving up ice and then back or passed from side to side, both defensemen must be good at regaining their gaps. Teams that tighten their neutral zone gap (the distance between the defending defensemen and the attacking forwards) create havoc for attacking forwards trying to enter the offensive zone. Another key skill of strong neutral zone forechecking teams is that all three forwards are able to skate backward and face the play to make their reads easier. You should practice this with all five defensive players moving in unison.
Neutral Zone Forechecking Systems
Teams may employ seven forechecking systems: 1-2-2 wide, Tampa 1-3-1, pressure 2-1-2, 2-3 deep lock, traditional 1-2-2, retreating 1-2-2, and the maritime sweep. Each system is described and discussed in this section.
1-2-2 Wide
This system is the simplest to teach and is effective in clogging up the neutral zone. The most important factor in making it work effectively is the play of F1. He should never forecheck too deep or too wide and give up mid-ice space. F1 should take a shallow angle and steer the puck carrier to one side. If a D-to-D pass is made by the opposition, then F1 reattacks on a shallow angle again. F1 must stay within 6 feet (1.8 m) of the blue line when initiating the push and take away the mid-ice pass with a well-placed stick. He can let the opposition have the return D-to-D pass. Essentially, F1 remains between the dots through this sequence to take away mid-ice space (figure 7.1). After the puck starts to move up the outside lanes, F1 should skate through the middle.

Figure 7.1 F1 angling the D-to-D pass.
F2 and F3 have simplified responsibilities. They stay on their side of the ice and lock the wide lanes (by staying in their specific lanes and skating backward to take away passing options). If the puck carrier comes up F2’s side, then he stands up (doesn’t back in) and keeps the opposition from gaining the red line (e.g., forces him to ice the puck). F3 takes the wide lane and makes sure that no pass can get to a player in that lane. D1 and D2 keep a tight gap in the middle of the ice, ready to adjust to the puck (figure 7.2a).
If the puck is moved to mid-ice or up the boards, then all five players react. D1 would overplay the boards when the puck comes up F2’s side. D2 stays in mid-ice, and F3 takes the wide lane (figure 7.2b).

Figure 7.2 (a) D1 and D2 keep a tight gap in the middle of the ice ready to adjust to the puck; (b) if the puck is moved mid-ice or up the boards, all five players react.
European teams commonly used this system when they began playing without the red line, which was several years before it was removed in North America. After the red line was removed, teams had more space to cover and this system was developed in response. In the 1-3-1, the three players across the middle of the ice definitely eliminate any room up the middle, but they give up space behind on the far blue line. The theory is that making the long pass is more difficult, especially through traffic. The 1-3-1 can be played in two ways, by either designating which defenseman is up in the middle of the ice or having the defensemen react depending on which side the puck is on. We recommend that one D be designated as the up player and the other as the back player (figure 7.3).

Figure 7.3 The 1-3-1 with one D as the up player and one D as the back player.
F1 has the freedom to go a little deeper (and press or angle the opponent with the puck) in this system because three lanes are covered in behind. F2 and F3 play their sides of the ice. If the puck carrier comes up F2’s side, then he stands up and prevents him from gaining the red line. F3 makes sure that the wide lane is locked up and prevents any passes from going to players in behind D2.
D2 tightens up in the middle of the ice, playing as far up as the top of the center circle. D2 may skate forward or accept the rush skating backward. Regardless, D2 must keep a tight gap in the middle. D2 may close on any pass to the middle of the ice. D1 sits back and plays like a rover in football; he stays in the middle initially and then reacts to wherever the puck goes (figure 7.4).

Figure 7.4 D2 keeps a tight gap in the middle and D1 sits back.
This system is a common neutral zone forecheck off a lost draw, but it is also used effectively by many teams who want to apply more pressure in this area (when trailing in the game or in need of a more offensive approach). The 2-1-2 system is one of the more aggressive neutral zone forechecks. It is basically a man-on-man system in the neutral zone. F2 and F3 attack the opponent’s defense in a staggered fashion. Therefore, if O1 has the puck, F2 will force and F3 will be halfway to O2. If a pass is made to O2, then F3 will jump immediately. F1 locks onto the other team’s center, making sure that no passes can be made to the middle of the ice, because both defensemen have outside responsibility. F1 also backs up the defense if they pinch up on the outside. D1 moves up on any passes to O4, and D2 does the same for passes to O5. One D must remain in the middle of the ice at all times when the other D is forcing the outside (figure 7.5).
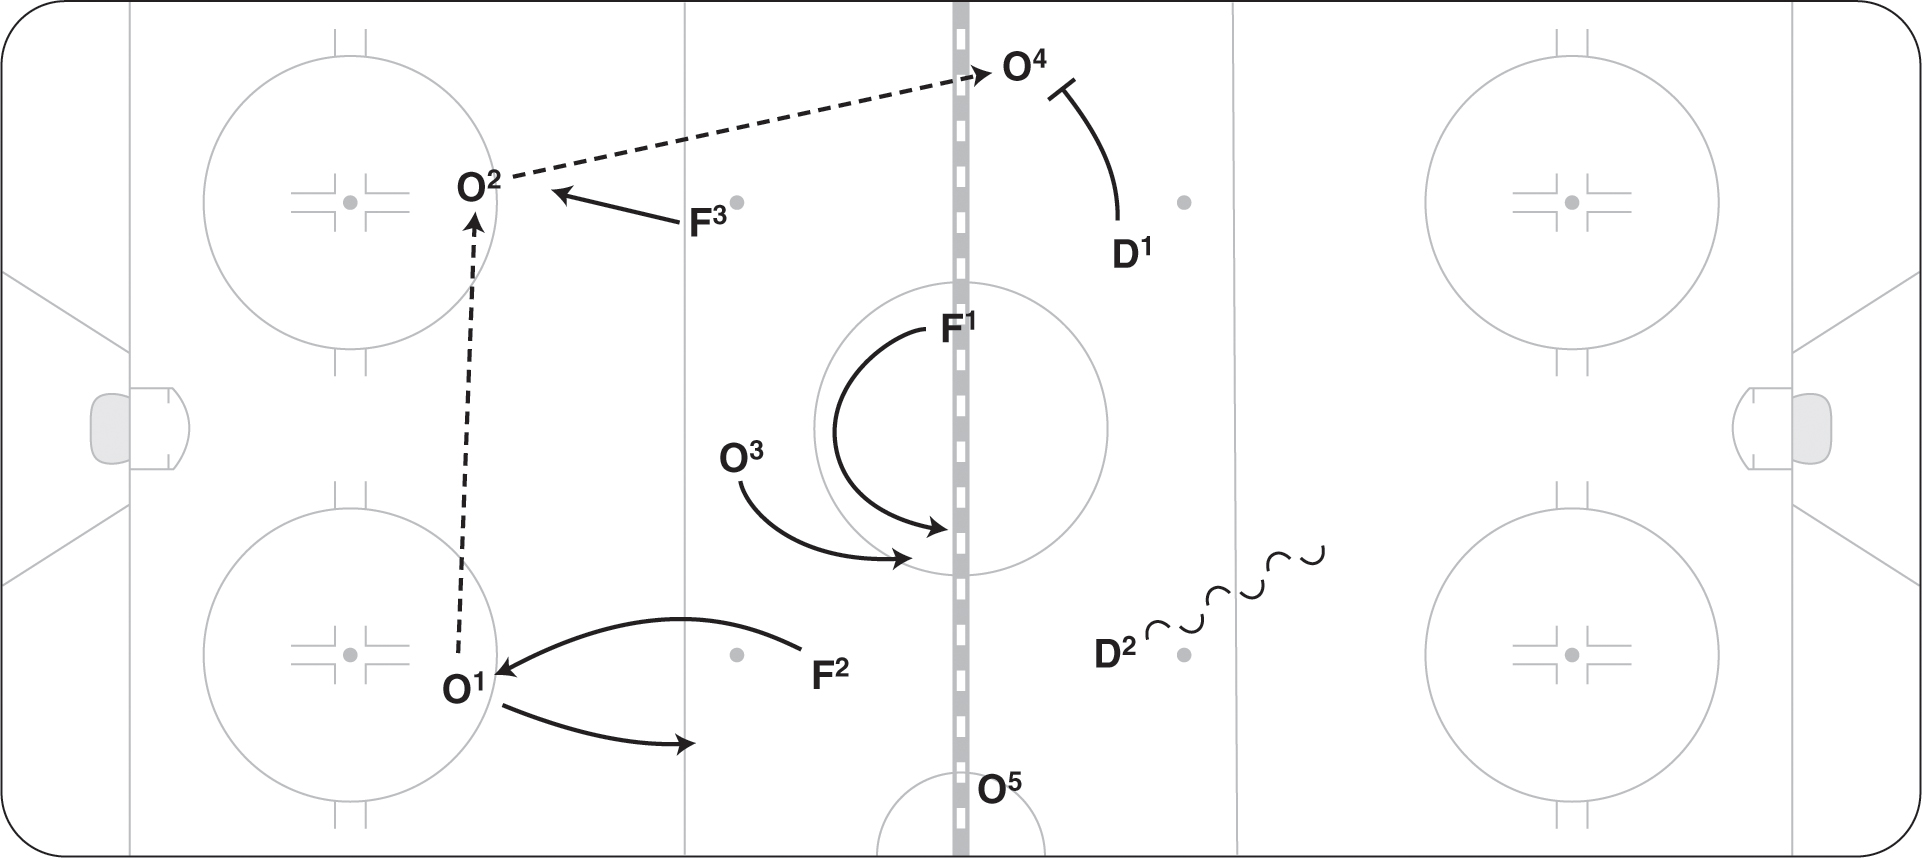
Figure 7.5 The 2-1-2 forecheck.
2-3 Deep Lock
The 2-3 system is similar to the 2-1-2, but it splits the deep ice into three lanes to eliminate the possibility of long stretch passes being made. F2 and F3 attack the opponent’s defense, again in a staggered fashion. F1 now slides back with the defense and takes a lane. We believe for consistency sake that designating one side is better. In the diagram, F1 is on the right side, D2 is in mid-ice, and D1 takes the left lane. This setup creates a wall in front of the blue line, which will be hard for the offensive team to penetrate with possession. All three players in back need to keep a tight gap with the opposition forwards (figure 7.6).

Figure 7.6 Deep lock 2-3 forecheck.
This system is common at many levels because it denies teams the ability to bring the puck up the middle and forces them to move the puck wide and try to enter up the boards. F1 starts by steering the puck to one side, and unlike in other systems mentioned, he may take away either the D-to-D return pass or the wide-lane pass, depending on which is a priority (figure 7.7). This decision will influence the angle that F1 takes and the position of his stick. F2 challenges O1 before the red line, forcing him to ice the puck or chip in behind. F3 locks across hard on the opposing player in mid-ice. F3 does not allow passes to any player in mid-ice and forces the opposition to make the long, wide pass to gain entry to the offensive zone.

Figure 7.7 The F1 taking away the wide or return pass.
D1 is ready to recover any chips in behind F2 and ready to challenge any bank passes to O3. D2 is responsible for any wide passes to O4. D2 must be alert because the wide pass is the way that teams try to break the traditional 1-2-2—they pass wide to O4 and try to have him pick up speed before the pass is made (figure 7.8).

Figure 7.8 Defending all passing options with the mid-ice lock.
Retreating 1-2-2
This system is a defensive setup and is similar to the 1-2-2 mid-ice lock. The primary difference is that all five players tighten up. F1 moves down to the top of the offensive zone circles, and the two defensemen sit back no farther than the center red line. As the offensive team advances up ice, all five players skate backward and retreat in a tight pack (figure 7.9a). This setup creates the visual of limited space for the offensive team. F2 and F3 initially remain wide but align themselves with the dots, giving up space along the boards and taking away space inside. D1 and D2 must be aware of the long stretch pass. A pass to the outside is not dangerous, but they have to protect against being too wide and allowing the long mid-ice pass.
F1 starts to angle the puck carrier as soon as the puck advances above the offensive circles (figure 7.9b). Again, F1 takes a shallow angle at the puck carrier and tries to steer the puck up one side of the ice. F1 stays between the dots, allowing the puck carrier to move into the trap. F2 now stands up from the inside out, taking away the red line so that the puck carrier cannot dump the puck in. F3 starts to lock across the middle and is ready to take away any passes to that area. D1 stays in behind F2 in case the puck is chipped to the far blue line. D2 stays back in mid-ice but is ready to confront any wide-lane passes. All five players should move as if tied together by a rope.

Figure 7.9 In the retreating 1-2-2 (a) all five players skate backward in a tight group; (b) F1 angles the puck carrier as soon as the puck advances above the offensive circles.
This system is unique but effective. Your team will need several practices to get everyone’s roles and responsibilities set so that the players can react and not think about it in a game.
F1 takes away the boards, forcing the opposition defenseman O1 to move the puck D to D. As the puck is moved D to D, F1 makes sure that no return pass can be made to the original defenseman O1. F2 sits in the center circle and on the D-to-D pass starts to move down to pressure O2. With no return pass option to O1, O2 will have to move the puck to one of the forwards.
D1, D2, and F3 create a wall at the far blue line similar to the wall in the 2-3 deep lock system and deny any passes to the forwards. The small space in the middle of the ice, if used, will have to be closed off by the middle D. F3 must always lock one of the wide lanes. The easiest thing for F3 to do would be to fill the lane closest to where he is when the forecheck is initiated. F3 must communicate this to the defense so that they can adjust (figure 7.10).

Figure 7.10 The maritime sweep movement.