Defensive Zone Entries
The most critical aspect of defensive zone entries is that the defensive players accepting the attack must correctly read the play. For the purposes of this book, defensive zone entries are defined as the moment the attacking team hits the offensive blue line with the puck. When this happens, the defensive players, who are usually the defensemen and possibly one forward, must scan the rush quickly and identify the number of attackers and defenders. Because of the dynamic nature of hockey, players must make this read in seconds, and rarely is any situation exactly like another. After the defenders see the rush clearly, they should call out whether it is a two on one, two on two, or three on two and communicate to any forwards coming back which player to pick up. The forwards coming back must read the rush quickly from the back side and pick up the right players.
If reads are so important, how do coaches improve the players’ ability to identify the rush? Well, they can try a couple of methods. First, they can do read-the-rush drills in practice, in which players face various situations; after they play it out, they get feedback from a coach who is off to the side. A simple read-the-rush drill may include a neutral zone regroup in which the defenseman must step up, read the rush, close the gap, and make it difficult for the offensive team to gain entry with possession. Another drill starts as a two on two with a backchecker and turns into a three on three, set up by the coach sending the backchecking and offensive forwards at different intervals.
The second way to help players identify the rush is to review video and ask what they see and how they would play each situation. Many times while watching video, players comment that during the game they read that they had less time and space than what the video shows. Hearing their perspective is helpful. In addition, during games one coach on the bench can provide feedback and discuss reads with players while the game is going on. The best approach is to ask the players, “What did you see on that rush?” and then tell them what you saw. Finally, to clear up any confusion about reads, set a rule for what players should do if they are unsure. The rule should be this: Hold mid-ice position, take a few more seconds to sort it out, and then when you are sure, move to outside areas to challenge the puck carrier.
Handling Defensive Zone Entries
After the puck carrier crosses the line, a number of options are available to the offensive team, as outlined in chapter 3. To develop your team in the area of handling defensive zone entries, you need to review each of the attack options and outline to your team how to cover them. Whether your team is faced with an attacker who delays, a two on one, two on two, or any variation of a three on two or three on three, they will know how to play it.
Note here that for all entries described, we focus primarily on the two defensemen and the first backchecking forward (figure 9.1). As mentioned in the backchecking chapter, the last two forwards coming back into the defensive zone must come back hard through mid-ice (inside the dots) and stop at the top of the circles. They should keep their sticks on the ice to discourage passing options.
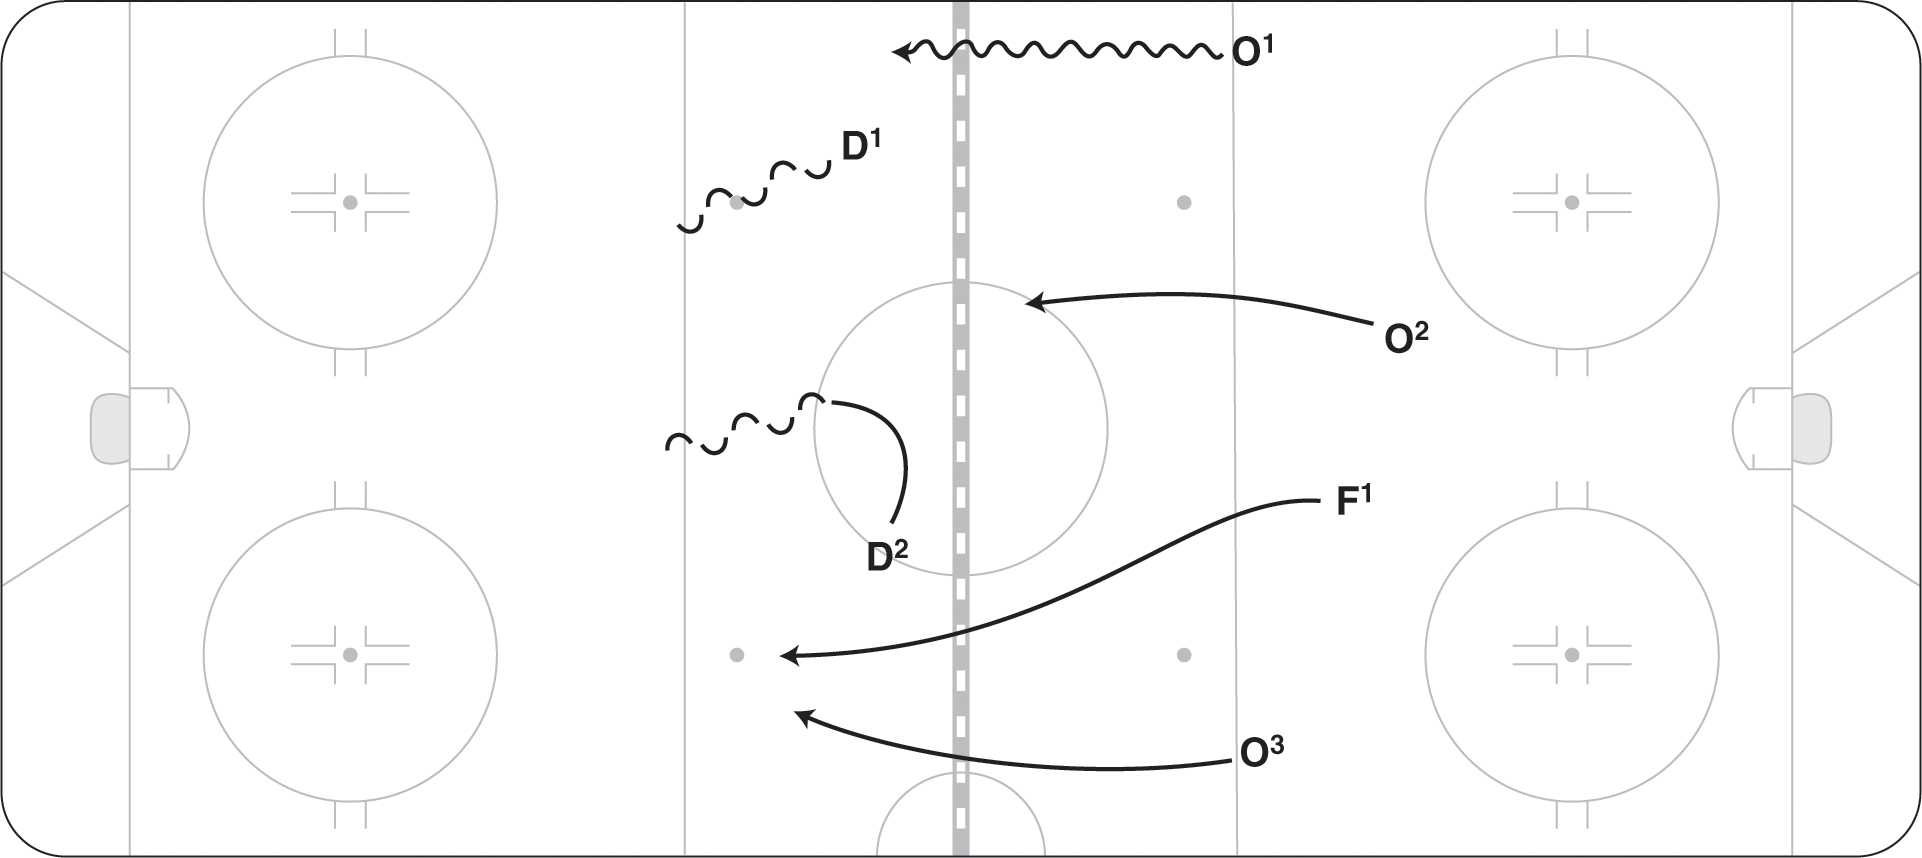
Figure 9.1 Handling the rush with two defensemen and a backchecking forward.
If the opposing forward delays when entering the offensive zone, the defense first reads whether the rush is even. If the offensive team outnumbers the defensive team, then the defense should hold inside position and wait for help. There are two ways to play an even rush where the puck carrier delays. In the first method, D1 steps up and plays the puck carrier, while F1 locks mid-ice and protects the space behind D1 (figure 9.2a). F1 looks for late players coming into the zone, and D2 plays the middle to wide side area. D2 automatically takes any midlane net drives. The second way to play an even-rush delay is to have the backchecking forward go after the puck carrier while both defensemen drop back inside with their sticks on the ice, ready to take away any plays inside and cover players going to the net (figure 9.2b). Either way is effective, but teams should pick one of the two strategies and stick to it so that both the defense and forwards always know who is going to take the delay player and who is going to stay inside.

Figure 9.2 (a) D1 playing the delay; (b) F1 playing the delay.
A new tactic being employed in the neutral zone over the last couple of years is an early gap and strike. Many teams start with their wingers low on the breakout, so if you have a mobile defense you may want to use this strategy. The gap and strike starts at the offensive blue line or between that line and center ice. When the opposition breaks out, the wide D (D1) moves across and strikes the forward as he starts to gain speed and attack through the neutral zone. His partner (D2) stays back and shifts slightly to mid-ice (see figure 9.3). Note that D1 skates forward with a good angle so that the opposition winger cannot skate or pass inside. Eventually, D1 will run the winger out of room and finish his check along the boards.

Figure 9.3 On gap and strike, D1 pressures from the inside ice.
Two on One
Coaches have several theories about how to play a two on one, but no factual evidence can tell us which is best. First, the defenseman should stay in mid-ice regardless of whether the two on one is down the middle or wide. Early, he should try to push the puck carrier wide. After the attack moves into the circles, the defenseman has two options:
- He can be responsible for the player without the puck and leave the player with the puck to the goaltender. To execute this tactic, the defenseman either blocks the passing lane by going down on one knee or turns to take the wide player at the last moment to minimize the risk that the opposition puck carrier will cut to a better shooting position. Ideally, the defenseman should back up in line with the strong-side post or goaltender’s pads and not give away too much ice to the puck carrier. When the defenseman turns to take his check, he should still keep an eye on the puck carrier so that he knows what is happening. The primary responsibility of the defenseman in this tactic is to make sure that no pass can be made to the backdoor for an empty-net tap-in (figure 9.4a).
- The second way to play a two on one is for the defenseman to slide flat on the ice with feet facing the net to take away the passing option and force the puck carrier to shoot (figure 9.4b). This slide must be executed with proper timing. The problem with the slide is that until they perfect it, many defensemen slide too far or leave their feet too early, allowing the puck carrier to cut in. In addition, after the defenseman slides he is in no position to defend a rebound. The sliding technique is effective in surprising the puck carrier and often making him panic, thereby forcing a bad pass into the sliding D or a hurried shot. In addition, the sliding technique usually eliminates the pass to the wide side.

Figure 9.4 During the two on one, the defenseman either (a) makes sure that no pass can be made backdoor or (b) slides flat on the ice with feet facing the net to take away the passing option.
In all two-on-two situations, the defensemen should make sure they have a tight gap. Without a tight gap, playing the two on two properly is difficult. To maintain a tight gap, defensemen should constantly be reminded to “gap up,” which means to move up with the play and tighten up on the rush. As a reference point, they should keep two stick lengths between each other; any farther back and they will lose the ability to move back at the same speed as the rush. Each of the two ways to play a two on two has its strengths and weaknesses.
The first method is for D1 to stay with the puck carrier regardless of what he does. If the puck carrier drives, delays, or cuts to the middle, D1 stays with him and D2 keeps position on the other player. The strength in playing it this way is that the players are not confused about who has whom. The weakness is that sometimes the defensive team can lose coverage, especially when the puck carrier crosses with the second offensive player (figure 9.5a).

Figure 9.5 (a) In a two on two, one option is for D1 to stay with the puck carrier no matter what. (b) A second option is for D1 to leave the puck carrier for D2 to play when the puck carrier crosses the ice.
The other way to play a two on two is for D1 to take the puck carrier on the drive or delay but to leave him for D2 to play when the puck carrier crosses the ice. D1 then picks up the other player (figure 9.5b). The disadvantage here is that D2 might not be in a strong position to pick up F1, and D2 might miss coverage on F2 in the exchange. The advantage is that both Ds stay in their lanes with good mid-ice position, thus reducing confusion.
Three on Two
When reading a three on two, both defensemen stay in mid-ice and try to delay the attack. Don’t confuse what looks like a three on three for what is really a three on two. What we mean here is that at times the defense will say, “I thought the backchecker had the third player,” but in reality the backchecker was a step away and couldn’t catch the player. If the offensive team sends a back-side drive, the strong-side D1 plays the two on one and the back-side D2 goes with the drive (figure 9.6). For a midlane drive, the back-side D2 plays the two on one, trying to shade (commit to one player while being ready to take the other player) the drive player but ready to come out on the wide pass. D1 plays the puck carrier.
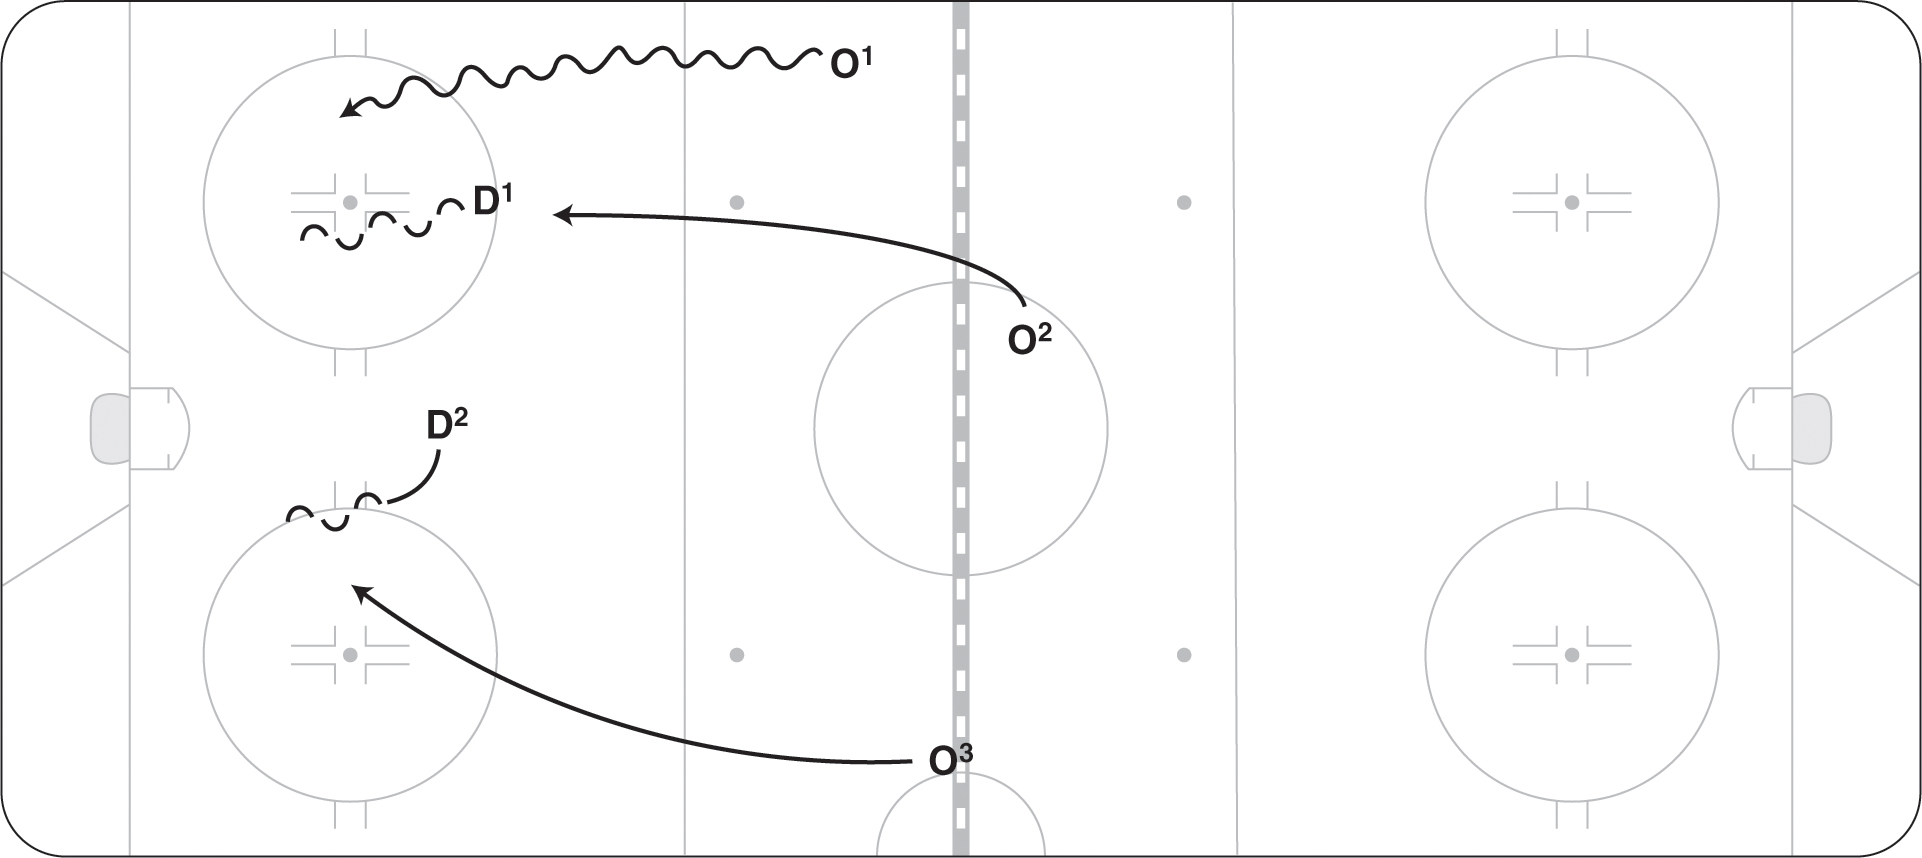
Figure 9.6 Defending a three-on-two back-side drive.
Three on Two With a Close Backchecker
In this situation the backchecker is close to catching the rush but doesn’t have position on any of the offensive players (figure 9.7). D1 and D2 should play it as a three on two until the backchecker has caught the opposition’s highest player. With the new obstruction rules not allowing the backchecker to hook the offensive player, the defense should not play it like a three on three until the offensive player is clearly caught by the backchecker. The Ds must make sure that the backchecker has body position on his player before they adjust and play it as a three on three. The best choice is to play it safe until they are sure because as soon as one of the defensemen overplays the outside, a two on one could open up inside if the backchecker is not in position.

Figure 9.7 A three on two with a close backchecker.
The backchecker must identify the player he is covering. As outlined in chapter 8, some teams like their backchecker in the wide lane and some like him in the mid-ice lane, so the defensemen adjust according to the team’s system. The backchecker usually takes the highest player unless he is already in position to take the wide player. He should keep his stick off the body of the free player so that he doesn’t take a penalty and should get good body position—close enough to the player to take his stick and at the same time keep an eye on where the puck is (figure 9.8).

Figure 9.8 The backchecker taking the highest player.
If the backchecker is coming back through mid-ice, he should leave any drive players to the defense and pick up the higher areas. Therefore, if the middle offensive player drives the net looking for a pass or deflection, then this player would be covered by D2. F1 must look around for the third forward and move to check him. Sometimes F1 will have to overplay the outside area if this forward is wider. As the play gets below the circles, he should lock onto his check (figure 9.9).
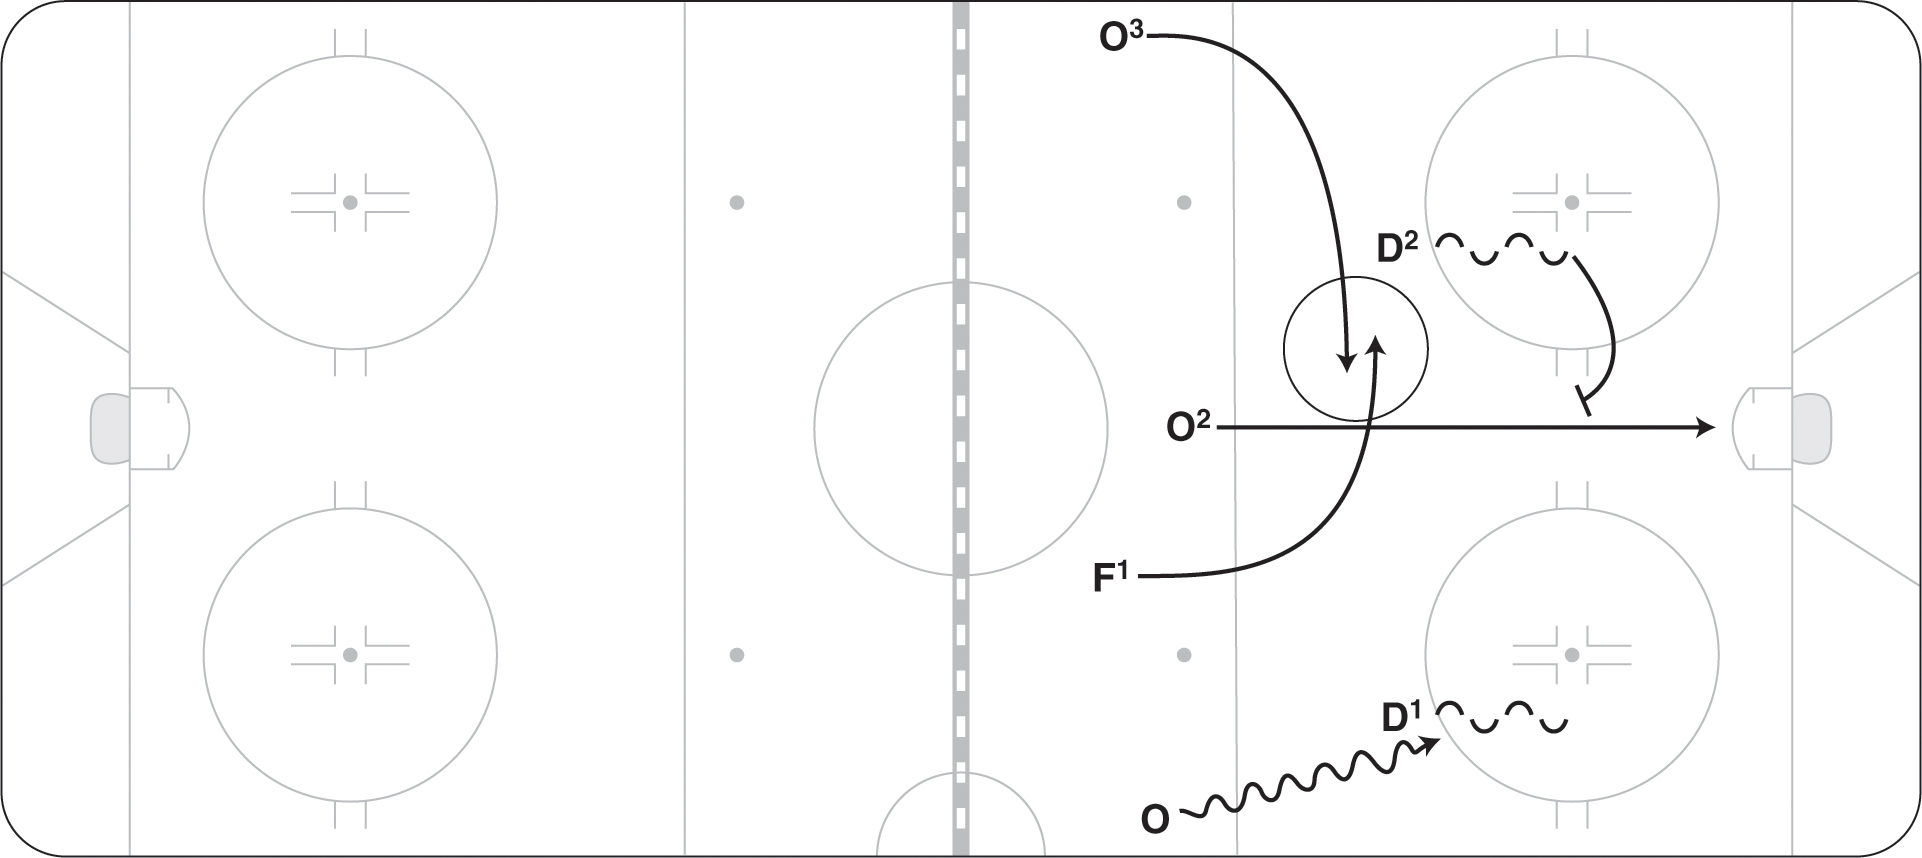
Figure 9.9 The backchecker leaving the drive and taking the highest player.
If the team’s neutral zone system has the first forward back locking the wide lane (figure 9.10), then on three-on-three rushes the forward should stay with the player in this lane and the defensemen will adjust to cover the middle and strong side. This setup becomes more of a man-on-man coverage when the play enters the defensive zone.
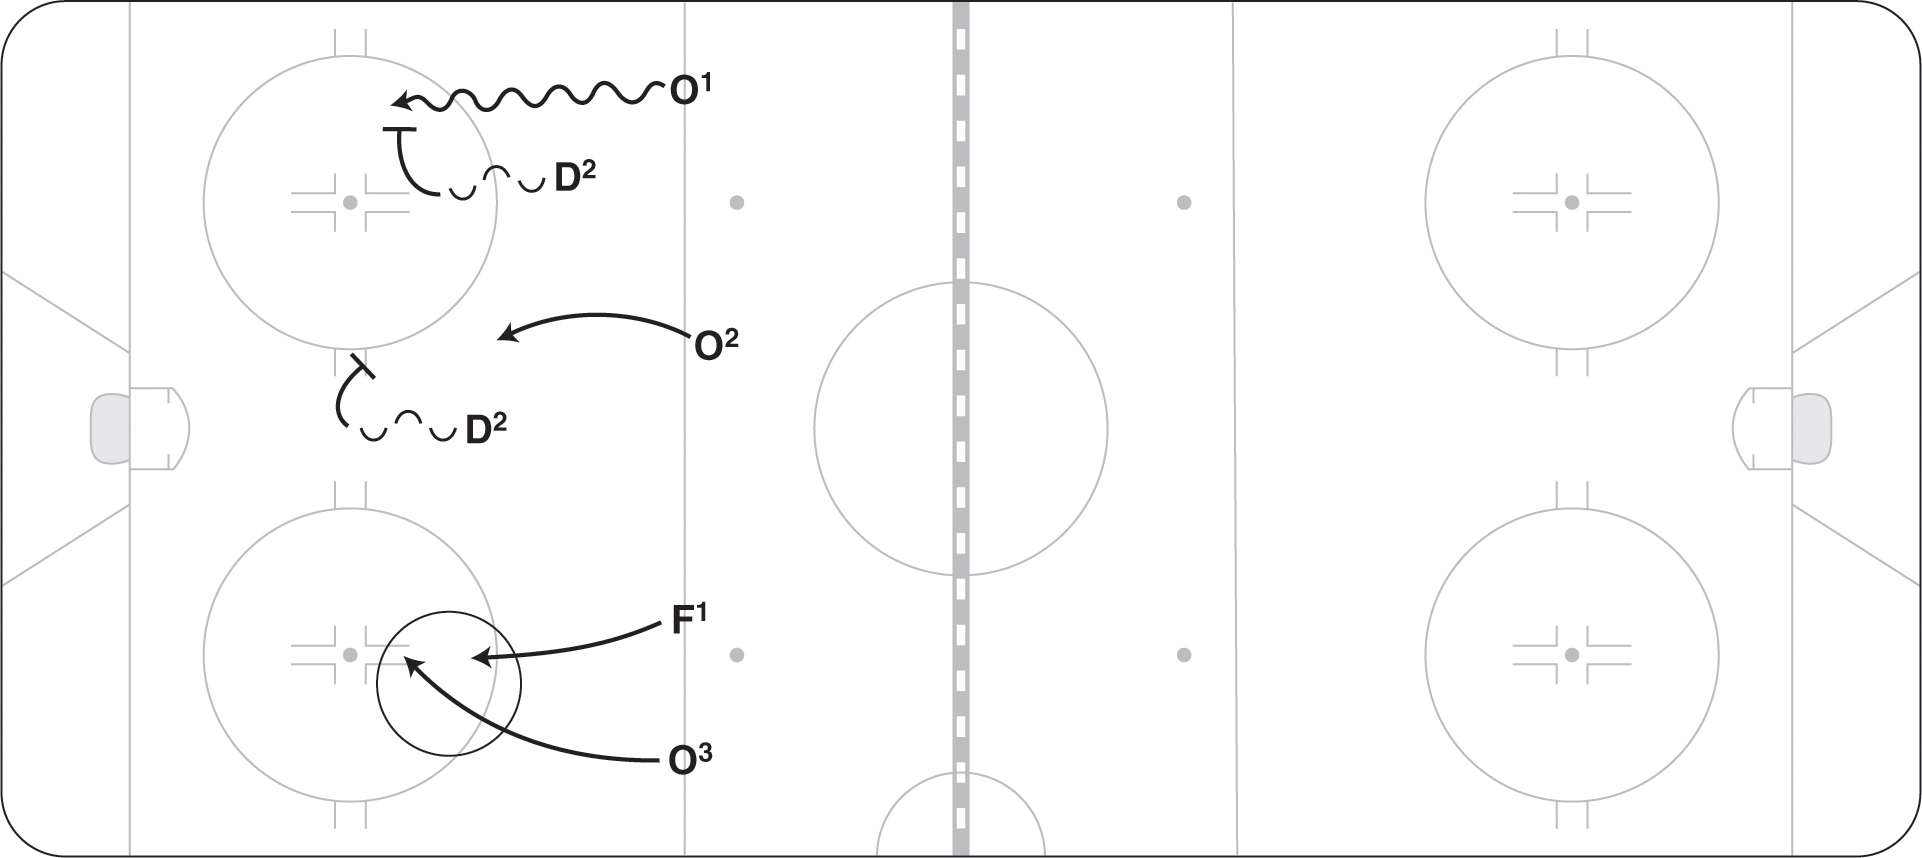
Figure 9.10 The three on three if the team’s neutral zone has the first forward back locking the wide lane.
Finally, if the backcheckers are instructed to hound the puck, then the backchecker attacks the puck carrier all the way into the zone. D1 shifts to the middle, and D2 takes the wide or back-side lane (figure 9.11).

Figure 9.11 Backchecker forces puck, D1 and D2 shift.
Depending on your philosophy as a coach, you might want to take this approach on defensive zone entries. In this situation whenever your team is faced with a three on two, two on two, or even two on one, they have the option of challenging the puck carrier just before he gets to the blue line. If the rush is a three on two, then D2 must take the middle lane at the same time as D1 forces the outside, leaving the wide side open. This pass will be difficult to make.
This tactic is used when the puck carrier might have his head down or has juggled a pass. In these situations D1 would strike right away. Although you are leaving mid-ice protection, the puck carrier is often in a position where he gets surprised and loses control of the puck or his support player goes offside. We don’t recommend using it often, but this aggressive play can be effective (figure 9.12).

Figure 9.12 Aggressive D1 stand.
The kick-out play or the kick and run play is one of the offensive tactics described in chapter 3. Defensively, there are two ways to handle the kick-out play if the rush is even. If the offensive team has the advantage, then the defensive team should hold mid-ice and wait for help, but if the rush is even, then either D1 or the backchecking forward (F1) can take the kick-out play while the other holds mid-ice. Because this play happens quickly, the best choice is usually to have the backchecking forward take the kick-out play while D1 stays in his lane (see figure 9.13).

Figure 9.13 The backchecking forward takes the kick-out play while D1 stays in his lane.
This is how to play the kick-out play from a defensive perspective (figure 9.14).
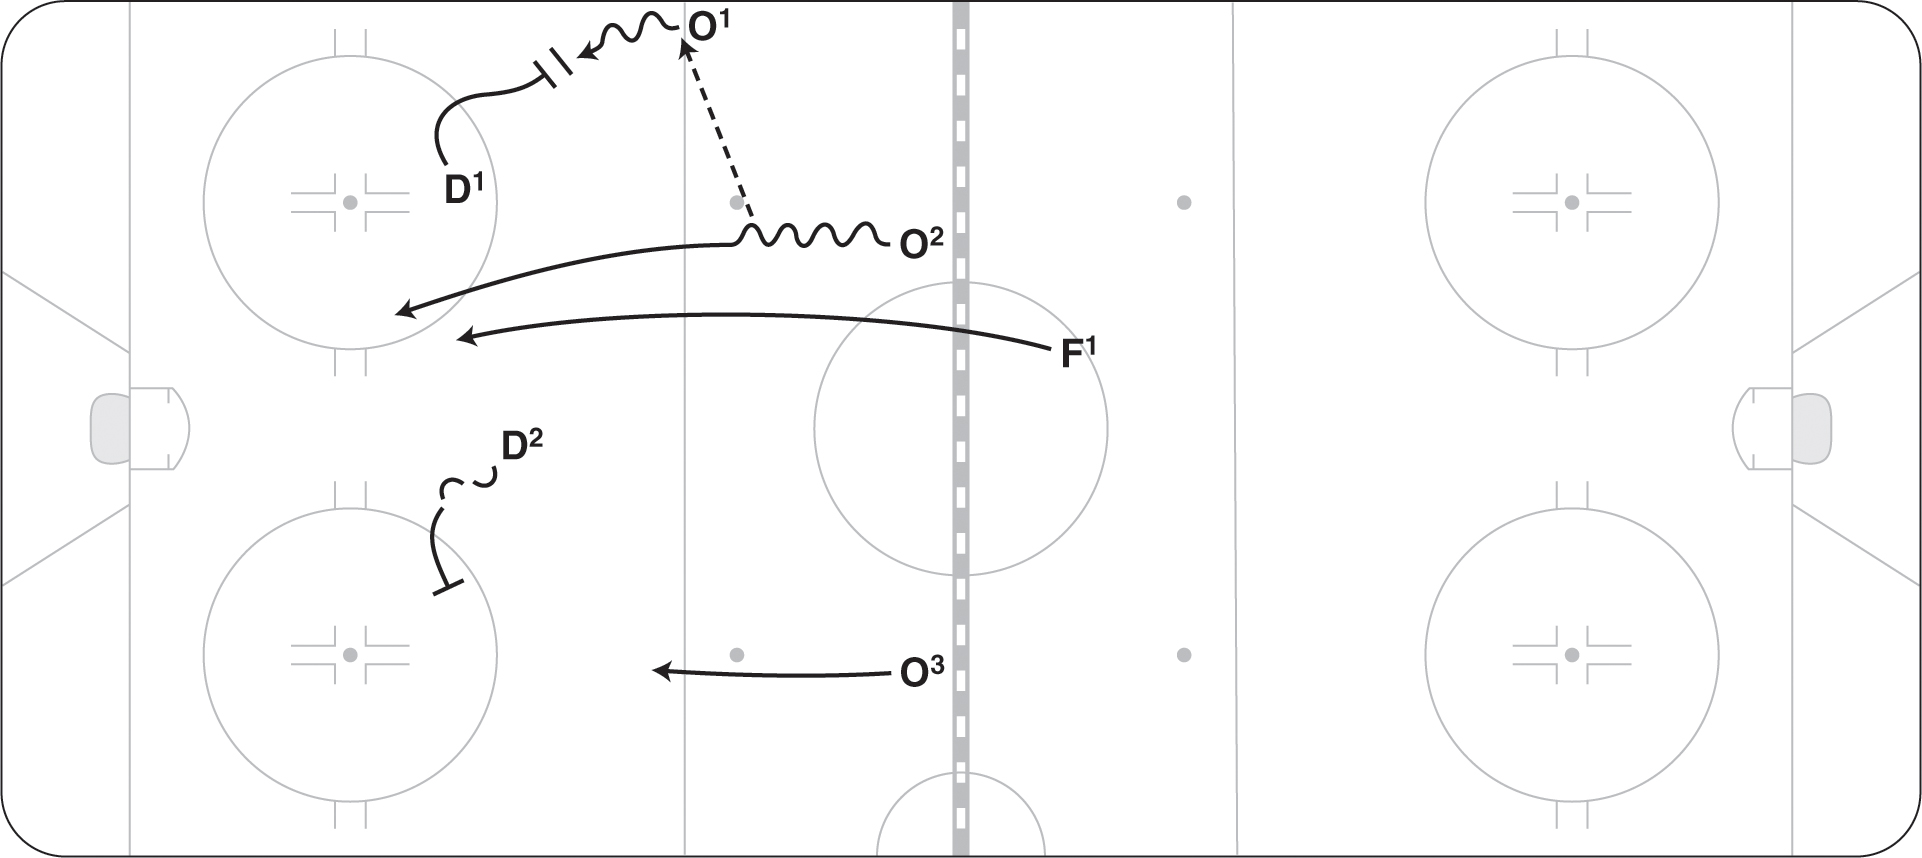
Figure 9.14 D1 takes the puck carrier, while F1 covers middle ice.
Backchecking requires commitment and work, as indicated in chapter 8. Not allowing the opposition to get a free fourth player into the attack is a characteristic of strong defensive teams. If a fourth player is in the attack, then the four on three should be played like a three on three. The first three attacking players will be covered, and if a pass is made to the late player, D1, D2, and F1 should hold their checks and let the fourth attacker shoot but not pass. The goaltender will have to be ready for the high shot. If D1, D2, or F1 can get into a shooting lane, he should try to do that but not let the fourth attacker pass because the goaltender must be committed to the shot. Ideally, F2 or F3 on the backcheck will eventually get some pressure on the fourth attacker (figure 9.15).

Figure 9.15 Allow the fourth player shot.
Transitioning Into Defensive Zone Coverage
Coaches must remind their teams that at some point the team shifts from defensive zone entry coverage to defensive zone coverage. Our thoughts are that you cannot rush this transition. First, make sure that your entry coverage is set and that the final two backcheckers are in the zone and stopped in mid-ice. When the puck moves to the outside, you can then transition into defensive zone coverage alignment, the subject of the next chapter.