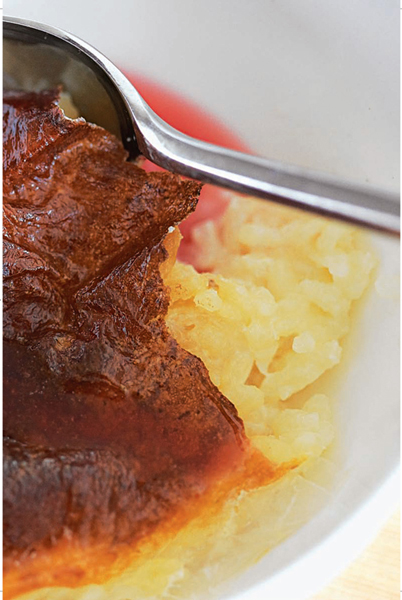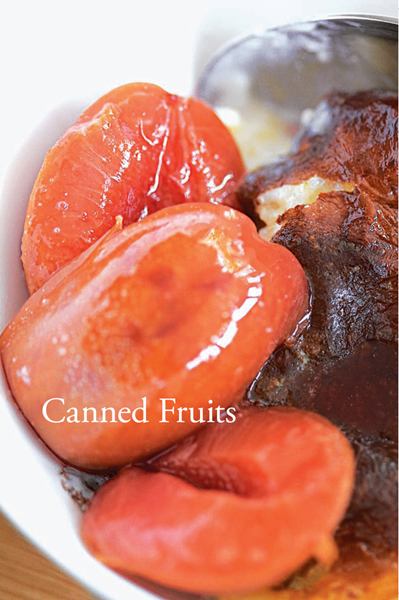
With the advent of the deep-freeze, canning has rather slipped from necessity and fashion. That’s a shame, as it is an excellent way of preserving fruits — far better than freezing for some, such as peaches, cherries, figs, and apricots. These, when canned, will remain closer in flavor and texture to their natural state. Another advantage of canning is that the fruit is ready and waiting to be used at any moment — there’s none of that ferreting about in the bottom of the freezer or waiting for a soggy mass of fruit to defrost.
Nevertheless, unraveling the canning process can seem like cracking a secret code. There are so many methods to choose from — the slow water method, the quick water method, the very low oven, the moderate oven, or the pressure cooker — as well as charts to navigate. To make it easier and to encourage you to have a go, I have whittled down canning to two basic methods — the water bath method and the oven method. To be successful, both rely on two simple points — the fruit must be sterilized by heating, and the jars must be perfectly sealed.
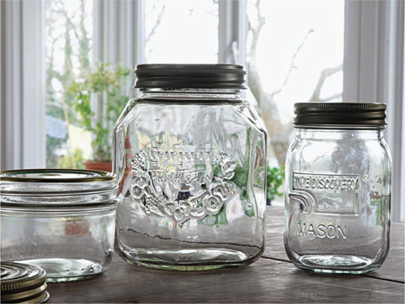
The containers used for canning are stronger than normal jam jars because they need to withstand a heating process. Two types are generally used (see below) and both are available in half-pint, pint, quart, and half-gallon (8-, 16-, 32-, and 64-fluid ounce) sizes.
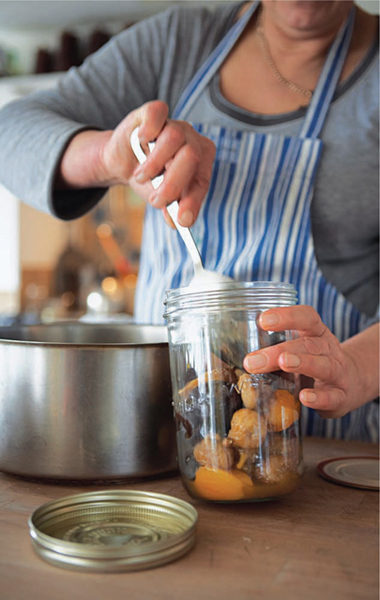
The jars, lids, and rubber rings should be sterilized before the fruit is packed in. I find the easiest way to do this is to place them in a large pan of cold water and bring slowly to a boil. I then remove the pan from the heat and leave the jars in the water until I need them. Remove the jars from the pan with a pair of tongs. There is no need to dry the jars. Alternatively, before use, the jars can be washed in hot water, left inverted to drain, then put in a 275°F oven for 15 minutes.
Screw-band jars Often referred to as Mason jars, these have metal lids with a rubber seal that separates the top of the jar and the lid. The screw-band is fully tightened only after the cooking process, to seal the jar and form a vacuum. Lids cannot be reused; the built-in seal works one time only.
Lock-lid jars These have a rubber ring to separate the jar top from the jar lid but are fastened with a metal spring clip. These jars allow steam to escape, but no air can enter. They normally have a wider mouth than screw-band jars and are therefore more suitable for use with larger fruits, such as pears or peaches.

The rubber rings must be a perfect fit and in perfect condition — so check them before using. They will deteriorate with use and will need replacing from time to time. The rubber rings can either be sterilized with the jars and lids, or be soaked in warm water (100°F) for 15 minutes (this makes it much easier to stretch them on), then dipped in boiling water just before they go on the jar.
Fruit can be canned in plain water, but a syrup based on sugar or honey will improve the flavor. Alcohol, pure fruit juice, fruit cordials, scented leaves, and spices can be added to give character and interest. The strength of the syrup depends on the type of fruit used and how you like your fruit to taste — the tarter the fruit, the heavier you’ll want to make the syrup. Generally, you want a sweeter syrup for more tightly packed fruit too, because less is used. Syrups are always prepared by simply dissolving the required amount of sugar or honey in water and boiling for 1 minute.
Light syrup 3 tablespoons sugar (2 tablespoons honey), 1 cup water
Medium syrup ⅓ cup sugar (3 tablespoons honey), 1 cup water
Heavy syrup ½ cup sugar (¼ cup honey), 1 cup water
Fruit should ideally be perfectly ripe, but err on the side of under rather than over if you have to. Handle the fruit carefully as any bruising will spoil the preserves. Prepare it by removing stalks, stems, leaves, and hulls and rinsing in cold water if necessary. Vegetables require a very high-temperature process and are not suitable for home canning by either of the methods covered in this book.
Plums and cherries These can be canned whole or pitted — pits will impart an agreeable almondy flavor. There’s no need to prick the fruit.
Gooseberries These are best canned when green and slightly underripe. The skins should be pricked or nicked to prevent shriveling.
Pears and apples These should be peeled and cored before canning. Pears can be cored and quartered or left whole. Once peeled, place in a bowl of salted water (1½ tablespoons of salt to 4 cups of water) to prevent discoloration until ready to pack.
Peaches, apricots, and nectarines These should be peeled: immerse in boiling water for 1 minute, then plunge into cold water, peel, and pack immediately.
Rhubarb These stalks should be chopped into 1- to 2-inch lengths and steeped overnight in a light to medium syrup prior to packing and processing.
Soft fruits Handle these as little as possible — just remove stems or hulls.
Fruit to be canned should be handled as little as possible. Packing the fruit in neatly will mean you can get more in the jar.
1. Fruit will shrink during the heating process so should be packed into jars as tightly as possible, but without bruising.
2. Use a long-handled packing spoon, the end of a wooden spoon, or a chopstick to position fruit and tease out any air bubbles.
3. Stand jars on a wooden surface or newspaper when filling with hot syrup.
4. Make sure the rim of the jar is free from seeds or fruit fibers.
5. Give the jar a sharp knock or swirl to remove any trapped air before sealing.
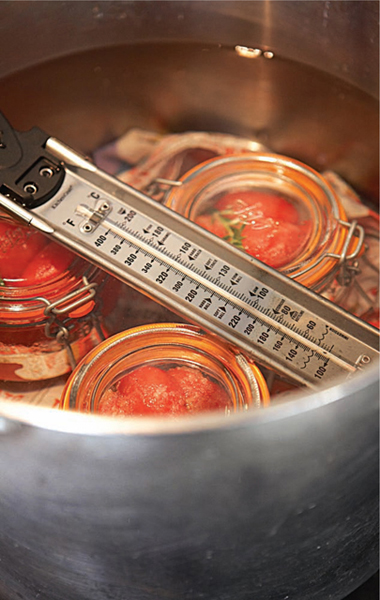
For canning in a water bath, you need a pan deep enough to contain the jars completely submerged underwater. The jars will crack if they sit directly on the bottom of the pan, so it needs a “false bottom” such as a wire trivet or a folded tea towel. A thermometer is essential to check the temperature.
The fruit should be packed into jars and filled to the brim with hot syrup (about 140°F). If you’re using Mason jars, the band should be released by a quarter of a turn for steam to escape. Place the jars in the pan and cover completely with warm water (100°F). Heat to the simmering point (190°F) over a period of 25 to 30 minutes, then simmer for the time given in the recipe or IN THE CHART.
Remove the jars one at a time and place them on a wooden surface, newspaper, or folded cloth — scooping out some of the water first will make it much easier to lift the jars from the pan. Tighten the screw-bands on Mason jars, then leave undisturbed for 24 hours, until completely cool. Check the seal the following day (SEE TESTING THE SEAL).
The oven method takes longer than the water bath method, but you can process more jars at a time and don’t need to worry about finding a deep pan.
Preheat the oven to 300°F. Stand the jars about 2 inches apart (enough to allow the warm air to circulate) on a thick pad of newspaper, or stand them on newspaper or a folded tea towel in a baking pan filled with water to a depth of 1¼ inches. Fill the packed jars with boiling syrup and cover with the rubber rings and jar tops, but do not fasten with clips or screw-bands at this stage.
Heat in the oven for the time given in the CHART. Remove the jars, one at a time, seal with the screw-band or clip immediately, and place on a wooden surface, newspaper, or folded cloth. Leave undisturbed until completely cool, and check the seal the following day (see below).
It’s important to test the seal after canning to be sure that it is absolutely airtight. When the jars are completely cool, undo the clips or remove the screw-bands. Put one hand underneath the jar and, with the other hand, carefully lift the jar by the lid. If it’s well sealed, the lid will remain firmly on. You can then refasten the clip or screw-band and put the jar away for storage. If the lid comes away, either reprocess the fruit or eat it up immediately.
Store canned fruits in a cool, dark, and dry place. They will keep well for up to 1 year. After this, although there may be nothing wrong with them, the texture and color will begin to deteriorate.
The round rubber seal on a lock-lid jar has a small protuberance that should break the seal when pulled. However, it doesn’t always work! So for stubborn lock-lid jars and Mason jars, very carefully insert the point of a knife between the rubber ring and the rim and gently lever up. If the seal is still difficult to break, then stand the jar in hot water for a few minutes — this will help to release the seal.
For safe canning it is important to adhere to these timings. For the water bath method, check the water temperature with a thermometer; for the oven method, preheat the oven and check the temperature using an oven thermometer.

Season: January to February
The arrival of the early, forced rhubarb in January deserves a salutation of the greatest magnitude, and I can never wait to savor its fresh, earthy energy. The blushing stalks, with their tart but delicate flavor, are strictly seasonal, so be sure you don’t miss the chance to preserve a jar or two to enjoy later in the year.
Makes two 16-ounce jars
7 tablespoons honey
Juice of 1 large orange (you need 7 tablespoons)
3 pounds, 6 ounces forced rhubarb
Put the honey and 2 cups plus 2 tablespoons of water into a pan and slowly bring to a boil to make a syrup. Remove from the heat and add the orange juice.
Meanwhile, wipe the rhubarb and trim the ends. Cut into even 1- to 2-inch chunks. Place the rhubarb in a bowl and pour in the hot syrup. Let stand for 10 to 12 hours. This soaking makes the rhubarb much easier to pack in the jars.
Using a slotted spoon, take the rhubarb from the syrup and pack into warm, STERILIZED JARS. Bring the syrup to a boil again and pour over the rhubarb, filling the jars to the brim. Cover with lids, remembering to loosen screw-bands, if you’re using them, by a quarter of a turn (SEE THE WATER BATH METHOD). Stand in a pan with a folded tea towel on the bottom. Cover the jars with warm water (100°F). Bring to the simmering point (190°F) over a period of 25 minutes. Simmer at this temperature for 2 minutes.
Carefully remove the jars from the pan and place on a wooden surface or a folded tea towel. Tighten screw-bands. Leave undisturbed to cool for 24 hours, then check the seals before storing (SEE TESTING THE SEAL). Use within 1 year.
Instead of honey and orange juice, try using 2 ounces of very finely sliced fresh ginger and liven up the syrup with ginger cordial or, better still, some ginger wine. Both natives of Asia, ginger and rhubarb are natural partners. So often ingredients that coincide, seasonally or locally, complement each other in the culinary world.
Season: late July to September
This recipe, applying the oven method, can be used for preserving the many members of the Vaccinium family, which include the cultivated blueberry as well as the wild huckleberry. The delicate, lemony nutmeg note of fresh bay complements their gentle flavor beautifully.
Serve these fragrant berries for a breakfast treat with thick vanilla yogurt.
Makes three 16-ounce jars
¾ cup superfine sugar
¼ cup lemon juice
2¼ pounds blueberries or huckleberries
6 fresh bay leaves
Preheat the oven to 300°F.
Start by making a fruit syrup: mix the sugar with 2½ cups of water in a pan and bring slowly to a boil to dissolve the sugar. Remove from the heat, add the lemon juice, cover, and keep warm.
Pick over the berries, removing any twiggy bits or leaves. Pack them firmly, without crushing, into warm, STERILIZED JARS, sliding the bay leaves attractively around the sides of the jars.
Bring the sugar syrup to a boil and pour over the berries, filling the jars to the brim. Cover with lids, but do not fasten the clips or put on the screw-bands (SEE THE OVEN METHOD). Put the jars, 2 inches apart, in the oven for 30 minutes.
Carefully remove the jars, seal with screw-bands or clips immediately, and place on a wooden surface, newspaper, or folded cloth. Leave undisturbed until completely cool, and check the seal the following day (SEE TESTING THE SEAL). Use within 1 year.
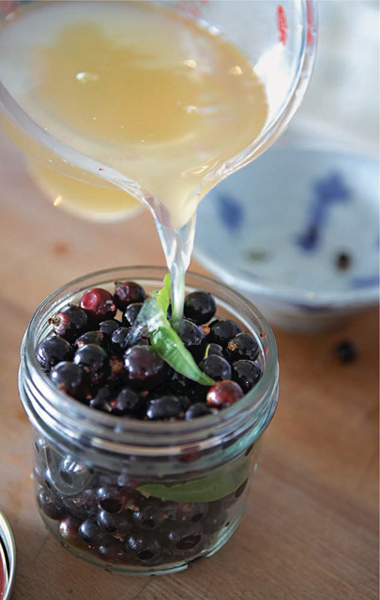
Season: June to August
The rich, intense flavor of black currants is well preserved by canning, and I find it very useful to have a few jars on the larder shelf. Preserved currants are delicious served with hot steaming custard, vanilla ice cream, or good plain yogurt. When friends drop by, I often open a jar for an instant dessert.
Makes two 16-ounce jars
1 cup granulated sugar
2½ pounds large, firm, juicy black currants
A few lemon verbena or scented geranium leaves (optional)
Put the sugar into a pan with 2½ cups of water and heat gently to dissolve, then boil for 1 minute to make a syrup.
Prepare the black currants by removing any twiggy stems and rinsing the fruit if necessary. Pack the currants as tightly as possible, but without crushing, into warm, STERILIZED JARS . If using verbena or geranium leaves, layer 2 or 3 among the little purple-black fruits as you go.
Cover the packed fruit with the hot syrup (140°F), filling the jars to the brim. Fasten with screw-bands or clips. If using screw-bands, remember to tighten them and then release by a quarter of a turn (SEE THE WATER BATH METHOD). Place a folded tea towel in the bottom of a large pan (which must be deeper than your jars are tall). Fill the pan with warm water (100°F), then submerge the jars completely.
Clip a candy thermometer to the side of the pan. Bring the water slowly to the simmering point (190°F) over 25 minutes, then maintain this temperature for just 2 minutes.
Lift the jars out and place on a wooden surface or a folded tea towel. Tighten screw-bands. Leave undisturbed for 24 hours. To check that they are properly sealed, remove the clips or screw-bands and lift the jars by their lids (SEE TESTING THE SEAL). Store in a cool, dark place. Use within 1 year.
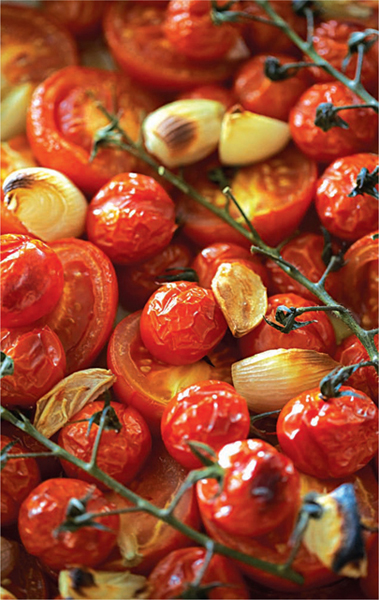
Season: August to September
For me, tomato passata is an essential pantry ingredient. I use it as a base for my ROASTED TOMATO KETCHUP, as well as for pasta sauces and curries.
The best time to make this preserve is when tomatoes are at their cropping peak — smelling strong, sweet, and aromatic when picked from the vine. This recipe uses 4½ pounds of fruit but, if you are using bought tomatoes as opposed to homegrown ones, I suggest you negotiate a good deal with your local grower and buy a boxful or two. You certainly won’t regret it. You can’t buy passata like this one!
Makes two 16-ounce jars
4½ pounds ripe tomatoes
7 ounces shallots, peeled and thinly sliced
3 or 4 garlic cloves, peeled and thinly sliced
A few rosemary, thyme, basil, or oregano sprigs
1 teaspoon salt
½ teaspoon ground black pepper
1 teaspoon granulated sugar
¼ cup olive, sunflower, or canola oil
Preheat the oven to 350°F.
Cut the tomatoes in half and place them, cut side up, in a single layer in a large roasting pan. Scatter the shallots, garlic, herbs, salt, pepper, sugar, and oil over the top. Roast for about 1 hour, until the vegetables are well softened. Remove from the oven and purée with a food mill.
Have your hot, STERILIZED JARS ready. Put the tomato purée into a saucepan and bring to the boiling point. Pour it into the jars, filling them to the brim, and seal immediately with clips or screw-bands. If you’re using screw-bands, remember to release the lid by a quarter of a turn (SEE THE WATER BATH METHOD).
Stand the jars in a large saucepan with a folded tea towel on the bottom of the pan. Cover with warm water (100°F) and bring to the simmering point (190°F) over a period of 25 minutes, then simmer for 10 minutes.
Remove the jars and stand them on a wooden surface or folded tea towel. Tighten the screw-bands, if using. Leave undisturbed until cool, then check the seal (SEE TESTING THE SEAL). Use within 1 year. Once opened, refrigerate and use within a few days.

Season: late August to October
It always amazes me just how much fruit a gnarled old pear tree can bear in a good season. However, it’s still a little tricky to catch pears at their point of perfect ripeness — somewhere between bullet hard and soft and woolly. Never mind, should you find yourself with a boxful of underripe specimens, this recipe turns them into a preserve “pear excellence.”
These pears are particularly delicious served with thick vanilla custard or used as a base for a winter fruit salad. Alternatively, try serving them with terrines and pâtés, or mix them with chicory leaves drizzled with a honey mustard dressing and crumbled blue cheese.
Makes two 32-ounce jars
⅔ cup granulated sugar
2 cups cider (dry, medium, or sweet)
3 pounds, 6 ounces small pears
Small handful of cloves
2 (2-inch) pieces of cinnamon stick
Preheat the oven to 300°F.
Start by making a cider syrup: mix the sugar with 2 cups plus 2 tablespoons of water in a pan and bring slowly to a boil to dissolve the sugar. Remove from the heat, add the cider, cover, and keep warm.
Peel the pears, keeping the stems attached. As you do so, place them in a bowl of lightly salted water to stop them from browning. When all the pears are peeled, cut them in half and stud each half with a clove or two. Pack them into warm, STERILIZED JARS, adding a piece of cinnamon to each. Pears are very bottom-heavy, of course, and I find the best way to pack them is head to toe.
Bring the cider syrup to a boil and pour over the pears. Cover the jars with lids, but do not fasten the clips or put on the screw-bands. Place the jars 2 inches apart, in the oven for 1 hour (SEE THE OVEN METHOD).
Remove the jars, seal with the screw-bands or clips immediately, and place on a wooden surface, newspaper, or folded cloth. Leave undisturbed until completely cool, and check the seal the following day (SEE TESTING THE SEAL). Use within 1 year.
Try replacing the cider with red wine, and add a star anise to each jar if you like.

Season: August to early October
The Brogdale Trust in Kent is home to the National Fruit Collection — a bit like a Noah’s Ark for the fruits of the earth. Among their many living specimens, they grow over 300 different cultivars of Prunus domestica, the European plum — also known as dessert plums. These fruits crop from high summer right through into October, giving us plenty to eat fresh, and loads to preserve for later in the year.
In the United States, European plums can be found at farmers’ markets, growing in backyards, or at some supermarkets. Or you can preserve peach, nectarine, or apricot halves in the same way.
Makes two 32-ounce jars
¼ cup honey
Finely grated zest of 1 orange
7 tablespoons brandy
2¼ pounds plums, stems removed
2 cinnamon sticks
2 star anise pods
Start by making a brandy syrup: put the honey and 1¾ cups of water into a pan, heat gently until the honey is dissolved, then add the orange zest and brandy. Set aside.
Halve the plums lengthwise with a sharp knife. Twist them apart and remove the pit with the point of the knife. Pack the plums into warmed, STERILIZED JARS with the rounded sides of the fruit following the curve of the jar (you’ll fit more in this way). Prod a cinnamon stick and a star anise down the side of each jar.
Pour the hot brandy syrup (140°F) over the fruit until the jars are full to the brim. Tap to remove any air bubbles. Seal with clips or screw-bands, remembering to release the screw-band by a quarter of a turn, if using this type of jar (SEE THE WATER BATH METHOD).
Choose a large pan, deep enough for your jars to sit in and be totally immersed in water. Put a folded tea towel on the bottom of the pan and fill with warm water (100°F). Put the jars into the pan, making sure they are completely covered with the water. Bring to the simmering point (190°F) over a period of 25 minutes, then maintain this temperature for 20 minutes.
Transfer the jars to a wooden surface or place on a folded tea towel. Tighten the screw-bands, if using. Leave undisturbed for 24 hours, then check that the seal is secure (SEE TESTING THE SEAL). Use within 1 year.
Season: August to September
The fig is a member of the mulberry family and is generally best suited to warmer climates. A contented, well-positioned homegrown tree can crop well, usually in August and September. There are countless varieties, ranging in color from purply black to yellowy green — any can be used for this recipe. Just make sure, when picking or buying, that your figs are ripe, as they do not ripen after picking.
This recipe uses a simplified version of the oven method. Everything is cooked and hot to start with, so it’s not necessary to heat the jars for an extended time in the oven. A few jars of these honey-soaked fruits, stored away for the winter months, will be a blissful reminder that the hot days of summer were not just a fig-ment of your imagination…
Makes two 8-ounce jars
12 figs (not too big)
⅔ cup freshly squeezed orange juice
2 cups freshly made Earl Grey or green tea
⅓ cup honey
Preheat the oven to 275°F and put your STERILIZED JARS inside to heat.
Wash the figs and remove any hard, twiggy bits of stem — but do not cut right back to the flesh, as this risks splitting the skin.
Put the orange juice, tea, and honey into a pan and gently heat to a simmer to make a syrup. Add the figs and cook gently for 8 to 10 minutes, until tender. Using a slotted spoon, take out the figs and carefully pack them into the hot jars. It may be a bit of a squash, but figs quite like this. Return the filled jars to the oven to keep warm — it is important to keep the jars as hot as possible to create a successful seal.
Bring the fruit syrup to a boil and boil for 6 to 7 minutes to reduce it in volume. Stand the jars on a wooden surface or newspaper and pour the hot syrup over the figs, filling the jars to the brim. Seal immediately with lids, clips, or screw-bands. Leave undisturbed for 24 hours, then check that the seal is secure (SEE TESTING THE SEAL). Use within 1 year.
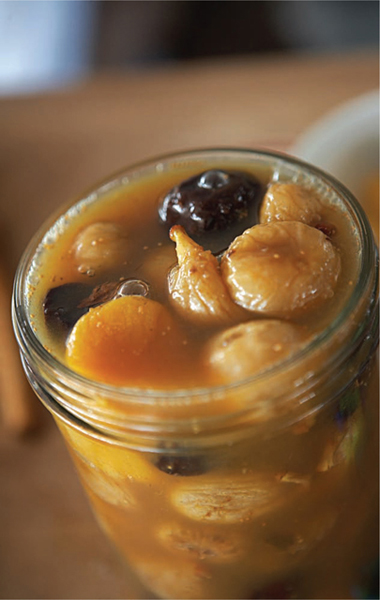
Season: winter
It may seem somewhat unnecessary to preserve dried fruit, but I love having a few jars of this compote on the shelf. The once-shriveled fruits become plump and luscious and are quite delicious served alone for breakfast or with yogurt or crème fraîche as a dessert.
I like to make this in early November, when newly dried prunes, figs, and apricots are available. Keep on the lookout for small, dried wild figs, which will plump up perfectly to their original shapely selves. The glistening black prunes from the Agen area in southern France are also key players — I prefer to use these unpitted because they infuse the compote with an almondlike essence.
A simplified version of the oven method is used — everything is cooked and hot to start with, so the jars don’t need to be heated for an extended time in the oven.
Makes four 16-ounce jars
3⅓ cups dried figs
1¼ cups unsulfured dried apricots
2⅓ cups dried prunes, Agen prunes if possible, preferably with pits
4¼ cups freshly made hot green tea, Earl Grey, or breakfast tea
¾ cup plus 2 tablespoons freshly squeezed orange juice
7 tablespoons honey
Combine the dried fruit in a large bowl. Pour the hot tea and the orange juice over it and mix together, making sure all the fruit is totally immersed. Cover and let steep for 24 hours.
Preheat the oven to 275°F and place your STERILIZED JARS inside.
Carefully transfer the fruit and liquid into a large pan. Bring slowly to a simmer on the stovetop and poach the fruit for 10 minutes.
Remove the pan of fruit from the heat. Using a slotted spoon, scoop out the fruit and pack into the hot jars. Return the jars to the oven to keep warm. Add the honey to the steeping juice. Bring to a boil and boil for 5 minutes.
Carefully remove the jars from the oven and pour in the honeyed juice so it comes to the very brim of the jars and completely covers the fruit. Seal immediately with lids, clips, or screw-bands. Leave undisturbed for 24 hours, then check that the seal is secure (SEE TESTING THE SEAL). Store in a cool, dry place and use within 1 year.
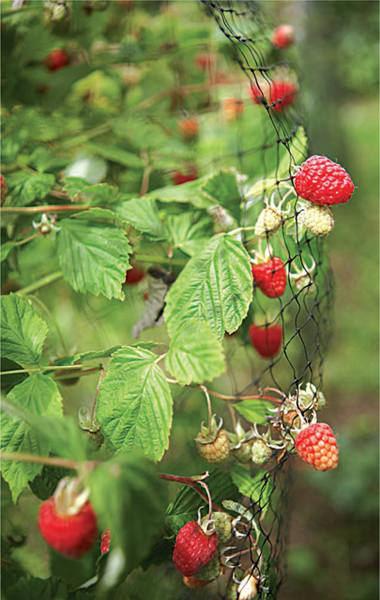
Season: July to late October
This recipe comes from Liz Neville, a virtuoso preserves maker with whom I run the River Cottage Preserved courses. You can make it with any raspberry, but we particularly like to use the big autumn berries. Bottle a few and you can extend your raspberry eating well into the dark winter months.
In an ideal world, the fruit for this preserve would be packed into the jars as you pick it from the canes. That may not be possible — but do make sure the fruit is in tip-top condition and handled as little as possible.
Makes three 16-ounce jars
¾ cup granulated sugar
2¼ pounds firm, just-ripe raspberries
½ to ⅔ cup brandy, gin, vodka, or raspberry liqueur
First make a syrup: put the sugar and 3¼ cups of water into a pan and heat slowly to dissolve the sugar, then bring to a boil. Keep the syrup warm.
Pack the raspberries tightly into warm, STERILIZED JARS. Make sure you don’t bruise the fruit — a chopstick or wooden spoon handle is useful for gently prodding it down. Pour the alcohol over the packed fruit. Fill the jars to the brim with the sugar syrup, tapping them to remove any air bubbles. Put the lids on the jars, loosening screw-bands by a quarter of a turn, if you’re using them, to allow the steam to escape (SEE THE WATER BATH METHOD).
Stand the jars in a deep pan and cover with warm water (100°F). Heat to the simmering point (190°F) over 25 minutes. Maintain this temperature for 2 minutes.
Carefully remove the jars and stand them on a wooden surface or thick folded towel. Tighten the screw-bands, then leave the jars undisturbed to cool. When cool, check the seal by removing the clips or screw-bands and lifting the jars by the lid (SEE TESTING THE SEAL). Use within 1 year.
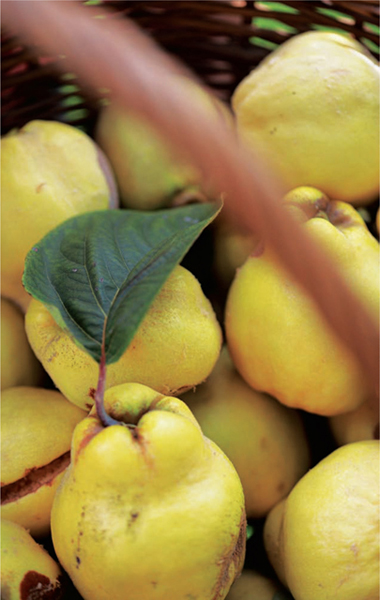
Season: September to October
The raw flesh of the lumpy yellow quince is dry and disagreeably sour. However, once cooked, it becomes pink and highly perfumed. Lightly sweetened and combined with good fluffy cooking apples, such as Granny Smiths, it makes a delightful accompaniment for roast pork or duck. I also love this aromatic fruity sauce on a home-baked rice pudding.
Makes four 8-ounce jars
1 pound, 2 ounces quince, peeled, cored, and chopped
Juice of ½ lemon
1 pound, 2 ounces cooking apples, peeled, cored, and chopped
⅔ cup granulated sugar
Put the quince, lemon juice, and 2 cups plus 2 tablespoons of water into a saucepan. Bring to a boil, then simmer for 8 to 10 minutes (quince takes longer to soften than apple and needs a bit of a head start). Add the apples and sugar and cook for a further 10 to 15 minutes, until all the fruit is well softened. Remove from the heat and either beat to a smooth pulp with a wooden spoon or press through a sieve.
Meanwhile, preheat the oven to 275°F and place the STERILIZED JARS inside.
Return the pulp to the pan and bring to a boil, stirring to make sure it doesn’t stick and burn. Remove from the heat and pour immediately into the warm, sterilized jars. Seal with lids, clips, or screw-bands, remembering to release the screw-band by a quarter of a turn if using this type of jar (SEE THE WATER BATH METHOD). Place in a deep pan with a folded tea towel on the bottom. Cover with warm water (100°F), bring to the simmering point (190°F), then simmer for 5 minutes.
Remove the jars from the hot water and place on a wooden surface or folded tea towel. Tighten the screw-bands, if using, and leave the jars undisturbed until cool. Check the seal (SEE TESTING THE SEAL). Store in a cool, dry place. Use within 1 year.