
If you already own a bicycle, you’ll probably want to use it for these rides, and who are we to say you shouldn’t? However, some types of bike are more suitable for our purpose than others.
We prefer a “hybrid” bike, though you could also use a touring bike. Both of these are intermediate bikes (between the extremes of racing and mountain bikes) appropriate for our intermediate rides. They combine wider, more stable tires and a more comfortable seat and upright riding position than racing bikes, and they are faster and lighter than mountain bikes.
Racing bikes and mountain bikes were designed for purposes other than the leisurely meanderings we describe. But if you already own one of these types of bike, you can use it on these rides. Cycling these routes is enjoyable, no matter what your choice of bike.
Many cyclists, including long-time owners, have not adjusted their bikes for proper efficiency. While this is not crucial for local shopping trips, it will make a difference in comfort and safety on longer rides. The subject of bicycle fitting is too detailed to cover properly in this book, so in addition to the tips below ask for on-the-spot advice at a bicycle shop or refer to a book on bicycle maintenance.
Bicycles are manufactured in various frame sizes for people of different stature. Once you’ve chosen a frame size, you can adjust the bike at several points to make it comfortable for you.
For instance:
> Saddle posts can be moved up or down.
> Saddles can be moved backward or forward, and their front end tilted up or down.
> Handlebars can be raised or lowered.
Your bike adjustments are correct if:
> When you sit on the bike, your leg is almost, but not quite, straight at the lowest point of your pedal revolution. If it is not, you are losing some of the downward force your legs are capable of producing. Your knees are lined up over your feet so you are not straining your hips, knees or ankles.
> Your handlebars are within easy reach, and your body is not angled too far forward. Your back is flat rather than rounded, and your neck, shoulders and wrists are relaxed.
> You are not slipping forward or backward on your saddle.
Getting these adjustments right is essential. If they are not correct, you will tire easily and be uncomfortable to the point where you will not enjoy cycling and might give it up. So it’s worth taking the trouble to ensure that you are completely at ease on your bike.
Correct leg position at bottom of stroke
Bicycle Essentials and Accessories
Most touring and hybrid bikes come well equipped for touring, but those that don’t can easily be fitted with the desired equipment.
Some bikes come with shocks (suspension), but they are not really necessary for these rides. Ideally, your bike should have:
MEDIUM TIRES. A tire between 1 3⁄8 inches and 1 ¾ inches wide is suited to both paved roads and reasonably smooth gravel dykes. A slightly raised tread helps the tire grip on uneven surfaces.
STRONG BRAKES. Cantilever and V-brakes are widely used, and both have strong pulling power.
EIGHTEEN SPEEDS OR MORE. A range of gears is good because it includes easier gears for hill climbing.
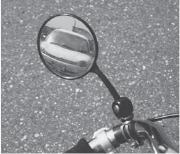
A REAR-VIEW MIRROR. This is one of the most important safety accessories you can have. A medium to large mirror attached to the handlebars lets you see more than a tiny one attached to a helmet.
MUDGUARDS. When you’re caught in a rainstorm, these tire protectors (sometimes called fenders) will prevent you from getting soaked in the spray from your tires.
A REAR LUGGAGE RACK AND PANNIER(S). The metal rack bolts to your bike so you can carry panniers. These saddle bags can hold your rain gear, lunch, extra clothing, tools, farm produce, etc. A bungee strap on top of your rack is a convenient way to hold articles of clothing you may want to slip on or off. While we much prefer panniers, which keep the bikes balanced and our backs free of sweat, others use a well-padded and lightweight backpack to carry their gear.
A HANDLEBAR BAG. This bag can carry items to which you want easy access, such as emergency tools, rags, energy rations, sunscreen, cash, a camera, maps and route instructions.
TOECLIPS. These curved plastic or metal pieces fasten onto the front of your pedals to properly position your feet. Adjustable straps hold your feet in place. Toeclips force you to put your weight onto the ball of your foot, which is the most efficient position for getting the most power from your pedal stroke. If you are a novice rider, delay fitting toeclips to your pedals until you feel totally comfortable on your bike. Always make sure the fasteners are loose enough to allow you to withdraw your shoes quickly when necessary, and remember to pull your feet backward before dismounting.
A WARNING DEVICE, MOST COMMONLY A BELL. A bell is required by law, and it is particularly useful to warn others on a shared pathway that you are approaching. Please do not ride at high speed, ring your bell, then expect other users to avoid you.
A WATER BOTTLE AND CARRIER. The metal or plastic cage fits on your bike frame and holds a water bottle. Drink often; dehydration can be a serious risk when you’re exerting yourself.
A BICYCLE PUMP AND A PRESSURE GAUGE. If the pump doesn’t come with a mount, you may need to fasten it to the bike’s frame with accessory clips that you can obtain at a bicycle shop. Make sure the pump fits the valve on the inner tube in your tire and keep your tires properly inflated. (The maximum pressure is noted on the side of the tire itself.)
A SPARE INNER TUBE, TIRE LEVERS AND A PATCH KIT. Tire punctures are the most common breakdown on a ride. Before you leave home, know how to change the tube; repairing the punctured one later is easier than trying to mend it on the spot. The spare should be the same size as the original tube. It may come with either a Schraeder (fat) valve or a Presta (thin) valve—it doesn’t matter which, but the valve should be the same type as on the original tire.
A TOOL KIT. Bicycles are subject to constant vibration, causing components to loosen. Regular maintenance will prevent most problems, but there will be times when, for want of a simple adjustment, your bike becomes unrideable. You will need some basic tools in order to make these adjustments when out on a ride. BCAA members now get free roadside bicycle assistance with their membership, so in a real pinch you can call a mechanic to help you out.
In order that their edges don’t become burred and eventually useless, your tools need to be an exact fit for the parts they’re being used on. It is also essential to tighten parts firmly to prevent components from slipping. To be sure we get the right fit, we’ve found it useful to detach a nut from the bike, take it to a hardware store and select a wrench that exactly matches that part, be it either metric or SAE.
Nowadays, Allen keys (also known as hex keys) have largely replaced screwdrivers. Here again, it is essential that they fit exactly so as not to ruin the screw heads. Allen keys are not often available singly, so you may have to buy a full set of ten to fifteen keys—just carry with you the two or three that fit your bike.
We show here the tool kit we have assembled for our joint use. Your tools may very well be different sizes.
A FIRST-AID KIT. Unless you have special needs, a basic kit from the drugstore should see you through most situations.
AN ANTI-THEFT LOCK. We recommend a U-lock for maximum strength, or keep your bike within sight at all times.
LIGHTS. The rides described in this book are intended to be done in daylight, but the law requires you to use a white front light and a red rear light if you are out past dark.
If you are driving to the starting point, you will need a bicycle carrier. A variety of racks is available from bicycle and automotive retailers. (Note: If your bike rack is easily removable, lock it in the vehicle while you are out riding.)
Warning of approaching danger
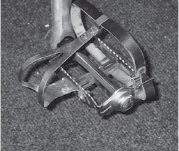
Toeclip

Left: rag for wiping oily hands; Top, left to right: penknife, tire levers, adjustable wrench, pliers, two-ended screwdriver; Bottom, left to right: 15mm, 13mm, 10mm, 9mm and 8mm wrenches, CR-V6, CR-V4 and CR-V3 Allen keys

Equipped for easy cycling
The following simple tasks will ensure that your bicycle is safe and enjoyable to ride:
> Check your tire pressure and add some air, especially if you haven’t ridden for a while.
> Test the bolts holding your rack, mudguards (fenders), handlebar bag and bottle cage (water bottle carrier) every once in a while—especially after riding over rough surfaces—to make sure they’re tight.
> Clean and lubricate the chain.
> Adjust your brakes and periodically replace brake pads and cables.
> Properly position gear-change guides to prevent the chain from slipping off the outside cogs.
Don’t be put off by these maintenance duties. They don’t need to be performed all that often, and if you aren’t interested in doing them yourself bicycle maintenance shops will handle them for you. But they must be done by somebody; otherwise your bicycle will become unfit to ride.
Better yet, get a book or take a course on bicycle maintenance and become interested in what makes your bicycle work best.
Contrary to popular belief, you don’t need to kit yourself out with expensive, specialized clothes—not, at any rate, for the type of cycling described in this book. Nevertheless, if that is what you fancy, bicycle shops carry a range of clothing (and other accessories) specially designed for cycling efficiency and stylishness.
Assuming that you’ll undertake these rides from approximately April to October, you’ll need to be prepared for weather ranging from cool to hot. The following should cover most eventualities:
HEADGEAR. Here you have no choice: The law in British Columbia requires you to wear a helmet. If you’re not already a cyclist, you will have to buy a helmet certified by the Canadian Standards Association. Buy one at a bicycle shop and ask the staff to advise you on proper fit. A poorly adjusted or improperly secured helmet is itself a source of danger.
LAYERS FOR THE UPPER BODY. Try a T-shirt, a long-sleeved shirt, a sweater and a windproof and waterproof jacket (see rainwear). Outer layers can be pulled off as the day warms up. Bright colours will help passing traffic see you more easily. Some cyclists find quick-drying nylon or polyester more comfortable than cotton. When you progress to longer hours of cycling than these individual rides call for, you might want to try clothing made of lightweight silk, merino wool or synthetic layers to help keep you dry and warm and prevent chafing.
SHORTS. These are our preferred legwear; we simply find them less restrictive than long pants. If you choose to wear three-quarter-length capri-style pants, be sure the fabric doesn’t catch in the chain and cause you to have an accident. To protect against saddle-soreness, you may want to buy specially padded cycling shorts or underwear that reduce the pressure on your seat. You can also buy a padded saddle cover.
SNEAKERS OR ATHLETIC SHOES. We find these types of shoes quite satisfactory provided they are not bulky, especially if you are using toeclips. Cleated cycling shoes are not necessary for our kind of cycling trips, which may include walking about in parks or buildings, but if you already own shoes with recessed cleats you will no doubt find them adequate for walking.
RAINWEAR. You can’t go out cycling without being caught in a shower occasionally, and we suggest you carry simple, lightweight rainwear for these times. For comfort and safety, keep your torso dry with a waterproof jacket rather than a cape, which can billow in the wind and upset your balance. You can also wear waterproof pants, but we find them uncomfortable against bare legs and prefer to go without.