Chapter 6
Reading Lines and Spaces
IN THIS CHAPTER
 Figuring out what all those lines, spaces, and marks mean
Fitting all the notes you need on one grand staff
Starting and stopping with bar lines
Bees buzzing, computers humming, and power tools vibrating are all sounds that can’t be easily deciphered and written down on paper. In frustration, humans decide that these noises mean nothing to them and move on with their lives. But people are incapable of being so blasé when it comes to two other types of sound: speech and music. Because this book isn’t Speech For Dummies, allow me to cut to the chase.
To play music, you have to know what note to play and when. A piano has 88 keys, each sounding a different musical note. (Chapter 5 tells you all about those 88 keys on the keyboard.) With a bunch of lines and dots, a composer tells you which notes to play, which of the 88 keys to press, and how long to play each note. In this chapter, I help you understand how each of these elements is written down in music.
Your Guide to a Piano Score
When you look at a piece of printed music, like “Humoresque” in Figure 6-1, the first thing you may notice are a bunch of dots and circles. These dots and circles represent notes. Each written note tells you two essential bits of info:
- What key to play
- How long to play that key
It shouldn’t take you long to notice that the notes are written on either a line or a space above or below a line. Without these lines, the notes are … well, just dots and circles.
Look a little more closely at Figure 6-1 and you see other familiar musical symbols that are all part of the written-music language. The following sections help you start deciphering that language, starting with the staff and the clef.
Note: Many of the elements of music notation (the universally accepted methods and conventions used to write music) are introduced in this chapter, and others are introduced in later chapters. You can, and should, always refer back to this page to remind yourself and reinforce all the elements of music notation. The key in Figure 6-1 tells you which chapter to go to for each element. Feel free to jump ahead and take a peek at any notational element that interests you.
Employing a staff of five lines
Figure 6-2 shows a set of the parallel lines you find in music. Count ’em — you should count five in all. Now count the spaces in between the lines — you should come up with four.
Together, these five lines and four spaces compose a musical staff. It’s an appropriate name because a composer employs his staff to hold the notes he’s writing. And what a staff to have! No complaining, no vacation time, no excuses for tardiness — just some inanimate lines and spaces.
Each line and space represents a specific musical note. The notes are named with the first seven alphabet letters, A-B-C-D-E-F-G, just like the white keys on the keyboard. (You can read more about the letters assigned to each of the keyboard keys in Chapter 5.) Each line and space is also named one of these letters. That way, when you see a note on the G line, you know to play the G key. See how everything is lining up?

FIGURE 6-1: An example of music written for the piano.

FIGURE 6-2: Music’s parallel lines.
Looking at your keyboard, you can see that there are several of each of the seven notes. For example, you see several separate G keys on the keyboard. Obviously, five lines and four spaces aren’t enough to accommodate all 88 keys. Before you panic, realize that you have a few more options.
Hanging from a clef
Instead of adding more lines and spaces to accommodate all the occurrences of each of the seven notes, you get a symbol to help out with the job. Think of it as your secret decoder ring, Captain Music Maker. Notice the little squiggly thing at the far left of the staff in Figure 6-3. This ornamental creature is called a clef (this one is the treble clef, to be exact).

FIGURE 6-3: The treble clef.
A clef’s sole purpose in life is to tell you the names of the lines and spaces on the staff. If the clef could talk, it would say something like, “For this set of notes, the lines and spaces represent these keys.”
 Music uses several different clefs, but as a keyboard player you’re in luck — you only need to know two of ’em. Think of it as having a clef for each hand.
Treble clef
Generally, the treble clef (shown in Figure 6-3) signals notes to be played by the right hand. This clef is also called the G clef because it
- Looks like a (very) stylized G.
- Circles around the second staff line which (not coincidentally) represents the note G.
The G line encircled by the treble clef isn’t for just any old G key. It’s the G that’s closest to the middle of your keyboard (see Figure 6-4 for a guide). After you’ve found this G, reading the other lines and spaces on the staff is as easy as reciting the alphabet.
If you’re close to a keyboard, put a right-hand finger on this G key. (If you’re not close to a keyboard, refer to the keys you see in Figure 6-4.) The next white key up (to the right) of the G is represented by the next space up on the staff. According to the E-Z Key Finder in Chapter 5, G stands for “Go back to the beginning of the alphabet,” so the next white key on the keyboard and the next space up on the staff correspond to the note A.
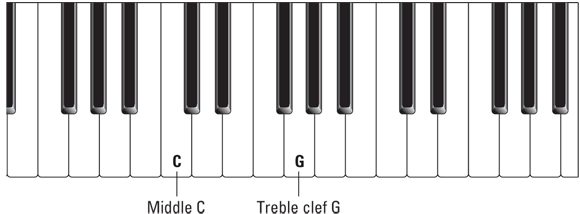
FIGURE 6-4: Finding treble clef G is no trouble.
Continue up and down the staff and you get the musical notes you see in Figure 6-5.

FIGURE 6-5: Names for notes on the treble clef lines and spaces.
Bass clef
Your left hand typically plays the lower notes on the keyboard, which are also called bass notes. (For the record, that’s pronounced like base, not like the fish you caught last weekend.)
The rules of equality demand that the left hand get its own clef, too. Meet the bass clef (shown in Figure 6-6). Like the treble clef, the bass clef surrounds a particular line that represents a particular note: F. You can remember the special relationship between the bass clef and the note F by thinking about the following two things:
- The bass clef’s two dots surround the staff line that represents the note F.
- The bass clef looks like a stylized F (use your imagination).

FIGURE 6-6: The bass clef.
You can call the bass clef the F clef or just think of it as a stylized B (the dots are the humps) for bass.
 The bass clef doesn’t surround the F just below the treble clef G. Instead, this F is one octave grouping below (or to the left), as shown in Figure 6-7. (See Chapter 5 for more on octave groupings.)
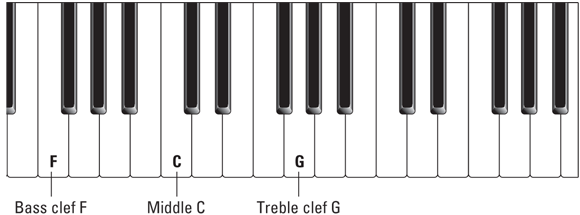
FIGURE 6-7: Finding bass clef F on the keyboard.
To read the notes on the bass clef, simply start with the F line and travel down (backward) and up (forward) through the alphabet. Figure 6-8 shows you the notes on the bass clef staff.

FIGURE 6-8: Names for notes on the bass clef lines and spaces.
Notice that the bottom line and top space of the treble clef and the bottom line and top space of the bass clef have the same letter name — they’re an octave apart. Same goes for the bottom space and top line on each staff. An octave above a note on a space is written on a line, and an octave above a note on a line is written on a space. Figure 6-9 illustrates this point beautifully.

FIGURE 6-9: Clues for reading octaves.
Accidentals
You may be wondering how these lines and spaces represent the black keys. Chapter 5 explains that the black keys are sharps and flats; for example, a B-flat is the black key to the left of (or lower than) a B, and an F-sharp is the black key to the right of (or higher than) an F. Instead of adding more lines and spaces to show the sharps and flats, a much simpler approach places these sharps and flats, or accidentals, on the same lines or spaces as their “natural” notes but with little symbols to the left of the notes. So B-flat sits on the B line with a little flat symbol (♭) next to it, and F-sharp is written on the F line with a sharp sign (♯) next to it. The natural sign (♮) cancels the flat or sharp, returning the note to its natural state, as shown in Figure 6-10.

FIGURE 6-10: Notating accidentals.
Double Your Staff, Double Your Fun
Sooner or later, on either staff, you run out of lines and spaces for your notes. Surely the composer wants you to use more of the fabulous 88 keys at your disposal, right? Here’s a solution: Because you play piano with both hands at the same time, why not show both staves (the plural form of staff) on the music page? Great idea!
Grand staff and ledger lines
Join both staves together with a brace at the start of the left side and you get one grand staff (it’s really called that), as shown in Figure 6-11. This way, you can read notes for both hands at the same time.

FIGURE 6-11: Isn’t this staff grand?
Why all the space between the two staves? Glad you asked. Look at the treble staff in Figure 6-11 and name the notes downward from the treble clef G line. Notice that you only get to E before running out of lines. What to do?
Now find the bass clef F line on the bass staff in Figure 6-11 and name the notes upward. The top line is A. What about the remaining B, C, C-sharp, D, and D-sharp in between A and E, shown in Figure 6-12?
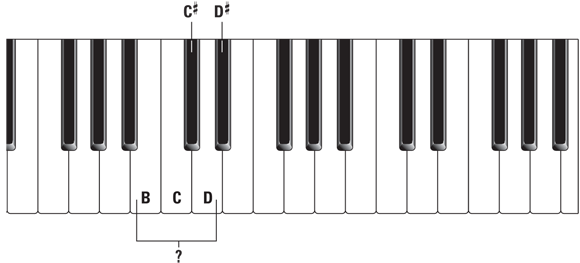
FIGURE 6-12: Where are the lines and spaces for these little guys?
The solution is the ledger line. Ledger lines allow you to notate the notes above and below each staff. Middle C, for example, can be written below the treble staff or above the bass staff by using a small line through the note head, as you can see in Figure 6-13.

FIGURE 6-13: Middle C written with ledger lines for both the right and left hand.
If middle C is written with a ledger line below the treble staff, you play it with your right hand; if it’s written with a ledger line above the bass staff, you play it with your left hand.
If you’re more of a visual learner, try thinking of it this way: The notes written in the middle of the grand staff, or between the two staves, represent notes in the middle of the piano keyboard.
The ledger line represents an imaginary line running above or below the staff, extending the five-line staff to six, seven, or more lines. A grand way to notate all the notes beyond the range of each staff, wouldn’t you say? You can, of course, read notes in the spaces between ledger lines just like you read notes in the spaces between the staff lines.
The notes B and D, surrounding middle C, can also be written by using ledger lines. That is, D can either be written below the bottom line of the treble staff, or it can sit on top of the middle C ledger line above the bass staff. Similarly, B can sit on top of the bass staff or below the middle C ledger line of the treble staff. Figure 6-14 illustrates these flexible note positions on the grand staff.

FIGURE 6-14: Playing the same note with different hands.
Climbing up the staff and beyond
Middle C may be powerful, but it isn’t the only note to receive the coveted ledger line award. Other ledger lines come into play when you get to notes that are above and below the grand staff. Notes written above the treble staff represent higher notes, to the right on your keyboard. Conversely, notes written below the bass staff represent lower notes, to the left on your keyboard.
For example, the top line of the treble staff is F. Just above this line, sits the note G. After G, a whole new set of ledger lines waits to bust out.
A similar situation occurs at the bottom of the bass staff. Ledger lines begin popping up below the low G line and low F that’s hanging on to the staff for dear life. Figure 6-15 shows a generous range of notes on the grand staff and how they relate to the keyboard.

FIGURE 6-15: Notes on the grand staff.
An octave above, an octave below
Writing and reading ledger lines for notes farther up and down the keyboard can get a little ridiculous. After all, if you were to keep using ledger lines, you’d take up an impractical amount of space, and reading all those lines would become tedious. That’s why composers invented the octave, or ottava line, which tells you to play the indicated note or notes an octave higher or lower than written. The abbreviation 8va means play an octave above, and 8vb means play an octave below. Figure 6-16 shows how these octave lines appear in written music.

FIGURE 6-16: Octave lines.
Punctuating Music: Bar Lines
In addition to horizontal staff lines, music employs some vertical lines to help you keep track of where you are in the music, sort of like punctuation in a written sentence.
A bar line divides music into measures, breaking up the musical paragraph into smaller, measurable groups of notes and rests. It helps organize both the writing and reading of music for the composer and the performer.
You can find out more about bar lines and measures in Chapter 7, which explains the important function they play when it comes to rhythm. In the meantime, Figure 6-17 shows you how bar lines are written.

FIGURE 6-17: Bar lines are vertical lines that divide music into measures.
 Be prepared to see a few other types of bar lines in piano music. They give you directions on how the music is structured, when and where to repeat, and when to stop. Following are the names of the five types of bar lines and details on what they tell you to do (check out Figure 6-18 to see what each one looks like):
- Single: Go on to the next measure.
- Double: Proceed to the next section (because you’ve reached the end of this one!).
- Start repeat: Repeat back to this measure.
- End repeat: Repeat back to the measure that begins with a start repeat (or to the beginning if you don’t see a start repeat).
- Final: You’ve reached the end! Stop playing!

FIGURE 6-18: The five types of bar lines.
Continuing to Read: Don’t Stop
As you read this book, you can instantly see that each page has several lines of text. You don’t stop reading when you get to the edge of the page or the end of a line. Instead, your eyes continue to read from left to right, reaching the end of one line and immediately falling to the beginning of the next line. You keep reading until you get to the end of the book, you get to the end of the sentence, or dinner’s ready.
Reading music is similar. You play the notes on the staff from left to right. When you get to the end of the staff or the edge of the page, you drop down to the beginning of the next staff, or set of staves, and keep playing until you get to the final bar line. (This process is the same whether you’re reading from a single staff or a grand staff.) The arrows along the dotted line in Figure 6-19 show you what I mean. Notice that the appropriate clefs appear on every new line of music.

FIGURE 6-19: Keep on reading, keep on playing.