I grew up in the Polyester Era, so I was middle-aged before I personally encountered the Shrunken Sweater Syndrome, though I knew a few unlucky souls who accidentally machine washed an expensive wool sweater with unfortunate results. I assumed that wool was delicate and that merely washing it made it shrink. But I’ve since learned that rather than the washing that causes the shrinkage, it’s the combination of hot water, agitation, and detergent that causes the scales on the wool fibers to lift and adhere to each other. That adherence causes the fabric to contract, and that contraction causes the wool to shrink and become thick and fuzzy.
Unplanned thick fuzziness can cause us to scream and tear our hair out, especially when we discover that a $400 cashmere sweater no longer fits anyone over the age of three. But once you’ve created that loose-knit, oversize object that you actually intend to shrink, you’ll discover that you can use wool’s natural shrinking ability to your advantage — and you’ll become completely hooked on knitted felt. Taking control is not as difficult as you might think, as you’ll soon find out when you knit your first project — and felt it, too. How you go about the felting process, the materials you use, and the length of time you agitate the wool all have a bearing on how the project shrinks.
My very first knitted felt project was a wool roll-brim cap. Following the hints I found on the Internet, I used big needles to knit a hat that would fit a giant, and then dropped it into a sink full of hot, soapy water, and waited gleefully for it to turn into lovely, thick felt. I swished it around. I swooshed it around. I scrubbed and twisted and sloshed it until my hands turned to prunes. I worked on that hat until my wrists felt like they were going to fall off. As directed, I periodically plunged it into a bowl of icy water.
After forty-five minutes of intense labor, I had a really clean hat that hadn’t shrunk at all.
I scrubbed some more.
I plunged some more.
I continued until I thought I was going to drop, and the silly hat still didn’t felt.
I asked around and was assured that if I continued scrubbing, the hat would eventually turn into felt. Eventually sounded like a very long time, so I threw it in the washing machine. I set the load for as small as the machine would allow. I set the water temperature to Hot Wash/Cold Rinse and added some detergent. I turned the machine on, and then I listened to some music while the washer did the work for me.
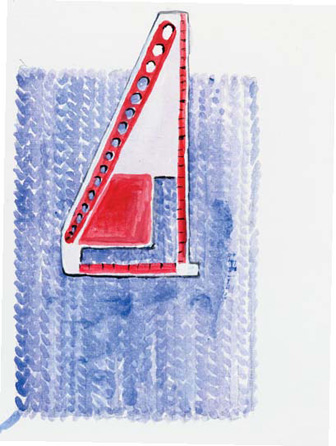
Believe it or not, the floppy, oversized “bag” in progress on the left really will shrink down and shape up to look like the stylish hat on the right after being felted.
Of course, it didn’t do the work all at once. After one complete washer cycle, I inspected the hat. Sure enough, it had shrunk some, but it was still way too big. So I washed it again.
After the second complete washer cycle, I checked again. The hat had shrunk even further, and it was starting to look more like fuzzy felt than soggy knitting. But it was still too big. So I washed it again.
Finally, after the third complete washer cycle, the hat was perfect! The formerly loose and floppy hat was now thick and fuzzy. The wool fibers expanded and wrapped around each other, locking together and creating a tight fabric through which no winter wind could blow. The colors had muted beautifully, and best of all, the hat fit perfectly.

It’s all in the fibers: This drawing shows greatly enlarged wool scales prior to felting. During the washing process they will open, tangle, and close again.
Another term for knitted felt is boiled wool. So, in the spirit of another experiment, I tried boiling a hat on my stove. I used a big old canning pot that I’d found at a rummage sale. The heat and agitation of heavy boiling, alternated with plunges into a bowl of icy water, did the trick in about an hour.
It worked, but there were drawbacks. “What did you do,” my husband asked, wrinkling his nose when he came home for lunch, “kill a sheep in here?”
There’s no getting around the fact that wet wool smells like wet wool. And if you boil wool in your kitchen, your whole house is going to smell like … wet wool. Of course, if you felt the wool in your washing machine, you’re going to get a little eau de damp sheep there, too, but it won’t be as strong, or as pervasive, as when you simmer items on the stove. I happen to like the smell of wet wool, but I’m in the minority in my family.
In order to keep complaints to a minimum, it’s best to do your felting in a room away from your family (mine never sets foot in the laundry room unless they’re under duress). It’s especially nice if you can have a door or some windows open during the process. Fresh air also helps to dry the wet felt. If you set your freshly felted things on a rack in the sun, they’ll dry in no time.
You won’t be able to tell, once the item is felted, whether you did the work by hand or with a machine, but your shoulders and arms will know the difference.
With experimentation, I found that items knitted with a particular type of yarn always took three complete washer cycles to felt. Further testing taught me that other yarn brands felted more quickly: Some needed just a few minutes of agitation, while others required one or two washer cycles. Each project, and each yarn, behaves differently during the felting process. One way to save water, time, and effort is to knit up several items and felt them together.
But whether shrinkage happens after five minutes of agitation, or three full cycles, felting knitted wool in the washer is absurdly easy. All you need is a washing machine set to wash in hot water, detergent, and a small mesh lingerie bag.
A mesh lingerie bag is an essential felting tool. No matter what yarn you use, knitted felt shrinks more in length than in width. However, wet wool is very heavy, and knitted items have a tendency to pull out of shape during agitation — sometimes with disastrous results. Large projects can, if unsupported, wrap around the agitator and stretch during the felting process.
One of my early failures was a knitting tote that ended up about a foot high and three feet wide, with felted handles that were fully twelve inches longer than they were when I started. I never felted another free-floating project. Placing the items to be felted in a lingerie bag helps to keep the tension on the wet yarn to a minimum, and allows for much less distortion during the felting process.

You’ll find small, mesh lingerie bags in most grocery or hardware stores.
1. Toss the items (safely zipped in a mesh lingerie bag) into the washer.
2. Add enough laundry detergent or no-rinse wool soap for a small washload.
3. Set the cycle to the smallest size load and Hot Wash.
4. Close the lid and turn the machine on.
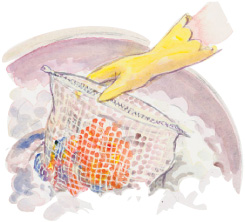
5. Check the felting process every few minutes, especially the first time you felt a new yarn. To check the progress, simply open the washer, stop the agitator, reach in (wearing rubber gloves if you want, since the water will be very hot), pull the lingerie bag from the soapy water, and look at the items. If they’re as small as you want them to be, remove the bag from the washer. If the items are not fully felted, put them back in the water and set the machine to begin agitating again.
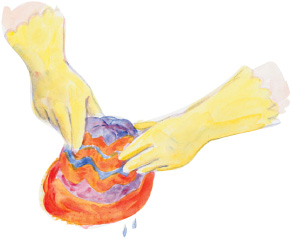
6. When the desired amount of felting has occurred, gently hand-rinse the items. To minimize the risk of further shrinkage, use rinse water that is the same temperature as the wash water.
7. Remove excess water by spinning the item briefly in the washer for no more than a minute or two, and/or rolling it in a bath towel.

Some yarns felt very quickly (one sample project for this book became almost too small within five minutes), while some yarns take several complete wash cycles. Experimentation and swatching will familiarize you with your yarn’s propensity for shrinkage. It is especially important to swatch if you don’t know the yarn’s fiber content. See pages 12–15 for important information about how to swatch.
Animal fibers other than sheep’s wool, such as mohair, llama, angora, and alpaca will also felt, so yarns spun from those fibers, or blends of those fibers with wool, are suitable candidates for felting. Several of the patterns in this book take advantage of the extreme fuzziness of felted mohair.
You may run across wool yarns that are specially treated to resist shrinkage and felting. Since knitted felt needs to shrink, do not use any wool yarn that is labeled “superwash” or “shrink-proof” for felt projects. Yarns that are wool blended with acrylic may be shrink-resistant as well, although yarn with a small percentage of manmade fibers sometimes felts. In all cases, swatching is recommended.
Some pure white wool yarns resist shrinkage because the scales that cause felting were removed or damaged as the yarn was bleached. Off-white yarns seem to felt well, across the board, and not all white yarns resist felting, so swatching is essential before beginning a large project.
Some people like their felt to retain some stitch definition, while others prefer fabric in which the stitches have shrunk enough to become invisible. If your goal is a completely soft and fuzzy surface, you can gently go over it with a pet brush after it dries thoroughly. This light brushing fluffs up the surface fibers and creates a well-finished, professional result.
Felt’s percentage of shrinkage is not set in stone. Some wool yarns shrink more, and shrink faster, than others. As a general rule, knitted felt loses 15 to 20 percent in width, and 25 to 40 percent in height. You control the shrinkage: By halting the felting process, you can decide when the felt is just right for you.
Once you’ve felted your item, you’ll need to shape it. If you want a hat to have a rounded crown, you may be able to simply smooth the wet hat into the proper shape and allow it to dry. Felted wool is a sturdy fabric, and it will hold its own shape fairly well without interior support. If you wish, place the hat over an upturned bowl, canister, or any other item that is the proper size. If the mold you use for blocking isn’t waterproof, cover it with plastic wrap before draping it with wet wool. Most small items will dry to a perfect shape if you smooth them out on a flat surface. For a really professional appearance, it’s best to use pins to block and hold the felt in the desired shape. Don’t be afraid to give your felt very firm tugs to get it into the shape you want it. You’ll find it’s quite tough and, while still wet, usually very malleable.
Practice patience, because it can take two days for a felted item to dry indoors. You can hurry the drying process along with a portable hair dryer. Clothes dryers are riskier: Felted items are likely to shrink further, and you can’t control the item’s shape if it’s in a dryer.
If, when dry, your shaped and blocked item doesn’t suit you, just wet it down and try again.
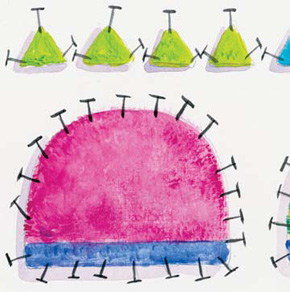
For best results, pin felted items to a sturdy blocking board until they are completely dry.
Putting a pair of old jeans in the washer speeds the felting process because the extra bulk adds to the agitation. You may be able to eliminate a complete wash cycle, and thereby save wear and tear on the machine (not to mention water). However, be absolutely certain that the item you add to the mix does not shed lint, because said lint will automatically, and almost permanently, be integrated into the felt as it shrinks. Believe me: It takes hours to pick felted lint out. Ditto tissues inadvertently left in jeans pockets.
I know, I know. You’ve dutifully read each page so far, you have your yarn and your needles, and you’ve chosen a design. You want to knit! But there’s one more thing you need to do before you can start: You have to knit a swatch. I completely understand your reluctance to bother. I’m a fly-by-the-seat-of-my pants sort of knitter myself. I prefer to figure out my gauge as I knit. But worse than taking the time to make swatches is wasting time and materials on projects that just don’t work. And unlike other knitting projects, once the item is felted, you can’t just pull out the yarn and start over. The fibers are irrevocably altered and completely locked together.
I confess that I learned the must-swatch lesson the hard way when I was designing the prototypes for this book. Some of the yarns I chose called to me so strongly that I threw caution to the wind and skipped the swatch altogether. But after several spectacular failures (a hat that should have fit a toddler but which felted too small for an infant, a Christmas stocking whose red body stained the white top, an expensive yarn that didn’t felt at all, and a couple of other un-usables), I surrendered. I can’t stress this rule enough: Always felt a test swatch of any new yarn before you begin a project.
A test swatch isn’t necessarily an accurate indicator of how a larger piece knitted from exactly the same yarn will behave during felting. But a felted test swatch will tell you three very important things: (1) whether or not your yarn will felt, (2) how much it will felt, and (3) whether or not the colors are stable.
There are more subtle influences as well: If you give five knitters the same yarn and instructions, you’ll still end up with five different-sized swatches. Each knitter works with a slightly different tension: My swatch knitted on size 10 needles could be the same size as your swatch knitted with size 11 needles. Different washing machines felt differently. Hard or soft water can affect the felting process. And even if everything else is uniform, different yarns, different colors of the same yarn, and even same-colored yarns from different dye lots, can felt differently. Personally, I think the surprises are what makes knitted felt such fun. To keep disasters to a minimum, however, it is essential that you knit a test swatch using each project’s specified yarn, incorporating all of the colors and strands, before you begin a felting project.
A swatch must be big enough to measure your knitting gauge, as well as the before-and-after size difference. Here’s how to do it: Using the needle size and yarn specified in the pattern (or a substitute yarn of equal weight), cast on 20 stitches. Work 30 rows of stockinette stitch (knit 1 row, purl 1 row). Bind off.
If you are testing several colors for a single project, knit your swatch using bands of those colors, with a couple of rows of a neutral color as a spacer. If your pattern calls for doubling your yarn (either the same yarn or a worsted, for instance, worked along with a strand of mohair or blending filament), knit your swatch accordingly. If you have several yarns to test, you can felt all of the swatches in the same batch.
Flatten the knitted swatch on a hard surface (the edges of stockinette stitch will roll) and measure the number of stitches along a 2-inch (5cm) area in any row. Then measure the number of rows in a 2-inch (5cm) area. A needle gauge with an L-shaped opening cut into it makes measuring easier.
If your knitted gauge is tighter than the gauge listed in the pattern (in other words, you get more stitches per inch than the recommended gauge), re-knit your swatch using larger needles. If your knitted gauge is looser than the gauge listed in the pattern (you get fewer stitches per inch than recommended), re-knit your swatch using smaller needles.
Use a flat ruler to measure the number of stitches and rows in 2″ (5cm).
While matching the pattern gauge doesn’t guarantee that your finished item will felt to the exact size listed, it has a much better chance of doing so if the gauges are the same. When the gauges match the pattern gauges, measure the width and length of the whole swatch and write those measurements down.
Although you don’t have to weave in the tails on the swatches before felting, it’s best to trim them, because tails have a tendency to felt to each other and create a real tangle (which will also be felted).
Place all of your swatches in a small mesh lingerie bag and wash according to the instructions on page 9. Check the felting progress frequently, because some wool yarns felt within five minutes. Be sure to check the felting of the first swatch made with an unfamiliar yarn at five-minute intervals, so that you can monitor the shrinkage accurately.
Don’t be surprised if the samples don’t shrink in one wash, or even after two washes. However, if you wash your swatches three or more times, and they show no shrinkage at all, you can be pretty certain that that yarn won’t felt.
Swatches will tell you whether your yarn is colorfast and actually shrinks at all, as well as how long it takes to felt it. Timing is especially important. Note any tendency to shrink very quickly, so that you can frequently monitor any felting you do with that particular yarn. With some yarns, fifteen minutes can be the difference between a hat that fits a teenager and one that fits a baby.
A swatch will also tell you how thick your knitted felt piece will be. Single-strand felted pieces are not as thick as double-stranded knitted felt. Certain items, such as tote bags and purses, may need that extra thickness for strength and stability. Some projects are double-stranded to compensate for the light weight of the original yarn. All swatches, whether worked with a single or a double strand of yarn, will shrink more in height than in width.

Record the type of yarn used, along with wash time and pre- and post-washing measurements.
A swatch won’t necessarily tell you how a larger piece knitted from the same yarn will react to the felting process. Wet wool is heavy, and agitation can sometimes stretch the piece even as it shrinks (unfortunately, that’s not a contradiction). Heavy, wide items, such as tote bags and purses, have a tendency to shrink much less in width than swatches knitted with the same yarn would indicate. The patterns in this book have been adjusted to take that propensity into consideration.
Long, narrow pieces may also stretch as they felt. If put into a washer unsupported, handles and drawstrings can end up longer than they were when you finished knitting them. Placing your knitted items in a mesh lingerie bag helps to alleviate these potential problems. The bag supports the wet wool as it’s agitated, keeps items from getting wrapped around the agitator, and prevents the loss of small pieces.
So, you’ve noted all the particulars of each felted swatch sample in your journal, and now you have umpteen fuzzy rectangles, in all sizes and colors collecting dust around your house. If you’re like me, you hate the very notion of throwing away things you worked on, but there’s no reason to throw these away. Felt is fabric, and any fabric can be cut and sewn. You can, with a little work and ingenuity, put these felted squares and rectangles to work in any number of projects. Before you begin, separate your swatches by thickness. Unless you want noticeable texture changes or thin pieces for appliqués, swatches of consistent thickness usually work best. Now, read on for some simple and practical ways to use your swatches.
MUG RUGS AND COASTERS: Select any swatch that is wide and long enough to fit under a cup or glass. Measure and trim the swatch so that it is square; brush the edges to disguise the trim. If you wish, work an embroidered or single crochet edging around the coaster in a contrasting color. Make the coaster waterproof by painting the underside with a non-skid plastic coating, such as Plasti-Dip. (See below left.)
HOLIDAY ORNAMENTS: Using a permanent marker, draw around any holiday cookie cutter that will fit on the swatch. Cut just inside the drawn line. You may work a contrasting-color edging around the outside of the ornament in embroidery or single crochet. To make a hanger, thread a length of pretty ribbon or cord in a large-eyed needle and sew through the center top of the ornament. (See below middle.)
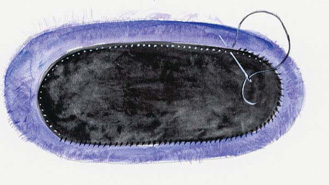
SACHET PILLOWS: Place two matching or complementary colored felted pieces together, wrong sides facing. Using matching thread, machine- or hand sew the pieces together about ¼″ (.6cm) from the edges, leaving a small opening. Stuff it with sweet-scented potpourri and a bit of polyester fiberfill; sew the opening closed. Our example is decorated with a small felt ball. (See below right; for felt ball instructions, see page 157.)
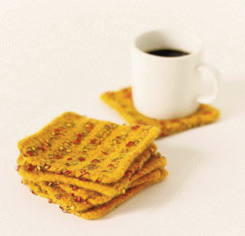
This coaster set tested alternating rows of worsted and a novelty yarn/worsted mix.
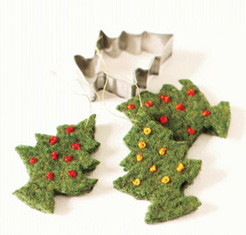
Christmas “cookie” trees are decorated with brightly colored perle cotton French knots.

Dried lavender, rosemary, and crushed rose petals are good choices for sachets.
Keep your cell phone safe at hand in a soft felt case with a fast-release clip for belt or purse.
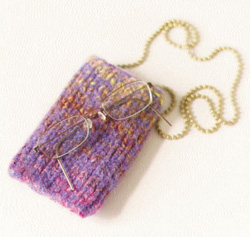
For a touch of glamor, use felted luxury yarn for an eyeglass case suitable for evening wear.
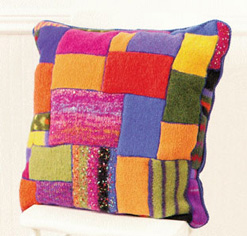
This bold retro patchwork design is large and sturdy enough to use as a floor pillow.
CELL PHONE CASE: Place two swatches together, wrong sides facing. Our example is about 4½″ × 6½ ″ (11.5 × 16.5cm), with the top layer about G″ (.6cm) smaller than the bottom layer. Using matching thread, hand or machine stitch along one short and both long sides. Attach a purchased quick-release fastener to one corner. (See above left.)
EYEGLASS CASE: Fold a 7½″ × 5½″ (19 × 14cm) felted swatch so that the short edges come together at the middle (this seam will be at the center back). Whipstitch the center back seam and the bottom seam. Attach a purchased chain or bead necklace at the upper corners, so that you can wear it around your neck. (See above middle.)
PATCHWORK PILLOWS: Lay an assortment of swatches on a piece of fabric cut to the size of your pillow form. If necessary, trim the outer edges of the swatches so that they fit neatly together and the outside edges are even. Pin, then baste the swatches in place. Machine zigzag along the edges of each swatch.
Lay the finished pillow top on backing fabric, right sides together. Cut backing to match pillow top. Pin pillow top to backing, and hand or machine stitch around three sides, using a ½″ (1.25cm) seam allowance. Trim excess fabric from seams and corners. Turn right-side out. Slip a ready-made pillow form or polyester fill into the opening. Turn raw edges in; whipstitch opening closed. (See page 17 right.) You can make patchwork placemats using the same technique. Embroider or single crochet an edging around the mats. Make mats about 12″ (31cm) by 16″ (41cm).
QUILT SQUARES: Cut pieces of any small patchwork quilt pattern out of felted swatch fabric. Trim off the recommended seam allowances and fit pieces together on a flat surface. Whipstitch pieces together. Flip the square over, and whipstitch again for reinforcement. Use the finished quilt squares as pillow tops or a shopping bag, or assemble enough squares to make a small felted throw.
EMBELLISHMENTS: Any felted item, such as a pillow top, hat, slippers, bag, or mittens, may be embellished with felt appliqué, either before or after felting. (For instance, see the Wine Sack on page 143.) Use a cookie cutter, or trace or create your own pattern to cut shapes from felted swatches. Before attaching the appliqué, you may want to embroider or crochet around the outside edges with a contrasting color thread or yarn or liven it up with beads, ribbon, buttons, embroidery, or needle felting. Sew appliqués in place with matching or contrasting thread or yarn, as you prefer.
When you’re knitting, you can carry everything you’ll need to keep you occupied in a regular handbag, or treat yourself and make a roomy felted bag. The Lunch Bag Carryall (page 33) would serve the purpose well. In addition to your knitting needles and yarn, you’ll also want a ruler, a pair of scissors, a yarn needle (which is blunt tipped and has a large eye), stitch markers big enough for large needles, and a medium-sized stitch holder (similar to a large safety pin, used for setting live stiches aside for future use). You might also find a stitch and needle gauge handy.

There are only a few knitting needles sizes called for in this book, and all of them are large. You will probably want to have straight, double point, and circular needles, since some of the patterns require more than one style. Most of the patterns call for 10″ (25cm) straight needles; you may sometimes need 14″ (35cm) needles. Double point needles come in short and long for most of the necessary sizes. A 16″ or 18″ (40 or 45cm) long circular needle works well for these projects.
Most of the patterns in this book using worsted weight, single-strand yarn call for US size 11 (8mm) or US size 13 (9mm) needles. Most patterns here that use bulky weight, single-strand yarn call for US size 15 (10mm) needles.
The knitting called for in this book is extremely basic. Beginning knitters should have no problem with most of these patterns, and experienced knitters will find all of the projects to be quite easy. Many of the little details that matter in regular knitting, such as different cast-ons or bind-offs, or the slant of an increase or a decrease, usually disappear completely when the item felts. Use whatever cast-on you like. Ditto with bind-offs, increases, or decreases. If you need help with basic stitch definitions or techniques, refer to pages 171–174 for guidance.
No matter how much experience you have as a knitter, felter, or designer, you’re going to experience an occasional failure. I had been knitting and felting hats, slippers, and purses for a couple of years before I wrote this book. One of my first book projects was a large knitting tote. Having felted smaller items with that particular yarn many times, I confidently worked out the pattern based on the purses I had knitted and felted previously. I then spent two weeks knitting a gargantuan bag. When I took the bag out of the washer, I was horrified to discover that it had lost almost nothing in width, but had shrunk down to not quite a foot tall. As a tote bag, it was useless. I said many bad words, chalked the disaster up to experience, but couldn’t quite bring myself to throw the bag away. The bag may have been unusable as a tote, but it had more than enough fabric to cut and sew four matching pillow tops, with plenty of scraps left over to make matching coasters!
Okay, you made your swatch, you followed the directions, you checked the felting process carefully, but the finished item still turned out to be too small. Don’t throw it away. First, see if you can stretch it out to a usable size. (See Too Much of a Good Shrink on facing page). If too-tight Fair Isle strands on the back are the culprit, try clipping each float and stretching the item again. (Because it’s felted, the knitting will not unravel.)
If a felted bag, purse, or hat is too long, evenly trim the excess. The edge won’t ravel, so you don’t need to hem it, but you may wish to give it a blanket-stitch edging with contrasting yarn. If purse handles are too long, trim the excess, then re-attach them and sew decorative buttons on the overlap. If the foot of a slipper is too long, trim excess, sew toe closed, and brush the seam to hide it.
Try washing too-big items again. I have not done any scientific research on the subject, but early on in my felting experiments I ran some of my less-successful pieces through many wash cycles in the machine, just to see how small they would actually get. Eventually, all of the pieces reached a point where they stopped shrinking. This makes sense when you remember that felt is nothing more than permanently matted fibers — they can only compress so far without the help of special machinery. I also learned that there was no set number of felting cycles to reach that point. Some yarns reached maximum shrinkage in four cycles, others took eight. If your item is still too big after three or four wash cycles, try a couple more. Another felting might just do the trick.
If the opening of a purse or pair of slippers is baggy even after additional felting, try running a line of gathering stitches around the edge, using unfelted yarn, thread, or narrow elastic. Another option is to knit and felt an I-cord for a drawstring, and then cut evenly spaced eyelets around the edge of the opening. An advantage of felted knitting is that you can trim it or even make holes in it without fear of tearing or raveling. The new eyelets will appear to have been knitted in.
If the opening is too big to gather, you can cut the felt, remove the excess fabric, and whipstitch (do not overlap) the opening closed with sewing thread. After the seam is sewn, use a hairbrush or pet comb to raise the nap of the felt to make the seam nearly invisible.
You can also fold a pleat in a too-big opening. Tack the pleat down and sew a decorative button on it. Tell everyone that you did it that way on purpose.

To make a slipper opening smaller, cut a pie-shaped piece from the edge, then whipstitch cut edges together with matching thread, and brush to disguise seam.
Even properly supported items can become distorted during felting, but you can generally fix the problem. Stretch the wet item until you get all the edges, seams, color blocks, and stripes straight and square. Pin the item to a board and leave it until it has completely air dried.
If the outside edges of a pot holder or pillow top are uneven and stretching doesn’t even things out, use a ruler to mark straight edges and square corners, and trim the excess. If a purse flap hangs oddly, stretch it while it’s still wet. You may also be able to steam press the damp area into shape. If nothing else works, cut the flap off the purse, trim it evenly, and sew it back in place with sewing thread. Brush the seam to cover it up.
If you test yarn combinations in your swatches (see page 13), you shouldn’t have to deal with surprises of this nature. But if it does happen, you may be able to use Rit Color Remover to take the excess color out. A quick dip in the solution (mixed according to the manufacturer’s directions) is sometimes enough to remove excess dye from areas where it isn’t wanted. A quick dip in Rit Color Remover will also fade some of the original colors, however, so you’ll have to decide if that’s a fair tradeoff for removing the discoloration.
The process of felting wool could reasonably be called Yarn Abuse. Repeated washing in hot water, coupled with vigorous agitation can cause even the most hardy dyes to wilt a little. If you felted a swatch of your intended colors, you should have a notion of how the yarn will behave under pressure. But if you’re surprised (and disappointed) by the look of your finished piece, you can overdye it.
Follow instructions on the package of dye carefully. Be sure to stir the item frequently to help ensure even color absorption.
You can also try hand-painting your finished piece in order to add dye to specific areas. I must warn you, however, that you’re liable to end up with colors bleeding into places where you don’t want it. Practice hand-painting on a felted swatch before you tackle a big project.
It looked so pretty in the skein. And even the swatch looked fine. But the finished item is just too icky to live with. You can overdye the entire piece as it is, taking the original color into consideration when choosing dyes. Or you can remove as much color as possible with Rit Color Remover and then re-dye it.
Felted wool items may be dry cleaned, especially if they have large stains. For everyday dirt, however, you can wash wool felt at home. Washing methods are similar to those you follow for all of your delicate hand-washables.
Although felt is created by heavy agitation in hot water, your finished, felted items should be washed gently and air dried. Use a mild detergent, or you may want to look for one of the new wool detergents, such as Wool Mix, which is available in lavender and eucalyptus scents. These detergents do not require rinsing and also work very well for the felting process itself.
Run a sinkful of warm water. Add a squirt or so of detergent and swirl the water a couple of times. Lower the item into the soapy water and let it soak for an hour or two. Every once in awhile, jostle the item a little bit to make sure that it’s entirely under water. Very gently scrub any stained or especially dirty areas.
It’s important not to stretch the felt, so leave the item in the sink while you drain the water. Press down with your hands to remove as much excess water as possible, then remove the item from the sink.
Run another sinkful of warm water. Lower the item into the water and gently swish it once or twice. Allow it to sit in the rinse water for 10–15 minutes. Drain the water, again leaving the item in the sink and pressing excess moisture out. Repeat this process until no soap bubbles appear when you lower the item in fresh water.
When the item is fully rinsed, you may wish to spin it in the washer (making sure that your washer does not spray cold water during the spin cycle). Be aware that some heavy felted items can become permanently creased in the spin cycle, so spin it for only a minute or two, or avoid this risky procedure. A safer method is to fold a bath towel or two around the item and press to blot out as much water as possible. Use more dry towels, as needed. Shape and block the damp item as you did when it was freshly felted, then allow it to air dry.
If gentle hand scrubbing does not remove stains, you may use any stain remover that is specifically rated for wool fabric. Follow the manufacturer’s instructions for use.
Knitted felt is an exceptionally sturdy fabric, but like other knits, even felted items may stretch or show other signs of wear eventually. The secret to better wearing and looking knits is to add stabilizing features. Here are some tricks that will help keep your creations in service for a longer period of time.
STRETCHY SLIPPER OR PURSE OPENINGS. If openings stretch with use, stabilize them by sewing a band of bias tape to the inside of the upper edge.
WORN-OUT SLIPPER BOTTOMS. Slippers will wear much longer and better — and be safer — if the soles are covered with non-skid fabric. Outline the sole of your slipper, then use the pattern to cut the non-skid fabric slightly smaller than the outline. Whipstitch the non-slip sole in place or use double-sided fusible interfacing to attach it.
STRETCHY HANDLES. To strengthen knitted handles other than I-cords, sew grosgrain ribbon to the wrong side. If I-cords stretch with use, cut the excess off, and if necessary, sew the cord back onto the bag. Or see the technique used for the handles on the Lunch Bag Carryall on page 37.
Make a pattern by tracing the sole of your slipper, then cut a matching piece from non-slip fabric about ¼″ (.6cm) smaller all around. Whipstitch in place.