Chapter 15
VPN Integrations
Abstract
This chapter combines all VPN-related activity, NAD setup, authentication, authorization, etc., into a single place. Other sections of the book are referenced here so it’s a good idea to have read the previous chapters. We’ll also cover configuring RSA Authentication Manager to support two-factor authentication over the VPN with ISE.
Keywords
VPN
2FA
two-factor authentication
AnyConnect
Configuring ISE for use with VPN use takes up only a relatively small section of this book not because it’s not effective, but because it’s really easy to deploy. We’re going to talk about a couple of our favorite VPN designs and deployment examples of configuring a Cisco ASA with AnyConnect SSL VPN while using ISE as the backend RADIUS authentication store.
There are a couple of things to keep in mind while configuring ISE and AnyConnect VPN integration:
• ISE profiling in the traditional sense doesn’t work. The endpoint identity for VPN users is the remote public IP address making resolution of the endpoint MAC address for profiling impossible.
• While you’re used to having lots of flexibility doing EAP methodologies with 802.1x, that functionality isn’t nearly as mature with VPN connectivity such that PAP is generally the standard RADIUS authentication methodology.
• There is a lot of functionality to take advantage of in AnyConnect that augments features/functionary in the ISE/ASA integration.
Let’s start by looking at a basic configuration for VPN portal on ASA controlled by ISE:
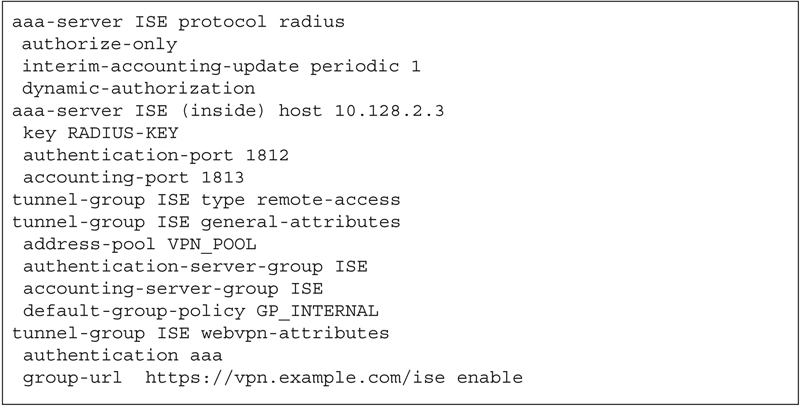
There a few parts of this configuration to point out. First, we’re configuring a RADIUS AAA server group using interim update, dynamic authorization (CoA), and standards complaint UDP ports (by default ASA will use the Cisco propriety legacy ports).1 We’ll also configure the RADIUS preshared key (PSK) we’ll be using between ISE and the ASA.
Beyond that, you’ll want to configure the other typical things you’d need to configure on a tunnel group:
• Specify address pool.
• Specify ISE as the RADIUS authentication server group.
• Specify ISE as the RADIUS accounting group.
• Specify default group policy you’d like to use.
You’ll notice that I’ve enabled a specific group-url in this tunnel group. If there are going to be multiple use cases deployed on VPN (internal users and contractors), then multiple URLs is a good way to differentiate between them.
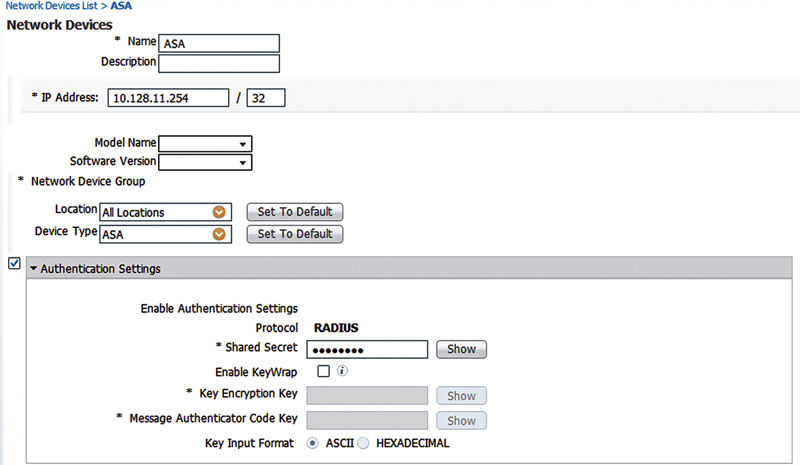
Once you add the configuration on the ASA, you’ll want to configure the ISE side of the house.
First, add the network device to ISE. All you need is the RADIUS shared secret and IP address. Nothing else is explicitly required.
Next you’ll want to configure the authentication policy. The authentication default authentication conditions will specify wired or wireless authentications for MAB or 802.1x. VPN authentication won’t match either of those since the compound conditions governing those conditions don’t include the “Virtual” RADIUS NAS-Port-Type. As such you’ll need to create a separate authentication policy rule.
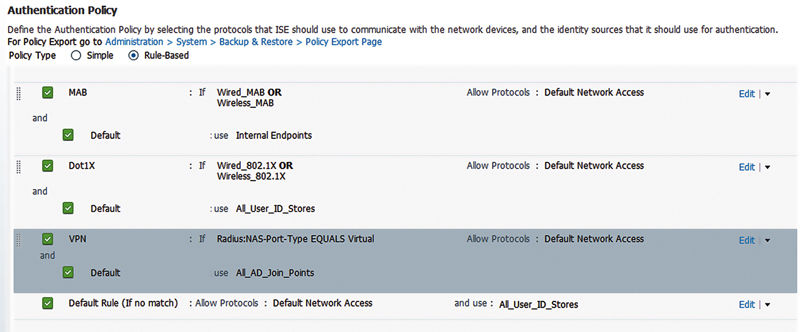
In this case we’ll be matching the NAS-Port-Type of Virtual and using AD as our identity store.
You’ll notice that we’ll also be using the “Default Network Access” result in the rule. By default PAP is enabled in this result but if you’ve disabled PAP as an allowed RADIUS authentication protocol, you’ll need to create a separate authentication result that allows PAP for VPN.
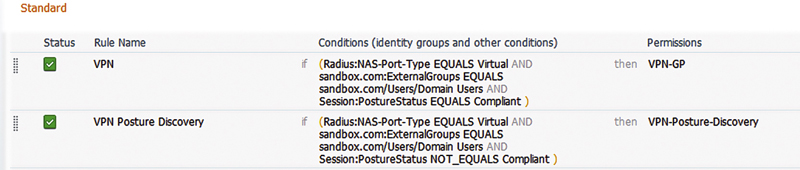
Authorization rules look remarkably similar to the conditions you’d specify for a wired or wireless 802.1x deployment.

In the conditions of the picture rule, we’ve specified both the media that the user is connecting with (virtual) and the external identify store group that the person is a member of. Easy right?
Now that we have some understanding of the AuthC and AuthZ conditions we need, there are a few options we have available for authorization results to actually give us a great deal of flexibility in our deployments. The two most popular ones are as follows:
• dACL
• Group policy override
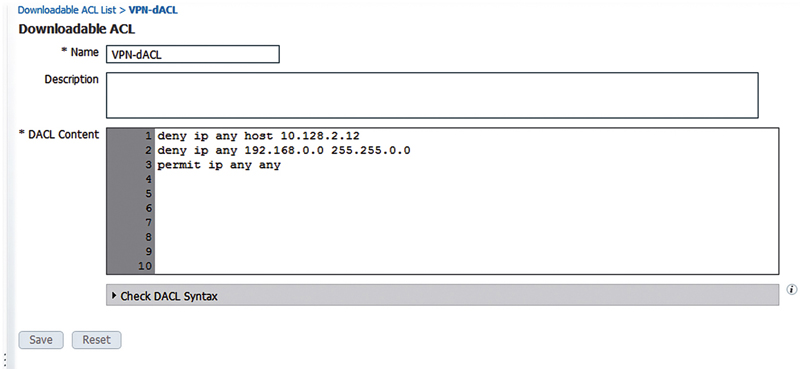
We’re pretty familiar with how dACL overrides work from wired network integration with ISE. You have the functionality for dACL on VPN with ASA but the actual behavior is a little different when applied to a VPN session. First of all, ASA VPN doesn’t use wildcard mask ACL syntax by default.2 Let’s create a simple dACL to start out where we deny some destinations and then permit all access.
Then simply reference this in an authorization result.
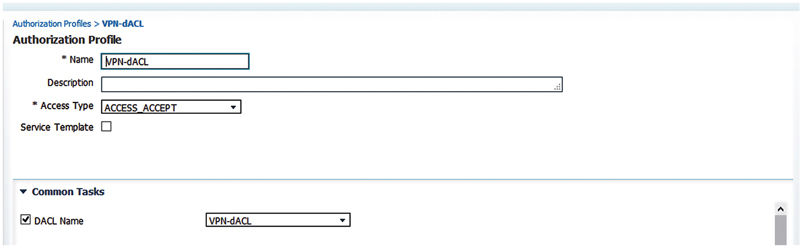
And lastly in an authorization rule.

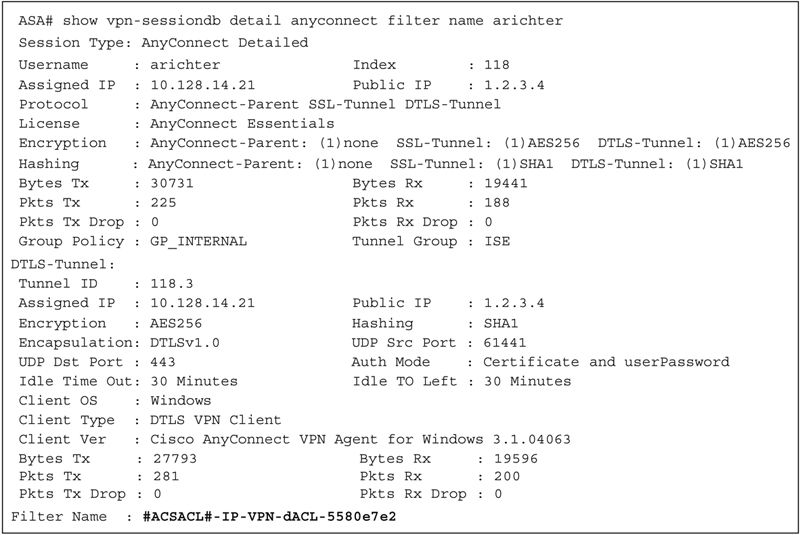
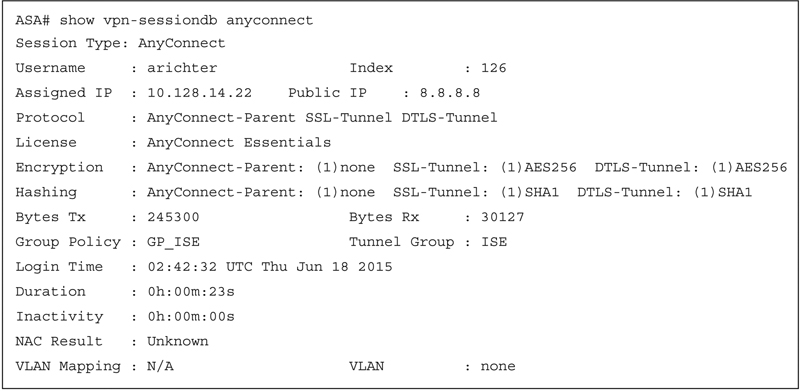
The next time someone authenticates to the VPN they’ll have that ACL set on their VPN session. You can verify that through the following commands to see what the name of the ACL that was actually applied was (it is hashed when it’s applied on a NAD). Below output has some information removed to save space:
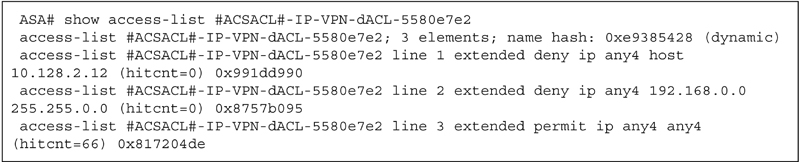
Then you can see the actual syntax of the ACL with the following command:
While doing dACLs with VPN clients is super easy it doesn’t always give you the flexibility you need to provide granular access for different users groups. If you need to regulate more than just access control, you need to override the group policy assigned to the user.
When we say that you may want more flexibility, group policy override gives you the maximum amount of flexibility you’d get in terms of attributes you could apply to a particular user. Here are some of our favorites (in no particular order):
• Max simultaneous logins
• DNS configuration
• Tunnel protocol (full client VPN vs. clientless or both could be allowed)
• Idle timeout
• Address pool
• VLAN
• Access list
The purpose of this chapter is not to explain all the ins and outs of ASA configuration but you get the picture that you can configure a great deal by setting the client’s group policy once it’s logged in.
So let’s go back into our same configuration and create a group policy and let ISE apply it.
Here is an example group policy:

Create an authorization result that references that group policy with the common task “ASA VPN”.3
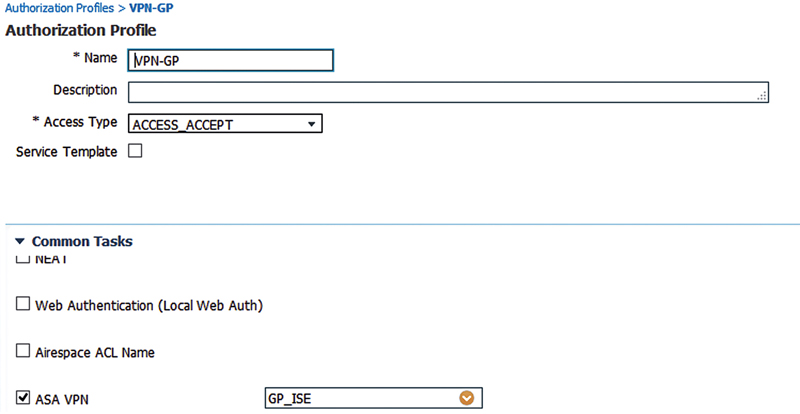
Then apply that to an authorization rule (in this case we’ll use the same AuthZ rule as before).

When I log back into VPN, I’m then assigned to that group policy and my session has inherited all its settings.
These authorization results work across ASA platforms that go back to current supported platforms so as long as you’re on an ASA that has a supported OS, both of those results are supported. That can be refreshing if you’re doing a complicated wired deployment where older platforms may have software-supported IOS but not have all relevant features that ISE may want for device sensor or Security Group Tag (SGT).
There is a design element that we haven’t gone over that is on the top of mind for most customers that is pretty important. For VPN users, how would you differentiate between devices that are corporate-owned devices that are BYOD but have the AnyConnect VPN client installed on them? This functionality isn’t always that easy to deploy. There are methodologies that include posture assessment4 but they wouldn’t pass a test of a “high-fidelity” authentication where we would say that circumventing the check wouldn’t necessarily be cryptographically trivial.
In our opinion the best way of validating that a device is a corporate-owned device when connecting to an AnyConnect VPN portal is to require a certificate authentication as part of its authentication. For better or worse, this isn’t necessarily an ISE-specific feature. ISE has the capability to check a user certificate first5 in an authentication sequence and then secondarily an AAA password. This is actually a pretty straightforward configuration. From an ASA perspective. The first thing you need to do to accomplish this is to configure your corporate PKI as a trustpoint in your ASA. This can be accomplished either through Adaptive Security Device Manager (ASDM) or on the ASA CLI.
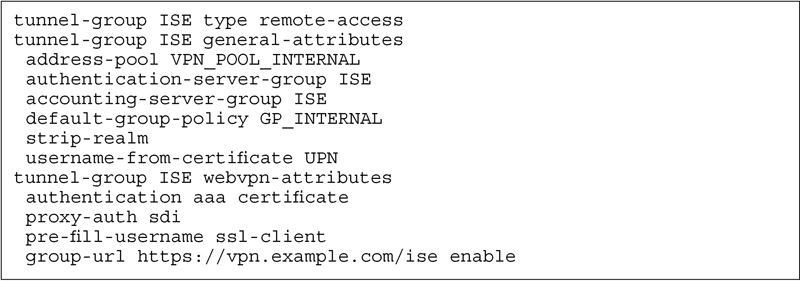
Once that’s established, you need to enable the tunnel group configuration to require certificate authentication along with AAA:
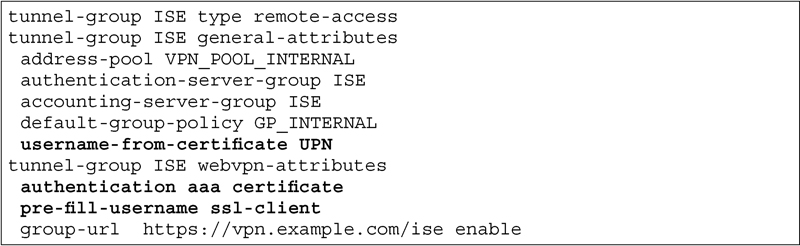
While the authentication methodology listed there is “AAA certificate” the functional process is to require a certificate first and then an AAA authentication. If the certificate can’t be validated by a trustpoint on the ASA, the person is never asked for a username/password. You’ll also notice that we included the “pre-fill-username” configuration in there as well as “username-from-certificate.” This is a pretty useful feature where you can actually have the username populated from a certificate attribute. If the certificate you’re using is the same type of certificate we discussed in Chapter 12, then we know the user principal name is in the SAN field of the certificate and that can be used as the username for an AD authentication)
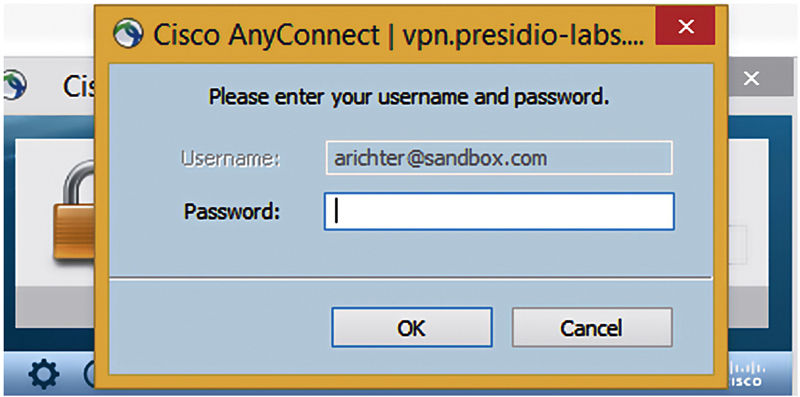
The user can see the username there, and then they’re prompted for their password. This isn’t exactly an ISE trick per se, because from an ISE perspective we’re still only checking the password.
So far we’ve been using AD username/password authentication but for users of RSA SecurID integrating ISE into an RSA Authentication Manager (AM) is very straightforward. While you can integrate your ASA directly into the RSA AM, using ISE along with AM and ASA provides you some additional functionality and convenience:
• Including ISE with AM gives you a single pane of glass to view all your authentications including wired and wireless and VPN all from the same authentication window.
• RSA AM doesn’t provide as robust a set of authorization conditions and results, in particular dACLs.
To integrate RSA AM into ISE, there are a couple of steps. First, log in to the Security Console as an administrator. Browse Access → Authentication Agents → Add New.
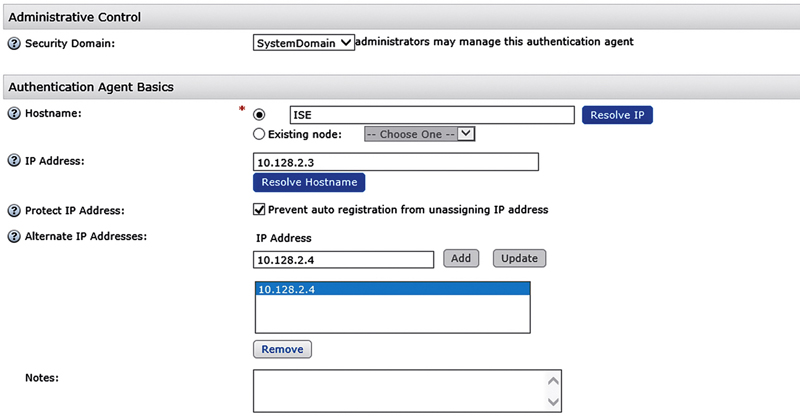
Add the hostname and then the IP address of your policy node. If you’re inclined, you can add all your policy nodes as alternate IP addresses under the single authentication agent.
Once you’ve done this, you need to download the configuration file to upload to ISE. Browse Access → Authentication Agents → Generate Configuration File.
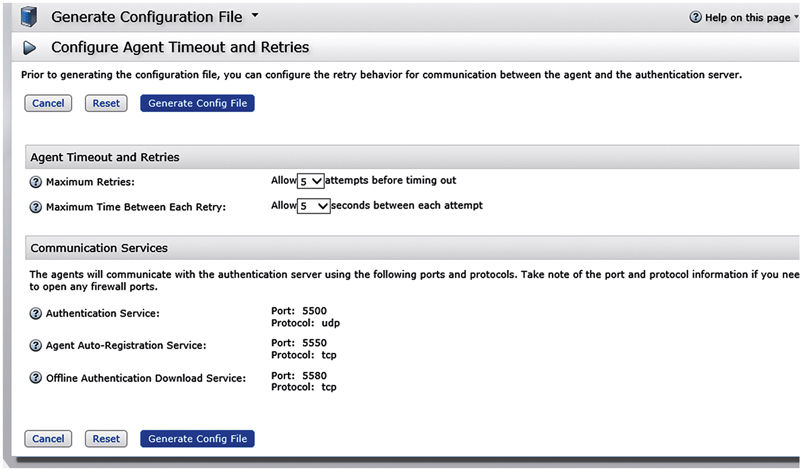
Click “Generate Config File” and you’ll be prompted to download a ZIP file that contains the sdconf.rec file. This file contains the information ISE needs to locate the RSA AM servers and authenticate to them.
Inside ISE browse: Administration → Identity Management → External Identity Sources → RSA SecurID and select Add.
Select Browse and select your sdconf.rec file. Once you’ve done that, ISE should be able to authenticate to RSA AM.
Lastly, if you want to enable the AnyConnect client to display RSA SecurID-type message at login (prompting for passcode rather than password), you need to enable SDI messages in the tunnel group. That’s also a single command:

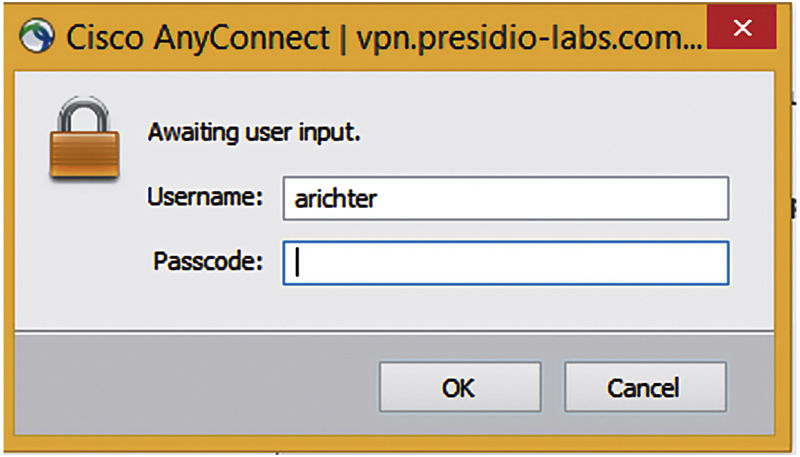
Once you enable that, you’ll see that the login prompt requests passcode.
There are a couple of things about the RSA integration with ISE that you should keep in mind:
• The Identity Source will be called “RSA SecurID.”
• ISE can integrate into only one AM cluster at a time so if you have more than one, you will likely have to configure it as a RADIUS proxy rather than native SDI.
• The RSA AM doesn’t distinguish between a failed authentication and an unknown user. If you’re going to add RSA AM to an ISS, then you should configure an “access reject” as a “user not found.” That field is in the “Authentication Control” tab under the RSA SecurID External Identity Source.
Applying authentication policy based on AD user group policy once the person has authenticated with AD is also completely possible. Just like we were able to authenticate users with an X509 certificate in the EAP-TLS sections of this book and then authorize the end user with AD, we can do the exact same thing with SecurID and AD.
Let’s look at the configuration.
The authentication rule will look exactly like you’d expect it to look.

We’re using a condition to identity VPN authentications and then using the RSA SecurID External Identity Source.
The authorization rule looks very similar. It identifies the media type through a condition and then selects an AD user group that my user happens to be a member of (and provides an appropriate result, in this case a dACL).

The actual authentication result will show us that in the process of authenticating and authorizing the VPN session, it checked with RSA for my token credential, and then looked to AD for group membership.

Lastly, if you want to combine both a certificate-based authentication and a RSA SecurID-type authentication on the ASA, that is also possible with a caveat. The methodology we used above when doing the AD password check to prepopulate the username field from the UPN isn’t possible in the exact same way. The reason is that the RSA AM server will not by default use a fully qualified UPN as a user credential; it will want only the simple username. The work-around is to use the “strip-realm” feature of the tunnel group and remove the parts of the username after the @. The ASA configuration would look something like as follows:
In this way, the ASA functionality is basically the same as before, but RSA SecurID authentication can be additionally utilized.
Posture
There are use cases where posture assessment is required on VPN sessions and in those cases, enabling posture assessment on your ASA VPN with Cisco ISE is pretty straightforward. Posture assessment with your AnyConnect VPN does work a little different and has some slightly different caveats than you would typically see on a wired or wireless connection just because the media (VPN) does function a little different. From an ISE configuration perspective the policy is basically identical to a typical wired or wireless configuration.6
The ASA configuration is the same as above with one exception. You need to configure a redirect ACL in similar fashion to the ACLs created to support posture on a wired implementation where denied traffic isn’t redirected and traffic permitted by the ACL is redirected per the policy:

With this, basic posture AuthZ policy can be created for your configuration.
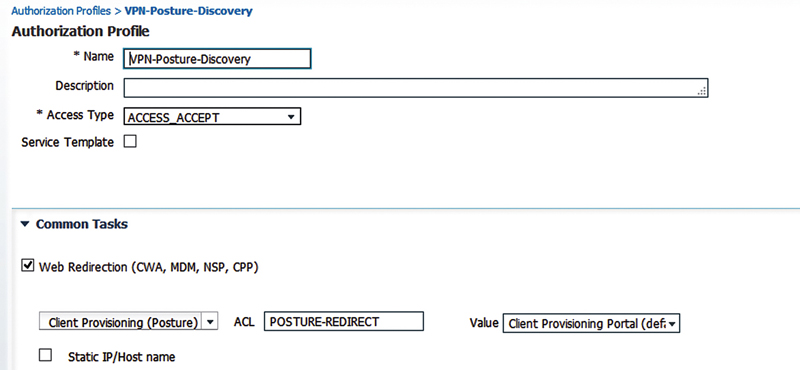
As to the posture discovery AuthZ result, it looks very similar to the AuthZ result you’d use with wireless posture since a separate dACL isn’t required.
The main distinction between wired or wireless posture assessment and posture assessment on a VPN is that when implementing posture assessment on a VPN tunneling policy is important. Tunneling policy means that what networks are being tunneled over the VPN is very important during posture discovery. In almost all implementations we would recommend, as a best practice, that posture discovery occur over a VPN that has full tunneling (all traffic is tunneled) configured on it. That way when VPN connectivity happens, if the device ends up not being posture compliant, it isn’t otherwise allowed to connect to other devices when remediation happens and it ensures consistent user experience during discovery or client provisioning. If split tunneling is configured and the client does not have the posture agent deployed, they may have access to internet resources but no internal resources until they attempt to connect to an internal website. Overall this can lead to a poor user experience.
All this talk about full tunneling may start to turn people who really prefer split tunneling as a much more efficient way of managing client traffic; you’d find that you have friends here. The way to implement this is pretty straightforward. Simply implement different group policies in different AuthZ rules for posture unknown versus posture compliant. That means that your posture unknown (discovery) rule should result in a group policy that requires full tunneling while the posture compliant rule should then have the split policy. In this way you can both accomplish effective full tunneling for posture checking and allow for split tunneling once a device is determined to be compliant.