Level 2: Drawing Things
Having settled into your brand new office space, your fellow co-workers are starting to ask you some hairy questions—such as, “Can we see some of your work?” The problem is, so far we have nothing to show (don’t show them that “what number am I thinking of?” game, please). We don’t even have a logo. It’s important to have great game ideas—but ideas alone are not enough. We need to get them out of our head and onto the screen as soon as we can. Before we can run, we need to learn to walk. For us, that means displaying some simple graphics. We need to start drawing things.
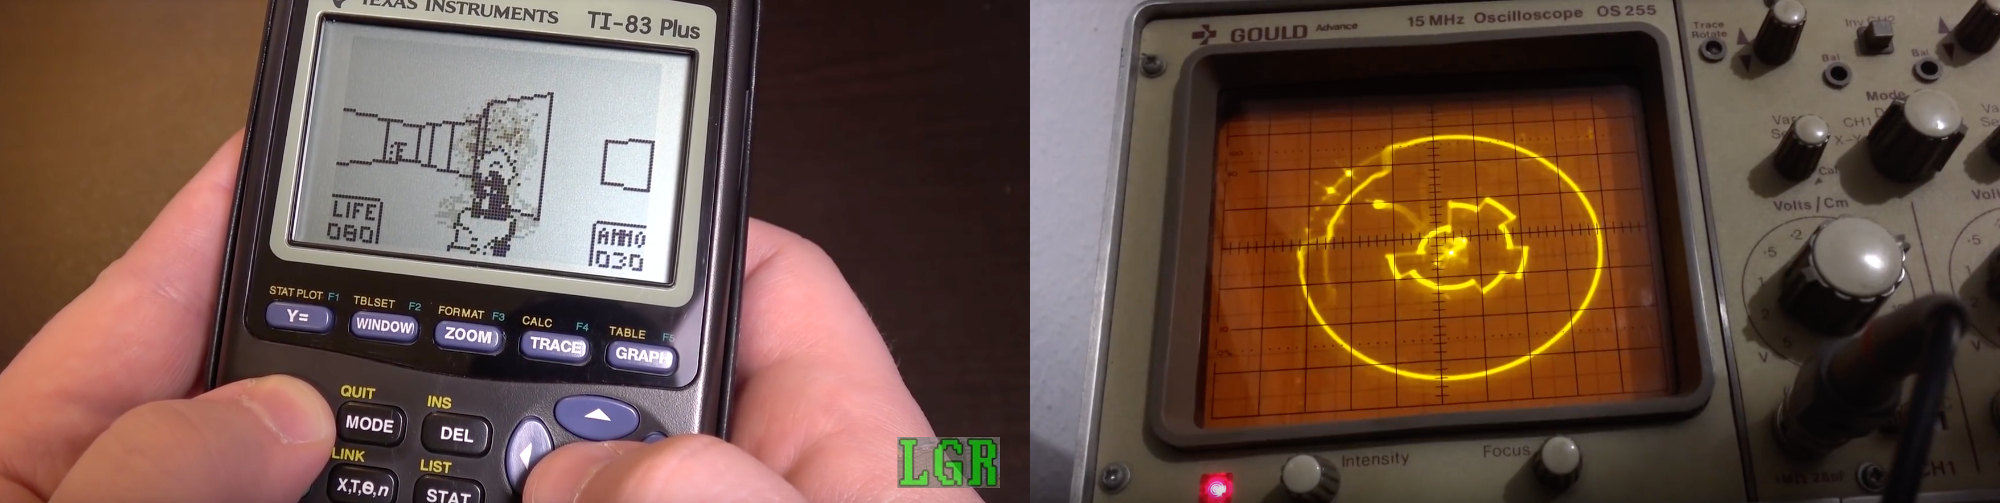
The first thing to realize is that you can make a game with just about any technology that exists. The “how to make a game” list from the previous chapter was very short: in a loop, get user input … to move everything a tiny bit … then respond to collisions … before you finally draw everything. If you understand the core of a game at this level, it’s not surprising that people create games that run in all sorts of weird places: in spreadsheets, on LGR’s old Ti-83 calculator, on Plonat Atek via an oscilloscope … If you can add logic and visuals to something, you can use it for games.
Don’t Get Pigeonholed
Try not to pigeonhole yourself to a particular technology. Whenever you read a tutorial or see some code, think about how you can apply the general ideas to any situation (or any programming language). That way, you’ll never find yourself locked into one solution, and you’ll gain insights from more sources.
DOM vs Canvas vs WebGL
These days there are several excellent options available for us when it comes time to push some pixels into the eyeballs of our players: plain ol’ web page elements (via images, containers styled with CSS, or SVG elements), the Canvas 2D API, and WebGL. Each of these comes with wildly different features, costs, and benefits. Ideally, the way you architect your game will be fairly render-agnostic so that it’s possible to take your game and render it to different environments without modifying too much of the core code.
If you have a webdev background, the most obvious way to get things on screen is via DOM elements in a web page. Using standard image elements, for example, we can position and move things around the screen. We can take advantage of DOM events, CSS transitions and animations. The downsides to this approach are possible poor performance (if you have a lot of things happening on screen), and no direct access at the pixel level: you can mostly only work with existing images. They can’t be wildly manipulated at runtime.
On the other end of the spectrum is WebGL. WebGL is an effort to bring the power of GPU processing to the web. Your computer’s CPU is great at processing general-purpose instructions for running software, but when you need raw number-crunching speed to manipulate zillions of pixels at 60 frames per second, you need to run on the GPU. WebGL provides a way to render graphical elements via the graphics card’s GPU, leaving your CPU free for game logic and other tasks.
WebGL has recently found its way into most modern web browsers and mobile devices, making it a promising and powerful target for our games. It’s a target that will become more important as we start pushing our games to the limits. WebGL’s downside is that it has a very steep learning curve—and an arcane, low-level API.
For the most part, we’ll be using a third option to make our games: the Canvas API. It doesn’t have the raw processing power of WebGL, but it’s simple to use, provides the ability to draw basic shapes and manipulate pixels, and does all the important stuff we need for making games quickly. But again, don’t get too bogged down in the details: our goal is to make fantastic games. The technology we choose is just a means to an end!
Plain Ol’ DOM
Before we get lost in the innards of the Canvas API, let’s have a look at how we could make a game the “old fashioned” way. It’s still viable (and sometimes even preferable) to make your games with standard DOM elements. It’s especially viable if you’re a web developer: you already know how to get things on screen and move them around.
Elements in an HTML document are organized logically in a tree structure. This organization is called the Document Object Model (DOM). It’s a tree because the document starts with a root node, that contains one or more child elements. Each of these child elements can themselves be containers that have further child elements. At the bottom of each branch are the leaf nodes that contain the content to display on screen. However, the tree doesn’t dictate where an element appears on screen. It’s CSS that allows you to put them pretty much wherever you want. Having a model with a separation between logical organization and on-screen display is good for modeling web pages, but it also works well for making games.
Using DOM elements is a little different from other drawing environments, because it’s a “set and forget” approach. In most rendering systems (including Canvas and WebGL) you have to re-draw the screen manually every frame. But the DOM takes care of this for us! So if you place your evil boss character in the center of the screen, he’ll stay there being evil for ever and ever.
If we want to use the DOM for games, our primary task is to keep our game’s logical model (in JavaScript) synchronized with its actual on-screen position. When we create a new game character in our game code (or remove an old one) we dynamically add or remove a corresponding DOM node via the standard DOM methods appendChild and removeChild. We keep a reference to the DOM elements in our JavaScript code, and then keep everything in sync as they move about in the game.
To put this to the test, and to prove we can make a game in any ol’ tech, let’s make a quick DOM-based game—Rick Clicker 2000. The goal of Rick Clicker 2000 is to click and remove all the Rick Astleys from the page as quickly as possible. If you have webdev experience, you probably already see how this will work: it’s some images with a click event handler.

We’ll begin with our base project from Chapter 1, but remove all the existing code in src/main.js, leaving us a with blank slate:
<div id="board">
  <span id="remain"></span>
</div>
The only addition to the base code’s HTML file is a span with ID remain. This is where we’ll show how many Ricks to click. Now, let’s write some code:
let clickers = 50;
let startTime = Date.now();

// position element in the DOM
function sync (dom, pos) {
  dom.style.left = `${pos.x}px`;
  dom.style.top = `${pos.y}px`;
}
First, we set up two global variables: one is the number of Ricks to click, and other is the time the game starts (so we can tell the player how long they takes to finish). We also add the all-important sync function that is the heart of our DOM renderer. sync moves an absolutely positioned DOM element (dom) to a given position with x and y coordinates by setting its left and top CSS properties respectively. In our tiny game the Ricks don’t move, so we’ll only need to call the function once per Rick. But if you were making an action game, it would be necessary to call sync every time Rick moved to keep the DOM elements up to date.
function addClicker () {
  const pos = {
    x: Math.random() * 500,
    y: Math.random() * 300
  };
  const img = new Image();
  img.src = "res/Images/rick.png";
  img.style.position = "absolute";
  img.addEventListener("click", removeClicker, false);

  document.querySelector("#board").appendChild(img);
  sync(img, pos);
}
The addClicker function creates a new Rick and assigns him a screen position with random x and y coordinates stored in a variable called pos. An HTML image is created using new Image(). It has an event listener attached that listens for a “click” event, and is styled to be absolutely positioned (so we can move it around by altering its top and left properties).
Finally, we can add the Rick to the page. We’re using the document.querySelector method to select the board element from the page, and appendChild to inject the image. We correctly position Rick via our sync helper (if this were an action-based game, we’d have to update the pos variable as Rick moved around, and then re-call sync). The pos variable is the logical model and the DOM image node is the rendering system.
Finding DOM Elements
The querySelector method accepts a query selector string and searches the page for the first match (its partner document.querySelectorAll is similar, but searches for all matches). The query string can be any valid CSS selector.
Because this is the DOM, we have to remember our normal website-making rules. The image for the game has to go in the correct folder (res/Images/), and it’s absolutely positioned via CSS. This means the image location will depend on the parent container it’s relative to. Because #board has no styling, the relative container is the main body element. But we want the images to appear inside our game board, and for that we make #board relatively positioned.
#board {
    /* additional styles for Rick */
  position: relative;
  background-color: #8CD;
}
We’ve added a bit of CSS in res/main.css to make the images relative to the game #board. And we’ll add a background color for our game for good measure. A nice sky-blue feels appropriate. With that fixed, any absolutely positioned elements will be aligned relative to #board. Perfect.
function removeClicker (e) {
  e.target.parentNode.removeChild(e.target);
  clickers--;
  checkGameOver();
}
When the user clicks on an image, the removeClicker function is called. This function receives the mouse event for the click, which we can use to find the event target—which is the correct Rick element to remove via removeChild. Finally, we call our checkGameOver function to see if all the Ricks are gone.
function checkGameOver() {
  document.querySelector("#remain").innerHTML = clickers;
  if (clickers === 0) {
    const taken = Math.round((Date.now() - startTime) / 1000);
    alert(`De-rick-ed in ${taken} seconds!`);
  }
}
Now for a bit of game logic. The remaining total of Ricks is displayed. If that’s zero, the game is finished and we calculate the time it took to clear the screen. The only thing left is to add a whole bunch of Ricks to start things rolling:
// Add all the Ricks!
for (let i = 0; i < clickers; i++) {
  addClicker();
}
So this is (technically, at least) a game—but notice that we didn’t have to add an infinite loop anywhere. Earlier we said this was a primary requirement for making games, so what’s going on? The trick is that the DOM is doing the loop for us behind the scenes. It has its own event loop that sits around waiting for the user to do things (like click an element) and dispatches the events to us. We say that the Web is event-driven. Our game only reacts to events: it doesn’t do anything by itself. This turns our core game loop on its head:
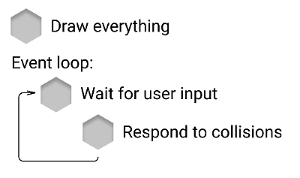
Traditional game programming tends to be more sequential than this. We’ll make our own explicit loop to show the difference in Chapter 3.
But being able to use the browser’s event loop is actually a terrific reason to use the DOM for games: we get the benefits of the event handling for free! The browser captures clicks for us—and these events target individual page elements (such as each Rick). When it comes time to do this in a procedural way (with Canvas or WebGL), it will be up to us to do this logic manually. If we want to know if the player clicked a Rick, we’ll have to get the current mouse position and figure out which elements occupy that space using our logical model (the pos variable), and then figure out which of those is on top.
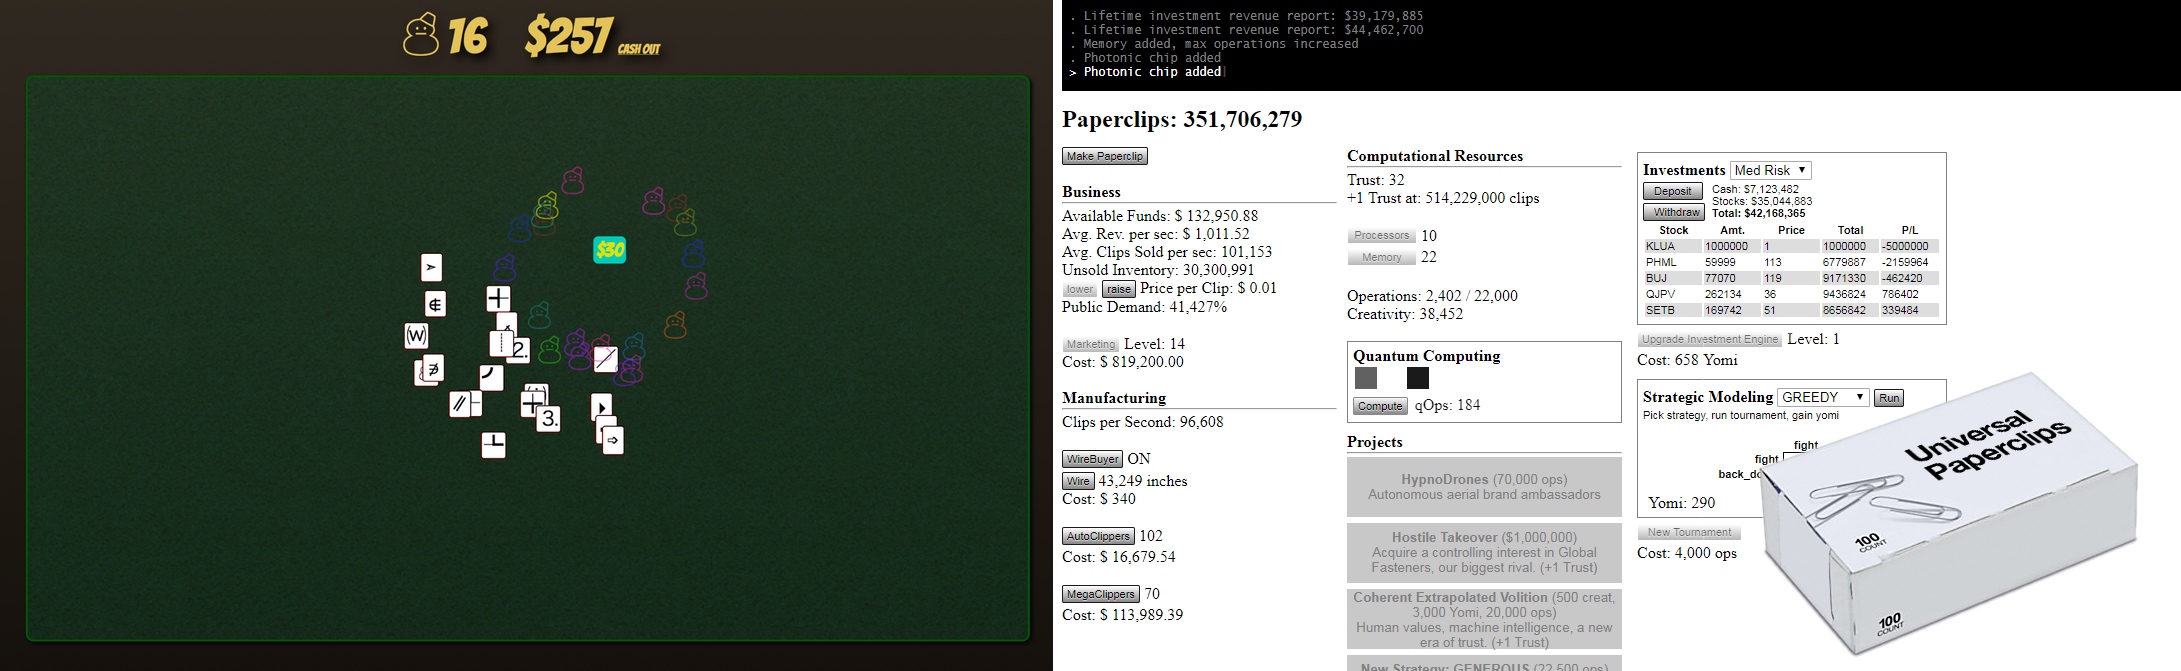
With a bit of imagination and a liberal sprinkling of graphics and CSS transitions, we could turn Rick Clicker into a more entertaining game. Cold Snap: Vegas Rules is a DOM-based game from the Ludum Dare game jam competition, featuring a clicking mechanic similar to Rick Clicker—but with a bit more polish. It could also be the start a terrifying Clicker game—perhaps something like Universal Paperclips, but with Ricks.
The games we’ve made so far are not very good. When starting game development, it’s critical to start small. Really small. Really really small. It’s so tempting jump right in and try to make a something epic (or at least “medium sized”). But small steps are the key to getting games finished … and getting games finished is the hardest part of gamedev.
To maintain your sanity through your initial, potentially boring games, you must add your own style and flair to everything you touch. Rick Clicker is bad, but at least a little bit funny. Play with every image, every variable, and make them your own! If you keep in mind your game’s aesthetic, you can add character and interest to even the simplest of ideas.
Why Not DOM?
So the DOM looks like a pretty nifty way to make games. We get a lot of browser power for free. It’s easy to add event handlers, and we can use our existing knowledge of CSS animations and effects. The flip side to this power is performance and extensibility. Action-packed games might have hundreds (or thousands) of things moving on the screen at once—goodies, baddies, explosions, particle effects … Each time something moves in a DOM document it triggers a reflow of the entire page. The browser needs to recalculate the correct position for all the elements on the screen and repaint them. This potentially takes a lot of time and limits how many things we can move smoothly.
Additionally, we don’t really have any direct access to the pixels on the screen: we can add and remove elements, but we can’t easily create our own images from scratch or do processing on existing ones. We can partly get around this restriction by using SVG (Scalable Vector Graphics). SVG provides a rich drawing API for shapes and paths (as well as regular DOM nodes for event handling) … but we still don’t get access at the pixel level, and it’s also relatively slow.
If these problems are acceptable (or nonissues) for game ideas you have, then by all means use the plain ol’ DOM (or SVG). It’s a perfectly valid choice for getting things on screen!
Canvas API
In this book we’ll largely be using the Canvas API for drawing. Introduced by Apple in 2005 for the dynamic creation and display of graphics and images, it was standardized in HTML5 and is now supported on most modern web browsers. The API sports a variety of features for drawing shapes, text, images, paths, and gradients. It’s fairly comprehensive, but we only need to know a subsection of it for getting started making games.
Our project skeleton from Chapter 1 includes an HTML page containing a single div element. Let’s add a canvas element inside that:
<div id="board">
  <canvas width="640" height="480"></canvas>
</div>
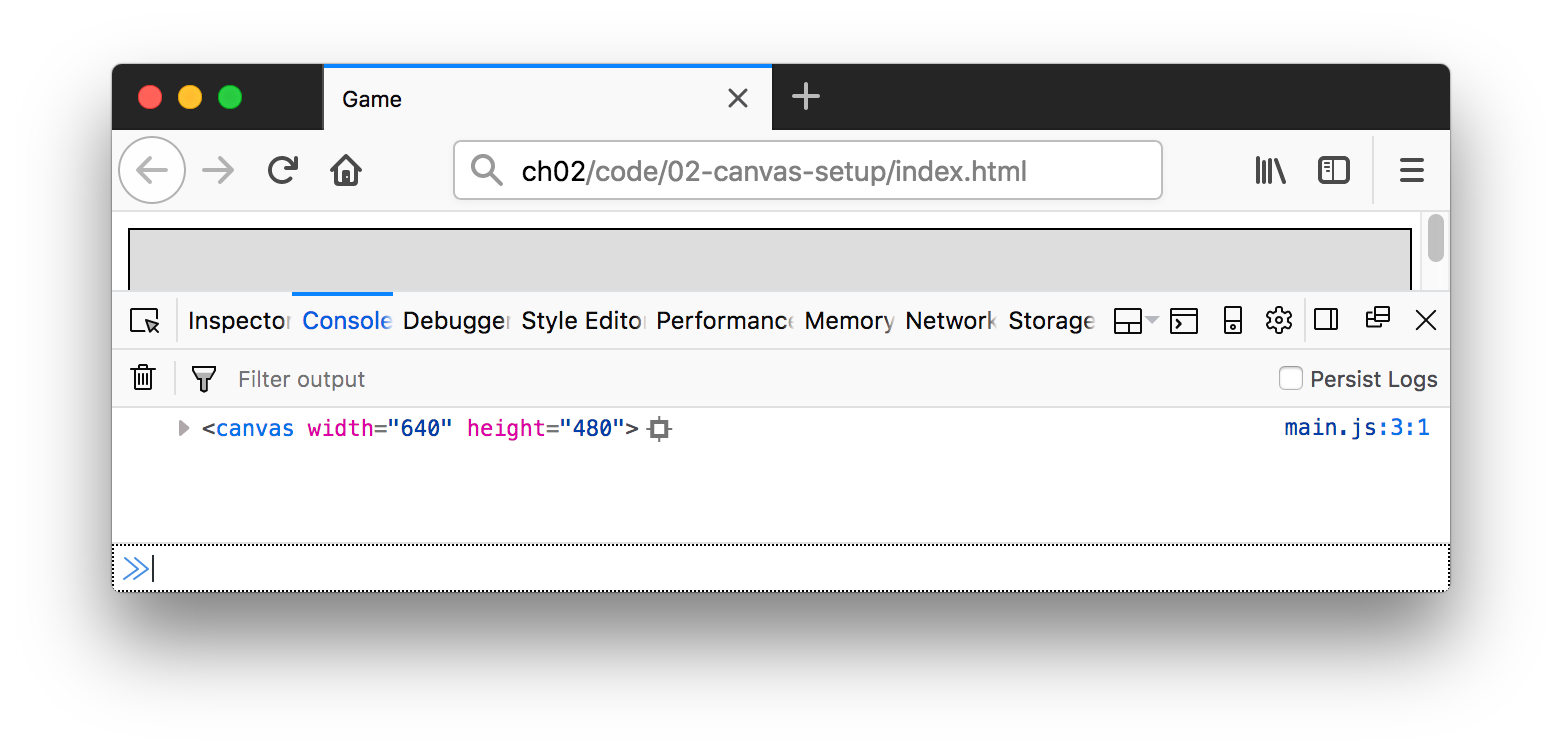
Just like any DOM element, we need to get a reference to it if we want to play with it. Let’s do that with document.querySelector inside main.js and then log the variable to the debug console to double-check the reference is correct.
Using the Console
If you’re not familiar, a web console is an interface for logging messages while your code runs. It’s not a standard part of the Web, so you shouldn’t leave it in your final code output—but it’s a very powerful tool for debugging. Most modern web browsers include support for functions like console.log (for general log messages) and console.error (for logging scary-looking messages). Find out how to access your browser’s web console, and memorize the keyboard shortcut for opening it!
const canvas = document.querySelector("#board canvas");
const ctx = canvas.getContext("2d");
console.log(ctx.canvas);
With the canvas element in our hands, we ask for a context for drawing via canvas.getContext("2d"). The canvas element is designed to allow various APIs to be layered on top of it; it’s like a general container for drawing stuff. We’ve asked for the drawing context called "2d", but we could ask for others (for example, if we had “webgl” we could get access to the WebGL API). There also may be other APIs accessed in this manner in the future. But for now, we just want to draw some 2D shapes.
Using the Context
Notice that we can also get the original canvas element back from the context (ctx.canvas). This is handy for getting attributes like the canvas width and height programatically.
Drawing Some Shapes
You use the Canvas API in a stateful way: many settings you make—such as defining the paint color, or the amount of transparency—is done once and then remains in effect until you change it. To make things appear, there’s a host of primitive drawing instructions (with names like fillRect, arc, path, text, and drawImage). Composing a complete image is a process of making changes to the settings and then calling the drawing instructions until you achieve your final result.
Skim the Following if You’re Super Impatient
What follows are instructions on using the Canvas API to draw things. It’s not about making games, but just drawing things. It’s really interesting, and well worth learning—in the spirit of “doing things from scratch”. But … if you’re impatient and itching to get on with it, feel free skim through. It’s some good stuff though, so don’t skim too fast!
Many Canvas drawing instructions only define the path of the shape, not information on its visual characteristics. To get something on screen you need to specify if you want to stroke the path (paint the outline of the shape), or fill the path (paint all of the insides of the shape). If you want to do both, you need to do two separate drawing instructions.
Before we define our shapes, we first have to set some global colors for drawing:
ctx.strokeStyle = "black";
ctx.fillStyle = "red";
The strokeStyle property sets the outline color of the shape we’ll draw, and fillStyle sets the shape’s solid fill color. Again, these are stateful properties, so once we’ve assigned them, all further drawing operations will use red and black until we reassign them to something else. The valid values for colors are any supported CSS Color DOM String—usually named values (“red”, “black” etc., as above), or RGB strings (such as 0xFF00FF, or rgb(255, 0, 255)). We’ll also be using some other formats as we go, to get alpha support and for making some nice color palettes for our games.
With the colors set, we can at last be rewarded with an image on screen:
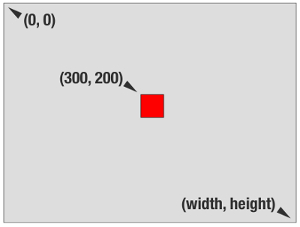
ctx.fillRect(300, 200, 50, 50);
ctx.strokeRect(300, 200, 50, 50);
The first instruction, fillRect, draws a filled rectangle in the color of the current fill style (red). The next instruction, strokeRect, then draws an outline of a rectangle over the top of this, in the current stroke style (black). Both operations expect the same set of four parameters: x position, y position, width, and height. All values are in pixels.
The coordinate system starts in the top left of the screen. We’ve asked for our rectangle to start 300 pixels in from the left, and 200 pixels down from the top. So we’ll end up with a 50x50 pixel square, starting at screen location 300x200 and ending at 350x250—kind of in the middle of the screen.
Our first game character—what a lil’ rascal! I hope you’re a little excited now that we’re drawing! Probably not going to win any art prizes with this little guy, but a journey of a thousand miles starts with a single rectangle. Many a great game prototype has featured the trusty square protagonist. And if it’s fun with rectangles, it’s going to be extra cool with real art.
Naturally, a square is nothing without its beloved partner in crime, the circle. There’s no circle method on the Canvas API. Instead, we have to make a circular path with arc:
ctx.beginPath();
ctx.arc(325, 170, 25, 0, Math.PI * 2, false);
ctx.fill();
ctx.stroke();
Oh, this looks a bit more complex than the rectangle. We’re using a canvas path to create a circular shape. The steps for making a general path are to start by calling beginPath. We then define the path shape—in this case using then arc drawing instruction. And finally we call fill or stroke (or both) to render the path in the appropriate color.
The arc method is a flexible way to draw circles or sections of a circle. The six parameters it expects are x, y, radius, start, end, and antiClockwise. x and y are the locations of the center of the circle. radius is the radius from the center. The start value indicates the angle on the imaginary circle the path begins, and end where it finishes. From 0 to Math.PI * 2 represents an entire circle (see the “Degrees vs Radians” section that follows). The last parameter is optional and dictates the direction of the arc: clockwise by default, but you can change it by setting antiClockwise to true.
Degrees vs Radians
Let’s take a brief aside to discuss degrees vs radians. We may as well get this out of the way now: in game development, anything that involves angles is usually expressed in radians rather than degrees. If you remember from school, a circle has 360 degrees—or 2π radians. Radians is just another unit of measure for angles. If we move clockwise, then 0 radians lies due east, π x 0.5 is south, π is west, π x 1.5 is north, and 2π is back where we started. The value π is accessible in JavaScript via the method Math.PI.
It’s easy to convert between degrees and radians: if a full circle is 360 degrees, or 2π radians, then a semicircle is 180 degrees or π radians. So to get radians from degrees, π/180 * degrees, and to get radians from degrees it’s 180/π * radians:
const deg2Rad = deg => (Math.PI / 180) * deg;
const rad2Deg = rad => (180 / Math.PI) * rad;
You can do all of your planning in degrees and convert them to radians at the last minute. But radians are so ubiquitous that it’s probably better if you just get used to thinking in radians!
The ability to draw simple shapes like circles and rectangles might not seem super exciting to begin with, but they can easily be composed into more impressive forms. Additionally, they’re very helpful for debugging (for outlining images and shapes when doing collision detection, for example) and can also be used for some simple and cool effects. Let’s make a starfield (starting with our project skeleton):
const canvas = document.querySelector("#board canvas");
const ctx = canvas.getContext("2d");
const { width: w, height: h } = canvas;
Like our rectangle + circle friends above, we start by getting a reference to the canvas element, then fetch the width and height (by destructuring and renaming the canvas’s width and height as w and h). Next, we set up some colors:
ctx.fillStyle = "black";
ctx.fillRect(0, 0, w, h);
ctx.fillStyle = "#555";
We fill the entire screen with black, using the instruction ctx.fillRect(0, 0, w, h). This fills a rectangle starting at the top left and ending in the bottom right. Then we change colors to a suitably cosmic gray, ready to draw some stars:
let x, y, radius;

for (let i = 0; i < 550; i++) {
  x = Math.random() * w;
  y = Math.random() * h;
  radius = Math.random() * 3;

  // draw the star!
  ...
}
We set up some variables and then loop a lot of times (because there’s a lot of stars in space). For each star we pick a random x and y position and radius. All that’s left to do is draw some circles:
// draw the star!
ctx.beginPath();
ctx.arc(x, y, radius, 0, Math.PI * 2, false);
ctx.fill();

A simple starfield background like this can add depth to your scene, and it also highlights a nifty lesson in game development: a simple thing repeated a lot of times can add up to more than the sum of its parts. Add “static starfield” to your bag of tricks. It’ll come in handy, I promise.
The Canvas API also has the ability to draw text. It’s a useful feature for both providing information to the player (in the form of head-up displays, scores, or instructions) and information to us as debug messages during development. Just as we can set the fill and stroke color, we set font information via the font property. This is a string that defines the font you want to use, as well as its size. By default, it’s “10px sans-serif”, but you can change it to whatever you want:
ctx.font = "20pt courier";
By default, the font families available are restricted to the fonts on the user’s computer. Just like with regular CSS, we have the ability to include custom fonts. This is helpful for adding style and individuality to our games and to ensure the fonts look the same to all players.
After setting it to the best font available to us for now (monospaced fonts are the best of course—so computer-y!), we then fill or stroke (or both) a message with fillText and strokeText:
const center = w / 2;
ctx.textAlign = "center";

for (let i = 0; i < 11; i++) {
  ctx.fillText("if you're in the game", center, i * 40);
}
ctx.strokeText("strokes the word", center, h - 30);
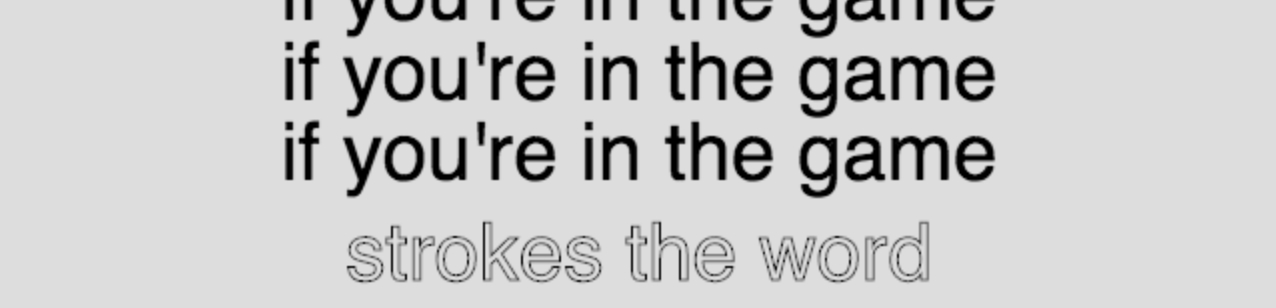
The parameters for the text method are a string with the message we want to display, followed by the x and y coordinates to plot at. The text will start from the location provided, but the alignment can be modified if needed. In our example, we modify it by setting the textAlign property to center. This way, the text is balanced on either side of the x coordinate.
Images
Okay, finally we’ve made it. Here comes the big one! Circles and squares are fine for debugging and testing, but in general we won’t be making our game assets out of simple shapes. The vast majority of assets in our games will be beautiful art we create elsewhere and then import. The Canvas API supports a few useful image-drawing operations, the most basic of which takes an HTML image and plots it at a given location.
Sounds great, but there’s one small catch: the image needs to be already loaded before we can draw it. As we move though our game development journey, we’ll see better ways to tackle asset loading. For now, we’ll just wait for the image load event using addEventListener:
const img = new Image();
img.src = "res/Images/rick.png";
img.addEventListener("load", draw, false);
Starting from our project skeleton again, with our friend rick.png copied into the images directory, this snippet of code will create a new DOM image and load the given URL. Once loading is complete, it will call the draw function, which looks like this:
function draw() {
  for (let i = 0; i < 100; i++) {
    const x = Math.random() * w - 50;
    const y = Math.random() * h - 100;
    ctx.drawImage(img, x, y);
  }
}
Jackpot! Step one in our plan for gamedev world domination is complete: we can draw a game character on screen! The drawImage method takes the image object along with the x and y coordinates and plots the image to the canvas at that point.
But drawImage can do oh-so-much more. It also has some optional parameters for cropping and stretching the image that’s rendered. For example, if we supply two extra parameters—width and height—we can change how the image is scaled. By default (if you don’t supply the parameters) they are the correct pixel dimensions of the image. But if you want to double the width of the image, you can multiply it by 2. If you want to halve the height, divide it by 2 … and so on.
Most of the time we’ll keep the multiplier value the same for both width and height so things are scaled uniformly. Let’s test this out by creating another starfield example … only this time as a snowfield. A snowfield of snowflakes:
const img = new Image();
img.src = "res/Images/snowflake.png";
img.addEventListener("load", draw, false);
The setup is similar to our last example: load the image, then call the draw function:
for (let i = 0; i < 100; i++) {
  let x = Math.random() * w;
  let y = Math.random() * h;
  let scale = Math.random();

  ctx.drawImage(img, x, y, width * scale, height * scale);
}

Our starfield just got a lot cooler (geddit?). This time we have a loop with 100 snowflakes. Each snowflake gets a random x and y position, as well as a random scaling factor. Math.random() will return a number between 0 and 1: we multiply the snowflake’s dimensions by this factor to get the final output size.
Besides scaling, there’s one more trick up drawImage’s sleeve. It can accept a call with nine parameters for getting very precise control over what’s drawn on screen:
ctx.drawImage(image, sx, sy, sw, sh, dx, dy, dw, dh);Phew, that’s a lotta parameters. There are really three “sets” here. First is the image, which we already know. The remaining parameters are two sets of x, y, width and height parameters: a “source” and a “destination”. This source lets you specify a piece of the original image, and the destination specifies where on the final canvas to draw (and to what scale).
// Draw the original
ctx.drawImage(img, 170, 140);

// Draw cropped images
for (let i = 0; i < 22; i++) {
  ctx.drawImage(
    img,
    // source
    32, 0, 53, 75,
    // destination location
    i * 20, i * 10,
    // destination scale
    i * 0.2 * 53, i * 0.2 * 75
  );
}

This example crops a Rick head from the original image: from 32 pixels in from the left and 0 pixels down from the top—then 53 pixels across and 75 pixels down (this defines the source area). It takes this crop and moves and scales it to create the crazy ’80s video effect. We’ll be using this technique a lot when making animations from grids of images: a single image will contain all the animation frames, but we’ll crop out individual cells to display like a flip book.
The last cool thing about drawImage is that the image parameter isn’t restricted to DOM images; you can also use another canvas element as the image source. This is really useful when doing procedurally generated assets, or adding static effects to existing images.
Transformations
There are still a few power features we need before getting down to making games. The Canvas API provides us with a set of features for performing transformations on the drawing surface. We can translate (move), rotate and scale (as well as perform more advanced general matrix transformations) our drawing operations. These affect the canvas surface itself—like keeping the “pen” still and moving the “paper” underneath.
The effects of transformations are cumulative (the order that you perform them is important) and permanent (so every subsequent drawing operation is affected). Because of this, we also get a way to undo stateful changes: save and restore. These methods create a stack of canvas states: we can push and pop from the stack to ensure we don’t get cumulative weirdness—like making a 1-degree rotation that accumulates every frame, sending our game spinning uncontrollably. (Of course, this might be exactly what you want!)
To see the stack in action, start with 100 squares drawn in the current fillStyle:
function draw() {
  for (let i = 0; i < 100; i++) {
    const x = Math.random() * w;
    const y = Math.random() * h;
    ctx.fillRect(x, y, 50, 50);
  }
}
Now we’ll draw black rectangle, followed by some red ones, and then restore the context:
ctx.fillStyle = "black";
draw();

ctx.save();
ctx.fillStyle = "red";
draw();
ctx.restore();

// Back in black!
draw();
Here we wrapped the red rectangles in a save and restore. When we restore, we go back to the original state. In this case, the fillStyle is returned to black. The result is three layers of rectangles: the background and foreground in black, the middle ground in red. We could easily do this manually without save/restore, but it becomes tedious when we want to perform a whole bunch of temporary changes.
Sometimes the cumulative nature of canvas transformations is useful, and we don’t want to save and restore our changes. Here’s an example where repeatedly applied transformations give us a nice kaleidoscope effect:
const { width: w, height: h } = canvas;
ctx.translate(w / 2, h / 2);
The first step is to move the origin of the canvas with translate. By translating to half of the width and half of the height, we’ve effectively offset all our subsequent drawing operations relative to the middle of the screen. Drawing a rectangle at point 0x0 will plot in the center, not in the top left.
for (let ring = 1; ring < 28; ring++) {
  ctx.fillStyle = `hsl(${ring * 25}, 90%, 50%)`;
  for (let dots = 0; dots < ring * 6; dots++) {
    ctx.rotate((Math.PI * 2) / (ring * 6));
    ctx.beginPath();
    ctx.arc(0, ring * 15, 7, 0, Math.PI * 2, true);
    ctx.fill();
  }
}
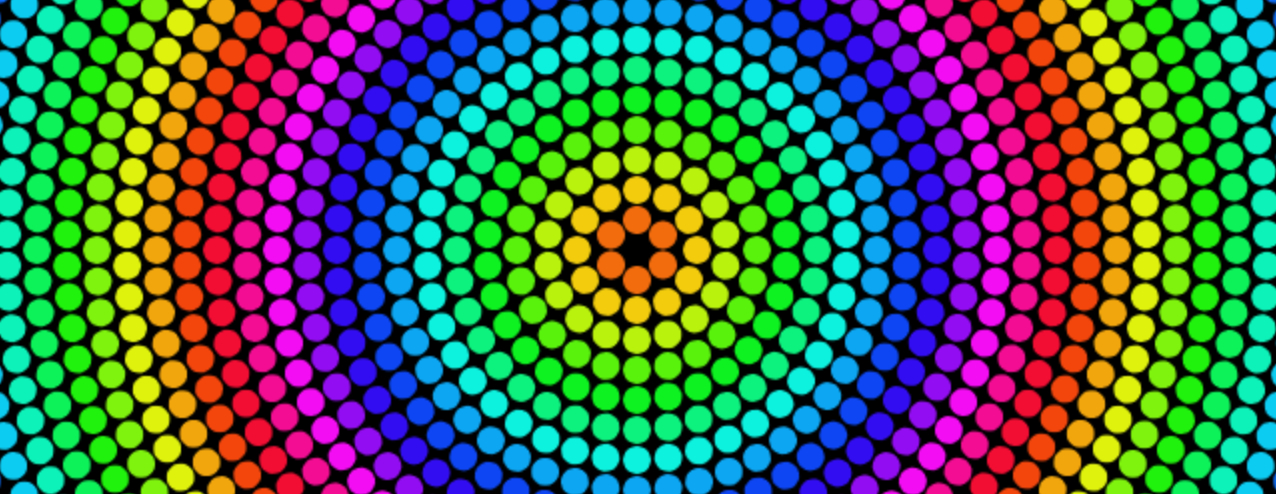
Next we do a nested loop of “rings” and “dots”. Each time we draw a dot, we rotate the canvas a small amount. It’s important to note the rotation is in degrees, not radians (see earlier). Each ring has 6 dots, times the ring number (so the inner-most has 6, the next has 12 etc.)—so our rotation amount is a full circle (Math.PI * 2) divided by 6. We draw each dot at x position 0, and y position dependent on the current ring number. Because the canvas itself is rotating, we get a circle pattern.
HSL
The color of each ring is set using HSL values. HSL (an alternate to RGB for defining a color) stands for “hue, saturation, lightness”, and is a great gamedev trick for picking random colors that aren’t terrible! The saturation and lightness values range from 0 to 100%, and the hue ranges from 0 to 360 (as in degrees in a circular color-wheel)—with 0 being red, and 360 also being red, with all the colors of the rainbow in between. We’ll talk more about colors as we progress, but notice in our example we modify the hue while keeping the saturation and lightness constant.
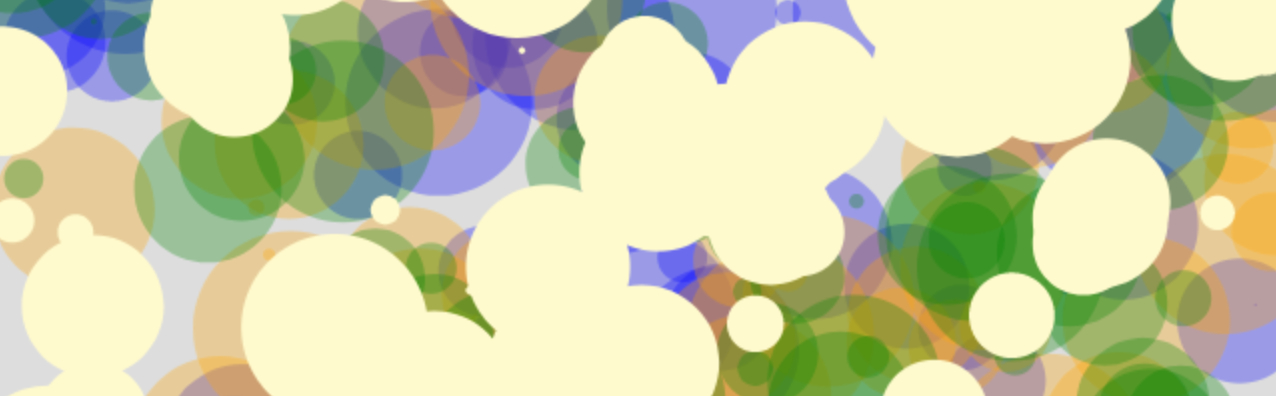
Blending and Alpha
Now that we’ve nailed the basics, we can look at some quick-’n’-easy effects to add to our repertoire. The Canvas 2D API features some more “artistic” functions that are required to compose nice-looking scenes.
By default, everything we plop onto our canvas is drawn fully opaque. Images drawn with drawImage will have the correct transparency (if transparency exists in the original source image), but we don’t have control over this at runtime. To control transparency ourselves, we need the globalAlpha property. The globalAlpha number value ranges from 0 (completely invisible) to 1 (fully opaque). As its name suggests, it applies globally to any drawing operations we do.
ctx.save();
ctx.save();
ctx.globalAlpha = 0.3;
ctx.fillStyle = "blue";
draw();
ctx.fillStyle = "orange";
draw();
ctx.fillStyle = "green";
draw();
ctx.restore();
ctx.fillStyle = "lemonchiffon";
draw();
Because the globalAlpha is less than 1, initial shapes are see-through. When we restore them, globalAlpha returns to 1, so the final draw call is solid.
Let’s look at one final cool trick of the Canvas API. In the example above, each layer of shapes is drawn over the top of another. In the intersecting areas, orange has precedence over the blue, and green has precedence over orange. But this behavior can be altered via the globalCompositeOperation operation.
The composite operation will be familiar if you’ve ever used Photoshop or similar image editing software that can change how layers are blended when things are drawn over the top of each other. In the Canvas API, the default value is source-over, meaning that the new image (the source) is rendered over the existing (destination) image. There are lots of other values available. Here’s an example of some of the possible composite operations:
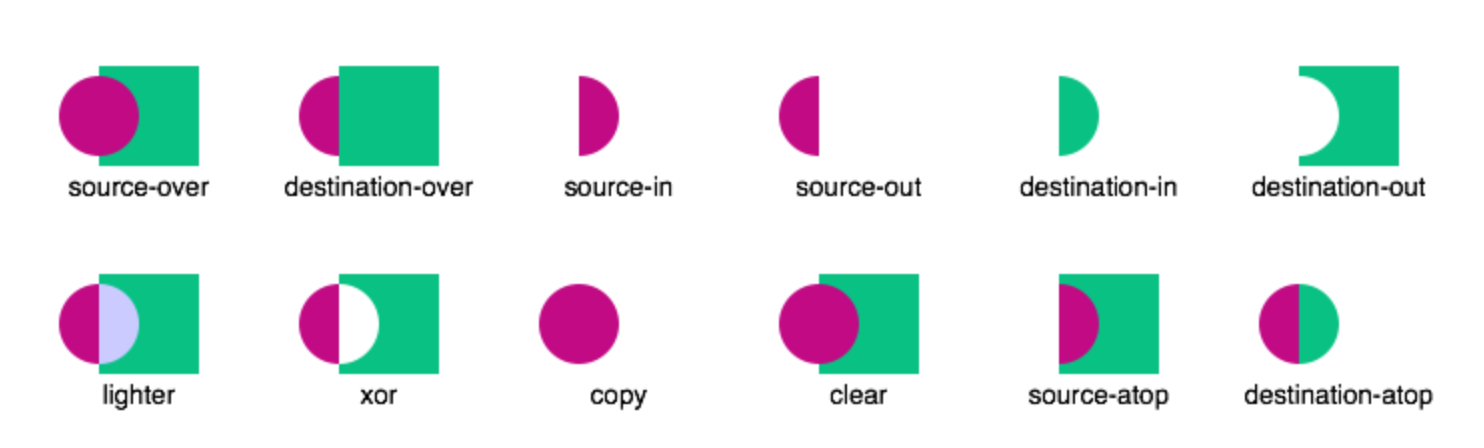
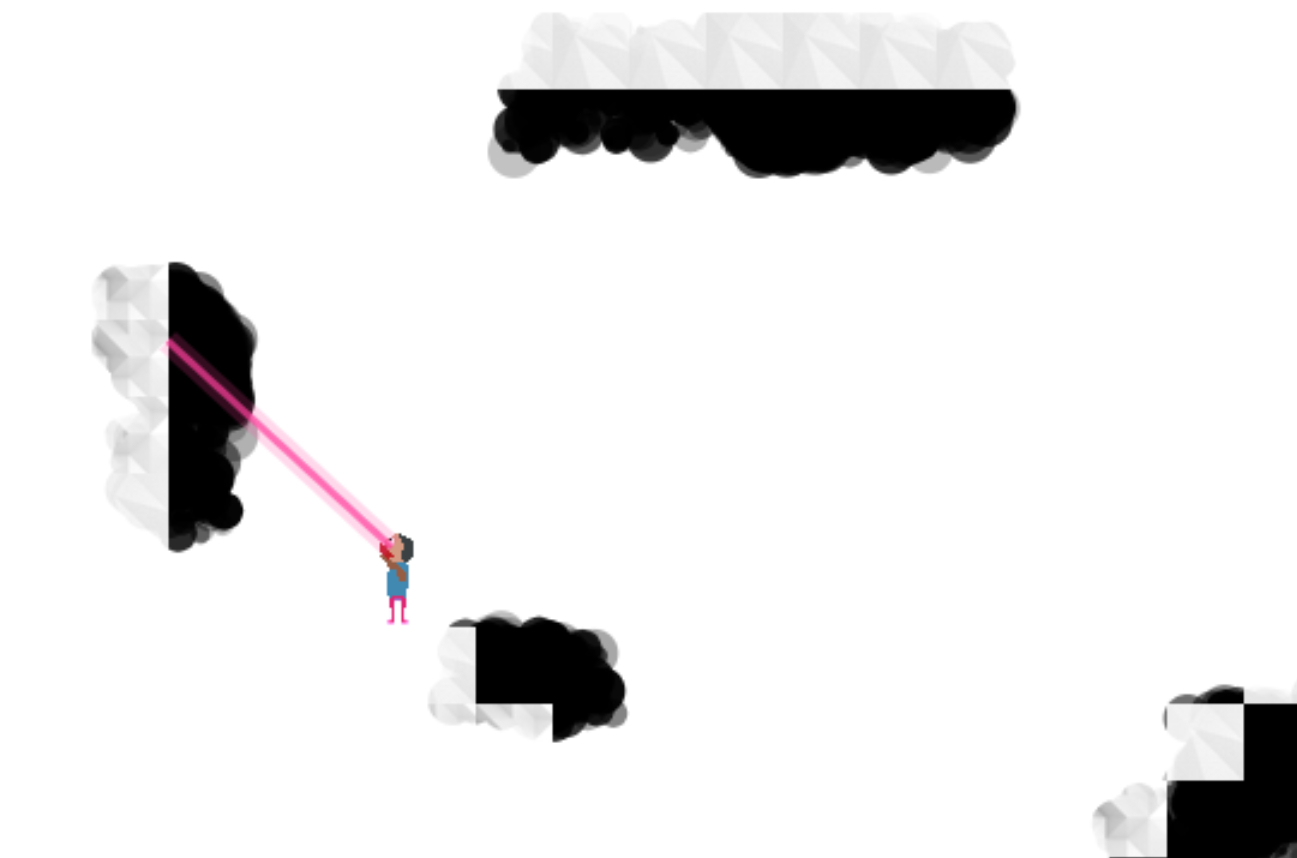
It’s best to play around with these—some have more obvious effects than others. For example, setting ctx.globalCompositeOperation = 'destination-over'; means that when you draw a shape, the background will end up in front of the new shape! You might not need to change these too often, but they can be useful for creating some interesting effects and game ideas. For example, here’s a screen shot from the game Zmore. In the game the entire scene is invisible. But the player can use a laser gun (powered by the destination-out composite operation) to shoot bubbles that render parts of the wall visible:
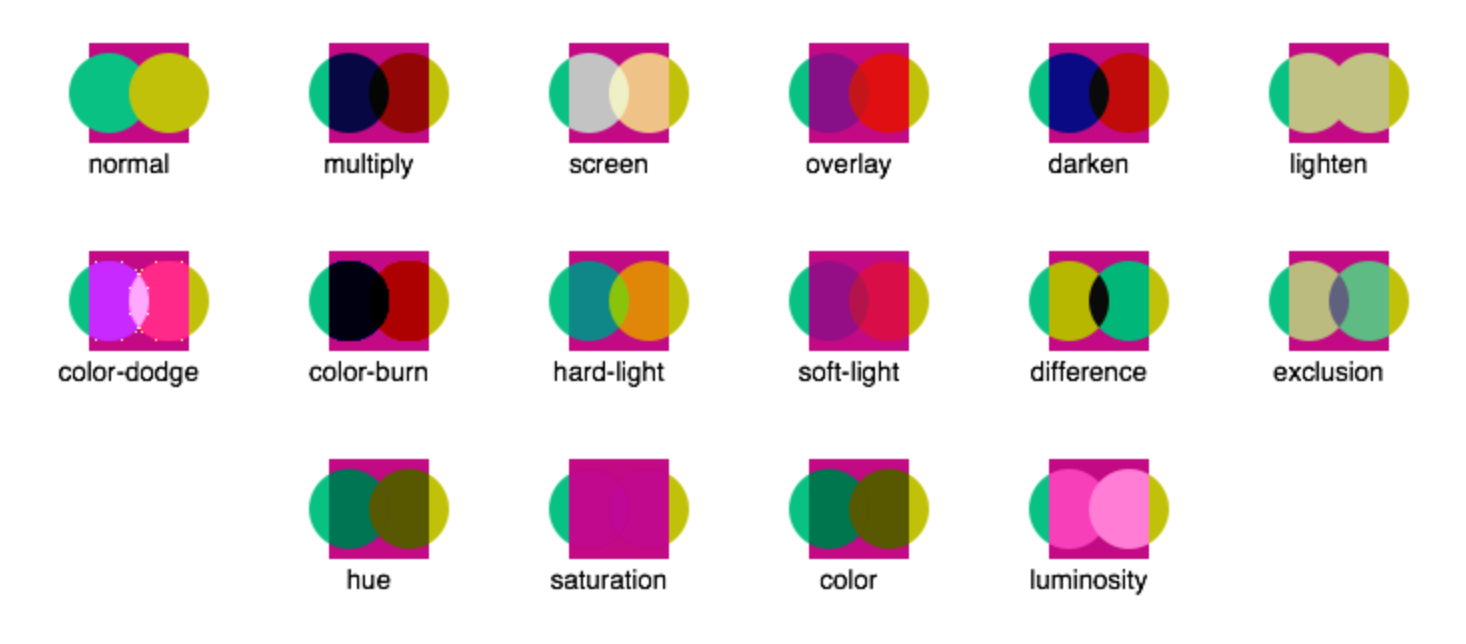
Recently, browsers have begun to implement additional composite functionality called blending modes. They work the same, but are more concerned with how colors are mixed. Because they’re relatively new, not all modes are fully supported on all browsers, so you should check out the results on browsers you want to target before shipping your game.
To test out the composite operations, we’ll get down to business and create ourselves a new company logo. This is going to show up at the start of all our games, and be printed out and sticky-taped to our office door—so it had better be good! First, we’ll define the main shape of our logo as two stacked words—MOM and POP—in big letters:
// Draw the words as a mask
ctx.font = "bold 70pt monospace";
ctx.fillStyle = "black";
ctx.fillText("MOM", 10, 60);
ctx.fillText("POP", 10, 118);
Next, we’ll change the composite operation to source-atop, which takes the source and only draws it where you’re trying to draw. So our initial words will act as a mask:
// Draw lines over the mask
ctx.globalCompositeOperation = "source-atop";

// Rainbow!
for (let i = 0; i < 6; i++) {
  ctx.fillStyle = `hsl(${i * (250 / 6)}, 90%, 55%)`;
  ctx.fillRect(0, i * 20, 200, 20);
}
This gives us some nice rainbow text. But now we need a drop shadow. By switching to destination-over, we re-draw our words in black, offset by a few pixels, and only the shadow will be visible:
// Draw the shadow behind the logo
ctx.fillStyle = "#999";
ctx.globalCompositeOperation = "destination-over";
ctx.fillText("MOM", 13, 62);
ctx.fillText("POP", 13, 120);
ctx.font = "30pt monospace";
The last step is to add the “games” byline under the logo. Now we jump back to the default composite operation and print some text. However, Canvas gives us no control over the font’s letter-spacing attribute, and the default is too tight for our logo. So we’ll do our own letter spacing, by plotting individual characters in the right place!
// Back to default
ctx.globalCompositeOperation = "source-over";

// Add characters (so they're evenly spaced)
"games".split("").forEach((ch, i) => {
  ctx.fillText(ch, i * 37 + 12, 145);
});
Ah, the perfect logo. Our neighbor Guy Shifty at EGI Games is going to be mighty jealous of this masterpiece. Let’s print it out and stick it on the door. You can perform some great visual trickery with the various features of the Canvas API, so it’s a good idea to spend some time figuring out how to use them. You never know when your game might call for some zany effects!
Performance Considerations
If you spend any time around gamers, it won’t be long before they start talking about FPS (frames per second) in games. This is the number of times the screen will be redrawn every second. There needs to be a minimum amount to fool the human eye into seeing movement. The “gold standard” at the moment is 60 frames per second—though many argue that 30 frames per second is enough to be smooth … as long as the game is good!
Canvas is powerful and pretty fast. You can easily make complex games, with lots of images and effects, all running at 60 frames per second. But there are limits. If you do too many drawImage calls (or other CPU-intensive operations) you’ll start to notice things slowing down. For now, we’re not worried about performance at all. Getting some experience under our belt is priority number one. But at some point in the future, on larger projects, you’ll notice your game start to get sluggish. When that happens, jump to Chapter 9 for some killer performance tips.
Game Engines vs Reinventing the Wheel
At this point you might be wondering why we’re reinventing the wheel by making our own game library from scratch. Hasn’t someone else already done it? It’s a valid question, and one you should consider carefully. Indeed, there are many excellent existing game libraries and engines for creating games. The hard work of writing a rendering engine and game framework has already been done for us; we could just plop in our graphics and write some game logic.
There’s a saying in the gamedev world: “Make games, not engines.” As computer programmers, we love to hack and tinker with things. We like to understand how everything works. It’s a noble trait, but it can sometimes obscure our larger, long-term goals—like actually finishing a game. We can save vast amounts of time (and get more impressive results, at least initially) by surrendering some control and using the tools already available to us.
So, why are we doing it from scratch?! First, it’s because we love to tinker and understand how everything works! The goal of this book is not to create a new JavaScript game library. It’s to understand the fundamentals of how a game library works. To do this, you have to be able to dive in, and play, and experiment with every aspect of the code. A third-party library may include its source, but the project is already built. It’s already huge. Everything is already in its place and it’s hard to know why it was structured that way and how you could modify it.
By building it ourselves, we’ll know everything about our library. We can tinker and change it however we want, and make it do whatever we want.
More crucially, a framework is a set of constraints. Game development is a highly creative undertaking, and frameworks and engines are like starting a painting with a base layer of paint-by-numbers: the end results can still be beautiful and interesting, but there will still be some essence of those initial boundaries. Frameworks can shape how you think about the possibilities of your games.
It’s a trade-off. Ultimately, anything you can do to get games completed is good. Just don’t forget the drawbacks. Many of the biggest indie hits (such as Braid and Fez) worked because of a quirky core mechanic that would have been hard (or even impossible) to implement in popular frameworks at the time. If you constrain yourself to thinking in a framework, you make it harder to think about experimenting with crazy ideas.
Okay, that’s enough for the warning. With the explosion in popularity of HTML5 games, we’ve seen several excellent libraries and frameworks bubble to the top. It’s been a rapid boil, though, so be sure to keep your eyes peeled for other newcomers to the field. And even if you don’t use them, they’re useful for ripping off good ideas for your own library!
Game Libraries and Engines
The quantity and quality of HTML5 game libraries is growing rapidly. At the time of writing, Phaser.io has (by far) the most traction in the JavaScript game-making community. Phaser will render to Canvas or WebGL and has built-in physics and particle engines, handles user input and triggering sounds, and has helpers for managing your game entities, and lots more.
Impact is another mature project, with a consistent and full-featured API. It has support for animations, images and sprites, sounds, physics … everything you’d need for making games. It’s not free (it’s still US$99 at the time of writing) but the cost includes the game engine, a cool level editor, and the source code for both. It was created by Dominic Szablewski (responsible for several great gamdev-related projects—notably Ejecta, which we’ll cover when it comes time take our games to mobile devices), and has a large and loyal community behind it.

Now—have you considered non-JavaScript options? I won’t judge, because getting projects finished is the primary objective. If some game-making software works for you, use it! One of the most prolific and easy-to-get-started packages is Game Maker. It has been responsible for some massive indie hits including Undertale, Nuclear Throne, Gunpoint, Hotline Miami, and Spelunky. A similar, web-based package is Construct3 which has a growing userbase.
If you want to “get serious”, then the king of the indie world at the moment is Unity. Unity is primarily a 3D (though recently its support for 2D is getting better) game-making engine and IDE that’s extremely popular amongst indie game developers. Games can be exported cross-platform, to iPhone and Android, and there’s even an exporter to HTML5 (though it’s pretty flaky—at least at the time of writing).
Godot
Another up-and-comer in this space is the Godot game engine. It’s a free and open-source environment that’s looking to take on Unity. It’s growing in popularity, and is worth keeping an eye on if you’re interested.
Finally, if you want to stay with trusty JavaScript but don’t want to do everything yourself, you might consider Pixi.js. Pixi.js is a 2D WebGL renderer (it falls back to Canvas if the browser doesn’t support it) that’s designed solely with the intent of rendering your game super fast. If you find yourself hitting the limits of canvas performance, Pixi.js is where you should turn next!
Quick, Draw
That’ll do us for drawing. Canvas provides us a fast and flexible rendering environment that’s pretty fun to work with. It might not be the Ferrari (or Tesla Roadster) of the rendering world, but it’s perfectly capable of handling our game requirements—at least for our first dozen or so games.
Anyway, enough drawing. Let’s go make some games.