Level 3: Game Loops & User Input
There’s a knock on the frosted-glass office window. It’s Guy Shifty and his shiny white teeth. “Hey, friend!” he croons, “we’ve got a little Friday two-hour game jam going on this afternoon. Fancy showing us what you’re made of? I don’t expect you can do anything under that kind of time pressure, but I’ll buy a copy of the winner’s game for a dollar. You in?”
Good news! We’ve just been commissioned to produce our first ever game. If we earn that dollar, we’ll (technically) be professional game developers! Also, it’s our first game jam. Game jams are organized events where people get together to make games, either solo or in teams, online or in person. They sometimes have themes or other restrictions, and they always have a time limit. A fixed deadline is a great incentive to start and finish making a game.
We’re getting ahead of ourselves. We still have a several missing pieces to figure out before we can claim our dollar prize money.
We can draw a static scene, but that’s far from a game. To create the illusion of movement and interaction, we must enter the mind of the cartoonist—composing a collection of static scenes, where the actors move ever so slightly each frame. If we carefully consider timing and expression, we can move everything a tiny bit in a way that looks and feels alive.
The Loop
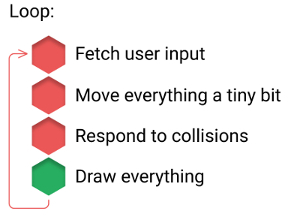
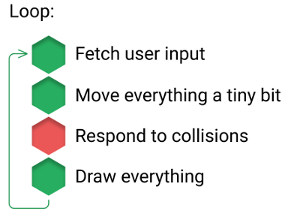
Here it is—the number one most important step in our list of game-making requirements: the infinite loop. Inside the loop is where we animate things, fetch periodic input from the outside world, and perform the necessary calculations to make our scene respond appropriately. In the following sections, we’ll build up a generic loop system that can power our games.
There are many ways to loop—from the quick and dirty, to the ridiculously over-architected. Just as with our rendering engine, how far you go will depend on your specific requirements. Just remember not to get lost in the details at the expense of making games. A quick and dirty solution that powers a fun game is more valuable that an elegant system with no game attached.
The Loop Exists
As mentioned in Chapter 1, even if you aren’t writing the loop yourself, it exists. In the case of our Rick Clicker game, the browser’s built-in event loop was running in the background, updating the view and responding to user input.
The Old-school Way
The quickest and dirtiest way to loop in the browser is with the setInterval and setTimeout methods. Not so long ago, these were the only way to do animation in JavaScript without blocking the main UI thread. (An infinite while loop, for example, could control a game, but because JavaScript is single-threaded it would lock up the entire page!) The setInterval and setTimeout don’t block, and both work in a similar way:
setInterval(() => {
  // Run your game loop!
}, 1000 / 60);
The first parameter is the function that will run after a certain time has elapsed. The second parameter is the delay time in milliseconds. If we specify 5000, for example, the function will be called once every five seconds. By specifying 1000/60, we’re asking for a loop that runs every 16 or so milliseconds. A thousand milliseconds in a second, divided by 60, gives us 60 frames per second. setInterval will run unceasingly and forever.
To interrupt the loop, you need a reference to the timer ID returned from calling setInterval. This is an integer that we can then pass to clearInterval to break the infinite loop. This gives us some control. Let’s use that control to play a game called “How many milliseconds does your luck last for?” Starting at 0, time will accumulate until you’re unlucky and the game’s over:
const start = Date.now();
const timer = setInterval(() => {
  // Clear the screen
  ctx.fillRect(0, 0, w, h);
  // Write the time
  ctx.strokeText(Date.now() - start, 20, 80);

  if (Math.random() < 0.01) {
    ctx.strokeText("Game Over!", 160, 180);
    clearInterval(timer);
  }
}, 1000 / 60);
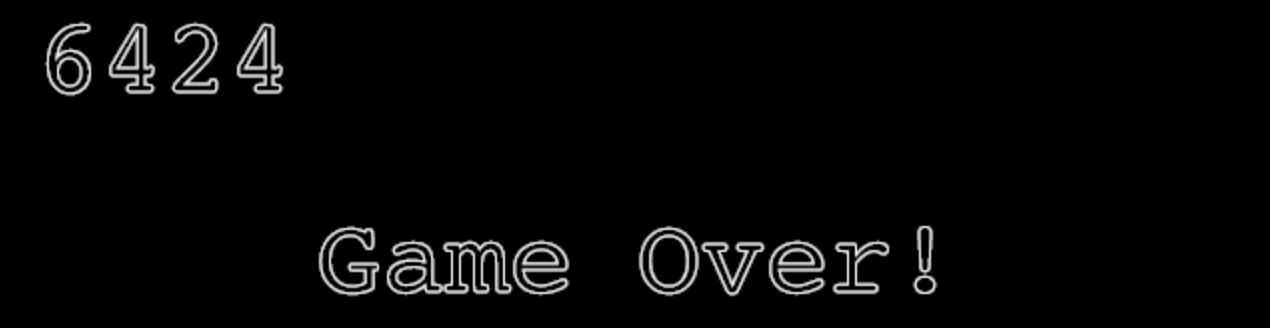
The game begins by taking the current time (in milliseconds) with Date.now(). The setInterval loop runs until you’re unlucky (that’s when our friend Math.random gives us a very small number). Theoretically, if you’re extremely lucky, the game will never finish—but practically, it takes a couple of seconds. My high score is 6424. Yet another boring game, but you should be a little excited, because we’re seeing our first bit of animation. Something is changing on screen at 60 frames per second!
An alternative to setInterval is setTimeout, which works in a similar way but loops only once. If you want to loop again, you have to re-call setTimeout. To facilitate that, we convert the anonymous function into a named function, loopy, and have setTimeout call loopy:
const start = Date.now();
function loopy () {
  ctx.fillRect(0, 0, w, h);
  ctx.strokeText(Date.now() - start, 20, 80);

  if (Math.random() < 0.01) {
    ctx.strokeText("Game Over!", 160, 180);
  } else {
    // Loop
    setTimeout(loopy, 1000 / 60);
  }
}
loopy(); // Start things running!
This construct is a bit more verbose than setInterval, but it affords us more control over when and how things loop. If you want to pause and resume the action, for example, it’s just a matter of not calling loopy until it’s time to start again.
These days there are better options than setInterval and setTimeout. But if you find yourself just wanting to get something looping without thinking about it (say, if you’ve just been thrust into a last-minute game jam), then these will work happily in all browsers, old and new.
Looping with HTML5
The problem with setTimeout and setInterval is that they’re a bit unreliable. They weren’t really designed for doing very high-precision animations. Also, they’ll just keep on running if the user switches browser tabs—unnecessarily draining their battery and using up CPU cycles. Thankfully, HTML5 has given us an improved timer specifically for running animations—requestAnimationFrame. Our general game loop structure (that we’ll use throughout the book) will look like this:
// Game setup code
...

function loopy (t) {
  requestAnimationFrame(loopy);

  // Game logic code
  ...
}
requestAnimationFrame(loopy); // Start things running!
A call to requestAnimationFrame says “I’d like my callback function to run on the next frame, please.” It runs at 60 frames per second in the browser (perfect for games) and it calls a function passing a single parameter of type DOMHighResTimeStamp. The timestamp is the amount of time that has elapsed since the page loaded. Note that to start things running we didn’t call loopy directly, but rather we invoked it via requestAnimationFrame. This is so we always have a correct value in our t (time) parameter.
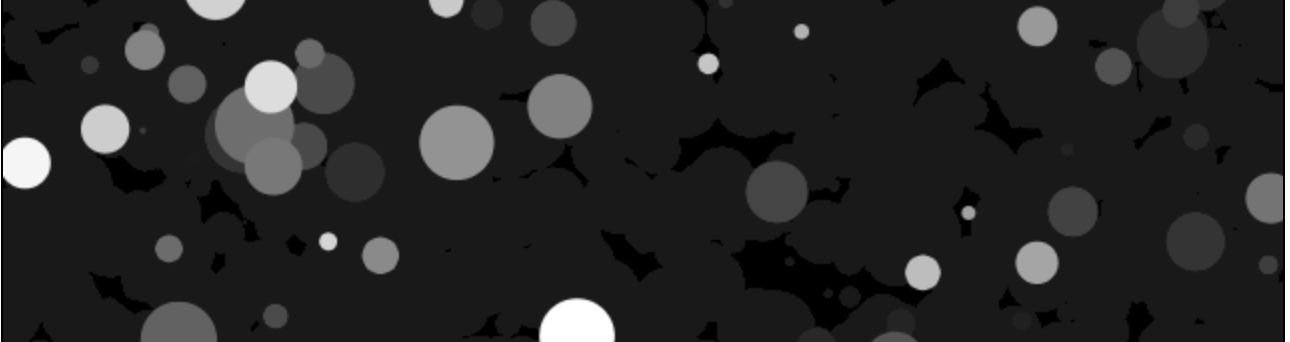
Let’s give it a whirl by creating our first bit of real animation—a small visual effect entitled “fading raindrops in the cold, cold night.” It’s some white circles randomly plotted on a black background. But the black background is also painted with a very low opacity wash (by setting Canvas’s globalAlpha), creating a pleasant transition of slowly fading splotches.
// Game setup code
ctx.fillStyle = "#000";
ctx.globalAlpha = 0.02;
In our game setup code, we set the Canvas state for drawing: a black background (#000), and a very low global alpha level. Inside the loopy function we can do the “game logic”. Here’s where we move everything a tiny bit:
// Game logic code
ctx.save();
ctx.fillRect(0, 0, w, h);
ctx.fillStyle = "#fff";
ctx.globalAlpha = 1;
The background is painted all black, the color set to solid white (by making globalAlpha = 1). Now we can splatter our circle to a random location, at a random size:
// Random circle
const x = Math.random() * w;
const y = Math.random() * h;
const radius = Math.random() * 20;

ctx.beginPath();
ctx.arc(x, y, radius, 0, Math.PI * 2);
ctx.fill();

ctx.restore();
The effect works because we paint the background with a very low alpha, but paint the circles with a very high alpha. This results in the “raindrops” becoming washed out over time. Experiment with all of the values to see the impact.
Commit This Loop to Memory
You should commit the simple requestAnimationFrame loop to memory. It’s a couple of lines that you’ll use over and over again, and having it in your brain will help when you find yourself taking part in something like the Zero Hour Game Jam, a contest that takes place as daylight savings time moves back an hour. Start making your game at 2 a.m., and when you finish an hour later, it’s 2 a.m. again!
An Even More Accurate Loop
The requestAnimationFrame timer is good enough to get started, but it still has some limitations that affect how your game works on different computers. This is especially true when we come to doing physics, where small timing issues can compound, until the game catastrophically fails—usually in a hilarious and explosive fashion.
We can alleviate most problems by keeping track of how much time elapsed between the previous frame and the current frame. If we account for this elapsed time in our animation code, things will animate correctly—even with different frame lengths. By multiplying our game object’s speed by the delta time between frames, a short frame (one that executes quickly) will only move the object a short distance. Conversely, if the frame takes a long time to complete, the delta time will be greater and the object will move further. The net effect is consistent movement regardless of frame length.
// Game setup
...
let dt = 0;
let last = 0;
function loopy (ms) {
  requestAnimationFrame(loopy);

  const t = ms / 1000; // Let's work in seconds
  dt = t - last;
  last = t;

  // Game logic code
  ...
}
requestAnimationFrame(loopy);
requestAnimationFrame gives us a timestamp containing the current time in milliseconds. We divide the timestamp by 1000 to get the current time in seconds. This was an API decision. (It’s another decision I’ve made that you’re free to disagree with. Many game engines leave everything in milliseconds, and you may want to as well.) I’ve chosen seconds because it can be more natural when thinking about how fast things should move.
We then calculate the delta time (dt)—the time elapsed since the last frame—by subtracting it from the last frame time. The delta time will be a factor used to correctly position our game objects. The total time, t, is also useful for many time-based calculations and effects that we’ll need in our games.
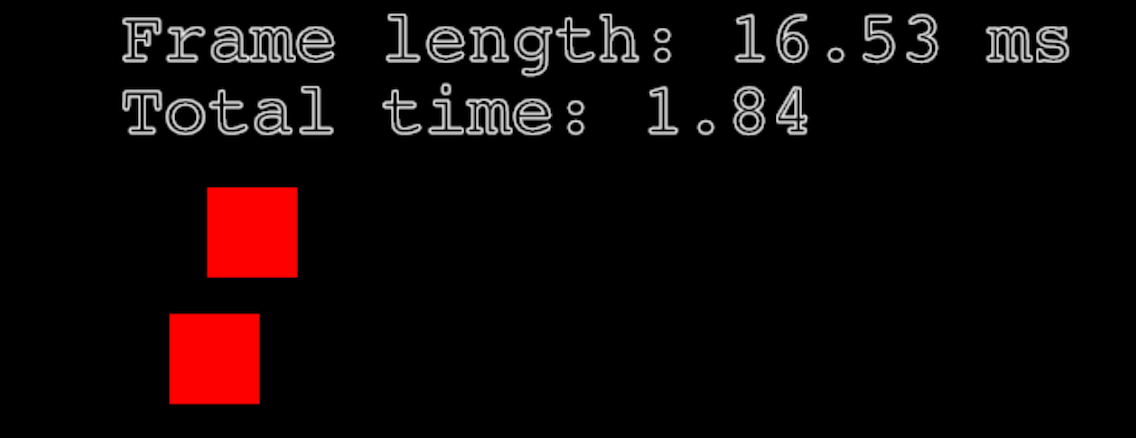
To visually see the difference when using a delta time, we’ll conduct a race between two squares—one using a fixed amount of movement every frame, and one using our new dynamic delta time:
// Game setup code
const speed = 64;
let p1 = 0;
let p2 = 0;
The p1 and p2 variables represent the position of each square. Every frame, the square will move by a constant amount (speed) multiplied by the delta time amount. The delta tells us the time that’s passed in seconds, so a speed of 64 effectively means “64 pixels per second”. Because the canvas is 640 pixels wide, it should take exactly 10 seconds to complete one lap.
To further illustrate what’s happening, and to make it a bit more exciting, let’s add some stats to the top of the screen that display the frame length and total time:
// Game logic code
ctx.fillStyle = "#000";
ctx.fillRect(0, 0, w, h);
ctx.strokeText(`Frame length: ${(dt * 1000).toFixed(2)} ms`, 70, 50);
ctx.strokeText(`Total time: ${t.toFixed(2)}`, 70, 90);
This canvas code will render the delta time dt (in milliseconds) and t (in seconds) on the screen. The JavaScript method toFixed will chop off a number at the given number of decimal places; we don’t need too much precision for this example! And now for the big race:
p1 += speed * dt;
p2 += speed * (1 / 60);
if (p1 > w) p1 -= w + 50;
if (p2 > w) p2 -= w + 50;

ctx.fillStyle = "#f00";
ctx.fillRect(p1, 120, 50, 50);
ctx.fillRect(p2, 190, 50, 50);
Tiny Movement
Before we analyze the results, let’s reflect on the implications of p1 += speed. The square’s initial position is 0. After one frame its position is slightly more than zero. You know what that means? It means we’ve just covered the second item in our list of core requirements for making games: “Move everything a tiny bit”!
The most crucial part of this snippet is the first two lines: both squares have their position increased a tiny bit adding speed multiplied by a factor. Square one has a dynamic factor based on the length of the previous frame. Square two has a fixed factor. Following this we do a little more game logic. We check if either square has gone past the edge of the screen. If they have, we send them back to the start of the screen by subtracting the width of the screen from their current position.
In an ideal world, these two squares would behave exactly the same, because requestAnimationFrame is supposed to loop at 60 frames per second. But if you run the program for a while (and depending on your browser and computer) you’ll notice this isn’t the case.
Switch Tabs
To really see the effect of this, switch tabs in your browser (causing requestAnimationFrame to pause). When you return, you’ll notice that square one—thanks to the large dt—moves to the correct position and still finishes a lap on every 10th second. Square two—thanks to being paused—starts lagging behind.
Using a delta time like this helps to ensure a game plays fairly regardless of the user’s computer speed. Our version is basic and useful enough, but there are some hidden issues with it that we’ll address later (we’ll need to be especially careful when we implement physics in Chapter 6). If you’re feeling loopy, you should also dive into the oft-cited resource on game loops, Glen Fiedler’s “Fix Your Timestep” article.
User Input
Our racing squares demo is alarmingly close to being a game. The next step is user input. The inherent fun of games centers around how the player’s reactions affect things on screen. It’s a feedback loop: their reactions influence the state of the game, resulting in a new state that requires further reactions. The challenge for the game designer (you) is to craft a compelling set of states, and provide a satisfying input system for the users to react with.
Writing a simple input system is really easy. Writing a good input system is really tough. When judging/rating/criticizing your games, the second thing people will comment on is the controls. (The first, unfortunately for me and my poor art skills, is graphics.) Making controls that feel perfect is as much art as science, and it varies wildly from game to game.
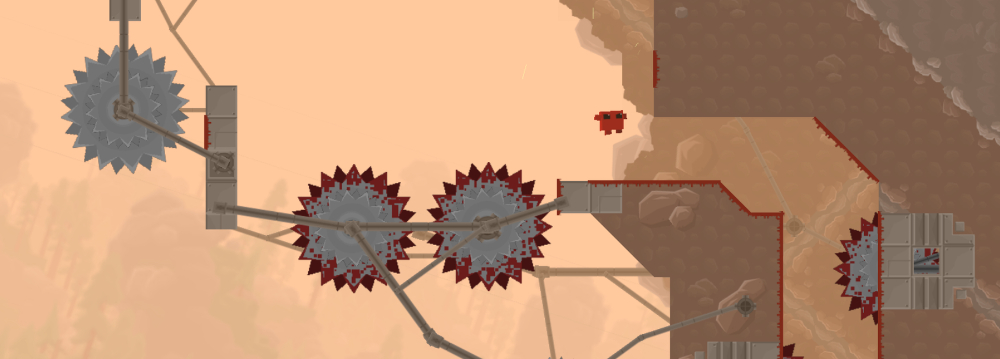
A notable example of great-feeling controls is in the indie game Super Meat Boy by Team Meat. (I recommend you go play it if you haven’t already.) Super Meat Boy is an infuriatingly difficult platform game where you die a lot. Despite the difficulty, the game is never overly frustrating, because the controls are so tight: every tiny movement of the game controller translates seamlessly to the on-screen character. When you die, you don’t feel like it was the game’s fault; you feel like it was your own personal failing, and you just have to try again.
A counter example, where extremely difficult controls make a game feel great is Getting Over It with Bennett Foddy. Here the controls do not feel good…they make you want to throw your mouse out the window! But they’re fair, so it keeps you coming back for more. The controls make the game.

Keyboard Input
Capturing raw user input is easy in HTML5, because the event-handling systems are provided by the browser. But as we covered earlier, the web is event-driven—meaning that nothing happens until the user presses something or does something. That doesn’t fit with the sequential flow processing of our core game loop: get input, move things, check collisions, draw everything. If a user presses a key during the “check collisions” phase, we can’t jump back to the “move things” phase.
Instead of responding directly to keyboard events, we update our model of the input state. Then, when the loop comes around for the next frame, we can poll the current state, and everything gets processed in order. To handle keyboard inputs, we listen to the standard keydown and keyup events, and maintain an object of which keys are currently being pressed. In our code we can ask “Is key X being pressed?” Asking (rather than being told) has the added bonus that we don’t have to deal with browsers’ key repeat events that fire if we hold a key down too long.
We’ll model our keyboard state in a class called KeyControls. It can live in a new file called KeyControls.js in our lib folder. It’s in the library folder because it will be a general keyboard handler. It won’t have logic that’s specific to one particular game, and we can reuse it for anything that needs keyboard control.
Structuring the Code, or Not?
This is the first time we’re creating a separate file for code. Although it’s in the interests of modularizing and structuring our codebase, it’s still introducing complexity that isn’t strictly necessary for our first game. We could just handle the keyboard state inline in the main.js without an external class. That becomes messy and hard to follow as the game grows, but it works. In fact, an exercise after you’ve finished this chapter is to un-make and distill our game into the simplest form possible you can. Write a small game in one file. It’ll cement your understanding and reinforce that there are many approaches to structuring a game. There’s no “one true way”.
class KeyControls {
  constructor () {
    this.keys = {};
    // Bind event handlers
    ...
  }
  // Handle key actions
  ...
}
export default KeyControls;
Creating a new KeyControls instance will allocate an object literal (keys) that’s a map from the key’s key code (effectively an ID for the key, constant for all keyboards) to a boolean value—true if the key is currently down, false if it’s not. So if the player presses the X key (which happens to be key code 88) then keys[88] will be true. We can then use this state in our games to control the characters.
// Bind event handlers
document.addEventListener("keydown", e => {
  if ([37,38,39,40].indexOf(e.which) >= 0) {
    e.preventDefault();
  }
  this.keys[e.which] = true;
}, false);

document.addEventListener("keyup", e => {
  this.keys[e.which] = false;
}, false);
The event handlers will fire for each key the player presses (keydown) or releases (keyup). The callback functions get given a keyboard event that contains a property which, the key’s key code.
That strange [37, 38, 39, 40].indexOf(e.which) check is a trick to stop the browser scrolling if the game is embedded in a web page that has scrollbars. The numbers represent the key codes of the keyboard arrow keys. The array method indexOf will return the index in the array of a match, or -1 if it’s not found. If one of the arrow keys is pressed, we call the event’s preventDefault method, preventing the browser’s default behavior from happening. The web browser’s default behavior for arrow keys is to scroll the entire current web page—making it very hard for the player to concentrate on the game!
Now we have a simple generic key press handler that we can use in our game. To figure out what a given key’s key code is, you can put a console.log(e.which) inside the keydown handler. For example, if the space bar is down (key code 32), fire! If the left arrow key is down (key code 37), move left. And so on.
if (keys.keys[32]) {
  // Space bar is being pressed!
}
However, this highlights the fact that key codes aren’t very intuitive. 32? What’s that?! When we’re writing a game, it would be nicer if we were able to use something more meaningful. To this end, we’ll add some helpful get properties inside the KeyControls so we don’t have to remember all those codes:
// Handle key actions
get action () {
  return this.keys[32];
}
The action property will tell us if the space bar is currently being pressed. Inside a game, we can now ask for its status:
if (keys.action) {
  // Jump, or shoot, or …
}
Often there should be multiple key codes mapped to the same game action. If the player wants to move left, they should be able to hit the A key (key code 65—for the ever-popular WASD arrangement) or the left arrow key (key code 37). These can be grouped together as getters as well. Rather than return boolean values, we’ll have them return some useful information about the nature of the player’s intent—namely, which direction they want to move:
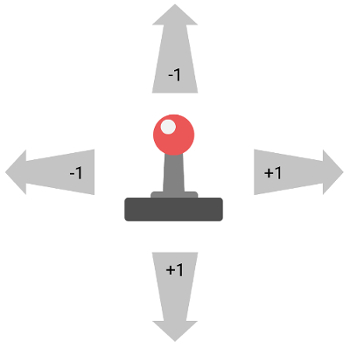
get x () {
  // left arrow or A key
  if (this.keys[37] || this.keys[65]) {
    return -1;
  }
  // right arrow or D key
  if (this.keys[39] || this.keys[68]) {
    return 1;
  }
  return 0;
}

get y () {
  // up arrow or W key
  if (this.keys[38] || this.keys[87]) {
    return -1;
  }
  // down arrow or S key
  if (this.keys[40] || this.keys[83]) {
    return 1;
  }
  return 0;
}
keys.x and keys.y are used to check when the player wants move horizontally or vertically. If the player moves left, keys.x will return -1. If the player moves right, it will return 1, otherwise it returns 0. Likewise, if the player moves up, keys.y will return -1, while down will return 1 and neither up nor down will return 0. These values can be used conveniently in calculations for the speed of a character, which we’ll do soon!
We can add as many of these helper methods as makes sense for our game, and each game will likely have different control requirements. But you can easily reuse the logic from game to game. I’ve made the decision to hardcode the WASD/arrow controls into KeyControls for a few reasons:
- They’re very applicable to many action games—and all of the games in the book will use them.
- Creating a general solution (with redefinable keys, for example) complicates the code too much at this stage.
- Making this class more general is a good challenge. Do it yourself!
Game Genre Doesn’t Really Matter
Yes, most of the games in this book will be action- or arcade-style games. Perhaps that’s not your preferred genre, but it really doesn’t matter. The ideas behind making games are all that matter. The core loops, the techniques for handling input, and rendering on screen—they’ll work for Sim games, Rouge-like text adventures, mobile zombie walking simulators … anything. Don’t get overly focused on one genre or technology when you’re starting out. There are lots of great tutorials around for all sorts of game mechanics, engines, and programming languages. Watch as many as you can, and try to steal (and apply) their good ideas for your own games!
To use the Controls object, import the file at the top of main.js (with import KeyControls from "../lib/KeyControl.js"). Then create a new instance with new KeyControls(). In this example, we’ll map the keyboard keys to a rectangle’s x and y location, and just for fun we’ll have its color be controlled by the space bar:
// Game setup code
let x = w / 2;
let y = h / 2;
let color = 0;
const controls = new KeyControls();
We have a new KeyControl instance ready to roll. Inside the main loop we can check for key presses, and draw our colorful square:
// Game logic code
x += controls.x;
y += controls.y;
if (!controls.action) {
  color += 10;
  if (color > 360) {
    color -= 360;
  }
}

// Draw the rectangle
ctx.fillStyle = `hsl(${color}, 50%, 50%)`;
ctx.fillRect(x, y, 50, 50);
We add the value of controls.x and controls.y to the square’s position every frame. Remember that the helper properties return -1, 0, or 1. If no movement keys are pressed, the values will be 0 and the rectangle will remain stationary. Otherwise, it will move in the direction that the keys are being held down—and we have some user-controlled movement! Next, we add a conditional check for the space bar. If controls.action isn’t active (the space bar is not being held down) we increment the variable color. The hue in the hsl color format ranges from 0 to 360; we wrap around if we exceed that.
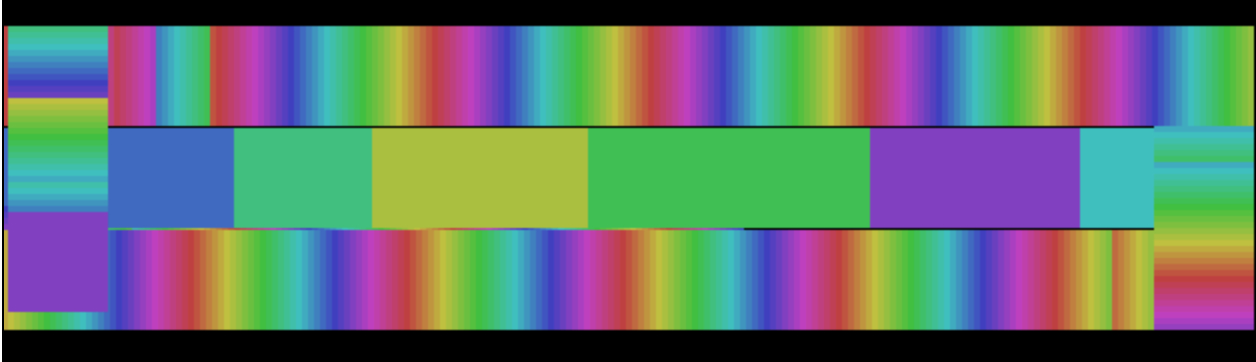
When the square is stationary it pulses with color. If you move the arrow keys it leaves a beautiful rainbow trail in its wake. Holding down the action key will stop the color cycling and allow you to paint in a solid color.
Mwahahaha! The next step towards our gamedev world domination plans is complete—actually controlling an on-screen object! Our keyboard handler is really just a map of KeyCode -> boolean that wraps keydown and keyup. The benefit of putting it in a module is we can extend it as our requirements change. For example, perhaps we also want to handle other keys without making special properties for them (like we did for action, x, and y). We’ll make and “advanced mode” for getting or setting a key’s state directly:
key(key, value) {
  if (value !== undefined) {
    this.keys[key] = value;
  }
  return this.keys[key];
}
The key function will return the state for the key code you ask for. If you wanted to know if the 1 key is down (key code 49) you can ask if (keys.key(49) { ... }. key also has some bonus functionality, in that you can set the state—which you might need to do if you want to reset a key so it doesn’t fire again until the user lifts their finger and presses it again: key.keys(32, false). Sometimes we might also want to do this for all keys that are currently being held down:
reset () {
  for (let key in this.keys) {
    this.keys[key] = false;
  }
}
This will set everything to false, so effectively no keys are being held down. The player will have to re-press a key if they want it to fire again. This ensures they don’t, say, accidentally start a new game because they hit the start button the instant the title screen appears. (We don’t have a title screen yet—but we will soon enough.)
Mouse Controls
We won’t be using the mouse in our first few games, so feel free to jump ahead to the next section. Otherwise, you’ll be happy to learn that handling the mouse is very similar to our KeyControls: wrap the DOM events and maintain the relevant state needed for our games. The particular events of interest are mousedown, mousemove, and mouseup. When the player moves their mouse over the page, we track the position. When they click or release the mouse button, we update the state. This state can be queried in the game loop in exactly the same manner as our key codes:
class MouseControls {
  constructor(container) {
    this.el = container || document.body;
    // State
    ...
    // Handlers
  }
}
export default MouseControls;
MouseControls takes a DOM element as a parameter. If one isn’t passed, it uses document.body. This means that the mouse position would be reported relative to the top left of the entire web page (not the game canvas)—so it’s better to pass a reference to the canvas element. Don’t forget to export the class out so it can be included in main.js.
// State
this.pos = { x: 0, y: 0 };
this.isDown = false;
this.pressed = false;
this.released = false;
There are a few things needed to track the state of the mouse system. The first is pos (position) for the x and y location of the mouse pointer. The others are boolean variables: isDown is true anytime the mouse held down; pressed is only true for the first frame the mouse is pressed (it’s only true once per click); and released is only true on the frame the mouse is released. pressed and released need to be calculated based on the state of isDown at the end of every game loop.
// Handlers
document.addEventListener("mousemove", this.move.bind(this), false);
document.addEventListener("mousedown", this.down.bind(this), false);
document.addEventListener("mouseup", this.up.bind(this), false);
For the mouse event handlers, the mousemove event listener will call the class’s move method. (This method is bound to the class using the bind function, so the context inside the move function will be this—the class instance. If we didn’t bind it, this would be the global window object and it would throw an error.) In turn, move calls a helper method (mousePosFromEvent) that sets the current mouse pos in relation to the game canvas:
mousePosFromEvent({ clientX, clientY }) {
  const { el, pos } = this;
  const rect = el.getBoundingClientRect();
  const xr = el.width / el.clientWidth;
  const yr = el.height / el.clientHeight;
  pos.x = (clientX - rect.left) * xr;
  pos.y = (clientY - rect.top) * yr;
}

move(e) {
  this.mousePosFromEvent(e);
}
The clientX and clientY coordinates come from the native mouse event. From these we subtract the DOM element’s position (obtained by calling getBoundingClientRect). We also have to consider any canvas stretching that might be done by CSS. By finding the ratio of the clientWidth and clientHeight to the element’s dimensions we can account for this and determine the correct current position of the mouse in the game screen.
Why are we doing this every frame?
It might seem strange to call getBoundingClientRect every frame. The reason is that the top and left properties will change when the screen is resized. An optimization would be to also handle screen resize events and update the cached coordinates then. This is left as an exercise for the reader!
Next up we have to handle the other two mouse events: mousedown and mouseup. This is where we update the state of the mouse clicks (and call mousePosFromEvent again to ensure we’re hitting the correct pixel):
down(e) {
  this.isDown = true;
  this.pressed = true;
  this.mousePosFromEvent(e);
}

up() {
  this.isDown = false;
  this.released = true;
}
When the user clicks, isDown and pressed are true. When the user releases, isDown is false and released is true. The last thing to do is to add an update method that needs to be called at the end of your game loop—to set the correct values for pressed and released, as these need to be cleared so they’re not true for multiple frames in a row:
update() {
  this.released = false;
  this.pressed = false;
}
Let’s replace the KeyControls for MouseControls in our last painting demo to get some nice mouse-control paint brushes happening. (Perhaps you could extend it to also use KeyControls for changing paint colors and brush sizes?) Don’t forget to pass the canvas into the MouseControl constructor:
const mouse = new MouseControls(canvas);
The controls can be used in a similar way to the KeyControls, with the exact position coming from the pos variable:
// Game logic code
const x = mouse.pos.x;
const y = mouse.pos.y;
if (mouse.pressed) {
  color += 10;
  if (color > 360) {
    color -= 360;
  }
}

// Draw the rectangle at `x` and `y`:
...
// Don't forget to update at the end!
mouse.update();
If you change mouse.pressed to mouse.isDown, the color cycling will happen for as long as you hold down the button, rather than just once per click. The last—and very important—thing we do is call mouse.update() at the end of the loop. Without that, pressed would not be reset to false and therefore would act exactly the same as isDown.
Both our KeyControls and MouseControls are minimal implementations, and we’ll hit their limits as we use them in real games. When this happens, we have two choices: augment the code with these requirements (so the new functionality will also be available for future games), or write completely custom controls that only work for our current project. Both approaches are valid. We’ll extend our controls handlers where it makes sense—but good game controls are so vital to the playability of a game that sometimes you just have to bite the bullet and start from scratch!
Creating Your Game Library
Hold on tight, because we’re about to change gears. We’re approaching a fork in the road, or some other driving metaphor. At this point we’ve covered 4 out of 5 of the core steps in making a game:
You might be hoping we just get straight to “respond to collisions” and call it a day, but instead it’s time to take a step back. It’s time to get serious. Hopefully you can see how games are formed using our core steps. Doing each step in order, in one page, is fine for a couple of squares, but it’ll become a giant mess for each new feature you have to jam in.
Making a giant mess is fine (I encourage you to do it!) because you’ll learn a lot before reaching the conclusion that there must be a better way. But in the interests of making bigger games faster, we’re going to start implementing one possible better way. As you progress, you’ll find yourself creating some pieces of code over and over, and in the spirit of “Don’t Repeat Yourself” it’s best to group them together into a library or toolkit.
When to Add Things to Your Library
A good rule of thumb that will keep you focused on writing games, and not needlessly wasting time bloating your game library, is to only add things the second time you need them.
The next section is going to be quite tough. We’ll cover a lot of the most important concepts in constructing a game engine. It’s a huge jump from drawing a few rectangles, but the payoff will be worth it. It’s also not essential you grasp everything all at once. As we start making games with our framework, it’ll be more obvious how the pieces fit together.
Our Game Architecture Idea
Having a library reduces code duplication, but it’s also where we can add some underlying structure and design principles. An overarching architectural idea will make it easier to decide where things live in a project, and how best to wrangle all the elements of a game. One common, high-level approach is to model all the pieces of your game as a tree.
A tree is a hierarchical structure made up of a root node which contains zero or more child nodes. The core idea behind our library will be a tree that maintains all of the elements in our game. Nodes in our system will be container elements that can hold either game elements (like players or bullets) or other containers. The game elements are leaf nodes in our tree. Similar game elements (for example, all of a player’s bullets) can be grouped into a container. This system is sometimes called a scene graph. We can easily recurse over the tree to update the game elements (“move everything a tiny bit”) or render them (“draw everything”).
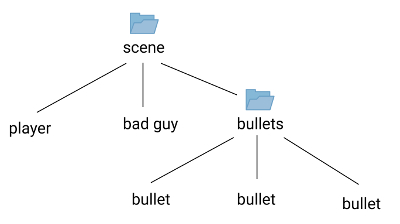
In this scene graph there’s a root-level “container” called scene that holds a few game entities: a player, a bad guy (this game only has one bad guy, apparently), and another container called bullets. Every time someone shoots, a new bullet object goes into the bullets container. Every frame cycles through each child—and updates it. Player will handle user input, bad guy might calculate some AI, the bullets container will then get a chance to update each of its children—and so on down the tree.
One Approach of Many
This approach is just one of a huge number of ways to tackle the problem of building a game framework. Your game library will work better for you if you develop it gradually (even if you start with a spaghetti code mess!), incorporating ideas and techniques that make the most sense to you. Our approach here is fairly common, but as you’ll see, it’s also fairly complex. Try your own ideas, and test other libraries and frameworks to get a feel for alternate ways of doing the same things.
Core ideas and project structure are all well and good—but the most critical aspect to any game library is the name, of course. MomPop Games needs to maintain its brand identity. So unless anyone has a better idea, our library is called Pop. That pops! Let’s rejig (and rename) our lib folder to look more like this:
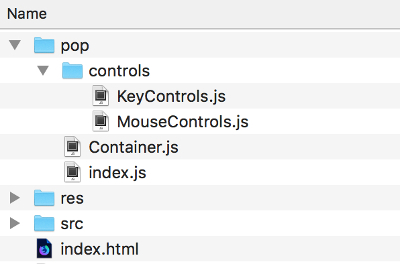
pop will hold all the source files of our game library. The index.js file will simply re-export all of the library files so everything is grouped under a single module:
import KeyControls from "./controls/KeyControls.js";
import MouseControls from "./controls/MouseControls.js";

export default {
  KeyControls,
  MouseControls
};
Then, for example, to make some keyboard controls you’d access it via pop.KeyControls. Eventually every file in our library will be exported out from here. Any new module we create needs to be added and re-exported.
With the name locked down, we’re ready to implement the guts of Pop. The primary item—the thing we’ll use most—is the Container class (pop/Container.js). You’ll see a lot of containers in the coming chapters. A Container will be a general “bag” to group related things in. It has couple of properties: a pos structure that holds its x and y screen position, and an array children that holds the child objects. These can include “things” like players, bad guys, explosions, and bullets. It can also include other containers. By nesting containers we have our game tree structure:
class Container {
  constructor() {
    this.pos = { x: 0, y: 0 };
    this.children = [];
  }

  // Container methods
  ...
}

export default Container;
Variable Names
In general, it’s considered bad form to shorten variable names. pos is just a short form of position, so it would be clearer to write it out if full. But I’m going to make a few exceptions to the rule: pos instead of position, and w and h instead of width and height. The reason is partly because they’re used so frequently that it becomes a pain to type out the full word, and partly because I’m just lazy. You can obviously name things however you like!
All items in our library must also be exported from the main Pop/index.js file to become part of Pop. Add Container to the list:
import Container from "./Container.js";
import KeyControls from "./controls/KeyControls.js";
import MouseControls from "./controls/MouseControls.js";

export default {
  Container,
  KeyControls,
  MouseControls
};
The API for our Container is pretty small: add, remove, and update. Through these we’ll manage all of the items in a game: adding and removing heroes and enemies, and updating each so they can perform their per-frame logic. The implementation of the add and remove methods simply gets game elements in and out of the children array:
// Container methods
add (child) {
  this.children.push(child);
  return child;
}

remove (child) {
  this.children = this.children.filter(c => c !== child);
  return child;
}
Calling add will push an element into the list, and calling remove will use the JavaScript array filter method to remove a matching element. It works by calling a function once for every child element. If the function evaluates to true, the element will remain in the returned list. Otherwise, it’s excluded and it will no longer be a child of the container.
Returning the Same Item
Note that add and remove return the same item we passed to it as a parameter. This might seem a bit redundant, but it allows us to use the value when applying it with functional methods such as Array’s map. For example, we might use an array to initialize a series of Spaceships. Because we return the Spaceship from add, each object becomes part of the returned set: const ships = [1, 2, 3].map(() => scene.add(new Spaceship()). We just transformed 1, 2, 3 into three spaceships!
Next we can update the children. The main loop will call update every frame. This is how stuff actually happens; this is how we “move everything a tiny bit”. Our update method traverses our tree structure, updating all of the containers, and sub-containers, and sub-sub-containers … until everything has been notified and given a chance to do its thing. We also pass along the delta time (dt) and total time (t) from our game loop so they can be accessed when doing movement calculations:
update (dt, t) {
  this.children.forEach(child => {
    if (child.update) {
      child.update(dt, t);
    }
  });
}
The key piece of code here is the call to child.update. All of the elements in our game can (optionally) have an update method. If they do, the container will call it and the element can do whatever it needs to do—such as move itself a tiny bit. Additionally, our container objects also have an update method (that one we just wrote) so elements can be either “entities” that will update themselves appropriately or another container that will have its own children. The update method will be recursively called until there’s no one left to update.
To use our structure in a game, we need to create a new instance of it. Then we can add, remove, and update game “things”:
import pop from "../pop/index.js";
const { Container } = pop;

// Game setup code
...
The first step is to always import our fancy library. By importing ../pop/index.js, all items are available via the pop accessor. We can then do new pop.Container() to make a container object. However, it’s a bit cleaner if we then extract out the pieces we want to use as standalone variables (const { Container } = pop;) so our code isn’t littered with lots of pops.
Using the container looks like this:
// Game setup code
const scene = new Container();

// Example game element to manipulate
const player = {
  update: function () {
    console.log("updated!");
  }
};

scene.add(player);
scene.update();
scene.remove(player);

console.log(scene.children); // Empty list
Container is really just a way to manage an array, but it makes our life easier in a few ways. The root container gives us a nice entry point into all of the things in our game. Containers also let us group related things so we can apply logic to only certain containers. For example, we can easily check for collisions on only specific types of objects by putting, say, all the player’s bullets in one container and all the bad guy’s in another.
Additionally, the scene graph approach is very flexible: it doesn’t dictate exactly what goes into the containers. We can treat background assets (such as scrolling background images) the same way we treat player and bullet objects.
The Renderer
The next big piece for our library is the renderer. One approach to rendering is to simply let our game objects render themselves inside their update function: as long as they somehow knew about the Canvas context, we could ask them to draw themselves every frame. They’re self-contained, and have all the information they need to just call the relevant Canvas drawing functions.
Another approach (spoiler, it’s the one we’re going to choose) is to completely separate our update phase from our rendering phase. A specialized system—called a renderer—will separately traverse the game tree and decide how to draw each object. The advantage of this approach is that all of the drawing complexity is contained in one subsystem without spilling into the game logic. The “racing squares” from earlier, for example, know they have a width and a height—but they don’t have to know what ctx.fillRect() is.
The beauty of this approach is that it’s possible to have multiple renderers that have different render targets. One renderer (our main one) knows how to draw a square using Canvas’s ctx.fillRect(). Another renderer may know how to draw it as a texture using super-fast WebGL (which we’ll cover in Chapter 9). Another might even know how to render a racing square as ASCII text in a text console! In each case, the game logic stays exactly the same.
Create another new folder inside pop called renderer. Inside this folder create CanvasRenderer.js. (Don’t forget to re-export this in Pop/index.js.) We can also now remove the static canvas tag in the index.html file of our project skeleton. Because we want the ability to have multiple types of renderers, it makes sense to create the type of element required in code rather than directly in the HTML. The index.html body should look more like this:
<div id="board"></div>
The CanvasRenderer will be responsible for rendering all the visuals for our game onto an HTML5 canvas element. But how do we define a “visual” element? The plan is to create models for each “type” of thing we want to display in our game—images, sprites (coming soon), text, and so on. These will be the leaf nodes of our game tree. Any renderer must know how to draw every leaf type to correctly render the game.
Our leaf nodes will live in the library root directory. Each leaf node will hold all the information needed for any renderer to draw them on screen. The first leaf type we’ll create is for text. A pop.Text element will be used to display text for messages, high scores, speech dialogs … whatever. Add a new file Text.js (and re-export it from Pop/index.js!):
class Text {
  constructor(text = "", style = {}) {
    this.pos = { x: 0, y: 0 };
    this.text = text;
    this.style = style;
  }
}

export default Text;
All of our types will have a position (pos) object so they can be correctly positioned on screen. The Text type also has an associated text string and some style information about how it should look. We’ll need to choose which properties we expect in the style object. For a start, we’ll support a fill property (for the color of the text), a font property (for the font information), and maybe optionally an align property for horizontally aligning the text. We can add support for more text features later if we need them.
Following Canvas's Conventions
The style properties we defined are similar—but not the same—as those supported by Canvas. fill will be the same as Canvas’s fillStyle, and align will be the same as textAlign. For the most part, it’s just convenient for us to follow Canvas’s conventions. But remember that the leaf nodes should not need to know about our rendering technology. Each should simply describe itself. It’s up to the renderers to convert that description into something it can display.
Our old approach was to directly call ctx.fillText to render text with Canvas. Moving forward, we only want to describe the text and someone else renders it. We can make a new Text object by instantiating it in the main.js file, and passing in a message string with some style information:
import pop from "../pop/index.js";
const { Container, Text } = pop;

const scene = new Container();
const message = new Text("The Renderer!", {
  font: "40pt monospace",
  fill: "blue",
  align: "center"
});
message.pos.x = w / 2;
message.pos.y = h / 2;

scene.add(message);
We’ve added something in our scene container—a Text object with some styled text and a position. At this stage, all we have is a model of a text message. Nothing is on screen. It’s just an object inside the container’s children array.
Now we can get down to the serious business of actually rendering our root container. The end goal of the renderer is to recursively traverse our tree and render any leaf nodes (currently just a Text message). To begin with, we have to create the canvas element and set up our environment in CanvasRenderer.js:
class CanvasRenderer {
  constructor (w, h) {
    const canvas = document.createElement("canvas");
    this.w = canvas.width = w;
    this.h = canvas.height = h;
    this.view = canvas;
    this.ctx = canvas.getContext("2d");
  }
}
export default CanvasRenderer;
Here’s the start of our CanvasRenderer. The logic should look familiar from Chapter 2, but instead of finding an existing canvas element in the web page, we create it with document.createElement. The renderer itself is now responsible for setting up everything it needs to render. We keep a reference to the canvas element (as this.view) as well as the context (this.ctx).
Thinking Beyond Canvas
Why assign the canvas element to this.view and not this.canvas? When we make another renderer that doesn’t use HTML5 canvas, it would be nice to keep our external API consistent (“view” sounds a bit more general than “canvas”). It doesn’t matter if we’re using Canvas or plain ASCII: we’d still get the main rendering element via renderer.view.
The width and height are set on the canvas element itself and (at the same time) on the object’s this.w and this.h properties. This concludes the setup: we have a canvas context that we can use to draw some Text (or any other leaf node). To start this process, we call the renderer’s render method, passing in our game tree container:
render(container) {
  const { ctx } = this;
  function renderRec (container) {
    // Render the container children
    ...
  }
  ctx.clearRect(0, 0, this.w, this.h);
  renderRec(container);
}
When render is called, we set up an alias to the renderer’s context (because we access this a lot), then clear the screen with ctx.clearRect. clearRect is a Canvas action that works in a similar way to fillRect, but instead of using a fill color, it makes the area transparent. It clears the screen. And finally we start the ball rolling by calling the internal renderRec (“render recursive”) function.
Why is there an internal function? Because our main data structure is a tree, and a very elegant way to traverse a tree (to render all the leaf nodes) is recursively. We pass the container to the internal renderRec, and somewhere inside that function, it will call renderRec with any child containers, and so on, until we only have leaf nodes.
// Render the container children
container.children.forEach(child => {
  ctx.save();
  // Draw the leaf node
  ...

  // Handle the child types
  if (child.children) {
    renderRec(child);
  }
  ctx.restore();
});
Inside the recursive function, we loop over and process each child item. The canvas context is saved and restored so any modifications to the state will not affect subsequent children. If the child of a container happens to have a children property, it’s also a container—so we re-call renderRec to draw all of its children too. Until our tree is fully rendered.
Before we draw the contents of the leaf node, we’ll translate the canvas to the correct position:
// Draw the leaf node
if (child.pos) {
  ctx.translate(Math.round(child.pos.x), Math.round(child.pos.y));
}
...
If the child element has a pos variable, we move the canvas’s drawing location to the correct x and y position. The positions are rounded with Math.round so we don’t draw things on “half pixels”. We’ll talk more about how translating works in the next chapter.
if (child.text) {
  const { font, fill, align } = child.style;
  if (font) ctx.font = font;
  if (fill) ctx.fillStyle = fill;
  if (align) ctx.textAlign = align;
  ctx.fillText(child.text, 0, 0);
}
Finally, some actual drawing! We’ll end up with a bunch of checks here to determine what we need to render. Our first (and currently only) case is to look for the child.text property. If a child element has this property, it means it’s a Text leaf node.
At this point, we have access to the renderer’s canvas context (ctx), a screen position to draw (it’s 0, 0, because we’ve already translated the canvas to the correct position offset), and the font style information (child.style—containing, optionally, font, fill, and align properties). That’s everything we need to draw some text in Canvas.
Font Baseline
After testing this out, I made an executive decision to add the line this.ctx.textBaseline = "top"; to the constructor of CanvasRenderer. This modifies the vertical baseline when calling fillText. By default, it’s set to bottom, which renders from the bottom-left corner. In this case, setting a Text entity’s position to message.pos.y = 0 aligns the bottom of the text to y position 0 (so you don’t see the message). By changing the baseline to top, it draws from the top-left corner—which is consistent with how other entities in our engine will be rendered.
We can put our CanvasRenderer to work in the main game file with our game scene.
import pop from "../pop/index.js";
const { Container, CanvasRenderer, Text } = pop;
As always, we extract the components we need from our library. For now, I’m being explicit about importing files and destructuring the library components: but it gets repetitive and takes up a lot of space in the book. Shortly I’ll start omitting these, but they’ll be in the supporting code examples if you can’t figure out where something is coming from.
// Game setup code
const w = 640;
const h = 480;
const renderer = new CanvasRenderer(w, h);
document.querySelector("#board").appendChild(renderer.view);
We decide on a width and height for our game screen, and pass them as parameters for creating our very first CanvasRenderer. As we know, this in turn creates a new HTML canvas element referenced by renderer.view. We inject that into our HTML page using the DOM method appendChild. Our canvas view is back!
Take a deep breath, because here comes our scene graph. We create our root scene container and add one child leaf node—a Text message—with its pos position set to the center of the screen:
// Game objects
const scene = new Container();
const message = new Text("The Renderer!", {
  font: "40pt sans-serif",
  fill: "DarkRed",
  align: "center"
});
message.pos.x = w / 2;
message.pos.y = h / 2;
scene.add(message);
Reread the above code carefully and make sure you follow everything that’s happening; it’s using all the most important parts of our game engine. The scene graph’s root node is the Container called scene. Next is a leaf node, message—a Text entity, with its pos position set to the center of the screen. The call scene.add(message) adds the leaf node to the container’s children.
// Render the main container
renderer.render(scene);
Aaaand finally we can call renderer.render(scene), which renders all the entire scene graph (just a single Text object so far) to the canvas context.

Phew. If you’ve made it to this point, then I have some good news: everything is easier from here on. It might seem like a ridiculous amount work to get something to appear on the screen (especially seeing as we were already doing a bunch of more interesting stuff last chapter!). But it’s important to grasp the importance of what we’ve built here. We’ve abstracted our game model and our rendering phase so they’re completely decoupled. Additionally, we have a base architecture that we can build upon—something that gives us structure and lets us more easily decide where pieces of our game code should go.
Bonus Renderer Features
Our renderer is going to grow and evolve as we create new entity types and encounter new requirements. We don’t want to complicate the renderer unnecessarily at this stage, but there’s a couple of features that I know will come in handy as we progress.
The first is a boolean flag called visible that can be applied to indicate the entity should not be rendered. By setting message.visible = false you hide the text. This could be used to hide the Game Over text until you died, or perhaps you miss the <blink>Blink Tag</blink> from HTML and could periodically toggle the message on or off.
container.children.forEach(child => {
  if (child.visible == false) {
    return;
  }
  ctx.save();
  ...
});
If a child entity is marked as not-visible, we don’t need to process it at all. We don’t even need to save/restore the canvas, and we can simply move on to the next child. This also means that, if the child is a Container, the container won’t be processed; all of its child elements will also be hidden as well.
The other feature we’ll add (which is mostly for debugging and experimenting) is to make the ctx.clearRect call optional. clearRect clears the canvas so you have a blank slate at the start of each frame. Usually this is exactly what you want, but occasionally (as in our fading raindrops example) it’s desirable to overwrite the current canvas. We’ll pass a flag in that can be set to false if you ever want to accumulate rendering across frames:
render(container, clear = true) {
  ...

  if (clear) {
    ctx.clearRect(0, 0, this.w, this.h);
  }
}
Adding the Loop
We’re not quite done yet. At the moment, we’re only rendering a static scene for a single frame. Where’s our infinite loop? To integrate that, we have to wrap the last line (renderer.render(scene)) in our requestAnimationFrame game loop from earlier. The game loop no longer contains any game processing or drawing of its own. It delegates those tasks to our new scene graph system. The game loop only executes scene.update(dt, t) to move everything a tiny bit, and then renderer.render(scene) to draw everything:
let dt = 0;
let last = 0;

function loopy (ms) {
  requestAnimationFrame(loopy);

  const t = ms / 1000;
  dt = t - last;
  last = t;

  scene.update(dt, t);
  renderer.render(scene);

}
requestAnimationFrame(loopy);
The text is now rendered 60 times per second. It’s hard to tell, because our Text leaf node doesn’t have an update method. It’s not being “moved a tiny bit”, it just sits there being boring. To make it more alive, you have to add an update function to the message element:
message.update = function (dt) {
  this.pos.x -= 100 * dt;
  if (this.pos.x < -420) {
    this.pos.x = w;
  }
};
scene.add(message);
The update Method
If any game object has an update method it will be called in by its parent container. How it gets an update method is up to you. Above we added it directly to the instance, but you can also create an object with a prototype (or use a custom class) that has an update method and it will call that. That’s what we’ll mostly be doing as we move forward.
The scrolling text message proves our engine is up and running! It works because our leaf node now has an update function that’s executed when its parent container (scene) loops through all its children. We use the delta time (dt) to move the message at 100 pixels per second, then wrap around once the text goes off screen (the amount 420 was determined by scientific trial and error).
Game Entities
The guts of our game library are in place, and the hard work is done. Now we can begin to build on it with more fun, game-related stuff. It’s time to implement the concept of a game entity. An entity is a thing in a game (we’ve been calling them “things” or “objects” or “items”, but that doesn’t sound game-designer-y enough). Players, bullets, bad guys, bonus pickups, weapons, glittery particles, rain drops, magic potions … a game entity is something that has a position and some dimensions. It doesn’t have to have a visual element, though. For example, a “trigger” entity is invisible, but performs some action when a player touches it.
A game entity that does have a visual element is called a sprite. The image associated with a sprite is commonly called a texture. We want to use lots of sprites in our games. Sprites are the bread and butter of nearly all 2D games, so let’s model these game entities and add them to our library as Texture.js and Sprite.js respectively:
class Texture {
  constructor (url) {
    this.img = new Image();
    this.img.src = url;
  }
}

export default Texture;
Sprite is also quite simple, and accepts a Texture as an input rather than a URL:
class Sprite {
  constructor (texture) {
    this.texture = texture;
    this.pos = { x: 0, y: 0 };
  }
}

export default Sprite;
Just like our Text model, we’re creating simple interfaces here—a representation of elements in our game. If we wanted to write a WebGL renderer, we’d still keep on using our Sprite and Texture objects in our game. They’d just be handled differently by each renderer.
The Texture is modeled as a simple DOM image. (You can just call it Image if you like. The term “texture” is a bit more generic, and is used often in other contexts like WebGL.) The texture accepts a URL path to the resource to load. For the following examples, we’ll draw a spaceship (called spaceship.png) and place it in the /res/Images/ folder.
Textures are useful on their own to display static images in our game, but we’ll also use one in our Sprite object. A Sprite is an image with a bunch of game-specific properties. At the moment, the properties consist only of a screen position, but we’ll be adding more functionality soon. It’s required that you pass a texture object to the sprite when you create it:
// Game objects
const scene = new Container();
const texture = new Texture("res/Images/spaceship.png");
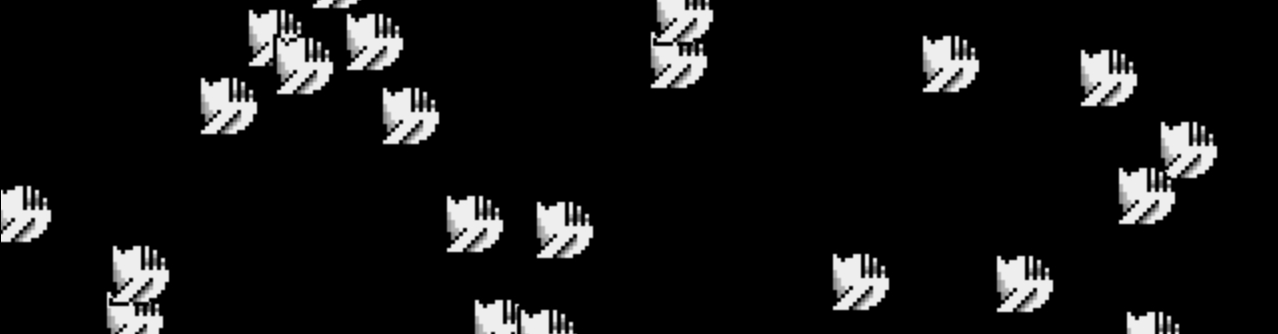
for (let i = 0; i < 50; i++) {
const ship = new Sprite(texture);
ship.pos.x = Math.random() * w;
ship.pos.y = Math.random() * h;
scene.add(ship);
}
This is gamedev: why have only one when you can have 50? The more the merrier! The fifty Sprite objects all using the same Texture entity. The texture needs be drawn on screen in the correct position. But this is just our model. The renderer doesn’t yet know how to draw a texture (it only knows how to draw text). To remedy this, inside the renderer’s recRender function we need to handle this new case:
// Handle the child types
if (child.text) {
  ...
}
else if (child.texture) {
  ctx.drawImage(child.texture.img, x, y);
}
Any new leaf node we create for our library must be added here if we want it to be displayed. When an entity passes through the renderer, and it has a texture property (as all our sprites will), it will be drawn as the image inside the Texture model—at the correct x and y position—using Canvas’s drawImage method.
Adding Some Action
The base sprite object currently doesn’t have any logic associated with it; it doesn’t have an update method. We already saw this when we added the update function to our Text object to create a scrolling message. Adding an update method is how our update system communicates with the entities:
const speed = Math.random() * 150 + 50;
const ship = new Sprite(texture);
...
ship.update = function (dt) {
  this.pos.x += speed * dt;
  if (this.pos.x > w) {
    this.pos.x = -32;
  }
};
The ships are assigned a random speed. The speed is a random number between 50 (the static component) and 200 (the random component between 0 and 150 plus the static component) pixels per second. Thanks to the update function, the ships fly to the right. When they exit the screen (pos.x > w) they wrap back around to the left.
To wrap around fully, they need a value that’s 0 minus the width of the ship itself (32 pixels). If we just set pos.x to 0, the ship would suddenly appear in full, rather than scroll in from stage left. As a test, see if you can make them fly to the left and wrap back around to the right. How about up and down?
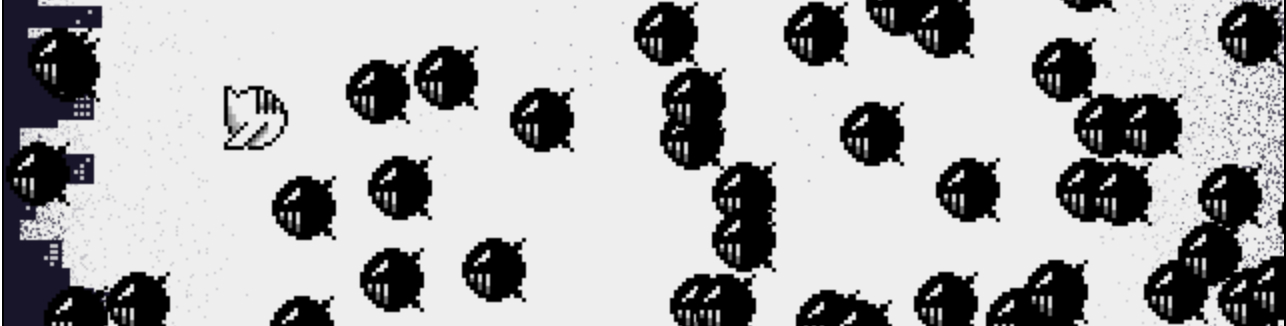
A Space Shoot-’em-up
Suddenly, a loud knock startles you as you’re tinkering. Uh oh, Guy Shifty’s at the door. “Hooooow’s it going, my main indie gamedev?” he laughs, making air quotes. You’re not sure which part of the sentence he was air quoting. Maybe all of it. “So, just a heads-up: the comp is starting in …” he looks at his watch, “oh, 30 minutes ago. There’s an hour and half left. The theme is ‘Space’ or, um, maybe ‘Shoot-’em-up’ … I forget now. Anyway, good luck!” And he’s gone.
A space-themed shoot-’em-up. The perfect vehicle to test-drive our shiny new library. The requirements for our simple shooter are fairly minimal:
- A controllable player.
- Bullets. A lot.
- Baddies. A lot. All scrolling towards the player.
- A way to vary the pace of the waves of bad guys.
- Collisions between baddies and bullets.
- If a bad guy gets past the player, game over.
Our game will be a side-scroller (waves of bad guys start off screen, then relentlessly steamroll toward the player until the player can’t keep them from getting past) shoot-’em-up (lots of bullets.) Our game will scroll right to left, but you could just as easy to scroll in any direction.
We can easily handle most of the items on the list already: only number five—“Collisions between baddies and bullets”—and number four— “A way to vary the pace of the waves of bad guys”—are new. We only have an hour and a half left in the game jam, so no time to dawdle.
Setting Up the Game
Our project skeleton should be looking fairly familiar now. (So this is the last time we’ll show the standard import statements at the top of the example. If you see references to Pop objects, you’ll have to remember to import them!) We set up the environment, create a main root scene container and then loop. To create a cool “narrow attack corridor of space”, this game will be only 300 pixels high.
import pop from "../pop/index.js";
const { CanvasRenderer, Container } = pop;

// Game setup code
const w = 640;
const h = 300;
const renderer = new CanvasRenderer(w, h);
document.querySelector("#board").appendChild(renderer.view);

// Game objects
const scene = new Container();
We also have the standard game loop that updates and renders our scene graph. We can copy-paste the entire game loop from the “Adding the Loop” section above. Hmmm, we’ve used that game loop twice now. And we know it’s boilerplate code that we’ll need for nearly every prototype we make. That’s a good candidate for integration into our library … buuut, we’re in the middle of an extremely time-sensitive challenge. Let’s type it out this one last time and refactor it next chapter, once we’ve won our $1.
A Controllable Player
First on our list of to-dos is “A controllable player”. That’s no problem: it’s just a Sprite entity (which needs a Texture to display) whose position is controlled by KeyControls. We’ll start by loading in some textures that we’ll need in the game:
// Load game textures
const textures = {
  background: new Texture("res/Images/bg.png"),
  spaceship: new Texture("res/Images/spaceship.png")
};
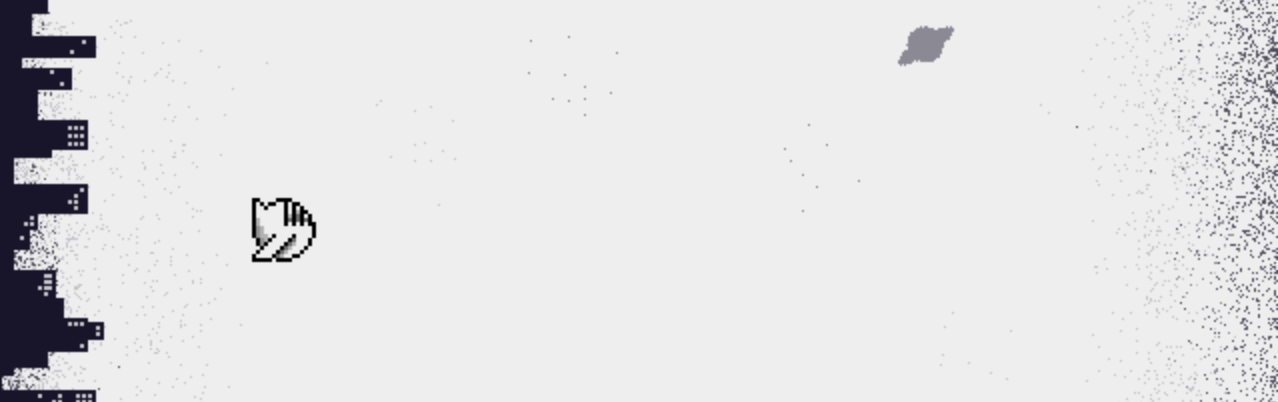
We’ve seen the spaceship before, but the background is new. It’s a static image that’s the same size as our game screen. It sets the scene and tells the story: we’re the last bastion of hope for a city facing imminent destruction from marauding kamikaze aliens from outer space. Good enough.
The textures are grouped together in a simple map called, unsurprisingly, textures. When we need them in our game we can refer to them with textures.spaceship. Later, we’ll see how we can be a bit more organized in loading assets, but this works for now.
const controls = new KeyControls();

// Make a spaceship
const ship = new Sprite(textures.spaceship);
ship.pos.x = 120;
ship.pos.y = h / 2 - 16;
ship.update = function (dt, t) {
  // Update the player position
  ...
};

// Add everything to the scene container
scene.add(new Sprite(textures.background));
scene.add(ship);
We create the player’s spaceship at 120 pixels from the left and half-way up the screen (height divided by 2, minus half the ship’s own height) and add both the spaceship and the background image to the scene. (If you forget to add an entity to the scene graph, it won’t be processed or displayed!)
The background image, textures.background, is going to be stationary. We don’t need to keep a reference to it. (That’s why we create the sprite directly in the call to scene.add.) By default, the Sprite’s position will be 0, 0—the top-left corner of the screen, which is the correct place to draw a background.
As we did earlier, to apply the keyboard movements to the player we modify its x and y positions inside the update function:
// Update the player position
const { pos } = this;
pos.x += controls.x * dt * 200;
pos.y += controls.y * dt * 200;

if (pos.x < 0) pos.x = 0;
if (pos.x > w) pos.x = w;
if (pos.y < 0) pos.y = 0;
if (pos.y > h) pos.y = h;
There’s a few interesting things happening here. The goal is to end up with new pos values where the renderer will draw the player’s texture. Way back at the start of the chapter we moved a colorful square around with the keyboard—and we’re doing the same here. The pos.x value is updated depending on the direction of the left (-1) or right (+1) keys held down (controls.x), then multiplied by the delta time and the player’s speed—200 pixels per second.
Moving Things
Changing the pos values is the only way we can move things around the screen. As we proceed, we’ll make bullets and baddies that will be controlled in a similar way (though they’ll be controlled by numbers, not by KeyControls).
We then perform a series of checks to clamp the player’s position inside the screen. If they try to move to a negative x position, for example, the position is snapped back to 0. They can’t escape through the left side of the screen. The same is done for the other edges.
A Player That Shoots
We have “a controllable player”, so on to the next item on our list—bullets. Bullets tend to be popular in shoot-’em-ups! Adding bullets is the same as adding the player, except that we’ll have lots of them. It makes sense to group them together in a new container.
// Load game textures
const textures = {
  ...
  bullet: new Texture("res/Images/bullet.png")
};

// Bullets
const bullets = new Container();

// Add everything to the scene container
scene.add(bullets);
Bullets (and bad guys) need to be controlled separately. And there needs to be a whole bunch of them. To facilitate this, we’ll have a factory function that’s responsible for pumping out bullet sprites, and adding their movement abilities (by way of an update function).
Playing Fast and Loose, for Now
It’s kind of cheeky to do it this way: we’re creating a new update function for every entity. The function could be named and reused, or it could be part of the object’s prototype, or … whatever you want! We’re playing fast and loose for this game jam, but we’ll fix it next chapter when we start modularizing things in separate code files.
function fireBullet(x, y) {
  const bullet = new Sprite(textures.bullet);
  bullet.pos.x = x;
  bullet.pos.y = y;
  bullet.update = function(dt) {
    this.pos.x += 400 * dt;
  };
  bullets.add(bullet);
}
To create a bullet, call fireBullet, passing the x and y coordinates of the bullet’s origin. The update function will “move the bullet a tiny bit” in the same way as the player moves, only the speed is hardcoded to 400 pixels per second. The pos.y value isn’t changed, so the bullet travels perfectly horizontal. The fireBullet factory function also adds the bullet into the bullets container for us. Thanks fireBullet.
When the player is holding down the action button (space bar) it will fire a bullet from the ship’s position. But … before doing this, we have to consider the fire rate. Holding down the space bar would generate one bullet every frame it’s being held down. 60 bullets per second. That’s too many for this particular game. Keeping track of the time of the last shot will allow us to regulate when the next shot can occur.
// Game state variables
let lastShot = 0;
Inside the main game loop we check if the player wants to fire a bullet or not (if control.action is true). Additionally, we make sure there’s been at least 150 milliseconds (0.15 seconds) since the last time they fired. (Feel free to experiment with other firing times!) Then we update lastShot and fire a bullet:
// Game logic code
if (controls.action && t - lastShot > 0.15) {
  lastShot = t;
  fireBullet(ship.pos.x + 24, ship.pos.y + 10);
}
This kind of timer—where we have a variable to track the last time an event happened—will show up often in your game dev travels. The initial position of the bullet is slightly in front of the player: 24 pixels to the right, 10 pixels from the top of the texture.

Removing “Dead” Entities
The gift of shooting is bestowed on the player. It looks great (and it’s pretty exciting that we can shoot), but there’s a hidden issue. If you hold down the fire button for long enough, your browser will eventually start to slow down and the game will become jittery … and probably crash. The bullets are never being destroyed. We end up with thousands and thousands of bullets all drifting off into the infinity of space (and wasting a lot CPU time being updated and rendered for nothing!)
// Destroy bullets when they go out of the screen
bullets.children = bullets.children.filter(bullet => {
  return bullet.pos.x < w + 20;
});
Our first attempt at a solution (shown above) is to filter the bullets out of the children array as they pass out of the screen (when their x position is greater than the screen width). Now you can shoot an infinite number of bullets and never slow down the browser.
Optimization
Deciding when to optimize things is a black art. We can sink an exorbitant amount of time into eking out small performance gains. In general, it’s best not to worry too much about optimization until you have a performance issue. You won’t be able to ignore performance considerations forever, but you can ignore them at least until we cover them in Chapter 9!
Removing “dead” entities is something common to every game. Instead of handling it manually, we can offload the responsibility to our library. We’ll make it that declaring an entity “dead” (i.e. bullet.dead = true) will remove the entity after it’s finished updating. This will be done as part of our core Container update logic. Instead of straight looping over the children, we filter them once as part of the regular update. Any children that set their dead property to true will be filtered out of the scene graph:
update (dt, t) {
  this.children = this.children.filter(child => {
    if (child.update) {
      child.update(dt, t, this);
    }
    return child.dead ? false : true;
  });
}
The dead property is nice, because we often deal with groups of entities by looping over them. Any time we encounter an entity we can mark it as dead and know that it’ll be removed from the children array at the end of processing:
// while looping over each bullet …
if (bullet.pos.x >= w + 20) {
  bullet.dead = true;
}
The Bad Guys Strike Back
Having tackled bullets, adding waves of scrolling kamikaze aliens shouldn’t be too tough. (But wait! Take a moment to think about how you’d do it.) I say the logic is identical to the bullet: we add a new container, create a factory function to generate bad guys, and attach the correct movement pattern (move toward the player rather than away from them):
// Bad guys
const baddies = new Container();
function spawnBaddie(x, y, speed) {
  const baddie = new Sprite(textures.baddie);
  baddie.pos.x = x;
  baddie.pos.y = y;
  baddie.update = function(dt) {
    this.pos.x += speed * dt;
  };
  baddies.add(baddie);
}

// Add everything to the scene container
scene.add(baddies);
The only difference is that a baddie’s speed is not hardcoded, but passed in at creation time. That way, our bad guys move at different velocities, providing some variation for the player.
To control the pacing and excitement in the game, we’ll schedule the bad guys with some spawner logic. It’s similar to how we regulated the player’s firing rate—but the rate will vary over time. This has the effect of creating peaks and troughs, and waves of spawned enemies.
// Game state variables
let lastSpawn = 0;
let spawnSpeed = 1.0;
We use these inside the game logic in the main loop. The magic numbers are adjusted each time an enemy is spawned. The time between each spawn becomes less and less and the aliens appear more frequently—giving the player a lot of targets to try to hit:
// Spawn bad guys
if (t - lastSpawn > spawnSpeed) {
  lastSpawn = t;
  const speed = -50 - (Math.random() * Math.random() * 100);
  const position = Math.random() * (h - 24);
  spawnBaddie(w, position, speed);

  // Accelerating for the next spawn
  spawnSpeed = spawnSpeed < 0.05 ? 0.6 : spawnSpeed * 0.97 + 0.001;
}
When enough time has elapsed, a new bad guy is spawned just off the right side of the screen. Its vertical position is picked at random. So is its speed, to a degree. The bad guy’s speed is negative (so it moves from right to left) and is modified by a random number to vary the intensity of the attack waves.
A Neat Randomization Trick
Math.random() * Math.random() is a very neat trick. Math.random() returns a number between 0 and 1; multiplying two together creates a distribution that favors lower numbers. The result is more bad guys moving slowly, with the odd baddie moving superfast.
Every time a bad guy is spawned, the spawnSpeed is adjusted—reducing by a factor of 0.97—until it hits 0.05 seconds (very frequent spawning), then resets to 0.6 seconds (slowish spawning) to give the player a breather. This satisfies our “a way to vary the pace of the waves of bad guys” game requirement.
Collisions—at Last!
It’s looking fantastic … but there’s a big problem. We’re nearly out of time for the game jam, but there are no collisions (and no scores). There’s no point to it! It looks like a game, but it’s not a game yet.
// Add the score game object
const score = new Text("score:", {
  font: "20px sans-serif",
  fill: "#8B8994",
  align: "center"
});
score.pos.x = w / 2;
score.pos.y = h - 30;
scene.add(score);

// Game state variables
let scoreAmount = 0;
let gameOver = false;
Tracking score is important. How else will a player know they’re awesome? A Text component is positioned in the center of the screen, just above the bottom. That was easy.
What about collisions? Well, that’s tougher. It’s a complex subject that we’ll delve into in Chapter 5, but that’s not an answer that Guy Shifty is going accept. The dying minutes of a game jam is the perfect time to break out something quick and dirty: Pythagoras’s theorem!
If we treat the positions of two sprites as points that define a line in space, the length of the line (the distance between the sprites) can be calculated by treating the line as a hypotenuse formed by making a right-angled triangle with the points:
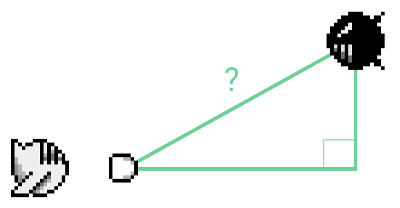
For every bullet and for every baddie, we find the hypotenuse formed between them: if the length of the hypotenuse is small, the two entities are very close—so the baddie is dead! To integrate this into our main loop, we’ll augment the code that checks if the bullets have gone off screen. Then nest a loop that goes over every baddie and check each bullet against each baddie. If they’re too close (or the bullet goes off screen), they’ll be marked as dead and be out of the game.
// Check for collisions, or out of screen
baddies.children.forEach(baddie => {
  bullets.children.forEach(bullet => {
    ...
    if (/* check for collision */) {
      // A hit!
      baddie.dead = true;
      bullet.dead = true;
    }
  });
});
By nesting the loops, we can check the full list of baddies and bullets, and apply Pythagoras’s theorem to their positions. If there’s a hit, the player gets a reward in the form of points. To make it more fun, the amount of points will depend on how long they’ve survived (by using t). Early kills are not as valuable as later ones!
// Check distance between baddie and bullet
const dx = baddie.pos.x + 16 - (bullet.pos.x + 8);
const dy = baddie.pos.y + 16 - (bullet.pos.y + 8);
if (Math.sqrt(dx * dx + dy * dy) < 24) {
  // A hit!
  bullet.dead = true;
  baddie.dead = true;
  scoreAmount += Math.floor(t);
}
To calculate the length of the sides of our right triangle, you subtract the x and y points of the entities (to get dx and dy). We take the center of each entity and then see if they overlap. (A baddie is about 32 pixels wide—which we’ll treat as a diameter—so 16 is the center. A bullet is smaller—about 16 pixels wide, so 8 is the center.) If the hypotenuse (calculated by taking the square root of the sum of the sides) is less than the two radiuses combined (16 + 8), then they overlap, and there’s a collision!
Imperfect Collisions
It’s not a perfect collision. Our sprites happen to be circular-ish. (That’s not a coincidence; I made them circular-ish on purpose!) So this radius check is pretty good. We’ll go much further into other collision detection techniques in Chapter 5.
Oh my, we have a game! Shooting baddies forever is fun, but will quickly get boring if there’s no grander purpose. The goal of our shoot-’em-up is to accumulate points and prevent bad guys from reaching our city. When the city is breached, the player is dead and is shown a good ol’ “Game Over” message.
function doGameOver() {
  const gameOverMessage = new Text("Game Over", {
    font: "30pt sans-serif",
    fill: "#8B8994",
    align: "center"
  });
  gameOverMessage.pos.x = w / 2;
  gameOverMessage.pos.y = 120;

  scene.add(gameOverMessage);
  scene.remove(ship);
  gameOver = true;
}
We create a doGameOver function which will be triggered if any of the baddies make it to the left side of the screen where our city folk reside. The perfect place to examine the bad guy’s progress is after the bullet-collision check (outside the inner loop.) If they’re the first one to make it to the city, the game over code function will be run. In either case, we also set dead to true, as they don’t need to be rendered on screen anymore.
// Check if out of screen
if (baddie.pos.x < -32) {
  if (!gameOver) {
    doGameOver();
  }
  baddie.dead = true;
}
There’s one slight issue remaining. The player can still spawn new bullets after they’re dead! To fix this, check the gameOver flag before shooting:
if (!gameOver && controls.action && t - lastShot > 0.15) {
  ...
}
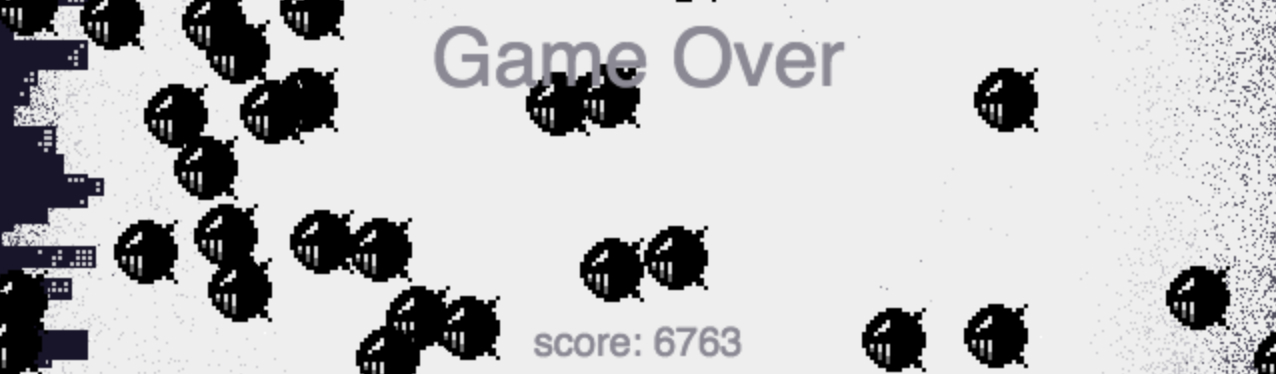
Not bad! Well, there’s no way to restart without refreshing the browser, so let’s now have a look at adding this new feature …
Game Over
“Sorry, time’s up!” beams Guy Shifty. “Did you get anything working? One of our guys managed to get a cube on the screen, but they assure me they’ve got the base for a solid AAA game engine there … Hey, what’s that?” He sits downs and plays through a few rounds of your game. His beaming smile reduces to a grimace. “Yeah, that’s pretty good,” he grumbles. He reluctantly takes out his wallet and gives you the dollar, and sulks out of the room.
Congratulations! You managed to build the base for a powerful game library, become a professional game developer, and ruin Guy’s weekend. Not bad for one day’s work.
This chapter has really covered a lot of ground, and some of the concepts are tricky. Take some time to experiment with the library. See if you can think of how to implement these ideas in other ways. See if you can add a feature to the game (play around with the spawn rates, the direction things move, adding a “pickup” item). See if you can create a game from scratch, with totally new graphics. Try to remember our core checklist and create something only using Canvas without any library.
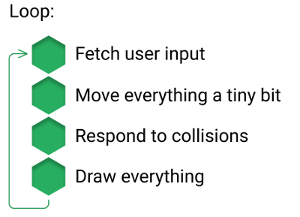
We’ve still got a lot of things to add and a lot of things to learn, but if you understand the concepts covered so far, everything from here on is child’s play.