:Level 5: Collision Detection & AI
After a marathon work week, you pat yourself on the back and pack up your stuff, ready to enjoy the lazy weekend ahead. As you get up to leave, you’re startled to discover Guy Shifty perched like the Cheshire Cat on the edge of your desk.
“Hey hey! Where are you off to? It’s the Lucky Dare Game Jam Competition this weekend. Don’t tell me you’re not doing it? You of all people need to build out your portfolio. Besides, this is the most fun game jam of the season. All my employees love doing it every year—which is why I made it mandatory.”
He might not be selling it well, but game jams definitely are good fun. Building small but complete games in a limited time forces you into the habit of getting games finished—the most elusive gamedev skill of all.
“48 hours to make a game,” Guy continues. “Voting just finished a few moments ago. The chosen theme is ‘Scared to Death’. You should really get cracking if you want to make something decent.”
There will be other weekends to relax, I suppose. Let’s do it!
Game Jams
If you’re hankering to go in a real game jam, there are plenty around! My favorites are the absolutely huge Ludum Dare competition (with a 48-hour time limit), and Js13kGames: an annual JavaScript-focused challenge where your entire game must fit in a 13Kb zip file! It’s run by Andrzej Mazur who also puts out the excellent Gamedev.js Weekly newsletter.
We still have couple of problems to tackle if we want more interesting games. Firstly, we need to expand our rudimentary collision detection methods to work with non-circular entities. That includes being able to collide with walls and other solid objects in our fancy new tile maps. And secondly, the baddies in our games thus far have been … uninspiring. They’re no match for us. They just float around, oblivious to the fact we’re even trying to shoot them. (Hmm, are we the bad guys?!) Anyway, this chapter addresses the two largest chunks missing from our game development repertoire: collision detection and AI.
Colliding with Things
It’s possible to make games that don’t require collision detection: puzzle games, card games, old-school text-adventure games … But come on, colliding with things (and avoiding colliding with things) is really fun! Yet it turns out that writing good collision detection code is actually quite difficult. After “control feel” and graphics, collision detection is one of the most oft-critiqued aspects of an action game. Players will be very unhappy if they feel they were unfairly killed (or unfairly denied a kill) because of a poor collision detection algorithm.
Paradoxically, you don’t want your collision detection code to be too good, either.
An enemy bullet overlapping the hero by just a single pixel should be enough to make them explode. But you may consider conveniently ignoring “close shaves” against the player, in order to improve the user’s overall experience. Players will blame you if they’re unfairly killed, but they’ll attribute near misses to their skillful mastery of the game.
This doesn’t just apply to bullet hit areas. For example, in a platform game you might want to make the player’s ground-collision area a bit wider than the graphic that represents it: when the player goes for a huge running jump, there will secretly be a few extra pixels on the edge of the platform. They’ll launch into a spectacularly satisfying leap, rather than plunging to their death.
Of course, this a balancing act. If you go overboard, the player knows you’re holding their hand. If you do it subtly—and these scary moments fall in favor of the player—they’ll feel awesome and want to keep playing and improving.
Bounding-box Collisions
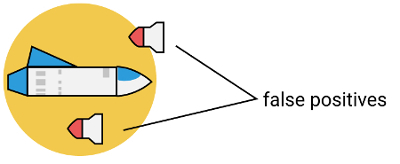
We’ve sort of cheated with collisions so far. To avoid introducing a lot of new code, we’ve stuck to the a basic circle collision algorithm. We covered this in Chapter 3, and then added it to our library as math.distance. It works well (it’s mathematically perfect, actually) for detecting collisions between two circles. But it turns out that circles are not the go-to shape for 2D game development. Rectangles are. And the most common collision algorithm used in 2D games is called the axis-aligned bounding box (AABB).
Axis-aligned means that it doesn’t work for independently rotated shapes (both entities must have the same rotation, their axes aligned), and they must be rectangles (their shape defined by a bounding box). Why is this preferable to circle collisions? When an entity has the same height and width, circles will generally be adequate for defining a hit area. But if the entity is very tall or wide, a circle hit area will have a lot of empty space. Collisions with the empty space will report a false positive.
Why Use AABB?
There’s a historical reason AABB was primarily used in 2D games—even for roundish game objects. Circle collision detection requires a square-root operation—something that was very expensive in terms of CPU instructions. (If you could get away with it, you could use an approximation of the distance to avoid the square root.) Even today, collision detection can consume a significant portion of your frame processing time. AABB is very fast to calculate. Saving cycles is still important!
To detect if two rectangles are overlapping, we have to compare each of their corners. The results of the comparisons can be used to determine where the entities sit in relation to each other.
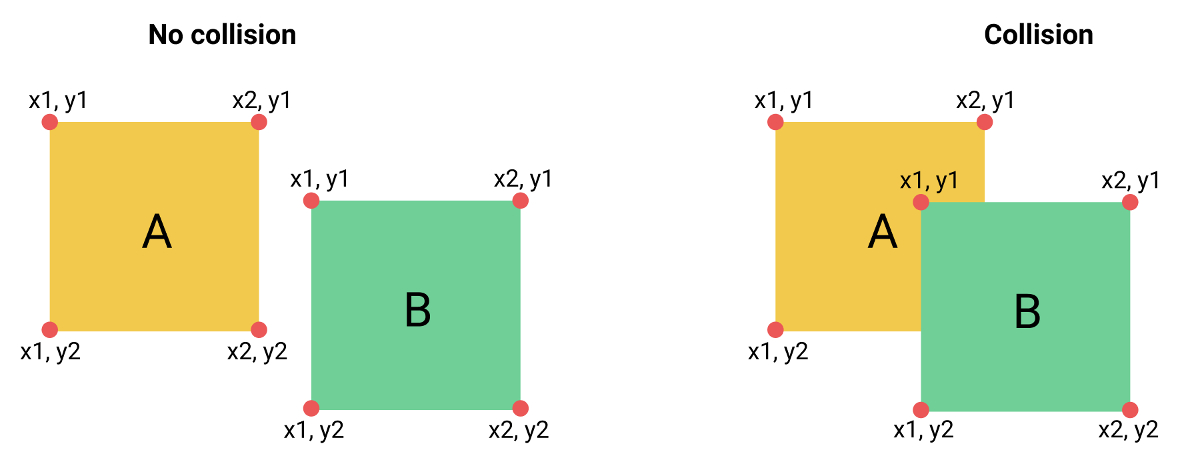
There are four expressions (two horizontal and two vertical) that all must be true if the rectangles intersect. First we check if a’s right edge is past b’s left edge, then if a’s left edge is before b’s right edge. If these two clauses pass, the rectangles overlap somewhere on the x axis. They may be above or below each other, so we have to do the same logic vertically. If both horizontal and vertical checks show an overlap, the rectangles are intersecting:
if (
  a.x2 >= b.x1 &&
  a.x1 <= b.x2 &&
  a.y2 >= b.y1 &&
  a.y1 <= b.y2) {
    // A hit!
}
The && Operator
Notice that, in JavaScript, the && operator is a short-circuit operator. This means that if any of the expressions are false, the remaining expressions don’t get evaluated. This is important for collision detection routines, as they’ll usually be called a lot of times every frame and can become a performance bottleneck. We’ll talk more about this in Chapter 9.
In our game engine, a Sprite object has a pos property with the x and y coordinates that represent the top-left corner of the graphic. We don’t have x2 or y2 properties. To figure out the other three corners, we need to provide some more information—namely, the entity’s width (w) and height (h). Given this, we can then calculate all four points of the rectangle:
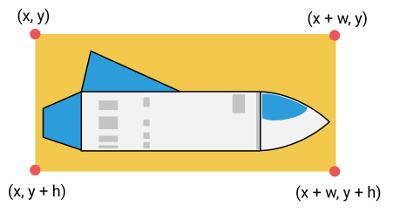
In our system, to find “a.x2” we actually need to use a.pos.x + a.w (the x position plus the width).
Quick demo time. To test the collision detection logic, spin up a new project with a new Game instance in main.js. We’ll do our tests here. Our game will be called Who stole my cheese, seriously? You’re a mouse, there’s some cheese. Every time you reach your goal (a collision is detected), the cheese is teleported away and reappears somewhere in the distance, for ever and ever. It’s a metaphor or something.

Add a couple of new files for our collidable entities—Mouse.js and Cheese.js. These will both be Sprites, and will only have a single frame each as a graphic. Mouse and Cheese will be very simple objects. If you wanted to, you could also just model them inline rather than as standalone files, as we did in Chapter 3.
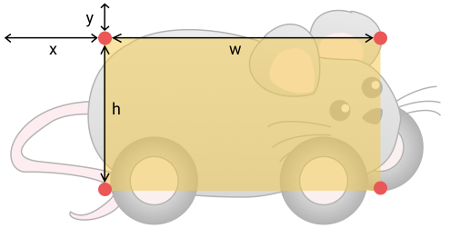
The cheese has no logic in it. It’s just cheese. However, we’ll add in the new w and h properties that represent the pixel size of the cheese.png file:
const texture = new Texture("res/Images/cheese.png");

class Cheese extends Sprite {
  constructor () {
    super(texture);
    this.w = 74;
    this.h = 50;
  }
}

export default Cheese;
That’s some good cheese. The cheese now has width (w) and height (h) properties so it can be used in our collision computations.
Hopefully creating new entities makes sense now. Any time you want to get something to display on the screen, create a Texture for it and give it to a Sprite (or TileSprite). The Game system takes care of updating it (if needed) and the CanvasRenderer takes care of drawing it for us.
Avoiding Manual Effort
It’s worth noting that adding size parameters manually could be avoided by taking the dimensions directly from the texture image. In the core library we could return the texture image’s width and height as the w and h properties. We won’t do this now, as having some manual control is useful, but it’s something we’ll add after we implement an asset-loading system.
It might seem like a hassle to make a file and extend a class, but now it’s easy to add functionality to the cheese when you later decide the cheese should fly, or shoot, or transform into a Camembert monster or something. The mouse is a bit more complicated (though you may notice that the logic closely resembles our spaceship from Chapter 3):
const texture = new Texture("res/Images/mouse.png");

class Mouse extends Sprite {
  constructor(controls) {
    super(texture);
    this.w = 100;
    this.h = 51;
    this.controls = controls;
  }
  update(dt) {
    const { pos, controls } = this;
    const { x, y } = controls;
    const speed = 100;
    pos.x += x * dt * speed;
    pos.y += y * dt * speed;
  }
}
Again, we’ve added the width and height of the image, but other than that, it’s really our spaceship in disguise as a mouse. Each frame in update, we get the user’s input and move ourselves a tiny bit. Then, as always, the entities must be added to the scene graph. We’ll put them in the main scene container. Remember that the add function returns the entity itself, so we can add it to the container and assign it to a variable in the same expression:
const game = new Game(640, 320);
const { scene, w, h } = game;
const a = scene.add(new Mouse(new KeyControls()));
const b = scene.add(new Cheese());

game.run(() => {
  // Bounding-box detection
});
A sprite will default to position {x: 0, y: 0} (the top-left corner of the screen). Before we run the game, move the Mouse and Cheese somewhere random on the screen. To do this, set both the x and y properties to a random value between 0 and the screen width/height (with math.rand). Rather than doing it manually to both entities, we’ll make a little function that does it for us for any entity:
const relocate = e => {
  const { pos } = e;
  pos.x = math.rand(w);
  pos.y = math.rand(h);
};
relocate(a);
relocate(b);
We can control our mouse friend around the screen, and of course that makes us hungry. We want to eat some cheese, using AABB to react to collisions. Because this is just a test, we’ll plop it inside the game.run main loop. (There’s no need to make a whole GameScreen unless you feel like building this out into bigger game!)
// Bounding-box detection
if (
  a.pos.x + a.w >= b.pos.x &&
  a.pos.x < b.pos.x + b.w &&
  a.pos.y + a.h >= b.pos.y &&
  a.pos.y < b.pos.y + b.h
) {
  // Hit!
  relocate(b);
}
When a hit is detected, the magic cheese instantly teleports to a new location. The important piece is the bounding-box test: each corner of the sprite is calculated using the entity’s w and h settings, along with their pos, to determine if any edges overlap. If they do, “Hit!” Take a minute to follow along with this logic and match the corners (x1, y1, x2, y2) to make sure it makes sense.
Drawing Rectangles
All this talk of boxes highlights that there’s currently no way in our library to draw a simple rectangle. Rectangles are very versatile. They can be used as backgrounds to text messages so things are easy read, they can be placeholder protagonists when you’re testing out a new game idea, and they can be debugging aids to figure out where the AABB collisions will actually occur. We should have rectangles in Pop.
Adding a new core type is a mundane task for us now! The two steps are: create the model for the type, and handle it in the renderer. We'll call our type Rect, and it can live in Rect.js:
class Rect {
  constructor(w, h, style = { fill: "#333" }) {
    this.pos = { x: 0, y: 0 };
    this.w = w;
    this.h = h;
    this.style = style;
  }
}
The Rect model has a width, a height, and some style information. We’ll simply support a fill color for now. The color will be set in the CanvasRenderer and the rectangle drawn with ctx.fillRect. If the renderer finds a leaf node in our scene that has width, height and style information, it draws the rectangle:
...
else if (child.style && child.w && child.h) {
  ctx.fillStyle = child.style.fill;
  ctx.fillRect(0, 0, child.w, child.h);
}
Adjusting the Bounding Box
For collision detection, a rectangle shape is a better fit for our entity than a circle, but it’s still not great. If you look closely (and move slowly) you’ll find occasions where a “hit” is detected even where pixels don’t actually overlap. This will be especially noticeable if your shape is not very boxy, or has some sort of protrusion (such as a mouse’s tail) leaving a lot of empty pixels in the rectangle. The easiest and sneakiest way to fix this is to reduce the size of the bounding box so that it’s smaller than the image that represents the entity.

Depending on your image, there might still be empty pixels, but by playing with the size and position of the box you can dramatically alter the feel of the game. To control the collision area, we maintain a second rectangle that we’ll call the hit box. We’ll make a distinction between the bounding box (that is, the rectangle that the entity’s texture can fit into) and the hit box—the tweaked rectangle used to improve the feeling of the game collision detection:
class Mouse extends Sprite {
  constructor(controls) {
    ...
    this.w = 100;
    this.h = 51;
    this.hitBox = {
      x: 18,
      y: 8,
      w: 70,
      h: 35
    };
  }
}
The hit box is a new object property that maintains the bounds of the collision area relative to the position of the Sprite itself. Usually the width and height properties will be smaller or equal to the bounding box dimensions, but there are some cases where it might be larger—for example, where you have a trigger sprite that fires when you’re near it. Here’s our sprite with the hit box highlighted to show where a collision will occur:
Bounding Box Highlighting
Highlighting the bounding box like this makes it easier to tweak and test collision settings. To facilitate this, I’ve added a helper in utils/entity to display the bounding box and hit box of a sprite. Calling entity.addDebug(mouse) will highlight the boxes on our mouse. It relies on the sneaky fact that our renderer will render anything in a children array, even if it’s not actually a Container. So create the array and add a debug Rect.
Any AABB calculation must account for the hit box area. The relative offsets of hitBox should be added to the Sprite’s position and dimensions. Rather than adding all of this directly into the collision detection test, we’ll create a temporary object that holds the calculated values:
const { hitBox: aHit, pos: aPos } = mouse;
const a = {
  x: aHit.x + aPos.x,
  y: aHit.y + aPos.y,
  w: aHit.w,
  h: aHit.h
};
We’ve effectively created a new bounding box that can be incorporated into the collision test. Once we do the same with the Cheese, both of these new bounding boxes can be fed into the previous AABB check.
Compared with our initial AABB implementation, this feels far better. The bounding boxes can overlap slightly, but a collision isn’t triggered until the hit boxes intersect. You can still find cases where a hit is detected where no pixels are intersecting; but a dirty gamedev secret is that nearly all games have this limitation. Computing simplified collision areas is fantastically more efficient than checking actual pixels, and (paradoxically) a tweaked hit box will often feel more “correct” to the player than precise pixel collision detection.
It’s extremely important to play around with the size of the hit boxes on all your entities. It has a big impact on tightness and the general feel of the game’s controls. As a rule, your players will be happy if the enemy hit boxes are bigger than their own!
Collision Testers
Once you’ve internalized how AABB works, it’s not much fun writing collision tests by hand. It should be handled in a helper function somewhere deeper in our library. Because collisions are between entities (with a w, h, and pos) it makes sense to put them into utils/entity.js. As we’ve seen, the first step to computing a hit box collision is to extract the new bounds of the entity based on its hitBox property:
function bounds(entity) {
  const { w, h, pos, hitBox } = entity;
  const hit = hitBox || { x: 0, y: 0, w, h };
  return {
    x: hit.x + pos.x,
    y: hit.y + pos.y,
    w: hit.w - 1,
    h: hit.h - 1
  };
}
The bounds function is a way to extract the collidable position and dimensions of an entity. If an entity doesn’t have a hitBox, get its full width and height. The or operator (||) is a short-circuit operator, so if hitBox is defined, it’s immediately returned. Otherwise, the new object is assigned.
Off-by-one
Our original hit tests suffer from an off-by-one error: w and h are not zero-based, so they are one pixel too large! I omitted this important information just to keep the core ideas (and code) clear, but I’ve snuck in the fix by subtracting one from hit.w and hit.h for the final w and h bounding values.
The bounds are calculated and used inside an AABB collision checker, hit, a function that takes two entities and returns a boolean indicating if the entities are hitting each other:
function hit(e1, e2) {
  const a = bounds(e1);
  const b = bounds(e2);
  return a.x + a.w >= b.x &&
    a.x <= b.x + b.w &&
    a.y + a.h >= b.y &&
    a.y <= b.y + b.h;
}
To test for collisions, first grab the bounds of both entities (with bounds), then run them through our now-familiar AABB test. All of the inline tests can now be taken out of the game.run game code and replaced with the hit tester:
if (entity.hit(mouse, cheese)) {
  relocate(cheese);
}
Ah, that’s much nicer! If we wanted to have many cheeses (who wouldn’t?), we can add them all to a cheeses container and then test each child:
cheeses.map(cheese => {
  if (entity.hit(mouse, cheese)) {
    relocate(cheese);
  }
});
However, knowing how hit is implemented, you might notice something inefficient. We’re recalculating the bounds of the player sprite for every child in the container, even though it never changes. It’s not a good idea to worry too much about performance at this stage (we’ll do plenty of worrying about it in Chapter 9), but I can’t let this one go.
function hits(entity, container, hitCallback) {
  const a = bounds(entity);
  container.map(e2 => {
    const b = bounds(e2);
    if (
      a.x + a.w >= b.x &&
      a.x <= b.x + b.w &&
      a.y + a.h >= b.y &&
      a.y <= b.y + b.h
    ) {
      hitCallback(e2);
    }
  });
}
The logic of hits is similar to hit, but applied to each child of a Container. Because there’s more than one possible entity to collide with, we can’t just return a single boolean. Instead, we call a callback function for every child element that collides. The reference to the bounds of the initial entity is stored (so we don’t unnecessarily recompute it) and then we map over the children, doing an AABB check for each. When something collides, the callback is called. This function also receives the entity we collided with. Often this is useful information in you game logic—such as when we have many cheeses and want only to teleport the cheese that was hit by the mouse:
entity.hits(mouse, cheeses, cheese => {
  relocate(cheese);
});
Moving the collision detection code into the core library means it’s convenient to use in future games—though it’s still important to understand how the algorithm is working under the hood. That knowledge lets you confidently customize things to fit your game’s specific use case, if necessary—and people will praise (or hopefully not even notice) your game’s excellent collision detection.
Procedural Level Generation
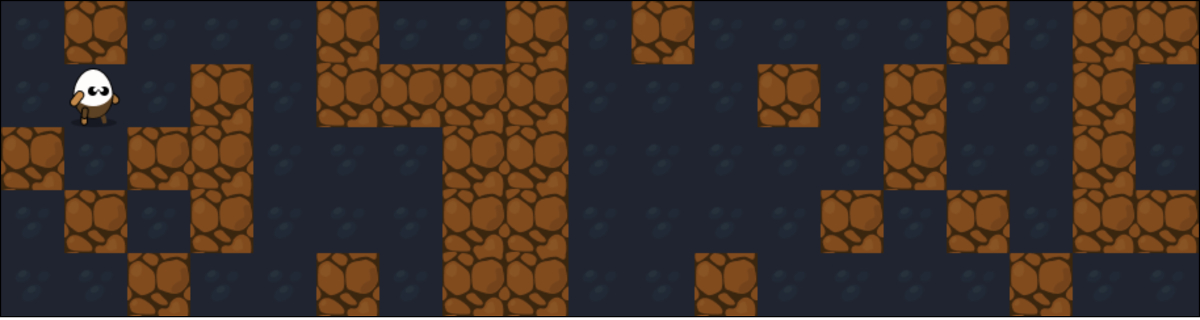
Time is ticking on the game jam clock, and all we have so far is “Spooky Cheese”. Let’s bin that idea and come up with a new concept—a hair-raising, procedurally generated, labyrinth-based action-adventure game … with bats and ghosts and goblins, and creepy things that shoot fireballs. Naturally we’ll need an intrepid explorer as the main character. Someone brave and determined, yet humble. Perhaps a little fragile. And probably egg-shaped—because that’s all I can draw … introducing Q.B. Bravedigger: explorer extraordinare! Or Bravedigger for short.
Bravedigger will avoid the scary dungeon dwellers while raiding their cavernous vaults of gold. The dungeon will be modeled on our Level tile map from the last chapter (the arena in SquizzBall). First, we need to create a suitable tileset. We at least needs some dungeon walls, but we can also noodle around and brainstorm some ideas for characters.

Yep, these look sufficiently scary (in a weird cute way). The Level will be a TileMap like SquizzBall, but the TileSprites will be arranged to look like a labyrinthine dungeon. The easy way to do this is to create our layouts by hand. We choose where each tile goes and carefully arrange them in clever maze patterns. But we want our levels to be different every game. How do we do that without creating a million levels by hand?
The answer is procedural generation. An algorithm (rather than a human) will design elements of the game. Procedural generation algorithms range from extremely simple to mind-bendingly complex. The simplest way we could generate a level is via Math.random(): each cell in our “maze” is picked at random. Not very playable, but a good place to start.
Procedural Generation
Procedurally generated levels are not easy to do well. It’s tempting to think we can delegate game design to a function and save all that time. In reality, you can lose a lot of time tweaking your algorithms, and even then, well-designed, hand-made levels are almost always more satisfying for the player. There are exceptions. Some games do procedural generation really well. Spelunky, from 2013, is a “rogue-lite” platform game that feels very “human” in its brutal level creation. Other bigger efforts like the epic space exploration game No Man’s Sky take procedural world generation to impressive lengths.
To start our dungeon, we first fill out the TileMap boilerplate (map width and height, tile width and height, and a texture). To create the level data, we’ll add some extra information to our frames. Not only do we specify the sprite sheet indexes (have a look at the tileset above to see which frames point to which graphic tile), but we also add identifiers for tiles. Later we can use them to get certain tiles by their ID.
const tileIndexes = [
  { id: "empty", x: 0, y: 2 },
  { id: "wall", x: 2, y: 2 },
  { id: "wall_end", x: 3, y: 2 }
];

const level = Array(mapW * mapH).fill(0);
// Make a random dungeon
...

super(
  level.map(i => tileIndexes[i]),
  mapW,
  mapH,
  tileSize,
  tileSize,
  texture
);
For the remainder of the book, we’ll use an object like tileIndexes to hold the metadata about our tiles. TileMap expects us to give it an array of tile frame offsets to draw the correct tile from the tileset image. But a tile is more than just a pretty face: it can have other properties too. For example, we may add a walkable flag to the empty tile (which we’ll do later in this chapter) so that entities can pass over it. (Otherwise, they’re blocked from walking on it.)
As we add features to our tile-based games, there will be more per-property metadata associated with each tile. They’ll all go in tileIndexes. We can refer to the tiles in our level simply by the offset in the tileIndexes tiles array. For example, we initialized our level variable to an array of size mapW * mapH and mapped each element to 0 (using Array’s nifty fill method). This means the entire map will be drawn as the first tileIndexes element (which is the “empty” tile). The entire level is empty. If we make some of the elements 1, these will point to the second tile—a “wall” tile.
A little help
I’ve kept it simple by using the array index. However if you look in the code examples you’ll find a helper function called getIdx that will return the index for a given ID, so you can write getIdx("wall") instead of just 1. This reads a lot nicer and will keep working if you change the order of the tileIndexes array.
The actual transformation between the offset and the tile object is done when we call super: level.map(i => tileIndexes[i]). All of the indexes (i) get mapped to the corresponding tiles. Creating a random level can then be done by assigning either a 0 (blank) or 1 (wall) tile to every space on the map:
// Make a random dungeon
for (let y = 0; y < mapH; y++) {
  for (let x = 0; x < mapW; x++) {
    // Define the dungeon walls
    level[y * mapW + x] = math.randOneFrom([0, 0, 1]);
  }
}
The level data is expected to be a one-dimensional array, but it’s better to think of it as a two-dimensional matrix representing the rows and cells of the map. To convert from x and y grid coordinates to the correct array element, multiply the y component by the map width (because each row has “width” elements in it), then add the x offset: y * mapW + x. To this element we assign either a 0 (empty) or a 1 (wall).
Weighting
Notice that we chose tiles randomly from the array [0, 0, 1]: two 0s and one 1. This is to weight the choice in favor of a 0 (resulting in more empty space in the level). This would be the same as if we had used math.randOneIn(3), or even Math.random() < 0.3333. It doesn’t matter how you weight things, as long as it gets you the results you’re after. Sometimes randOneFrom is helpful when you’d like to choose from non-sequential items—for example,
math.randOneFrom([0, 1, 2, 2, 4]). In this case, 0, 1, and 4 all have a 1-in-5 chance of being chosen, and 2 has a 2-in-5 chance.
Okay, that doesn’t look much like a maze, and doesn’t look like much fun to traverse as a player. This is the double-edged sword of procedural generation: your levels will only be as good as your algorithm! Game design is an art form, and you’re outsourcing some of your art generation and game design skills to the algorithm.
That said, we can do a lot better than Math.random()! We’re going to use a very simple maze-ish generator for our levels. I say “maze-ish”, because maze enthusiasts (yes, there are many) wouldn’t consider it strictly a maze. There’s no start, no finish, and it’s not perfect. A perfect maze has no loops where you can double back on yourself. But our algorithm is simple, consisting of three steps:
- Draw the map borders (add a wall around the perimeter).
- Add grid “posts” (add a wall in every other cell, making a grid).
- Add some side walls. For each grid post, randomly pick a direction and add a wall.
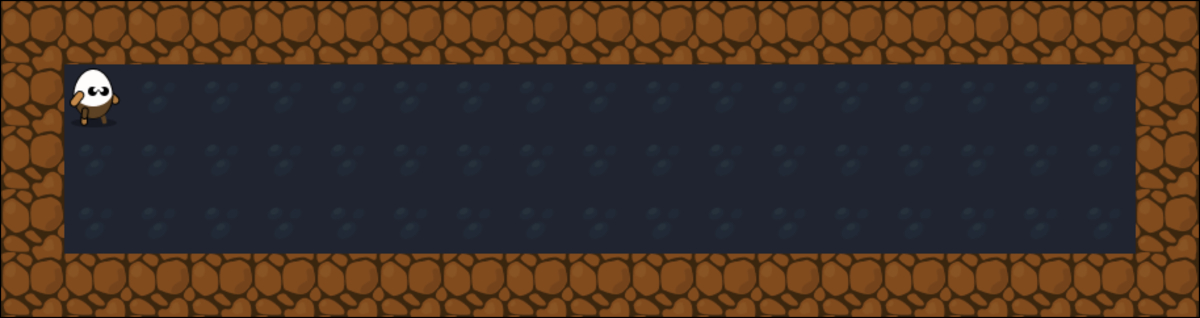
This logic generates a satisfying level for such a small amount of code. Step 1 is to draw the walls of the level. In our nested for loops, we check the x and y loop variables and see if they lie on the perimeter.
// Define the dungeon walls

// 1. Map borders
if (y === 0 || x === 0 || y === mapH - 1 || x === mapW - 1) {
  level[y * mapW + x] = 1;
  continue;
}
The big if statement here checks four cases—one for each “direction”. If y === 0, we’re on the very first row of the level. If x === 0, we’re on the very first column of the level. Similarly, we check if we’re in the last row or column. If so, draw a wall and continue on to the next loop item. The level will look like this:
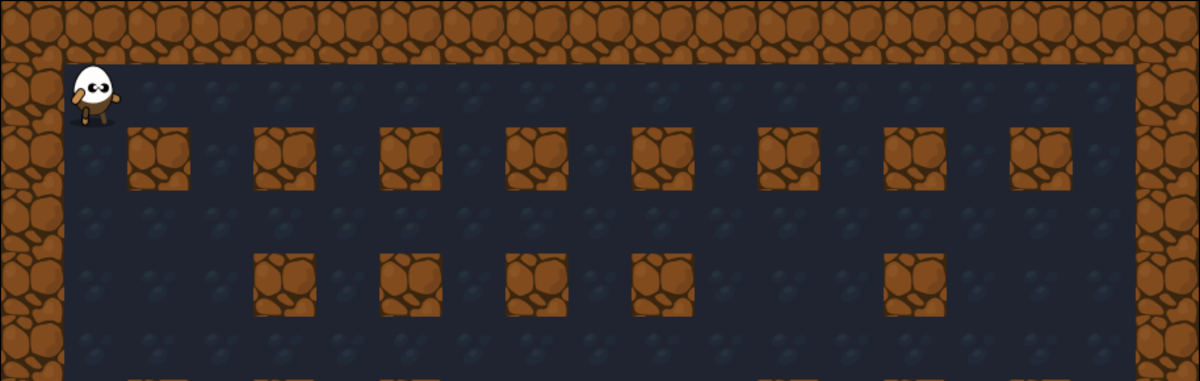
If it’s not a wall item, the if statement will be false and we can move on to step 2—adding grid posts. The idea of this step is to make a consistent grid of walls spaced evenly so there’s a one-space gap between each of them. To do that, we check y % 2 || x % 2. This will be true in every odd cell. In these cases, we continue and leave them blank.
// 2. Grid points - randomly skip some to make "rooms"
if (y % 2 || x % 2 || math.randOneIn(4)) {
  continue; // don't draw a wall, please.
}
level[y * mapW + x] = 1;
We also do something extra: we randomly don’t draw some of the grid points. Wherever this occurs (when we have math.randOneIn(4) in our example, but you can play with this value) there will be a gap in the grid posts. In the final level, this will look like “room”. It doesn’t look much like a room at the moment though. After adding grid posts, the level will look like this:
Better than our first random level, but a little too open. Step 3 involves adding in some side walls. We’ve just drawn the grid post; now we take a random direction—north, south, east, or west—and make that a wall too.
// 3. Side walls - pick a random direction
const [xo, yo] = math.randOneFrom([[0, -1], [0, 1], [1, 0], [-1, 0]]);
level[(y + yo) * mapW + (x + xo)] = 1;
The direction north is represented by the array [0, -1], which is the x/y offset from the current position. The cell to the north is at location x + 0 (no change in the x position) and y + (-1) (“up” one in the y position). South is [0, -1] (“down” one in the y position). East is [1, 0] (“right” one in the x direction), and west is [-1, 0]. The directions are all stored inside another array, and math.randOneFrom picks one for us.

Getting the Faux-3D Look
After the map was designed, I did another pass over the level data and checked if there was a wall tile below each tile. If the space was free, then I converted the wall tile into a wall_end tile which gives the faux-3D look.
The transformation is complete! Refresh the page over and over; each time, a new design. It’s quite impressive to get such satisfying results from so few rules (and so little code!). It’s not foolproof, but will serve well for a base for our game jam entry. Hopefully it gives you a taste for what procedural generation is about. If you’d like to see more of what can be done with algorithms, check out Reddit’s lively Procedural Generation subreddit.
Colliding with Maps
To make the walls of the maze solid, we need to add collision detection between Bravedigger and the map’s TileSprites. But collision detection isn’t enough; we also need to perform collision resolution. Collision resolution is how we resolve an entity’s position after a collision is detected. Our spooky cheese magically teleporting is kind of a resolution (hey, it certainly isn’t colliding anymore), but it’s not very useful. In a maze, we don’t want to teleport to a random location every time we touch a wall!
The secret to doing collision resolution is to test the intended movement of the player, before they make it. Depending on the result of the test, you can either allow the move (if the tile area is clear), or reject (or modify) it if they hit a solid tile.
Getting the collision detection and resolution perfect for tile maps is complex, but the task can be broken into three pieces: basic collisions (determining when we would be “stuck in a wall”), snapping back to perfectly rest against the edge of a tile, and “wall sliding” (allowing horizontal movement when you’re only blocked vertically, and vice versa).
For the first part—basic collisions—you might think we could just do our AABB test against every tile in a map. Yep, that would work for sure. But tile maps can be very large, and checking every tile against every entity quickly becomes a huge computational task. Thanks to the grid-like nature of a tile map, it’s more efficient for us to work against the model of the entire map, rather than consider each entity individually.
For example, if we know a player wants to move to map position {x: 1, y: 1}, there’s no need to do a full AABB test between the player’s Sprite and the TileSprite at location {x: 1, y: 1}: we could just store metadata in the TileSprite’s frame, then look up if it’s “walkable” or not. No calculations necessary! If a tile is “walkable”, the player is allowed to move. Otherwise, they’re stopped in their tracks.
const tileIndexes = [
  { id: "empty", x: 0, y: 2, walkable: true },
  { id: "wall", x: 2, y: 2 },
  { id: "wall_end", x: 3, y: 2 }
];
The first step is to annotate the tileIndexes metadata with suitable attributes. Designating a tile as walkable indicates that the player is allowed to move freely over this type of tile. To make walls obstruct a player, we don’t give them the walkable attribute.
const tile = this.tileAtPixelPos({ x: pos.x, y: pos.y });
const canWalk = tile.frame.walkable;
This will tell us if the player’s top-left corner is touching a walkable block, or if it’s a solid wall. But because a player has two dimensions, they’re likely touching more than one tile in any given frame. Assuming they’re smaller than a single tile, they can be intersecting with up to four tiles at any given moment:
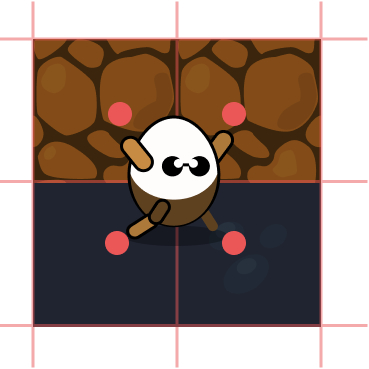
In this image, the entity’s top-left corner is touching tile 1, the top-right corner is touching tile 2, the bottom-left corner is touching tile 3, and the bottom-right corner is touching tile 4. This means we have to check each corner of a Sprite to get the full set of possible collisions.
Keeping Things Simple
For simplicity, our engine is going to maintain the assumption that the entities will be the same size or smaller than a tile. If the entity is larger, it’s possible that a collision with the middle of the entity is not detected. To fix this, you have to check more than just the corners: you must check the full range that covers the number of tiles the entity could possibly cover.
Finding the tiles that an entity is touching can be the responsibility of the TileMap. To check each corner, we need the bounds of the entity (the result of calling entity.bounds) and, optionally, an x and y offset from the bounds. The reason for the offset will be explained shortly.
tilesAtCorners(bounds, xo = 0, yo = 0) {
  return [
    [bounds.x, bounds.y], // Top-left
    [bounds.x + bounds.w, bounds.y], // Top-right
    [bounds.x, bounds.y + bounds.h], // Bottom-left
    [bounds.x + bounds.w, bounds.y + bounds.h] // Bottom-right
  ].map(([x, y]) => this.tileAtPixelPos({
    x: x + xo,
    y: y + yo
  }));
}
The four corners are placed in an array, then mapped to a function that retrieves the tile at that location with tileAtPixelPos. The end result is an array of the top-left, top-right, bottom-left, and bottom-right tiles that the entity is standing on. Depending on where the player is, they might all be the same tile (if the player is carefully placed in the center of a tile) or they could be four different tiles (if the player is on an intersection of the tiles).
const bounds = entity.bounds(player);
const tiles = map.tilesAtCorners(bounds);
const walks = tiles.map(t => t && t.frame.walkable);
const blocked = walks.some(w => !w);
The tiles array contains a bunch of information about the tiles, but for now we’re interested in “walkability”. We map over the tiles and extract only if the frame is walkable or not. We then check each of these values to see if any of the tiles are blocking us (that is, any of the walks values are false). Now we know if any tiles below the entity are solid!
Additionally, because the tiles represent the corners of the entity, we can use the walks array to glean more useful information about how the entity collides. For example:
const hitYourHead = walks[0] || walks[1]; // TL or TR
const feetInTheGround = walks[2] || walks[3]; // BL or BR
const collidedLeft = walks[0] || walks[2]; // TL or BL
const collidedRight = walks[1] || walks[3]; // TR or BR
So, back to tilesAtCorners. What are those xo and yo offsets for? They’re there to facilitate collision resolution. It’s too late for us if the player is already standing inside a wall: we should have checked before we let them get themselves stuck. The xo and yo offsets represent the amount the player would like to move. For example, the player might ask us “am I allowed to move to the left 5px and down 2px this frame?” and we check with xo = -5 and yo = 2. If any of the tiles are not walkable, we say “Sorry, no.”
Asking questions about the tiles you would be touching—and responding accordingly before it happens—is collision resolution.
We’ll generalize the idea of “intended movement” as a function that can be reused by multiple entities (and in multiple games). Inside the entity’s update function, we call the function with the amount the entity would like to move. This value may come from the player’s controls, or from gravity in a physics system. It might be the amount generated from an AI movement function, or it may be derived from specific logic in our game: “if the player is swinging a sword, is the tile in the direction the player facing a magic tile?”
The movement function will compute the result of trying to move by the intended amount, and then return the allowed amount the entity can move. For now, if the space is clear, the results will be the same as the inputs. (“Sure, you can move left 5px and down 2px.”) If the entity is blocked, the function will return zeros. (“Sorry, you can move left 0px and down 0px.”) In a later section, we’ll return more fine-grained results.
Collision detection code varies greatly between your games, and you’ll eventually need to write your own that matches your game’s requirements. But there are some common cases that we should include in the Pop library too. They can go in a new folder called pop/movement/. Our first attempt will be called deadInTracks.js. It stops the player dead in their tracks when they touch a wall:
function deadInTracks(ent, map, x = 0, y = 0) {
  const bounds = entity.bounds(ent);
  const tiles = map.tilesAtCorners(bounds, x, y);
  const walks = tiles.map(t => t && t.frame.walkable);
  const blocked = walks.some(w =>!w);
  if (blocked) {
    x = 0;
    y = 0;
  }
  return { x, y };
}
The function accepts the entity, the map they’re testing against, and the amount they want to move. It returns the amount the player is allowed to move. If any of the tiles aren’t walkable, the allowed movement will be {x: 0, y: 0}. If it’s all clear, the allowed movement will be the full amount the player requested to move—{x: x, y: y}. The result can then be added to the entity’s position so they either move or get blocked:
class Player extends TileSprite {
  constructor(controls, map) {
    super(texture, 48, 48);
    this.controls = controls;
    this.map = map;
    // ...
  }
  update(dt, t) {
    let { x, y } = controls;
    const xo = x * dt * speed;
    const yo = y * dt * speed;
    // Can we move to this position?!
  }
}
Normally, we’d simply add the xo and yo to pos and be done: the player can move wherever they want. But when implementing collision resolution, we’ll ask our function if we’re permitted to make a move before our position is updated:
// Can we move to this position?!
const r = deadInTracks(this, map, xo, yo);
pos.x += r.x;
pos.y += r.y;
Notice that the value returned from deadInTracks is added to pos. deadInTracks is the boss of how far we’re allowed to move. It needs the entity that’s trying to move (this, the player), the map that’s trying to stop it, and the amount of intended movement. When any of the tiles aren’t walkable, blocked is true and x and y are set to 0. Otherwise, they stay unchanged from the value passed in. Either the player can move according to its speed, or it’s stopped dead in its tracks. Now they can’t walk through walls.
Finding Empty Tiles
The clock is still ticking, and we have no goal in our game yet. Rule number 1 of game jams is “Make sure you get enough sleep, otherwise going to work on Monday will be a nightmare.” But rule number 2 is “Add a win/lose state as quickly as possible!” The goal will be “help Bravedigger find as much treasure in the dungeon as you can.” Several treasures should be sprinkled around the maze and—upon collecting it all—it respawns. Everyone likes infinite treasure.
Picking things up is an effortless task for us now. (Skip forward if this is old news!) Pickup is a class that extends TileSprite and which points to the correct frame graphic. It doesn’t have any extra logic. Pickups will be added in the main GameScreen to a special container, called pickups:
this.pickups = this.add(new Container());
this.populate();
To spawn the pickups, we have the populate helper method to position the treasure. There will be five treasure pickups per spawn. These are randomly positioned to free spots (walkable tiles) on the map:
populate() {
  const { pickups, map } = this;
  for (let i = 0; i < 5; i++) {
    const p = pickups.add(new Pickup());
    p.pos = map.findFreeSpot();
  }
}
The map.findFreeSpot function is new. It returns a random walkable (non-wall) tile. It wouldn’t be very fair if we spawned treasure inside a wall! Because findFreeSpot will rely on the tile metadata, it’s game-specific. So it lives in the Level class (not in the parent TileMap). findFreeSpot doesn’t take any parameters, and it returns the {x, y} position of an empty space on the map:
findFreeSpot() {
  const { mapW, mapH } = this;
  let found = false;
  let x, y;
  while (!found) {
    // Choose random tile
  }
  return this.mapToPixelPos({ x, y });
}
It uses a while loop to search the map until it finds a free spot. When it does, it converts the map position into a pixel position:
x = math.rand(mapW);
y = math.rand(mapH);
const { frame } = this.tileAtMapPos({ x, y });
if (frame.walkable) {
  found = true;
}
To find an empty space, choose a random tile and see if its frame has the walkable property. If not, try again. If there happens to be no free spaces in the entire map, this function will run forever. (Your homework is to cap the amount of searching it will do!)
Inspecting Metadata
Although we’re looking for walkable tiles here, this approach will work for any other game logic too. For example, if you wanted to find a specific type of tile, say a “wall”, you could ask if (frame.id === "wall"). The key is inspecting the metadata for the properties you need.
With pickups placed on the map, we can finally check for collisions. (Thank you again, hits collision helper method.) If the player has retrieved all of the treasure (and children.length is 1—that is, it will be 0 once this pickup is removed) then we call populate again to add some more:
// Collect pickup!
entity.hits(player, pickups, p => {
  p.dead = true;
  if (pickups.children.length === 1) {
    this.populate();
  }
});

Wall Sliding
Great! We have a goal for the game, and Bravedigger can explore and interact with the maze. But it doesn’t “feel” quite right. When you hit a wall, you stop, dead in your tracks—even if you’re moving diagonally. This means you need to lift your fingers off the arrow keys and press them again every time you hit a wall. You’d expect that you should still move in the non-blocked direction. This is known as wall sliding.
To implement wall sliding, we break the collision detection into two pieces: a vertical check, and a horizontal check. The vertical check ignores the amount of “intended x movement” (temporarily assuming it’s 0) and only looks for collisions moving up or down. If there is a collision, set the y amount to 0 to prevent moving into the wall. Next, check the horizontal movement using both the intended x amount and the y amount allowed from the vertical direction check. Here’s the skeleton for our movement/wallslide.js implementation:
function wallslide(ent, map, x = 0, y = 0) {
  let tiles;
  const bounds = entity.bounds(ent);

  // Final amounts of movement to allow
  let xo = x;
  let yo = y;

  // Check vertical movement
  if (y !== 0) { }

  // Check horizontal movement
  if (x !== 0) { }

  // xo & yo contain the amount we're allowed to move by
  return { x: xo, y: yo };
}
It’s the same structure as deadInTracks, but this time we’ll do two checks—one if the entity wants to move vertically (y !== 0) and one if the entity wants to move horizontally (x !== 0):
// Check vertical movement
tiles = map.tilesAtCorners(bounds, 0, yo);
const [tl, tr, bl, br] = tiles.map(t => t && t.frame.walkable);

// Hit your head
if (y < 0 && !(tl && tr)) {
  yo = 0;
}
// Hit your feet
if (y > 0 && !(bl && br)) {
  yo = 0;
}
First, the vertical test: the player wants to move up or down. We check tilesAtCorners with the y amount, but we temporarily assume there’s no horizontal movement (that is, we hardcode 0 as the x parameter)—even if there is. This is to only test for vertical collisions. If the vertical direction is blocked, it gets set back to zero, and no vertical movement will be allowed.
Destructuring Results
Rather than dealing with the result of the tilesAtCorners—“an array of four values that represents the top-left, top-right, bottom-left, and bottom-right”—we destructure the results into variables tl, tr, bl, br. This makes it easier to perform logic like “will the entity’s head be hitting a non-walkable tile?”
Having conducted our vertical tests, we can then do the same for the horizontal direction:
// Check horizontal movement
tiles = map.tilesAtCorners(bounds, xo, yo);
const [tl, tr, bl, br] = tiles.map(t => t && t.frame.walkable);

// Hit left edge
if (x < 0 && !(tl && bl)) {
  xo = 0;
}
// Hit right edge
if (x > 0 && !(tr && br)) {
  xo = 0;
}
The only (and crucial) difference is we use the intended horizontal amount for x but the new vertical amount for y (that is, the amount returned from the vertical test, not hardcoded to 0). Effectively, we’ve tested the entity’s movement in two steps—allowing it to move in either direction even if one is blocked.
Try this out and compare it to our deadInTracks effort. The difference is night and day. Hold down multiple directions at the same time and you can wall slide around much more smoothly, traversing the maze without getting trapped on every surface.
Snap to Edges
One subtle issue remains with tile map collisions that needs addressing—and you may not even notice it if your player’s movement speed is low.
Say the player is moving horizontally at a rate of 5 pixels per frame. They run into a wall on the right (so xo is 5). The wallslide code checks if they’re clear to move, and it says “No! You hit the wall! Sorry, but your x movement is 0!” Depending on where the player was located in the previous frame, they could currently be stopped up to 5 pixels away from wall, leaving a gap:
The faster the speed, the bigger the gap can be. To correct this, rather than setting xo or yo to zero when there’s a collision, determine the correct number of pixels between the entity and the tile and subtract that from the intended distance to move. The result is the exact amount of space the player can move without being stuck, and without leaving a gap:
// Hit your head
if (y < 0 && !(tl && tr)) {
  tileEdge = tiles[0].pos.y + tiles[0].h;
  yo = tileEdge - bounds.y;
}
// Hit your feet
if (y > 0 && !(bl && br)) {
  tileEdge = tiles[2].pos.y - 1;
  yo = tileEdge - (bounds.y + bounds.h);
}
To calculate the distance to move, take the position of one of tiles we would hit and subtract our current position. For example, if we hit our head we move 1 pixel below the tile above us (The extra pixel is because the tile height is not zero-based). For example, if we hit our head we move 1 pixel below the tile above us. If we hit our feet we move 1 pixel above the tile below us. The same idea is applied to the horizontal checks for the left and right edges:
// Hit left edge
if (x < 0 && !(tl && bl)) {
  tileEdge = tiles[0].pos.x + tiles[0].w;
  xo = tileEdge - bounds.x;
}
// Hit right edge
if (x > 0 && !(tr && br)) {
  tileEdge = tiles[1].pos.x - 1;
  xo = tileEdge - (bounds.x + bounds.w);
}
Any collision with a tile will now situate the entity snugly against the correct edge. As you can see, there’s quite a lot of complexity in getting collision resolution working perfectly. Thankfully, it’s something that will apply to all of our future tile-based games, and something that’s now handled by the Pop game library.
wallslide.js Isn’t a Catch-all
Your future games will have some specific needs that won’t be addressed by wallslide.js. Good collisions are vital to a great-feeling game, so don’t be afraid to copy-paste this and use it as a base. If you create new features that are general to many games, add them back into the library!
If you’ve understood wall sliding, you’re in an excellent position to implement all kinds of TileMap features. One of my favorite resources on this subject is an extremely old set of articles titled Tonypa’s tile-based tutorials. They were written for Flash (and the code is in ActionScript) but the core ideas are easy to port over to our system!
AI: The Bots Strike Back
We have all the tools at our disposal now to make fantastically detailed worlds to explore and inhabit. Unfortunately, our co-inhabitants haven’t proved themselves to be very worthy opponents. They’re dumb: they show no emotion, no thought, no anima. We can instill these characteristics via graphics, animation, and above all, artificial intelligence (AI).
Artificial intelligence is a huge and extremely complex field. Luckily, we can get impressive results even with a lot more artificial than intelligence. A couple of simple rules (combined with our old friend Math.random) can give a passable illusion of intention and thought. It doesn’t have to be overly realistic as long as it supports our game mechanics and is fun.
Like collision detection, AI is often best when it’s not too good. Computer opponents are superhuman. They have the gift of omniscience and can comprehend the entire state of the world at every point in time. The poor old human player is only able to see what’s visible on the screen. They’re generally no match against a computer.
But we don’t let them know that! They’d feel bad, question the future of humanity, and not want to play our games. As game designers, it’s our job to balance and dictate the flow of our games so that they’re always fair, challenging, and surprising to the player.
Intentional Movement
Choosing how sprites move around in the game is great fun. The update function is your blank canvas, and you get godlike control over your entities. What’s not to like about that!
The way an entity moves is determined by how much we alter its x and y position every frame (“move everything a tiny bit!”). So far, we’ve moved things mostly in straight lines with pos.x += speed * dt. Adding the speed (times the delta) causes the sprite to move to the right. Subtracting moves it to the left. Altering the y coordinate moves it up and down.
To make straight lines more fun, inject a bit of trigonometry. Using pos.y += Math.sin(t * 10) * 200 * dt, the sprite bobs up and down through a sine wave. t * 10 is the frequency of the wave. t is the time in seconds from our update system, so it’s always increasing linearly. Giving that to Math.sin produces a smooth sine wave. Changing the multiplier will alter the frequency: a lower number will oscillate faster. 200 is the amplitude of the waves.
You can combine waves to get even more interesting results. Say you added another sine wave to the y position: pos.y += Math.sin(t * 11) * 200 * dt. It’s almost exactly the same as the first, but the frequency is altered very slightly. Now, as the two waves reinforce and cancel each other out as they drift in and out of phase, the entity bobs up and down faster and slower. Shifting the frequency and amplitude a lot can give some interesting bouncing patterns. Alter the x position with Math.cos and you have circles.
The important aspect of this is that movements can be combined to make more complex-looking behaviors. They can move spasmodically, they can drift lazily. As we go through this chapter, they’ll be able to charge directly towards a player, or to run directly away. They’ll be able to traverse a maze. When you combine these skills (a bobbing motion used in conjunction with a charge-at-player), or sequence them (run away for two seconds, then bob up and down for one second) they can be sculpted into very lifelike beings.
Waypoints
We need to spice up these apathetic ghosts and bats, giving them something to live for. We’ll start with the concept of a “waypoint”. Waypoints are milestones or intermediate target locations that the entity will move towards. Once they arrive at the waypoint, they move on to the next, until they reach their destination. A carefully placed set of waypoints can provide the game character with a sense of purpose, and can be used to great effect in your level design.

So that we can concentrate on the concepts behind waypoints, we’ll introduce a flying bad guy who’s not constrained by the maze walls. The scariest flying enemy is the mosquito (it’s the deadliest animal in the world, after humans). But not very spooky. We’ll go with “bat”.
Bats won’t be complex beasts; they’ll be unpredictable. They’ll simply have a single waypoint they fly towards. When they get there, they’ll pick a new waypoint. Later (when we traverse a maze) we’ll cover having multiple, structured waypoints. For now, bats waft from point to point, generally being a nuisance to the player.
To create them, make a new entity based on a TileSprite, called Bat, in entities/Bat.js. The bats need some smarts to choose their desired waypoint. That might be a function that picks a random location anywhere on screen, but to make them a bit more formidable we’ll give them the findFreeSpot functions, so the waypoint will always be a walkable tile where the player might be traveling:
const bats = this.add(new Container());
for (let i = 0; i < 5; i++) {
  bats.add(new Bat(() => map.findFreeSpot()))
}
We have a new Container for the bats, and we create five new ones. Each gets a reference to our waypoint-picking function. When called, it runs map.findFreeSpot and finds an empty cell in the maze. This becomes the bat’s new waypoint:
class Bat extends TileSprite {
  constructor(findWaypoint) {
    super(texture, 48, 48);
    this.findWaypoint = findWaypoint;
    this.waypoint = findWaypoint();
    ...
  }
}
Inside Bat.js we assign an initial goal location, then in the bat’s update method we move towards it. Once we’re close enough, we choose another location to act as the next waypoint:
// Move in the direction of the path
const xo = waypoint.x - pos.x;
const yo = waypoint.y - pos.y;
const step = speed * dt;
const xIsClose = Math.abs(xo) <= step;
const yIsClose = Math.abs(yo) <= step;
How do we “move towards” something, and how do we know if we’re “close enough”? To answer both of these questions, we’ll first find the difference between the waypoint location and the bat. Subtracting the x and y values of the waypoint from the bat’s position gives us the distance on each axis. For each axis we define “close enough” to mean Math.abs(distance) <= step. Using step (which is based on speed) means that the faster we’re traveling, the further we need to be to be “close enough” (so we don’t overshoot forever).
Using Absolute Value for Distance
We take the absolute value of the distance, as it could be negative if we’re on the other side of the waypoint. We don’t care about direction, only distance.
if (!xIsClose) {
  pos.x += speed * (xo > 0 ? 1 : -1) * dt;
}
if (!yIsClose) {
  pos.y += speed * (yo > 0 ? 1 : -1) * dt;
}
To move in the direction of the waypoint, we’ll break movement into two sections. If we’re not too close in either the x or y directions, we move the entity towards the waypoint. If the ghost is above the waypoint (y > 0) we move it down, otherwise we move it up—and the same for the x axis. This doesn’t give us a straight line (that’s coming up when we start shooting at the player), but it does get us closer to the waypoint each frame.
if (xIsClose && yIsClose) {
  // New way point
  this.waypoint = this.findWaypoint();
}
Finally, if both horizontal and vertical distances are close enough, the bat has arrived at its destination and we reassign this.waypoint to a new location. Now the bats mindlessly roam the halls, as we might expect bats to do.
This is a very simple waypoint system. Generally, you’ll want a list of points that constitute a complete path. When the entity reaches the first waypoint, it’s pulled from the list and the next waypoint takes its place. We’ll do something very similar to this when we encounter path finding shortly.
Moving, and Shooting, Towards a Target
Think back to our first shoot-’em-up from Chapter 3. The bad guys simply flew from right to left, minding their own business—while we, the players, mowed down the mindless zombie pilots. To level the playing field and make things more interesting from a gameplay perspective, our foes should at least be able to fire projectiles at us. This gives the player an incentive to move around the screen, and a motive for destroying otherwise quite peaceful entities. Suddenly we’re the hero again.
Providing awareness of the player’s location to bad guys is pretty easy: it’s just player.pos! But how do we use this information to send things hurtling in a particular direction? The answer is, of course, trigonometry!
function angle (a, b) {
  const dx = a.x - b.x;
  const dy = a.y - b.y;
  const angle = Math.atan2(dy, dx);

  return angle;
}
Trigonometry
In this chapter, we’ll see a couple of trigonometric functions for achieving our immediate goals of “better bad guys”—but we won’t really explore how they work. This is the topic of next chapter … so if you’re a bit rusty on math, you can breathe easy for the moment.
In the same way we implemented math.distance, we first need to get the difference between the two points (dx and dy), and then we use the built-in arctangent math operator Math.atan2 to get the angle created between the two vectors. Notice that atan2 takes the y difference as the first parameter and x as the second. Add the angle function to utils/math.js.
Most of the time in our games, we’ll be looking for the angle between two entities (rather than points). So we’re usually interested in the angle between the center of the entities, not their top-left corners as defined by pos. We can also add an angle function to utils/entity.js, which first finds the two entities’ centers and then calls math.angle:
function angle(a, b) {
  return math.angle(center(a), center(b));
}
The angle function returns the angle between the two positions, in radians. Using this information we can now calculate the amounts we have to modify an entity’s x and y position to move in the correct direction:
const angleToPlayer = entity.angle(player.pos, baddie.pos);
pos.x += Math.cos(angle) * speed * dt;
pos.y += Math.sin(angle) * speed * dt;
To use an angle in your game, remember that the cosine of an angle is how far along the x axis you need to move when moving one pixel in the angle direction. And the sine of an angle is how far along the y axis you need to move. Multiplying by a scalar (speed) number of pixels, the sprite moves in the correct direction.
Knowing the angle between two things turns out to be mighty important in gamedev. Commit this equation to memory, as you’ll use it a lot. For example, we can now shoot directly at things—so let’s do that! Create a Bullet.js sprite to act as a projectile:
class Bullet extends Sprite {
  constructor(dir, speed = 100) {
    super(texture);
    this.speed = speed;
    this.dir = dir;
    this.life = 3;
  }
}
A Bullet will be a small sprite that’s created with a position, a velocity (speed and direction), and a “life” (that’s defaulted to three seconds). When life gets to 0, the bullet will be set to dead … and we won’t end up with millions of bullets traveling towards infinity (exactly like our bullets from Chapter 3).
update(dt) {
  const { pos, speed, dir } = this;

  // Move in the direction of the path
  pos.x += speed * dt * dir.x;
  pos.y += speed * dt * dir.y;

  if ((this.life -= dt) < 0) {
    this.dead = true;
  }
}
The difference from our Chapter 3 bullets is that they now move in the direction given when it was instantiated. Because x and y will represent the angle between two entities, the bullets will fire in a straight line towards the target—which will be us.
The bullets won’t just mysteriously appear out of thin air. Something needs to fire them. We need another new bad guy! We’ll deploy a couple of sentinels, in the form of top-hat totems. Totems are the guards of the dungeons who watch over the world from the center of the maze, destroying any treasure-stealing protagonists.

The Totem.js entity generates Bullets and fires them towards the Player. So they need a reference to the player (they don’t know it’s a player, they just think of it as the target) and a function to call when it’s time to generate a bullet. We’ll call that onFire and pass it in from the GameScreen so the Totem doesn’t need to worry itself about Bullets:
class Totem extends TileSprite {
  constructor(target, onFire) {
    super(texture, 48, 48);
    this.target = target;
    this.onFire = onFire;
    this.fireIn = 0;
  }
}
When a new Totem is created, it’s assigned a target, and given a function to call when it shoots a Bullet. The function will add the bullet into the main game container so it can be checked for collisions. Now Bravedigger must avoid Bats and Bullets. We’ll rename the container to baddies because the collision logic is the same for both:
new Totem(player, bullet => baddies.add(bullet)))
To get an entity on screen, it needs to go inside a Container to be included in our scene graph. There are many ways we could do this. We could make our main GameScreen object a global variable and call gameScreen.add from anywhere. This would work, but it’s not good for information encapsulation. By passing in a function, we can specify only the abilities we want a Totem to perform. As always, it’s ultimately up to you.
Don’t lose your entities
Container logic. If we add an entity to a container during that container’s own update call, the entity will not be added! For example, if Totem was inside baddies and it tried to add a new bullet also to baddies, the bullet would not appear. Look at the code for Container and see if you can see why. We’ll address this issue in Chapter 9, in the section “Looping Over Arrays”.
When should the totem fire at the player? Randomly, of course! When it’s time to shoot, the fireIn variable will be set to a countdown. While the countdown is happening, the totem has a small animation (switching between two frames). In game design, this is called telegraphing—a subtle visual indication to the player that they had better be on their toes. Without telegraphing, our totems would suddenly and randomly shoot at the player, even when they’re really close. They’d have no chance to dodge the bullets and would feel cheated and annoyed.
if (math.randOneIn(250)) {
  this.fireIn = 1;
}
if (this.fireIn > 0) {
  this.fireIn -= dt;
  // Telegraph to the player
  this.frame.x = [2, 4][Math.floor(t / 0.1) % 2];
  if (this.fireIn < 0) {
    this.fireAtTarget();
  }
}
There’s a one-in-250 chance every frame that the totem will fire. When this is true, a countdown begins for one second. Following the countdown, the fireAtTarget method will do the hard work of calculating the trajectory required for a projectile to strike a target:
fireAtTarget() {
  const { target, onFire } = this;
  const totemPos = entity.center(this);
  const targetPos = entity.center(target);
  const angle = math.angle(targetPos, totemPos);
  ...
}
The first steps are to get the angle between the target and the totem using math.angle. We could use the helper entity.angle (which does the entity.center calls for us), but we also need the center position of the totem to properly set the starting position of the bullet:
const x = Math.cos(angle);
const y = Math.sin(angle);
const bullet = new Bullet({ x, y }, 300);
bullet.pos.x = totemPos.x - bullet.w / 2;
bullet.pos.y = totemPos.y - bullet.h / 2;

onFire(bullet);
Once we have the angle, we use cosine and sine to calculate the components of the direction. (Hmm, again: perhaps you’d like to make that into another math function that does it for you?) Then we create a new Bullet that will move in the correct direction.
That suddenly makes maze traversal quite challenging! You should spend some time playing around with the “shoot-at” code: change the random interval chance, or make it a timer that fires consistently every couple of seconds … or a bullet-hell spawner that fires a volley of bullets for a short period of time.
Flexible Mechanics
Throughout this book, we’ve seen many small mechanics that illustrate various concepts. Don’t forget that game mechanics are flexible. They can be reused and recombined with other mechanics, controls, or graphics to make even more game ideas—and game genres! For example, if you combine “mouse clicking” with “waypoints” and “fire towards”, we have a basic tower defense game! Create a waypoint path for enemies to follow: clicking the mouse adds a turret (that uses math.distance to find the closest enemy) and then fires toward it.
Smart Bad Guys: Attacking and Evading
Our bad guys have one-track minds. They’re given a simple task (fly left while shooting randomly; shoot towards player …) and they do the same thing in perpetuity, like some mindless automata. But real bad guys aren’t like that: they scheme, they wander, they idle, they have various stages of alertness, they attack, they retreat, they stop for ice cream …
One way to model these desires is through a state machine. A state machine orchestrates behavior changes between a set number of states. Different events can cause a transition from the current state to a new state. States will be game-specific behaviors like “idle”, “walk”, “attack”, “stop for ice cream”. You can’t be attacking and stopping for ice cream. Implementing state machines can be as simple as storing a state variable that we restrict to one item out of a list. Here’s our initial list for possible bat states (defined in the Bat.js file):
const states = {
  ATTACK: 0,
  EVADE: 1,
  WANDER: 2
};
We Don't Actually Need to Define States
It’s not necessary to define the states in an object like this. We could just use the strings “ATTACK”, “EVADE”, and “WANDER”. Using an object like this just lets us organize our thoughts—listing all the possible states in one place—and our tools can warn us if we’ve made an error (like assigning a state that doesn’t exist). Strings are fine though!
At any time, a bat can be in only one of the ATTACK, EVADE, or WANDER states. Attacking will be flying at the player, evading is flying directly away from the player, and wandering is flitting around randomly. In the function constructor, we’ll assign the initial state of ATTACKing: this.state = state.ATTACK. Inside update we switch behavior based on the current state:
const angle = entity.angle(target, this);
const distance = entity.distance(target, this);

if (state === states.ATTACK) {
  ...
} else if (state === states.EVADE) {
  ...
} else if (state === states.WANDER) {
  ...
}
Depending on the current state (and combined with the distance and angle to the player) a Bat can make decisions on how it should act. For example, if it’s attacking, it can move directly towards the player:
xo = Math.cos(angle) * speed * dt;
yo = Math.sin(angle) * speed * dt;
if (distance < 60) {
  this.state = states.EVADE;
}
But it turns out our bats are part chicken: when they get too close to their target (within 60 pixels), the state switches to state.EVADE. Evading works the same as attacking, but we negate the speed so they fly directly away from the player:
xo = -Math.cos(angle) * speed * dt;
yo = -Math.sin(angle) * speed * dt;
if (distance > 120) {
  if (math.randOneIn(2)) {
    this.state = states.WANDER;
    this.waypoint = findFreeSpot();
  } else {
    this.state = states.ATTACK;
  }
}
While evading, the bat continually considers its next move. If it gets far enough away from the player to feel safe (120 pixels), it reassesses its situation. Perhaps it wants to attack again, or perhaps it wants to wander off towards a random waypoint.

Combining and sequencing behaviors in this way is the key to making believable and deep characters in your game. It can be even more interesting when the state machines of various entities are influenced by the state of other entities—leading to emergent behavior. This is when apparent characteristics of entities magically appear—even though you, as the programmer, didn’t specifically design them.
Emergent Behavior
An example of this is in Minecraft. Animals are designed to EVADE after taking damage. If you attack a cow, it will run for its life (so hunting is more challenging for the player). Wolves in the game also have an ATTACK state (because they’re wolves). The unintended result of these state machines is that you can sometimes see wolves involved in a fast-paced sheep hunt! This behavior wasn’t explicitly added, but it emerged as a result of combining systems.
A More Stately State Machine
State machines are used a lot when orchestrating a game—not only in entity AI. They can control the timing of screens (such as “GET READY!” dialogs), set the pacing and rules for the game (such as managing cool-down times and counters) and are very helpful for breaking up any complex behavior into small, reusable pieces. (Functionality in different states can be shared by different types of entities.)
Dealing with all of these states with independent variables and if … else clauses can become unwieldy. A more powerful approach is to abstract the state machine into its own class that can be reused and extended with additional functionality (like remembering what state we were in previously). This is going to be used across most games we make, so let’s create a new file for it called State.js and add it to the Pop library:
class State {
  constructor(state) {
    this.set(state);
  }

  set(state) {
    this.last = this.state;
    this.state = state;
    this.time = 0;
    this.justSetState = true;
  }

  update(dt) {
    this.first = this.justSetState;
    this.justSetState = false;
    ...
  }
}
The State class will hold the current and previous states, as well as remember how long we’ve been in the current state. It can also tell us if it’s the first frame we’ve been in the current state. It does this via a flag (justSetState). Every frame, we have to update the state object (the same way we do with our MouseControls) so we can do timing calculations. Here we also set the first flag if it’s the first update. This is useful for performing state initialization tasks, such as reseting counters.
if (state.first) {
  // just entered this state!
  this.spawnEnemy();
}
When a state is set (via state.set("ATTACK")), the property first will be set to true. Subsequent updates will reset the flag to false. The delta time is also passed into update so we can track the amount of time the current state has been active. If it’s the first frame, we reset the time to 0; otherwise, we add dt:
this.time += this.first ? 0 : dt;
We now can retrofit our chase-evade-wander example to use the state machine, and remove our nest of ifs:
switch (state.get()) {
  case states.ATTACK:
    break;
  case states.EVADE:
    break;
  case states.WANDER:
    break;
}
state.update(dt);
This is some nice documentation for the brain of our Bat—deciding what to do next given the current inputs. Because there’s a flag for the first frame of the state, there’s also now a nice place to add any initialization tasks. For example, when the Bat starts WANDERing, it needs to choose a new waypoint location:
case states.WANDER:
  if (state.first) {
    this.waypoint = findFreeSpot();
  }
  ...
  break;
}
It’s usually a good idea to do initialization tasks in the state.first frame, rather than when you transition out of the previous frame. For example, we could have set the waypoint as we did state.set("WANDER"). If state logic is self-contained, it’s easier to test. We could default a Bat to this.state = state.WANDER and know the waypoint will be set in the first frame of the update.
There are a couple of other handy functions we’ll add to State.js for querying the current state:
is(state) {
  return this.state === state;
}

isIn(...states) {
  return states.some(s => this.is(s));
}
Using these helper functions, we can conveniently find out if we’re in one or more states:
if (state.isIn("EVADE", "WANDER")) {
  // Evading or wandering - but not attacking.
}
The states we choose for an entity can be as granular as needed. We might have states for “BORN” (when the entity is first created), “DYING” (when it’s hit, and stunned), and “DEAD” (when it’s all over), giving us discrete locations in our class to handle logic and animation code.
Controlling Game Flow
State machines are useful anywhere you need control over a flow of actions. One excellent application is to manage our high-level game state. When the dungeon game commences, the user shouldn’t be thrown into a hectic onslaught of monsters and bullets flying around out of nowhere. Instead, a friendly “GET READY” message appears, giving the player a couple of seconds to survey the situation and mentally prepare for the mayhem ahead.
A state machine can break the main logic in the GameScreen update into pieces such as “READY”, “PLAYING”, “GAMEOVER”. It makes it clearer how we should structure our code, and how the overall game will flow. It’s not necessary to handle everything in the update function; the switch statement can dispatch out to other methods. For example, all of the code for the “PLAYING” state could be grouped in an updatePlaying function:
switch(state.get()) {
  case "READY":
    if (state.first) {
      this.scoreText.text = "GET READY";
    }
    if (state.time > 2) {
      state.set("PLAYING");
    }
    break;

  case "PLAYING":
    if (entity.hit(player, bat)) {
      state.set("GAMEOVER");
    }
    break;

  case "GAMEOVER":
    if (controls.action) {
      state.set("READY");
    }
    break;
}
state.update(dt);
The GameScreen will start in the READY state, and display the message “GET READY”. After two seconds (state.time > 2) it transitions to “PLAYING” and the game is on. When the player is hit, the state moves to “GAMEOVER”, where we can wait until the space bar is pressed before starting over again.
Pathfinding
Our entities have become sentient and can make decisions for themselves. But they don’t have a lot of vision. They lack a long-term plan. One of the most useful (and fun) ways to make AI-controlled entities smarter is to give them the brains to navigate intelligently from one point in a maze to another.
In grid-based games, this is most effectively done via a pathfinding algorithm. As the name implies, this class of algorithms calculates how to navigate a path from one point in our game to another. Pathfinding algorithms operate on a graph of nodes that represent space in your game level. Our graph is a simple 2D grid. You can find paths through a 2D grid efficiently with the A* (pronounced “A star”) algorithm.
The concepts of A* are not too difficult to understand and implement. The idea is to treat the game tile map as a mathematical graph. The algorithm uses a system of weights to traverse the graph and find the most direct path between any two nodes (map tile positions). We won’t implement one here; we’ve got games to make. But if you’re interested in diving into the hows and whys, there’s a lot of information on A* available online.
There are many A* libraries for JavaScript, and they all work in more or less the same way:
- create an instance of the pathfinding library
- convert your game level to the correct format for the algorithm
- set the start and end nodes on the graph
- call the function to calculate the path and get a result.
What’s returned is a list of cells that represent the shortest path from the start point to the end point. How cool is that!
We’re going to use a recent and well-maintained A* library called EasyStar.js. EasyStar is “an asynchronous A* pathfinding API written in JavaScript for use in your HTML5 games and interactive projects”. It’s efficient and has a feature-rich API. To use it, install it from npm by running the following command in your project from the command line:
npm install --save easystarjs
This adds the EasyStar library to your package.json file, ready to be imported into your game. Now we can move on to step 1 of 4: “create an instance of the pathfinding library”. Go ahead and create a fresh pathfinder object inside our Level constructor function:
import EasyStar from "easystarjs";

// Create a pathfinding thing
const path = new EasyStar.js();
EasyStar expects levels to be modeled as a two-dimensional array of integers that should be passed to a method setGrid. Unfortunately, our map is stored in a one-dimensional array. So step 2 of 4 for pathfinding is “convert your game level to the correct format for the algorithm”. This is achieved by “chunking” the original array into map-width sized chunks, appending them to the resulting two-dimensional array:
// Translate the one-dimensional level into pathfinder 2d array
const grid = [];
for (let i = 0; i < level.length; i += mapW) {
  grid.push(level.slice(i, i + mapW));
}

path.setGrid(grid);
By default, all of the tiles are considered “solid” (non-walkable). We tell EasyStar which tile types are walkable via the setAcceptableTiles method. Walkable tiles in our game are defined in the tileIndexes metadata. We can map over this array and extract the tile indexes that have the walkable property set to true:
const walkables = tileIndexes
  .map(({walkable}, i) => walkable ? i : -1)
  .filter(i => i !== -1);
path.setAcceptableTiles(walkables);

this.path = path;
Extracting the walkable tile indexes is done in two phases (because we need the index of the array element, not just the element itself). First, map tileIndexes to an integer value of either the tile’s index (if it’s walkable) or a -1 (if it’s not). Then filter out all of the -1s, leaving just the tile indexes that are walkable.
That’s the setup done. If the level changes dynamically during your game (for example, if the player has the ability to build or destroy blocks), you’ll have to recalculate the grid with setGrid again to update the graph. Our levels are static, so we only need to do it once.
Target the Player
The next step is to “set the start and end nodes on the graph”. First we need a new bad guy to give the pathfinding brain to. Pretty sure what we need now is ghosts. Ghosts that (for one reason or another) have the supernatural ability to know where Bravedigger is standing, yet don’t have the supernatural power of passing through walls. They’re the spookiest because they have to obey alive-human rules.
Ghosts have a pos (which will also be the path start position) and a target (the path end position). At any given time, they can ask EasyStar to give them an updated list of the waypoints they must pass through to get to the player. EasyStar is an asynchronous library, so the final path is returned to the ghost via a callback function:
findPath() {
  // Calculate the pathfinding path
  const { map, target } = this;
  const s = map.pixelToMapPos(entity.center(this));
  const d = map.pixelToMapPos(entity.center(target));
  map.path.findPath(s.x, s.y, d.x, d.y, path => {
    this.path = path || [];
  });
  map.path.calculate();
}
The EasyStar API requires a start and end position as tile indexes (s is source, d is destination). path.findPath is the EasyStar asynchronous call that returns either null if no path is found, or a list of waypoints that represent the path. This is stored on the ghost’s path property. To actually make EasyStar do some work, we have to call path.calculate.
Pathfinding & Performance
Pathfinding is impressive, but it can be computationally expensive. If you updated a path every frame, on a big level, for large quantities of entities, you’d see your frames per second go down the drain. There are tricks to help (such as only periodically updating paths), but always remember the golden rule when making your first few games: don’t waste time optimizing something until it’s really a problem!
Moving Along a Path
The final step is to actually follow the path. This works almost identically to our original Bat’s waypoint system—except that, instead of a single random waypoint, we use the head of the list of the path elements. Once the ghost is “close enough” to the waypoint, we slice this list (which removes the head), and then start moving towards the next waypoint. The result is that the ghost relentlessly hunts down the player. Perfect!
followPath(dt) {
  const { map, speed, path, pos } = this;
  if (!path.length) {
    return; // We've finished following the path
  }

  // Move in the direction of the path
  const cell = this.path[0];
  // ... just like we moved towards waypoints

  // If you made it, move to the next path element
  if (closeX && closeY) {
    this.path = path.slice(1);
    if (this.path.length === 0) {
      this.findPath();
    }
  }
}
For our game, our ghost is a bit lazy. It only looks for a new path after it gets to where the player was standing. Obviously the player is not as lazy: they’ve moved on a long time ago to avoid being struck by totem projectiles! You could make the ghost far more vicious by updating its path more regularly. Updating often enough would result in an unforgiving ghost that the player could never escape. Pathfinding in action is fantastically satisfying.

Enemies alive
It’s halfway through the game jam. You should have been asleep many hours ago, but you’re having a lot of fun, so you’re still at the office. As you rise to leave for some much-needed rest, right on cue our old friend Guy Shifty appears, looking annoyingly wide awake and sprightly.
“Hey, whoa! You heading off already?” He tilts his head back and laughs. “You must be feeling confident. I’d never let my employees off this early. How’s it traveling, anyway?”
You let him play through the maze dungeon arena. After several minutes, he looks up at you and asks, “What’s with all the dungeons and bats and ghosts and things?”
You remind him of the game jam’s theme, “Scared to Death”, and his eyes go wide. “Oh—did I say that? Oh, ha ha, nooo … that was last year’s theme. This year it’s, um … ‘Let’s get PHYSICal’. You know—like physics games with gravity and stuff? Ah, that’s funny. Too bad, because I like your dungeon thingy.”
You’re beginning not to like this guy.
24 hours down the drain. 24 hours to start all over again. On the positive side, you now know a lot more than when you started: how to do bespoke collision detection between rectangles, how to wall slide around a tile map, how to stalk humans by injecting cunning and cleverness into the brains of artificial foes. You can feel the power rising. Use that power for good, not evil!