Rnds 1, 3, and 4 A
 Rnd 2 B
  Rnd 5 C
QUICK & EASY 17
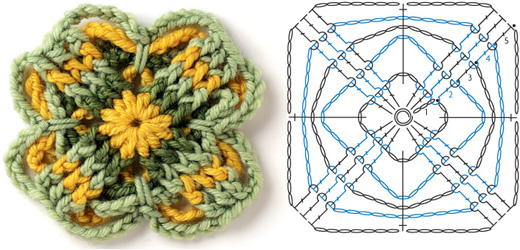
Rnds 1, 3, and 4 A Rnd 2 B Rnd 5 C
Working a single crochet stitch over existing chains and into a space several rounds down is a simple-as-can-be variation on an ordinary square.
Begin with sliding loop.
Rnd 1 Ch 3 (counts as dc), 2 dc in ring, ch 3, *3 dc in ring, ch 3; rep from * two more times, join with slip st to top of ch-3 — 12 dc and 3 spaces.
Rnd 2 Ch 3 (counts as dc), dc in next 2 dc, ch 7, *dc in next 3 dc, ch 7; rep from * around, join with slip st to top of ch-3.
Rnd 3 Ch 3 (counts as dc), dc in next 2 dc, ch 9, *dc in next 3 dc, ch 9; rep from * around, join with slip st to top of ch-3.
Rnd 4 Ch 3 (counts as dc), dc in next 2 dc, ch 11, *dc in next 3 dc, ch 11; rep from * around, join with slip st to top of ch-3.
Rnd 5 Ch 3 (counts as dc), dc in next 2 dc, *ch 7, working over 3 ch-loops, sc into space from Rnd 2, ch 7**, dc in next 3 dc; rep from * around, ending last rep at **, join with slip st to top of ch-3. Fasten off.
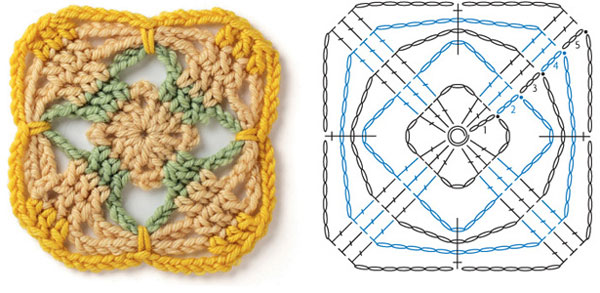
SQUARE: 3¾" (9.5 CM)
[ GATHERED CHAINS ]
Take the columns of double crochet separated by chains from the last family of motifs, throw in a few spike single crochets to change the shape of the motifs, meta-chain the corners, or use post stitches to create a textured, reversible square. When who’s to say which is the right side, what kind of connection offers the most reversibility? JAYGo may be the way to go.
18 Rnds 1, 3, and 4 A Rnd 2 B  Rnds 5 and 6 C
Gathering chains from the top down isn’t the only way to do it. Here, long corner chains are looped through each other before working the final round. Want another option? Try it with standard stitches instead of post stitches.
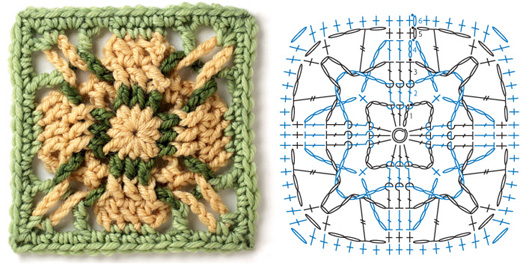
SQUARE: 4" (10 CM)
FPdc (front post double crochet) Yarn over, insert hook from front to back to front around post of stitch indicated and pull up a loop, (yarn over and pull through 2 loops on hook) two times.
Standing FPdc (standing front post double crochet) Beginning with slip knot on hook, yarn over, insert hook from front to back to front around post of stitch indicated and pull up a loop, (yarn over and pull through 2 loops on hook) two times.
Begin with sliding loop.
Rnd 1 Ch 3 (counts as dc), 2 dc in ring, ch 5, *3 dc in ring, ch 5; rep from * two more times, join with slip st to top of ch-3 — 12 dc and 4 spaces. Fasten off.
Rnd 2 Standing FPdc in first dc of any 3-dc group, FPdc in next 2 dc, ch 9, *FPdc in next 3 dc, ch 9; rep from * two more times, join with slip st to top of first FPdc. Fasten off.
Rnd 3 Standing FPdc in first dc of any 3-dc group, FPdc in next 2 dc, ch 11, *FPdc in next 3 dc, ch 11; rep from * two more times, join with slip st to top of first FPdc. Fasten off.
Rnd 4 Ch 3 (counts as dc), dc in next 2 dc, *ch 5; sc in next Rnd-1 space behind Rnd-2 and Rnd-3 chains, ch 5, dc in next 3 dc; rep from *, omitting last 3 dc, join with slip st to top of ch-3.
Slip one Rnd-2 chain over each corresponding chain in Rnd-3 at all four corners.
Rnd 5 Ch 1, sc in same st and in next 2 dc, *ch 1, tr in Rnd-2 space, ch 2, (sc, ch 1, sc) in Rnd-3 space, ch 2, tr in Rnd-2 space, ch 1, sc in next 3 dc; rep from * around, omitting last 3 sc, join with slip st to first sc.
Rnd 6 Ch 1, sc evenly around, working 1 sc in each st and ch-1 space, 2 sc in each ch-2 space, and placing (sc, ch 1, sc) in each corner space, join with slip st to first sc. Fasten off.
This is the three-sided version of this family. What would this one look like joined to others? Try it and see!
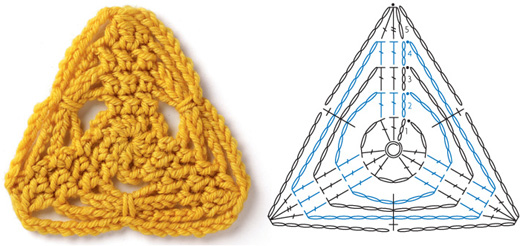
TRIANGLE: 3½" (9 CM)
Partial dc (partial double crochet) Yarn over, insert hook into stitch or space indicated and pull up a loop, yarn over and pull through 2 loops on hook.
Partial tr (partial treble) (Yarn over) twice, insert hook into stitch or space indicated and pull up a loop, (yarn over and pull through 2 loops on hook) two times.
Begin with sliding loop.
Rnd 1 Ch 3 (counts as dc), 2 dc in ring, ch 2, *3 dc in ring, ch 2; rep from * once more, join with slip st to top of ch-3 — 9 dc and 3 spaces.
Rnd 2 Ch 3 (counts as dc), dc in next 2 dc, ch 6, *dc in next 3 dc, ch 6; rep from * once more, join with slip st to top of ch-3.
Rnd 3 Ch 3 (counts as dc), dc in next 2 dc, ch 8, *dc in next 3 dc, ch 8; rep from * once more, join with slip st to top of ch-3.
Rnd 4 Ch 3 (counts as dc), dc in next 2 dc, ch 12, *dc in next 3 dc, ch 12; rep from * once more, join with slip st to top of ch-3.
Rnd 5 Ch 2 (counts as Partial dc), Partial tr in next dc, Partial dc in next dc, yarn over and pull through all 3 loops on hook, *ch 9, working over 3 ch-loops, sc into space from Rnd 2, ch 9**, Partial dc in next dc, Partial tr in next dc, Partial dc in next dc, yarn over and pull through all 4 loops on hook; rep from * around, ending last rep at **, join with slip st to top of ch-3. Fasten off.
Gathering chains on this six-sided version creates a flowerlike appearance. Play with colorwork and perhaps textured stitches for even more variation.
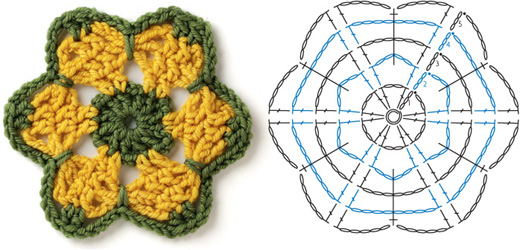
HEXAGON: 4¼" (11 CM)
Begin with sliding loop.
Note: Do not tighten loop until Rnd 2 is complete; the loop must stay open for motif to lie flat.
Rnd 1 Ch 3 (counts as dc), dc in ring, ch 2, *2 dc in ring, ch 2; rep from * four more times, join with slip st to top of ch-3 — 12 dc and 6 spaces.
Rnd 2 Ch 3 (counts as dc), dc in next dc, ch 4, *dc in next 2 dc, ch 4; rep from * around, join with slip st to top of ch-3.
Rnd 3 Ch 3 (counts as dc), dc in next dc, ch 6, *dc in next 2 dc, ch 6; rep from * around, join with slip st to top of ch-3.
Rnd 4 Ch 3 (counts as dc), dc in next dc, ch 8, *dc in next 2 dc, ch 8; rep from * around, join with slip st to top of ch-3.
Rnd 5 Ch 3 (counts as dc), dc in next dc, *ch 5, working over 3 ch-loops, sc into space from Rnd 2, ch 5**, dc in next 2 dc; rep from * around, ending last rep at **, join with slip st to top of ch-3. Fasten off.
Motif 20 Rnds 1 and 5 A Rnds 2–4 B
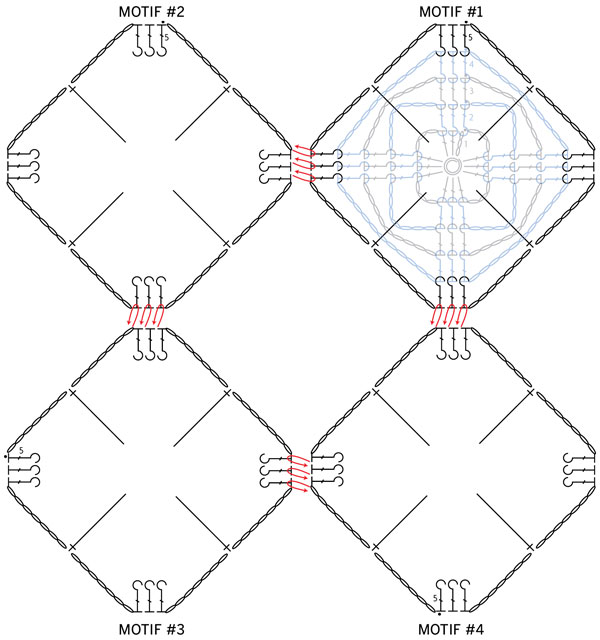
Having an even number of stitches at each point offers a challenge because there is no “center” stitch to use as a connection point. Here, a flat join connects Motif 20, with the join made in both of the double crochets at each point. Where a third motif joins two adjacent motifs, one join is made in the closest double crochet on one motif, and the second flat join is made in the closest double crochet on the next motif. If you prefer, where two motifs are joined, you may place the join in just one of the two double crochets.
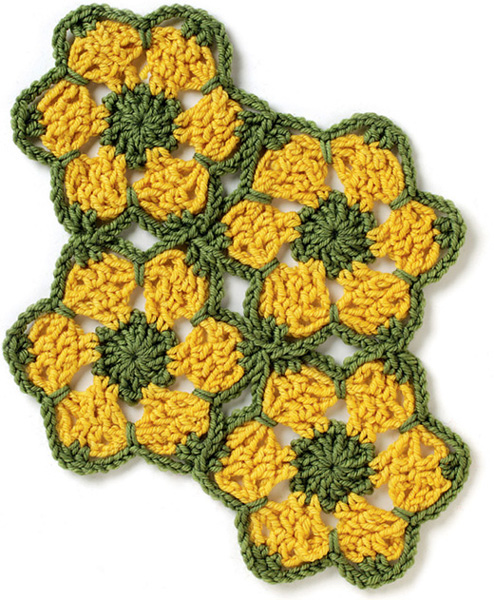
 Even number of stitches at connection point
JAYGo
Flat join
Connection in adjoining stitches
Tight placement of pointed shapes
[ TIP ]
A flat join brings shapes very close together. To create more space between the shapes, try a single crochet join.
Until you stitch it, you might find it difficult to understand how this circle relates to others in this family, but it does! The number of points and the depth of the spike stitches (the single crochets that gather the chains by going into previous rounds) determine the final shape of each motif. For another variation, try working the spike stitches only one round down on the final round.
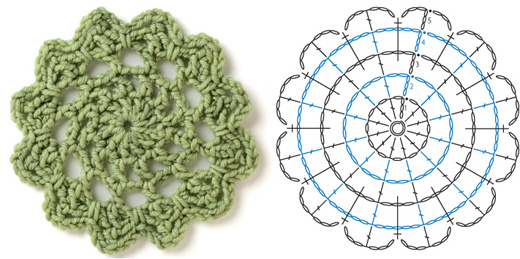
CIRCLE: 4¾" (12 CM)
Begin with sliding loop.
Note: Do not tighten loop until Rnd 2 is complete; the loop must stay open for the motif to lie flat.
Rnd 1 Ch 4 (counts as dc and ch 1), *dc in ring, ch 1; rep from * 10 more times, join with slip st to top of ch-3 — 12 dc and 12 spaces.
Rnd 2 Ch 5 (counts as dc and ch 2), *dc in next dc, ch 2; rep from * around, join with slip st to top of ch-3.
Rnd 3 Ch 6 (counts as dc and ch 3), *dc in next dc, ch 3; rep from * around, join with slip st to top of ch-3.
Rnd 4 Ch 8 (counts as dc and ch 5), *dc in next dc, ch 5; rep from * around, join with slip st to top of ch-3.
Rnd 5 Ch 6 (counts as dc and ch 3), *working over 2 ch-loops, sc into space from Rnd 3, ch 3**, dc in next dc, ch 3; rep from * around, ending last rep at **, join with slip st to top of ch-3. Fasten off.
22 Rnds 1 and 4 A Rnd 2 B Rnds 3 and 5 C
Add some post stitches for texture and reversibility! This motif is truly reversible, but each side looks quite different — just choose one side or the other as the right side. Even better, put them together for a fabric that looks great on both sides (see Joins on pages 78 and 80).
SQUARE (REVERSIBLE): 3¼" (8.5 CM)
FPdc (front post double crochet) Yarn over, insert hook from front to back to front around post of stitch indicated and pull up a loop, (yarn over and pull through 2 loops on hook) two times.
Standing FPdc (standing front post double crochet) Beginning with slip knot on hook, yarn over, insert hook from front to back to front around post of stitch indicated and pull up a loop, (yarn over and pull through 2 loops on hook) two times.
Begin with sliding loop.
Rnd 1 Ch 3 (counts as dc), 2 dc in ring, ch 3, *3 dc in ring, ch 3; rep from * two more times, join with slip st to top of ch-3 — 12 dc and 4 spaces. Fasten off.
Rnd 2 Standing FPdc in first dc of any 3-dc group, FPdc in next 2 dc, ch 7, *FPdc in next 3 dc, ch 7; rep from * two more times, join with slip st to top of first FPdc. Fasten off.
Rnd 3 Standing FPdc in first dc of any 3-dc group, FPdc in next 2 dc, ch 9, *FPdc in next 3 dc, ch 9; rep from * two more times, join with slip st to top of first FPdc. Fasten off.
Rnd 4 Standing FPdc in first dc of any 3-dc group, FPdc in next 2 dc, ch 11, *FPdc in next 3 dc, ch 11; rep from * two more times, join with slip st to top of first FPdc. Fasten off.
Rnd 5 Standing FPdc in first dc of any 3-dc group, FPdc in next 2 dc, *ch 7, working around 4 ch-loops, sc into space from Rnd 1, ch 7**, FPdc in next 3 dc; rep from * around, ending last rep at **, join with slip st to top of first FPdc. Fasten off.
Motif 22
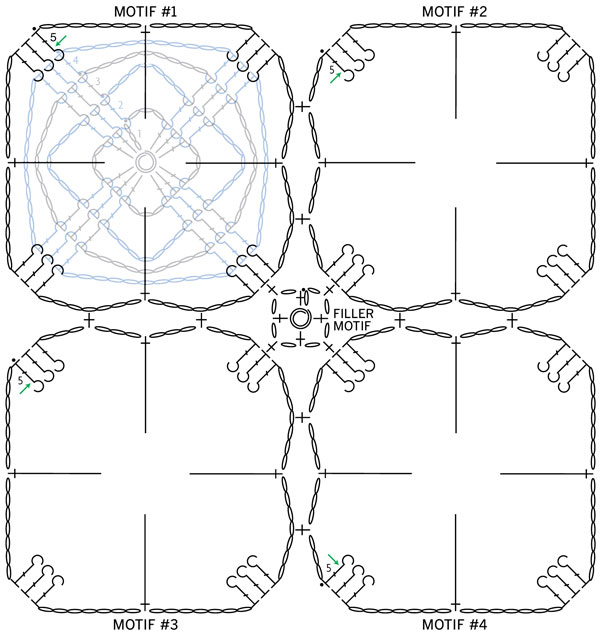
Reversible shapes offer all kinds of fun options for connections. In this example, Motif 22 is connected using alternating sides as the “right” side. Just make all the motifs as for Motif 22, but flip the connected piece over as needed to attach each additional motif. And of course, the other side looks just like this! A tiny filler motif connects to each shape and fills the center space.
Work the first motif through Rnd 5. Make additional motifs the same as the first motif, joining to previous motif(s) in Rnd 5, by working (ch 3, sc in space of previous motif, ch 3, sc over 4 chs into Rnd-1 space, ch 3, sc in space of previous motif, ch 3, 3 FPdc) across each side to be joined.
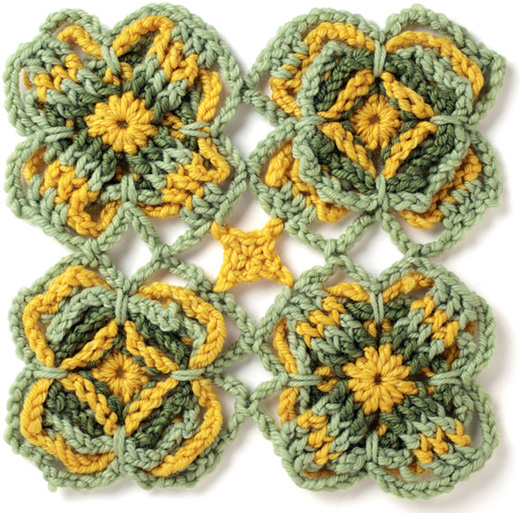
Rnds 1, 4, and Filler Motif A Rnd 2 B Rnds 3 and 5 C
Begin with sliding loop.
Ch 1, sc in ring, ch 1, sc in center dc of interior 3-dc group on any joined motif, ch 1, *sc in ring, ch 1, sc in center dc of next interior 3-dc group, ch 1; rep from * two more times; tighten sliding loop, join with slip st to first sc. Fasten off.
FEATURES:
Reversibility
JAYGo
Single crochet join
Connection in adjoining spaces
Filler motif
Motif 22
Connecting Motif 22 at the square tips gives an entirely different look from the previous connection example.
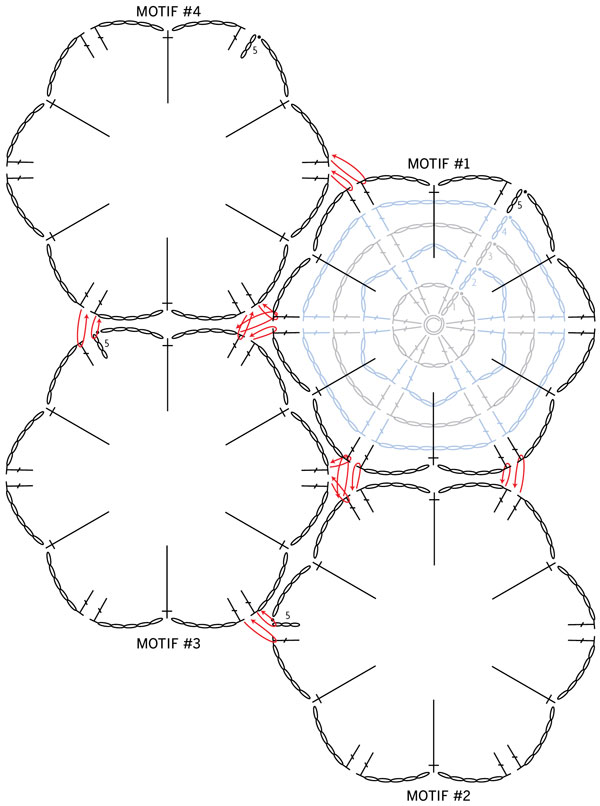
After working the first motif through Rnd 5, make and join additional motifs, joining each new motif to previous motif(s) in Rnd 5. Work (FPdc in next dc, flat join to corresponding dc on previous motif) three times at each tip to be connected. Note that the stitch diagram shows the “right” side of the connected fabric, as it is worked, while the photograph shows the reverse side of the same fabric. Although no filler motif is shown, this might be an excellent place to create a space-filling shape.
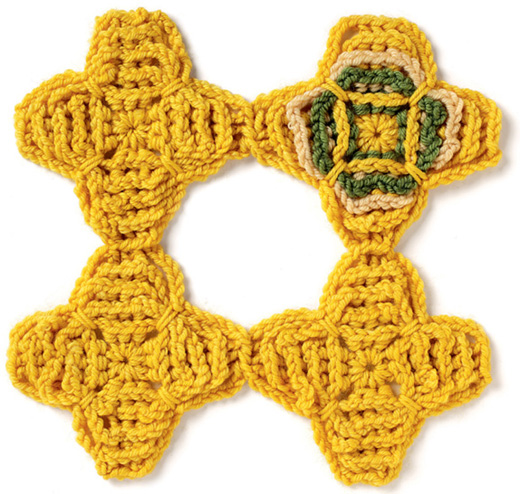
Rnds 1, 4, and 5 A Rnd 2 B or A Rnd 3 C or A
FEATURES:
Reversibility
JAYGo
Flat join
Connection in adjoining stitches
Connections in multiple stitches