INTRODUCTION TO
ANIMALS
Animals are fascinating subjects, and you can spend many hours at the zoo with your sketchpad, studying their movements, their body structures, and their coat textures. (See pages 86–87 for more on drawing animals from life.) And because pencil is such a versatile tool, you can easily sketch a rough-coated goat or finely stroke a smooth-haired deer. Of course, you don’t have to go to the zoo to find models; try copying the drawings here, or find a wildlife book for reference, and draw the animals that appeal to you.
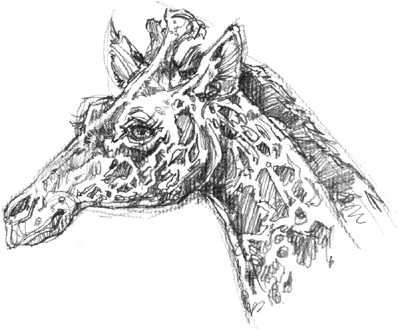
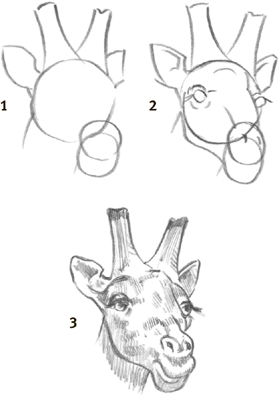
Studying the Head When drawing the head, pay special attention to the giraffe’s most distinctive features. Emphasize the narrow, tapered muzzle and the heavy-lidded eyes, adding long, curved eyelashes. To make sure the knobbed horns don’t look “pasted on,” draw them as a continuous line from the forehead, curving back where they attach to the head.
Working Out the Structure To draw the full body, make sure the proportions are correct. Begin by placing circles for the midriff, shoulders, withers, and haunches. Then use the body width as a guide for the other parts: the neck (from shoulder to head) and the legs are all bout the same length as the body is wide, and the head is roughly a third as long.
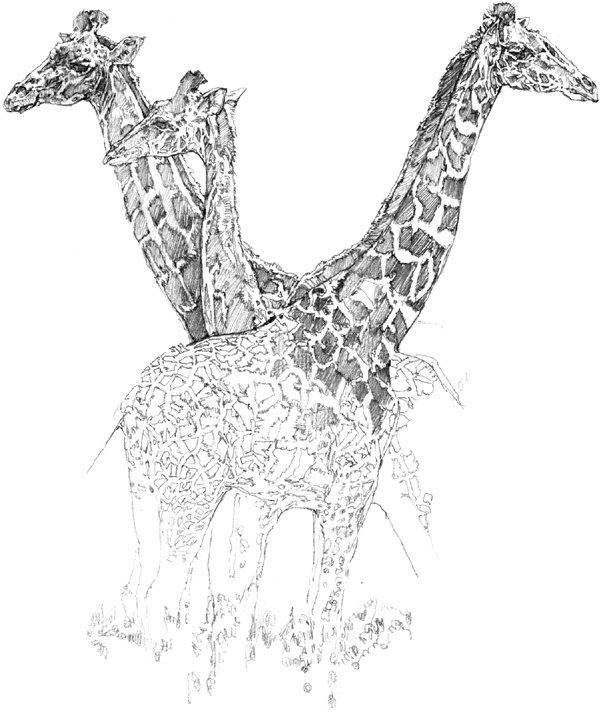
Developing Markings Start drawing this trio by sketching and refining their general shapes and then outlining the markings with a sharp-pointed HB. Then shade in the spots with a round-tip HB, making your strokes darker in the shadow areas, both on the spots and between them.
DRAWING FUR AND HAIR

Smooth Coat Shade the undercoat with the side of a blunt 2B and pick out random coat hairs with a sharp HB pencil.
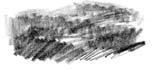
Rough Coat Using the side of your pencil, shade in several directions. With your pencil, use different strokes and various pressures.
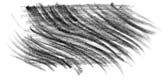
Long Hair Make wavy strokes in the direction the hair grows, lifting the pencil at the end of each stroke.
Short Hair Use a blunt HB to make short, overlapping strokes, lifting the pencil at the end to taper the tips.
Before you begin drawing any animal subject, ask yourself what it is that makes that animal distinct from all others. For example, sheep, horses, and giraffes all have hooves and a similar body structure, but a bighorn sheep has curled horns and a shaggy coat, a horse has a smooth coat and a single-toe hoof, and a giraffe has an elongated neck and legs and boldly patterned markings. Focusing on these distinguishing characteristics will make your drawings believable and lifelike.

Depicting Hair To show the texture of this bighorn’s coat, use the point of a 2B to apply long, wavy strokes on the body. Then draw short, wispy tendrils on the legs and underbelly.
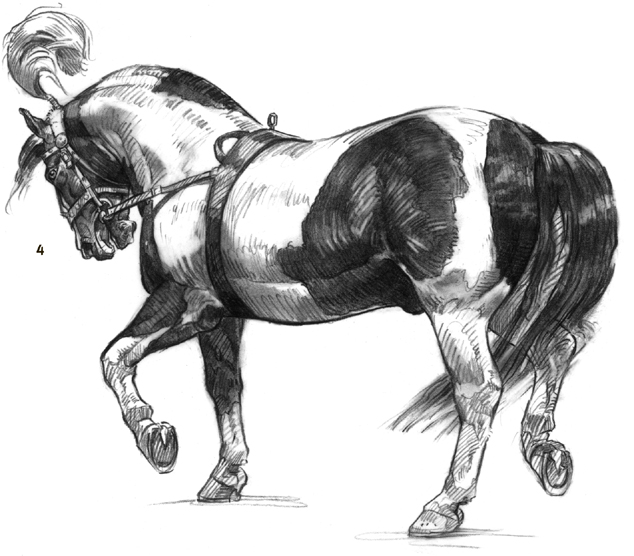
Creating a Portrait To capture this horse’s likeness, focus on its features: the large nostril, wide eye, pointed ears, and strong cheekbone all distinguish this horse from, say, the sheep on the left or the giraffe on the opposite page. Use a sharp-pointed pencil for the outline and details, and the flat side of the lead for shadows. Then go back over the shading with the point to accentuate the underlying muscles, leaving large areas of white to suggest a smooth, glossy coat.
Showing Action Drawing from pictures of animals helps you study their movements frozen by the camera. Focus on the sharp angles of the legs and feet, and suggest the underlying muscles by varying the direction of your strokes.
Horse

Giraffe
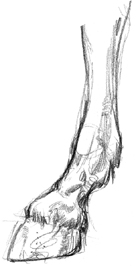
Focusing on Feet Horses have solid, single-toed hooves, whereas giraffes, sheep, and other ruminants have split (cloven) hooves. Notice that the horse’s hoof is angled a little more than the giraffe’s and that the giraffe’s toes are not perfectly symmetrical.
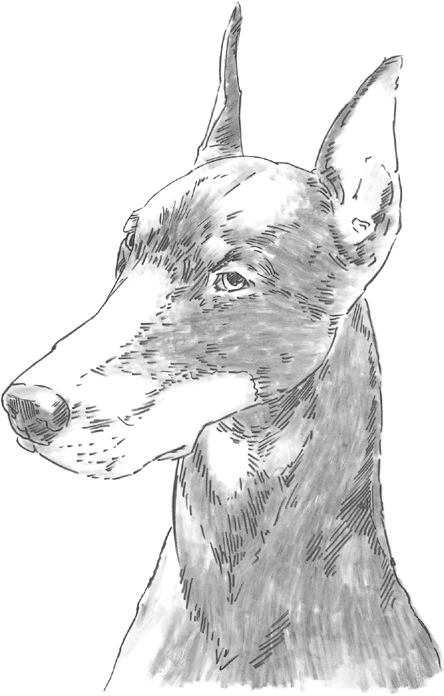
Doberman Pinschers are known for their sleek, dark coats. When drawing the shiny coat, be sure to always sketch in the direction that the hair grows, as this will give your drawing a more realistic appearance.
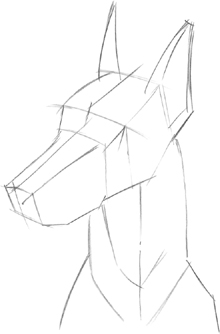
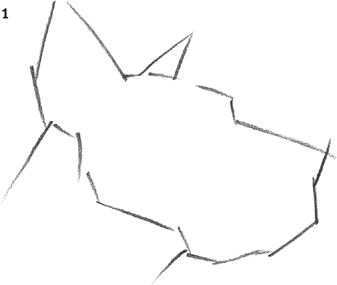
Step One With a sharp HB pencil, block in the boxy shape of the Doberman’s head and shoulders with quick, straight lines. Even at this early stage, you want to establish a sense of dimension and form, which you’ll build upon as the drawing progresses.
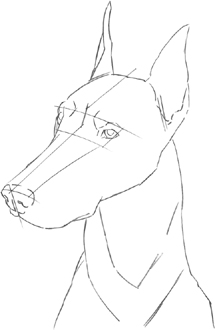
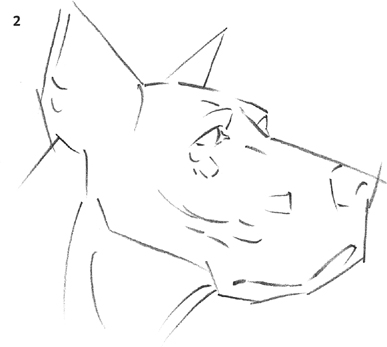
Step Two Using the lines from the previous step as a guide, adjust the outline of the ears, head, and neck to give them a more contoured appearance. Then add the eyes and nose, following the facial guidelines. Finally refine the outline of the muzzle.
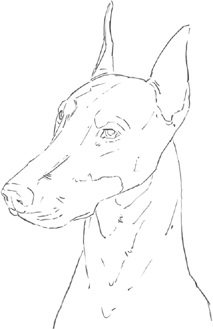
Step Three Next erase any guidelines that are no longer needed. Then begin placing light, broken lines made up of short dashes to indicate where the value changes in the coat are. These initial lines will act as a map for later shading.
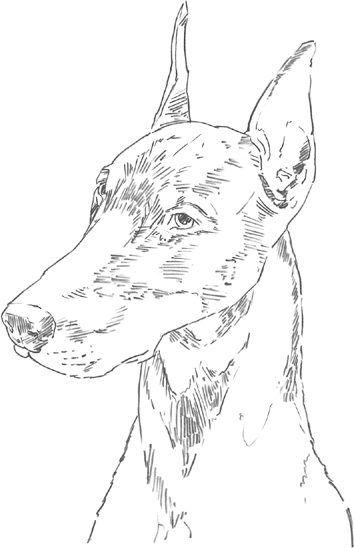
Step Four For the dog’s short hair, begin with small, dark hatch marks to establish the bristly, coarse nature of the coat. Then fill in the darks of the eyes and eyebrows, and dot in a few light rows of whiskers at the tip of the muzzle.
Step Five Now fill in the remaining darks. First create some graphite dust by rubbing a pencil over a sheet of fine sandpaper. Then pick up the graphite dust with a mediumsized blending stump and shade in the dark areas of the dog’s fur and nose. To avoid hard edges, blend to create soft gradations where the two values meet.
Great Danes have elegant stature and unique faces. While their enormous size (they can reach 30 inches tall at the shoulder) may be slightly intimidating, they are actually very gentle and affectionate, especially with children.
The erect ears can be developed from simple triangle shapes.
Developing the Shape In steps 1 and 2, use an HB pencil to block in the dog’s large head. Notice the droopy lips and eyelids, which give the subject a pleading expression. Refine the shapes, and lightly shade with a 2B pencil to bring out the form and contours of the head in step 3. The minimal shading will give the coat a smooth appearance.
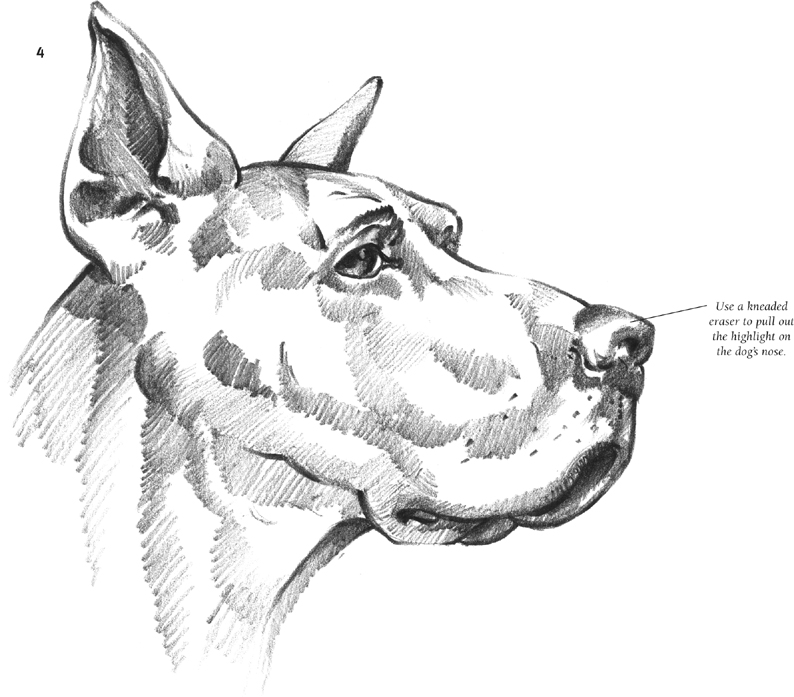
Use a kneaded eraser to pull out the highlight on the dog’s nose.
Creating Form Add darker values within the center of the ear to create the curvature of the ears, “carving out” the area through skillful shading, as shown in the final drawing. To enhance the shine of the nose, shade it evenly, and use a kneaded eraser to pull out highlights.
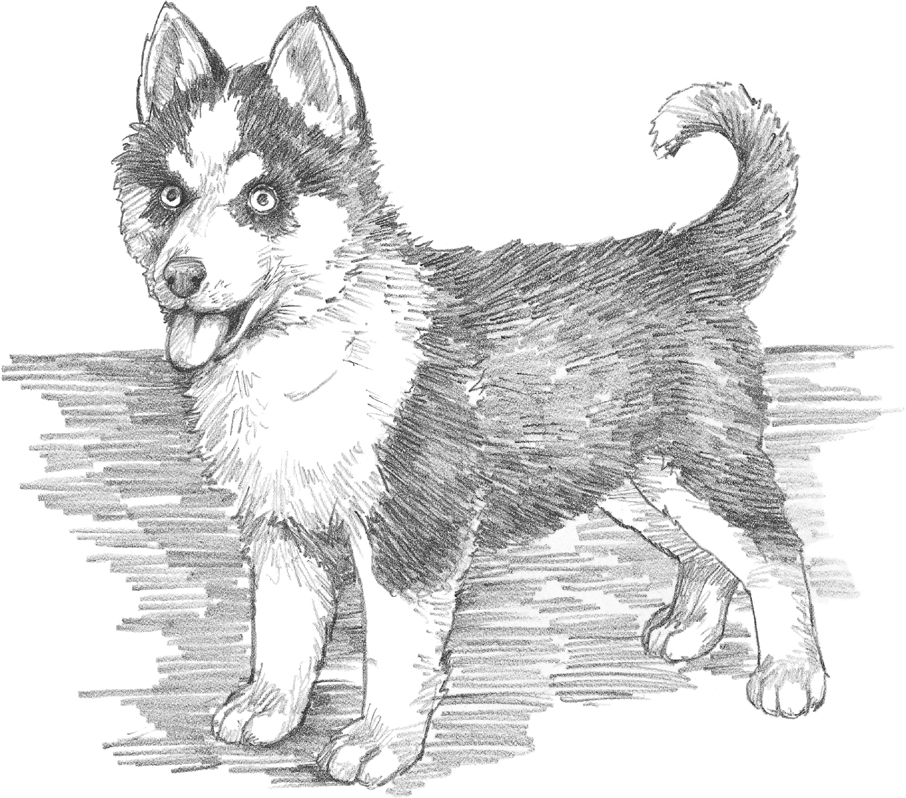
The Husky is an athletic sled dog with a thick coat. It has a deep chest and a bushy tail, evident even at the young age of this little pup.
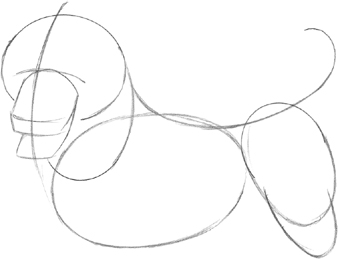
Step One First suggest the position of the spine and tail with one gently curving gesture line. Then use this line to position the round shape of the head, body, hindquarters. Next draw guidelines for the pup’s facial features, at the same time establishing the general shape of the muzzle.
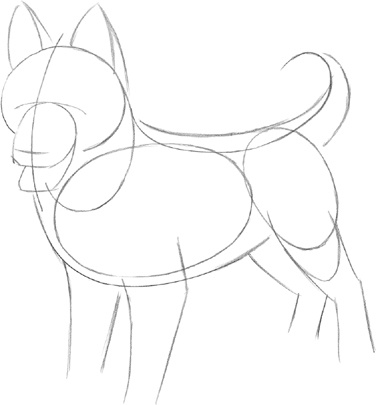
Step Two Now outline the entire torso using smooth, quick lines based on the initial shapes. Place the triangular ears and suggest the upper portion of the four legs.
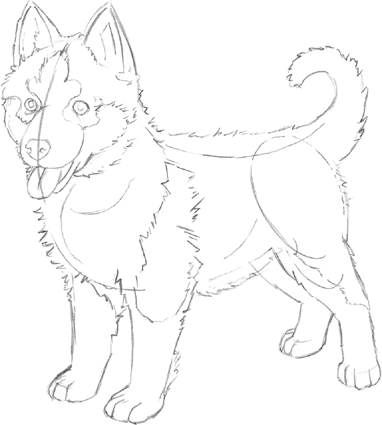
Step Three Once you’re satisfied with the pose and the way it has taken shape, begin to develop the puppy’s coat. Apply a series of short, parallel strokes that follow the previous outline, producing the appearance of a thick coat. Using the same kind of strokes, outline the color pattern of the coat. Then place the eyes, nose, mouth, and tongue, and refine the paws.
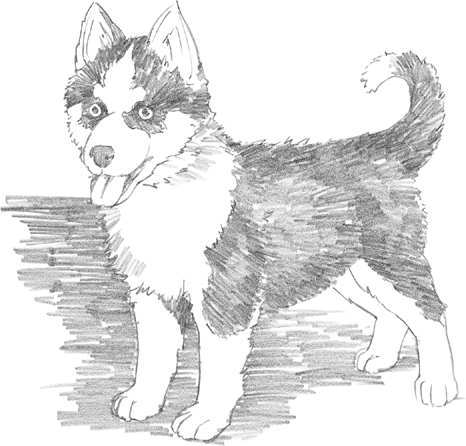
Step Four Next erase any guidelines you don’t need and begin shading the dark areas of the fur with the broad side of the pencil. Use straight strokes that follow the direction of hair growth, radiating from the center of the face and chest. Next shade in the nose and pupils. Then add a background to contrast with the white of the puppy’s chest. Apply straight, broad strokes with the side of the pencil, using horizontal hatching lines.
Step Five At this stage, add volume to the dog’s form, defining it with a few light strokes along the edges of the white fur. Now shade the far hind leg and left cheek by covering those areas with more strokes. Next go over the dark fur with a softer pencil and thinner, darker strokes, applying denser strokes toward the edges to suggest form. Finish the piece by adding the final details and shading to the nose, mouth, eyes, and inner ears.
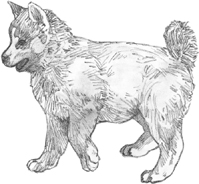
COMPARING THE PUPPY AND THE DOG
Young puppies and full-sized dogs have the same features but in different proportions. Proportion refers to the proper relation of one part to another or to the whole—particularly in terms of size or shape—and it is a key factor in achieving a good likeness. A puppy isn’t just a small dog. Although a puppy has all the same parts as its adult counterpart, the puppy’s body appears more compact than the dog’s—and its paws, ears, and eyes seem much larger in proportion to the rest of its body. In contrast, the adult dog seems longer, leaner, and taller. Its muzzle appears larger in proportion to the rest of its body, and its teeth are noticeably bigger. Keeping these proportional differences in mind and incorporating them in your drawings will help you make your artwork look convincingly realistic.
The powerful English Bulldog, with its stocky, muscular body, is a fun, challenging breed to draw. Even though the pronounced underbite of this dog gives it a gruff expression, it is known to be very affectionate and docile.
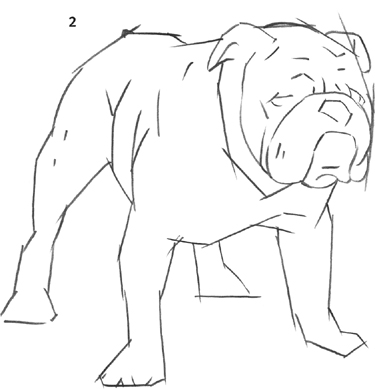
Blocking In In step 1, block in the general outline with short, straight lines. Keep the legs short and bowed to give the dog its compact, stocky appearance. As you sketch the features in step 2, study the low placement of the eyes, as well as how the nose is pushed into the face.
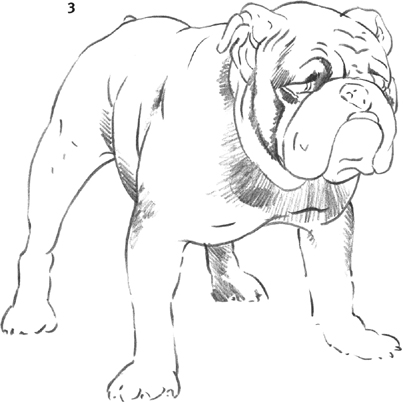
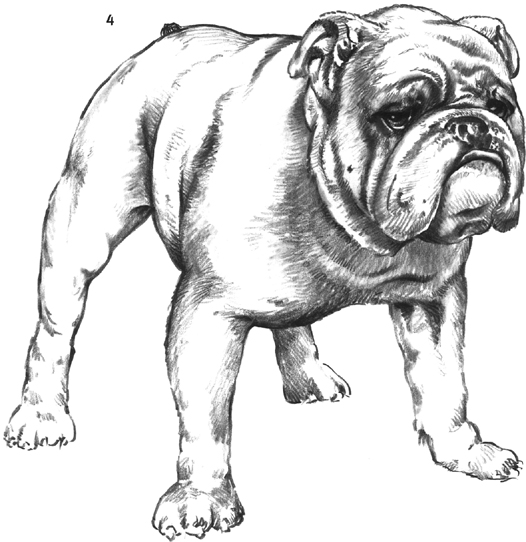
Placing Shadows and Details Begin shading with a sharp 2B pencil, developing the folds on the face and the contours and shadows along the body. Keep the pencil fairly sharp to make the folds distinct and the fur smooth. Use a sharp pencil to add the details in the eyes. As in all the drawings, work at your own pace, and don’t rush when shading the fur. Your attention to detail will be apparent in the final rendering.
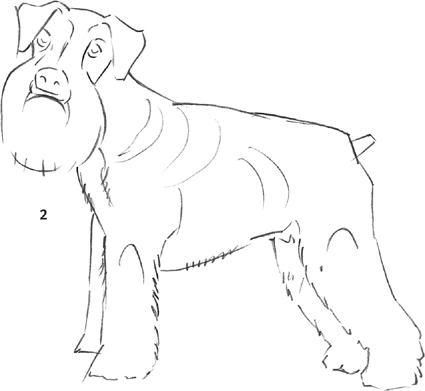
The Miniature Schnauzer’s bushy eyebrows and long beard give it a striking appearance. Almost square in profile, the Miniature Schnauzer (along with its larger counterparts, the Standard and Giant Schnauzers) exhibits a straight, level back and well-developed legs.
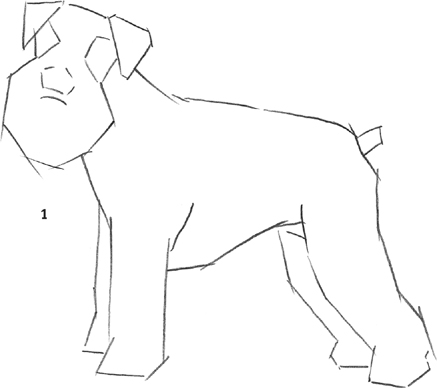
Creating a Basic Outline As you block in the body in step 1, make the face wider around the cheeks to accommodate the full beard. Next add triangle shapes on top of the head so the ears appear to flop forward. In step 2, place the wide-set eyes and broad nose, and suggest a furry outline.
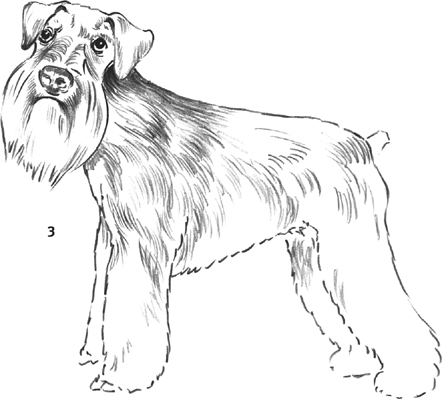

Dark shading here prevents the face and beard from blending into the body.
Forming Texture Slowly lay in the coat with quick strokes along the back in step 3. Make certain the hair closest to the face is dark, so the outline of the face is visible. Fewer strokes are needed on the chest and legs because the coat is generally lighter in these areas. You can also mold a kneaded eraser into a sharp edge and “draw” with it in the direction of the hair to create highlights.
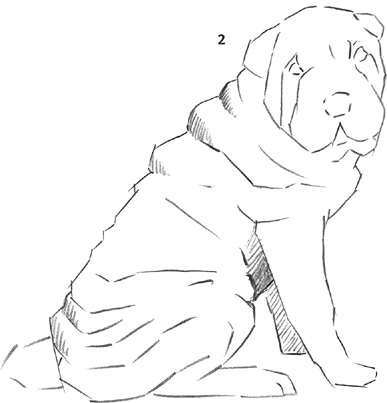
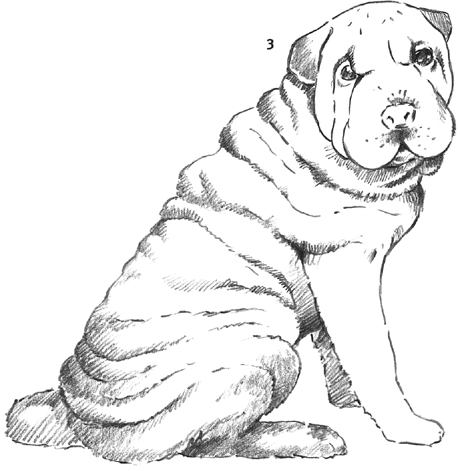
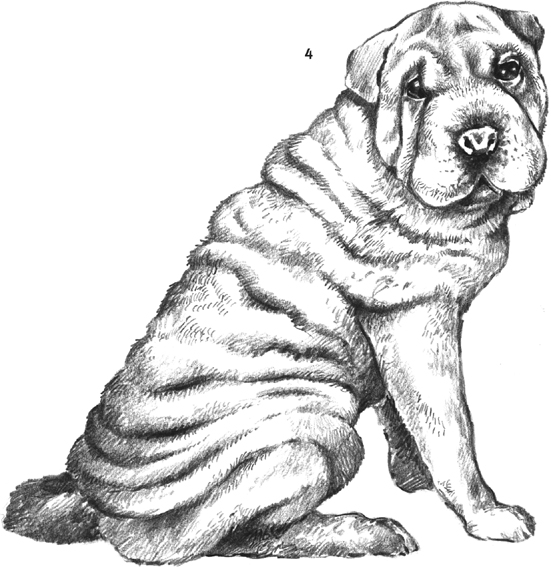
The Shar-Pei is probably best known for its loose folds of skin. These wrinkles seem to give this breed a worried expression. The puppy shown here has looser skin than an adult; eventually the body will fill out, and the folds will become less obvious.
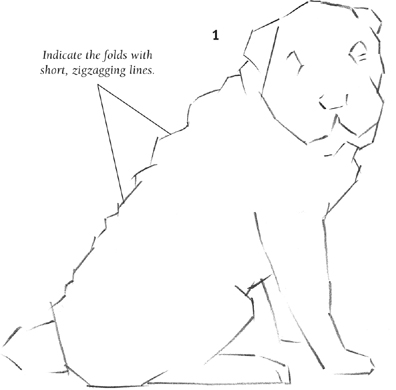
Depicting the Shar-Pei As you block in the dog’s shape in step 1, use short strokes placed at wide angles to sketch the outline. To develop the folds in step 2, start by lightly shading inside the creases. Give equal attention to each fold so the dog appears realistic. Continue to develop the shading with short slash marks in step 3, keeping the values darker between the folds.
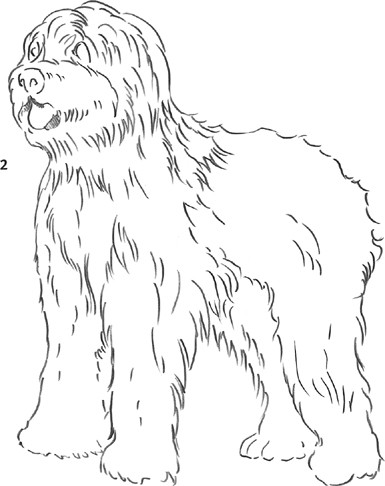
The most distinctive feature of the Old English Sheepdog is its long fluffy coat, which sometimes covers the dog’s eyes and hides the ears. This particular rendering doesn’t require many fine details, but the coat does require much attention.
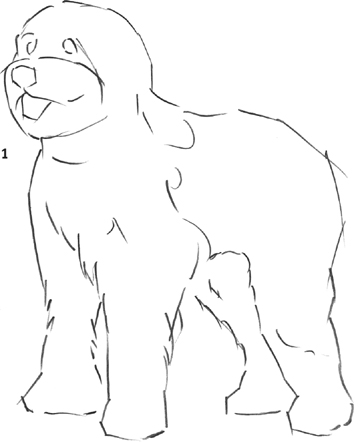
Suggesting the Overall Shape Lay down a basic outline in step 1, adding some suggestions of hair in step 2. Keep your lines loose and free.
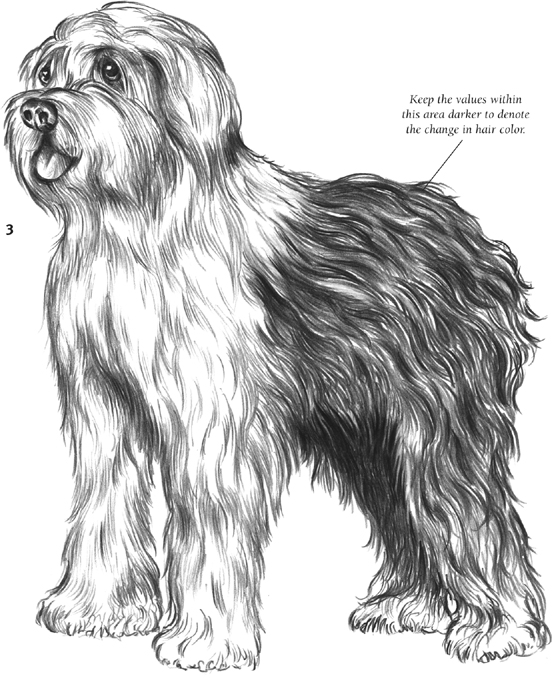
Keep the values within this area darker to denote the change in hair color.
Rendering the Hair As you begin to develop the coat, notice how the nose, tongue, and eyes differ in texture; they are quite smooth in contrast. You can use a blunt-pointed pencil to lay in the hair, adding more shading layers to the back end of the body to indicate the darker color.
Hair Detail Enhance the texture of the dog’s hair by molding a kneaded eraser into a sharp edge and erasing with the edge in the direction of the strokes. This brings out highlights and creates shadows between the strands.
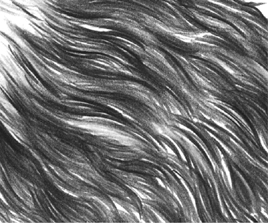
The very recognizable Chow Chow can have a rough or smooth coat, which should be rendered with a soft, sharp pencil. Notice how finely detailed this rendering appears; each hair of the coat is carefully drawn. It should be obvious what this dog’s coat would feel like.
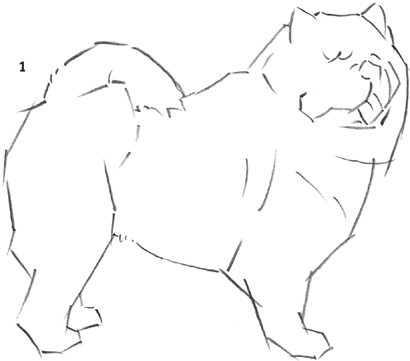
Sketching the Chow Chow In steps 1 and 2, sketch a preliminary outline of the dog, and add the facial features. With a sharp pencil, begin shading the darkest areas within the fur in step 3. This fur texture shows many highlights, so the kneaded eraser will also be useful for enhancing the realism of the drawing.

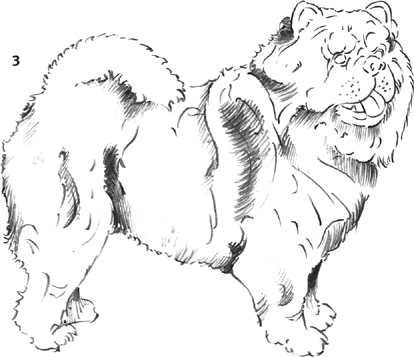
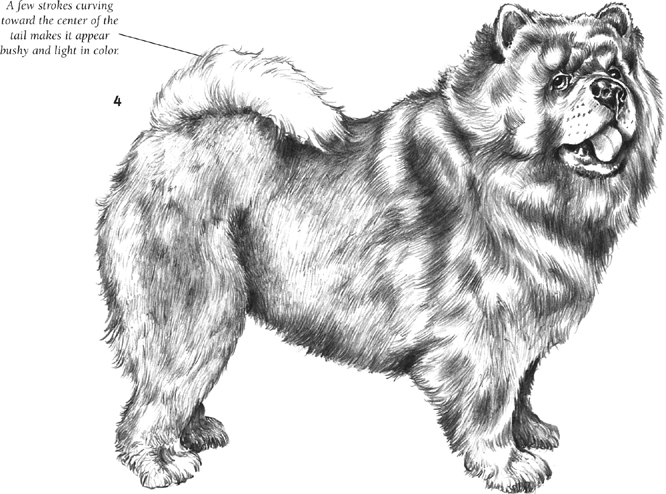
A few strokes curving toward the center of the tail makes it appear bushy and light in color.
The Bouvier des Flandres is a herding breed which originated in Belgium. Although it has a formidable, rugged appearance, this intelligent breed makes an excellent pet.
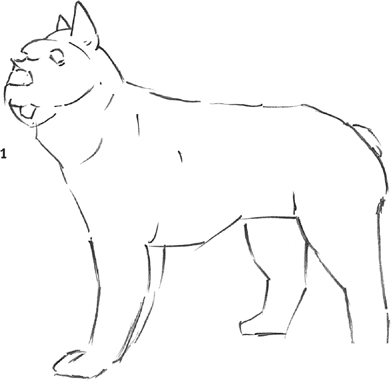
From this angle, the dog’s right eye is not visible. Take your time at the block-in stage so the features are correctly placed before continuing.
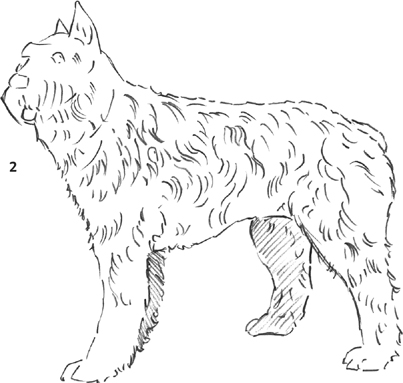
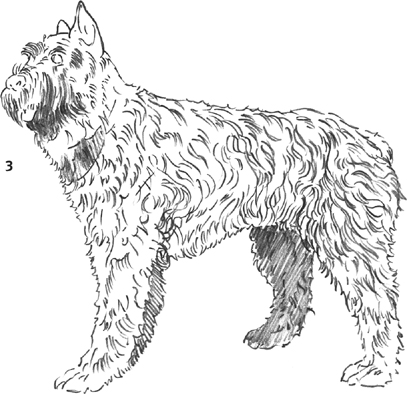
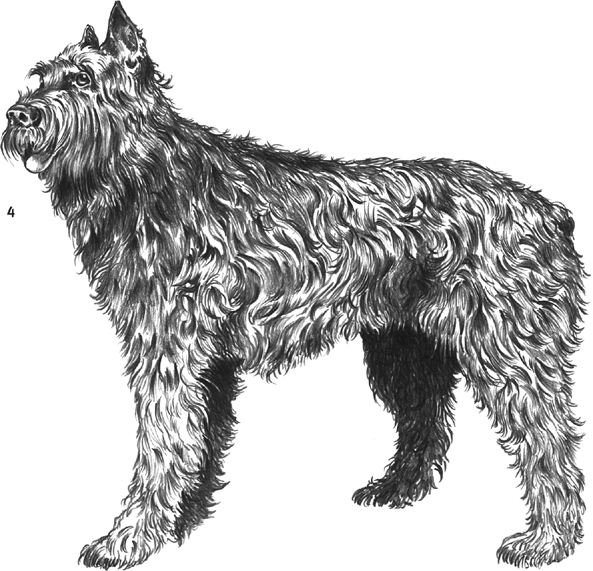
Drawing the Bouvier In step 1, block in the preliminary outline of the dog’s body. Develop the thick, shaggy coat as shown in steps 2 and 3. Allow some of the paper to show through as highlights, or use a kneaded eraser to create them. Since it may take some practice to capture the essence of the hair texture, practice on a separate piece of paper until you feel comfortable with your skills.
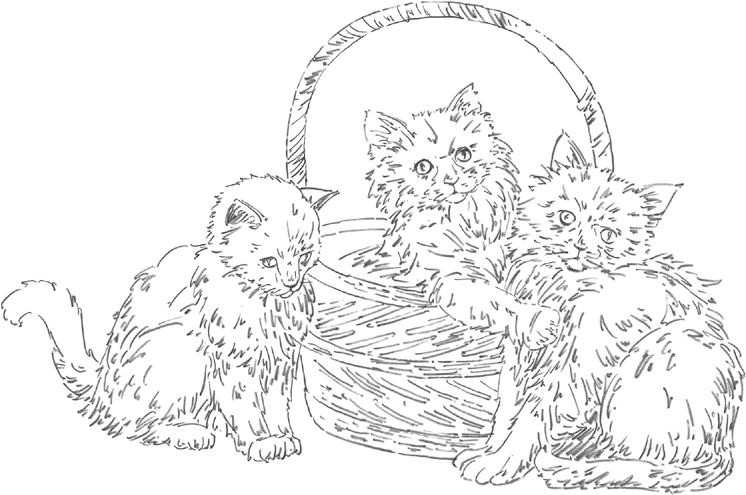
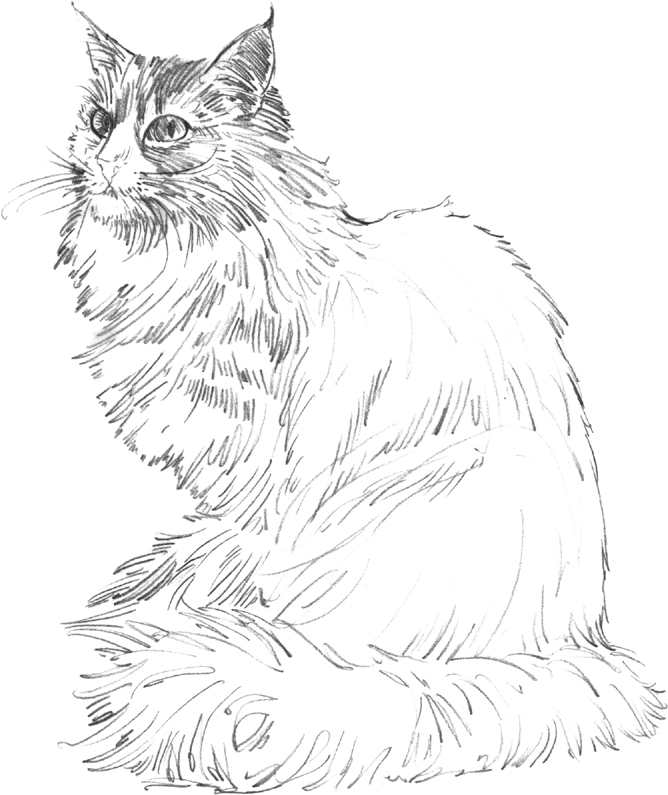
Ragdolls get their name from their very relaxed nature. To draw these soft, fluffy kittens, use short, quick strokes to suggest the fur. Then use a blending stump to soften some of your marks, creating the smooth appearance of the fur.
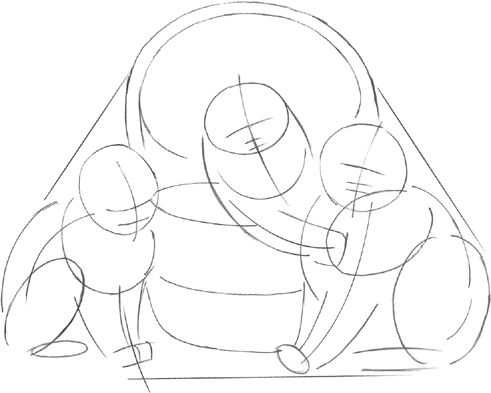
Step One Sketch out the balanced, triangular composition of the basket and three kittens. Then build each feline shape with ovals indicating the position of the head, chest, and hindquarters. Next mark a few guidelines for the facial features and suggest the general shape of the legs and paws. Continue to develop the kittens, adding triangular shapes to the ears that follow the tilt of each head. Then sketch the tails of the two cats outside the basket.
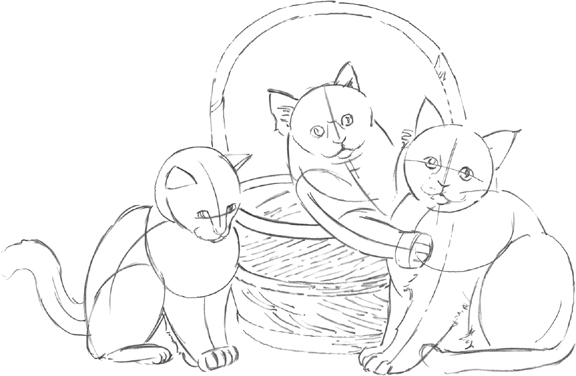
Step Two At this point, erase the initial guidelines and focus on refining the outline of the cats. Add the eyes, nose, and mouth to each kitten and define the individual sections of the paws. Then begin to create the weave pattern of the basket with parallel diagonal strokes.

Step Three Next complete the outline of the kittens, retracing the initial sketch with short, broken marks to suggest fluffy hair. Further develop the texture of the basket, adding more parallel horizontal strokes to define the separate bands. Then add curved strokes to the basket handle, to suggest roundness.
Step Four Continue to add texture to the basket and the kittens, switching between an H and a 2B pencil. Vary the thickness of each stroke by alternating between the sharp point and the flat side of the pencil lead. As you develop each area, be careful to do so at the same rate to maintain an even balance.
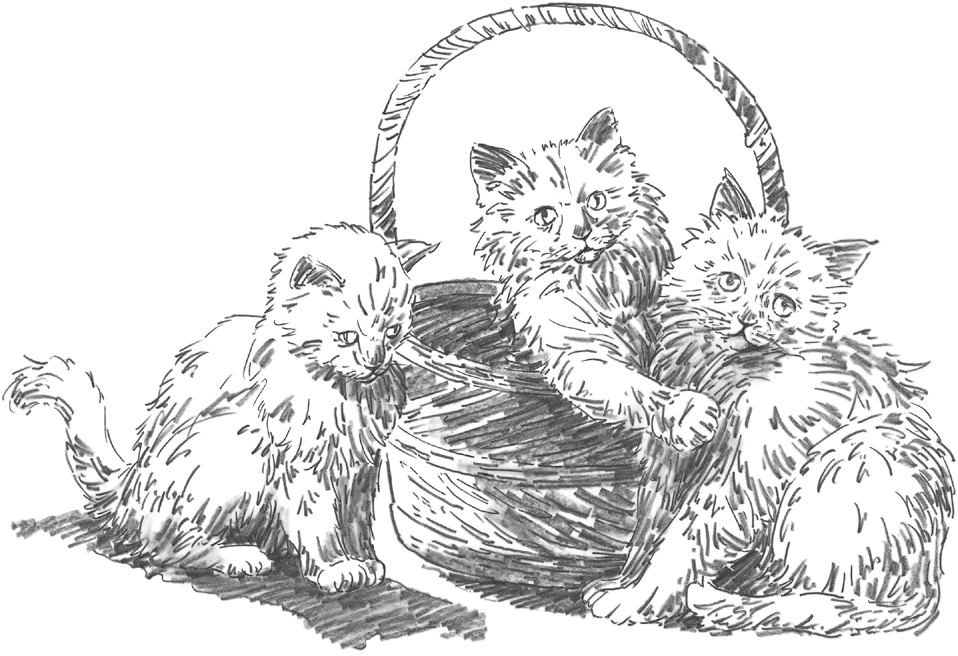
Step Five To finish, darken the basket shadows by stroking over them with the flat side of the pencil tip, following the direction of previously placed strokes. Use the same technique to add cast shadows under the kittens and the basket. These dark areas will contrast nicely with the white highlights on the kittens. To finish the kittens’ coats, lightly shade with a blending stump to produce softer, more subtle shadows.
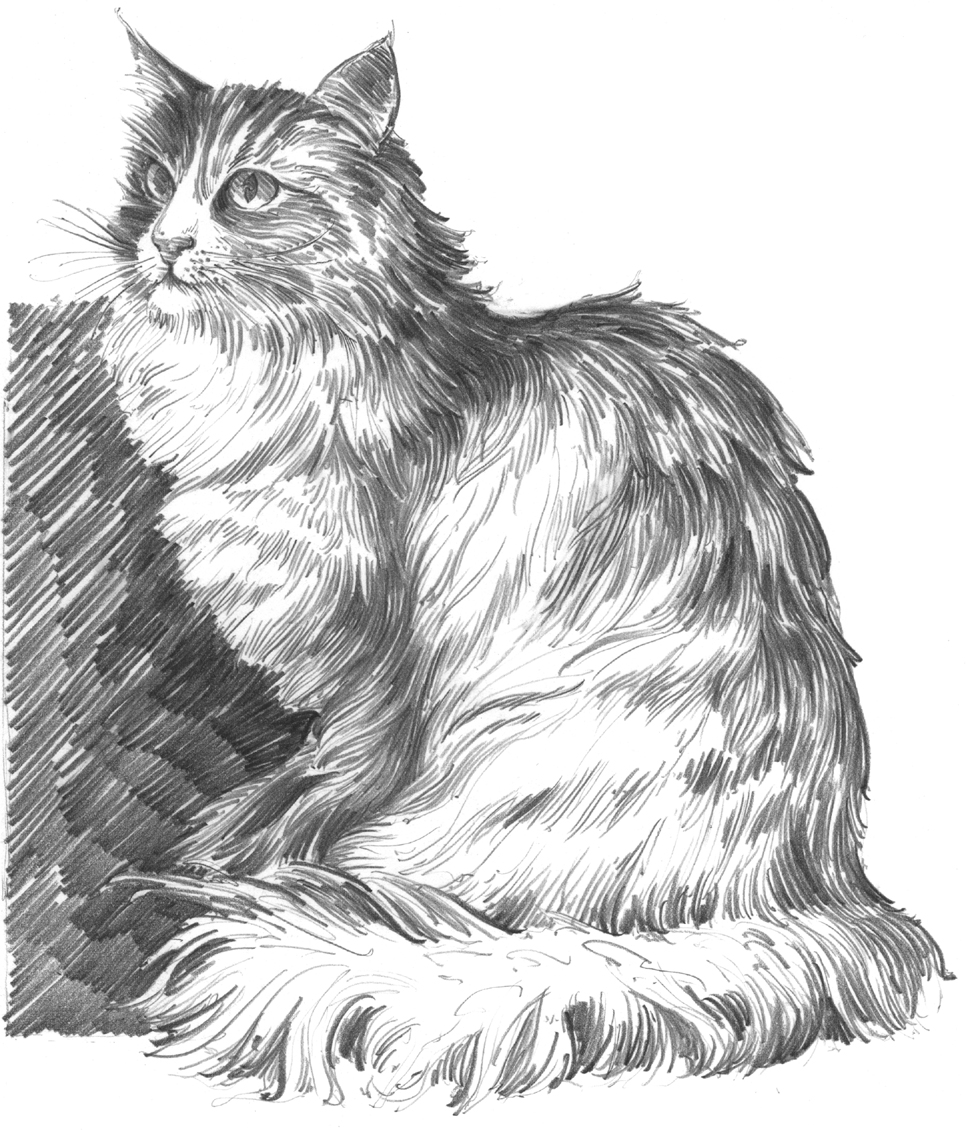
The Persian is a stocky cat with long, silky hair. It has a large, round face with short, broad features and small ears. To depict the quality of this Persian’s fur, keep your pencil strokes uniform and deliberate. Notice that this example has been developed much further than the previous examples were.

Flowing, curved lines are used to indicate the cat’s form beneath the fur.
Step One When you block in this cat, notice that the eyes are two different shapes. This is because the head is viewed at a three-quarter angle. Block in the basic shape of the cat, making curved lines to suggest its roundness and to show changes in the form.
Step Two Use uniform pencil strokes to indicate the layers of fur around the head, chest, and back. Notice the way the pencil strokes are used to refine the features. Use a sharp HB pencil to shade the eye and to draw the fine lines of the nose and whiskers. Next use 2B and 4B pencils to bring out the thick texture of the fur. Remember that the lines should always be drawn in the direction that the hair grows.
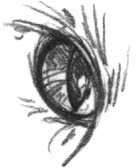
Eye Detail At this view, the angle of the cat’s right eye is important; the pupil remains perpendicular and is partially covered by the bridge of the nose.
Step Three The final rendering shows an effective use of contrasting values. The minimal shading in the white areas on the cat’s chest and side reflect where the light strikes the coat. The middle values are shown in the fur along the left side of the cat’s face and on the cat’s left ear. Use a 4B or 6B pencil for darker strokes along the backbone, neck, right side of the face, and parts of the tail. Notice how the dark background is used to create the shape of the light-colored fur on the cat’s chest and tail.
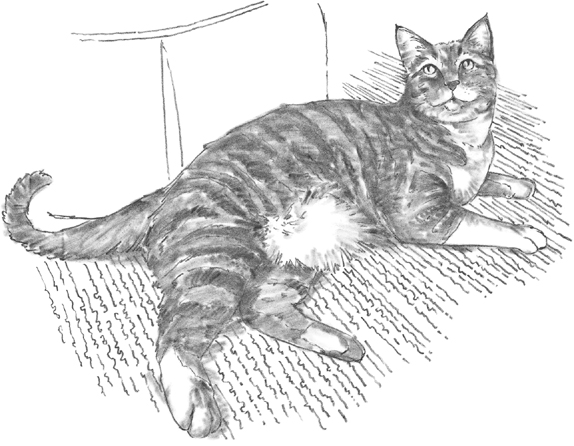
Patterns and textures can add interest to an otherwise ordinary subject. For this sketch, the pairing of a ridged carpet and striped cat produces an eye-catching study in contrasts.

Step One Begin with a sideways S to establish the cat’s gesture line, using a tighter curl for the tail. Then establish the basic shapes using a circle for the head and ovals for the chest, body, and haunches. To create guidelines for the cat’s features, center a cross over the face and add two dashes to indicate the position of the mouth and nose.
Step Two Now draw a smaller oval over the cat’s stomach, blocking in the bulging fur of its underbelly. Then create the full outline of the cat’s body, adding its four legs. Next draw the triangular ears and place the eyes, nose, and mouth.
Step Three Next go over the outline with short, broken strokes that better depict the fur. In addition, define the toes and paw pads, and add a few lines to suggest the crease at the cat’s shoulder. Also add more detail to the face, marking the stripes and filling in the crescent shapes of the pupils.
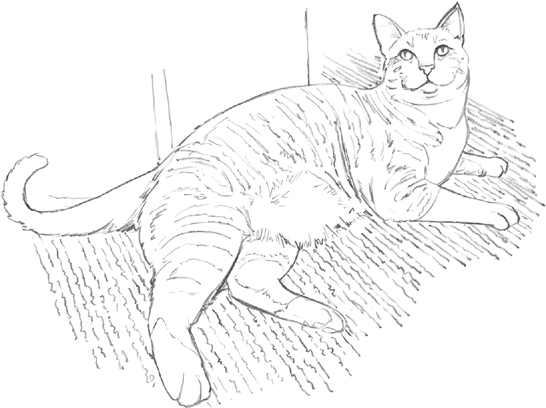
Step Four Erase any guidelines you no longer need, and map out the basic tabby pattern of the cat’s coat. Use curving lines to suggest the cat’s rounded form. Then scribble in the contrasting parallel lines of the carpet, and place the first lines of the ottoman behind the cat.
Step Five Next apply shading to the cat’s subtly striped coat. Go over the graphite with a blending stump to allow soft gradations, which best illustrate the cat’s fluffy fur. You can also use the stump to soften edges, such as along the delicate fur of the cat’s underbelly. Then further define the cloth-covered ottoman behind the cat.
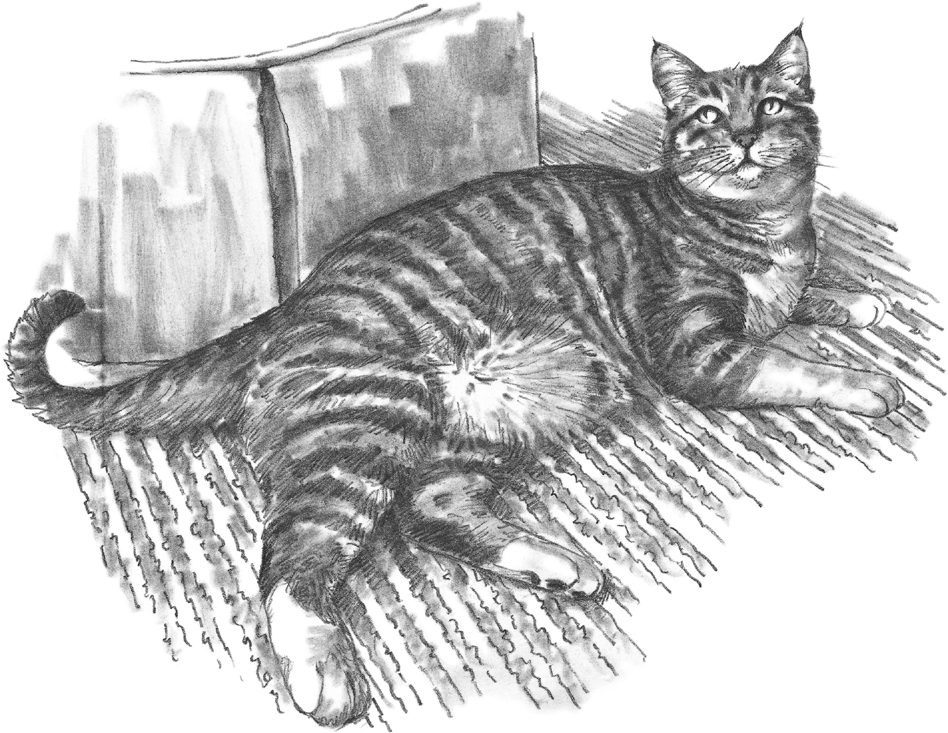
Step Six Now continue to build up the cat’s darker values, developing the dark stripes of the cat by applying heavier strokes in the same direction as the fur growth. For the ridged carpet pattern, lightly smudge shading in every other stripe using graphite dust and a blending stump. Then, to finish, apply a few broad, vertical strokes to the ottoman with the blending stump, producing a calming contrast to the busy striped patterns of the carpet and cat.
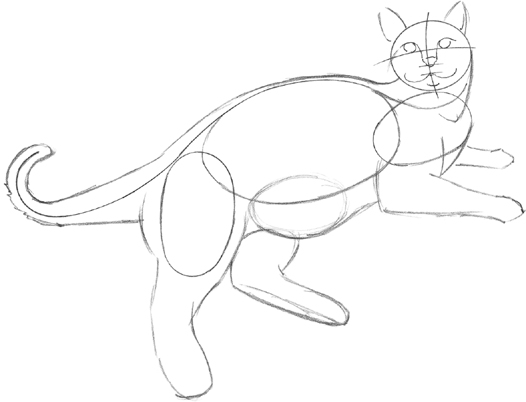
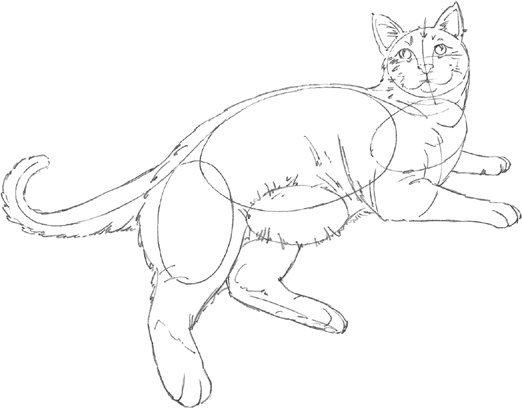
This grooming cat presents a slightly challenging pose, so it’s important that you take your time blocking it in. Use ovals to establish the placement of the major body parts, and draw guidelines along the skull and backbone to help you place the curves of the cat’s body. Remember that the cat’s front left leg is supporting the weight of its upper body, so it needs to be placed correctly. If it isn’t, the cat will look as if it is about to fall over.
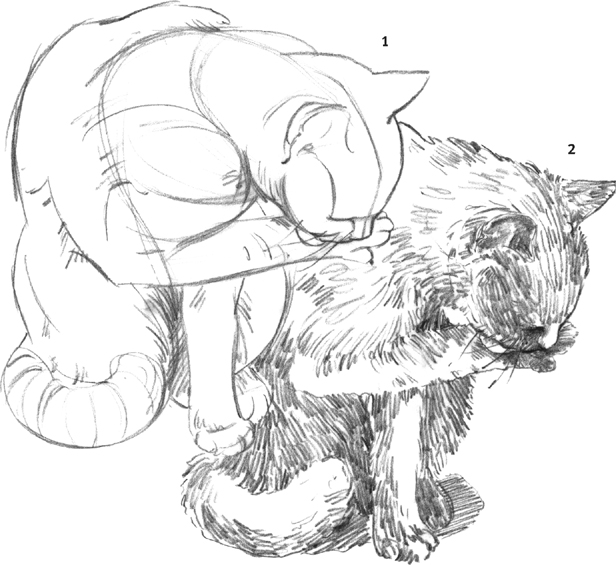
For a difficult pose like this one, it is important to observe your subject closely.
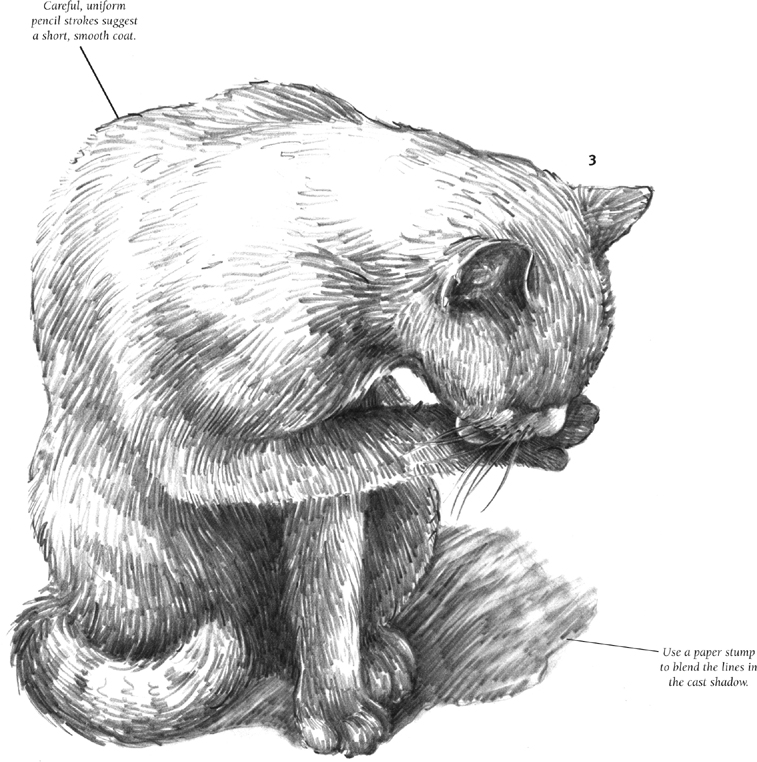
Top: Careful, uniform pencil strokes suggest a short, smooth coat.
Bottom: Use a paper stump to blend the lines in the cast shadow.
Suggesting Details When the pose is correct, begin laying in the fur. In step 2, use a soft pencil, such as a 6B, to draw the hair. Create contrast and depth by varying the density of your strokes to produce different values and layers of shading. Try not to overwork your drawing. It is better to stop shading before it seems finished than to go overboard and ruin the rendering.
Cats use body language to express themselves. A cat will mark its territory by rubbing its body against something to transfer its personal scent to the object. Sometimes a cat will rub against people’s legs to show affection and send a greeting. The contrast between the rounded, diagonal body of this cat and the vertical lines of the wall makes an effective composition.
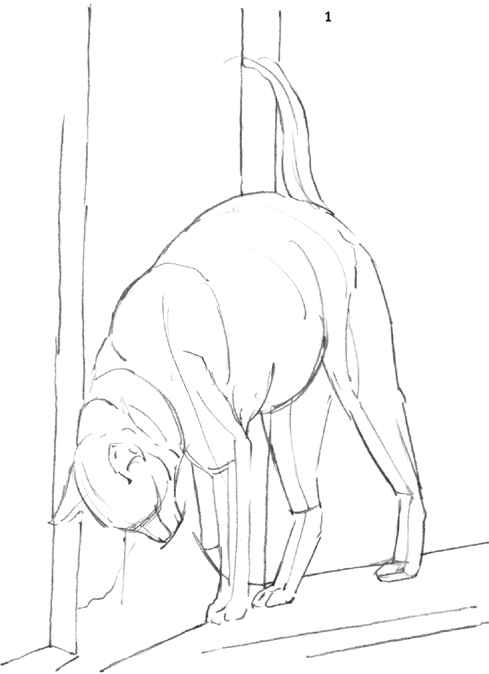
Blocking In First sketch in the vertical and horizontal lines for the wall and floor before you block in the cat’s body. Then draw the curved back, the rounded shoulder, and the raised tail. Pay particular attention to the proportions and positions of the legs. The cat must always look balanced. Refine your lines before adding the final shading strokes.
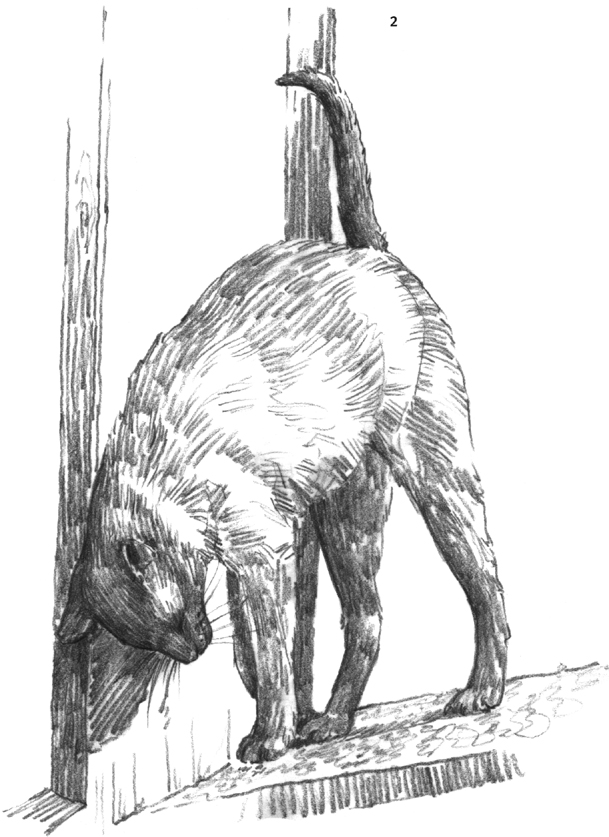
Change the angles of the strokes for the shadow and the wall, and vary the length of the strokes for the cat’s fur.
Make sure your shading reflects the direction of the light source, which, in this drawing, makes the front of the legs appear darker.
Cats love to climb, although this kitten has found itself in a precarious situation. Note that kittens have round, barrel-shaped bodies, whereas adult cats have long, lanky bodies.
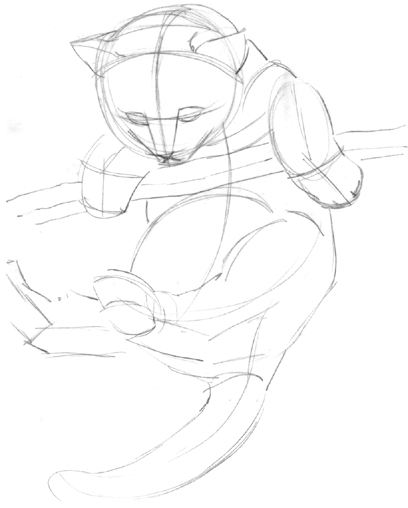
Step One Sketch in the branch so that it is at a slight angle. Then block in the kitten’s body around the branch. Be careful not to make the body too elongated; show it curving around and under the branch. Use a sharp HB pencil to lightly indicate the face, belly, legs, and tail.
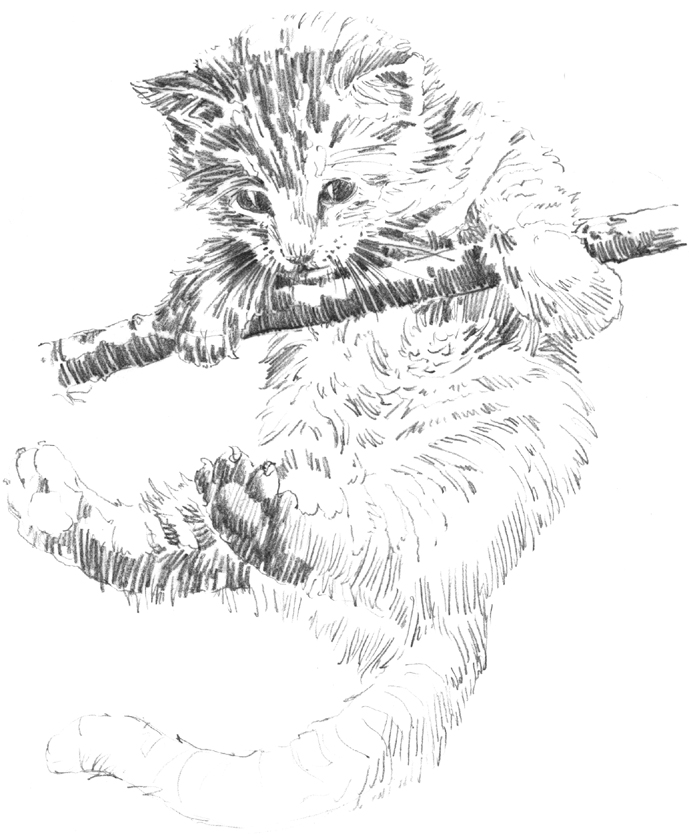
Use the sharp point of an HB pencil to show the claws protracting from the toes.
Step Two Use a 6B pencil to flesh out the features and develop the fur and the branch. Use dark, uniform strokes for the shading on the underside of the branch and on the kitten’s footpads. Vary the values to create a striped effect in the fur.
Notice that the kitten has an expression of determination—not of fear.
Step Three Now develop the rendering to your satisfaction. Use an HB pencil for the whiskers over the eyes and the fine lines around the nose, eyes, and mouth. Continue creating the texture of the kitten’s coat by making deliberate strokes of different lengths in the varying directions of fur growth. Remember to leave uniform areas of white to suggest this tabby’s stripes.
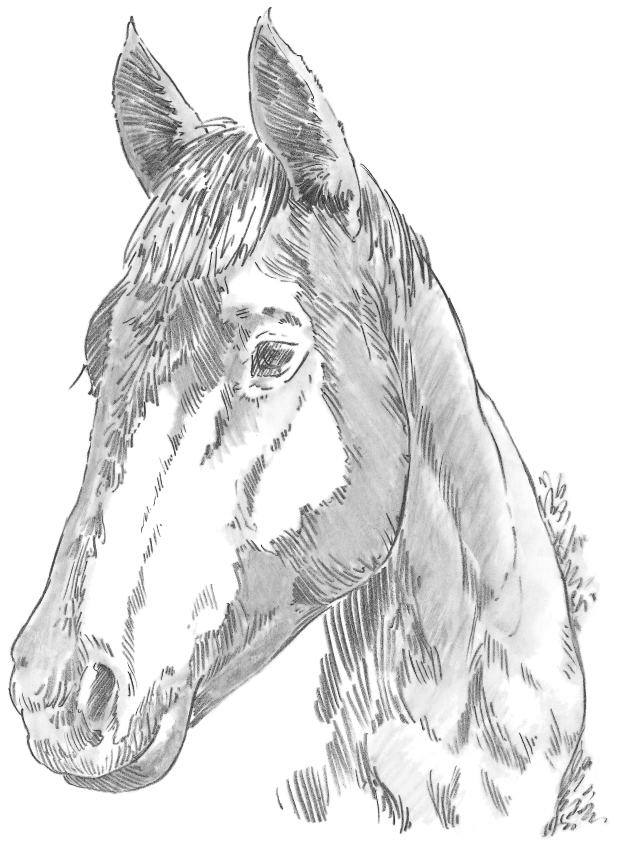
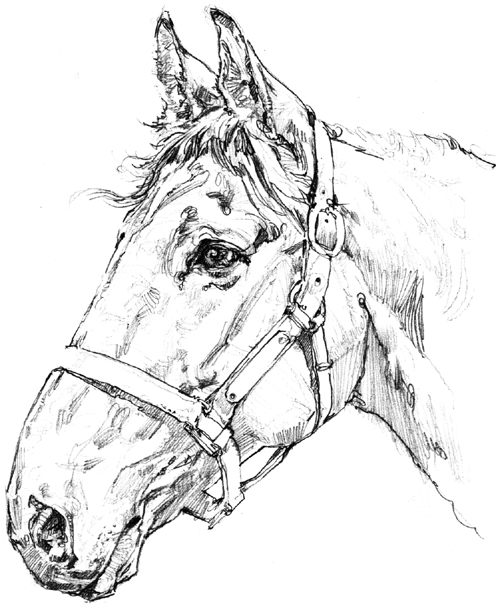
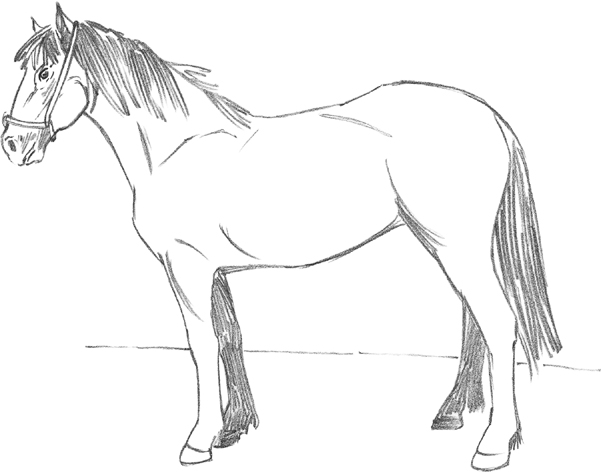
Horses are fantastic drawing subjects, as their inherent beauty and grace can be quite captivating. Pay careful attention to the detail of the eye to express this gentle creature’s warmth and intelligence.
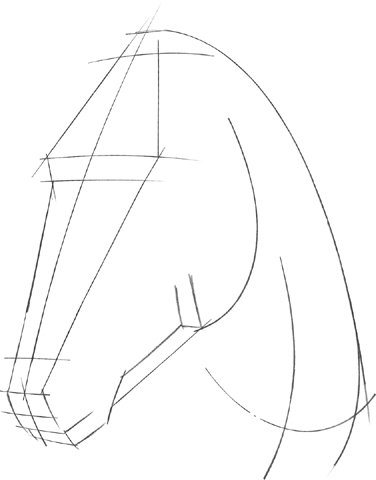
Step One First establish the structure and angle of the head and neck with long strokes. Then mark several planes with horizontal strokes, setting up guidelines for the placement of the eyes, nose, and mouth.

Step Two Now use the initial guidelines to place the ears, eyes, nostrils, and mouth. (The eyes are about 1/3 of the way down the horse’s head.) Also refine the outline of the neck and jaw line.
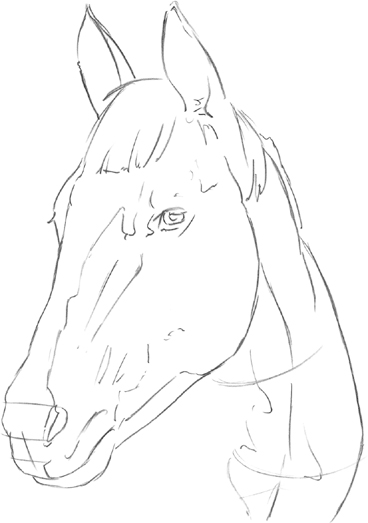
Step Three Next erase any guidelines that you no longer need and add the forelock between the ears. Use thin, irregular lines to indicate the value changes on the horse’s face. Then add a little more detail to the horse’s eye.
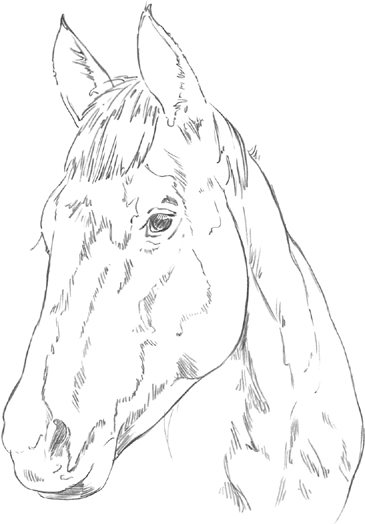
Step Four At this point, begin to develop the texture of the coat. Now replace the solid lines that divide the values of the horse’s face with a series of short hatch marks that follow the direction of hair growth. Fill in the eye (see detail on page 77), and add long strokes to the mane and forelock to contrast with the short hairs of the coat.
Step Five Now create the dark areas of the coat using a large blending stump dipped in graphite dust. Apply broad strokes, fading them out as you work down the neck. With a smaller stump, add more detail and shading around the eye and ears. Finally enhance the sense of depth by adding darker graphite strokes in the shadows of the ears and under the head.
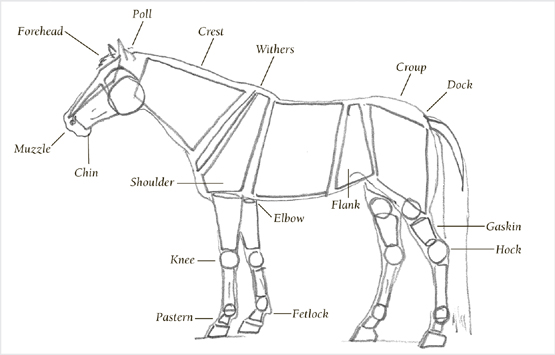
HORSE DETAILS
Muzzle The muzzle has subtle, curved forms, which are defined with careful shading. The area around the nostril is raised, as is the area just above the mouth; indicate this shape by pulling out highlights with a kneaded eraser.
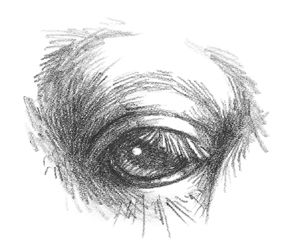
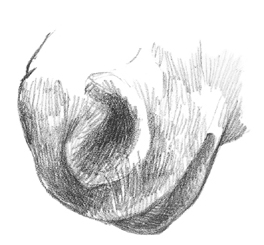
Eye Horses’ eyes have a lot of detail, from the creases around the eyes to the straight, thick eyelashes that protect them. To create a sense of life in the eye, leave a light crescent-shaped area to show reflected light, and leave a stark white highlight above it.
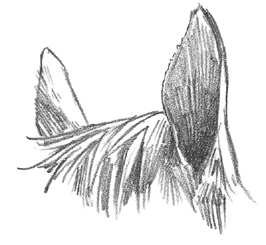
Ears Render the horse’s forelock hair with long, slightly curving strokes. Then shade the interior of the ear with upward, parallel strokes, making them darkest at the bottom and gradually lighter as you move up the ear.
For this profile, start by blocking in the basic shape of the horse’s head, then gradually develop the form, being more careful and deliberate with your lines and shading strokes. Remember to observe your subject closely so you can render a good likeness.
HB pencil
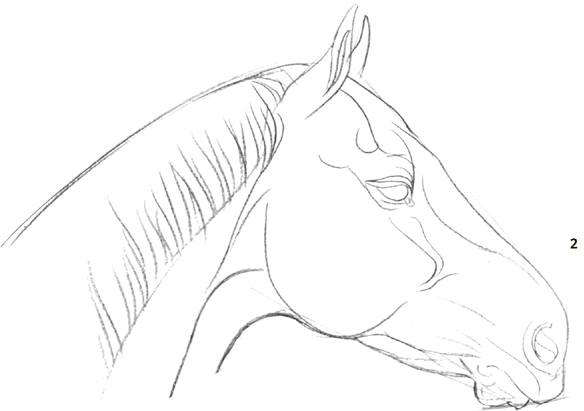
Establishing Guidelines After blocking in the shape of the head in step 1, take your time to refine the outlines, being sure to emphasize the protruding lip and the graceful curves of the neck. Mark the major muscle areas around the eye, above the cheek, and along the muzzle in step 2. Then follow these guidelines to apply varying values of shading on the face and neck, using the side of a soft lead pencil.
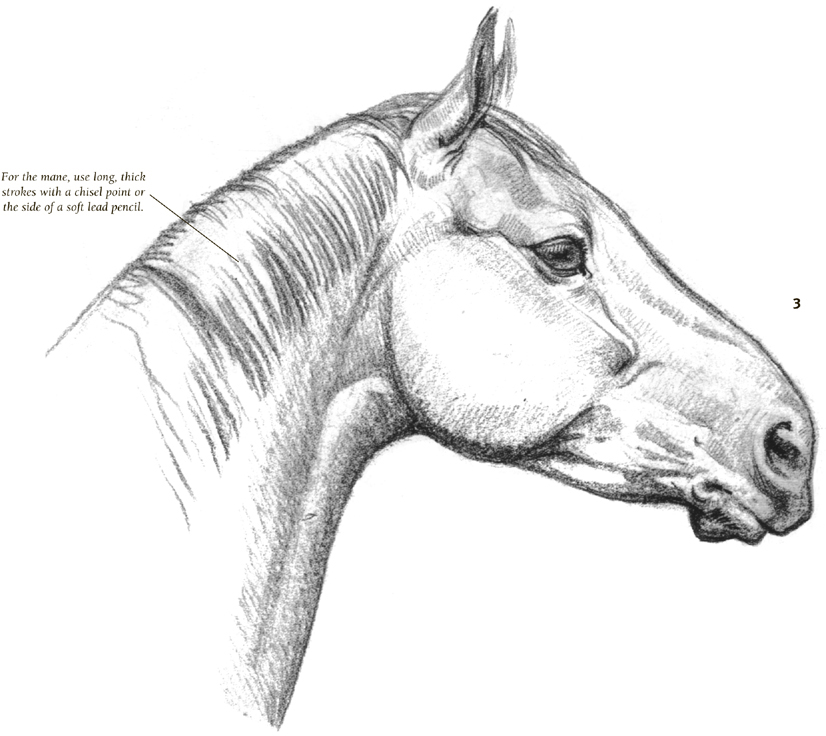
For the mane, use long, thick strokes with a chisel point or the side of a soft lead pencil.
Rendering Details Apply short, light strokes for the shading on the face and neck, with a few thick, perpendicular lines for the muscles on the jaw and around the eye. Try blending some areas with a paper stump for a softer effect.
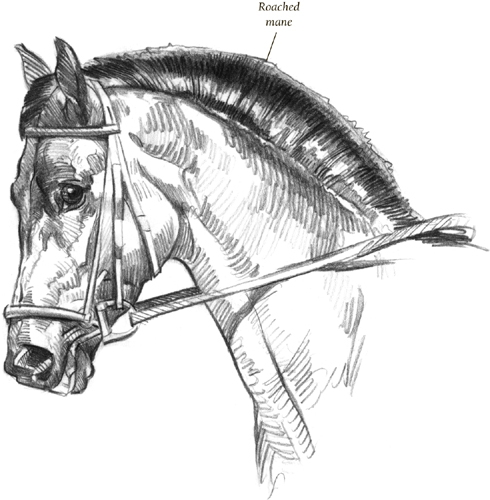
Here are some slightly more complex examples to help you practice shading techniques. Notice the differences in the viewing angles, mane treatments, and tack (the bridles, reins, and halter). As always, start with a few block-in lines, refine your outlines, and then add the shading.
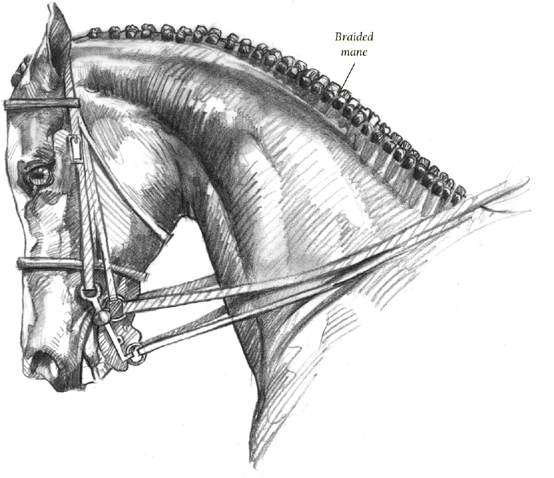
Depicting Manes Show horses often have braided manes, and roached manes have been shaved to a few inches in length so they stand straight up. These two mane styles show off the horses’ necks and give you the opportunity to practice shading the muscles in the head and neck. Because there are so many differences among breeds, your observation skills will be well tested drawing horses!
Use short horizontal strokes for the front of the neck, and vary the angle of the strokes on the side to follow the curve of the neck.
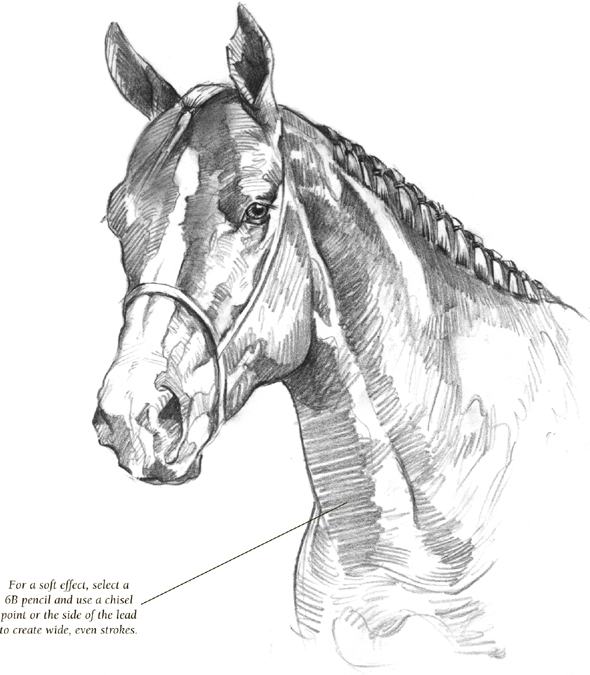
For a soft effect, select a 6B pencil and use a chisel point or the side of the lead to create wide, even strokes.
Applying Light and Dark Values As you shade these heads, look carefully at the way the contrast between light and dark values gives form to the horses. Dark and middle values add depth, and the highlights make those areas “pop out.” Vary the kinds of strokes you use to emphasize the different textures in the sleek coats, the coarser manes, and the smooth leather of the horses’ tack.
Ponies are not just small horses; they are a distinct species. Smaller in size than horses, ponies are also more sure-footed and have a stronger sense of self-preservation.
Step One With an HB pencil, sketch the bulk of the pony onto your paper. Use overlapping ovals for the chest, body, and haunches. Then place the gentle curves of the neck, blocking in the head with short, angular strokes. Add ovals to block in the curvature of the jaw and muzzle.
Step Two Building on the lines from step 1, outline the entire pony. Block in the legs, carefully sketching the hooves and joints. Quickly suggest the mane and tail with a few long strokes, and place the mouth, nostril, eye, and ears.
Step Three Now erase the initial oval guides and shade the outside legs with long, vertical strokes. Then create the texture of the mane and tail with long, straight strokes to represent strands of hair. To give the body form, add a few marks to suggest the major muscles. You can give the face form with a few areas of light, solid shading. Then outline the halter.
You certainly don’t need to learn the names of every bone and muscle in order to draw an animal accurately. But it is helpful to have a little knowledge of the basic anatomy of your subject. For example, an understanding of the underlying shapes of the horse’s skeletal and musculature structures will result in more realistic depictions of the horse’s form. (Ponies have the same basic structure as horses, although sizes and proportions differ.) Knowing the shapes of the bones will help you draw lifelike legs, hooves, and faces. And familiarity with the major muscle groups will help you place your shadows and highlights accurately, bringing the horse or pony’s form to life.
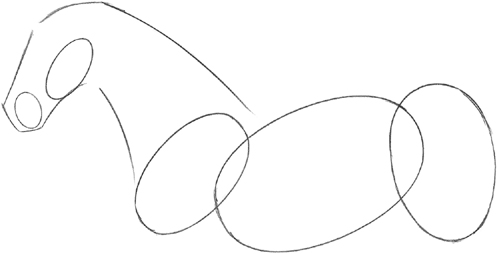
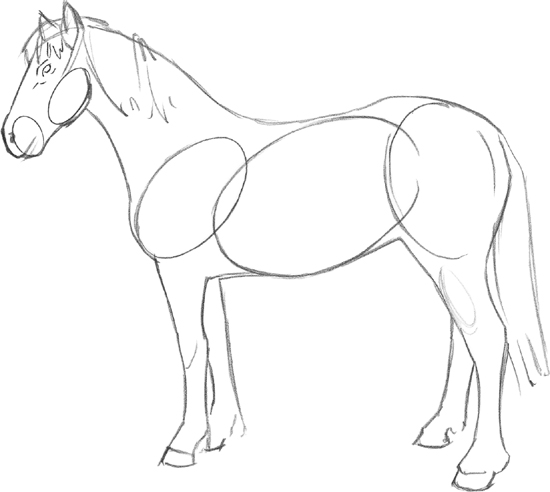
Drawing the horse’s body is easy if you break down the animal into basic shapes. Start with circles, cylinders, and trapezoids—as shown on the horse at right—to help you get a good general sense of the size and proportion of the parts of the horse, such as the head, neck, belly, and legs. Then simply connect these shapes, refine the lines, and add a few details to produce a realistic outline of your equine subject.
Artwork © 2005 Elin Pendleton.
Step Four Ground the pony by adding a few cast shadows and faint lines for the stable in the background. Keep these lines thin and light so that they don’t compete with the pony. Now finish the body of the pony by shading with parallel strokes that follow the muscle structure. This hatching technique creates a slightly stylized effect. Finish by touching up the facial details with additional shading.
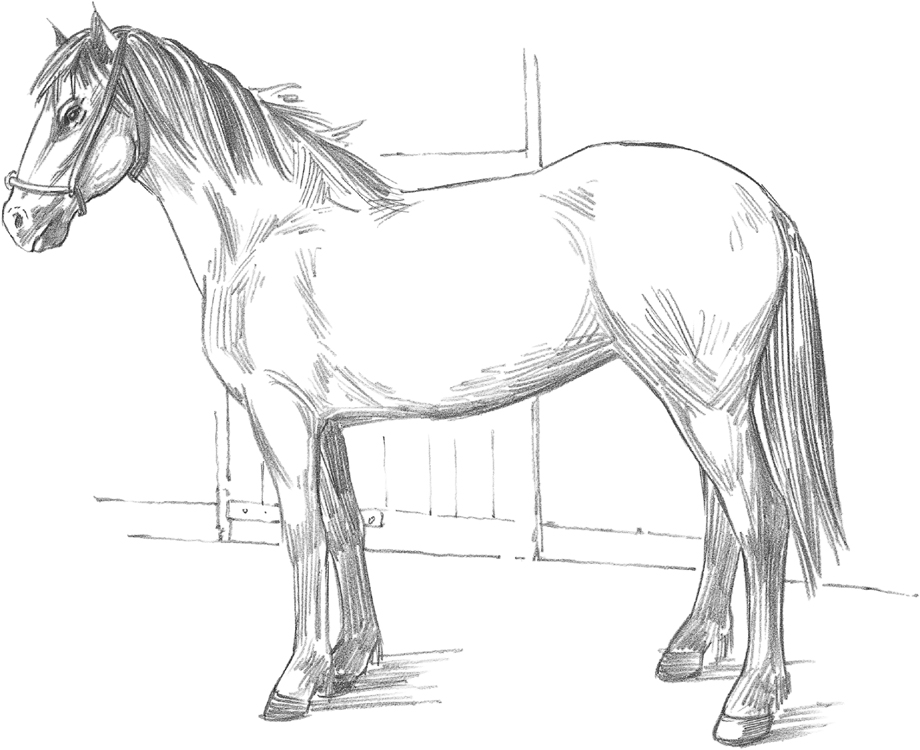
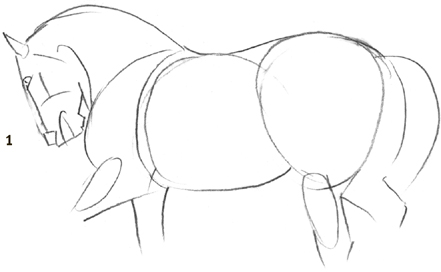
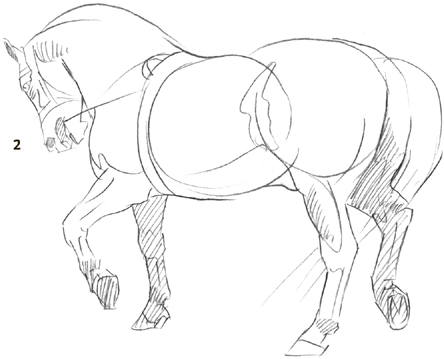
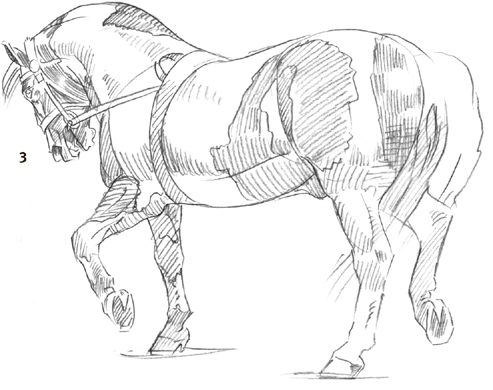
The Clydesdale, a large draft horse bred for heavy farm work, is now a popular parade horse, easily recognized by its “feathers”—the long hairs around its lower legs. The pose shown here emphasizes this draft breed’s muscular hindquarters. The Clydesdale has a round rump, heavy legs, a thick and arched neck, and a Roman (arched) nose.
Be sure to emphasize this horse’s massive proportions as you block it in.
Starting Out Block in this horse carefully, keeping the principle of foreshortening in mind. Use a soft lead, such as a 2B, to establish the areas of light and dark in step 3, and, for contrast, use heavy, straight strokes for the mane and tail.
Portraying Unique Qualities Study your subject carefully so you can depict its unique characteristics, such as the decorated mane and tail of this parade horse.
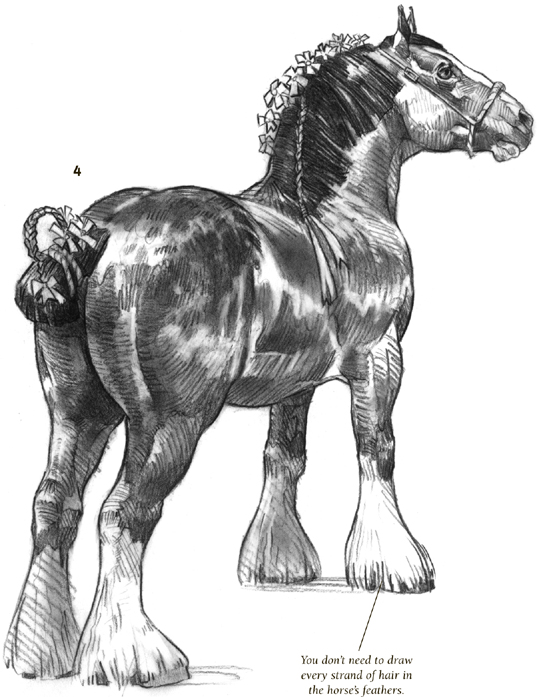
You don’t need to draw every strand of hair in the horse’s feathers.
Horses used in the circus are large-boned breeds such as European Warmbloods. These breeds have broad backs and strong builds combined with an elegant, graceful carriage. This striking pinto provides good practice for your shading techniques because its coat has both light- and dark-colored areas.
Developing Your Sketch Use large ovals and circles when blocking in this horse to establish its size and strength. The reins are attached to the surcingle around the horse’s body, so the head needs to be angled sharply toward the horse’s chest, and the neck is greatly arched. In your final rendering, shade the white areas lightly, and use an eraser to pull out the highlights in the dark patches and in the tail.
From this angle, the roof of the horse’s mouth and the shoes on its hooves are visible. Make sure that you draw them all from the same vantage point.
When going to the zoo, you can observe all the different animals and draw them in a variety of poses. This is another great way to practice seeing the important shapes and to train your hand to draw them quickly! Make several rough sketches of an animal—plus a few with some detail whenever you get the chance. You can also write comments in the margins of your sketchbook—noting the animal’s expressions, mannerisms, patterns, fur textures, and colors—so that you can refer to them later, when you’re back in your work space.
DRAWING FROM LIFE
When working outside (also called “on location”), it often pays to keep your art materials to a minimum so that they’re easily transportable. When going to the zoo, try taking only a small sketchbook, a few HB pencils, and a sharpening implement. You might include an eraser if you plan to make rendered drawings. Another thing to consider is the weather: Heat and glare can make drawing uncomfortable, so you may also want to take a hat, water, and even bug repellent, if necessary.
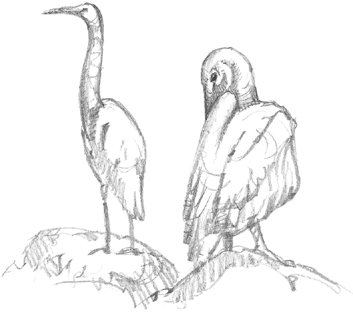
Sketching Quickly The zoo is a wonderful place to sketch birds, although most don’t stand still for very long. Quickly sketched the general pose of each crane and then add more detail on the head of the grooming crane. Sometimes it’s good to bring my camera along to record details for future drawings. And if you can’t get close enough to the animal to see clearly, use your camera lens as “binoculars” and zoom in!
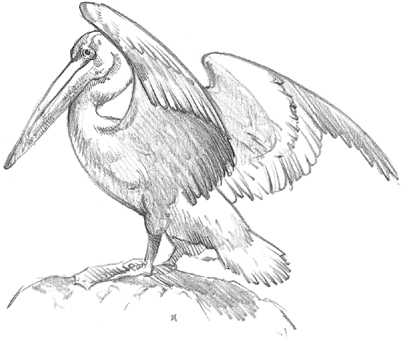
Observing Animals One of the joys of sketching live birds and animals is the spontaneous and natural actions you are privy to. If you find a large pelican like this one drying its wings in the sun, for example, you’ll have a little more time to draw, so you might be able to add the details and some shading on the body, head, and wings.
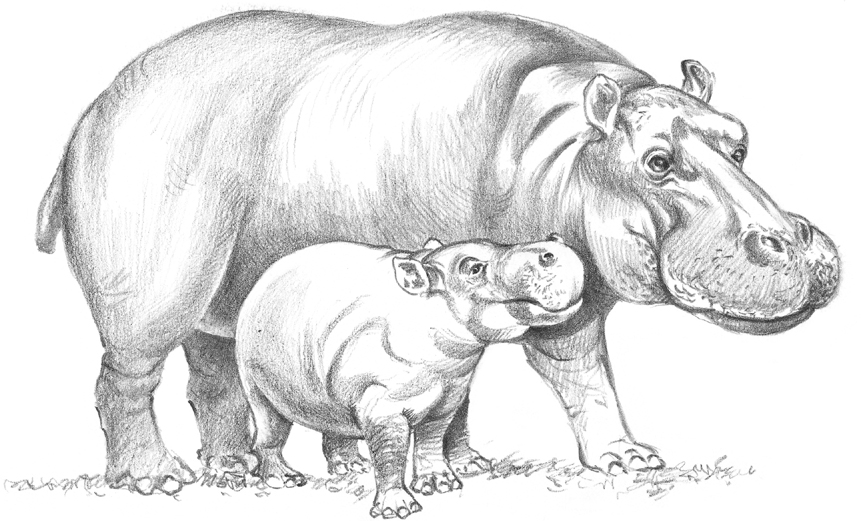
Taking “Notes” When catching sight of magnificent animals like these, make a quick sketch and take some photos on site. Then develop your final drawing back at your work space, using your sketches and photos for reference.
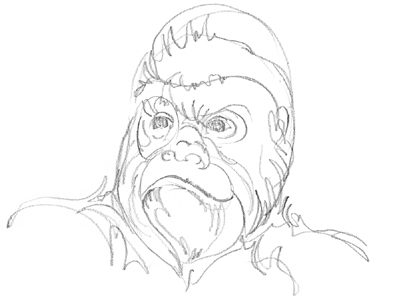
Step One Adult gorillas often sit and observe their onlookers, giving you enough time to make fairly detailed drawings. Begin by lightly sketching some loose ovals to work out the shapes of the head and shoulders. Then draw shapes to suggest the features and a line to indicate the brow.
Step Two Start adding details to the eyes, nose, and mouth. Place the ear, aligning it with the brow. Then begin suggesting the basic hair patterns, following the curves of the face and shoulders.
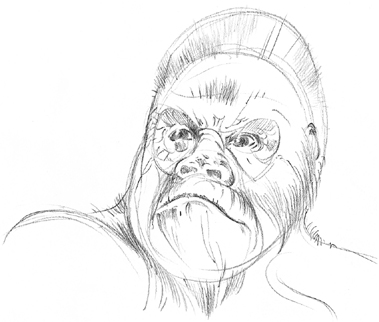
Step Three Use the sharp point of your HB pencil to start filling in the hair, lifting up as you finish each stroke to create the wispy ends. Your pencil strokes should always follow the direction of hair growth. Now begin developing the features with shading techniques. If you notice that you made any mistakes in the previous steps, you can correct them here.
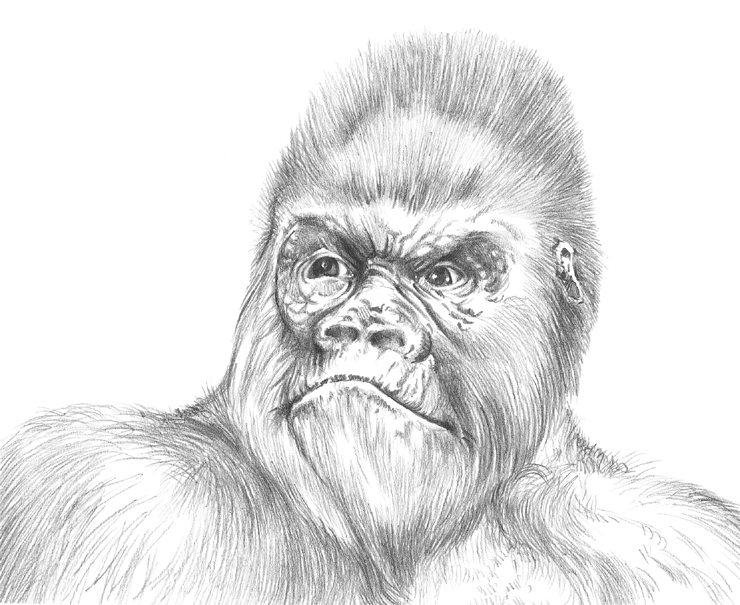
Step Four Continue to build up the hair with tapered strokes, following the contours of the face and shoulders but stroking up at the top of the head and over the brow. Then refine the ridges, bumps, and wrinkles that give this great ape such an expressive face, and finish developing the surprisingly small ear. Use a 2B pencil for the darkest shadows and the eyes, leaving the paper white for the highlights.
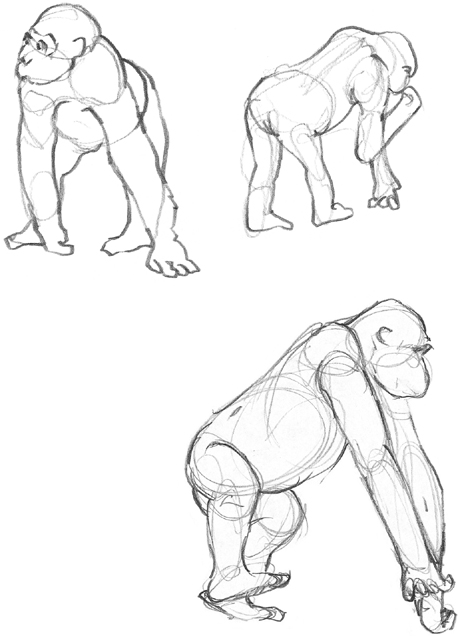
Make some quick, gestural, contour drawings of an active young gorilla to work out its proportions and postures. Pay particular attention to the size relationships of the arms and legs, as well as the angles of the shoulders, spine, and pelvis.
Although the flamingo is best known for its color, its interesting textures make it an ideal subject for graphite pencil sketching. Pay attention to details as you render this bird’s stubbly head and neck feathers, soft back and wing feathers, smooth beak, and tough legs and feet.

Step One With an HB pencil, start by placing the flamingo’s head and body using egg shapes. Then sketch the S shape of the neck and the large, curved beak. Add a triangle shape for the tail, and draw the outline of the legs and feet, placing ovals for the “knees.” Note that the legs are about the same length as the distance from the top of the head to the base of the body.
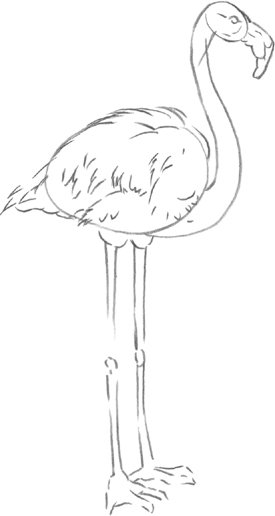
Step Two Now refine the outlines and begin marking the placement of the major feathers on the body. Then start developing the head and beak, refining the outlines and placing the eye, facial muscles, and beak pattern.
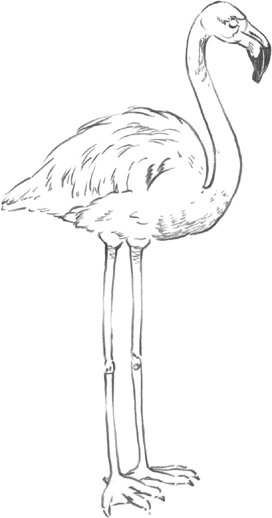
Step Three Next erase any guidelines that are no longer needed. Then add light shading to the underside of the body and the upper legs with short, curved strokes. Continue developing the head with a few feather details, and then darken the tip of the beak.
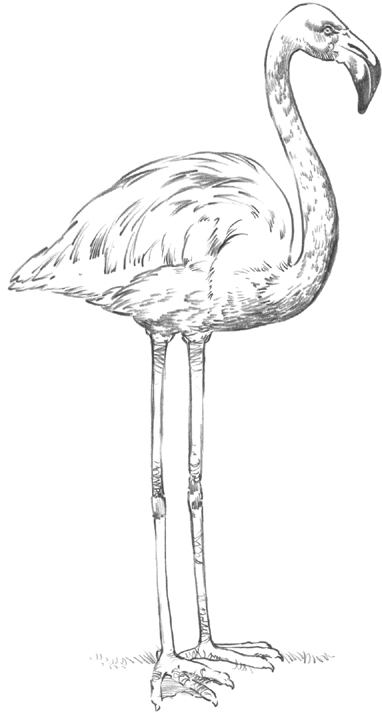
Step Four Now add the final details. First finish shading the flamingo’s neck and belly using a soft pencil in the underhand position; then make short strokes in the direction in which the feathers lie. Shade more intensely on the right and on the underside of the flamingo, as the source of light is coming from the upper left. Add texture to the legs and feet with squiggly lines. Finally create the final feathers on the flamingo’s back with long, curved strokes.
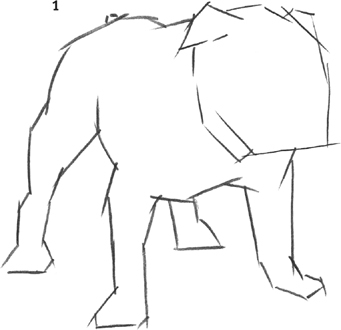
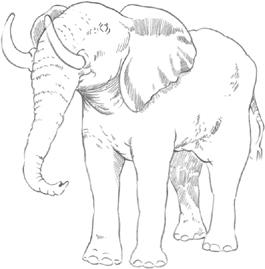
This elephant makes a simple subject because even its details are larger than average! Use simple shading to indicate its ridged tusk, wrinkled body, smooth tusks, and bent tail.
Step One Begin drawing the elephant with large overlapping circles and ovals to place the elephant’s head and establish the general bulk of the body.
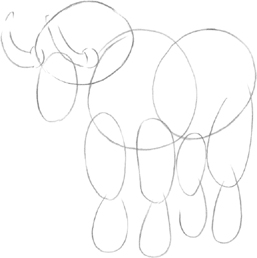
Step Two Next draw thin, vertical ovals to indicate the legs and the widest part of the trunk. Then draw the curved shapes of the tusks on either side of the base of the trunk.
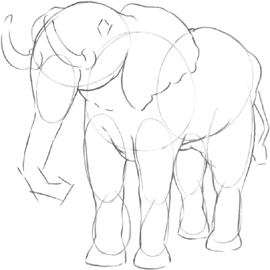
Step Three Now, using the basic shapes as a guide, draw the outline of the elephant’s body, ears, head, and legs as shown. Then sketch the shape of the trunk and the general outline of the tail.
Step Four Now refine the outlines and erase any guidelines that remain. Then apply shading to the neck, ears, tail, and legs, reserving the darkest applications for the final step. Use short strokes to suggest the wrinkles on the trunk and some folds of skin on the body.
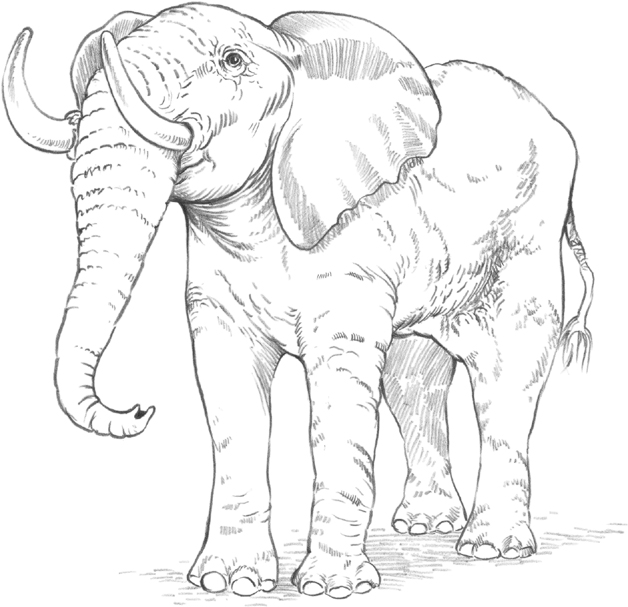
Step Five Using a 2B pencil, reinforce the darkest shadows, such as on the tail and beneath the head. Then fill in the detail of the eye, leaving a small spot unshaded for the highlight. Finally finish developing the shading and texture of the elephant, and then add a light cast shadow around the feet to anchor the elephant to the ground.
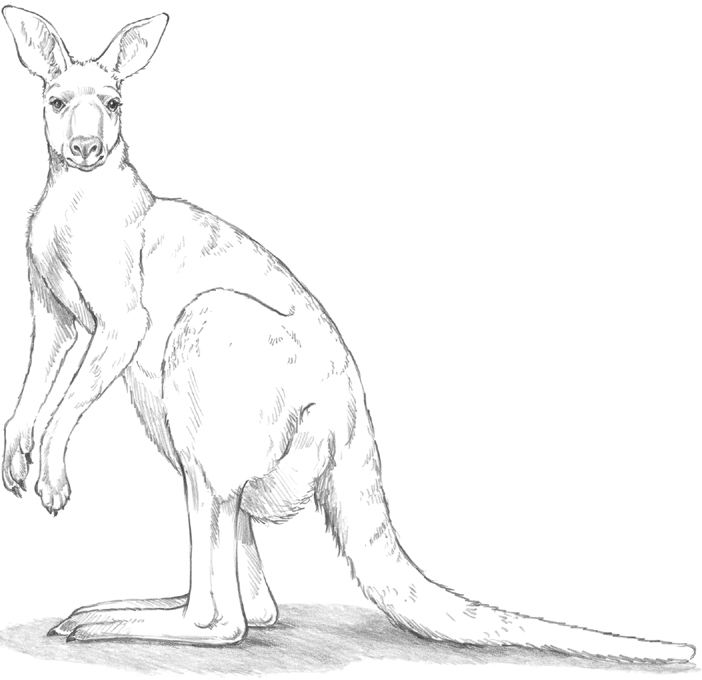
With the kangaroo, it’s especially important to draw what you see, not what you expect to see. Study the features of the animal for beginning. For example, notice that the kangaroo’s ears, tail, and feet are disproportionately large in comparison to its other features. Attention to detail will produce a more accurate final drawing.
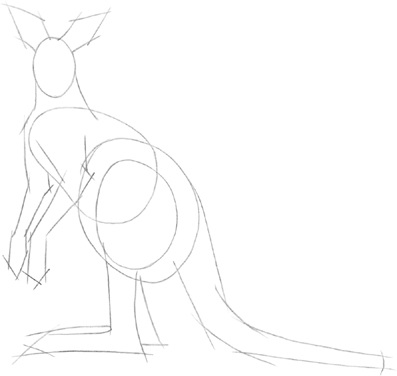
Step One First draw a pear shape for the torso of the kangaroo. Then establish the lower body and hindquarters with two concentric circles. Add an oval to place the head, and then block in the rest of the kangaroo, adding the forelegs, back legs, and long, thick tail.
Step Two Next begin to refine and darken the outlines, creating smoother contours and adding a few details to the ears and back feet. Also start to suggest the short hair with a few strokes along the rump.

Step Three At this point, draw light outlines to place the eyes, muzzle, nose, and mouth, and start to refine the shapes of the toes on the forelegs. Then start to shade the coat by adding closely placed parallel strokes to the underside.
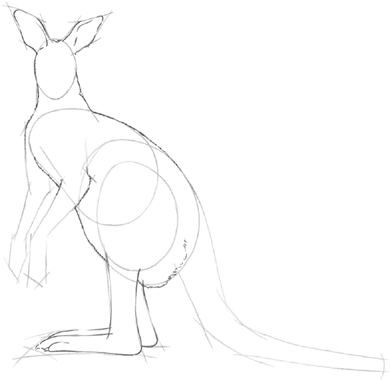
Step Four Now erase any remaining guidelines that still show from the initial sketch and continue to develop the coat texture. Add the suggestion of the muscles under the kangaroo’s coat with short, curved strokes. Then complete the details on the claws and face, filling in the eyes and nose. Finally add a cast shadow, stroking diagonally with the side of an HB pencil.
Birds come in all shapes, sizes, and textures. This toucan’s long, smooth feathers require long, soft strokes. Soft shading is also used to indicate the smooth texture of this bird’s beak.
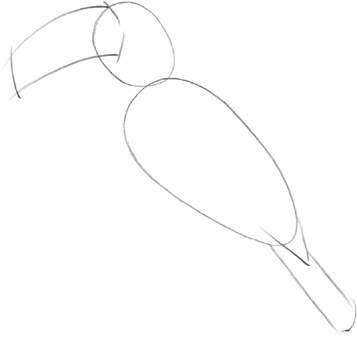
Step One Use basic shapes to block in the toucan; establish the body with a long egg shape, the head with an oval, and the tail and beak with rectangular shapes. Make the large beak almost twice as wide as the head, and the tail half as long as the body.
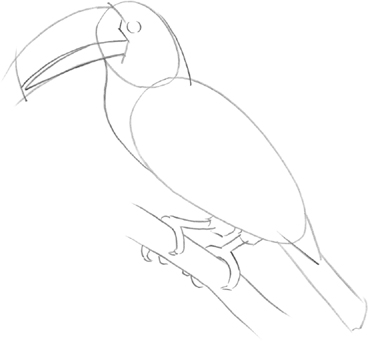
Step Two Now add the legs and feet, posing the toucan on a branch. Be careful to make your preliminary lines light, as it may take several sketches to make the bird appear balanced over its legs. Mark the opening in the beak and the position of the eye.
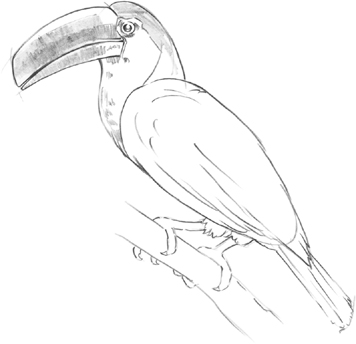
Step Three Next refine the outlines and erase any guidelines you no longer need. To suggest the feathers, add a few strokes along the wings and tail. Then begin to shade the beak with long, perpendicular strokes using the side of a sharp HB pencil. Now begin shading the top of the head and small areas of the chest.

Step Four Finally shade the wing and tail using the side of the pencil and stroking in the direction of feather growth, giving the under-side the darkest value. Then add the details to the feet and branch, suggesting the cylindrical nature of each with curved strokes.
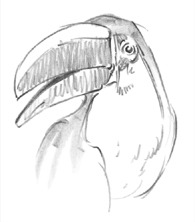
CHANGING THE VIEWPOINT
Once you’re comfortable drawing the toucan in profile, try a three-quarter angle. From this viewpoint, the light top of the beak is more visible, and the chest is more prominent than the head. This angle makes a more lively and engaging portrait.
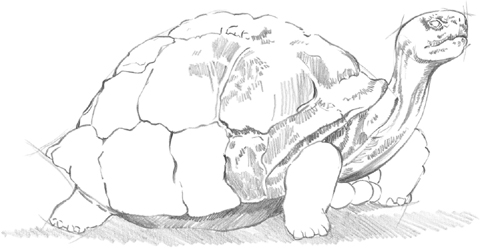
The hard shell of the tortoise produces an interesting shading challenge—you must develop the rounded form by focusing on the highlights and shadows of your subject. As you draw, pay careful attention to the variations in the size and intensity of the shadows.
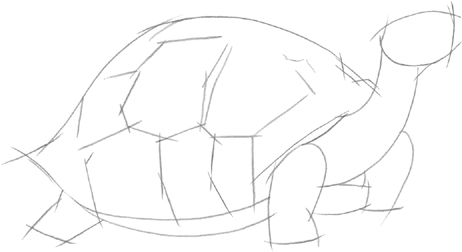
Step One First sketch the roughly oval shape of the tortoise shell and body with an HB pencil. Then draw an egg shape for the head and sketch in the curved neck and stocky legs. Now add rough lines to indicate the general pattern of the shell.

Step Two Next refine the outlines, giving the shell a bumpy perimeter and smoothing the lines of the legs, head, and neck. Then mark the positions of the eye, mouth, and toes and sketch the round segments on the shell just beneath the tortoise’s neck.
Step Three Now begin to develop the shading on the shell with light, parallel strokes. Start shading the neck with patches of short strokes stretching from the shell toward the head, giving the skin a dry, wrinkled look. Then darken the underside of the tortoise and add a light cast shadow with the side of a soft pencil.
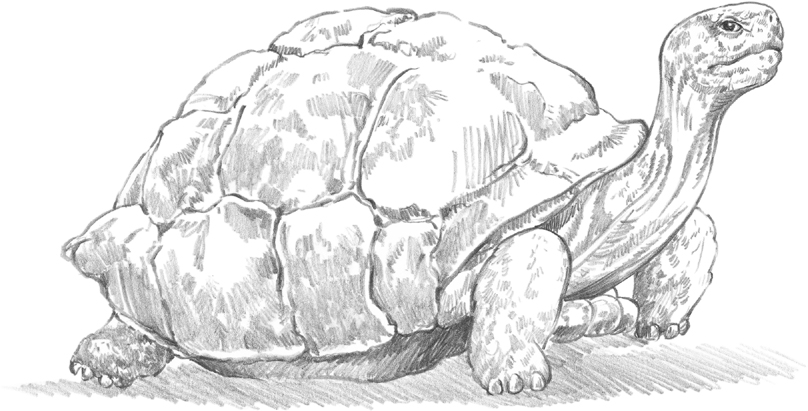
Step Four Continue to apply light shading to the shell, varying the direction of my strokes and leaving plenty of white on the light-colored shell. Develop the texture of the legs and add dimension to the toenails. Then fill in the eye, leaving a highlight in the upper-right quadrant.
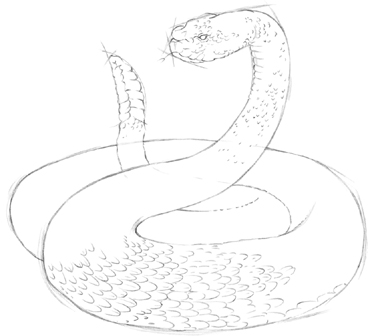
Snake patterns are typically quite repetitive, which makes them easy to render. Just remember to apply perspective to your drawing, sketching smaller shapes on parts of the reptile that are farther from the viewer.
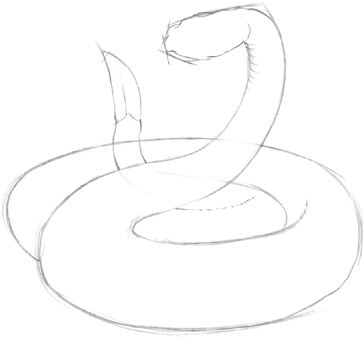
Step One To begin drawing the rattlesnake, create a rough outline of the coil and block in the shapes of the head and rattle. Draw through the snake’s body, meaning draw the line behind the tail, even though it won’t be visible in your final drawings. This will help you keep your drawing accurate.
Step Two Then mark the position of the eye and mouth, adding a Y-shaped tongue. To create the illusion of scales, draw backward C-shaped strokes along the sections of the body closest to the viewer.

Step Three Next finish applying scales to the body and begin shading in the snake’s diamond skin pattern. Then erase any sketch marks you no longer need and add cast shadows beneath the coils.
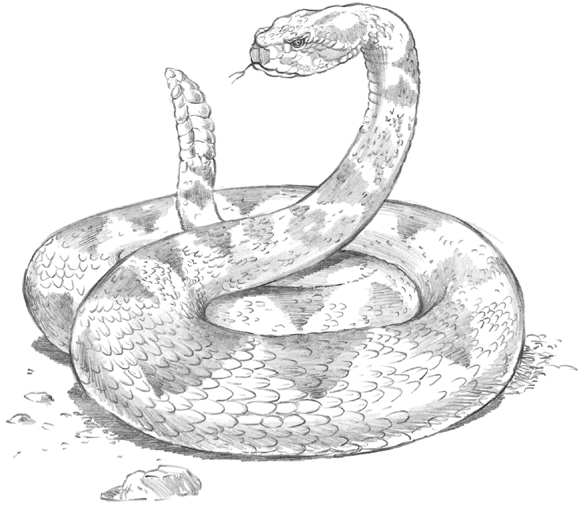
Step Four Finish adding the snake’s markings and apply further shading and details to the rattle and the head. Add a shadow along the lower third of the body to create form, giving it a cylindrical appearance. To finish the drawing, establish a sense of ground by suggesting pebbles and a rough surface.
Pandas are an easy subject to approach when you begin with simple shapes. Start with a circles for the head and body; then add ovals for the arms, legs, and paws. Add the details, such as the eyes, nose, and bamboo leaves. Then use soft, short strokes to indicate the texture of the panda’s thick black-and-white fur. When rendering hair, always stroke in the direction it grows.
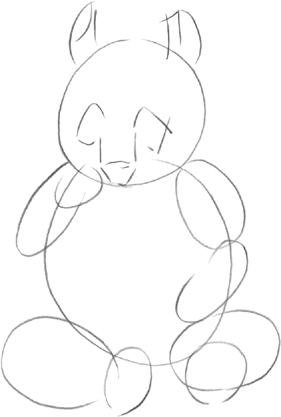
Step One First establish the panda’s overall shape and pose. Start with a circle for the head and a larger oval for the body. Then draw a series of ovals for the arms, legs, and feet, dividing the left arm into upper and lower sections. Also mark the general shape and position of the ears, the eye mask, and the nose.
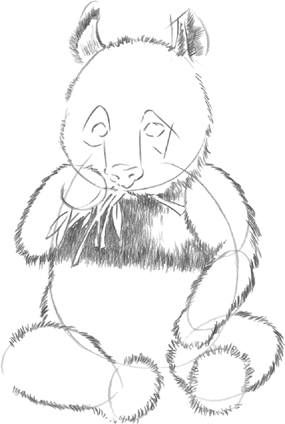
Step Two Next place the eyes, refine the shape of the nose, and sketch in the branch of bamboo. Use the side of a soft pencil and make short, soft marks around the outlines to indicate fur. Then begin shading all the black areas on the coat with an HB pencil, stroking downward in the direction of the hair growth.
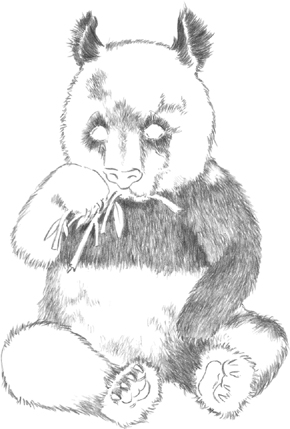
Step Three Now erase any remaining guidelines and continue shading the black areas of fur. Then use a blending stump to smooth the pencil strokes, creating the illusion of soft fur. Add a few closely spaced strokes in the white fur to give it dimension and suggest the underlying muscles. Then draw the footpads and toenails.
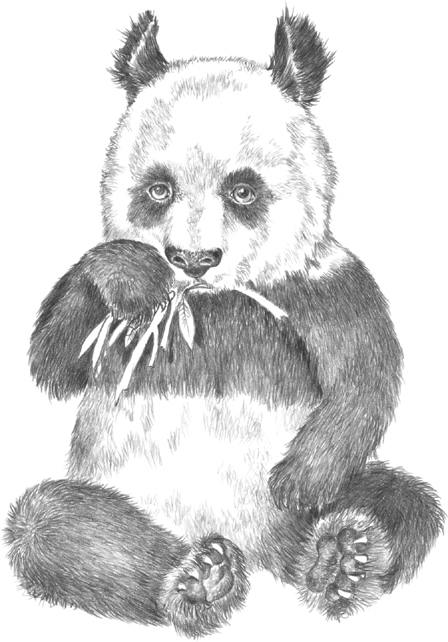
Step Four Continue to develop the shading with soft, short strokes to show the fur’s texture. Also keep building up the panda’s form by varying the shading of the fur; for example, darken the areas between the arms and the body, as well as the areas on the legs that are closest to the ground. Finally add the details to finish the feet, claws, nose, and eyes.
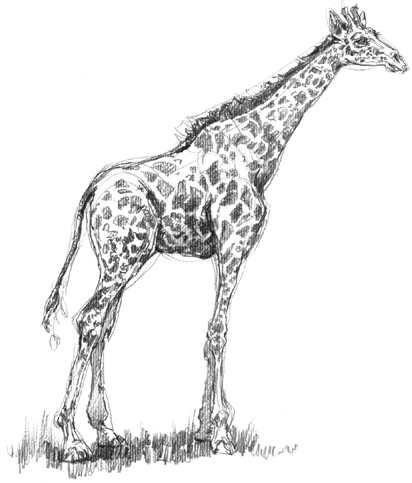
Accurate proportions are important when drawing the giraffe; when blocking in your drawing, consider how making the legs too short or the neck too thick would alter the animal’s appearance. Use the head as a unit of measurement to draw the rest of the body in correct proportion—for example, pay attention to how many heads long the legs and neck are.
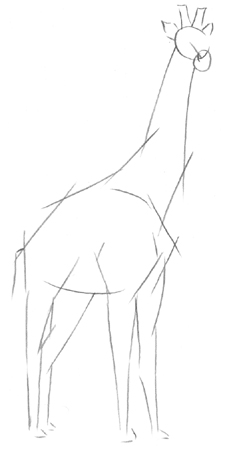
Step One To begin, block in the basic shape of the giraffe, adjusting the lines until you are satisfied with the proportions. Notice that the giraffe’s neck is as long as its legs, and its hindquarters slope down sharply.
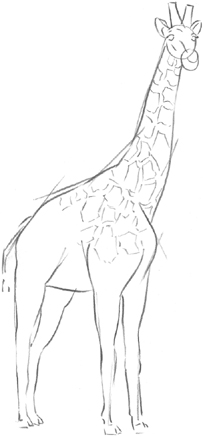
Step Two Now begin to refine the shapes of the legs and rump, smoothing the outline. Then begin placing the features and blocking in the pattern of the coat. For this species of giraffe, the spots all have slightly different irregular shapes, with small gaps between them.
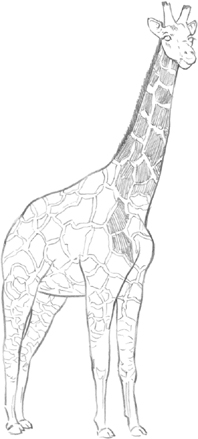
Step Three Now erase any stray sketch marks and focus your attention on rendering the giraffe’s face. (See the details in the box below.) Then fill in all the dark patches of the coat, adding the mane with a 2B pencil and short, dense diagonal strokes.
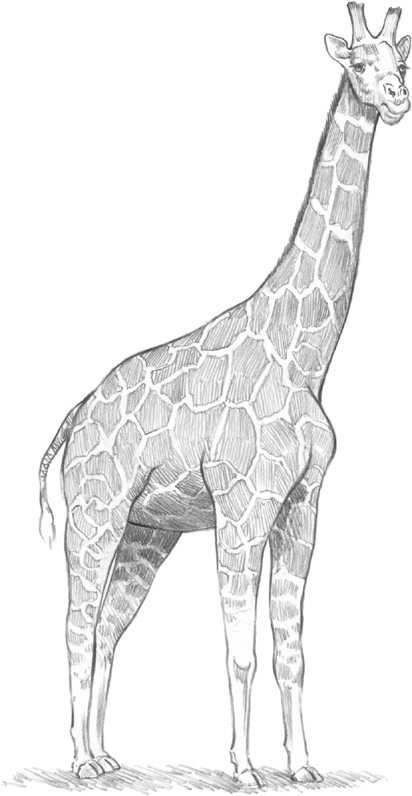
Step Four In this final step, after shading the face, add the shading beneath the giraffe’s body and head. To keep the giraffe from appearing to float on the page, draw the ground with tightly spaced diagonal strokes.
DRAWING THE HEAD
Start with a circle for the head and two smaller circles for the muzzle; then add the horns and ears. Draw a curved jaw line, and sketch in the eyes—and eyelashes—and inner ear details. Then refine all the outlines and shade the face, using a soft pencil for the dark areas and changing the direction of the strokes to follow the forms.