We’ve already covered most of the basic LEGO Technic pieces. In this chapter, we discuss three other popular pieces: axles, bushes, and universal joints. While all of these elements can be used to transmit drive, they can also be used as structural elements in your builds. Let’s take a look.
Axles are one of the most basic and crucial pieces in LEGO Technic. They have a very special property: Depending on the shape of the hole they’re put through, axles can either rotate inside other pieces or remain fixed to them (at the same time locking them together), as Figure 4-1 shows.
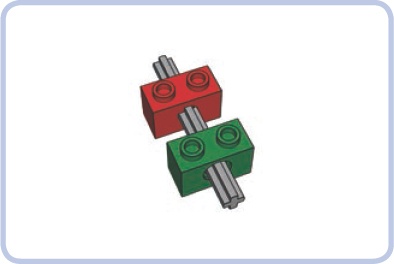
Figure 4-1. A regular axle put through two Technic bricks: The red brick has an X-shaped axle hole that locks the axles, while the green brick has a pin hole that allows the axle to rotate freely.
Axles have two essential tasks: transferring drive and structural reinforcement. The first task requires axles to rotate freely and to be connected to a motor, either directly or through gears, axle joiners, or other pieces.
The task of reinforcing requires axles to remain fixed relative to other pieces, which necessitates an axle hole. It is not uncommon to use an axle exclusively for holding together pieces at fixed angles, as shown in Figure 4-2.
Figure 4-2. A 5-stud-long axle connecting five other pieces. All the pieces are fixed to the axle, and the axle alone keeps them at fixed angles.
It is also possible to use an axle for both tasks at once—the axle can transfer drive through pieces while at the same time keeping other pieces locked to it. Such a combination is shown in Figure 4-3. Note that any axle that holds pieces together is subjected to structural stress, which adds friction to it. This will matter when you use the axle to transfer drive.
There are three categories of axles, each suitable for a different purpose. They are standard axles, modified axles, and flexible axles.
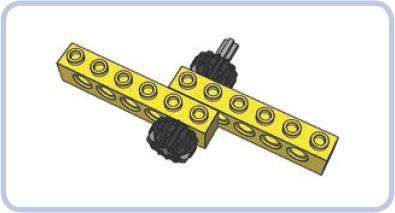
Figure 4-3. A 5-stud-long axle used to keep two bricks (yellow) together between two gears (black). The axle can rotate inside the bricks, and the gears’ rotation can be used to transfer drive.
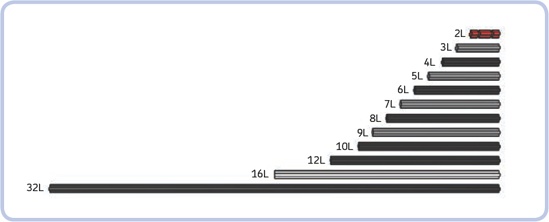
Standard axles come in 12 variants. At first only axles of even length existed, and they were all black. Odd-width axles were later introduced to accommodate the studless system; initially, these axles were also black, but they were later changed to light grey in order to provide a simple distinction between odd and even lengths. Following is a description of various axle lengths and their colors.
| 2L Notched to make pulling it out of other pieces easier; primarily red, less often black. There once was a smooth variant of this length. |
| 3L Primarily light grey, less often black or red. |
| 4L Primarily black; rare variants in a number of other colors. |
| 5L Primarily light grey, less often black. |
| 6L Primarily black, less often light grey; rare variants in a number of other colors. |
| 7L Primarily light grey. |
| 8L Primarily black. |
| 9L Latest variant; available only in light grey. |
| 10L Primarily black; rare variant in green. |
| 12L Primarily black, less often red; rare variants in a number of other colors. |
| 16L Exclusively white. This axle is noticeably more elastic than any other length; it can easily bend and unbend. |
| 32L Primarily black, less often yellow. |

Modified axles belong in two groups: threaded axles and axles with stops. Threaded axles are black, come in 4L and 10L variants (top two axles, above), and went out of use in LEGO Technic sets circa 1990. Along with threaded nuts to hold their ends, threaded axles work as bolts to hold parts together. They have a very small cross section and will break if used to transmit torque. Given how rare and expensive they are, builders should be careful not to misuse them.
Axles with stops, on the other hand, are newer and have many practical applications. The stops can’t go through a pin hole or an axle hole, so they can be used to prevent undesired sliding of the axle. All four variants of axles with stops used to come in dark grey, but the first variant is now produced in dark tan only.
| 3L Has a special kind of stop that ends with a hollow stud, which actually makes the axle a little longer than 3 studs and allows us to connect studded pieces to its end. The end with the stud can also be inserted into a pin hole, which makes the axle rotate with extra friction. |
| 4L Has a standard, smooth stop that fits entirely inside a pin hole. |
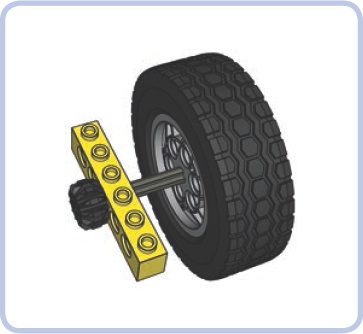
| 5.5L Has a midpoint stop located 1 stud away from one end (and therefore 4.5 studs away from the other); has a half-stud-long section without grooves adjacent to the stop on the longer side. Although its extra half stud of length often makes it difficult to fit into a structure, it has interesting applications. Figure 4-4 shows one of them: The axle is inserted into a brick so that it protrudes by 1 stud on one side and its stop secures it from sliding through the brick to the other side. This way, the axle won’t slide out with the wheel (for example, while making a tight turn), and the wheel can be driven using the gear. |
| 8L Identical to the 4L variant, only longer. |
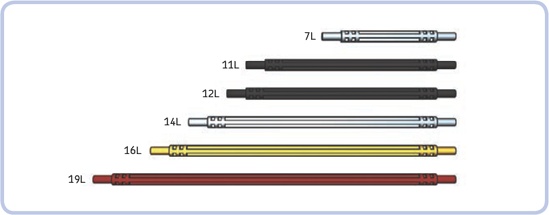
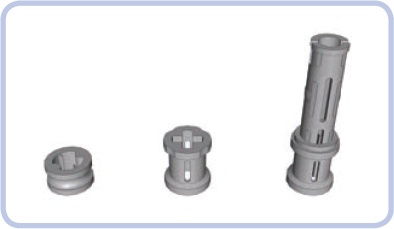
Flexible axles, also called soft axles, are made of soft material and are easily bent without incurring damage. While they can be put through a pin hole, their ends prevent them from being put through an axle hole. Each end has a 1-stud-long protrusion that is less thick than a full stud. The protrusions are most often inserted into half pins, which are then inserted into pin holes to anchor the axle. The axles come in many colors and six variants that vary only by length: 7L, 11L, 12L, 14L, 16L, and 19L.
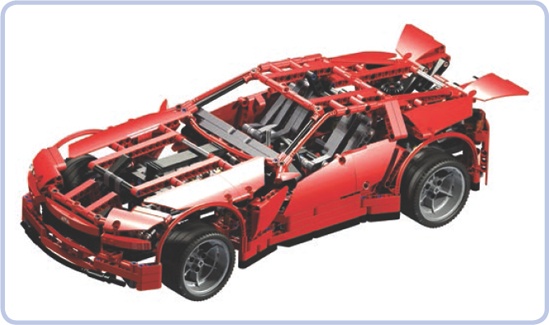
Flexible axles have few practical or structural uses: It’s extremely difficult to use them to transfer drive or to hold anything together. They are also too soft to act as springs, although they can be used instead of shock absorbers to stabilize pendular suspensions. They are most often used as decorative elements, bent to form various arches. Their flexibility makes them popular in LEGO Technic supercars (as Figure 4-5 shows), where they form mudguards, windshield edges, bumpers, hoods, and other curvy elements whose shapes are difficult to model with other LEGO pieces.
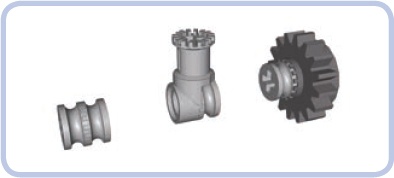
LEGO bushes, also called bushings, are small elements put on axles in order to maintain spacing between two or more other elements. They can also prevent pieces from sliding off of axles or keep axles in place. They come in three versions: a half bush (half stud long), a bush (1 stud long), and a bush with a long pin (3 studs long, including a 2-stud-long pin), all of which are shown in Figure 4-6.
The half bush is the only piece from this group that comes in variants (as shown in Figure 4-7). Its variants include a toothed half bush, a toothed half bush with a cut-out axle hole, and the currently produced smooth half bush with a cut-out axle hole.

Figure 4-7. From left to right: a toothed half bush, a toothed half bush with a cut-out axle hole, and a smooth half bush with a cut-out axle hole
The first variant, the toothed half bush, comes with a complete axle hole and with 16 small teeth on one side. The other side is completely smooth. The rim of the half bush has a groove that allows it to act as a pulley for rubber bands, as shown in Figure 4-8. In fact, all half bushes have the ability to act as a pulley. For more information on pulleys, check out Chapter 6.

Figure 4-8. A half bush and a wedge belt wheel both have grooves for LEGO rubber bands and can be used as pulleys.
The toothed side of the half bush can be meshed with a number of other LEGO pieces: another toothed half bush, a toothed axle connector, or a toothed 16-tooth gear with clutch (as shown in Figure 4-9). It’s important to keep in mind that when these pieces are meshed, they come roughly 1 mm closer to each other, which means that there is 1 mm of backlash behind them.
It’s also useful to remember that the pieces can be meshed at various angles of rotation. Since there are 16 teeth on the side of the half bush, each tooth corresponds to 22.5 degrees; this is the minimum value by which we can change the angle of two meshed pieces. This arrangement creates some useful possibilities. For example, you can use two half bushes to couple two switches in such a way that turning one switch on turns the other one off (see Figure 4-10).
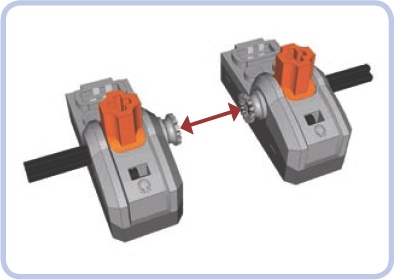
Figure 4-10. By meshing these two half bushes at the same angle, the two switches will be coupled and work as one. But if meshed with one half bush rotated by just one tooth relative to the other one, the two switches will be coupled so that only one of them can be on at a time and turning one off turns the other one on.
The toothed half bush is still popular today because it takes a lot of force to make it move on the axle. This makes it useful in high-load applications: Two toothed half bushes are preferable to one regular bush because they are less likely to slip along the axle when a load is applied (see Figure 4-11).
Finally, toothed half bushes can be used as bevel gears (as shown in Figure 4-12), but they must be shifted by a quarter stud each to mesh, and their teeth generate high friction and easily disengage under torque.
The second variant, the toothed half bush with a cutout, is exactly what its name implies: a copy of the previous version with part of the axle hole cut out, which makes the axle hole larger (see Figure 4-13). This modification was introduced to make it easier for children to take half bushes on and off the axles, and that’s exactly what makes it much less popular with builders: These bushes are more likely to shift when stressed than the first variant. Other than that, it has every quality of the original toothed half bush except that, having been introduced a few years later, it’s newer and thus made of stronger material.
The third and final variant, the smooth half bush with a cutout, is an exact copy of the previous variant minus teeth. More specifically, the teeth haven’t been removed but rather have been filled in order to create a smooth side; thus, both sides of this variant are identical. This variant is also identical to the previous variant in terms of how much stress it can take before shifting along the axle. There are two forms of this variant, with the newer piece having a slightly expanded axle hole. The difference is barely noticeable and does not affect the properties of this piece. This half bush variant was introduced 13 years after the first version and is still in use today; therefore, it is always available in better condition than previous variants and is made of stronger material.
The regular bush is a far less complex piece, with only one variant available. It can be used for securing axles or maintaining 1-stud spacings. One of its sides is smooth, and the other has four small notches in it. The notches fit LEGO studs and enable the bush to be placed in the middle of 4 studs, as shown in Figure 4-14. That means the bush can be connected to bricks and plates sized 2×2 studs or larger.
The bush with a long pin is a combination of two pieces: the long pin and a regular bush. One of its sides is just like a bush, except that its axle hole is only 1 stud deep and it has smooth rims. Its other side is identical to that of a long pin with friction, as shown in Figure 4-15.
This particular combination was developed as a convenience for the official LEGO Technic sets. Large and complex sets are very often divided into several modules that are built separately and then connected. The bush with a long pin is well suited for this task because it can be pushed in and pulled out more easily than regular pins (see Figure 4-16). LEGO uses this piece for temporarily locking some modules together as well: For example, the bush with a long pin enables a truck’s cabin to be lifted up, lowered back, and then locked in that position (as shown in Figure 4-17).
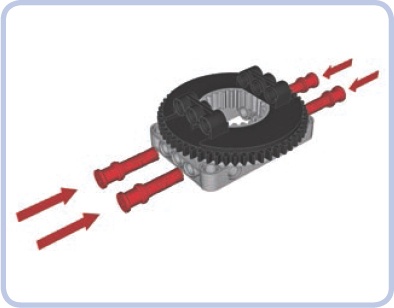
Figure 4-16. An example of the intended use of a bush with a long pin. Let’s assume that we want to connect the turntable to a 5×7 frame so that they can be easily disconnected. We can do this by pushing the bushes in to lock the turntable into place and then pulling them out to free the turntable.

Figure 4-17. Another example of the intended use of a bush with a long pin. Let’s assume that the 5×7 frame is part of the chassis and the yellow beams are part of the cabin of a truck. We can lower the cabin by rotating the yellow beams and then lock it in that position by pushing the red pieces in. Then we can pull them out and lift the cabin up again.
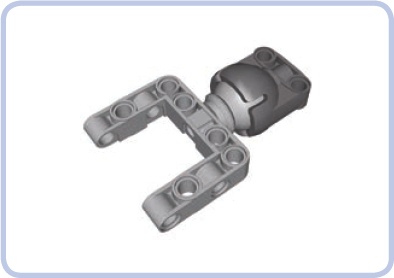
LEGO universal joints, also called u-joints or Cardan joints, are used to transfer rotary motion from one axle to another at an angle. They consist of a central disc with four pegs, located between two hinges with two pegs per hinge, as shown in Figure 4-18.
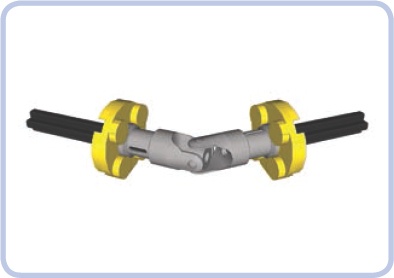
The main advantage of universal joints is that they can transfer motion along a line, acting like a bent shaft. Additionally, their angle can be changed at any moment without affecting the speed or torque they are transferring. Their only flaw is that if they are bent at more than 45 degrees, they generate fluctuations in transmitting the motion. These fluctuations increase together with the angle, resulting in vibration, until the joint becomes completely locked at 90 degrees (see Figure 4-19).
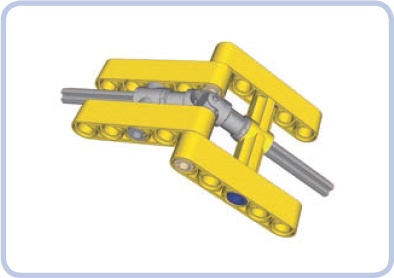
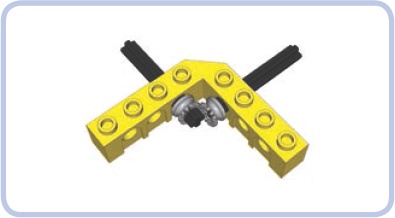
Universal joints can be damaged by very high torque in one of two ways: The yoke (the part that embraces the axle) can crack, or the pegs on the cruciform (the disc in the center) can snap. The first type of damage can be prevented by using 2×2 round bricks or round plates, as shown in Figure 4-20. The latter type has no countermeasure beyond building your own style of universal joint (see Chapter 8).
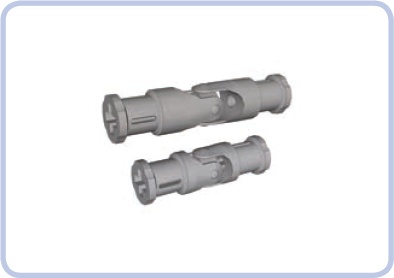
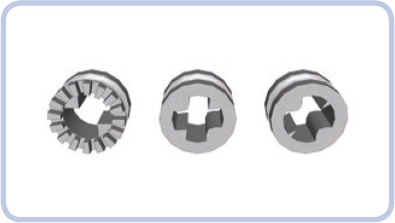
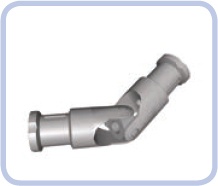
Universal joints were originally 4 studs long. Then in 2008, a new 3-stud-long version was introduced (shown in Figure 4-21). The new version fits well into studless structures thanks to its odd length (shown in Figure 4-22), and it is produced using stronger material than the old one. Additionally, its central disc is solid rather than hollow, and its pegs are less likely to snap; this has made it much more popular and useful than the old version. Like the old version, though, it can be secured with round plates.
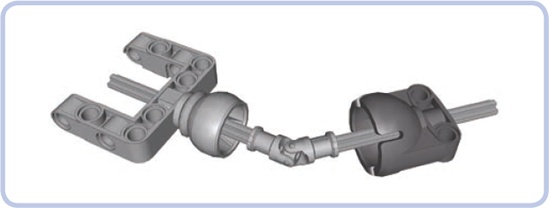
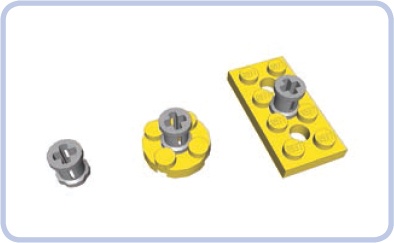
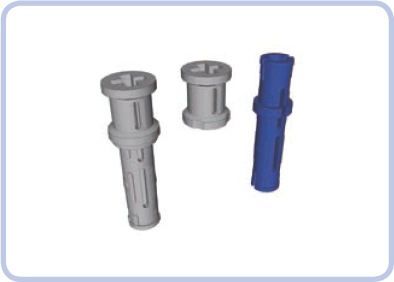
When dealing with high amounts of torque, we can also use a ball joint, which combines two studless pieces to create a sturdy, tight housing for the 3-stud-long universal joint (as shown in Figure 4-23 and Figure 4-24). The universal joint can rotate inside the housing without being stressed or pulled. As a result, a ball joint can be used for connecting structures that exert some load on the universal joint between them. This method holds these structures together firmly while allowing a universal joint to pass through, and it also gives these structures a large degree of free movement. The ball joint handles structural loads, leaving the universal joint with only the torsion of its shaft to handle. LEGO first used this method to connect suspended axles to a chassis while transferring drive from the chassis to the axles.
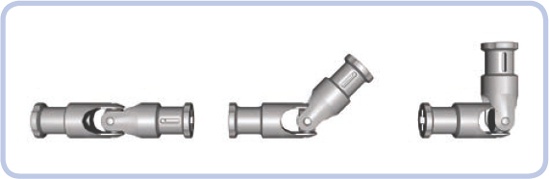
Figure 4-19. From left to right: a universal joint when it’s straight, a universal joint bent at 45 degrees, and a universal joint bent at 90 degrees (unable to rotate)