Scaling is a fairly straightforward process requiring simple multiplication and division. To begin, we need two things: a blueprint of the original object and a point of reference that will determine the resulting size of our model.
A blueprint is a technical drawing that typically includes a front, side, rear, and top view, as Figure 20-1 shows. We’ll want to find blueprints whose views show the object at the same scale.

A proper blueprint shows only the important edges of the object, without any filling, shading, colors, or textures. Figure 20-2 shows the same object with and without the central perspective—that is, a “vanishing point.” As you can see, perspective can distort the image and thus affect the measurements we take from it.
Where do you find blueprints? The best free source is http://www.the-blueprints.com/. If you can’t find the blueprint you need there, you can check LEGO MOCs websites, like http://www.brickshelf.com/ and http://mocpages.com/, as some builders publish their MOCs along with the blueprints they used. If you plan to model construction equipment, such as excavators, dump trucks, and so on, you can check the website of the original machine’s manufacturer. Many major manufacturers, such as Caterpillar, JCB, Komatsu, Liebherr, and Volvo, publish product brochures, usually as PDF files, that include a blueprint showing a machine’s dimensions in at least two views. Alternatively, you can look for 3-D models—some vehicles are popular with 3-D artists, who often present their work on the Internet in a blueprint-like form. Model-building kits can also be a source of high-quality blueprints, as their instructions often include painting diagrams that look exactly like blueprints. For example, Revell offers many instructions for free (http://www.revell.com/support/instructions.html).

Figure 20-2. Side view of the same model with central perspective (top) and without central perspective (bottom)
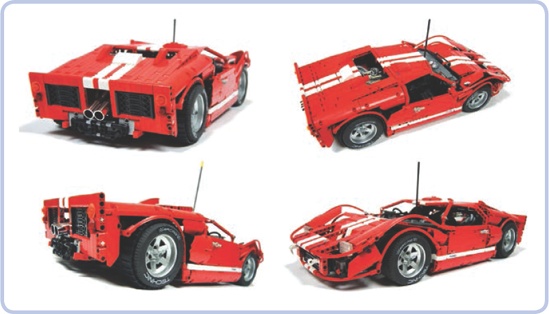
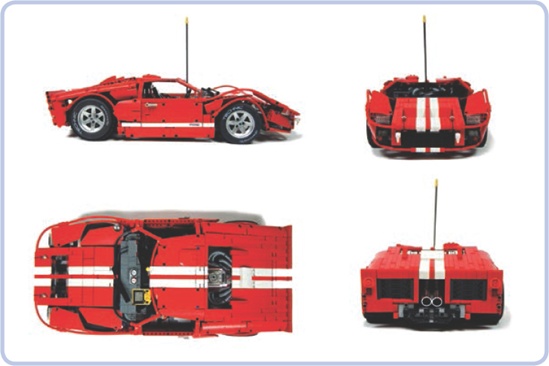
As a last resort, you can use photographs in place of a blueprint. The ideal set of photos shows the entire unobstructed vehicle from direct angles, preferably from a distance. The photos should obviously be as large, clean, and bright as possible, and they should be scaled to show the object at the same size from various angles. Figure 20-3 and Figure 20-4 provide examples of unusable and usable photos, respectively.
A point of reference is a constituent part that determines the size of a model. We use it to calculate how much smaller (or larger) than the original object the model has to be. Basically, we need some part in our model whose size can be compared with the size of its real counterpart. For wheeled vehicles, comparing wheels—or, more specifically, the diameter of tires—works best. Because LEGO wheels have a fixed size, we can easily scale the rest of our model to be the appropriate size.
The general rule of thumb for any build is to select the vehicle’s most specialized part. Since we can’t adjust the size of LEGO wheels, tracks, or propellers, we have to start with them as a reference point and then scale accordingly. Bear in mind other space constraints, like a vehicle’s hull dimensions and your model’s target functionality, as you work from your point of reference.
For tracked vehicles, we can use the width of the tracks as a reference point. This is an optimal reference point because a poor fit is usually more noticeable when it comes to track width than, for instance, the diameter of the sprocket wheels.
A helicopter model can be scaled using the ready-made LEGO propeller that will be used as the tail rotor. A jet plane model can be scaled using the cylindrical LEGO piece that will be used as the jet engine housing. And a boat can be scaled using a ready-made LEGO hull (these come in many variants, including watertight ones).
Let’s assume we have a good blueprint of the vehicle we want to scale and we have chosen a LEGO wheel as our point of reference. Now we can begin the actual scaling. (Note that the following process works the same way regardless of the part we use as our reference point.)
We will be taking various measurements off the blueprint. We can do that directly in the blueprint file, measuring distances with a program such as GIMP or Windows Paint. When you open the file in Paint, for example, and draw a line, the dimensions of the line (in pixels) will be shown in the lower-right corner of the program window. By holding down the shift key while drawing, you can make sure the line is perfectly horizontal or vertical. The other way to measure the blueprint is to print it out and simply use a ruler. Personally, I prefer this method, as it allows me to add notes to the printout, and it doesn’t require using a computer every time I need to measure something. The notes on such a blueprint can become quite elaborate and include a great deal of information, as Figure 20-5 shows.
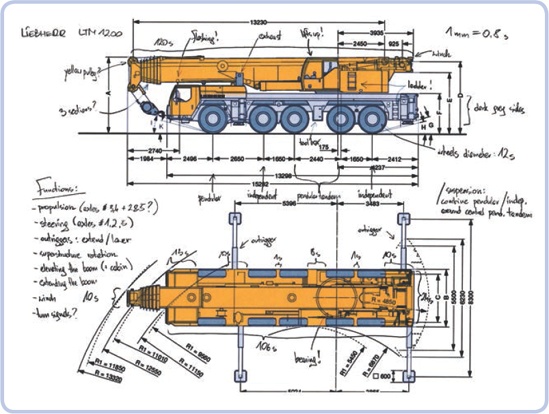
Figure 20-5. A printout of a Liebherr LTM1200 mobile telescopic crane blueprint. All basic dimensions and functions are marked, and the scaling ratio is noted in the upper-right corner. The blueprint comes from the manufacturer’s product brochure.
First, we have to determine the scaling ratio—the difference in dimensions between the blueprint and our model—which will allow us to calculate all of our model’s target dimensions. We can do this by comparing the size of our point of reference—in this case, a LEGO wheel—with its counterpart on the blueprint.
Let’s assume that we want to scale a Dodge Viper using a wheel from the 8448 Super Street Sensation set, which has a diameter of 10 studs. We begin by measuring the diameter of the wheel on a blueprint (indicated by the blue line in Figure 20-6), and the result is 28 mm. Now we divide the diameter of our LEGO wheel by the diameter of the wheel on the blueprint:

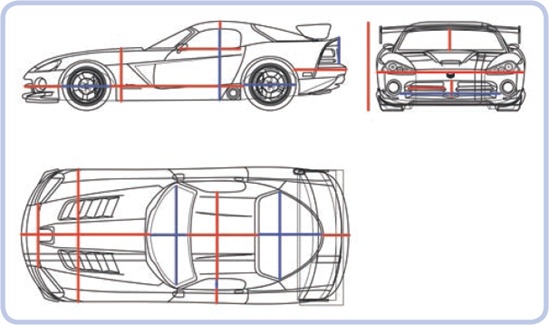
Figure 20-6. A Dodge Viper’s blueprint with three views. Colored lines mark various dimensions that can be easily measured.
We can round this value to 0.36 studs/mm. This is our scaling ratio—it shows how many studs are equal to 1 mm on the blueprint:
| 1 mm = 0.36 studs |
Now we can calculate any dimension of our LEGO model by measuring the corresponding dimension on the blueprint and multiplying it by the scaling ratio. For example, we can start with the width of the vehicle, which is 81 mm on the blueprint.
| 81 mm × 0.36 studs/mm = 29.2 studs |
The width of my model should be 29 studs.
We can summarize the calculations we have done with the following formulas:

Putting it all together, we get this:

Let’s put the formula to work to see how wide the same model would have to be if I scaled it for smaller LEGO wheels:
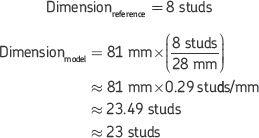
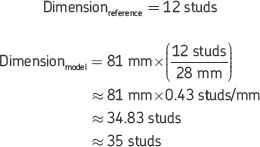
And if I scaled for slightly bigger LEGO wheels:
With the scaling ratio determined, we can proceed to take all the measurements we need from the blueprint. As Figure 20-6 shows, practically any object can be broken into a number of lines marking distances along the three basic dimensions: length, width, and depth.
For our Dodge Viper, the most important dimensions to calculate are the following:
Total length, width, and height
Height from the bottom of the body to the top of the cabin
Height from the bottom of the side window to the top of the cabin
Height from the bottom of the body to the top of the hood
Length of the body behind the rear wheels
Length of the body in front of the front wheels
Distance between the front and rear wheels
Length, width, and height of the windshield and all windows
Length of the trunk and hood
Length and width of the cabin roof
Distance between the headlights
Distance between the side window and the edge of the body
Length and width of the front grille
Height of the body’s rear end above the bumper
Figure 20-7 to Figure 20-9 show the most important dimensions of other types of vehicles.
Once you have your dimensions, it is possible to determine the scale of your model. To do this, we need to compare certain dimensions of the model with the dimensions of the original object using the same units. It’s a good idea to check body width—it’s one of the most important dimensions of any vehicle. Let’s assume that I have built my Dodge Viper model 29 studs wide, as originally planned. Because 1 stud equals 8 mm, 29 studs equal 232 mm. According to Dodge, the body width of the real car is 1,920 mm. Now, 1,920 / 232 equals 8.276. We can round this number to 8, which makes 1:8 the scale of my Viper. In other words, my model is 8 times smaller than the real vehicle.
Note
Before dividing, make sure you’re using the same units for both dimensions.

Figure 20-7. A blueprint of the Humvee with the core dimensions marked. The angular silhouette of this car is convenient for both measuring and modeling.
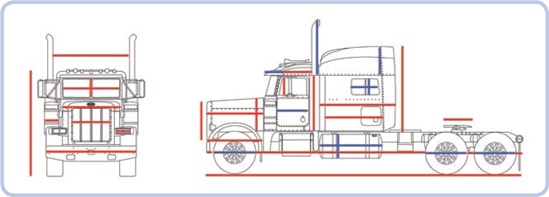
Figure 20-8. A blueprint of the Peterbilt 379 truck with the core dimensions marked. These include the dimensions of the airfoil, fifth wheel, hood, and side fuel tanks.
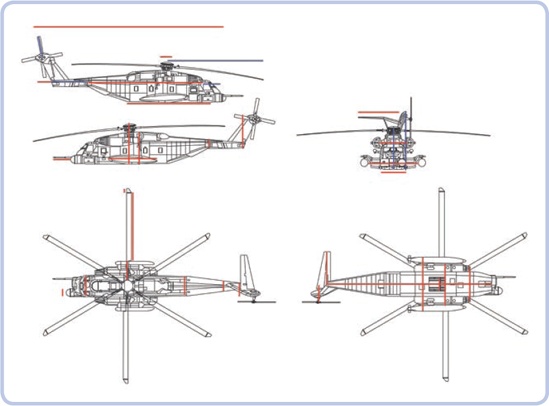
Figure 20-9. A blueprint of the Sikorsky MH-53 Pave Low helicopter with the core dimensions marked. These include the dimensions of the hull, tail boom, tail fin, both rotors, and main rotor hub.

where

Sometimes you may want to build a model in an already determined scale. For example, you might want to build a model that matches the size of someone else’s construction. Building a model in an already determined scale makes calculating the dimensions slightly more complicated. First, you need to know at least one dimension of the original object and compare it to the same dimension on the blueprint. Let’s assume I want to build the 1,920 mm wide Dodge Viper in a 1:12 scale. The width on the blueprint is 81 mm. We need to calculate the blueprint ratio, that is, the difference between the dimensions of the real car and those of the car on the blueprint. In this case, the ratio is 1,920 / 81, which equals 23.7. We can round the result to 24 to get our blueprint ratio. The formula is as follows:

Now we can proceed to calculate any dimension by measuring the part on the blueprint, multiplying it by the blueprint ratio, and then dividing it by the scale. For example, let’s check to see what size wheels I’m going to need for my 1:12 model. The wheel’s diameter on the blueprint is 28 mm. Therefore, we perform the following calculation:
This means the diameter of the model’s wheels should be 56 mm, which equals exactly 7 studs.
Given this information, we can calculate any dimension for a predetermined scale using the following formula:

Of course, the actual vehicle consists of more complex shapes than just those created by perpendicular lines, and these shapes need to be approximated with LEGO pieces. But by keeping our approximation within the core dimensions, we make sure the model has the right size, right angles, and right proportions. A model that has few details awry but accurate proportions always looks better than a model with plenty of intricate details but wrong proportions. Details can impress, of course, but they can’t hide errors in the proportions of the model.
Now that we can calculate the important dimensions, the next chapter will focus on modeling and other details.