
Sometimes you will need an image with extremely high resolution. Although camera manufacturers are constantly competing with each other to produce the highest image sensor resolution, this is not always a productive approach. An increase in the number of pixels in a sensor will always reduce the size of each individual sensor element, making the sensor increasingly sensitive to image noise. An alternative to ever-increasing camera resolution is to use software such as PhotoAcute, which merges several images into one image with greater resolution than each of the originals. This technique has many practical applications, but is not a catch-all solution for images with insufficient resolution.
Making this type of merged image involves a fair amount of effort, but has a number of advantages:
1. You can use just about any camera, including bridge and compact cameras
2. The technique can be used not only to increase resolution, but also to (optionally) reduce image noise
3. If you merge images with differing exposure values, this can have the side-effect of producing a Dynamic Range Increase effect (DRI)
This chapter explains all the preparatory and practical steps you need to take to produce great super-resolution images. We will also discuss the general use of PhotoAcute for subsequent reference.
Similarly to shooting for panoramas and HDRI images, there are several points to keep in mind when you shoot the individual basis shots for a super-resolution (SR) image. Sharp, well-exposed images are the ideal starting point.
As with HDRI, when we construct a high-resolution image out of several (almost) identical shots, any movement of the objects in the scene can cause problems. Algorithms exist which help to resolve the problem, but they can never completely eliminate blurring. Therefore, it is important to shoot your images as quickly as possible one after the other. A camera with a built-in burst mode is helpful here, as it allows you to shoot a sequence of images simply by pressing and holding the shutter button.
Because the primary goal here does not involve improving dynamic range, you should only use a small shutter speed bracketing interval with the camera set to Av (or Manual) + AEB. Experience has shown that a ½ EV step* is ideal. Smaller intervals can also be used if you are shooting a longer sequence. The range of contrast in your scene plays a role when deciding which bracketing steps to use – a high-contrast scene demands slightly larger steps, while a low-contrast scene works better with smaller steps. If the camera you are using is capable of capturing the entire range of contrast in a scene, you can simply leave out the bracketing procedure. Small bracketing steps (or no bracketing) have the advantage of avoiding longer exposures and the associated risk of camera shake. If you are not particularly interested in increasing the dynamic range of your image, burst mode is just fine, and can help you to shoot longer sequences more easily. Many DSLRs today can only bracket sequences of up to three shots. Newer, high-end models are often capable of more.**
Because PhotoAcute is capable of reducing noise (by averaging) while merging images, it is possible to work with ISO speeds between about 400 and 800, and therefore shorter exposure times, faster shooting speeds, and a reduced risk of camera shake. The best ISO setting depends on how well your particular camera handles noise.
PhotoAcute combines several technologies when merging images, and produces images with not only higher resolution, but also with a larger dynamic range (similar to DRI). The program averages the exposure values of the shots involved, and can thus also reduce noise in the final image.
Most HDRI applications require you to shoot from a tripod in order to avoid discrepancies between shots. PhotoAcute makes it possible to shoot SR sequences hand-held, which can be a great practical advantage.
How much resolution can actually be gained using PhotoAcute and the Super-Resolution process? PhotoAcute doubles the resolution along both the X- and Y-axes, resulting in an image that is four times larger than the originals. For this reason, the software manufacturer recommends that you use at least four images as a basis for your new image, although you can use less if that is what is available. However, more is often better, and five or six originals can produce better final results.
The following sections deal with the general usage of PhotoAcute, with relation not only to SR image creation, but also to the other functionality the program provides. We will be referring to these sections later in the book.
Depending on whether you shoot your images in RAW or JPEG format, you will have to prepare your material slightly differently for processing with PhotoAcute. The only RAW format that works well in PhotoAcute is DNG. Because very few digital cameras shoot directly in DNG format,* some preprocessing and conversion to the DNG format will be necessary if you are shooting RAW. Depending on which RAW converter you use, you have three basic options:
A. You can use the Adobe DNG Converter to convert a camera-specific RAW format into DNG (see section 2.5)
B. You can use your RAW converter to perform basic preprocessing before exporting your image as a 16-bit TIFF file. If you use this method, remember to use the settings (exposure compensation, white balance, cropping, rotation, etc.) applied to your best image for all the others in the sequence. How you go about doing this depends on which RAW converter you use. We have already briefly described this process for Adobe Camera RAW and Adobe Lightroom in section 2.1 (page 16).
C. You can leave the image files in their original RAW format and import them directly into PhotoAcute. This, however requires that:
1. You have a locally installed copy of Adobe DNG Converter
2. Your DNG converter supports your particular RAW format
3. You have configured PhotoAcute to recognize the path to your Adobe DNG Converter. Here, PhotoAcute automatically opens the RAW file in the DNG converter and automatically loads the resulting DNG file.
If your source images are in a format that is not supported by PhotoAcute, we recommend converting them to TIFF format for processing, although PhotoAcute also supports JPEG.
If this is the first time you are using PhotoAcute, you will need to carry out the following setup and registration steps before proceeding:
After starting PhotoAcute for the first time, you will need to activate it, either by entering a registration code or selecting trial mode.
Start by selecting the program’s preferences (PhotoAcute ▸ Preferences). In the following dialog box, click Registration. This will display the dialog box shown in figure 3-1. You can then enter your name and registration code, or simply click on the Trial / Reg button before clicking OK to proceed.
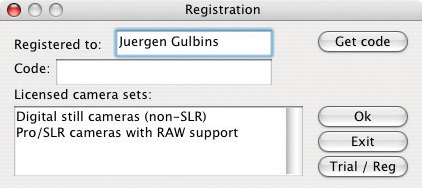
Figure 3-1: When using PhotoAcute for the first time, you will have to either enter a license key or choose Trial / Reg mode.
The Licensed box indicates which version has been registered (there is also a program version designed specifically for camera phones available, but that doesn’t interest us here). The standard version of the program only supports compact cameras – the following sections describe the Pro version.
To begin with, you should adjust the program’s settings to match your working environment (PhotoAcute ▸ Settings).
General |
Here, you should set the Scratch Folder option to point to a folder where the program can store temporary files. The default setting will point to your main hard drive, but if you’re short on space there, you should set this option to use a different drive, or a partition with plenty of spare space. 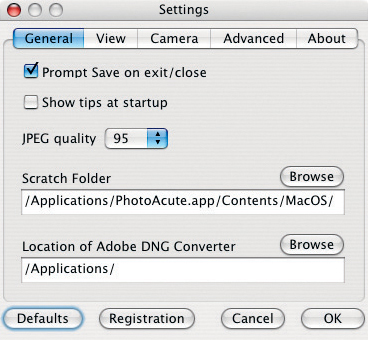 Figure 3-2: This shows the standard settings with the tab “General”. Make sure the path Location of Adobe DNG Converter is set correctly, using the Browse button to locate the correct folder if necessary. The tool-tips which pop up automatically when you start the program can be useful at first, but can get annoying after a while. You can deactivate them by deselecting the Show tips at startup option. You should keep the default JPEG quality setting. |
View |
The View tab governs the user interface settings (see figure 3-3). Tiled mode controls the behavior of the preview thumbnails. You are sure to want to deactivate Show welcome page once you have seen it once. The View interpolation section allows you to select which algorithm PhotoAcute uses to scale the preview display on your monitor (which, by the way, has nothing to do with the scaling of actual image). Nearest neighbor is the fastest method, Bicubic and Background bicubic require more processing power and are slower.  Figure 3-3: Setting up PhotoAcute’s image viewing settings. Background bicubic initially displays a simply interpolated image while performing the bicubic interpolation for subsequent display. We will be using this option. |
Camera |
Use this tab to specify your favorite camera/lens combination (see figure 3-4 It is also a good idea to activate the Autodetect camera type from EXIF data option (  Figure 3-4: Use this tab to define the camera/lens combination you use most often, and whether the camera and lens data should be extracted from the EXIF data (if available). |
Advanced |
Use option Option Option PhotoAcute automatically does a slight sharpening of your final image. You can use the slider 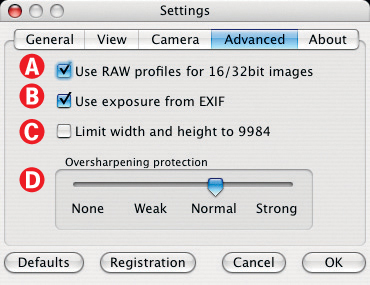 Figure 3-5: Define the profiles to be used for image processing and the degree to which PhotoAcute sharpens your results. |
About |
The About tab (figure 3-6) includes information about the program version in use and your registration/licensing status. |
Now click OK and you will find yourself back in the main program window. Some of the settings shown here (e.g., those for your camera and your lens) can also be found in the Settings dialog for individual merge processes. We will be addressing this option later.

Figure 3-6: Here, you will find information regarding your PhotoAcute version and your registration and licensing status.
PhotoAcute offers two modes for displaying preview thumbnails and the final image. Tiled mode displays all the images curently in use, distributed across the application window – otherwise, the program only displays a single image from your list. We use Tiled mode for most multi-image scenarios, but you can easily switch beteween the two modes by activating or deactivating the Tiled option in the View settings (see figure 3-7  ).
).
Although PhotoAcute can perform several optimization functions simultaneously, as described in section 2.4, we will start by concentrating on maximizing resolution, and the settings associated with this function. The logic involved in the merge itself should become self-evident during the process.
![]() PhotoAcute’s “Super Resolution” function only works if the program recognizes your camera and supports it with an appropriate profile. Camera recognition takes place either via an image’s EXIF data or via settings made in the “Camera” tab of the program’s settings dialog.
PhotoAcute’s “Super Resolution” function only works if the program recognizes your camera and supports it with an appropriate profile. Camera recognition takes place either via an image’s EXIF data or via settings made in the “Camera” tab of the program’s settings dialog.
The first step is to open the images you wish to work with using one of the several methods PhotoAcute offers.

Figure 3-7: The PhotoAcute application window with loaded images displayed in Tiled mode. Here, you can use the “Settings” button to change the settings for the current process that would otherwise be made using the “Preferences” dialog.
A. Go to File ▸ Open (or click on the Open-button in the PhotoAcute window) and use the resulting dialog box to navigate to a folder containing your source images. Instead of opening each file individually, you can open multiple images either by using the  -key while selecting, or by holding down the
  -key to select an entire group.
B. Drag and drop the required files into the PhotoAcute window directly from Windows Explorer or from the Mac Finder.
C. Drag the images from a drag-and-drop-capable image browser (Adobe Bridge, for example) and drop them into the PhotoAcute window.
You may have to exercise some patience during this process, as PhotoAcute can be slow when handling large images. Once processed, the images appear (usually cropped) in the preview tiles, as shown in figure 3-7.
Normally, you will have to set the display ratio to its smallest size (25%) to display your images adequately. The Fit setting (which can be found in the  menu) scales your images to fit them into the individual tiles, but stretches them to a degree that often makes this view unusable. You can move the selected image detail displayed in the navigation window using your mouse, which will be displayed along with its EXIF data (such as aperture, shutter speed, and focal length; see figure 3-7).
When working with RAW files, don’t be irritated by the somewhat colorless and lifeless preview images. Along with the stretched preview images already mentioned, this problem simply underscores the weaknesses of PhotoAcute’s preview system.
The next step is to select the images you want to merge using the check-box next to each image’s name. Only selected images will be processed. The last selected image is automatically selected as your preferred image, and is marked in gray. This image will then be your reference image for the processes that will be applied to all the other images in the sequence, so it is important to select the image with the best tonal range for this purpose. The final, merged image will be saved in a new file, and your original images will not be changed during the merge process.

Figure 3-8: You need to select the images to be merged by hand. The image marked blue is the reference image.
If the settings you have made previously are not suitable for the current run, click Settings. This will call up the familiar dialog box (see the description on page 35). You can now adjust your preferences as desired.
Now click Start. In the resulting dialog box (see figure 3-9), you can choose either a preset merge process using the menu, or you can make your merge settings manually.
Figure 3-9: This is where you can specify how your images will be processed. Your settings can be saved as a new preset and selected in Menu .
Manual settings are made mostly in menu (see figure 3-10), where you can specify the primary goals of your merging process:

Figure 3-10: Here, you select the required merge process.
▸ Merge the source images into a new image with twice the original resolution
▸ Merge the source images into a single, normal-resolution image with reduced image noise
▸ Re-align and display the source images (without merging)
In our first example, we will be using four images to create a new super-resolution image. Accordingly, we select the first menu item. Alternatively, we could simply reduce image noise, or align and export our images for further processing (in Photoshop, for example).
In menu  (figure 3-11), you will find additional, special processes that can be applied to your images:
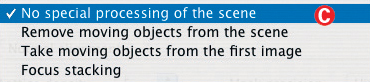
Figure 3-11: Use this menu to define additional special processing steps.
▸ No special processing
▸ Remove moving objects from the scene
▸ Remove moving objects from the first image only
▸ Merge the source images using focus stacking
We don’t need any specialized treatment in our first example, so we will select the first option.
We then use menu  to define how the images in the sequence are aligned (see figure 3-12):
▸ Normal alignment (this is our standard setting)
▸ Only small shifts (to be used for images shot using a tripod)
▸ Wide distortions (recommended for hand-held shots)
▸ No alignment at all (usually only applicable for images made using a microscope)

Figure 3-12: Here, you define how the source images will be aligned for the merge process.
Because the shots used in our example were taken hand-held, but supported on a solid base, we will use the first option, Normal alignment.
The final step involves activating options in menu  , which determine the remaining corrections which are to be applied to our image. These options include:
Auto-crop output We recommend activating this option, which automatically crops the final image to include only sections which were present in all of the source images. We therefore also recommend that you shoot your images with a generous border, in order to compensate for any parts of the image that may be auto-cropped later.
Correct image geometry PhotoAcute uses this option to correct lens errors (distortion). This option can only be used if PhotoAcute has a profile for the camera/lens combination that was used to shoot the original image (see section 3.5 for more information).
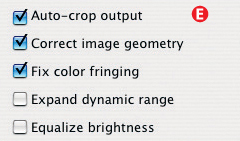
Figure 3-13: Optional additional corrections that can be applied during merging.
Fix color fringing This corrects chromatic aberration in your source images before merging. This function also requires the presence of a complete camera/lens profile.
Expand dynamic range This combines the tonal values of the individual source images to expand the dynamic range of the resulting image (DRI). This is particularly effective if the source images come from a homogenous sequence. The resulting image is, however, an LDR image (and not an HDR image), although the program version 2.8 (and higher) allows you to save a real HDR image. An LDR image is saved in either a 16-bit or an 8-bit format.*
Equalize brightness This option calculates the brightness of the final image by averaging the brightness values of the individual source images. Here, PhotoAcute reduces shadow noise in order to make shadow details more visible. Our experiments with this function sometimes delivered unsatisfactory results, but it is nevertheless worth giving it a try.
Lattice density This sets the limits for the density of the elastic distortion lattice in the alignment algorithm. High values make it possible to compensate for more complex distortions (due to the use of a fish-eye lens, or the visual effects of hot air rising, for example) but can lead to artifacts and incorrect matching if moving objects are present in the scene.

Figure 3-14: This parameter controls the density of the elastic distortion lattice in the alignment algorithm.
Mask precision This parameter controls the precision of focused areas and detection of moving objects. A higher value leads to longer processing times, but may achieve better results. Medium usually works fine.

Figure 3-15: This parameter controls the degree of precision PhotoAcute will apply when looking for moving objects.
The settings you use can be saved as a preset (click Save Preset in menu ). These will then appear as a separate item in the drop-down menu under the name you specify (see figure 3-9). You can use fairly long preset names to describe your settings accurately. You also have the option of writing an abbreviated description which will later appear in the drop-down menu .
In section  (see figure 3-9 on page 38), PhotoAcute displays information about the camera and lens used for the shot and the focal length (if a zoom lens was used). This information is taken either from the reference image EXIF data or from the preferences set by the user.
Finally, click OK to start processing. The progress bar at the bottom of the window will track progress, which can be slow if you are working with a large number of images, or if you are applying a number of complex corrections.
The result will be a new image, stored initially only in your computer’s memory cache, and displayed in the program’s preview window along with its size (measured in pixels). The program will automatically suggest a name for the new image, consisting of the name of the reference image and a suffix. You can inspect this virtual result in the navigator window along with the reference image. Again, don’t let the rather lifeless (RAW) display image bother you. A little post-processing in a RAW converter or in Photoshop can work wonders.
If the result is acceptable, you need to save it as a file with its own unique name (either the suggested name or one of your own invention). PhotoAcute offers several export formats (see figure 3-16). If the source images were DNG or RAW files, then they should be exported to DNG to allow for more flexible processing later on. Although the option exists, we do not recommend using PhotoAcute’s DNG to TIFF or JPEG conversion, or that you use any output format other than DNG.
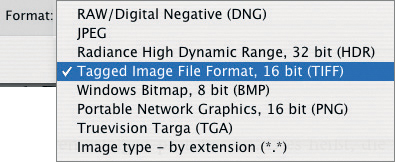
Figure 3-16: PhotoAcute offers several different file formats for saving your final image. If your input files were RAW files, your output format should be DNG.
When creating an SR image, the difference between the source images and the resulting super-resolution image may be hard to detect at first. Apart from the fact that the image file is larger, in most cases, the differences in resolution and detail will only become apparent at the printing stage. PhotoAcute cannot, of course, work miracles and make details appear which weren’t part of the source images to begin with. However, the merged image will always show noticeably better texture once it has been interpolated for printing using Photoshop or a similar tool. Figure 3-17 shows two magnified image details – the one on the left was printed directly from the source image, while the one on the right is the result of PhotoAcute’s super-resolution processing.
Figure 3-17: The image on the left is a merged super-resolution image. The center image is a detail taken from one of the source files. The image on the right is a detail taken from the super-resolution image.
You can also apply other corrections when merging images, which we will describe in the following sections. These corrections are applied to the source images before merging, and will not modify the actual source files. Reducing image noise is usually the most important of these additional corrections.
As previously mentioned, PhotoAcute can carry out a number of automatic corrections before merging images. These functions include the removal (or, more accurately, reduction) of chromatic aberration and lens distortion correction. Unfortunately, the program cannot correct vignetting.
All of these corrections are profile-based, which means that the properties of a camera and a specific lens are measured against special test exposures and are stored in a profile. These profiles do not, by the way, have anything to do with conventional ICC color profiles.* The profile data is then used to make appropriate corrections to your images. In order for this procedure to work effectively, the specific camera/lens combination you are using has to have its own, unique profile.*
If your camera (or lens) is not supported, the program’s manufacturer (Almalence Incorporated) will make you one for free and make it available to all other users online. In order to do this, you will need to make a series of test shots and send them to Almalence. The exact procedure is described at the URL listed in the margin.
![]() A description of how to establish a profile for a specific camera or lens can be found at: www.PhotoAcute.com/studio/downloadwin.html#profiles_list
A description of how to establish a profile for a specific camera or lens can be found at: www.PhotoAcute.com/studio/downloadwin.html#profiles_list
Wide-angle lenses and zoom lenses in particular tend to produce distortion (especially when used at their shortest and longest focal lengths). The effects produced are usually pin-cushion  or barrel
  distortion of straight lines. The degree of distortion depends on the lens (or focal length) being used and the subject distance. The closer you are to your subject, the more visible distortion will be. The distance between the subject and the center of the lens also plays a role – the further a straight line is from the center of the image, the more pronounced any distortion will be.
Such distortion is usually barely visible in most landscape images, but can be bothersome in architectural images or others which contain clear, straight edges (see figure 3-19).
These days, most high-quality photo editing software will allow you to correct these types of aberrations. In Photoshop, the Lens Correction filter has been available since the CS2 version (Filter ▸ Distort), but requires you to find the appropriate settings using the preview window and trial-and-error. A profile-based solution is more elegant, and is offered by other programs, such as DXO Optics Pro [35], PTLens [15], or LensFix [16].
These programs all offer additional, manual error correction for camera/lens combinations that are not already profiled, whereas PhotoAcute only allows profile-based error correction.
To make the corrections described on pages 38–40 using PhotoAcute, activate the Processing dialog, and check the Correct image geometry option (see figure 3-18). Figure 3-19 shows the result of such a correction. We used an image which isn’t particularly appealing, but which clearly shows evidence of lens distortion. Corrections made to most other images will be much more subtle.

Figure 3-18: The “Correct image geometry” option can be used to correct lens-based distortion.
This type of image correction (like the ones we will describe later) can be used on single or merged images, and can also be applied to images already processed using other tools, such as Photoshop, Photomatix Pro, Helicon Focus, CombineZM, or FDRTools. For applications that do not support profile-based image correction, you can use PhotoAcute for preprocessing. Simply load your images into PhotoAcute, activate the desired corrections (see figure 3-18) and choose the Output individual aligned images option in menu as shown in figure 3-20. This operation requires you to have an established profile for your camera/lens combination, and to load at least two images for processing.
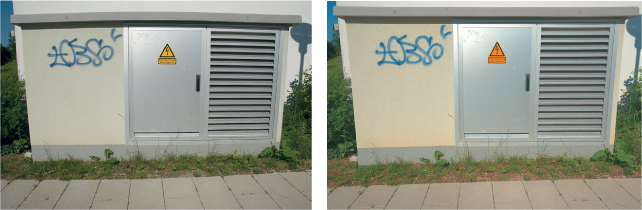
Figure 3-19: The image on the left shows strong distortion caused by the wide-angle setting of the zoom lens we were using. The image on the right shows the results of using PhotoAcute’s distortion correction. There is some obvious over-compensation, and perspective distortion has not been addressed.
PhotoAcute sometimes over-compensates while performing geometric corrections, and we recommend that you check thoroughly how well the program handles your camera/lens combination. If PhotoAcute isn’t up to your standards, we recommend using the relatively inexpensive PTLens [15], which is easy to use, supports a large number of cameras and lenses, and only costs about $25.

Figure 3-20: These settings allow you to export corrected images without merging them.
“Chromatic aberration” describes color fringing, which results from deficiencies in the construction of a lens – different wavelengths of light are refracted to slightly different degrees by the elements of the lens, causing their images to be formed in a staggered pattern on the camera’s image sensor. This type of aberration is often particularly evident in high-contrast portions of an image, and at well-defined edges. Stopping your lens down (reducing the aperture) while shooting helps to reduce this unwanted effect.

Figure 3-21: “Fix color fringing” will reduce chromatic aberrations in your image.
The term color fringing, which is used in PhotoAcute, is generally correct, but is also (somewhat confusingly) used elsewhere to describe the blooming effect that occurs when the pixels that make up certain highlights in an image become irreparably over-exposed. Here, we are referring exclusively to chromatic aberrations.
Activating PhotoAcute’s Fix color fringing reduces chromatic aberrations. There are no additional settings for this function, and it only works properly when an appropriate camera/lens profile is used.
If the color fringing isn’t completely gone after processing, you can make additional corrections later using a RAW converter.*

Figure 3-22: Highly magnified details: The left-hand (source) image shows a clearly visible magenta color fringe between the cherub and the dark background. On the right is the processed image, in which the effect is visibly reduced. We also activated the “Equalize brightness” function during processing. The final image was constructed from three source images.
Most good RAW converters (including Adobe Camera Raw, Lightroom, and Capture One) offer this type of functionality, but these are not generally profile-based.
PhotoAcute does not yet have the necessary functionality to perform the corrections described (distortion, chromatic aberrations, etc.) on single images which can then be separately saved to files, for example as components of a panorama sequence. PhotoAcute requires you to always load at least two images. Other programs or plug-ins, such as PTLens [15] or LensFix [16], and RAW converters like Bibble [57] or DXO [35] can correct images based on profiles and then export the corrected image. If you are shooting with a Canon DSLR, you can also use Canon’s DPP (Digital Photo Pro) software to perform these types of corrections.
The smaller your camera’s image sensor, the higher your camera’s resolution; the older your camera, and the higher your ISO speed setting, the greater the degree of noise your image will display. Images brightened after shooting will also show increased noise, especially in darker image areas.
Noise manifests itself in the form of discrepancies in brightness and contrast between neighboring pixels, which are, in turn, caused by the technical inadequacies of the digital photographic process, and not by real artifacts present in the subject. When discussing noise, we differentiate between color noise and luminance noise, and most RAW converters offer noise reduction filters for both types of noise. There are many different ways to reduce noise, starting with the camera itself.
Apart from when we are using extremely long exposures, we prefer to reduce noise later rather than in-camera, due to the processing power and the degree of control a computer gives us. Reducing image noise always involves striking a compromise between the level of noise present and the sharpness of the final image.
Activating noise reduction during shooting can also significantly reduce your potential shooting speed. The camera’s image processor simply needs time to reduce noise, and for most multishot techniques, a fast shooting speed is a better choice.
![]() Several of the tools we will be discussing also allow you to reduce image noise by averaging the pixels found in multiple images of the same scene. The “Fusion” method in Photomatix Pro also provides an “Average” option, and FDRTools also has an averaging function. Both programs are discussed further in chapter 6.
Several of the tools we will be discussing also allow you to reduce image noise by averaging the pixels found in multiple images of the same scene. The “Fusion” method in Photomatix Pro also provides an “Average” option, and FDRTools also has an averaging function. Both programs are discussed further in chapter 6.
Many of our techniques allow you to reduce noise in a relatively natural way. DRI and HDRI images only use portions of the images which are correctly exposed anyway, although some tone mappers (explained in section 6.1) can increase the effects of noise when increasing microcontrast. PhotoAcute reduces noise by averaging the exposure values of the pixels in the source images, thus almost entirely eliminating the random deviations that cause noise in the first place. Here, the more shots you use – hopefully without much shake – the better your results will be.
To activate this function, use menu (see figures 3-23 and 3-9) and activate the option labeled Combined 1x output (no super-resolution, noise reduction only). Additionally, you can also activate Equalize brightness from menu (see figure 3-24).

Figure 3-23: Automatic noise reduction is a part of all PhotoAcute’s basic processes, but can also be activated separately.
Figure 3-25 shows two image details demonstrating the difference between a source image and the image resulting from using PhotoAcute’s active noise reduction. The final image was merged from six separate source images.
If you choose to use DNG as both the import and export format, you will be able to perform more noise reduction later (if necessary) using your RAW converter. You can also further reduce noise for all other formats using Photoshop (Filter ▸ Noise Filter ▸ Reduce Noise). For even better results, you can use special Photoshop plug-ins, such as Neat Image [36], Noise Ninja [37], Noiseware [38], or Nik Software’s Define [23].
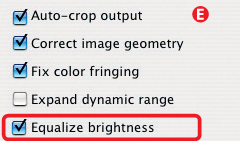
Figure 3-24: When this option is activated, PhotoAcute will average the brightness values of the pixels of all source images.
Whichever route you decide to take, images shot at high ISO speeds can always benefit from an application of PhotoAcute’s noise reduction feature.

Figure 3-25: The image on the left shows one of the source files. The upper right image is an enlarged detail from this image. The lower right image shows a detail of the noise-reduced image. Six images were shot using a Nikon D200 at ISO 1600 and merged using PhotoAcute.
It is not uncommon for objects in a scene to move between shots, creating a problem for the photographer when combining a sequence into a merged image. This applies just as much to superimposed super-resolution images as to stitched panoramas. If you have enough source images (PhotoAcute recommends that you use at least five images, and doesn’t function with less than four), then the program is capable of digitally removing moving objects from a scene. With a little bit of luck and sufficient object movement, the program can produce perfectly acceptable results.
Here, we use either the option Remove moving objects from the scene (see figure 3-26), or Take moving objects from the first image before we begin the merge process.
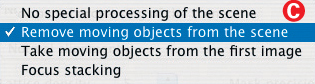
Figure 3-26: The second and third options help you to remove moving objects from your image.
Our example scene shows a construction site fence. At no point during the shoot was the scene empty of passersby, so we used PhotoAcute to “clean” the image. We could have achieved the same effect using one of the Photoshop stamp tools, but this way is faster. Figure 3-27 shows our six source images, and figure 3-28 shows the scene after we used PhotoAcute to eliminate passersby and merge the images.
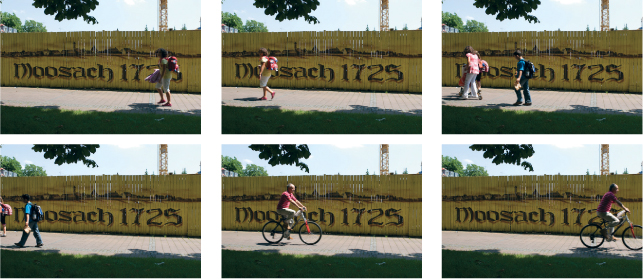
Figure 3-27: Our six source images showing the passersby that we want to remove from the scene.
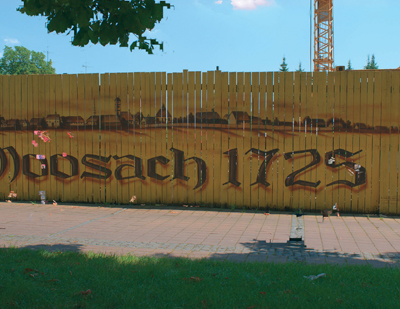
Figure 3-28: The merged image after an attempt to remove the moving objects from the scene. The results still leave something to be desired, and even the leaves at the top of the frame show a movement that hasn’t been completely eliminated.
The results aren’t perfect, but can certainly serve as a basis for some further stamp-based corrections.
The problem of moving objects is one of the more prominent aesthetic problems that can occur when using multishot techniques, although it is always less of an issue for panoramic shots. Although each of the programs we will be discussing has some kind of correction feature for this type of issue, and although the quality of these functions is always improving, we have yet to find an effective all-around solution. The best solution is still simply to avoid capturing moving objects when shooting your source images.
When shooting images for multishot processing, you simply have to be patient and wait for the wind to die down, for the grass to stop moving, for tree branches or flowers to stop waving, or for your scene to become people-free. Simply getting up early is often an effective way to find the scene you are looking for, and using a camera with a fast burst mode is often a great help too. If nothing else helps, you may have to retouch your individual shots by hand before merging, or after the merge, which can be even more painstaking. Remember – some scenes are simply not suitable for use in a multishot merge.
Focus Stacking describes a technique which enables the user to construct a single image out of multiple images of a single scene shot at different focus distances. The resulting image will have a much greater depth of field than each of the source images. The use of PhotoAcute for focus stacking purposes is explained in chapter 4.
Working directly with a command prompt has pretty well gone out of fashion (with the exception of Unix and Linux and some IT administrators), but the method does have some advantages. Processes which take a long time to complete, or which need to be repeated regularly, can be executed in the background if they are started at a command prompt level. PhotoAcute offers a command line interface which enables the user to control all of the program’s functions (except, of course, the actual visual inspection of images). A very elegant way to approach working with the command line is to create scripts (text files) containing several commands, which are executed one after the other when the script is run. Once a script has been started, you can return to doing other tasks in your computer’s graphical user interface.
Information about how to start the PhotoAcute command prompt can be found in the program’s online help. Once you understand PhotoAcute’s graphical interface, switching to the command prompt is a very simple step. This is especially true if you are already familiar with other types of shell scripts or scripting languages. You can create scripts in any text editor, and a single command line in a script might look something like this:
PhotoaAcute @Church -m2 -oChurch_x_2 -p2 -ro -e2 -f1 -a1 -g1 -c2
This command opens all the files that are part of a list contained in the file Church (@Church). It tells PhotoAcute to merge them into a single super-resolution image (-m2), to use DRI to optimize the tonal range (-e2), and to average the brightness and correct chromatic aberration (-f1). It also tells the program to align the individual shots as if they were taken using a tripod (-a1), to perform distortion correction (-d1), and to crop the final image. The option “-oChurch_x_2,” then saves the final image as Church_x_2.
PhotoAcute supports a number of different input and output file formats.
The program’s input formats include JPEG, TIFF, and numerous RAW formats. For the majority of the functions described here, you will achieve the best results with image files that contain as much image data as possible. If your camera supports a RAW format – as most modern DSLRs and bridge cameras do – you should use this format for shooting images for super-resolution merging. RAW files usually provide between 12- and 16-bits of image data per color channel, while a JPEG or a TIFF image taken directly from the camera’s memory card will only contain 8-bits of data per channel. Even if a 16-bit TIFF image appears to contain more information, it can nevertheless only contain as much data as the camera can capture in the first place (typically 12- or 14-bit per RGB color channel).
If your camera only supports JPEG, you should set it to shoot at the highest possible resolution and use the lowest possible compression setting. If your camera offers you the choice between using JPEG and TIFF, we recommend that you use TIFF, as this format is not susceptible to the formation of compression artifacts.
If you import JPEG or TIFF images into PhotoAcute, you will be limited to those same formats as export options. If, for example, you import an 8-bit TIFF image, then an 8-bit format is the only format you can export after processing. If you import a RAW (or DNG) image, you can (and should) export to DNG.
We have found that Adobe Camera Raw can not always interpret PhotoAcute’s DNG output correctly. It this happens to you, you will have to revert to using the TIFF format (preferably 16-bit TIFF).
If you wish to import RAW images generated by your camera, PhotoAcute will automatically use Adobe DNG Converter to create a working DNG file. In order for the converter to function correctly, it has to be installed either at its default location in the operating system folder, or at a location whose path can be set in the PhotoAcute preferences dialog (see figure 3-2 on page 34).
If you are importing DNG or any other RAW format, you should always use DNG as your export format. PhotoAcute’s RAW-to-JPEG or RAW-to-TIFF conversion capability is not the best available, and the program warns users accordingly. Several of the other programs we have mentioned are not capable of exporting any RAW formats at all – in these cases we recommend exporting to 16-bit TIFF.
We don’t want create the impression that PhotoAcute only works well with RAW or DNG files. The program supports JPEG and TIFF perfectly well, and these formats have their own advantages – you can preprocess them in a photo editor, adjust white balance and vignetting, or even crop in advance to save time later during additional processing steps. However, if you plan to make corrections to the image geometry or to any lens-based aberrations, it is better not to crop your images in advance.
As already mentioned, the best starting point for super-resolution images are source images saved in RAW or DNG format. PhotoAcute can, in turn, also save your results as DNG files. These DNG files will, however, require some post-processing in order to convert them to a regular image format. When using 16-bit TIFF files for input, the preferred export format is also 16-bit TIFF, as this offers the most margin for further image enhancements, such as white balance correction, tone balance correction, tone mapping, global and selective color correction, and also scaling and sharpening. 16-bit image files are also better suited for microcontrast enhancements. If your input images are based on an 8-bit format (TIFF or JPEG), PhotoAcute can only output an 8-bit format.
If you are using RAW source images, you will need to decide which of your planned corrections you want to perform during the image preprocessng stage, before the actual merge process takes place. Classic examples of preprocessing steps are white balance and exposure compensation corrections. If you decide not to post-process your image’s microcontrast in Photoshop, you can still adjust local contrast using a good RAW converter. These days, even (careful) global increases in color saturation are best performed using a RAW converter. While most RAW converters offer a sharpening option, they are not usually capable of processing selectively, and can only target an entire image. Because sharpening is often an important factor influencing overall image quality, it is usually better to adjust image sharpness at the post-processing stage using Photoshop, especially if you have access to a sharpening plug-in.
These days, most RAW converters can also convert images to monochrome (black-and-white) to a high standard. You can then optimize your monochrome tonal structure later using Photoshop, or other similar tools.

Figure 3-29: This setting allows you to control PhotoAcute’s sharpening effect.
Defining the order of your workflow steps when using a RAW converter isn’t always easy: Should you preprocess your RAW image and export the results to TIFF, or should you simply post-process the entire image using Photoshop? Most perspective or distortion correction cannot be performed using a RAW converter, and will require use of an image editing program rather than regular post-processing.
Regardless of which PhotoAcute export format you choose, the resulting images will not need to be sharpened as much as other images, as PhotoAcute always sharpens images automatically. This effect can be controlled using the Oversharpening protection slider in the Advanced tab in the program’s Preferences and Settings dialog (see figure 3-29). If you are using JPEG or TIFF source files, you should sharpen your images as little as possible at the shooting stage. This will help avoid over-sharpening and the creation of unwanted image artifacts.
An alternative method of increasing image resolution is to stitch several individual, overlapping images together to form a single, merged image. Here, each individual source image captures a different part of the overall scene. This technique is also described in more detail in chapter 5. Depending on the number of images used, this method can increase resolution by up to 4x or more. Additionally, this process also allows you to work outside the constraints of your camera’s normal format without losing resolution due to cropping or trimming.
Both of these processes – merging multiple images using PhotoAcute or using stitching software – are capable of delivering much higher image quality than interpolation using Photoshop (and/or plug-ins) can deliver.
Figure 3-30: It’s also possible to increase the resolution of an image by merging a series of overlapping source images. Once merged, you can then correct perspective errors and even out exposure differences to produce a seamless result. These final steps can be performed by hand or using appropriate software.
For those of you who aren’t satisfied by these methods and who want images with even higher resolutions, we recommend that you visit the Gigapxl Project at www.gigapxl.org.


