Chapter 1. A
About This Program
In Windows: About This Program
To find out what version of a Macintosh program you’re using, you choose the About command, always the first item in the Apple menu. But to ferret out the same information in Windows, you need to look instead for an About menu item in the Help menu for the application you’re using. It’s usually the last item in the Help menu, and it produces a dialog box filled with version numbers, serial number, and other info, exactly as in Macintosh “About” boxes.
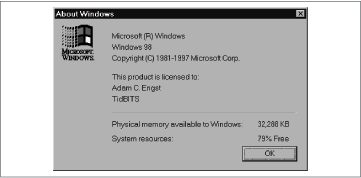
To learn more about Windows itself, choose Help → About Windows 9X in any Desktop window (such as a folder or Explorer window). The resulting dialog box tells you the version you’re running, to whom it’s licensed, the physical memory available, and the system resources usage level (see Figure 1-1).
ADB (Apple Desktop Bus)
In Windows: Keyboard Port, Mouse Port, USB
Older Macintosh models rely on a technology (a jack and cable-connector style) called ADB (Apple Desktop Bus) to connect keyboards, mice, trackballs, and joysticks, along with a few other types of devices. On the PC, though, there’s no technology equivalent to ADB and no single standard port for input devices (although someday USB may become such a standard). So, if you’re adding a keyboard or a mouse to your PC, make sure to check the ports before purchasing.
Some PC keyboards have a large 5-pin round (DIN) connector, but others connect to a smaller 6-pin, round, mini-DIN port (also known as a PS/2 connector). The 6-pin connector appears commonly on laptops, where space is limited.
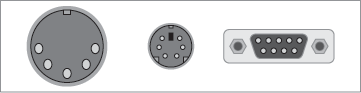
PC mice, too, come in two basic varieties: the serial mouse (which connects to a 9-pin DB-9 connector) and the bus, or PS/2, mouse, which connects to the 6-pin mini DIN port. See Figure 1-2 for diagrams of the three different ports. Depending on your PC, your back panel might be labeled with icons for the different ports.
Windows offers no standard means of daisy-chaining multiple keyboards and mice, as you can on the Macintosh, although Windows 98 does let you use multiple mice at the same time. This configuration is handy if your laptop has a trackball, for instance, and you’d like to hook up a serial mouse as well. In fact, many laptops let you attach a second keyboard or mouse so you can avoid using the cramped built-in keyboard and pointing device.
Adobe Acrobat
In Windows: Adobe Acrobat
Adobe Acrobat is a cross-platform program (versions exist for the Macintosh, Windows, and Unix) that lets you see documents onscreen as they were meant to be seen on paper, complete with graphics, typography, and original layout. You can also print these documents without loss of quality, even if you lack the documents’ original fonts.
Some companies choose to distribute online in Acrobat format—more accurately called PDF or Portable Document Format—because of this guarantee of display quality. Other uses of Acrobat include sending proofs of documents to people who may lack both the necessary program and the necessary fonts to view the original file, and distributing forms such as the IRS tax forms, which must be printed out accurately.
Adobe put a lot of effort into making Acrobat files totally cross-platform. If you create an Acrobat file using Acrobat Distiller on the Macintosh, you can send that file to a Windows user who can read and print it using the free Acrobat Reader—and vice versa.
You can find much more information about Adobe Acrobat on Adobe’s web site at http://www.adobe.com/.
Alias
In Windows: Shortcut
A Macintosh alias is an icon that represents some other file, folder, or disk and takes up very little disk space, yet opens the original icon when double-clicked. In effect, it lets a file, folder, or disk icon be in more than one place at once. A common usage: put the alias for a commonly used item in your Apple menu or on your Desktop. In Windows, the equivalent icon duplicates are called shortcuts.
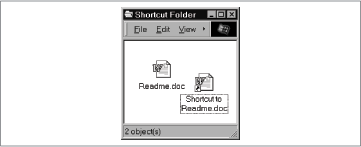
Creating shortcuts. To create a shortcut, right-click a file, folder, or disk; from the pop-up menu that appears, choose Create Shortcut. Windows creates the shortcut next to the original, calling it “Shortcut to Applications” (or whatever the name of the original was, as shown in Figure 1-3). Shortcut icons match the originals, with the addition of an arrow branded on the icon (exactly as in Mac OS 8.5 and later). Once you’ve created a shortcut, you can rename it, move it, or copy it anywhere you like; double-clicking it opens the original file.
As an alternative method of creating a shortcut, open the window where you’d like the finished shortcut to reside. Then choose File → New → Shortcut. The Create Shortcut wizard walks you through the steps of creating a shortcut: choosing the original, naming the shortcut, and sometimes choosing an icon.
Note
When you’re asked to select an icon for the shortcut, the Browse dialog box defaults to showing you only programs. You must choose Files of type → All Files to see other types of files from which you can steal icons.
Windows also offers several shortcuts to creating shortcuts:
Right-click any blank spot on the Desktop or in a Desktop window; from the resulting pop-up menu, you can choose New → Shortcut to place a new shortcut on the Desktop.
If you right-click and drag an icon, Windows asks if you want to move the original to the new location, copy the original to the new location, or create a shortcut in the new location.
If you press Ctrl-Shift when dragging, Windows displays the same pop-up menu, but defaults to making a shortcut of the original in the new location (your cursor changes to indicate that it will create a shortcut).
You’ll find that Windows is distinctly different from the Macintosh in one regard: if you try to drag a program’s icon to a different window, Windows makes a shortcut in the new location instead, unbidden. To move or copy the actual program you must right-click and drag, or Shift-drag, its icon.
Special shortcut features. Windows shortcuts offer more control than Macintosh aliases. To access these additional features, right-click the shortcut icon and choose Properties from the resulting pop-up menu. In the Properties dialog box, click the Shortcut tab for information about the shortcut, such as target type and target location. The Target field contains the full pathname to the original.
The “Start in” field specifies the folder that contains the original item. (It may also identify a folder that contains files related to the original item, such as a folder containing documents to open at launch.)
More useful is the “Shortcut key” field, which lets you define a keystroke that launches, or switches to, the program referenced by the shortcut. (In other words, Windows has a built-in function that does what, say, QuicKeys does on the Macintosh—launches your favorite programs and documents from the keyboard. See Macros for more information on macro programs in Windows.) To specify such a shortcut key, click in the field and press any key except Escape, Enter, Tab, Spacebar, Print Screen, or Backspace; your finished keystroke is Ctrl-Alt-[whatever key you chose].
Note
Windows lets you duplicate shortcut keys for different shortcuts; the most recent one defined should overrule any duplicates. If a previously assigned shortcut keystroke is giving you trouble, however, right-click the offending shortcut, and choose Properties → Shortcut → Shortcut Key → Delete.
Finally, the Run pop-up menu lets you specify which kind of window will open when you launch a program from its shortcut: a normal window, a window that’s minimized to an icon on the Taskbar, or a window that’s maximized to take up the full screen. This option is especially useful for shortcuts in the StartUp folder that run at startup; you may want certain background applications, such as speech-recognition engines or screen capture utilities, to launch automatically at startup but to minimize themselves to get their windows out of your way.
Finding the original item. The Properties → Shortcuts dialog box offers two useful buttons. To find the original item, click Find Target; Windows opens the folder containing the original icon. (This mechanism is exactly the same as the Show Original command applied to a Macintosh alias.) To change the shortcut’s icon, click Change Icon and choose an icon from those listed in the Change Icon dialog box.
Note
Even in Windows 98 shortcuts aren’t as smart as aliases. Beware of creating shortcuts for items on other networked computers or on removable disks, for example—Windows still isn’t smart enough to prompt you to insert the appropriate removable disk or make the specific network volume accessible when you double-click such a shortcut.
If you change the name of the original file, a Windows shortcut still works. But in Windows 95, if you move the original file to a different folder, your shortcut “breaks,” so that it no longer launches the proper file when double-clicked. In fact, it may open a random file in the original’s home folder! There’s no workaround other than to upgrade—in Windows 98, shortcuts can locate their originals even after they’ve been moved.
Appearance Control Panel
In Windows: Display Control Panel, Sounds Control Panel
In Mac OS 8.0 and 8.1, the Appearance control panel let you adjust a few subtle cosmetic interface options: highlight color, menu font, and the like. In Mac OS 8.5 and later, though, the Appearance control panel is a full-fledged application that governs a broad array of “look and feel” settings—what pattern or picture you’d like as your Desktop backdrop, what fonts you prefer for your windows and menus, what sound effects should accompany your Finder activity, and so on.
In Windows, you’ll find these features and more, but they’re scattered among several different control panels. Here, tab by tab of the Mac OS 8.5 Appearance control panel, is where to find them.
Themes and Appearance tabs. The Macintosh Appearance control panel’s Themes tab lets you name and save a single “theme” that incorporates dozens of settings in the Appearance control panel; the Appearance tab lets you choose color schemes for icons, windows, selected text, and so on.
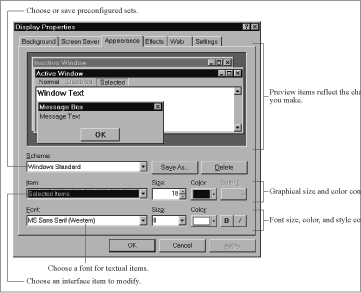
In Windows, the closest corresponding feature is called Schemes; you access it from Control Panel → Display → Appearance (see Figure 1-4). The Item menu lets you choose every conceivable interface component (icon, menu, message box, and so on, right down to the inactive window border)—at which point the dialog box’s Size, Color, and other pop-up menus let you modify that element. You can save your creations and, when you create a truly ugly one (an easy task), delete them.
A scheme, however, stores only window color schemes and font choices on your PC—not the full array of sounds and Desktop patterns stored by Macintosh theme.
Fonts tab. The Mac’s “Smooth all fonts on screen” setting in Appearance → Fonts is equivalent to the “Smooth edges of screen fonts” checkbox in Control Panel → Display → Effects in Windows. To change the actual font choices for Windows windows, menus, and so on, visit Control Panel → Display → Appearance, as described previously.
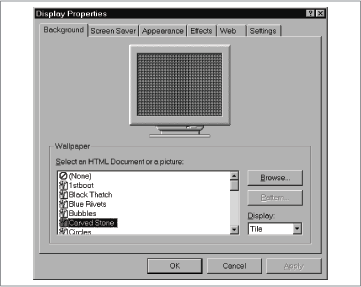
Desktop. Follow these steps to apply a picture to the background of your Desktop in Windows (see Figure 1-5):
Open Control Panel → Display → Background.
Select a picture in the Wallpaper list to preview it.
Choose Center, Tile, or Stretch from the Display menu (experiment to see the differences).
Click Apply to preview the new background at full size. If you don’t like the way it looks, repeat the previous steps.
Click Close when you’re happy with the background you’ve chosen.
Windows comes with a few graphics files, most of which are designed to be tiled, but you can add your own in several ways:
You can use any bitmap file (.bmp); click Browse and find it on your hard disk in the Open File dialog box.
If you see a graphic you like on the Web and you’re using Internet Explorer, you can right-click the graphic and choose Set as Wallpaper. Doing so creates a picture named “Internet Explorer Wallpaper” in the list; note that setting another graphic as wallpaper replaces (and deletes) whatever you were using before.
You can also right-click a graphic in a web page and choose Save Picture As, then save it as a bitmap file. Once it’s saved on your hard disk, you can use it as a background as you would any other bitmap file.
Although most of the pictures in the Wallpaper list look like a Mac’s standard built-in patterns, they’re actually individual graphics files. To use a pattern rather than a picture, follow these:
Open Control Panel → Display → Background.
Select None at the top of the list.
Click Pattern.
Choose a pattern and click OK to set it as the pattern for your Desktop.
You can edit the pixels that make up the pattern, or create new ones, by clicking Edit Pattern. Give the pattern a new name in the Sound. Mac OS 8.5 marked the official debut of sound effects in the Mac OS—subtle sounds that can accompany such system actions as dragging icons and opening and closing windows. (Apple actually showed this feature back in the early 1990s with the Sonic Finder, a version of the Finder that was never officially released. Several third parties also provided it in early versions of the Mac OS.) Windows provides control over these system action sounds in the Sounds control panel (Control Panel → Sounds).
Note
In Windows 98, you can’t change the pattern’s color in the Pattern Editor. The pattern is simply a black overlay over the colored Desktop. (You change the Desktop color in the Display control panel’s Appearance tab.)
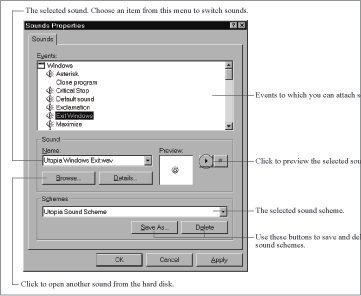
Although you can assign sounds to individual actions or events in Windows (see Figure 1-6), you’re more likely to choose a sound scheme, which is a collection of related sounds. If any given sound bugs you, though, you can just turn it off (much to the relief of those driven nearly insane by the Utopia scheme’s shutdown laughter).
Options. The Mac’s Smart Scrolling option in Appearance → Options (which creates a double-headed scroll-bar arrow at one end of each scroll bar, instead of the usual one-arrow-at-each-end arrangement) has no equivalent in Windows.
Nor does Windows offer an equivalent to the Mac’s “Double-click title bar to collapse windows” option (in Appearance → Options). But double-clicking a window’s title bar in Windows always does something anyway—it maximizes the window, making it fill the entire screen.
Apple Guide
In Windows: Help
Apple Guide is the online help technology that walks you through various tasks, such as adjusting the sound volume or setting up a printer. To use it, you click through successive tutorial screens, with animated red circles pointing out items on the screen that you’re supposed to click or adjust.
In Windows, the online Help system frequently takes the form of step-by-step, successive tutorial screens, just like Apple Guide, but without nearly as much interaction or animated red highlighting. For more information about different online help options in Windows, see Help.
Apple Menu
In Windows: Start Menu, Favorites Menu
The Mac OS’s Apple menu is user-configurable; by moving files and folders in and out of the System Folder → Apple Menu Items folder, you can control what’s listed in the Apple menu. Such important elements as the Chooser, the Control Panels item, and Recent Applications, Recent Documents, and Recent Servers items—along with your favorite documents, disks, folders, and programs—also call the Apple menu home.
In Windows, the Apple menu’s equivalent is the Start menu, although the two aren’t identical. As on the Macintosh, you can add items to this menu—but in Windows, you can’t remove most of the default menu items. Windows 98 also offers a Favorites menu (a submenu in the Start menu), exactly as in Mac OS 8.5 and later; it’s closer in spirit to the Mac’s Apple menu, since you can easily add folders to your system-wide list of favorites and access them from Start → Favorites.
User-specified items. Just as you put aliases in the Apple Menu Items folder on the Macintosh, so you can put shortcuts into the Start Menu folder in Windows. Such items are listed above the Programs item in the Start menu. Here’s how to add items to the Start menu:
Right-click the Start menu. Choose Open (to open the Start Menu folder) or Explore (to view it in an Explorer window). Then right-drag a file or folder into the Start Menu folder, and choose Create Shortcut Here from the pop-up menu.
Right-click a blank area of the Taskbar, choose Properties, and click the Start Menu Programs tab in the resulting dialog box. Clicking the Add button runs a wizard that walks you through finding a file to add and placing it appropriately. If you click Remove, a dialog box lets you remove items from the Start menu. Click Advanced to view an Explorer window that shows the Start Menu folder’s contents; from there, you can drag shortcuts in or out to add or remove them from the Start menu.
In Windows 98, drag an icon onto the Start menu, pause briefly without releasing the mouse button, and then drag the item anywhere you want within the menu. You can even put things into your Programs or Favorites folders this way.
Adding folder shortcuts to the Windows 98 Start → Favorites menu is even easier. Whenever you’re viewing a folder window, choose Favorites → Add to Favorites. If you are used to the Mac OS 8.5-style Favorites menu, you may be confused that the Favorites command lists both shortcuts to web pages as well as to favorite folder windows.
Other items. Most of the remaining Apple-menu elements familiar to Macintosh users—the Chooser, Control Panels, and the Recent Items listings—have equivalents in Windows. See their individual listings.
One aspect of the Windows Start menu frequently throws Macintosh users making the switch: unlike the Apple menu, you can’t open any Start-menu folder directly in the Start menu. You must slide the cursor sideways onto the submenu and make a selection there.
For example, on the Macintosh, you can choose Favorites, Recent Documents, or Control Panels from the Apple menu and release the mouse—the corresponding window appears. On Windows, however, you’re not allowed to choose those commands in the Start menu. You must choose one of the items in their submenus.
Apple Menu Options Control Panel
In Windows: No direct equivalent
The Apple Menu Options control panel adds two useful features to the Macintosh. First, it lets your Apple menu sprout four levels of submenus, thus letting you select, from this menu, files that are deeply nested in folders within folders. Second, Apple Menu Options adds three commands to your Apple menu: Recent Applications, Recent Documents, and Recent Servers. These commands (and their matching System Folder subfolders) list the most recently used applications, documents, and servers that you’ve opened.
Windows offers the same submenu-listing feature, but gives you no control over the number or type of menus. It can, however, offer easy access to your most frequently used items, as follows:
Start → Documents works almost exactly like Apple → Recent Documents, tracking your most recently used documents.
Start → Programs lists all Windows programs—not just those most recently opened—on your hard disk. Since Macintosh users may find Windows navigation difficult at first, the Programs menu can prove helpful—it’s easier to launch programs from the Programs menu than to find them in your folder hierarchy.
Apple System Profiler
In Windows: System Information, Windows Report Tool
On the Macintosh, you generally don’t need to know the technical details of your system. When you do, though, you can fall back on Apple System Profiler, which provides detailed information about your Mac’s hardware and software configuration. In Windows, the System Information program does roughly the same thing.
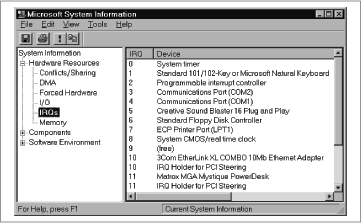
If you have Windows 95, you’re out of luck; there’s no such program or built-in method of creating a system profile. In Windows 98, however, you can find System Information at Start → Programs → Accessories → System Tools → System Information. The program provides a two-pane interface, with all the hardware and software components of your system listed on the left, and details about the selected component on the right (see Figure 1-7).
If you’re a Macintosh user using a Windows machine for the first time, the system information may not mean much to you. But the system information can prove extremely useful to a support technician you manage to get on the phone.
If you’re asked to submit a report detailing your system’s hardware and software configuration, use the Windows Report Tool (accessible from Tools → Windows Report Tool in the System Information program) to create a report. In it, describe your problem, what you thought should happen, and any steps necessary to reproduce your problem. Along with that information, Windows Report Tool takes a snapshot of the settings on your computer and bundles it all up for sending.
AppleCD Audio Player
In Windows: CD Player
If you’re used to wasting the vast computing power of your Macintosh by playing audio CDs on your CD-ROM drive, you’ll appreciate the fact that you can do the same thing under Windows (assuming of course, that your PC has a sound card installed). When you pop an audio CD into your PC’s CD drive, the Windows equivalent of the Mac’s AppleCD Audio Player launches itself—something called CD Player—and starts playing the CD. (You can also launch CD Player manually in Windows 98 from Start → Programs → Accessories → Entertainment → CD Player, or in Windows 95, from Start → Programs → Accessories → Multimedia → CD Player.)
To prevent CD Player from launching automatically, press Shift when you insert the CD. Or, if you never want a CD to start automatically, right-click My Computer and choose Properties. Switch to the Device Manager tab, open the CD-ROM branch, and double-click your CD-ROM drive to open its Properties window. Switch to the Settings tab and turn off “Auto insert notification.”
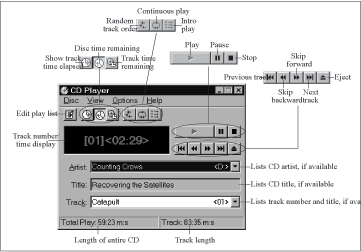
CD Player, like its Macintosh equivalent, offers all the controls of a CD player: random, continuous and intro modes, pause, stop, play, eject, next and previous track, skip forward and back buttons, and so on (see Figure 1-8). The View → Volume Control command summons a separate Volume Control application, absolutely teeming with individual sound-tweaking controls.
CD Player lets you switch among three display modes: Track Time Elapsed, Track Time Remaining, and Disk Time Remaining. CD Player can also show the artist’s name, the title of the CD, and the name of the current track number—if it knows this information. Unfortunately, you must teach it—by choosing Disc → Edit Play List. In the resulting dialog box, you can type in disc, artist, and track information, and also specify which tracks you’d like to hear. CD Player stores the play list information in a file called cdplayer.ini, which is limited to 64K; if you have a huge CD collection, you’re out of luck.
As an alternative, check out the extensive list of CD-playing software that works with the CDDB CD Database on the Internet. It’s at http://www.cddb.com/downloads/.
AppleScript
In Windows: Batch Language, Windows Scripting Host
Long ago, DOS users jeered that the Mac OS had no equivalent to the DOS batch language. That was true, although the DOS batch language was nothing to write home about (it lacks many programming constructs necessary to write more than the simplest programs). When Apple added scripting capabilities to the Mac OS, they took the form of the full-featured Apple-Script, which provides far more access to the internal workings of Macintosh applications than batch files ever did for DOS programs.
In other words, if you’re used to the power of AppleScript, you may be sorely disappointed in what you can do with batch files in Windows. Luckily, Windows 98’s Windows Scripting Host lets you write and run scripts in a variety of powerful scripting languages, including Microsoft’s VBScript and JScript, plus JavaScript, Perl, PerlScript, Python, and TCL. Windows 95 and NT 4.0 users can download Windows Scripting Host from http://msdn.microsoft.com/scripting/default.htm?/scripting/windowshost/.
Batch language. Batch files are ASCII text files that contain commands that you could execute at the DOS prompt, as well as rudimentary programming constructs like looping and conditionals. These files can’t use the name of any internal DOS programs, and their names must end in .bat. Each command must be on a line by itself; each command executes sequentially.
These limitations might seem onerous, but you can perform some useful tasks in batch files. Possibilities include making sure a network connection has been established before running an Internet program, or creating a specific set of folders and files before starting a new project.
If you’re interested in pursuing the Windows batch language, check out O’Reilly & Associate’s Windows 95 in a Nutshell.
Windows Scripting Host. Macintosh users will probably feel more at home with Windows Scripting Host, which lets you execute scripts written in a variety of scripting languages. Unfortunately, though not surprisingly, AppleScript isn’t among those languages. But if you have experience with scripting in Unix, you can use any one of several Unix scripting languages.
The huge advantage of Windows Scripting Host over the DOS batch language is that some of these scripting languages, such as the freely downloadable PerlScript (see http://www.activestate.com/pw32/), let you access the internals of Windows programs, much as AppleScript does for Macintosh applications.
Scripts written in any of these languages are still ASCII text files, although they have specific extensions that enable Windows to identify them as scripts and run them through the Windows Scripting Host. For instance, VBScript scripts have .vbs extensions, whereas JScript scripts use the .js extension.
For more on this kind of Windows scripting, Learning Perl on Win32 Systems might prove helpful, since it’s specific to PCs.
AppleShare
In Windows: Microsoft Networks, File Sharing, Client for Microsoft Networks
Macs have always had built-in Ethernet or LocalTalk ports for networking. The software protocol for sharing files over a network is AppleShare—but that term may refer to any of three things:
The overall technology for sharing files on the Macintosh over AppleTalk or TCP/IP networks.
The server software used to serve files over a network to Macs.
The client software used to access AppleShare servers over a network.
AppleShare file sharing technology. The Windows counterpart to the AppleShare technology is Microsoft Networks, which lets you share files among networked Windows machines. Microsoft Networks can use any of the network protocols installed on your PC, including TCP/IP, IPX, NetBEUI, and so on. Remember, protocols are the languages used to communicate over a given network. Microsoft Networks uses your selected protocol to provide file and printer sharing services.
(To share files between Macs and PCs, see Transferring Files to Windows.)
AppleShare server. Apple sells a server called AppleShare; the latest version, called AppleShare IP, adds Internet server capabilities (Web, FTP, DHCP, and electronic mail) to its standard file and print serving capabilities. In the Windows world, you’d probably rely instead on Windows 98’s big brother, Windows NT, for similar server duties. Windows NT is an industrial-strength operating system designed for use on servers, although it comes with an equally beefy learning curve.
If you don’t need such power, the built-in file and print sharing in Windows may be sufficient, since it’s roughly on the same level as personal file sharing in the Mac OS. You set up file and print sharing in the Network control panel in Windows. For more information, see File Sharing and Printer Sharing.
AppleShare client. On the Macintosh, to access AppleShare servers and other Macs running file sharing, you click the Apple-Share icon in the Chooser. In Windows, you can access available servers from the Network Neighborhood icon on the Windows Desktop.
Adding a Windows PC to an AppleShare network. If you’re in the uncommon position of trying to make a Windows PC hook up to a primarily Macintosh-populated network, several excellent commercial software products await. The best-known, and among the most stable, is PC MACLAN (http://www.miramarsys.com/). Once installed on the Windows PC—not a difficult proposition, thanks to the excellent phone support—it lets you access the network’s Macintosh printers and hard disks through the standard Network Neighborhood interface.
As a bonus, PC MACLAN can also make the Windows machine available to the Macs on the network—using the same Chooser or Network Browser software the Macintosh users would ordinarily use to access other networked Macs. There’s even a version (PC MACLAN Remote) that lets you dial into a Macintosh network from a Windows laptop (or other remote Windows machine).
AppleTalk
In Windows: NetBEUI
You can think of network protocols as languages that computers use to speak to one another. AppleTalk is the standard Macintosh network protocol, although Macs can use other protocols, such as the Internet’s TCP/IP. In the Windows world, the standard network protocol is NetBEUI (pronounced “net-booie”).
AppleTalk Control Panel
In Windows: Network Control Panel
AppleTalk is the Macintosh control panel that lets you specify what kind of network the Macintosh is using: Ethernet, infrared, LocalTalk, and so on.
In Windows, you use the Network control panel for such configurations. Unfortunately, the Windows Network control panel can be intimidating to the Macintosh user; if you’re a first-timer, see Networking before reading ahead.
To configure a PC to see other machines on a network, just as you’d set the AppleTalk control panel to use the Ethernet port on a Macintosh, here’s what you’d do. See Figure 1-9 for additional information.
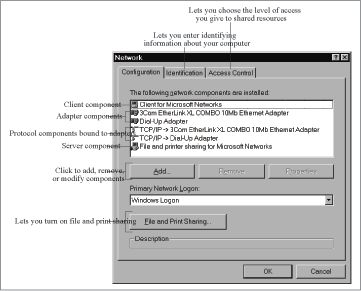
In the Network control panel’s list of network components, make sure you have an adapter for the hardware device that connects you to the network (probably a network card). If not, add one by clicking Add → Adapter and picking the appropriate item from the lists. If you’re using a modem, use the Dial-Up Adapter. Adapter icons look like little PCI cards.
See if the appropriate protocol is included in the list of installed components in the Network control panel. (It should be the same as the other computers with which you want to communicate, generally NetBEUI or TCP/IP.) Protocol icons look like network wires. If your desired protocol is not present, add it by clicking Add → Protocol and picking the appropriate protocol from the lists. This step causes Windows to create network components for that protocol for each adapter. If your desired protocol is present, but it doesn’t seem to be bound to your adapter (the protocol components in the Network control panel list the adapter to which they’re bound), try adding the protocol again.
Depending on the protocol you’ve chosen, you may have to configure the protocol component. That’s primarily true for TCP/IP, which you’re likely to use if you also want to access the Internet. Select the protocol and click Properties, or double-click the protocol to display a Properties dialog box. TCP/IP requires the most configuration. See TCP/IP Control Panel for detailed configuration instructions.
If you want to connect to other servers on your network, make sure to add and configure the Client for Microsoft Networks component as well. Adding a client is just like adding an adapter or protocol; in this case, click Add → Client → Microsoft → Client for Microsoft Networks. To configure Client for Microsoft Networks, double-click it to display its Properties dialog box.
Click OK in the Network control panel, after which Windows installs any necessary files from the Windows CD-ROM and asks you to reboot. (Now you’ll pine for the AppleTalk control panel on the Macintosh, which never requires you to restart the Macintosh.)
After configuring the Network control panel to use the appropriate adapter, protocol, and service, test your connection by opening the Network Neighborhood icon on your Desktop (assuming there are other servers you can access). If you see their icons, you’re all set. If not, return to the Network control panel and double-check your settings for the adapter, protocol, and client. It’s worth checking the advanced settings for your network adapter’s component—the occasional PC Card Ethernet adapter requires you to specify the type of Ethernet cabling in the Advanced tab.
Application Menu
In Windows: Taskbar
To switch between running applications on the Macintosh, you can choose an application’s name from the application menu in the upper-right corner of the menu bar. (In Mac OS 8.5 and later, you can instead press Command-Tab to cycle through your active applications, exactly as in Windows.)
In Windows, there’s no application menu; instead, you switch between open programs by clicking their icons on the Taskbar, the strip at the bottom of the screen. You can, however, move the Taskbar to other edges of the screen by dragging it to a new location.
In fact, the Taskbar offers many more functions than the Mac’s application menu (especially in Windows 98), including toolbar management and window management. There are innumerable combinations of items you can place on your Taskbar, in your choice of sizes and positions; take some time to experiment.
Window switching. The Taskbar doesn’t just list all your active applications, as on the Macintosh—in fact, it contains icons for every window in every application with independent windows (some applications, like Microsoft Word, create a single parent window and keep all the document windows inside the parent window). If you have two web browser windows open, two buttons appear on the Taskbar (see Figure 1-10). The more open windows, the more icons on the Taskbar, to the point where they become too small to fit.
To switch to a different window, click its icon on the Taskbar. If you click the button belonging to the frontmost window, Windows 98 minimizes that window, turning it into an icon on the Taskbar.
To drag something (some selected text, for example) from one application to another when both windows aren’t visible simultaneously, you can use the Taskbar as an intermediary. Drag the selection over the destination’s icon on the Taskbar; wait until Windows displays the corresponding window; then release the mouse. The selection appears in the destination window (if the software accepts such a drag-and-drop).
Toolbars in Windows 98. Windows 98 lets you add several different toolbars to your Taskbar, which you may consider either handy or overly cluttered. Most toolbars let you place unopened items—shortcuts to folders, documents, applications, or web pages—on your Taskbar, which otherwise lists only open windows (see Table 1-1).
To add a toolbar, right-click the Taskbar and choose from the Toolbars submenu. To remove a toolbar from your Taskbar, either choose it from the Toolbars submenu again (a checkmark appears next to its name), or right-click it and choose Close. You can move and resize toolbars by dragging their left edges.

Toolbars are a special type of window. You can add items to a toolbar by dragging icons onto it—Windows makes a shortcut to the item (or offers to). You can also drag Desktop icons onto toolbar icons as another way to move files or folders, or to open documents with specific applications. (This technique may sound familiar to Macintosh users if you’ve ever dragged document icons onto application icons, or onto the Mac OS 8.5 Application Switcher palette.)
In fact, because toolbars are special types of windows, you can even drag them off the Taskbar onto the Desktop, where they become free-floating windows. Or drag a toolbar to an edge of the screen; Windows “docks” (fastens) it to that edge, just as in Microsoft Office programs on the Macintosh. As with the Taskbar, right-clicking a toolbar provides a menu from which you can set the toolbar to be always on top and, if it’s docked, to hide itself.
The Address toolbar is the most unusual of the toolbars: it duplicates the function of the Run command from in the Start menu. Type the name of a folder, program, or web page in the Address toolbar and press Enter to open that folder, program, or web page. If you misspell one word, though, Windows assumes you’re looking for a web page; you must then wait as it opens an Internet Explorer window that doesn’t find anything. Misspell in a multiple-word string, and Windows searches Yahoo’s web catalog for those words.
You can make your own toolbars, too. Right-click the Taskbar; choose Toolbars → New Toolbar. In the resulting dialog box, choose a folder or type a web address. (Making a toolbar to a web page is strange, since you end up with that web page displayed in your Taskbar. You can drag that toolbar off the Taskbar to the Desktop, where it becomes its own window, but why not just open a window in Internet Explorer?)
Window management. One problem Macintosh users encounter in Windows is that they can’t hide all the windows that belong to an application at once, as they can on the Macintosh. As a result, you may find it difficult to work on the Desktop among all the windows cluttering it up. Pressing the WIN key-M (in Windows 95) or clicking the Show Desktop button on the Quick Launch toolbar (in Windows 98, as shown in Figure 1-11) is like choosing Hide All from the Macintosh application menu while in the Finder—it hides all other programs’ open windows. Click the Show Desktop button (Windows 98) again to simulate the Mac’s Show All command.
Toolbar | Functions |
Address | Opens a window displaying a folder’s contents, a program, or a web page when you type a folder name, program name, or URL in the Address field. |
Links | Shows the contents of your Links toolbar from Internet Explorer. |
Desktop | Shows any icons that are sitting out on your Desktop. |
Quick Launch | Displays small buttons that, when clicked, run Internet Explorer, run Outlook Express, view channels, or minimize/restore all the windows on your Desktop. |
Custom Toolbar | Shows the contents of a folder or a web page that you select. |
One more note on window management (in Windows 95 or 98): When you right-click an empty portion of the Taskbar, the contextual menu provides commands to cascade the windows currently open on the Desktop, tile them horizontally or vertically, or minimize/restore them all. Although some individual Macintosh applications offer this feature, it’s not built into the Mac OS.
Taskbar display. The Taskbar is generally always visible, although you can set it to appear only when you move your cursor to the corresponding edge of the screen. In addition, applications generally don’t cover the Taskbar, although you can change that behavior, too. To change these options, right-click the Taskbar → Properties. If you want the Taskbar to appear only when you move your cursor to the Taskbar’s edge of the screen, turn on “Auto hide.” To permit application windows to overlap the Taskbar, turn off “Always on top.” (But in general, there’s little reason to do so unless you’re working on a tiny screen.)
If the Taskbar isn’t large enough for everything you want it to display, you can enlarge it by dragging an edge. It can grow as large as half the size of the Desktop, though increasing it more than a line or two is seldom necessary.
To make your Windows 98 Taskbar occupy two lines, devoting one to the Address toolbar, increase the size of the Taskbar first, then display the Address toolbar.
As you open more windows, the number of buttons on the Taskbar increases and the size of each icon shrinks (to a minimum of 16 by 16 pixels each). Icons without names aren’t particularly useful at that size, but if you move your cursor over the icon, a ToolTip pops up, identifying the full name. In the worst situation, you may have too many icons to fit on the Taskbar, even at the smallest size. In that case, an arrow appears on end of the row of icons; click it to see those that are hidden from view.
You can choose which edge of the screen holds the Taskbar; click an empty area of the taskbar and drag to another edge of the screen. Macintosh users may prefer to see the Taskbar at the top of the screen, but that positioning may obscure the title bar of some Windows applications. If so, press Alt-Spacebar, then M, and then use the arrow keys to move the offending window. (Or press Alt-Spacebar, then X to maximize the window.)
Clock. The Taskbar’s Properties dialog box also lets you hide the clock at the end of the Taskbar. Moving the cursor over the clock displays a ToolTip with the current date; right-clicking the clock brings up the Taskbar’s contextual menu with a command that lets you set the time and date. For more information, see Date & Time Control Panel.
Tray. The area at the right edge of the Taskbar, next to the clock, is called the Tray. The icons of startup applications often appear in the Tray; they take up less space than full Taskbar icons that way (and, presumably, you don’t need to switch into these applications often). They too often have ToolTips in case you don’t understand the icons. A number of other icons in the Tray display system status indicators or provide direct access to settings like volume or bit depth, much like the Mac’s Control Strip.
Applications
In Windows: Programs
For a list of applications that are similar to the Macintosh applications you’re used to, see Cross-Platform Applications.

Assistant
In Windows: Wizard
Some tasks on the Macintosh require a number of steps in various control panels or applications. To help new users complete these tasks, Apple created assistants—programs that walk you through the task, step by step, one configuration screen after another. (In Mac OS 8 and later, for example, you may remember having used the Mac OS Setup Assistant or the Internet Setup Assistant.)
In Windows, these assistants are called wizards, and they’re far more prevalent than on the Macintosh. You’ll find yourself using them all the time with little alternative. Unless you’re familiar with what the wizard is doing for you, you probably won’t be able to circumvent it. And in most cases, it’s not worth the effort.
ATM (Adobe Type Manager)
In Windows: ATM (Adobe Type Manager)
Adobe Type Manager, commonly known as ATM, is a font utility designed to display clear, sharp characters of any size on screen and on non-PostScript printers. ATM works with Type 1 PostScript fonts; TrueType fonts, which exist for both Windows and the Macintosh, don’t require ATM to perform the same feat. (Without ATM, PostScript fonts often look jagged on the screen and on inkjet printouts.)
ATM is available for both Windows and the Macintosh, but you’re more likely to see it on the Macintosh, since a limited version of ATM is installed with the Macintosh version of Adobe Acrobat’s free Acrobat Reader. A commercial product with additional type-manipulation capabilities, ATM Deluxe, is available for both Windows and the Macintosh. See http://www.adobe.com/ for more information.
Auto Power On/Off Control Panel
In Windows: None
Auto Power On/Off works with only a small number of Macs, including the Quadra 840AV and the Power Macintosh 7100 and 8100. It serves the same purpose as the more recent Energy Saver control panel, letting you specify when the Macintosh turns on and off automatically. For information on similar features in Windows, see Energy Saver Control Panel.
AutoRemounter
In Windows: Client for Microsoft Networks Logon Options
When PowerBooks go to sleep, they lose network connections. This control panel automatically remounts servers when you wake the PowerBook. In 1998, Apple incorporated this feature into the Energy Saver control panel. In Windows, you can find the corresponding option in Control Panel → Network → Client for Microsoft Networks → Properties → “Logon and restore network connections.”