Chapter 2. B
Balloon Help
In Windows: ToolTips, Context Sensitive Help in Dialog Boxes
On the Macintosh, if you’re trying to find out more about an item on the screen, you turn on balloon help by choosing Help → Show Balloons from the ubiquitous Help menu. Windows offers two features that are comparable to the Mac’s balloon help: ToolTips, for explaining toolbar icons, and context-sensitive help in dialog boxes. For more information about getting help in Windows, see Help.
BinHex
In Windows: BinHex
BinHex is a bit of an anomaly on the Macintosh—it’s both a binary packaging format that lumps the two Macintosh file forks together and a transfer encoding format that converts the resultant 8-bit file into 7-bit ASCII text for transmission via email or downloading from FTP or web sites.
BinHex is neither used nor necessary in the Windows world, where files have only a single fork. Some, but not all Windows email programs can decode BinHex files received from Macintosh users. If you find yourself with a binhexed file on a Windows machine, several utilities can decode it; the best will be Aladdin Expander from Aladdin Systems. You can download Aladdin Expander—and learn more about related products from Aladdin—from http://www.aladdinsys.com/.
For more information, see Transferring Files to Windows.
Boot Disk
In Windows: Boot Disk
Although both the Macintosh and Windows support multiple disks, not all of these disks can boot a Windows PC. Any disk can boot a Macintosh if the disk contains valid System and Finder files and is selected in the Startup Disk control panel. The situation isn’t as simple when you’re using Windows PC.
PCs generally boot from the first floppy drive (the A: drive) or the first hard disk (the C: drive). Most newer PCs also have a bootable CD-ROM drive. The order in which your PC checks for bootable disks is determined by the BIOS (like the Mac’s ROM), and can be changed in your BIOS setup menu.
A disk is bootable if it contains the necessary files. At a minimum, these must include autoexec.bat, command.com, config.sys, drvspace.bin, io.sys, and msdos.sys.
To create a startup floppy disk that can boot your PC, follow these steps:
Open Control Panel → Add/Remove Programs → Startup Disk → Create Disk.
Insert a floppy disk when prompted—note that all files already on the disk at that point will be erased. Windows may ask for your Windows CD-ROM.
PC boot sequences prevent you from using a Zip disk or an external hard disk to boot the machine in case of problems with your main hard disk. Nor do Windows PCs generally come with a system-software startup CD, as Macs do. As a result, make sure you have a floppy disk that can boot your PC—and don’t lose your Windows CD. You may need both disks, since you may need the combination to recover from hard disk corruption.
Button
In Windows: Button
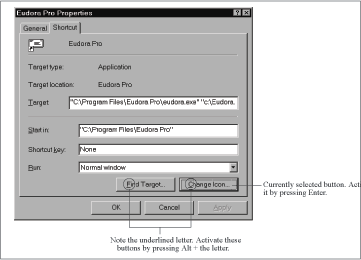
Along with menus, buttons are one of the most common elements of a graphical user interface. Buttons are generally rectangles in Windows and rounded rectangles on the Macintosh. On both platforms, the button name fits inside the rectangle. To activate a button, press it by moving the cursor over the button and clicking. But you undoubtedly already knew all that.
What you may not know is that you can click many buttons in both systems from the keyboard, without using the mouse at all. Most dialog boxes have at least OK and Cancel buttons.
Like the Macintosh, Windows lets you click default buttons (which are outlined) by pressing Enter or Spacebar. Similarly, you can “click” Cancel buttons in dialog boxes from the keyboard—just press the Esc key, exactly as on the Macintosh.
Except in Microsoft and some former Claris programs, where many dialog box elements have keyboard equivalents, the OK and Cancel buttons are usually the only ones you can trigger from the keyboard on a Macintosh. But in Windows, you can “click” virtually any button, checkbox, popup menu, or radio button in a dialog box from the keyboard. One button, generally the most likely one you’ll use, is always highlighted (with a thin line inside the button outline) when the dialog box appears, but you can also change which button is selected by pressing the Tab key repeatedly (see Figure 2-1). Pressing Shift-Tab reverses the order of selection.