Chapter 5. E
Edit Menu
In Windows: Edit Menu
The Edit menu in the Finder’s menu bar is mirrored within the Edit menu of every folder window in Windows. Most of the menu items—Cut, Copy, Paste, and so on—have the same names and keyboard shortcuts as on the Macintosh, except that you use the Ctrl key instead of the Mac’s Command key.
The commands in the Windows Edit menu work exactly as they do on the Macintosh—you can cut, copy, or paste highlighted material in your applications. At the Desktop, however, Windows offers a unique feature—you can use Cut, Copy, and Paste on Desktop icons themselves, thus moving or copying actual files to other windows. Although this method of moving and copying files may seem unfamiliar, give it a try. You may find it easier than dragging files around in Windows.
For information on the main commands in the Edit menu, Cut, Copy, Paste, and Undo, see their respective entries. Among the other Edit menu items are:
Clear. Windows has no equivalent to the Mac’s Clear command, but Macintosh users never use it anyway (it’s easier to press the Delete key).
Select All. The Windows Select All command (Ctrl-A) works almost identically to the Macintosh Select All command (Command-A), selecting everything (all icons, all text, all graphics, or whatever) in the current window. However, the Mac’s Select All command can also select all the text of a file while you’re editing it, which isn’t possible in Windows.
Show Clipboard. Windows has no direct equivalent to the Mac’s Show Clipboard command, which displays whatever textual or graphical information you’ve most recently cut or copied to the clipboard—an occasionally handy option. However, the Clipboard Viewer performs the same function. In Windows 98, it’s accessible at Start → Programs → Accessories → System Tools → Clipboard Viewer. In Windows 95, you may have to install it from Control Panel → Add/Remove Programs → Windows Setup → Accessories → Clipboard Viewer, after which it appears in Start → Programs → Accessories → Clipboard Viewer.
Preferences. Most Macintosh programs, including the Finder, offer a Preferences command in the Edit menu. In Windows, the same command is usually called Options, and—especially in Microsoft programs—it’s frequently found in a menu called Tools.
At the Desktop level, Windows lacks anything comparable to the Finder Preferences dialog box (Edit → Preferences). That makes sense, since most of the options in that dialog box—spring-loaded folders, control over grid spacing, and labels—don’t exist in Windows.
Ejecting Disks
In Windows: Ejecting Disks
On the Macintosh, you eject a disk using a menu command (or by dragging a disk icon to the Trash). On a PC, however, most people push the manual eject button on the front panel of every floppy, Zip, CD, and other drive.
Don’t eject the disk while the PC is accessing it—that is, when the small light on the front panel of the disk drive is illuminated. It’s best to close the window to the floppy disk before ejecting it, too; otherwise, the PC may access the drive, looking for the disk and possibly damaging it.
Since PCs don’t eject floppy disks automatically when you shut down or restart, you’re likely to find your PC trying to start up from the floppy disk the next time you turn it on. Obviously, unless the floppy disk has the necessary system files to boot, the PC won’t get far—a confusing error message on a black screen is all you get. When this situation happens to you, eject the disk and press any key to force the PC to boot from the hard disk.
Although most PC users are in the habit of ejecting disks by pressing the manual eject button on the front panel of the computer, that’s not the only way to do the job on some PCs and with some types of disk drives. You can also eject some disks by opening the My Computer icon under Desktop, right-clicking the corresponding disk-drive icon, and choosing Eject from the resulting contextual menu.
Email Attachments
In Windows: Email Attachments
One of the best ways to transfer files from a Macintosh to a PC running Windows is by attaching the files to an email message. Unfortunately, although this technique can work well, it’s fraught with pitfalls. For more information on how to transfer files successfully, see the email section of Transferring Files to Windows.
Emulators
In Windows: Emulators
This book assumes that you have access to a physical PC or a physical Macintosh. However, several third-party programs let you run Windows—and Windows software—on the Macintosh; there are even programs that let you run Macintosh programs, in a limited way, on a PC.
Running Windows on the Macintosh. For the most part, the only successful emulators run PC software (DOS, Windows, and even other operating systems) on the Macintosh. Note, however, that running Windows software through an emulation program is much slower than using the same software on a real PC.
Virtual PC (Connectix)
Virtual PC has an excellent reputation. One advantage of Virtual PC over Soft-Windows (described next) is that it emulates an entire PC, not just Windows. Thus, you can use Virtual PC to run PC-compatible operating systems other than Windows, such as Windows NT or even OS/2. You can learn more about Virtual PC at the web site http://www.connectix.com/html/connectix_virtualpc.html.
SoftWindows (Insignia Solutions)
SoftWindows (and its predecessor, SoftPC) have been around for many years. Its price and feature list are very similar to Virtual PC’s; one pleasant feature is TurboStart, which memorizes the state of your emulated Windows environment when you quit the program (Virtual PC has a similar feature). The next time you resume SoftWindows, it starts up in a fraction of the time an actual PC would take to start up. You can find more information on SoftWindows and other Insignia products at http://www.insignia.com/.
Whether emulation software makes sense for you depends on your proposed uses. Emulation works well if you need to run Windows programs only occasionally; you’re more likely to encounter flakiness if you use the system heavily.
If you want to run Windows software on a Macintosh, but don’t want to put up with the slow speeds of emulation software, many Macintosh fans look into an Orange Micro OrangePC. This PCI card includes a Pentium processor and the other circuitry found in a real PC, and can therefore run software at about the same speeds. You save considerable desk space and (if you have a fancy monitor, keyboard, and ergonomic setup) equipment cost.
On the other hand, compare prices—it may actually be less expensive to buy a PC. Furthermore, you may occasionally experience glitches when trying to move data back and forth between the two operating systems.
You can find more information about Orange Micro’s products at http://www.orangemicro.com/.
Running Macintosh software on a PC. Running Macintosh software on a PC is a much more difficult proposition, and attempts to write such programs have had decidedly mixed results. Such programs can’t run many Macintosh programs because their creators can’t legally copy necessary code from the Macintosh ROM chips. The most successful Macintosh emulator, called Executor, comes from a company called ARDI. You can find more information about Executor (and the compatibility list of software it can run) at http://www.ardi.com/.
Energy Saver Control Panel
In Windows: Power Management Control Panel
The Mac OS’s Energy Saver control panel lets you set when your Mac’s components to go to sleep after a period of inactivity. In Windows, the Power Management control panel provides similar functions, including the capability to put the PC into standby mode, turn off the monitor, and turn off hard disks (see Figure 5-1).
Although the Power Management control panel lets you create groups of settings, called “schemes,” display a power meter in the Tray, and require a password when coming out of standby, it lacks the Mac’s controls for going to sleep and waking up at specified times.
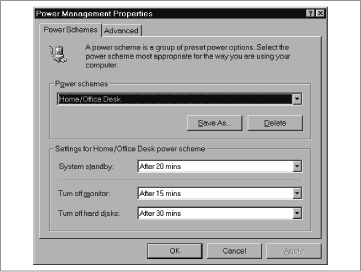
Not all PCs support power management features—they must support APM (Advanced Power Management), which must be turned on in the BIOS (which is like the Mac’s ROM). Consult your PC’s manual for details on its support for APM.
Erase Disk
In Windows: Formatting Disks, Hard Disks
Erasing a Macintosh disk is as simple as selecting the disk and choosing Special → Erase Disk. In Windows, the process is nearly as simple:
Double-click the My Computer icon.
Right-click the floppy icon, and choose Format from the pop-up menu.
In the Format dialog box (see Figure 5-2), choose the capacity of the disk, the format type, and other options.
If you want to name the floppy disk, enter a name into the Label field, since you can’t rename a disk directly within Windows.
Click Start.
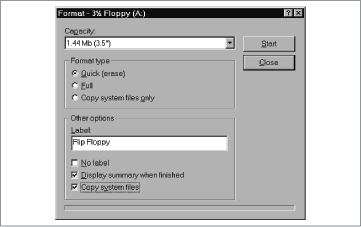
A Quick format merely erases the disk’s directory, whereas a Full format also scans the entire disk surface for bad sectors. The “Copy system files only” option creates a disk that can boot your PC (instead of creating an empty floppy). For additional information, see Hard Disks.
Esc Key
In Windows: Esc Key
On the Macintosh, the Esc (generally known as Escape) key has little purpose beyond its ability to cancel a dialog box. In Windows, however, Esc has more functions, as you can see in Table 5-1.
Ethernet
In Windows: Ethernet
Ethernet is a networking protocol that’s supported equally well by the Macintosh and Windows, so it’s an excellent method of connecting a Macintosh and a PC to transfer files or share other network resources. For more information on configuring a PC running Windows to connect to an Ethernet network, see Networking; for more about moving files back and forth, see Transferring Files to Windows.
Keyboard Shortcut | Function |
Esc | Closes a dialog box or menu without performing any operations, exactly as on the Macintosh. Esc also cancels a Cut/Copy operation in progress, as Command-period does on the Macintosh. |
Alt-Esc | Sends the current window behind all the other open windows. |
Ctrl-Esc | Displays the Start menu. |
Eudora
In Windows: Eudora
Qualcomm’s Eudora is one of the oldest and most popular Internet email programs on the Macintosh, having first appeared in 1988. It’s also popular in Windows, and the two versions are extremely similar, often down to the keyboard shortcuts. If you’re used to Eudora Light or Eudora Pro on the Macintosh, you should try it in Windows, since it’s easy to switch.
The other advantage of using Eudora in both Windows and the Macintosh is that you’ll experience the fewest problems when sending attachments back and forth.
For more information, or to download a free copy of Eudora Light, visit http://www.eudora.com/. Also check out Eudora 4.2 for Windows & Macintosh: Visual QuickStart Guide, described at http://www.tidbits.com/eudora/eudora/.
Extensions
In Windows: Drivers
On the Macintosh, extensions are the files in the System Folder → Extensions folder. Some extensions are drivers, and make it possible for the Macintosh to use unusual pieces of hardware. Other extensions patch the Mac OS and modify its standard behavior, making possible such features as Internet connections, faxing, and screen savers.
Windows has drivers, too, but it doesn’t have extensions. However, programmers can’t patch Windows as they can the Mac OS. Instead, Windows relies on background applications, often with little or no interface, to fulfill the same purpose as Macintosh extensions. (You may see the icons of such self-launching background apps in your Taskbar system tray.) These applications “listen” to system events and perform various actions based on what they hear. The advantage of this technique is that it doesn’t allow as much leeway in modifying the operating system in potentially dangerous ways.
Extensions Folder
In Windows: StartUp Folder
Since Windows uses applications for the kinds of things that are handled by Macintosh extensions, Windows has no equivalent to the Mac’s Extensions folder. The closest equivalent is the StartUp folder, which you can view by right-clicking the Start button and choosing Open. Then open Start Menu → Programs → StartUp.
There are other ways to control Windows startup applications, too, as described in the following entry.
Extensions Manager Control Panel
In Windows: Manual manipulation of files, Third-Party Utilities
Because Windows uses applications rather than Macintosh-style extensions, Microsoft never saw the need to provide a utility for turning startup applications on and off. As a result, if you want to create different sets of applications to launch at startup, you must create a “StartUp (Disabled)” folder and move items between it and the real StartUp folder. Here’s how to do this:
Right-click the Start button, and choose Open.
Open Start Menu → Programs → StartUp.
Choose New → Folder and name it StartUp (Disabled).
Drag the StartUp (Disabled) folder to a different location, such as the Desktop.
Make a shortcut to the StartUp folder in the same location by right-dragging it to the new location, and then choosing Create Shortcut.
Drag shortcuts from the StartUp folder into the StartUp (Disabled) folder to disable them.
Drag shortcuts back from the StartUp (Disabled) folder into the StartUp folder to enable them again.
If you’re a Macintosh user, this process should sound familiar—moving files between the Extensions and Extensions (Disabled) folders is exactly how Extensions Manager (and rival Conflict Catcher) works. Luckily, numerous third-party freeware and shareware utilities can manage the startup process; search for “startup” in an online software library like ZDNet’s Software Library at http://www.zdnet.com/swlib/ for a selection. Be careful when using these utilities, since any program that can modify the Registry can cause problems if something goes wrong.
Extensions Off
In Windows: Safe Mode
In times of troubleshooting, you wouldn’t get far without some means of starting a computer from Ground Zero, its native, virginal, factory-fresh state, free from any software you’ve added to its operating system. On the Macintosh, of course, you start up your Macintosh with the Shift key pressed to boot with all extensions turned off. (Doing so in Windows just prevents applications in the StartUp Folder from launching.)
In Windows, restoring the OS to its bare minimum components is called booting in Safe Mode. To do so, choose Start → Shut Down → Restart. In Windows 95, press the F5 key when you see the words “Starting Windows 95.” In Windows 98, press Shift as the computer starts up again. It’s normal for Windows to take much longer to start up in Safe Mode. Eventually, you’ll be prompted to acknowledge that Windows is running in Safe Mode; click OK.
When the startup process is finished, you’ll see the words SAFE MODE in each corner of the screen. Your Desktop may look very different, lacking its customary background and monitor settings. Software that loads automatically (screen savers, virus protection utilities, and so on) is now turned off. So are all of your device drivers except the keyboard, mouse, and basic monitor software; your CD-ROM, network, and Internet “extensions” are turned off, exactly as they would be on the Macintosh.
The troubleshooting work is halfway done: you can now begin the business of adjusting your control panel settings, or installing updated driver software, in hopes of solving whatever problem you were having (see Troubleshooting).
To exit Safe Mode, choose Start → Shut Down → Restart and let the computer start up again normally.