Chapter 8. H
Hard Disks
In Windows: Hard Disks
Although hard disk technology is essentially the same on both Macs and PCs, there are a number of differences.
IDE versus SCSI. You can attach a SCSI hard disk to a PC, but SCSI drives are less common than in the Macintosh world, where SCSI was once the standard. To attach a SCSI-based hard disk to a PC, you need either a SCSI host adapter card or a built-in SCSI connector on the motherboard, which isn’t common. For more information, see SCSI.
Most PC hard disks, like all Macintosh internal hard disks today, are IDE (Integrated Drive Electronics) drives, which merely means that the hard disk controller is integrated with the drive. The better term is ATA (AT Attachment), which is a specific type of IDE drive. ATA-IDE hard disks are popular because they’re fast and cheap. However, you can put only two ATA-IDE controllers, each with only two disks, in a PC, so the possibilities for expansion are more limited than with SCSI.
ATA-IDE drives are generally cheaper and slightly faster than the equivalent drive mechanism using SCSI, simply because the SCSI controller chip adds some overhead. However, because each SCSI drive has its own controller chip, multiple SCSI drives attached to the same computer can all work simultaneously. In contrast, the two ATA-IDE drives on a single controller cannot operate simultaneously, which means that copying files between two such disks can take longer.
Boot disks. You’re probably used to being able to start up a Macintosh from any kind of disk—a floppy disk, Zip drive, external hard disk, or the CD-ROM that came with the Macintosh, for example. On the other hand, PC models from only a few manufacturers can start up from any disk other than the built-in C: hard disk and the A: floppy drive. (Check the manual or call the manufacturer to find out.) For more information, see Boot Disk.
Hard drive icon positioning. The first time you use a Windows machine, you may be alarmed to discover that no hard disk icon appears in the upper-right corner of your screen, where would appear on a Macintosh. That’s because all hard disk icons appear in a central window—the one that opens when you double-click the My Computer icon in the upper-left corner of your screen.
It’s easy enough to simulate the Macintosh approach, however—just drag the desired icons (including CD-ROM, Zip, and floppy) out of the My Computer window and onto your Desktop in the traditional positions. You’ve just created shortcuts (aliases) of your drives, which you can now rename in the usual way (see Filenames).
The icons will always be present, even when there’s no corresponding floppy, CD, or Zip inserted in the machine. That may throw you if you’re used to the Macintosh way, in which icons only appear on the Desktop if the corresponding disks have actually been inserted. Still, the shortcuts-on-the-Desktop trick is one of the most efficient means of becoming comfortable with working in Windows.
Internal versus external. Thanks to the two-drive limit of ATA-IDE hard disk chains, it’s relatively uncommon to see PCs with external hard disks attached. It’s technically possible to attach certain external parallel-port hard disks to a PC, but they’re extremely slow, especially when compared with SCSI hard disks.
As on the Macintosh, if you plan to attach a SCSI hard disk to your PC (after equipping the computer with the SCSI card, for example), use high-quality SCSI cables. Cheap SCSI cables may not be sufficiently shielded, which can lead to strange disk-related errors such as files being corrupted or crashes while reading files. In addition, turn any external hard disks on before you turn the PC on and turn them off after turning the PC off.
Compression. Although drive compression programs were once marketed for the Macintosh, they’ve all fallen by the wayside as hard disk sizes increased and prices dropped. However, in the PC world, those technologies remain popular—in fact, Microsoft includes one, called DriveSpace, with Windows. Use DriveSpace (Start → Programs → Accessories → System Tools → DriveSpace) to compress a PC hard disk to free up some space—at the expense of speed. To save even more disk space, you can use Compression Agent (in the same location) to compress files even further. Compression Agent compresses files quite slowly, though, so you’ll probably want to set it up as a scheduled task (see Macros).
Disk maintenance. Although hard disks may last for many years, it’s important to perform routine disk maintenance to keep the data structures (such as directories and lists of bad blocks) up to date. If you don’t, your disk may suffer an increasing level of data corruption, which could cause crashes or even data loss.
For more information about performing routine disk maintenance, see Disk First Aid.
Disk formats. With Mac OS 8.1, Apple introduced HFS Plus, which saves space by using small block sizes even on very large hard disks. The Windows 98 equivalent is FAT 32, a 32-bit filesystem that’s more efficient than the previous FAT 16 and supports larger hard disks.
Just as HFS Plus-formatted disks aren’t accessible by Macs running Mac OS 8.0 or earlier, so too FAT 32 disks aren’t accessible on machines running Windows versions earlier than Windows 98.
Converting a Windows hard disk from FAT 16 to FAT 32 is easier than converting a Macintosh hard disk from HFS to HFS Plus. Just run the program called Drive Converter, found in Start → Programs → Accessories → System Tools → Drive Converter. After you’ve converted your drive, it’s a good idea to run Disk Defragmenter (available in the same location).
Reformatting. As on the Macintosh, you’ll rarely need to reformat (erase) a Windows hard disk. There are two levels of formatting: quick and full. Quick formatting, which corresponds to “initializing” on the Macintosh, just wipes the directory information. Full formatting, which compares with “formatting” on the Macintosh, actually erases the surface of the disk. Needless to say, a quick format is considerably faster than a full format.
To format a PC hard disk, follow these steps:
If your PC can start up Windows from any disk other than the internal C: hard disk, boot from another disk. (If, like most PCs, yours can start up only from the internal hard disk or a floppy disk, see the following instructions.)
Right-click the hard disk icon, and then choose Format.
In the Format dialog box, choose Quick or Full, and specify whether you want to copy system files (which you do if you want the disk to be bootable).
You can also reformat your hard disk when you start up the machine from the System floppy disk that came with it. Unfortunately, such a floppy starts up your machine in DOS mode, not the more familiar Windows.
After the machine has started up, you’ll see this on the screen:
C:\>
At this point, you should type:
format c: /s
and then press Enter to reformat your hard disk. (Replace C: with the appropriate drive letter for the hard disk you want to format.)
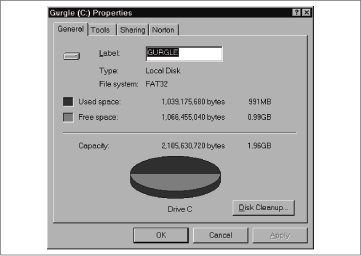
Checking free space. When using a PC for the first time, you might want to see how large its hard disk is and how much of that space is free. To do so, open the My Computer window and then click the hard disk icon; you’ll see its capacity and free space statistics at the bottom of the window. You can also view a graph of the hard disk’s free space by right-clicking its icon and then choosing Properties → General (see Figure 8-1).
Drive letters. On the Macintosh, every disk has a name, and you can give multiple disks the same name. In Windows, however, every disk is referred to by a drive letter, although disks can also have labels that you make up yourself.
In general, floppy disks are called A: and B:, your main hard disk is known as C:, and your CD-ROM drive is D:. If other hard disks are attached to the PC, they’ll have higher drive letters. It’s also possible to give a shared folder or disk from the network its own drive letter, so don’t assume if you see an M: drive, for instance, that there’s another hard disk attached to the PC.
Help
In Windows: Help
As on the Macintosh, Windows offers a Help menu in almost every program. Also as on the Macintosh, however, the kinds of help commands you’ll find in this menu vary depending on the program you’re using. You may encounter three help formats: Windows Help, ToolTips, and context-sensitive help in dialog boxes.
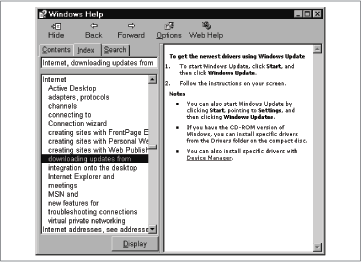
Windows Help. Using Windows Help is similar to using the Help Viewer in Mac OS 8.5. In Windows 95 and applications of its era, each help topic appears in its own separate window, forcing you to switch between windows as you search. In Windows 98, the help mechanisms improved, eliminating much of this window-switching. The trickiest part of using Windows Help is that Help-menu items don’t have standard names. The primary help command may be called: Help Topics, Contents, Index, or even Info Desk.
Windows 98 help tips. The left pane in Windows 98 Help lists the contents or index entries, or search results, and the right pane displays the information associated with the topic you select (see Figure 8-2). If you want, you can hide the left pane entirely, though that eliminates the entire advantage of the two-pane interface.
Some index entries are associated with more than one topic. When you double-click one of those entries, Windows Help displays a dialog box containing the available topics. Double-click one to display it in the right pane.
When you see words underlined, much as in a web browser, clicking them either provides a pop-up note that defines the underlined term or performs some action, such as opening a control panel. Unfortunately, Windows Help can’t coach you through performing a task nearly as well as Apple Guide can.
ToolTips. ToolTips are something like balloon help on the Macintosh. When you point to some window control, button, or other interface element, a tiny rectangle appears, offering a label for the item you’re pointing to.
ToolTips occasionally provide more than a simple label for a button or icon. Point to the Start button, for example, and the ToolTip tells you “Click here to begin.” (It’s not clear what you’re beginning, of course, and don’t get confused by the fact that you also click the Start button to end a session.) More useful is the ToolTip that appears when you move your mouse over the clock, which then tells you the day and date (see Figure 8-3).

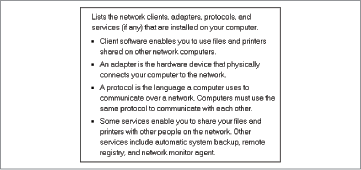
Context-sensitive help. The context-sensitive dialog-box help in Windows is even more like the Mac’s balloon help than ToolTips. When you’re in a dialog box, there’s often a question mark button in the upper right corner, next to the Close button. When you click it, your cursor turns into an arrow with a question mark. Then click on any item (button, field, list, whatever) in the dialog box; if there is help available for that item, Windows displays it in a box that looks like a Post-It note. For instance, Figure 8-4 shows the context-sensitive help for the list of components in the Network control panel.
As with everything else in Windows, there are several other ways to access this context-sensitive help in dialog boxes. If you right-click an item in a dialog box, a What’s This? button appears; click it and the help message appears. Alternatively, move your mouse over the item in question and then press F1 to reveal the help message.
HFS, HFS Plus
In Windows: FAT 16, FAT 32
HFS and HFS Plus are the schemes the Macintosh uses to store files on hard disks in systems before and after Mac OS 8.1, respectively. The exact analogues in Windows are called FAT 16 and FAT 32; for details, see Hard Disks.
Hiding Applications
In Windows: Minimizing Windows
It’s common practice on the Macintosh to hide applications when you wish to clear the screen to work in another program. The Hide command in the Application menu works well for this purpose, instantly hiding all windows belonging to the frontmost program. In contrast, in Windows, the windows of many applications—Internet Explorer and Outlook Express, for example—operate independently of the application itself, and there’s no way to hide all of them at once.
Instead of the Hide command, therefore, in Windows, you use the Minimize button (in the upper-right corner of every document and application window) to achieve the same effect. Clicking this button makes the window collapse to the size of a single icon on your taskbar at the bottom of the screen. For more information, see Collapsing Windows.
In Windows 98, you can hide all windows of all applications in a single click, as though you had switched to the Macintosh Finder and then used the Hide Others command in the application menu. To do so, summon Windows 98’s Quick Launch toolbar (right-click the Taskbar and choose Toolbars → Quick Launch) and then click the Show Desktop button (see Figure 8-5). To restore all the windows in their original locations, click Show Desktop a second time.
In both Windows 95 and 98, you can press WIN key-M to perform the same stunt.