Chapter 9. I
Icons
In Windows: Icons
Both Windows and the Macintosh make heavy use of icons to represent disks, files, and folders on the computer. Using the View menu, you can specify how you’d like the icons in a particular window to appear.
On the Macintosh, the icon displayed on a certain file is determined by its invisible Type and Creator codes. In Windows, however, document icons are associated with filename extensions—a file with the extension .doc, for example, gets the Microsoft Word icon.
Custom icons. Changing a Windows icon isn’t as easy as it is on the Macintosh. You’re free to replace only three kinds of icons: those that represent certain Desktop items, such as the Recycle Bin; the icon displayed on any shortcut; and the icon that appears on a certain kind of document, such as Word documents. But Windows offers no means of replacing the icon of one file or folder (without using third-party utility programs).
Changing the icon associated with a certain document type. To change the icon associated with a filename extension, follow these instructions:
Choose View → Folder Options → File Types.
Select the file type that you want to change. If you know the first few letters of its name, type them to scroll the list.
Click Edit → Change Icon.
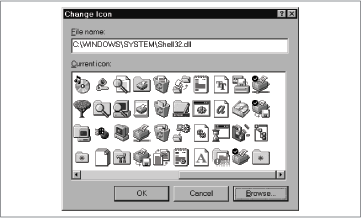
Select an icon from the list shown (see Figure 9-1), or click the Browse button if you’d like to copy the icon from another file on your hard disk.
When you click the Browse button, you’re offered the chance to navigate your hard disk on a quest for files whose icons you’d like to swipe. Here are a few files that contain ready-to-use icons:
\Windows\System\shell32.dll
\Windows\System\pifmgr.dll
\Windows\moricons.dll
\Windows\System\rnaui.dll
\Windows\progman.exe
\Windows\System\user.exe
Changing the icon on a shortcut file. To change the icon associated with a shortcut, follow these steps:
Right-click the shortcut and choose Properties → Shortcut → Change Icon.
Select an icon from the list shown, or click the Browse button to find another file containing icons, as described in the previous tip.
Changing the icons of Desktop items. To change the icons for various items on your Desktop, do this:
Open Control Panel → Display → Effects.
Select one of the icons, then click Change Icon.
Select an icon from the list shown, or click the Browse button to find another file containing icons, as described in the prior tip.
Rebuilding Desktop icons in Windows 98. If you notice that some of the items on the Windows Desktop have lost their original icons, you can direct Windows to delete and then rebuild the ShellIconCache file, which is the Windows equivalent of the Mac’s invisible Desktop files. Follow these steps:
Install TweakUI by installing the Windows 98 Resource Kit Tools Sampler on the Windows 98 CD-ROM at Windows 98\tools\restkit\setup.exe. If you use Windows 95, you can download TweakUI from http://www.microsoft.com/windows95/downloads/default.asp.
Open Control Panel → TweakUI → Repair → Rebuild Icons.
Click Repair Now.
IDE
In Windows: IDE
For information about IDE hard disks in PCs, see Hard Disks.
Installing Hardware
In Windows: Add New Hardware
Connecting a new peripheral, such as a printer or Zip drive, to a Windows-based PC isn’t nearly as simple as it is on the Macintosh. In Windows, every gadget you add to your PC must have a corresponding software driver on the hard disk—and it’s your job to hope that this driver is up-to-date, bug free, and compatible with all your other drivers.
With the advent of Windows 95, this driver chaos has improved considerably, thanks to the built-in collection of drivers Microsoft calls “Plug and Play” technology. This system permits Windows to recognize most popular hardware add-ons and install the proper driver automatically. Unfortunately, peripherals that Windows doesn’t yet know about continue to cause headaches.
In the event that you want to connect a device that Windows doesn’t recognize automatically, you need to use Control Panel → Add New Hardware. Add New Hardware is a wizard that walks you through the process of installing the necessary driver software. Before you run Add New Hardware, make sure you’ve properly attached the new peripheral. Then, make sure the device is turned on, if it has its own power switch. Windows won’t be able to detect devices that are turned off.
Add New Hardware first scans for Plug and Play-compatible devices. If it doesn’t find your new accessory device in its list, Windows gives you a choice: you can identify the device in a list Windows shows you, or you can let Windows scan the PC for devices that aren’t Plug and Play-compatible (a process jokingly called “Plug and Pray”). For best results, choose the latter option—Windows can sometimes figure out what device you’ve plugged in.
If Windows fails to identify the device correctly, then identify it yourself—select it from the Windows list, or click Have Disk and insert the floppy disk provided with the add-on device. (The manufacturer of the add-on generally provides instructions along these lines.)
The Add New Hardware wizard makes it emphatically clear that you should restart your PC manually should it freeze during the detection phase. (When Microsoft gets the time, perhaps it will rewrite the wizard to avoid these crashes rather than simply displaying warning messages.)
Installing Software
In Windows: Add/Remove Programs
Installing new software programs in Windows isn’t as simple as on the Macintosh. Windows applications often require the installation of many different files in different places, making subsequent removal difficult, to say the least. You can’t install many Windows programs by simply dragging them to your hard disk, either, as you can on the Macintosh.
Because of these considerations, most Windows applications come in the form of an installer. This installation program can both install and, when the time comes, uninstall your new program (using the Control Panel → Add/Remove Programs function).
Installing applications. Most applications come with installation instructions, but the general installation procedure follows one of these courses:
Insert the software CD-ROM to run the installation program (which is generally called Setup.exe). Follow the instructions on screen.
Open Control Panel → Add/Remove Programs → Install/Uninstall, click the Install button, and follow the instructions on the screen. (Behind the scenes, this wizard does little more than locate the software’s manufacturer-supplied installer program.)
Occasionally, you’re required to run Setup.exe (the installation program on the software CD or disk) manually, which you can do as though it were any other application. See Opening Files for the various different ways of opening an application, and see Find for instructions on how to find Setup.exe if it’s not visible.
If you’ve downloaded the program from the Internet, you may need to expand a compressed Zip file before running an installation program. (See StuffIt for more information about dealing with Zip files.) After you’ve expanded the downloaded file, look for a file called something like “Read Me” for installation instructions.
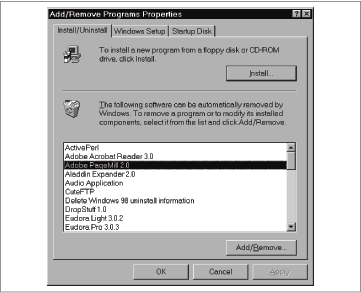
Uninstalling applications. The uninstall portion of Add/Remove Programs is more useful, though not always effective. Good installers include uninstall routines when they install applications, and they register themselves with the Add/Remove Programs control panel so you can uninstall the program easily. You can uninstall anything listed in the Install/Uninstall tab’s scrolling list by selecting it, then clicking the Add/Remove button (see Figure 9-2). Windows asks if you’re sure you want to do remove all traces of the program from your computer, and if you agree, it tries to do so. It doesn’t always succeed, so you may have to delete shortcuts and other remnants of the application manually.
One piece of advice: If Windows ever asks you if you want to delete a file that it claims no program is using, say “No!” in a firm voice (and click the No button). Windows isn’t very smart about this kind of thing sometimes, and has been known to delete files that are not only necessary, they’re in fact used by Windows itself. Play it safe and leave those files be—at worst they’ll clutter a folder slightly.
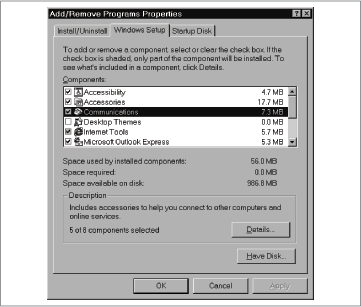
Adding and removing parts of Windows. When you installed Windows itself, you may not have installed all the optional components you wanted, or you may have installed some that you no longer want, because they’re wasting disk space you need. The second tab in the Add/Remove Programs control panel lets you add and remove Windows components. Installed components are marked with a checkmark; if the checkbox is shaded, only part of the component has been installed (see Figure 9-3). (Again, if Windows ever asks you if you want to delete a file that it claims nothing is using, do not delete the file.)
To mark a component for installation, click the box to add a checkmark. To remove a component, click so that the checkmark disappears. To select specific parts of a component, select the component name and then click the Details button—or double-click the component name—to summon a list of the individual parts of the component, which you can add and remove in the same way. When you’re finished, click OK. Insert any disks that Windows asks for (it’s likely to require the Windows CD-ROM).
Internet
In Windows: Internet
The rise of the Internet is the most significant change in the computer world over the last few years. One important aspect of this sea change is that the Internet has brought Windows and the Macintosh closer together. Since the Internet is essentially platformagnostic, the world’s programmers have put a great deal of work into open standards that work on both Windows and the Macintosh. That’s why you can receive Internet email, or browse the Web, equally well on either a Macintosh or a PC. Aspects of Internet use are covered throughout this book; refer to the following list for some of the main entries:
For information about connecting a Windows-based PC to the Internet via a modem, see Remote Access Control Panel and Modems.
For information about connecting a Windows-based PC to the Internet via a network, see TCP/IP Control Panel.
For information about cross-platform Internet email programs, see Eudora and Microsoft Outlook Express.
For information about cross-platform web browsers, see Internet Explorer and Netscape Navigator/Communicator.
For a list of Internet-related applications that exist in both Macintosh and Windows flavors, see Cross-Platform Applications.
For information about file formats you might encounter on the Internet, see File Types.
For information about transferring files from a Macintosh to a Windows-based PC over the Internet, see Transferring Files to Windows.
For information about searching the Internet, see Find.
For information about running a personal web server, see Web Sharing Control Panel.
For a list of useful web sites, see Web Sites for Windows Software and Information.
Internet Config
In Windows: Internet Control Panel, Individual Application Preferences
For more information about the equivalent to Internet Config in Windows, see Internet Control Panel.
Internet Control Panel
In Windows: Internet Control Panel, Individual Application Preferences
You’ll find a control panel called Internet on both Windows and Macintosh, but the two control panels aren’t very similar. The Mac’s Internet control panel lets you set up preferences for a variety of Internet applications in Mac OS 8.5 and later, but the Windows Internet control panel duplicates only the preference panels in the Internet Explorer web browser. The other equivalent settings from the Macintosh Internet control panel are scattered among various Windows programs:
Personal, Email, News. In Windows, specify your email, newsgroup reader, and personal account settings in your actual email and newsgroup reader programs—there’s no centralized location or control panel, as on the Macintosh.
Web. The Web tab of the Macintosh Internet control panel stores your home page and search page locations, a location for saving downloaded files, and settings for colors and links. In the Windows Internet control panel, the General tab lets you specify a home page location (though not a search page) and General → Colors lets you control the various colors used in your web browser. The option to underline links, however, is located in Advanced → Browsing.
Advanced. Of the various panels in the Macintosh Internet control panel’s Advanced tab, only two have any correspondence to the Windows Internet control panel: Helper Apps and Firewalls. The Programs tab of the Windows Internet control panel closely resembles the Mac’s Helper Apps panel, and its Connection tab → Proxy server section corresponds to the proxy entries in the Macintosh Internet control panel’s Advanced → Firewalls tab.
The remaining options in the Mac’s Advanced panel correspond to Windows like this:
File Transfer, Hosts
You can’t select default FTP servers or hosts in Windows.
Fonts
The font settings on the Macintosh side take effect in applications like email programs and newsreaders. In Windows, you select fonts individually in each such application.
File Mapping
On the Macintosh, this database lets you associate downloaded Windows files with the programs you’d like to open them—according to the filename extensions of the downloaded files. For example, you might decide to have sound files whose names end with .aiff and .wav opened in the Mac’s Movie Player program.
There’s no corresponding Windows feature, since Windows already knows which filename extension launches which application. For more information, see File Types.
Messages
In Windows, you make this kind of setting—email and news quoting characters and email/new signatures—within your email and newsreader programs, not in a centralized control panel.
Internet Explorer
In Windows: Internet Explorer
Internet Explorer, Microsoft’s free web browser, is available for both the Macintosh and Windows, and works essentially alike on each platform. You can learn more about the Macintosh version of Internet Explorer and download a copy from Microsoft’s web site at http://www.microsoft.com/windows/ie/default.htm.