Chapter 12. L
Labels
In Windows: None
On the Macintosh, you can label icons with a color or text label as a quick and easy means of categorization. There’s no equivalent in Windows.
Launcher Control Panel
In Windows: None
The Mac’s Launcher control panel creates a Desktop window that stores the icons of frequently used files, folders, disks, and servers. A single click on one of these buttons opens the corresponding icon, saving you the effort of burrowing through your nested folders to find the original item. The Launcher can have multiple “pages” filled with icons in particular categories.
Windows has no precise equivalent. However, you can easily create a toolbar that’s loaded up with icons to which you’d like easy access. For more information on creating toolbars, see “Toolbars in Windows 98” in Application Menu.
List Views
In Windows: List Views
When you’re examining your files and folders in a Desktop window, the Macintosh and Windows both offer a list view—a compact display of a window’s contents. (The alternative Icon view is better suited for windows containing only a few files or folders.)
However, you, the experienced Macintosh user, may be alarmed at first to discover that the Windows list view arranges your icons in multiple columns, forcing you to scroll both vertically and horizontally to get through the list. You’ll probably feel much more at home with the view Windows calls Details view, which is almost exactly like the Mac’s list view. (Choose View → Details View in any Windows window; see Figure 12-1.) Now, as on the Macintosh, you can click the heading above a column (where it says Size, for example) to sort the list by that criterion; click again to reverse the sorting order.
Also as on the Macintosh, you can adjust column widths in Details view by dragging the tiny divider line between column headings. You can’t rearrange the columns in a Windows list view, however, as you can Mac OS 8.5 and later. (Nor can you specify which columns appear in a particular window, as you can on the Macintosh.)
Separate folder lists. You may also be disoriented by the fact that Windows maintains two separate alphabetical clusters in each list view: first folders, and then individual files are listed. On the Macintosh, folders sort within the list of files, rather than separately, as in Windows.
Disclosure triangles. The final difference between the Windows and Macintosh list views: Windows doesn’t have what are called disclosure triangles, the tiny triangle buttons beside each folder name. In Windows, there’s no way to view an indented list revealing the contents of a folder without opening a new window, as the Mac’s disclosure triangle does. The closest approximation Windows offers is its two-pane Explorer window mode; for more information, see Finder.
LocalTalk
In Windows: Direct Cable Connection
LocalTalk was a significant development for the Macintosh. Using this technology, you could connect Macs and printers in an office using little more than ordinary telephone wire, so that their users could share printers and transfer files among machines.
Today, of course, Ethernet is a far faster and more reliable networking method, if slightly more expensive. See Networking for more information on connecting Macs and PCs.
On Windows, there’s no inexpensive, standard equivalent to the Mac’s LocalTalk system. However, you’re not stuck without an inexpensive way to share files and resources between two PCs running Windows, thanks to the Direct Cable Connection.
Direct Cable Connection lets you designate one computer as a host and the other as a guest. Once you’ve set up the connection, the guest computer can access shared files on the host computer, including any files on a network connected to the host computer. You can also print on printers connected to the host computer.
You have three options for physically connecting the computers. The easiest is infrared. However, infrared ports are relatively uncommon, particularly on desktop PCs, and can be difficult to configure. The best option, therefore, is a bidirectional parallel cable, which connects the computers’ parallel ports. It’s faster than the third option, a null modem serial cable, which connects the computers’ serial ports and is thus more likely to conflict with modems or mice. These are both special cables—make sure you buy the right type at a computer store. Windows Help recommends cables from Parallel Technologies at http://www.lpt.com/.
Follow these steps once you have the appropriate cable:
Ensure that both Network control panels (Control Panel → Network → Configuration) have the “Client for Microsoft Networks” client component and the “File and printer sharing for Microsoft Networks” service component installed, along with the NetBEUI protocol component. See AppleTalk Control Panel for more information.
Go to Control Panel → Network → Identification and give each PC a unique name. Share your files by selecting Control Panel → Network → Configuration → File and Printer Sharing → “I want to be able to give others access to my files.” Now open Start → Programs → Accessories → Communication → Direct Cable Connection on both PCs. If this option is not installed, install it from Control Panel → Add/Remove Programs → Windows Setup → Communications → Details → Direct Cable Connection. Set one as the host and the other as the guest.
Select the appropriate port on both machines. Both must be using the same type of cable. Finally, share a folder on the host (for more information, see File Sharing).
Once the connection is made, click the View Host button on the guest machine to see shared folders on the host. If that fails, open Start → Find → Computer and enter the name of the other computer to find it on the network.
If you have trouble, check the Direct Cable Connection troubleshooter located within Start → Help → Contents → Troubleshooting. Also be sure to check out the Windows 95 Direct Cable Connect Problem Page, at http://www.tecno.demon.co.uk/dcc.html, for a vast amount of useful information. Frank Kime’s Direct Cable Connect Win 95 to Win 95 page at http://www.cs.purdue.edu/homes/kime/directcc/directcc95.htm is also helpful.
After you’ve run the Direct Cable Connection setup wizard once, you won’t have to do so again; it remembers your settings.
Location Manager Control Panel
In Windows: Hardware Profiles, System Control Panel, My Locations, Telephony Control Panel, User Profiles, Users Control Panel, Passwords Control Panel
The Mac’s Location Manager control panel and related components let you switch many control panel settings at once—time zones, network configurations, Internet settings, speaker volume, and much more—with a single click. This feature is extremely valuable to laptop owners who travel from office to office, but can also be useful to desktop Macintosh owners who switch among, for example, multiple Internet accounts.
There’s no direct Windows equivalent of the Mac’s Location Manager. However, you can use three different features of Windows to simulate aspects of the Mac’s Location Manager: hardware profiles, user profiles, and dialing locations.
Hardware profiles. One side effect of the way Windows automatically detects hardware and installs the necessary drivers is that at every boot, Windows checks to see what hardware you’ve attached to your PC and adjusts software configurations—such as network settings—correspondingly. The reverse is also true—it checks to see what you’ve removed and tries to act appropriately. Most of the time, this comes into play with laptops, of course, since it’s likely that you would have different setups at work and home or at work and on the road.
So, to make your PC laptop realize that it has a new configuration, shut it down in the old configuration, add or remove hardware, then start it back up again. Some configuration changes may be detected when you wake up a laptop from Standby mode, but a full boot works best.
Windows can memorize these hardware configurations as hardware profiles. Most of the time, Windows automatically creates and switches between hardware profiles. However, you can create and switch between hardware profiles manually, and more important, you can edit existing hardware profiles.
To do so, open the System control panel’s Hardware Profiles tab (Control Panel → System → Hardware Profiles) or right-click My Computer and choose Properties → Hardware Profiles). In the Hardware Profiles tab, you can create, rename, and delete profiles. To switch between them, you must restart the machine—as Windows begins to load at the next startup, you’ll be asked to choose a profile from a text menu.
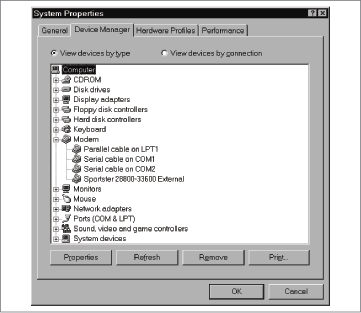
Once you’ve booted with a profile, you can edit it (to remove devices, for example) in Control Panel → System → Device Manager (see Figure 12-2). Find the appropriate device, double-click it, and in its Properties window, check either “Disable in this hardware profile” or “Remove from this hardware profile.” Use the former option if you might want to restore that device to the profile later; use the latter to eliminate the device from the profile forever.
My Locations. When traveling, you may want to change the phone number you dial to connect to the Internet. The Mac’s Location Manager is ideal for this task, letting you store predefined sets of Internet settings and switch among them using a menu.
Windows stores a single system-wide set of phone numbers, but provides numerous places to access that set. The easiest in Windows 98 is Control Panel → Telephony → My Locations. Alternatively, if you’re using Windows 95, you can choose Control Panel → Modems → Dialing Properties, or you can summon the same control panel from within most communications programs.
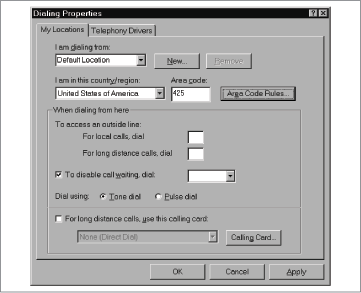
In the My Locations tab, you can define multiple locations, each with its own area code, dialing rules, and options for getting outside lines (see Figure 12-3). An additional dialog box lets you enter calling card details.
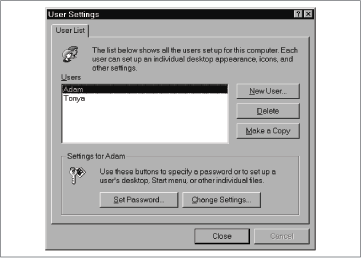
User profiles. It’s easy for several people to share a single Windows PC; thanks to the User Profiles feature, each person will encounter his or her own customized Windows environment. You can coopt some of these options in the Users control panel (Control Panel → Users) to make a traveling laptop easier to use (see Figure 12-4). Items you can personalize include:
Desktop folder and Documents menu
Start menu
Favorites folder
Downloaded web pages
My Documents folder
To set up a user profile, choose Control Panel → Users; the wizard will walk you through the process.
For instance, if you’re switching from a large monitor to a relatively small LCD display, you may wish to logon as a different user and switch the contents of the Desktop. You may also decide to set up have different Favorites for use when traveling. After you’ve set up profiles in the Users control panel, be sure to turn on multiple user support in Control Panel → Passwords → User Profiles.