Chapter 13. M
Mac OS Easy Open Control Panel
In Windows: Open With Dialog Box
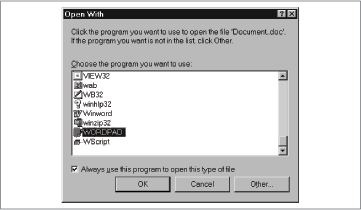
In Mac OS versions before 8.5, when you double-click a document whose parent application isn’t on the hard disk, Mac OS Easy Open presents you with a list of alternate applications that can open the document. Windows does the same when you try to open a document that lacks a filename extension, or one whose extension isn’t included in the Registry.
Double-clicking such an unknown document type summons the Open With dialog box, which lets you choose an application to open the file (see Figure 13-1). The “Always use this program to open this type of file” checkbox lets you create a permanent association between the application and file type as indicated by the filename extension.
You can bring up the Open With dialog box even for files that Windows does recognize, which might be handy if you want to open an HTML file in Notepad rather than Internet Explorer, for instance. To do so, Shift-right-click the file, and then choose “Open with” from the contextual menu.
Mac OS Help
In Windows: Windows Help
The HTML-based Windows Help, accessible from Start → Help, is extremely similar to the Mac OS Help system introduced in Mac OS 8.5. For more information, see Help.
Macros
In Windows: Macros, Scheduled Tasks
Macro programs let you record or script actions—mouse clicks, menu commands, type phrases, and so on—and then play them back with a single keystroke or click. Because a macro program can also be used to reassign keystrokes to other functions, you might find them especially helpful in making your PC behave more like the Macintosh you’re used to.
For more information on commercial macro utilities, visit the following web sites. (Of the following products, QuicKeys is likely to be the most familiar to you, since it’s also the most popular Macintosh macro program.)
QuicKeys (CE Software): http://www.cesoft.com/quickeys/qkhome.html
Aim Tools (AimSoft Development): http://www.aimtools.com/aimtools/index.cfm
Aim Keys (AimSoft Development): http://www.aimtools.com/aimkeys/index.cfm
AutoMate (Unisyn): http://www.unisyn.com/Automate/automate.htm
EZ Macros (American Systems): http://www.americansys.com/ezmacros.htm
MacroMagic (Iolo Technologies): http://www.iolo.com/macromagic/
ShortCuts (Kiss Software): http://www.kissco.com/html/shortcuts_product_page.html
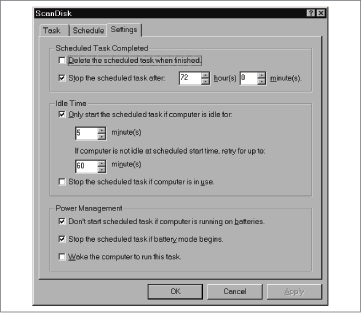
Scheduled tasks. Although Windows has no built-in macro capability, Windows 98 can launch a particular program on a repeating basis via Scheduled Tasks (accessible via My Computer → Scheduled Tasks). This feature is most useful for running disk utility programs like ScanDisk (for more information, see Disk First Aid) or Disk Defragmenter, but you could also theoretically schedule a task to do something such as connect to the Internet and retrieve your email, or perhaps print a weekly report automatically.
To create a scheduled task, follow these steps:
Open My Computer → Scheduled Tasks → Add Scheduled Task.
Select a program to run from the list, or click the Browse button if you want to choose a document or a program that’s not listed.
Set how often the task should run and when it should run.
Once you’ve set up a task, right-click it in the Schedule Tasks folder, and then choose Properties to modify the schedule, details about the task, and other settings, including whether it should wait until the computer is idle (see Figure 13-2).
Map Control Panel
In Windows: Date/Time Control Panel
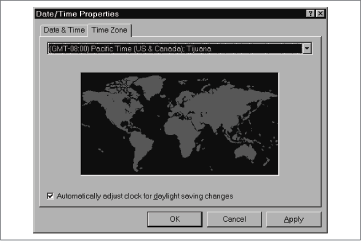
The Map control panel (in the Control Panels folder until Mac OS 8.5; in the Apple Extras folder thereafter) lets you look up the latitude, longitude, and time zone of any place on the planet. It can also be used to specify your current time zone (a function also available in the Date & Time control panel).
In Windows, you set your local time zone in Control Panel → Date/Time → Time Zone (see Figure 13-3). Unfortunately, although the Date/Time control panel displays a map of the world, you can’t click to specify your current location (except in the initial release of Windows 95); you must select a time zone from a menu.
Windows offers no equivalent of the latitude and longitude finding capabilities, or the Time-zone comparison feature, of the Map control panel.
Memory Control Panel
In Windows: Virtual Memory Dialog Box
Because of the way Windows handles memory, you don’t need to perform as much configuration as you do on the Macintosh. In most cases, you don’t need to change the default settings at all.
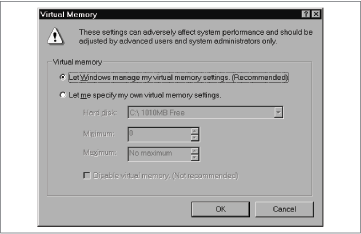
Virtual memory. To modify the virtual memory configuration in Windows, right-click the My Computer icon and choose Properties → Performance → Virtual Memory. You can specify which hard disk contains the swap file and how small and large it can grow. After you restart the machine and return to the Virtual Memory dialog box, the setting will seem to have reverted to letting Windows handle virtual memory. That’s normal—Windows is handling virtual memory, but now using the settings you provided.
Disk cache. Windows handles its own disk cache automatically, too, although here again, you can modify it to increase speed slightly.
Right-click My Computer. From the pop-up menu, choose Properties → Performance → File System → Hard Disk.
From the “Typical role of this computer” menu, choose “Network server.” Doing so forces the computer to cache, or memorize for speed, more directory paths and filenames.
This setting consumes 30K more memory than the “Desktop computer” setting, but makes windows and some menus appear faster when opened.
Also make sure that the settings in the CD-ROM tab match the speed of your CD-ROM drive, which is probably a quad-speed or faster drive. Unless the PC has less than 12 MB of RAM total, set the supplemental cache size to the largest setting, 1238K, using the slider.
RAM disk. Windows offers no equivalent to the Mac’s built-in RAM disk capability.
Memory Usage
In Windows: My Computer Properties; Virtual Memory
To find out how much RAM your PC has, right-click the My Computer icon. From the pop-up menu, choose Properties. Look at the bottom of the dialog box to see how much RAM is installed.
If you’re familiar with how the Macintosh manages memory—where each application claims a certain chunk of memory, which it then relinquishes when quitting—you’ll appreciate how memory generally works in Windows: for the most part, automatically.
Virtual memory is always turned on in Windows, exactly as on the Macintosh. In Windows, however, the amount of hard disk space used by this memory-optimizing scheme constantly changes according to the demands your work places on the PC’s memory. You can change some of its settings, such as the hard disk that Windows uses for virtual memory; right-click My Computer and choose Properties → Performance → Virtual Memory (see Figure 13-4). Otherwise, however, it’s best to let Windows manage your virtual memory with no intervention from you.
As on the Macintosh, virtual memory on a PC uses empty hard disk space as temporary artificial memory when you run out of RAM. It’s important, therefore, to avoid letting your hard disk fill up. If you run low on disk space, Windows has more trouble swapping information to the hard disk and performance may suffer badly. Worse, you may experience random problems before Windows complains about being out of memory.
When your disk starts to fill up, you can use Disk Cleanup in Windows 98 to remove unnecessary files; a message may even warn you that your disk is getting full. Disk Cleanup is located at Start → Programs → Accessories → System Tools → Disk Cleanup. In older versions of Windows, just delete some files or uninstall applications using Control Panel → Add/Remove Programs.
Menu Bar
In Windows: Menu Bar, Taskbar
As a Macintosh user, you’re accustomed to seeing a single menu bar at the top of the screen. Windows is totally different—in Windows, you’ll see a menu bar at the top of every single window.
The closest interface element Windows has to the Mac’s top-of-screen menu bar is the Taskbar, the strip of icons at the bottom of the screen. If you’re trying to make the Windows Desktop feel more familiar, consider moving the Taskbar to the top of the screen—just drag it by any unoccupied gray area.
Doing so makes the Start menu, now located at the top-left corner of the screen, simulate the Apple menu. It also makes the Tray (the collection of icons on the right side of the Taskbar) emulate the right side of the Macintosh menu bar, which generally holds the clock and various utility menus. (See Control Strip for details on the Tray and Taskbar.)
If you’re a keyboard-shortcut lover, you may be pleased to discover that you can open Windows menus without using the mouse—you can actually pull down the menu with a keystroke so that you can survey its contents. See Menus for details.
Menus
In Windows: Menus
Menus are one of the primary interface elements of both Windows and the Mac OS. As on the Macintosh, you can click once on a menu to open it, after which it stays down, even if you release the mouse button. (In Windows, however, the menu doesn’t close automatically after 15 seconds, as on the Macintosh—it stays open until you make a selection or press Esc.)
If you’re used to older Macintosh operating systems, in which menus don’t stay down when clicked, you can still use Windows menus in the traditional way—by keeping the mouse button depressed continuously as you open the menu and drag down to the command you want.
One of the first things you’ll notice about Windows menus is that one letter of each menu name is underlined. If you open a menu, you’ll see that each menu command also has such an underline. These are keyboard accelerators—keyboard shortcuts that let you open menus and make selections from them without using the mouse.
The key to mastering these underlined commands is the Alt key. For example, you might notice that the first menu in your program is called File, and the Save command is in that menu. Without using the mouse, then, you could press Alt-F (to open the File menu) and then Alt-S (to use the Save command). Eventually, after you’ve had some practice, many Windows users fall into the practice of pressing F and then S in rapid sequence while pressing Alt, thus opening the menu and choosing the command in a single step.
Microphones
In Windows: Microphones
Most Macs come with a microphone jack, and many also include either a built-in or external microphone for recording sounds. In the PC world, however, equipping your machine with a sound card (if your computer doesn’t include one) and microphone is generally left up to you. Refer to the sound card’s documentation for details on what sort of microphones it supports.
Microsoft Excel
In Windows: Microsoft Excel
If you use Microsoft Excel 98 on the Macintosh, you can use Microsoft Excel 97 in Windows without having to learn anything new. Even the file format is identical—you can email or otherwise transfer Excel files between the two platforms without having to convert them.
Microsoft Outlook Express
In Windows: Microsoft Outlook Express
As with the other programs included in today’s Microsoft Office, the email program Outlook Express is nearly identical on Macintosh and Windows. Outlook Express for Windows is a free download from http://www.microsoft.com/ie/ie40/oe/; it also comes with Windows 98 and Internet Explorer.
Microsoft PowerPoint
In Windows: Microsoft PowerPoint
PowerPoint, the leading presentation/slide show software on the Macintosh, is also available in a nearly identical version on Windows. It’s included with Microsoft Office 97 for Windows, and is also sold separately. As with the other programs in today’s Microsoft Office, PowerPoint files are 100 percent cross-platform: you can email (or otherwise transfer) a PowerPoint file back and forth between Windows and Macintosh with no conversion necessary.
Microsoft Word
In Windows: Microsoft Word
The level of your comfort using Microsoft Word in Windows (known as WinWord by the insiders) depends on the version you’re accustomed to using on the Macintosh. Word 98 on the Macintosh is nearly identical to Word 97 for Windows, for example; the documents produced by these two programs share the same file format, and can be freely exchanged with no conversion necessary. Likewise, Word 6.0 on the Macintosh is equivalent to Word 95 in Windows. Earlier versions of the program weren’t identical, however, and file translators downloaded from the Microsoft web site may be necessary to convert their files.
Modem Control Panel
In Windows: Modems Control Panel
In Windows, you probably won’t have to fiddle with modem settings, provided Windows detects your modem properly. However, if you do need to configure your modem, the Modems control panel provides all the options you need. It’s accessible from Control Panel → Modems.
General tab. In the General tab, you can add and remove modem information and modify modem settings. You can also modify dialing properties such as location and area code, plus options for accessing outside lines, disabling call waiting, and using credit cards for long distance calls.
To modify settings for a modem, click its name in the list, and then click Properties. Another dialog box appears, with a General tab and a Connection tab.
The General tab contains the basic options for choosing a serial port, setting speaker volume, and setting maximum speed. The more powerful settings are in the Connection tab, where you can change both connection and call preferences. You shouldn’t need to change the connection preferences since almost everything uses eight data bits, no parity, and one stop bit. The call preferences might be more useful; for instance, not waiting for a dial tone can be useful when traveling in countries with different dial tones.
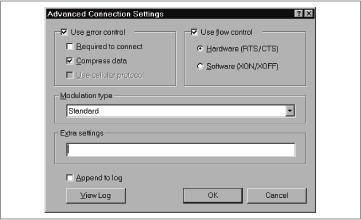
The truly tweaky settings such as flow control and modulation type live in the Advanced Connection Settings dialog box (see Figure 13-5). Pay special attention to the Extra settings field, since you can use it to override the default modem initialization string that Windows uses. You might need to do this to change the initialization string to connect with weird modems or for other unlikely situations.
The Diagnostics tab of the Modems control panel provides technical information about the driver your modem uses and internal modem settings. Click More Info to see the internal settings; that information might be useful for serious troubleshooting, but it’s not light reading.
Modem Port
In Windows: Serial Port
PCs generally come with two serial ports, called COM1 and COM2, although one is often taken up by an internal modem. The occasional PC may also have an additional serial card that provides two more serial ports, called COM3 and COM4. You can plug much more than just external modems into these jacks—you can also connect a mouse, printer, PalmPilot HotSync cradle, and similar add-ons to COM ports.

PC serial ports use either DB-25 or DB-9 jacks (see Figure 13-6).
In general, Windows serial ports are dramatically more complex than those on the Macintosh; persuading a knowledgeable guru to help you with such configurations is almost always a good idea. For example, inside the PC, your COM ports get the CPU’s attention by making an interrupt request—an IRQ. Because the PC has a limited number of channels over which these requests can take place, some COM ports (such as COM1 and COM3) are designed to share an IRQ channel. If action takes place on these two ports simultaneously, the result is the common Windows headache known as an IRQ conflict. Whatever was plugged into those two COM ports—a modem and a mouse, for example—is temporarily disabled. In such an event, you have no choice but to call the PC manufacturer’s help line.
You can learn more about how a serial port is configured by right-clicking My Computer and choosing Properties → Device Manager → Ports (COM & LPT) → Communication Port (COM1) → Properties. Don’t change the low-level port settings unless you know what you’re doing.
Modems
In Windows: Modems
In general, modems work exactly alike on Macs and Windows. In fact, you can sometimes move the identical modem between platforms, provided you overcome the incompatibility of connections and driver software. Refer to Table 13-1 for information about modem cross-platform compatibility.
Once a modem connected to a PC, Windows automatically detects it and tries to install the correct drivers. If Windows can’t identify the modem, or the modem won’t connect with the default settings, you might have to modify settings in Control Panel → Modems → General → Properties. In addition, you can access the useful Windows 98 Modem Troubleshooter from Control Panel → Modems → Diagnostics → Help.
For more information about configuring a modem, see Modem Control Panel and Remote Access Control Panel.
Modem Type | Compatibility Notes |
Macintosh external modems | Generally compatible with PCs, once you add a PC serial cable. A few external Macintosh modems (such as Global Village models) come with nonstandard cabling that can’t easily be adapted for the PC. Finding a Windows modem driver for a Macintosh modem shouldn’t be a problem for most well-known brands. |
Macintosh internal modems | Both connector and software driver problems make these modems incompatible with PCs. |
Macintosh-oriented PC Card modems | Generally compatible with PC Card-capable PC laptops, but verify Windows modem driver availability with the manufacturer. |

Monitor Port
In Windows: Video Connector
All PCs sold today come with standard 15-pin video connectors (see Figure 13-7), often called VGA connectors—precisely the same monitor jack found on today’s Macs. (Very old PCs might have 9-pin connectors for older video standards such as EGA or CGA, but you shouldn’t see those on any modern PC.) The happy result is that you can freely move monitors between Macs and PCs without buying so much as a single adapter.
Monitors
In Windows: Monitors
Most monitors sold today are multiple frequency monitors (also called multisync monitors), which means, among other things, that they’ll work with both PCs and Macs. Better yet, all Macintosh models today feature standard PC-style VGA monitor connectors on the back panel. (When installing an older Apple monitor onto your PC, you may need an inexpensive adapter, available from an electronics shop or online mailorder web site, for the video connector.)
If you have Windows 98 or later, you can connect multiple monitors to your PC; the additional monitors act as an extension of the primary monitor’s Desktop. Setting up such a configuration isn’t, however, anywhere near as simple as doing so on the Macintosh. For example, in Windows, you must define one monitor as your primary monitor, which is always fixed in the upper-left corner of the virtual Desktop. The primary monitor can be connected to almost any video card, but each secondary monitor requires one of a small set of video cards, such as the ATI Mach 64, Rage I, and Rage II. Be sure to check this capability before buying a video card for use with a secondary monitor.
In addition, the BIOS (roughly equivalent to the Macintosh ROM chips that store low-level instructions on how the machine works) on your PC must correctly identify which video card is driving the primary monitor. If the BIOS doesn’t let you select which video card is the primary one, it decides based on the order of the PCI slots in the machine. In this case, install the primary video card in the highest priority PCI slot—the easiest way of determining this is probably through trial and error, starting with the PCI slots on the ends.
Monitors & Sound Control Panel
In Windows: Display Control Panel’s Settings Tab, Sounds Control Panel, Multimedia Control Panel
In Windows, you make the settings for your monitors, sounds, and speakers in separate control panels; there’s no direct equivalent to the Mac’s centralized Monitors & Sound control panel.
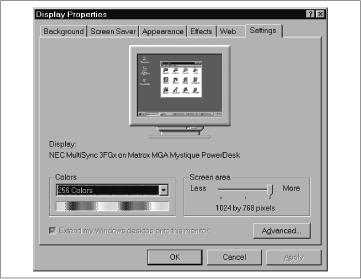
Monitor tab. On the Macintosh you specify the resolution and color settings for your monitor by clicking the Monitors icon in Monitors & Sound. In Windows, you make the settings in Control Panel → Display → Settings (see Figure 13-8). The options for number of colors are essentially the same as on the Macintosh, although the terms are different. In Windows, “High Color (16 bit)” corresponds to the Macintosh “Thousands” setting, and “True Color (24 bit)” is the same as the Mac’s “Millions.” The available screen resolutions are accessible from the Screen area slider; the options here depend on your video card model. Similarly, clicking Advanced brings up the Properties for your specific video card.
Although Windows 95 can’t work with more than one monitor, Windows 98 supports up to nine of them, and the “Extend my Windows Desktop onto this monitor” checkbox lets you create a large Desktop, as is the default on the Macintosh. (If that checkbox is unchecked, you see the same image on all monitors.)
The primary monitor is always fixed in the upper-left corner of the virtual Desktop; the secondary monitors can be arranged as you like.
Sound tab. The Sound panel of Monitors & Sound lets you adjust your speaker volume and identify what sound source you’d like to record from (CD-ROM, microphone, and so on).
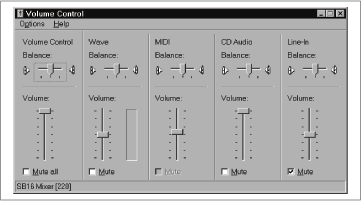
In Windows, you use the Multimedia control panel for the same purpose (Control Panel → Multimedia). Just drag the Volume slider to adjust your overall speaker volume. To fine tune your speaker sound, you can also use the Volume Control application, available at Start → Programs → Accessories → Multimedia → Volume Control (see Figure 13-9); on some systems, a corresponding icon is available at the right side of your Taskbar, as described in Control Strip.
The Multimedia control panel also lets you specify the sound source for recording your own sounds in Windows, exactly as on the Macintosh. The Preferred Device corresponds to the Mac’s Sound Monitoring Source pop-up menu, and the Preferred Quality pop-up menu corresponds to the Mac’s Sound Output Quality pop-up menu.
Alerts. To specify what sound effect you’d like Windows to use as its error beep, choose Control Panel → Sounds. You’ll discover here that Windows can play a different beep sound to each error event—one sound when a program quits unexpectedly, another when an error message appears, and so on—as well as many non-error events, such as opening or closing a window. To use this control panel, click the name of an event in the list. Then, using the Name pop-up menu below the list, choose the sound effect you want to associate.
Motherboards
In Windows: Motherboards
Macintosh users don’t think about swapping motherboards because Apple motherboards aren’t interchangeable among different models. However, in the PC world, you might very well want to speed up your machine by installing a faster motherboard. Although doing so isn’t a task for a novice, various books can walk you through the process; visit a bookstore and browse through the PC hardware section to find one you like. You can also upgrade the CPU chip itself in many PCs, provided your motherboard is designed to accommodate a faster chip.
Mouse
In Windows: Mouse
Using a mouse in Windows is almost exactly the same as using one on the Macintosh, with one major exception. The standard Macintosh mouse has only a single button, whereas a PC mouse sports two. The left PC mouse button corresponds to the Macintosh mouse button; the right PC mouse button generally does what Control-clicking something does on the Macintosh. In addition to summoning contextual menus, right-clicking in Windows may also bring up contextual help (see Help) and options for moving files and copying files.
Many modern PC models come with a Microsoft IntelliMouse—easily identified by the small rubber roller wheel nestled between the two mouse buttons. In many programs, rolling this wheel with your index finger does nothing at all. In Microsoft programs and some others, however, rolling this wheel scrolls the current window or list, saving you a trip to the scroll bar.
When you want to scroll in more dramatic increments, push down on the roller wheel as you drag upward or downward. Using this power-scrolling method, you can zoom all the way to the top or bottom of a document with only a single mouse gesture—but without much precision, of course.
Mouse Control Panel
In Windows: Mouse Control Panel
The Macintosh Mouse control panel lets you choose the speed of the mouse tracking (how fast the cursor moves when you move the mouse) and the double-click speed (how quickly you must click twice for the computer to register a double-click instead of two separate clicks). The Mouse control panel in Windows provides the same settings, plus a few more.
In the Buttons tab, you can swap the two mouse buttons, which is handy if you’re left-handed. The Motion tab lets you turn on pointer trails, which could conceivably be useful on laptops with lousy LCD screens. (Macintosh PowerBook laptops offer the same feature.)
The Windows Mouse control panel even lets you choose from among different mouse pointer shapes. (Click the Pointers tab to see your choices.) You can choose “schemes” (sets of related pointers), or you can change any individual pointer by clicking Browse and then selecting a different cursor file.
Movie Player
In Windows: Media Player, Active Movie Control
On the Macintosh, you use the Movie Player or QuickTime Player program to view digital QuickTime movies. If you’re trying to find a similar program in Windows, look no further than Media Player, located in Start → Programs → Accessories → Entertainment [or Multimedia] → Media Player.
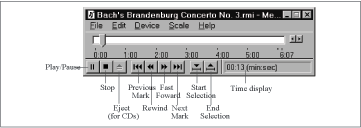
Media Player can play a wide variety of multimedia files, including ActiveMovie files, Video for Windows, sound files, MIDI files, and CD audio (although playing audio CDs is better done with CD Player). Media Player’s interface resembles a CD player or VCR (see Figure 13-10). Media Player can also show you the scale in time, frames, or tracks and play selections from a file. You can even include a multimedia file in a document by opening it in Media Player, choosing Edit → Copy Object, and then pasting it into your document.
Moving Files
In Windows: Moving Files, Copying Files
There’s little to moving files and folders on the Macintosh—you just drag the file or folder’s icon from one window to another on the same disk. The situation is much more complicated in Windows, where there are multiple ways to move files and folders around. Note that Windows doesn’t offer a “spring-loaded folder” feature, as in Mac OS 8 and later.
Here are a number of different ways you can move a file from one location to another:
Drag any file icon (except that of an application) or folder icon from one window to another on the same disk, exactly as on the Macintosh.
Drag any file or folder from one disk to another, holding down Shift after you start dragging.
Right-drag any file or folder from one window to another on any disk, and then choose Move Here from the contextual menu that appears.
Select one or more files or folders, and then choose Edit → Cut. (Alternatively, right-click one of the selected items and choose Cut.) Then switch to another window and choose Edit → Paste. Using this technique, you can even “paste” files onto a different disk.
A few aspects of moving files in Windows may catch you by surprise:
If you drag an application, Windows makes a shortcut (alias) in the destination instead of moving the actual application. The cursor shape lets you know what’s about to happen: if you see a tiny curved arrow on your cursor, Windows is about to make a shortcut (see Figure 13-11). For more information about shortcuts, see Alias.
You can change a move into a copy by pressing Ctrl while dragging. However, there’s no way to turn a move action into a shortcut creation action.
Once you’ve begun to drag an icon, you can change your mind—making the icon snap back to its original location—by clicking the other mouse button or by pressing Esc.
You cannot move a file into or out of the My Computer window. Anything you drag out of this window becomes a shortcut.
Moving files in Explorer windows works just like moving them in Desktop windows; you can drag files or folders from the left pane to a folder in the right pane. (See Finder for details on Explorer windows.)
Multitasking
In Windows: Multitasking
Despite the online battles waged by proponents of each platform, you won’t notice much difference between the multitasking schemes used by the Macintosh and Windows. On either platform, you can download a file from the Internet while retrieving your email, browsing the Web, and writing in a word processor. For information about switching between different applications in Windows, see Application Menu.
