Chapter 14. N
Netscape Navigator/Communicator
In Windows: Netscape Navigator/Communicator
The Macintosh and Windows versions of Netscape Navigator and Communicator are even more alike than the corresponding versions of Microsoft Internet Explorer. Better yet, the Windows versions of Netscape’s browsers seem to have been designed first on the Macintosh, so they’re among the easiest Internet programs to use on both platforms. You can learn more about the Windows version of Netscape Communicator and download a copy from Netscape’s web site at http://www.netscape.com/computing/download/index.html.
Network Browser
In Windows: Network Neighborhood
In Mac OS 8.5, Apple introduced Network Browser, which helps you find and connect to file servers on your network. The corresponding program in Windows is called Network Neighborhood. (If it doesn’t show up on your Windows Desktop, you can add it from Control Panel → Network → Configuration → Add → Client → Microsoft → Client for Microsoft Networks.)
Using Network Neighborhood to browse for, and connect to file and print servers on your network is simplicity itself. Doubleclick the Network Neighborhood icon, and then double-click the icon for the server you want to access. The process works exactly like opening folders in Windows, with three exceptions:
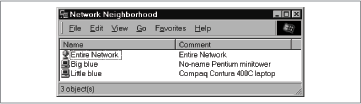
In the main Network Neighborhood window, you’ll see an icon for Entire Network, along with icons for servers in your local workgroup. If your network includes multiple workgroups, double-click Entire Network to move up a level to view other workgroups.
If you view the Network Neighborhood window in Details view (View → Details), the Comment column may provide useful information about specific servers (see Figure 14-1). Comments aren’t available in other views.
When you double-click a server icon in the Network Neighborhood window, you’ll see a folder icon for each shared folder, and a printer icon for each shared printer. Printers otherwise show up only in My Computer → Printers.
Note
If your network includes many servers, you may prefer to search for a particular server instead of browsing for it manually. To do so, right-click Network Neighborhood and then choose Find (or choose Start → Find → Computer). Then enter the name of the computer you want to find; click the Find button. Matching computers are displayed in a list below the search field; double-click to open any of them.
Simplifying access. After you’ve located and connected to either a shared folder or printer, you can simplify the process of connecting to that resource again in the future.
As a Macintosh user, your first reaction might be to create a shortcut to the resource, just as you’d create an alias to a shared folder on an AppleShare server. This trick works well in Windows, too. However, you can also map a shared folder to a drive letter, after which the shared folder appears in My Computer just as though it were another disk.
Networking Macs and PCs together. Thanks to some ingenious software tools, Macs and PCs can exist on the same network, sharing hard disks and printers as though there were no OS difference whatsoever.
Consider, for example, the Macintosh-side software known as DAVE (http://www.thursby.com/). It adds Windows’ NetBIOS networking protocol, which permits the Macintosh to connect to Windows machines (versions 3.1, NT, or whatever). DAVE requires no installation on the PC side—a relief to Macintosh fans who can continue using their favorite machine without bothering the company’s tech staff. Once DAVE is running, PC users see Macs and Macintosh printers through the standard Network Neighborhood program; Macintosh users see PC volumes through the Chooser or Network Browser.
DAVE is great for introducing a Macintosh minority to a larger PC network. If you’re in the opposite situation, adding a few Windows machines to a predominantly Macintosh network, buy PC MACLAN instead (http://www.miramarsys.com/). It lets a PC access the network’s Macintosh printers and hard disks through the standard Network Neighborhood program. In fact, if you launch the included AppleShare Server software on the Windows machine, the PC can also become available to the Macs on the network—using the same Chooser or Network Browser software the Macintosh users would ordinarily use to access other networked Macs.
Network Control Panel
In Windows: Network Control Panel
Before the release of the AppleTalk control panel several years ago, the Mac OS included a Network control panel that let you specify which kind of physical network (LocalTalk, Ethernet) you wanted to use. In Windows, you use the Network control panel for that task; see Networking for the basics of Windows networking and AppleTalk Control Panel for the details of using the Network control panel.
Networking
In Windows: Networking
Configuring your network on Windows is quite a bit different from doing so on the Macintosh.
Windows networking basics. The Mac OS separates networking resources by protocol and task, providing you with AppleTalk and TCP/IP control panels to set up your network configuration and the File Sharing control panel to configure file sharing. In Windows, on the other hand, everything is bundled together into the Network control panel (Control Panel → Network). Within the Network control panel, Windows provides four types of network components:
Client
Client components help you connect to servers on your network. If you want to access files on a remote server, you need the appropriate client software installed. The most common is “Client for Microsoft Networks.” The Macintosh equivalent is the AppleShare extension.
Adapter
Adapter components let you configure the physical network interfaces, such as Ethernet cards. You must have a software adapter for each card type. If you have a modem, you’ll need a Dial-Up Adapter as well. For the most part, you don’t configure adapters, although the Bindings tab in the Properties dialog box for each one lets you specify which protocols the adapter will use. For instance, you might not want your Dial-Up Adapter to use NetBEUI, just TCP/IP. On the Macintosh, you specify adapters in the “Connect via” pop-up menu in the AppleTalk and TCP/IP control panels.
Protocol
Protocol components let the PC speak specific protocols, or network languages. For communication to take place, all the computers involved must be configured to use the same protocol using the same type of adapter (protocols are “bound” to adapters, which means that that adapter uses that protocol). Most of your networking configuration takes place at the protocol level, especially if you’re using a protocol like TCP/IP that can require a fair amount of manual configuration. The Macintosh equivalents are the AppleTalk control panel and TCP/IP control panel.
Service
Service components let you share folders and printers with other people on your network. If you want to set up your computer as a server for others to access for file or printer sharing, you must install and configure the appropriate service, the most common of which is “File and printer sharing for Microsoft Networks.” On the Macintosh, you’d use the File Sharing control panel and the Printer Share extension. See File Sharing and Printer Sharing for more information.
Procedures. To install a new networking component in the Network control panel, click Add, choose the component type, and then choose the appropriate component. Make sure you have your Windows CD handy, since Windows will almost certainly need to install some new files.
To remove a networking component because you’re not using it, select it in the list and click Remove. Keep notes on what you’ve done, since if something stops working after removing a component, you should reinstall it.
To modify the configuration for a component, either double-click it or select it and then click Properties. Windows opens a tabbed Properties dialog box offering configuration choices. Configuration possibilities break down like this:
Client components primarily offer logon options.
With adapter components, you’re most likely to want to choose which protocols to bind in the Bindings tab; you can also fiddle with advanced settings if you know what you’re doing.
Protocol components also offer bindings and advanced options, plus any standardized options necessary for that protocol. For instance, TCP/IP requires an IP address, gateway, and DNS configuration, all of which you set in different Properties tabs (see TCP/IP Control Panel for help).
Service components offer various settings appropriate to that service.
Other networking related entries. In today’s networked world, large portions of both the Mac OS and Windows are linked to networking. The following entries should get you started in networking on Windows. For Internet-specific references, see Internet.
For information about sharing files in Windows, see AppleShare and File Sharing.
For information about sharing printers in Windows, see Printer Sharing.
For information about configuring PCs to see each other on a network, see AppleTalk Control Panel.
For information about connecting a Windows-based PC to the Internet via a modem, see Remote Access Control Panel and modems.
For information about connecting a Windows-based PC to the Internet via a network, see TCP/IP Control Panel.
For information about transferring files from a Macintosh to a Windows-based PC via a network, see Transferring Files to Windows.
Note Pad
In Windows: Notepad, WordPad
On the Macintosh, the Note Pad desk accessory holds short notes. There’s no direct equivalent in Windows, though you can just create text files in either Notepad (Start menu → Programs → Accessories → Notepad) or WordPad (Start menu → Programs → Accessories → WordPad), just as you might in SimpleText on the Macintosh.
For the record, the primary difference is that Notepad creates pure text files without any formatting. WordPad can not only create files with fonts, sizes, and type styles, but also read and save Microsoft Word documents.
NuBus Slots and Cards
In Windows: PCI Slots and Cards
Over the years, Macs have sported a number of different types of expansion slots. From 1989 to 1995, the most common Macintosh expansion slot was the industry standard NuBus specification. Although a standard, it wasn’t used in the PC world, and in 1995, Apple switched to using the higher performance PCI (Peripheral Component Interconnect) bus for expansion slots.
In the Windows world, expansion cards today come in the PCI format, exactly as on all Macs made since 1995. For details, see PCI Slots and Cards.
Numbers Control Panel
In Windows: Regional Settings Control Panel
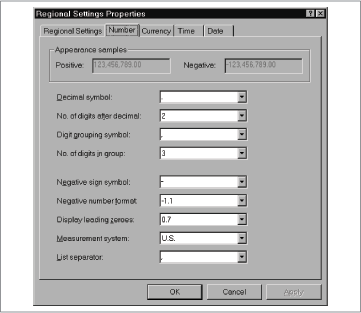
The Mac’s Numbers control panel lets you choose among a variety of settings that relate to how numbers are displayed in different countries.
Windows provides more control over number display in the Regional Settings control panel. In Control Panel → Regional Settings → Number, you can specify how numbers should appear (see Figure 14-2). And in Control Panel → Regional Settings → Currency, you can choose how currency numbers should appear.
Most people in the U.S. don’t need to change the defaults. If you live in a part of the world were numbers are written differently, changing the settings is merely a matter of choosing the appropriate options from the drop-down menu.
Whether on Macintosh or Windows, you won’t see the effects of your changes except in a couple of out of the way places: the currency setting affects Microsoft Excel, and large-number punctuation may appear in the Size column of your Desktop list views.
Num Lock Key
In Windows: Num Lock Key
Older PC keyboards lacked separate cursor keys; in those days, a press of the Num Lock key turned the number keypad into its alternate function as cursor keys.
That workaround is no longer necessary in this age where every keyboard has a separate bank of cursor keys. Even so, the Num Lock key still appears on most PC keyboards; it’s virtually useless except in certain Microsoft programs. For example, in Microsoft Word, pressing this key performs its time-honored function of turning the number keypad into cursor keys.