Chapter 16. P
Page Setup
In Windows: PageMaker
As on the Macintosh, the Page Setup command is available in almost every Windows program’s File menu. It offers a dialog box where you can specify page size, margins, and other program-specific options related to printing. The individual options in this dialog box vary widely from Windows program to Windows program, but the idea is the same.
PageMaker
In Windows: PageMaker
If you’re accustomed to using PageMaker on the Macintosh, you should have little trouble switching over to PageMaker on Windows. Moving files between platforms may be more complicated, most often because the fonts may not be identical on the two platforms.
Keep in mind that your Windows version of PageMaker can open documents created by the same-numbered Macintosh PageMaker version, but can’t open older (or newer) Macintosh PageMaker documents.
For more information about PageMaker and its successor, InDesign, visit http://www.adobe.com/.
Password Security Control Panel
In Windows: Passwords Control Panel
Macintosh PowerBook users may be used to relying on the security offered by the Password Security control panel, which is available only on PowerBooks. The same basic feature is offered by the Windows control panel called Passwords (Control Panel → Passwords), although this security is much more easily circumvented.
The Windows Passwords control panel has three tabs relating to different password uses:
Change Passwords. In the Change Passwords tab, you can change the Windows password, which is the one that appears at every startup. However, it offers little true security: pressing Esc dismisses the login dialog box, and entering a new username and password creates a new user profile.
Since the Windows password exists primarily to thwart the idle pair of prying eyes, you may wish to shut it off entirely so you don’t have to enter a password every time the PC starts up. To eliminate the login dialog box, check these conditions:
Your Windows password must be blank in Control Panel → Passwords → Change Passwords → Change Windows Password.
You must disable user profiles by selecting Control Panel → Passwords → User Profiles → “All users of this computer use the same preferences and desktop settings.”
You must set Windows so your primary network logon is Windows Logon, which you do by choosing Control Panel → Network → Configuration → Windows Logon.
If you wish to use user profiles, or to log onto your local network automatically at startup, you’ll have to endure having to enter your password on each startup.
Remote Administration. In the Remote Administration tab, you specify whether you want to permit remote administration of your files and printers from other computers. Unless your network administrator tells you to turn this on, leave it off.
User Profiles. The User Profiles tab controls whether you use User Profiles. Here, you can specify which aspects of Windows will be included in the user profiles. Once you’ve turned on user profiles here, use the Users control panel (Control Panel → Users) to create and set up accounts for new users.
Paste
In Windows: Paste
The Windows Paste command (Ctrl-V) works exactly as it does on the Macintosh (Command-V). On Windows, however, it offers an additional feature: you can actually cut and paste file icons for the purpose of moving them to another window, as described in Edit Menu.
PC Cards
In Windows: PC Cards
PC Cards, originally known as PCMCIA cards, are credit card-sized expansion cards commonly used to provide modem or network features to laptops that otherwise lack them. Other uses of PC Cards include hard-disk storage, RAM expansion, ISDN adapters, and even systems that use the Global Positioning System (GPS) satellites to locate your exact position on the planet.
There are three types of PC Cards. Type I cards were designed to be only memory expansion cards; they’re 3.3mm thick. Type II cards have many more functions, but are the same size. Type III cards, usually hard disks, are 10.5mm thick. Each type is backward compatible, so you can insert a Type I card into a Type II or Type III slot. Better yet, most Macintosh and PC laptops offer a pair of Type II slots on top of one another; the advantage of this arrangement is that you can insert either two Type I or Type II cards, or a single Type III card.
Using PC Cards in Windows is much like using them on the Macintosh; you can insert and remove them without having to turn off the computer.
On the other hand, no icon appears on Windows Desktop when you insert a PC card, as it would on the Macintosh. Furthermore, beware: on a Windows PC, you must “stop” a card before ejecting it. To do so, open Control Panel → PC Card, select the PC Card you want to eject, click Stop, and then eject the card manually (by pressing the eject button).
Despite the fact that the PC Card specification is a standard, PC Cards require driver software. Windows comes with a huge database of drivers, and can therefore recognize many PC cards automatically, but you can’t assume that a PC Card sold for use on the Macintosh will work with Windows. If your PC doesn’t automatically recognize a Macintosh PC Card when you insert it, contact the card’s vendor to see if Windows driver software is available.
PC Exchange Control Panel
In Windows: None
The PC Exchange control panel lets Macs read PC-formatted disks and offers some translation capabilities. No equivalent is built into Windows, although you can buy programs like Macintosh Drive 98 for Windows (http://www.media4.com/), Conversions Plus and MacOpener from DataViz (http://www.dataviz.com/), or MacSEE from Reevesoft (http://www.reevesoft.com/macsee_info.htm) that serve the same purpose. For more information, see File Exchange Control Panel and Transferring Files to Windows.
PCI Slots and Cards
In Windows: PCI Slots and Cards
Over the years, Macs have sported different types of expansion slots. Starting with the Macintosh II, the most common slot was called NuBus. In 1995 and later Macintosh models, Apple substituted the faster PCI (Peripheral Component Interconnect) expansion slots. Today’s PCs also contain PCI slots.
Although PCI slots are universal on today’s desktop Macintosh models, the PC world evolves more slowly. As a result, although most modern PCs include PCI slots, they also often include the older ISA or EISA slots to support older cards. If you have a choice, always use the PCI version of a card.
Installing a PCI card in a PC is essentially the same as installing one in a Macintosh. The only difficulty you may encounter is the struggle to open your PC’s case, depending on its design. Refer to the PC’s manual for instructions on opening the case and installing the PCI card.
Don’t assume that you can use a PCI card sold for use in a Macintosh. That arrangement may be possible, but check with the card’s manufacturer to make sure Windows drivers for the card are available.
PCMCIA
In Windows: PCMCIA
The PCMCIA (Personal Computer Memory Card International Association) specification for credit card-sized expansion cards was considered far too difficult to remember or say (wags claimed it stood for “People Can’t Memorize Computer Industry Acronyms”), so PCMCIA cards are now officially known as PC Cards.
PDS (Processor Direct Slot) Slots and Cards
In Windows: PCI Slots and Cards
Exactly as on the Macintosh, the expansion slots found in Windows computers have varied over the years—ISA, EISA, and VESA each preceded the current kind of slot, known as PCI. Those are the rough equivalents of the various Macintosh slot types: PDS, NuBus, and today’s PCI. See PCI Slots and Cards.
Photoshop
In Windows: Photoshop
Adobe Photoshop has become the standard program for photo editing and image production for both Macintosh and Windows users. The program is identical on both platforms, and you can exchange Photoshop files—as well as GIF, TIFF, EPS, and other graphics files, of course—without any conversion. For additional information about Photoshop, visit Adobe’s web site at http://www.adobe.com/.
PICT
In Windows: Bitmap
The standard graphics file format on the Macintosh is called PICT and can hold either object-oriented graphics or bitmapped graphics. In general, a bitmapped graphic is composed of a specific arrangement of dots, and the image can be edited only by adding or removing dots. In contrast, object-oriented images contain objects, such as squares and circles, and you can edit them by modifying the object.
In Windows, the most common graphics file format is the bitmap (.bmp) file. You encounter this kind of file in a number of situations:
You can copy the image of the active window or of the entire screen in bitmap format—thus making what’s known as a screen capture—by pressing Alt-Print Screen or Print Screen. To paste the image into a document, choose Paste from the Edit menu.
You can use Paint (or any of many other graphics applications) to create and edit bitmap images.
You can cover the background of your Desktop with “wallpaper” made of any bitmap image. To do this, open the Display control panel, click the Background tab, and then, in the wallpaper area, click the Browse button. Select any bitmap (or GIF or JPEG) image, and then finally click OK or Apply.
If you need to open a Windows bitmap file on the Macintosh, you can use Picture Viewer, the free program on every modern Macintosh hard disk (which you can also download as part of the QuickTime software suite from http://www.apple.com/quicktime/). You can also use any standard graphics program, such as Photoshop or the shareware GraphicConverter.
Power Key
In Windows: Power Switch
You turn most Macs on and off by pressing the Power key on the keyboard. Every Windows machine, however, is different, but few have keyboard power switches.
Instead, you must generally push a physical switch on the front of the machine to turn it on. And to shut down a Windows PC, choose Start → Shut Down, and then click Shut Down in the dialog box that appears. If you have a relatively modern PC—one that supports the Advanced Power Management specification—the machine then shuts down completely; if it doesn’t, you have an older machine that must then be manually switched off using the same power switch.
PPP Control Panel
In Windows: Dial-Up Networking
For information about connecting a PC to the Internet by modem, see Remote Access Control Panel.
PRAM (Parameter RAM)
In Windows: None
When the Mac’s control panel settings—especially mouse, network, and monitor settings—seem to go awry, the veteran Macintosh user immediately thinks of zapping the PRAM. This troubleshooting trick involves pressing the Command, Option, P and R keys while the Macintosh starts up; after two or three repetitions of the startup chime, the keys are released, and the Macintosh resets all of its control panel settings to their factory defaults.
There’s no equivalent in Windows. When mouse, network, and other peripherals begin to act up, your troubleshooting thoughts should turn to software driver updates and other Windows techniques.
Preferences Folder
In Windows: Registry
On the Macintosh, most applications store their settings and preferences files in the Preferences folder. Windows has no equivalent folder for storing individual configuration files; instead, it relies on a single, preference-collecting database file called the Registry.
Applications (or their installers) can create and modify entries in the Registry, just as applications on the Macintosh manage their own preferences files.
The existence of the Registry explains why you generally can’t copy an application to a different PC and expect it to work—without the Registry components created by the original installer, many programs can’t run.
As you probably know, you can’t manually open a Macintosh preference file to make changes. In contrast, the Windows Registry is, technically speaking, editable, provided you have the Registry Editor program and a great deal of expertise. Registry entries are cryptic, and making a mistake could cripple an application or even Windows itself. Don’t mess with the Registry unless you have specific instructions for performing a task.
Printer Port
In Windows: Parallel Ports, Serial Ports
Most inexpensive printers in the Macintosh world connect to the printer port of older Macintosh models, which is technically known as an RS-422 serial port. (There’s no printer port on any modern Macintosh at all, of course; USB has replaced the serial port technology of older models.) For more information about serial ports on PCs, see Modem Port. In Windows, however, most inexpensive printers connect to the parallel port, which doesn’t exist on the Macintosh.
Parallel ports (often called LPT ports) send data on eight lines simultaneously, making them significantly faster than serial ports. That’s why they’re also good for accommodating network adapters, low-speed storage devices, and direct file transfer with other PCs.
A number of different types of parallel ports have appeared over the years, including the original unidirectional parallel port (which could only send information), the bidirectional parallel port (which could send and receive data and is sometimes referred to as Standard Parallel Port, or SPP), the significantly faster Enhanced Parallel Port (EPP), and another high-speed variant called the Enhanced Capabilities Port (ECP). In modern PCs, you’re likely to have combination ECP/EPP ports.
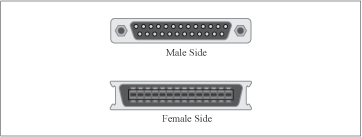
No matter what type of parallel ports the PC sports, the connectors are the same. On the computer, you’ll find the DB-25 D-shell connector; on peripherals with parallel ports you’ll find 36-pin Centronics connectors that look like SCSI connectors (see Figure 16-1).
You can learn more about how a parallel port is configured by right-clicking My Computer and choosing Properties → Device Manager → Ports (COM & LPT) → ECP Printer Port (LPT1) → Properties. Don’t change the low-level port settings unless you know what you’re doing.
Along with connecting printers to PCs, the most common use of parallel ports is for the Direct Cable Connection; for more information, see LocalTalk.
Printer Sharing
In Windows: Printer Sharing
Because of the prevalence of LocalTalk-and Ethernet-compatible printers in the Macintosh world, many Macintosh users don’t realize they can also share serial StyleWriter inkjet printers. But you can, thanks to the Printer Share extension. Windows lets you share printers attached directly to a PC in much the same way you share folders on the PC’s hard disk.
Note that you can’t share a printer attached to a PC with a Macintosh on the same network.
Configuring file and print sharing. To turn on file and print sharing in Windows, follow these steps:
Open Control Panel → Network → Identification. Fill in a name, workgroup, and description for your computer.
In Control Panel → Network → Configuration’s list of network components, make sure you have the same protocol used on both the PC sharing the files and the PC you want to be able to access the files. TCP/IP or NetBEUI work fine.
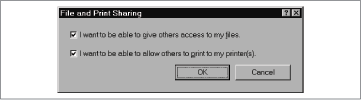
In Control Panel → Network → Configuration’s list of network components, make sure you have the “File and printer sharing for Microsoft Networks” service component. If you don’t see it in your list, add it by clicking Add → Service → Microsoft → File and printer sharing for Microsoft Networks. Service icons look like little computers with a hand under them.
Also in the Network control panel, click the “File and Print Sharing” button, and check “I want to be able to allow others to print to my printer(s)” (see Figure 16-2).
Open My Computer → Printers, right-click the printer you want to share, and then choose Sharing from the contextual menu.
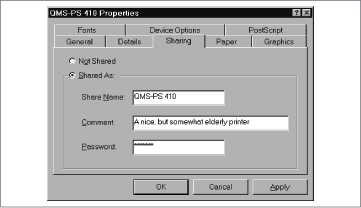
In the Properties dialog box’s Sharing tab, click Shared As, enter a name for the shared item, type a comment others will see in the Network Neighborhood, and enter a password (see Figure 16-3). Be careful with your password, especially if other people on the network can access your PC or if you have a permanent Internet connection via a cable modem or DSL connection.
When you close the Properties dialog box, Windows asks you to confirm your password.
That’s all there is to turning on printer sharing in Windows.
Accessing shared printers. To connect to a shared printer, follow these steps. For more information, see Network Browser.
In Control Panel → Network → Configuration’s list of network components, make sure you have the same protocol used on both the PC sharing the printer and the PC you want to be able to access the printer. TCP/IP or NetBEUI work fine.
In Control Panel → Network → Configuration’s list of network components, make sure you have the “Client for Microsoft Networks” client component. If you don’t see it in your list, add it by clicking Add → Client → Microsoft → Client for Microsoft Networks. Client icons look like little computers.
Double-click the Network Neighborhood icon on your Desktop. For extra information about the shared computers, switch to Details view by choosing View → Details.
Double-click the icon for the computer whose printer you want to access, and then double-click the printer you want to access.
If this is the first time you’ve accessed this printer, Windows prompts you to set up the printer. Doing so involves installing the appropriate drivers and creating an icon for the printer in My Computer → Printers.
You can print to the shared printer as you would to any other printer. But the first time you print, Windows prompts you to enter the password. You can choose to have the password remembered in your password list, which can be a security risk. Once the password is accepted, your document prints on the shared printer.
Printing Files
In Windows: Printing Files
Once properly configured, printing in Windows works almost exactly the same way it does on the Macintosh. For information about setting up Windows printers, see Desktop Printers, Page Setup, and Printer Sharing, and for information about font handling in Windows, see Fonts.
As on the Macintosh, you can print from Windows in a number of different ways:
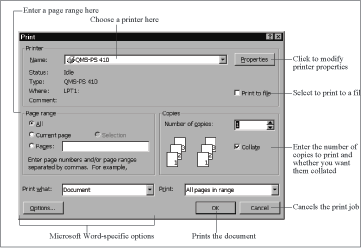
From within an application, choose File → Print (Ctrl-P). The Print dialog box appears, where you can choose which printer to use, which pages to print, how many copies to print, and any other application-specific options (see Figure 16-4).
Drag one or more document icons to either a printer icon in My Computer → Printers or to an open print queue window (accessed by double-clicking a printer icon). When you do this, Windows launches the necessary application and prints the document without displaying the Print dialog box.
You can print some kinds of documents by right-clicking their icons and then choosing Print from the contextual menu. This command has the same effect as dragging the document icon to the printer icon. Trial and error is the only way to determine which kinds of documents you can print in this way.
Windows can print in the background, exactly as on the Mac OS.
Publish and Subscribe
In Windows: OLE
With System 7, Apple introduced a technology called Publish and Subscribe, which is a lot like Copy and Paste, except that the pasted material can be automatically updated when the original changes.
Microsoft’s Object Linking and Embedding technology, or OLE, accomplishes much the same thing. OLE exists both on the Macintosh (in Microsoft applications and a few others) and in Windows. It gives OLE-savvy programs two features: linked objects and embedded objects.
A linked object is a living copy of material whose original sits in another document. Changes to the original object are reflected in the copy, exactly as in Publish & Subscribe. As an example, imagine inserting an Excel spreadsheet with yearly data into a corporate report created as a Word document. You want changes to the data to be reflected in the corporate report, so when you insert the file into Word (via Insert → File), you’d make sure to select the “Link to file” checkbox.
In contrast, an embedded object has no link back to the original object—it’s a copy that doesn’t change if changes are made to the original. For example, you might want to insert a logo graphic into a Word document, but since you’re unlikely to change your logo, there’s no reason to maintain a link between the original and the copy.
Not all Windows applications offer OLE features, although most Microsoft applications do. Consult your application’s manual for details on how to link or embed objects.