Chapter 19. S
Saving Files
In Windows: Saving Files
You save documents in Windows exactly the way you do on the Macintosh: by choosing File → Save or by pressing, in the Windows case, Ctrl-S.
Only a few differences are worth noting:
When naming a file for the first time, remember that most punctuation is off-limits (see Filenames).
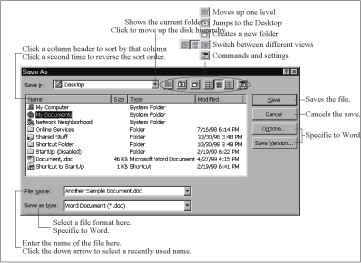
When the Save As dialog box appears, as shown in Figure 19-1, Windows 98 offers a Desktop button (the folder button that contains an asterisk). To get the same kind of directory overview in Windows 95, choose Desktop from the Save In pop-up menu, or click the tiny “next level up” folder icon repeatedly.
You can adjust the look—the equivalent of the Desktop View setting—of the Save As dialog box by clicking the icons in the upper right. These icons correspond to List view (see List Views), Details view (which resembles the Macintosh list view), and the special Properties view. In Properties view, single-click a file on the left side of the window to view an information pane on the right side.
You can switch to another application even while the Save box is still on the screen. See Dialog Boxes for details.
You can move the Windows Save dialog box around on the screen by dragging its title bar.
Scrapbook
In Windows: Scraps
Apple’s Scrapbook program lets you store text, graphics, or sounds for use in other applications. Windows has no equivalent, but Windows 98 features scraps (see Clipping Files) that serve much the same purpose.
Screen Capture
In Windows: Screen Capture
For writers of computer books, magazines, and manuals, the screen capture, or screen shot, is a vital tool: it’s a graphics file that captures what was on the screen at a precise moment. On the Macintosh, you create screen shots by pressing various key combinations, such as Command-Shift-4. In Windows, too, you press specified keyboard keys to create screen shots, as outlined in Table 19-1.
As on the Macintosh, more powerful screen capture utilities can do things such as saving snapshots in different file formats. One popular example of these utilities is SnagIt (TechSmith Corporation, http://www.techsmith.com/products/snagit).
Key Combination | Function |
Print Screen (sometimes abbreviated Prt Sc) | Takes a picture of the entire screen and copies it to the clipboard, ready for pasting into a graphics program |
Alt-Print Screen | Takes a picture of the currently active window and copies it to the clipboard |
Screen Savers
In Windows: Screen Savers, Power Management Control Panel
Windows has a built-in screen saver, saving you the trouble of buying a commercial one like After Dark for Windows. Better yet, Windows can also shut the monitor off after a specified period of inactivity, which saves the screen far more effectively than a screen saver ever could (see Energy Saver Control Panel).
To set up the screen saver in Windows, follow these steps:
Open Control Panel → Display → Screen Saver.
From the pop-up menu, choose a screen saver module. A small preview appears (see Figure 19-2).
Click Settings; in the dialog box, modify the options for the selected screen saver, if desired.
If you want to see a full size preview of the screen saver, click Preview.
If you want to assign a password that must be entered to stop the screen saver, select “Password protected” and enter a password.
Set the time before activation—the amount of time since you last used your computer before the screen saver kicks in—in the Wait field.
Click OK or Apply to save your settings.
The Windows screen saver’s password option offers only minimal security. Simply restarting the computer is enough to bypass it.
Script Editor
In Windows: Notepad
Script Editor is a small text editor specifically designed for editing AppleScript scripts. There’s no direct equivalent in Windows, though most Windows users would use Notepad to edit batch files. For more information about scripting in Windows, see AppleScript. For information about Notepad, see SimpleText.

SCSI
In Windows: SCSI
The basic rules for SCSI on a PC are much the same as they are for the Macintosh: Each SCSI device requires its own unique ID number, the first and last devices on a SCSI chain require terminator plugs, and so on.
Unfortunately, SCSI on the PC can be quite confusing for a Macintosh user—for one thing, SCSI isn’t a standard feature on most PCs, as it was on the Macintosh for many years. In general, you have to buy a SCSI card and install it into your PC if you plan to attach SCSI devices to it. (Zip drives sometimes come with low-end adapters, but this inexpensive card may not let you attach multiple SCSI devices, as a real SCSI card would.) If you experience SCSI problems—your SCSI gadgets don’t work, for example—follow the same steps you would on a Macintosh. Start by checking SCSI IDs and termination. Use high-quality cables—cheap and poorly shielded cables can cause strange problems.
Then reduce the SCSI chain to a single device and test again. If that configuration works, add another device and test again. Repeat this process, adding devices slowly and testing after each one.
Sherlock
In Windows: Find
Sherlock is Apple’s name for its beefed-up Find program, which made its debut in Mac OS 8.5. For information about finding files and folders in Windows, and searching the Internet, see Find.
Shift Key
In Windows: Shift Key
As on the Macintosh, the Shift key does far more in Windows than simply produce capital letters:
Hold down Shift when booting the PC to prevent items in your StartUp folder from launching, as on the Macintosh.
When selecting multiple icons in a Desktop window, or when selecting multiple items in a list, Shift-click to select all the items between the first selected item and the one on which you’re clicking. (This isn’t the same effect you get when Shift-clicking items on the Macintosh, where each additional click adds only a single item to the selection. To produce that effect in Windows, Ctrl-click each item.)
Press Shift-Del to delete a file immediately—without sending it to the Recycle Bin. (You won’t be able to recover the file later, as you would if it were stored in the Recycle Bin.)
Shift-double-click a folder to open it in a two-pane Explorer window.
In situations where the Tab key is used for navigation (to move between fields in a dialog box, for example), adding Shift reverses the direction of the navigation, exactly as on the Macintosh.
Shut Down
In Windows: Shut Down
As with the Macintosh, you shouldn’t shut down a Windows PC simply by cutting its power. If you do so, Windows complains at the next startup and encourages you to run the ScanDisk disk repair program to check for any hard disk corruption that your rash action may have caused.
Instead, to shut down a Windows machine, follow these steps:
Choose Start → Shut Down, or click the Desktop and press Alt-F4.
In the Shut Down dialog box, select Shut down (or type the letter S).
Click OK.
Windows quits all running programs, prompting you to save any changes in unsaved documents. Then, if your PC supports Advanced Power Management, it shuts off completely; if not, it prompts you to turn off the power manually.
Shutdown Items Folder
In Windows: None
When you shut down a Macintosh, anything in its System folder → Shutdown Items folder is automatically opened (a backup program, for example) before the shut down process wraps up. Windows has no equivalent feature.
SimpleSound
In Windows: Sound Recorder
SimpleSound, the simple sound-recording program in the Mac’s Apple menu, looks positively Spartan next to its Windows equivalent, Sound Recorder (available from Start → Programs → Accessories → Entertainment → Sound Recorder). (Of course, neither program is suitable for professional audio processing.)
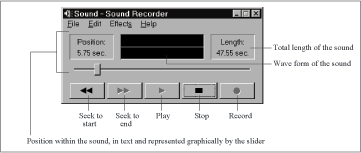
The basics of using Sound Recorder are easy, provided you have an audio input device—a microphone, for example—connected to your PC. To record a sound, click Record. When you’re finished recording, click Stop. Save your file by choosing File → Save As.
To play a sound file, choose File → Open, open the sound file you want to play, and then click the Play button. See Figure 19-3 for descriptions of the various buttons.
That’s only the beginning of Sound Recorder’s features. Choose Help → Help Topics for details on using the following features:
Delete parts of sound files
Change the speed of a sound file
Change the volume of a sound file
Play a sound file in reverse (great for those Beatles songs!)
Add an echo to a sound file
Change the quality of a sound file
Change the format of a sound file
Mix sound files
SimpleText
In Windows: Notepad, WordPad
SimpleText is the free, stripped-down word processor—ideal for Read Me files—that comes with the Mac OS. Windows provides a pair of text-processing utilities, one less powerful than SimpleText, the other more powerful.
Notepad. Notepad (Start → Programs → Accessories → Notepad) is the older of the two Windows text editors; its feature set is truly basic. You can open only a single text file at a time, and only files smaller than 32K. Notepad offers only a single font for the entire document. Its concept of advanced features are a Word Wrap command that wraps the text to the current size of the window—without it, and when you resize the window, text scrolls past the right edge of the window—and a Time/Date command that inserts the current time and date at the insertion point. You can also search for text in a file, which is occasionally handy when reading a long ReadMe file.
Notepad is the default application for opening text files, so you’ll probably see a fair amount of Notepad when reading ReadMe files. The program is also good for editing configuration text files, which you may occasionally encounter in Windows.
WordPad. WordPad (Start → Programs → Accessories → WordPad) steps past Simple-Text’s features with a few basic word processing features. WordPad is also limited to opening a single file at a time, but it can open text files, RTF (Rich Text Format) files, Microsoft Word files, and Windows Write files. (In View → Options, you can specify how WordPad displays files of each type). WordPad can display graphics stored in Word files, and it’s handy for reading Word files without launching—or even owning—Word.
WordPad sports the basic trappings of its big brother, including a toolbar, formatting bar, ruler, and status bar. They work as you’d expect in a word processor; if any of the icons throw you, hold the cursor still over the icon in question to see a ToolTip that explains the cryptic graphic.
You can format your WordPad text with fonts, sizes, and styles, along with bullet styles, paragraph formatting, and tab settings. Like Notepad, WordPad can insert the time and date into the document; it can also accept pasted graphics. Also like Notepad, WordPad can find text in a document, but it can also replace found text strings.
Sleep
In Windows: Stand By, Suspend
Every recent Macintosh model offers a sleep mode. In sleep, the computer requires less power, yet springs fully back to life when you press a key. Windows and recent PCs offer a similar feature, called Stand by in Windows 98 or Suspend in Windows 95. The command appears in Windows only if your PC supports the technology called Advanced Power Management (APM). Some Windows programs don’t react well when the PC is awakened from sleep; otherwise, though, the Suspend or Stand by mode of your PC can save you electricity, money, and wear and tear.
To put a Windows 95 PC into standby mode, choose Start → Suspend. In Windows 98, choose Start → Shut Down; in the Shut Down dialog box, click “Stand by” and then click OK. To wake up a PC that’s in standby mode, press any key or move the mouse.
You can also configure your PC go into standby mode automatically, much as you would schedule a Macintosh to go to sleep in the Energy Saver control panel. Options to turn off the monitor, spin down the hard disks, and put the entire PC in standby mode are available in the Control Panel → Power Management control panel.
Sorting Files
In Windows: Sorting Files
When you’re faced with a folder containing a large number of files, sorting the files makes it easier to find the one you want. For more information on sorting files in Desktop windows, see View Menu.
Details. Details view in Windows is much like the Mac’s list views; to sort files in a Details View window, click the name of the appropriate column at the top of the window. For instance, to sort the files alphabetically by name, click the Name column header, exactly as on the Macintosh. To reverse the direction of the sort, click the column header again.
You can also choose a sorting criterion from View → Arrange Icons, but clicking column headers is easier.
Large icons, small icons, or list. In the three Windows icon views, you can arrange the icons in four ways: by name, type, size, or modification date. Just choose the appropriate item from View → Arrange Icons, almost exactly as on the Macintosh. To clean up a poorly arranged window, choose View → Line Up Icons. And if you’re sick of lining up the icons, choose View → Arrange Icons → Auto Arrange, which works just like the Keep Arranged feature in Mac OS 8.5 and later.
Special Menu
In Windows: Contextual Menus, Start Menu
The Finder’s Special menu offers a grab-bag of commands related to the Trash, disks, and the Macintosh itself. The equivalent Windows commands are equally useful—if you can find them.
Empty Trash. Because the Windows Recycle Bin empties itself automatically when it becomes full, you don’t need to empty it yourself. If you prefer to do so, however, right-click the Recycle Bin; from the contextual menu, choose Empty Recycle Bin. For more information, see Trash.
Eject. In Windows, you can generally summon the Eject Disk command for particular disk—a Zip, floppy, or CD, for example—by right-clicking the disk icon itself (in the My Computer window). Most Windows users, however, don’t bother with such menu commands, preferring instead to simply press the physical eject button on the front panel of every kind of removable-disk drive. For more information, see Ejecting Disks.
Erase Disk. To reformat a disk in Windows, right-click its icon and then choose Format. For more information, see Erase Disk.
Sleep. To put a PC into standby mode (the equivalent of sleep on the Macintosh), choose Start → Suspend (Windows 95) or Start → Shut Down → Stand by (Windows 98). See Sleep for more information.
Restart. To restart a PC, choose Start → Shut Down → Restart. For details, see Restart.
Shut Down. To shut a PC down, choose Start → Shut Down → Shut down. For more information, see Shut Down.
Speech Control Panel
In Windows: None
Thanks to Apple’s MacinTalk speech synthesis technology, the Mac OS can read text out loud in a variety of voices. The most helpful use of this feature is the Talking Alerts option in the Speech control panel, which reads the text of dialog boxes aloud.
There’s no built-in speech synthesis technology in Windows.
Speech Recognition
In Windows: Speech Recognition
One happy discovery you may make as you move into the Windows world is the variety of speech-recognition software. Programs like ViaVoice (IBM), Naturally Speaking (Dragon Systems), and Voice Express (L&H) let you actually dictate to your computer. You wear a headset microphone; as you speak normally, at full speed, the software turns your spoken words into typed words.
Dragon Systems (http://www.dragonsys.com), one of the major companies in the speech recognition field, purchased Articulate Systems, and Power Secretary has disappeared. Dragon concentrates on its Windows program Naturally Speaking, which not only accepts dictation, it does so with continuous speech recognition, so you can speak, well, naturally.
Spring-Loaded Folders
In Windows: None
Spring-loaded folders, a feature of Mac OS 8 and later, are a great way of navigating quickly through a hierarchy of closed windows.
Windows has no equivalent to spring-loaded folders. If you’re seeking a faster way of navigating through closed folders in Windows, you should try the two-pane Explorer view (see Finder).
Startup Disk Control Panel
In Windows: None
Although a Macintosh can start up from any hard disk that contains a System Folder, you can use the Startup Disk control panel to specify which such disk you’d like to start up the Macintosh (if more than one is available).
Only a few PCs can start up from a disk other than the internal hard disk, so Windows offers no standard means of specifying a startup disk. Refer to your PC’s manual for information on how to go about specifying alternate boot disks, if such a thing is possible on your model. See Boot Disk for more information.
Startup Items Folder
In Windows: StartUp Folder
The Windows StartUp folder (in C:/Windows/Start Menu/Programs) is almost exactly the same as the Mac’s Startup Items folder: when you turn on the computer, any document, shortcut or program inside this folder is automatically launched. You can add items to or remove them from the StartUp folder in any of several ways.
The easy method. Follow these steps to add a file to the StartUp folder:
Find the icon for the program or document you want to put in your StartUp folder. There’s no need to make a shortcut—Windows will do so automatically.
Drag the icon to Start → Programs → StartUp. When you see a thick black line between items in the StartUp menu listing, release the mouse. This action may feel alien to you, because you can’t drag an icon into a menu on the Macintosh. Windows creates a shortcut to the icon in the StartUp folder. The next time you boot the PC, that file will open automatically.
Removing an item from the StartUp menu is similar, if equally unfamiliar for a Macintosh user:
Open Start → Programs → StartUp.
Drag an item in the StartUp menu to a new location, such as the Desktop. Once removed from the StartUp menu, the file won’t launch the next time you boot the PC.
The Macintosh-like method. If dragging icons in and out of menus feels too bizarre, follow the steps below to add and remove items from the StartUp folder just as you’d do it on the Macintosh:
Open C:/WindowsStart Menu/Programs/StartUp. As an alternate method of navigating from the My Computer window, right-click the Start menu, choose Open, open the Programs folder, then open the StartUp folder.
Drag icons into, or out of, the StartUp window to enable or disable them as startup items.
Stationery
In Windows: None
Via the Get Info window, you can turn any Macintosh document into a “stationery pad”—a special file that when double-clicked generates a new, untitled copy of the original file. Windows itself has no equivalent feature.
Stickies
In Windows: None
The Mac’s Stickies desk accessory lets you create and edit little pastel-colored Post-It-style notes on your Mac’s Desktop. There’s no equivalent built into Windows.
StuffIt
In Windows: Zip
The standard compression and archiving format on the Macintosh is StuffIt, a proprietary format created by Aladdin Systems. Although Windows PCs can create and open StuffIt archives (using the Aladdin DropStuff and Aladdin Expander utilities), the primary compression and archiving format in Windows is the Zip format. You can identify a Zip file by the letters .zip at the end of its name, just as the letters .sit identify a StuffIt file.
Because StuffIt is a proprietary format, most of the software available for working with StuffIt archives comes from Aladdin, whereas numerous companies produce utilities for working with Zip archives. The best-known companies in this field, along with Aladdin Systems, are PKWARE and Nico Mak Computing. You can download PKWARE’s PKZIP from http://www.pkware.com/ and Nico Mak’s WinZip from http://www.winzip.com/. Aladdin Expander and Aladdin DropStuff are available from http://www.aladdinsys.com/.
Expansion. Macintosh users using Windows will find comfort in using the free Aladdin Expander in Windows; it can expand both Zip files and many common Macintosh file formats. To expand a Zip file with Aladdin Expander, drag the file onto the Aladdin Expander icon. (Many people leave Aladdin Expander, or a shortcut to it, on the Desktop for this purpose.) Even easier: right-click the Zip file’s icon, and then choose Extract from the contextual menu.
The most popular shareware Windows Zip utilities, PKZIP from PKWARE and WinZip from Nico Mak Computing, work the same way.
Compression. To compress a file in Windows, consider the shareware Aladdin DropStuff, which can create either StuffIt or Zip files. You can drag the files onto the Aladdin DropStuff icon, just as you’d do on the Macintosh, or you can right-click the icons and then choose an appropriate action from the DropStuff menu.
PKZIP and WinZip resemble the full-featured StuffIt Deluxe on the Macintosh—they not only create Zip archives, but also let you add files to and remove files from those archives. Because they’re shareware applications, you’re free to try both before choosing one.
If you decide to try multiple applications to work with Zip archives, be aware that since Windows assigns file types by filename extension, the different utilities may fight over the right to “own” the .zip filename extension.
System Folder
In Windows: Windows Folder
The most important folder on the Macintosh is the System Folder, which holds all the files the Mac OS needs to make your Macintosh work. In Windows, the equivalent folder is the Windows folder, which sits right in your main hard disk window.
The Windows folder contains hundreds of cryptically named files and folders, and there’s no way to identify each one. Don’t feel bad—most Windows users can’t tell you what those files and folders are, either. In other words, your PC will run best if you avoid deleting, moving, or renaming any of these files.
On the other hand, a number of folders within the Windows folder are worth knowing about. See Table 19-2 for details.
Folder | Contents |
Command | Contains DOS programs that are still useful on PCs running Windows. |
Cookies | Stores cookies created on your PC by web sites you’ve visited. |
Cursors | Holds standard and optional cursor graphics. |
Desktop | Files and folders that appear on the Desktop are actually stored in this folder, exactly the way the Macintosh stores Desktop icons in the invisible Desktop folder. See Desktop. |
Favorites | Stores your web pages and folders. See Favorites Menu. |
Fonts | Contains fonts, just as on the Macintosh. See Fonts. |
Help | Stores help files used by Windows, just as on the Macintosh. See Help. |
History | Contains shortcuts to web pages you’ve visited recently. |
Options | May contain .cab files (archive files for the Windows installer). They’re stored here so that the Windows CD-ROM isn’t necessary when you want to add and remove parts of Windows. |
Recent | Holds shortcuts to recently used documents, which Windows displays in the Start → Documents menu. Equivalent to the Recent Documents folder on the Macintosh. |
Sendto | Contains shortcuts and folders that appear in the Send To menu. |
Start Menu | Shortcuts and folders here appear in the Start menu; see Apple Menu. |
Start Menu → Programs | Contains shortcuts and folders found in the Start → Programs menu. |
Start Menu → Programs → StartUp | Shortcuts or other files here open automatically when Windows boots. Equivalent to the Mac’s Startup Items folder. |
System | Contains a vast number of important drivers and other system files. Roughly equivalent to the Mac’s Extensions folder or its System suitcase. |
Web | Stores files related to the Active Desktop and channels. |