Chapter 23. W
Web Sharing Control Panel
In Windows: Personal Web Server
The Web Sharing control panel, included with Mac OS 8 and later, lets any Macintosh become a low-volume web server. Windows’s Personal Web Server software is similar. It’s not part of a standard installation, but it’s on the Windows 98 CD-ROM (and with Internet Explorer 4.0 when installed on Windows 95).
To install Personal Web Server, follow these steps (note that you can’t install Personal Web Server from Control Panel → Add/Remove Programs → Windows Setup → Internet Tools):
Insert the Windows 98 CD-ROM.
Choose Start → Run.
Type
x:\add-ons\pws\setup.exein the dialog box (wherexis the letter of your CD-ROM drive), and then click OK. (To find out the letter of your CD-ROM drive, double-click the My Computer icon; you’ll see an icon, with the appropriate letter identified, representing the CD-ROM drive.)Follow the directions in the Personal Web Server Setup program, making sure to note the folder where you place HTML files to be served.
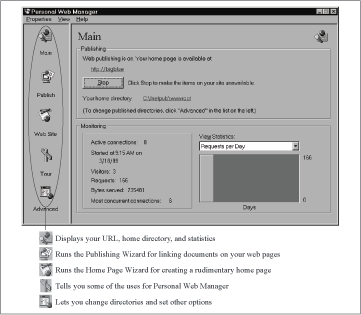
Once you’ve installed Personal Web Server, open Start → Programs → Internet Explorer → Personal Web Server → Personal Web Manager to configure your web server. Five icons down the left side provide access to the Personal Web Server’s options (see Figure 23-1).
Of these different sections, the Main icon corresponds most directly to the Mac’s Web Sharing control panel. It provides a Start/Stop button, tells you the address of your web site, and lists your shared folder. You’re also shown the current number of connections and basic access statistics.
The Publish and Web Site icons provide access to wizards that walk you through putting basic content on your web site. The Web Site icons leads to the Home Page wizard, which, after you’ve answered a few questions, creates a rudimentary home page. The Publish icon leads to the Publishing Wizard, which lets you put links to your documents on your home page. You’ll also find the Tour icon, which suggests different ways you can use Personal Web Server.
Instead of using the Publishing Wizard, you may prefer to drop your finished web page documents onto the Publish icon that Personal Web Server puts on your Desktop. When you do so, Personal Web Manager runs, filling in the necessary information in the Publishing Wizard for you.
Finally, the Advanced icon lets you change folders, identify default documents, save activity logs, and turn on directory browsing, which is akin to the Macintosh Web Sharing control panel’s Personal NetFinder feature.
In the Mac’s Web Sharing control panel, you can control who has access to which web pages by setting up accounts in the Users & Groups control panel. But Personal Web Server offers no such security.
Web Sites for Windows Software and Information
In Windows: Web Sites for Macintosh Software and Information
The Web is full of useful Windows software and information; here are some of the best sites.
MacWindows. The MacWindows web site is the most appropriate for readers of this book, because it focuses on information of interest to people using both Macs and Windows-based PCs—or switching from one platform to another. See http://www.macwindows.com/.
Microsoft Support Center. If you’re having trouble with Windows or another Microsoft product, your first stop should be Microsoft’s online support resources. Especially useful are the online troubleshooters and Microsoft’s support newsgroups, where you can post questions and read answers. See http://support.microsoft.com/.
PCWin Resource Center. The PCWin Resource Center offers downloadable freeware and shareware files, plus tips and tricks, a discussion area covering networking and hardware issues, and—in case you didn’t think Windows programmers had a sense of humor—a list of Easter Eggs. See http://pcwin.com/.
Stroud’s Consummate Winsock Applications. If you need an Internet-related program for Windows, check out Stroud’s Consummate Winsock Applications list. This web site features nothing but Internet utilities, making it easy to navigate. See http://cws.internet.com/home.html.
Windows FAQ. FAQ stands for Frequently Asked Questions; this site collects those questions and provides answers. It may take some time to find the section that matches your question, but it’s worth looking. See http://www.orca.bc.ca/win95/.
Windows 95 Annoyances. Windows Annoyances, which is both a book from O’Reilly and a web site, offers information on how to cope with Windows, ways of customizing the operating system, dealing with networking, and more. As a Macintosh user in a Windows world, you’re probably having no difficulty finding annoyances about Windows; this web site can help you work around them. See http://www.annoyances.org/win95/.
WinFiles.com. WinFiles.com provides explanations, software, and information about Microsoft Windows. WinFiles.com is especially useful if you’re looking for a freeware or shareware utility. See http://www.winfiles.com/.
Windows
In Windows: Windows
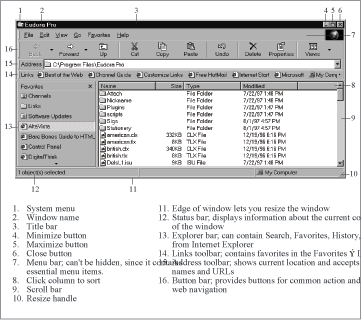
Mac OS windows are relatively Spartan, concentrating on what’s in the window. In Windows, particularly in the Desktop windows of Windows 98 however, you can choose to view all sorts of window dressing (see Figure 23-2) by choosing items from the View menu (alternatively, right-click the window’s menu bar to add or remove toolbars).
You can find extensive information on manipulating and understanding Windows windows in the sections List Views, Collapsing Windows, Zooming Windows, Title Bar, Resizing Windows, and View Menu. In the meantime, here’s a crash course on windows in Windows:
Move a window by dragging its title bar, exactly as on the Macintosh.
Close a window by clicking the X in the upper-right corner.
Resize the window by dragging the lower-right corner—or enlarge it only vertically or only horizontally by dragging the thin gray window edge.
You can maximize a window, making its edges expand until they merge with the edges of the screen, by clicking the middle icon of the three in the upper-right corner. To turn it back into a free-floating rectangle, click the same button again (even though the button has changed shape).
You can hide the window by clicking the leftmost of the three icons in the upper-right corner. Doing so is called minimizing the window—in effect, the window collapses into a single icon on the Taskbar at the bottom edge of your screen. Click that icon again to restore the window to full size.
Use the View menu in a Desktop window to do the same kinds of things you would do on the Macintosh—change to a list view (called Details View in Windows), icon view, and so on.