Chapter 26. B
Backspace Key
On the Macintosh: Delete Key
The Backspace key is near and dear to the hearts of editors everywhere. Standard keyboards from Apple call the same key “Delete.”
In Mac OS 8 and later, the Delete key has one additional function that’s extremely welcome. You can move files to the Trash by selecting their icons and then pressing Command-Delete. Doing so is exactly the same as selecting a file in Windows and pressing Delete. On the other hand, there’s no way on the Macintosh to delete a file completely without sending it to the Trash first (Shift-Delete in Windows).
Background
On the Macintosh: General Control Panel, Desktop Patterns Control Panel, Desktop Pictures Control Panel, Appearance Control Panel
In Windows, you can change the appearance of your Desktop background by applying either a graphics file (wallpaper) or a pattern to it. You can do the same in the Mac OS as well, although they’ve moved around over different versions of the operating system.
In versions of the Mac OS prior to System 7.5, the General Controls control panel (Apple menu → Control Panels → General Controls) let you switch between a number of built-in Desktop patterns.
With System 7.5 and 7.6, Apple included the Desktop Patterns control panel (accessible from Apple menu → Control Panels → Desktop Patterns) to let you switch between different Desktop patterns.
Mac OS 8.0 and 8.1 featured the Desktop Pictures control panel, described later in this entry, which let you apply both patterns and pictures to your Desktop. Desktop Pictures is located in Apple menu → Control Panels → Desktop Pictures.
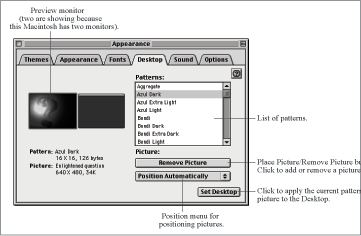
In Mac OS 8.5, Apple incorporated the Desktop Pictures control panel into the Appearance control panel, accessible from Apple menu → Control Panels → Appearance → Desktop (see Figure 26-1). It works the same way as Desktop Pictures.
To apply a pattern to your Desktop, follow these steps:
Open Apple menu → Control Panel → Appearance → Desktop.
Select a pattern from the Patterns list.
Click Set Desktop.
Applying a picture to the Desktop is slightly more complicated. Apple included some sample pictures in Macintosh HD → System Folder → Appearance → Desktop Pictures, but you can use any picture you like if it’s in the GIF, JPEG, Photoshop, or the Macintosh-only PICT file format.
Open Apple menu → Control Panel → Appearance → Desktop.
Click Place Picture, then find the desired picture on your hard disk. Alternatively, from the Finder, drag the picture file’s icon into the preview monitor in the Appearance control panel.
If you wish, choose a position from the Position menu under the Place Picture button.
Click Set Desktop.
Batch Language
On the Macintosh: AppleScript
Many Windows users, particularly those who grew up using DOS, know that you can create collections of commands called batch files. Although batch files are primarily used to automate what you could do manually from the DOS command line, a variety of other commands in the batch language provide looping, conditionals, and other programming constructs. Batch files aren’t important or heavily used in Windows, but they can still prove useful on occasion for automated processes. In Windows 98, Microsoft introduced the Windows Scripting Host, which lets you write and execute scripts written in a variety of scripting languages, including Microsoft’s VBScript and JScript, along with JavaScript, Perl, PerlScript, Python, and TCL.
The Macintosh has no command-line underpinnings, so a batch language per se has no meaning in the Macintosh world. Instead, you can use AppleScript to control many Macintosh applications, including the Finder. AppleScript is a full-featured scripting language, and those who know it well can make it do impressive things, ranging from automating desktop publishing layout production to creating scripts that enhance web servers.
If you want to write a script, it’s most easily done in a simple program that comes with the Mac OS called Script Editor. More capable AppleScript editors are available from third parties.
Scripts can be saved in several different formats, which is useful to know because other people may send you scripts. Scripts might be text files, compiled scripts, applications, or run-only applications. Double-clicking text files and compiled scripts opens them in Script Editor, where you can edit the AppleScript code and run the script by clicking the Run button. Applications and run-only applications act like any other applications on the Macintosh; the only difference between them is that Script Editor can open and edit applications, but not run-only applications.
You can extend AppleScript’s capabilities with files called scripting additions (they’re also sometimes informally referred to as “osaxen”). Scripting additions belong in System Folder → Scripting Additions.
The Mac OS comes with a number of useful sample scripts—you’ll find them in Apple menu → Automated Tasks.
BinHex
On the Macintosh: BinHex
You may be a bit perplexed when receiving email attachments on the Macintosh in BinHex format, or when trying to download software from the Internet for the Macintosh in BinHex format, since BinHex isn’t commonly used in Windows.
BinHex is a bit of an anomaly on the Macintosh—it’s both a binary packaging format that lumps the two Macintosh file forks together and a transfer encoding format that converts the resultant 8-bit file into 7-bit ASCII text for transmission via email or downloading from FTP or web sites. Unfortunately, as with all transfer encoding formats, the file size grows when encoded.
Most Macintosh files downloadable from the Internet are stored in BinHex format still, even though it’s no longer the necessity it once was. The reasons are mostly historical, although some people on the Internet are still using older programs or hardware devices that can’t handle 8-bit communications. In cases where 8-bit data paths are guaranteed, MacBinary is more efficient, since it solves the multiple fork problem without increasing the file size.
You can identify BinHex files by their filename extension of .hqx. You should need to create a BinHex file only if you’re planning to upload a file; email programs encode attachments in BinHex format automatically. Similarly, email programs decode binhexed attachments automatically, but not all Macintosh web browsers and FTP programs do; you may need to decode the file by using a utility like Aladdin’s StuffIt Expander (see Zip). Aladdin also makes the shareware program DropStuff and the commercial StuffIt Deluxe, both of which can create BinHex files.
Some, but not all, Windows email programs can encode and decode BinHex files. If you find yourself with a binhexed file, to decode it you’ll need StuffIt Expander from Aladdin Systems. You can download it from http://www.aladdinsys.com/.
For more information, see Transferring Files to the Macintosh.
BIOS
On the Macintosh: ROM or ROM File
The Macintosh has no exact equivalent to the tiny, hardware-based kernel of Windows boot-up information known as the BIOS (Basic Input Output System). The Mac’s much larger, more complete ROM file (found in the System Folder of iMacs and other modern models) or the ROM chip (on older Macs) performs similar under-the-hood functions, such as providing the fundamental bootstrap code necessary for the computer to turn on before its actual operating system software loads. But you can’t edit the Mac’s ROM files, and the Macintosh ROM constitutes far more of an OS component than the BIOS code on a PC.
Bitmap (.bmp) Files
On the Macintosh: PICT Files
A bitmapped graphic, often created by what are called paint programs, is an image composed of a specific arrangement of dots; you can edit the image only by adding or removing dots. In contrast, object-oriented images (created by drawing programs) contain objects, such as squares and circles, which you can edit as discrete objects.
More to the point, in Windows, bitmap is a specific graphic file format, typically signified by a filename with a .bmp extension. The comparable Macintosh format is PICT, which can be composed of either bitmapped or object-oriented graphics. The principal uses for PICT files are as screen captures and file icons.
Note
Although PICT files are the Mac’s main graphics file format, they’re not well suited to desktop publishing. Professional printing equipment frequently chokes on such graphics—whenever possible, save your graphics files in such cross-platform file formats as TIFF. Be careful when working with images if you care about the file format, since copying an image generally copies it as a PICT, which may not be what you expected.
Boot Disk
On the Macintosh: Boot Disk
Most PC users are accustomed to being able to boot a PC only from an A: floppy disk or C: hard disk drive, although many recent PCs support booting from alternate drives in the BIOS.
On the Macintosh, any disk can boot the computer if it contains a valid System Folder. This capability is tremendously handy for troubleshooting, since you can use any hard disk, CD-ROM, or removable disk to boot a Macintosh.
The order in which the Macintosh checks to see which disk to use can be helpful to know:
If there is a floppy disk containing a System Folder in the floppy drive, the Macintosh boots from the disk. Remember that Macs automatically eject floppies when you choose Special → Restart, so you may have to insert the floppy disk again if it was in before restarting.
If you hold down the C key on most modern Macs, the Macintosh boots from the internal CD-ROM drive, again assuming a CD with a System Folder (such as the system CD that comes with every Macintosh) is in the drive.
If you aren’t holding down the C key, the Macintosh looks for the hard disk (or partition) selected in the Startup Items control panel. If that hard disk includes a System Folder, the Macintosh boots from it.
If the hard disk (or partition) selected in the Startup Items control panel lacks a System Folder, the Macintosh continues to look for another hard disk or partition from which to boot. If the Macintosh can’t find any valid boot disk, it flashes a question-mark icon on the screen until you insert a disk containing a System Folder.
Briefcase
On the Macintosh: PowerBook File Assistant, File Synchronization
Working with multiple computers—such as a laptop and your desktop PC—raises the thorny issue of tracking different versions of the same file on different computers. The obvious solution is to copy files to the laptop before a trip, and back to the desktop on return. Unfortunately, if you’re not careful, you could end up with modifications in both copies of a file.
Microsoft addressed this problem with the Briefcase in Windows, which lets you carry files between computers and synchronize them when you return. The Mac’s File Synchronization program (formerly known as PowerBook File Assistant) performs roughly the same function.
Note
Although File Synchronization works fine on desktop Macs as well as PowerBooks, your system installer doesn’t install it by default unless you have a PowerBook. To install File Synchronization onto a desktop computer, perform a custom installation of Mac OS 8.5 and select File Synchronization from the list of Control Panels.
File Synchronization is simpler to understand than the Windows Briefcase. You simply identify pairs of folders—one on the laptop, one on the desktop, for example—to synchronize. When you ask it to perform a synchronization, File Synchronization compares the modification dates of all the files in the synchronization pairs and copies files back and forth as necessary.
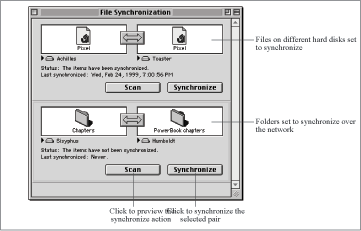
To synchronize two folders (which don’t have to have the same name), follow these steps.
Open Apple menu → Control Panels → File Synchronization.
In the Finder, drag the source folder into one side of the file pair (see Figure 26-2) and the destination folder into the other side.
Then, if you want changes made in either folder to be reflected in the other, make sure the arrow pointing between the two is double-headed. Otherwise, if you only want changes in one folder to be reflected in the other, click the arrow until it points from the source to the destination.
When you’re ready, click the Scan button to see what File Synchronization plans to do, or click the Synchronize button to synchronize the files without prior verification.
Synchronizing a pair of files requires exactly the same steps, but when selecting a source and destination, the files must have the same name.
Once you’ve become comfortable with what File Synchronization does, you may want to set certain file or folder pairs to automatic synchronization (select the pair, then choose Synchronize → Automatic). That way, whenever you open File Synchronization, it will synchronize that pair without your intervention. For even more automation, consider putting an alias to File Synchronization in your Startup Items folder so it runs at startup. Then, when you insert a disk or mount a server that contains half of a synchronization pair, the synchronization happens immediately.
Button
On the Macintosh: Button
Along with menus, buttons are one of the most common elements of a graphical user interface. Buttons are generally rectangular in Windows and rounded rectangles on the Macintosh.
As in Windows, when a button has an outline around it (heavier and darker in Macintosh dialog boxes), it’s the default button—press Return or Enter to “click” it. You can also trigger a Macintosh Cancel button from the keyboard—press the Esc key or Command-period.
If you’re used to Windows, where you can trigger any button in any dialog box from the keyboard, you may be disappointed on the Macintosh. Only a few programs—notably those from Microsoft and the former Claris—offer the ability to “click” buttons with keystrokes.