Chapter 28. D
Date/Time Control Panel
On the Macintosh: Date & Time Control Panel
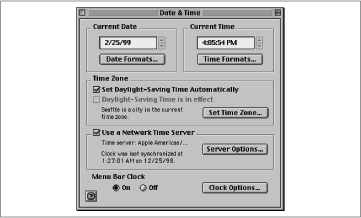
The Windows Date/Time control panel lets you set your date, time, and time zone. You can do all that and more in the Macintosh Date & Time control panel (Apple menu → Control Panels → Date & Time).
The Date Formats and Time Formats buttons let you modify the way the Macintosh displays dates and times; in Windows, these settings are in the Regional Settings control panel.
Both Windows and Mac OS 8.5 (or later) can automatically adjust your computer’s clock for daylight savings time (see Figure 28-1). In all previous versions of the Mac OS, you must check a Daylight Savings Time checkbox to make the Mac OS adjust the time.
Another welcome feature that appeared in Mac OS 8.5’s Date & Time control panel is time synchronization over the Internet. Few computer clocks are completely accurate on their own; and by leaving this setting on, you can be sure that the Mac’s clock is always accurate to within fractions of a second.
Finally, you can turn the menu bar clock on and off from the Date & Time control panel, set a wide variety of clock options, including display format, chimes, and font settings.
Delete Key
On the Macintosh: Del Key
The Delete key on PC keyboards is generally grouped with the Insert, Home, End, Page Up, and Page Down keys. On most Macintosh keyboards, the same key is labeled Del, and it’s usually called the “forward delete key.” (The modern Apple keyboard, such as the one provided with the iMac, iBook, and Power Macintosh series, don’t have this key at all—a good argument, among power users, for buying a replacement USB keyboard.)
Unlike the Mac’s Delete key and the Backspace key in Windows, which delete the character to the left of the insertion point, the Del key deletes the character to the right—thus the “forward” delete. (When you’re using a graphics or layout program, on the other hand, the Del and Delete keys behave identically, deleting the selected object.)
Deleting Files
On the Macintosh: Deleting Files
The most basic method of deleting files and folders on the Macintosh is the same as in Windows—just drag them to the Trash. However, you can delete items on the Macintosh in several additional ways, though not as many as in Windows. For a full list, see Recycle Bin.
Desktop
On the Macintosh: Desktop
The desktop metaphor in Windows was one of the most significant moves toward the Macintosh style of working. Like the Windows Desktop, the Macintosh Desktop is, behind the scenes, actually a folder that contains files and other folders that appear on the backdrop, the Desktop, when you first turn on the computer. Anything you’d do on the Windows Desktop is likely to work on the Macintosh Desktop: renaming files, opening folders, dragging icons, and so on.
The Macintosh Desktop displays icons for all the accessible disks, the Trash, available printers (in Mac OS 8 and later), and any other items you might have dragged or saved to the Desktop. In new installations of the Mac OS, a variety of additional icons—mostly aliases that you can delete if you wish—are on the Desktop by default.
Here are the differences between the Windows and Macintosh Desktops:
The Windows Desktop holds files and folders only from the C: drive, whereas every Macintosh disk has its own invisible Desktop Folder. So, if you drag a file from a floppy disk window to the Macintosh Desktop, it remains on the floppy disk but appears on the Desktop.
Windows printer icons appear in My Computer → Printers, whereas Mac OS 8 Desktop Printer icons appear on the Desktop.
In Windows, the Network Neighborhood icon shows up on the Desktop; in Mac OS 8.5 and later, the equivalent Network Browser is in Apple menu → Network Browser. In earlier versions of the Mac OS, the Chooser (Apple menu → Chooser) is the only way to find servers on the network.
In contrast to Windows, where it can be difficult to remove some items from the Desktop without using the TweakUI control panel, only two kinds of icons must remain on the Macintosh Desktop: disk icons and the Trash. To remove an icon from the Macintosh Desktop, drag it to the Trash or to another folder.
The Macintosh Desktop has only one feature that’s even vaguely similar to the web browser-like Active Desktop in Windows: Button view, where a single click, not a double-click, opens any icon. (To turn on button view in any window or the Desktop itself, choose View → as Buttons.)
Note
If you find yourself seated at a Macintosh whose Desktop appears in Button view, you may wonder how you’re supposed to move or copy Desktop icons. After all, clicking one opens it, so dragging is out of the question.
Solution: drag the file by its name, not by its icon.
The Finder Desktop versus Windows Desktop. The most significant difference between the Windows and Macintosh Desktops, however, is that the Macintosh Desktop “belongs” to the Finder, along with all other Finder windows. So, when you switch into the Finder (by clicking any visible Desktop area, for example), all Finder windows appear over whatever other application windows you have open.
Note
Some people, particularly novices, occasionally click the Macintosh Desktop by accident while working in another program—and are then confused by the sudden disappearance of the application windows, which are now concealed by Finder Desktop windows. If that syndrome affects you, uncheck “Show Desktop when in background” in the General Controls control panel; from now on, wayward clicks can’t take you out of the current application—the Application menu, or the Quit command, is your only way out.
The fact that Finder windows appear over other windows when you click the Desktop exemplifies the different way the Macintosh and Windows handle tasks. In Windows, every window is a separate task that appears separately on the Taskbar. On the Macintosh, though, every application is a separate task that appears in the Application menu. Windows belonging to those applications are not separate tasks, and thus appear or disappear all at once.
For whatever reason, perhaps the differences in the way tasks are handled between Windows and the Macintosh, Windows users seem not to use the Desktop much. In contrast, Macintosh users often use the Desktop as a temporary storage spot for active documents, filing them when the project is done. Since you can drag-and-drop Macintosh document icons onto Desktop application icons, just as in Windows, many Macintosh fans also store aliases to their most frequently used programs on the Desktop for quick access.
Changing the Desktop pattern or picture. For information about changing the Macintosh Desktop’s background, see Background.
Details view. If you’re a fan of Details view in Windows, in which files are listed in a folder window database-style, with columns indicating each file’s size, modification date, and so on, you’ll feel right at home on the Macintosh. Choose View → as List in any Macintosh window to create the identical effect.
In Mac OS 8.5 and later, you can perform all the usual stunts in this view—click a column’s name to sort the list by that criterion, drag the column dividers to make columns wider or narrower, and so on. (Note how cleverly the Date column rewrites itself as you shrink its space—first the Macintosh abbreviates, then eliminates the day of the week; as the column gets narrower, the dates are written in a shorter format [7/2/99]; and finally, the modification time is eliminated from the column display.)
In fact, the Macintosh even lets you rearrange the columns by dragging their names horizontally. (The Name column must always be the first column, however.)
Dialog Boxes
On the Macintosh: Dialog Boxes
In Windows, you’re used to seeing dialog boxes in a wide variety of situations: changing settings, opening documents, printing, and so on. The Mac OS uses dialog boxes for similar tasks, but there are differences which you may find either confusing or helpful.
Modality. The Macintosh has two types of dialog boxes. First, there’s the application modal type, which lets you work in other applications before closing the dialog box; this kind of box generally has a title bar, which you can drag to move the window. System modal dialog boxes, on the other hand, must be dismissed before you can return to work. (The Print and Save dialog boxes take this form.) These usually lack a title bar and can’t be moved; if you click anywhere outside of such a window, the Macintosh rewards you with only a beep.
Most Windows dialog boxes, on the other hand, are application modal. Windows has only a few system modal dialog boxes, such as the Shut Down dialog box, which prevent you from doing anything else until you’ve closed the dialog box.
Dialog box title bar controls. Windows dialog boxes have two standard controls in their title bars—a help button and a close button. Clicking the help button provides a pop-up window of information about the next thing you click in the dialog box, and clicking the close button is the same as clicking a Cancel button.
Macintosh dialog boxes lack these controls. You close a Macintosh dialog box by clicking OK or Cancel, and (in most Macintosh programs) you get help by choosing Help → Show Balloons and pointing at different items in the dialog box. See Help for more information.
Tabbed dialog boxes. Many Windows dialog boxes use tabs to separate different panels in a dialog box. (Examples include most Windows control panels, including Display and Accessibility Options.) That interface convention is becoming more common on the Macintosh as well, but it’s not universal. In its place, Macintosh dialog boxes often feature a scrolling list of icons; click an icon to display the panel associated with it. Other dialog boxes let you change dialog box panels from a pop-up menu.
Dialog box buttons and keyboard shortcuts. In many Windows dialog boxes, an Apply button saves the changes you’ve made without closing the dialog box, as clicking OK would do. Settings dialog boxes on the Macintosh seldom have an Apply button (except for some Microsoft programs), so you must click OK to save your changes and close the dialog box.
As in Windows, pressing Return or Enter in a Macintosh dialog box is the same as clicking the default button. Also as in Windows, you can usually press Esc (or Command-Period) as the equivalent of clicking Cancel. See Button for more detail on keyboard operation of dialog-box elements.
Dial-Up Networking Folder
On the Macintosh: PPP Control Panel, Remote Access Control Panel
The Dial-Up Networking folder in Windows contains a wizard that helps you create new connections for dialing up Internet servers, connecting two computers via Direct Cable Connection, and more. Dial-Up Networking requires the appropriate configuration in the Network control panel—for instance, if you want to connect to an Internet service provider using Dial-Up Networking, your TCP/IP settings in the Network control panel must be correct. The situation is relatively similar on the Macintosh, though the details are different.
On the Macintosh, you use the Remote Access control panel (Mac OS 8.5 and later) or the PPP control panel (Mac OS 8.0 and 8.1) to enter the settings for an Internet service provider. And exactly as in Dial-Up Networking, you must configure various other control panels for connections to work. See Network Control Panel for instructions on configuring the Mac’s TCP/IP control panel to provide an Internet connection. This is necessary before continuing with the Remote Access control panel.
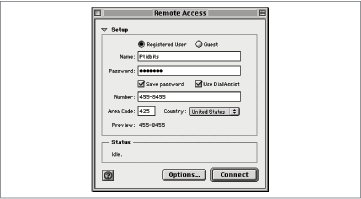
Configuring a connection. Configuring the Remote Access control panel (or the older PPP control panel) is easy. You enter your username, password and the telephone number to dial, and decide whether you want the software to save your password (see Figure 28-2). Click the Options button to view a tabbed dialog box that offers some optional settings—none are essential.
From the Remote Access menu, you can open the various other control panels that you might need to configure for a connection, including AppleTalk (necessary for an Apple Remote Access connection), Dial-Assist (useful if you’re using a calling card), Modem (necessary no matter what), and TCP/IP (essential if you’re calling an Internet service provider).
Just as with Dial-Up Networking, you can create and switch between multiple configurations, which is handy if you use different ISPs at home and work, or when you travel. Follow these steps:
In Remote Access, choose File → Configurations (Command-K).
With Default selected, click Duplicate, then give the new configuration a new name.
Click Make Active to switch to that configuration and close the Configurations dialog box.
Make appropriate changes to the settings, then close the Remote Access window, saving changes when it prompts you to do so.
Using Remote Access. Once configured, you open and close connections in one of two ways:
You can open the Remote Access control panel, switch to the correct configuration (if you have more than one) using File → Configurations, then click the Connect button. When connected, the Connect button changes to Disconnect.
If you have multiple configurations, the easiest way to switch among them is to use the Remote Access menu (see Figure 28-3) on the Control Strip (for more information, see Tray). This same menu lets you connect or disconnect without having to open a control panel.
Note
Suppose each of your multiple Internet configurations requires different network settings. (That might be the case if, for example, your PowerBook connects to an Ethernet network at work, but a modem at home.) In such a situation, consider using the Location Manager control panel (Apple menu → Control Panels → Location Manager). It lets you create configurations for different locations, each with different network settings, Internet phone numbers, and so on.
Thereafter, you can use the Location Manager menu on the Control Strip to switch quickly among them without even restarting the computer. Doing so is much easier than flipping between configurations in several different control panels before dialing out. For more information, see User Profiles.
Direct Cable Connection
On the Macintosh: LocalTalk, Ethernet, File Sharing Control Panel
The Windows Direct Cable Connection utility is useful for connecting two PCs that can’t easily be networked in any other way. That’s seldom a problem on the Macintosh, since every Macintosh has a LocalTalk (printer) port, Ethernet port, or both. Local-Talk and Ethernet, with the Mac OS’s built-in file sharing software, are the preferred methods of connecting two Macs for sharing files and other network resources.
Connecting Macs via LocalTalk. To connect two Macs via LocalTalk, you need a pair of PhoneNet adapters, which are inexpensively available from any mail order or online retailer. You use standard telephone cable to connect the two PhoneNet adapters. Once you have the necessary hardware, follow these steps:

Plug one PhoneNet adapter into each Mac’s printer port.
Connect the adapters with the telephone cable.
Each adapter has two telephone-style jacks. Fill the empty one on each adapter with the terminator plug provided in each adapter package.
On one Macintosh, open the Apple-Talk control panel. Make sure it says Printer port (or, on older PowerBook models, Modem/Printer port). Close the control panel and save changes, turning on AppleTalk if you’re prompted to do so.
On the same Macintosh, use the File Sharing control panel to turn file sharing on. For more information, see File Sharing and Printer Sharing. Close the window and save changes.
On the other Macintosh, open the Chooser (Apple menu → Chooser), click the AppleShare icon, and then double-click the name of the server (the first Macintosh). If you’re running Mac OS 8.5 or later, you can instead use the Network Browser, which works more like the Network Neighborhood in Windows.
Log in using the owner name and password of the first Macintosh (which you set either in Apple menu → Control Panels → File Sharing in Mac OS 8.5 and later, or in Apple menu → Control Panels → Sharing Setup for earlier versions of the Mac OS). An icon representing the first Mac’s hard disk appears on the Desktop.
There’s no reason to use LocalTalk networking to connect modern Macs, since iMacs, blue power Macintosh G3 models, and 1999-and-later PowerBooks don’t even have the necessary printer port. These modern models should be connected with Ethernet, described later in this section.
If you must add a modern Macintosh to a network of older Macs that don’t have Ethernet jacks, however, an adapter like the Farallon iPrint LT will bail you out. It plugs into a USB ports and provides a standard older-Macintosh printer port, which can then accept your standard PhoneNet adapter. For information, visit http://www.farallon.com/.
Connecting Macs via Ethernet. All current Macs, and many older models, have built-in Ethernet jacks. That’s fortunate, since Ethernet is many times faster than LocalTalk.
You set up an Ethernet network among Macs exactly as you would among Windows PCs—by buying an Ethernet hub, connecting it to the computers, and so on. But for quick connection between two Ethernet-equipped Macs (á là Direct Cable Connection), you can use an inexpensive Ethernet crossover cable instead. (Such a cable is available for about $10 from computer superstores or mail order outfits.) Once you have the crossover cable, follow these steps:
Connect the crossover cable from one Mac’s Ethernet port to the other’s.
Open Apple menu → Control Panels → AppleTalk.
From the pop-up “Connect via” menu, choose Ethernet. Close the control panel and save changes.
On one Macintosh, use the File Sharing control panel to turn file sharing on. For more information, see File Sharing and Printer Sharing.
On the other Macintosh, open the Chooser (Apple menu → Chooser), click the AppleShare icon, and then double-click the name of the server (the first Macintosh). If you’re running Mac OS 8.5 or later, you can instead use the Network Browser, which works more like the Network Neighborhood in Windows.
Log in using the owner name and password of the first Macintosh (which you set either in Apple menu → Control Panels → File Sharing in Mac OS 8.5, or in Apple menu → Control Panels → Sharing Setup for earlier versions of the Mac OS). An icon representing the first Mac’s hard disk appears on the Desktop.
For more information about iMac connections, read the article at http://db.tidbits.com/getbits.acgi?tbart=05085.
Directories
On the Macintosh: Folders
This terminology issue is a “tomato/tomahto” problem: in Windows, people call the file-folder icon a directory; on the Macintosh, the identical entity is called a folder. They’re one and the same.
For more information about what you can do with directories, see Folders.
Disk Defragmenter
On the Macintosh: Third-Party Utilities
Windows’s Disk Defragmenter utility program defragments your hard disk, moving the portions of files that are scattered around the disk into contiguous chunks.
Disk defragmentation programs are available for the Macintosh, but Apple has never bundled one with the Mac OS. In part, that may be because disk defragmentation isn’t as much a performance problem as it used to be when hard disks were much slower. In addition, you can easily defragment a Macintosh hard disk the homemade way: back up your entire hard disk, reinitialize it with Drive Setup, and restore your files.
Most people never defragment their hard disks, since the almost imperceptible performance gain doesn’t seem worth the time for the risk of having a program touch every file on your hard disk. If you want to defragment your hard disk, however, consider the following Macintosh utilities:
Norton Utilities for Macintosh (Symantec): http://www.symantec.com/
DiskExpress Pro and PlusOptimizer (Alsoft): http://www.alsoft.com/
Disk Space
On the Macintosh: Window Info Strip, Get Info
To find out how much space is available on a Macintosh disk, open its window (or open any folder on that disk). The information strip just below the title bar shows exactly how much space is available.
The info strip, however, doesn’t tell you how big a disk is, nor how much is in the disk already. To find that out, highlight the disk’s icon. Choose File → Get Info. The resulting window shows the disk’s capacity, as well as how much data is on the disk (and how much is available).
Disks
On the Macintosh: None
The Macintosh has no equivalent of the My Computer window, where icons for all your disk drives appear. In fact, the Macintosh doesn’t display permanent icons for your disk drives at all.
Instead, icons appear on the right side of the Desktop screen only when a disk—floppy, Zip, CD-ROM, or whatever—is actually inserted into the machine. (If you insert a disk and no corresponding icon appears, then the Macintosh lacks the necessary software to read it. You may be inserting a Windows floppy disk on a Macintosh lacking the File Exchange control panel, a CD-ROM when the Mac’s CD-ROM extensions are turned off, or a Zip disk when the Iomega software hasn’t been installed.)
Ejecting disks. Ejecting disks is different on a Macintosh, too. You’ll quickly discover that pushing the eject button on a Macintosh disk drive accomplishes nothing at all—a safety feature designed to protect the unwary from ejecting a disk while it’s being accessed. Instead, you must eject a disk by highlighting its icon on the screen, and then performing one of these steps:
Drag the disk icon to the Trash. Alarming as this may feel it first, this action doesn’t actually trash the disk—ejecting it instead.
Choose Special → Eject Disk (in Mac OS 8.5 and later).
Choose File → Put Away (in earlier Mac OS versions).
Control-click the icon and choose Eject from the contextual pop-up menu that appears (Mac OS 8.5 and later).
Erasing disks. To erase a disk, highlight its icon on the screen and then choose Special → Erase Disk. If you have the File Exchange control panel installed, and you’re erasing a floppy disk, you’ll be asked whether you want the disk formatted for Macintosh or DOS (Windows). See Formatting Disks for more information.
Renaming disks. You can rename a Macintosh disk just as you’d rename any file: Click once on its name, and then type away. If this doesn’t work, try turning off File Sharing first.
Display Control Panel
On the Macintosh: Appearance Control Panel, Energy Saver Control Panel, Monitors & Sound Control Panel
In Windows, the Display control panel is positively bristling with features, spread out among seven tabs in the dialog box. On the Macintosh, most of the same features are scattered among several different control panels. Here they are, corresponding to each of the Display control panel’s seven tabs:
Background. On the Macintosh, you choose a picture to use as your Desktop background with either the Appearance control panel or the Desktop Pictures control panel, depending on your OS version. For more information, see Background.
Screen Saver. The Mac OS doesn’t include a built-in screen saver, although a variety of third party utilities can do the job. However, the Mac’s Energy Saver control panel (Apple menu → Control Panels → Energy Saver → Sleep Setup) provides controls for putting the monitor to sleep, a state that not only blacks the screen—therefore preserving its phosphor coating far more effectively than an animated “screen saver” could—but also consumes far less power. For more information, see Power Management Control Panel.
Appearance. The Mac’s Appearance control panel (Apple menu → Control Panels → Appearance) controls the system-wide look of your Macintosh, much like the Windows Display control panel’s Appearance tab. The Appearance control panel looks significantly different between Mac OS 8.0 and Mac OS 8.5, but the Mac OS 8.5-and-later version is a superset of previous versions.
In the Themes tab, you can choose a predefined groups of settings, much as you select appearance schemes in Windows.
The Appearance tab provides pop-up menus for choosing a highlight color, which applies to selected text, and a variation color, which tints scroll bars, menus, progress, bars, and so on.
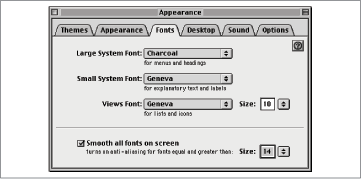
The Fonts tab lets you choose large and small system fonts, plus a font for lists and icons (see Figure 28-4).
Effects. The Effects tab in the Windows Display control panel controls a number of unrelated visual effects, and it also lets you change Desktop icons.
On the Macintosh, you can change any icon (except Desktop Printers or the Trash) by pasting a new icon over the old one. To do so, Control-click an icon, choose Get Info → General Information, click the icon in the Get Info window to select it, and then paste the graphic you want to use as the replacement icon.
Of the other options, the Macintosh has equivalents only for “Use large icons” and “Smooth edges of screen fonts.” To default to large icons, choose Edit → Preferences → Views → Icons and click the large icon radio button. And to smooth fonts, open Apple menu → Control Panels → Appearance → Fonts, select “Smooth all fonts on screen,” and choose the point size above which the Mac OS starts smoothing fonts.
Web. The Macintosh has no equivalent to the Windows Active Desktop, which you control from the Display control panel’s Web tab.
Settings. The Settings tab of the Windows Display control panel lets you set the resolution and color depth of your monitor; on the Macintosh, use the Monitors & Sound control panel (Apple menu → Control Panels → Monitors & Sound → Monitors) to perform the same tasks (see Figure 28-5).

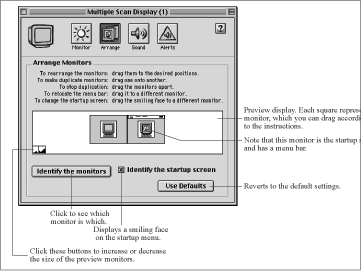
If you have multiple monitors connected to your Macintosh (a highly recommended productivity enhancement), you can arrange them in Apple menu → Control Panels → Monitors & Sound → Arrange (see Figure 28-6).
DLL Files
On the Macintosh: Shared Libraries
On the Macintosh, files whose names end with the letters lib are probably shared libraries, which fulfill the same purpose as DLL files on Windows. You may find shared library files in the System Folder → Extensions folder, or in the same folder as an application that requires them.
Fortunately, shared libraries are completely invisible and forgotten on the Macintosh—the Macintosh user is never asked to install newer versions, for example. Microsoft programs, moreover, are smart enough to auto-install any shared libraries that you may have moved or deleted.
Documents Menu
On the Macintosh: Recent Documents
If you want to work with a document that you’ve been using recently in Windows, you can choose it from Start → Documents. On the Macintosh, choose your recently used document from Apple menu → Recent Documents. Although the Windows Document menu is restricted to 15 recently used documents, on the Macintosh you can specify how many documents you want tracked. To do so, use the Apple Menu Options control panel (Apple menu → Control Panels → Apple Menu Options).
Another advantage of the Mac’s Recent Documents menu is that it tracks all the documents you open. The Windows Document menu, on the other hand, includes only documents you open from an Explorer or a folder window—in other words, not documents you open from within an application.
To clear items from your Recent Documents command, you have two alternatives. First, you can just wait until they go away automatically, since Recent Documents tracks only the most recently used documents. Second, you can open the System Folder → Apple Menu Items → Recent Documents folder and throw away the aliases you find there. (Although the TweakUI control panel in Windows 98 lets you make Windows clear the Documents menu every time you restart, there’s no equivalent on the Macintosh without writing a custom AppleScript script.)
DOS
On the Macintosh: Third-Party Utilities
Despite Microsoft’s claims, Windows is built on top of DOS and continues to work with DOS. The Mac OS has no such underpinnings in a command-line based operating system.
If you’re wondering how you can run DOS (or Windows) programs on a Macintosh, see Emulators.
Drivers
On the Macintosh: Drivers, Extensions
Drivers are small programs that let a computer, either a Macintosh or a PC, communicate with some piece of hardware, be it a printer, modem, or scanner. Drivers are a much bigger deal in the PC world than in the Macintosh world for two reasons:
Since there are many more manufacturers of hardware for PCs, the possibilities for problems and conflicts are much greater.
Apple often writes generalized drivers that work for an entire class of hardware devices, which relieves manufacturers from having to create their own drivers. For instance, most laser printers use Apple’s LaserWriter driver, and many USB devices can use Apple’s generic USB driver.
As a result, you’re less likely to encounter conflicts or confusions with drivers for Macintosh hardware. Plus, just as with the PC, a custom driver comes with any peripheral that requires one, and updates are often available from the manufacturer’s web site. Updates are far less frequently required on the Macintosh, too.
Many drivers, such as those for the mouse, keyboard, monitor, hard disk, speakers, and so on, are invisible and built into the Macintosh ROM. Other drivers are included in the form of Macintosh extensions. You’ll find them in Macintosh HD → System Folder → Extensions.
DriveSpace
On the Macintosh: None
DriveSpace is a disk-compression product included with Windows to create compressed disks, saving space and making room for more files (at the expense of speed).
Although numerous Macintosh products have existed for compressing entire disks, they’ve all faded away as hard disks have grown in size and dropped in price. The tradeoffs of reduced speed and greater chance for lost data in the event of disk corruption caused the Macintosh market to reject these programs several years ago.
In part, these disk-compression products may have survived in the PC world because it’s more difficult to add additional hard disks to a PC than to a Macintosh. If you need more disk space on a Macintosh, it’s easy to attach an external hard disk, Zip disk, or other disk drive.