Chapter 30. F
Fat 16, Fat 32
On the Macintosh: HFS, HFS Plus
Over time, both Apple and Microsoft have revamped the technical protocols used for storing files on your hard disk surface. The older schemes, which wasted large amounts of disk space, were called FAT16 in Windows or the Hierarchical File System, or HFS, on the Macintosh. The newer schemes are called FAT32 and HFS Plus (Mac OS Extended), respectively. After converting your PC’s hard disk from one scheme to the other, you’ll have many more megabytes free, especially if your hard disk contains many small files.
Just as Windows 98 is required to access FAT32 disks, only recent versions of the Mac OS recognize disks formatted with HFS Plus. For example, a Macintosh running Mac OS 8.0 or earlier doesn’t recognize a disk formatted with HFS Plus. (When you look at such a disk—a Zip disk, for example—on an older Macintosh, you see nothing on the disk except a single text file called Where_Have_All_My_Files_Gone?.)
You can convert Macintosh disks from HFS to HFS Plus in one of two ways. The free way: erase it completely using the included Drive Setup application. The commercial way: use PlusMaker (http://www.alsoft.com/), which converts your Macintosh hard disk to HFS Plus without requiring erasure.
Favorites Menu
On the Macintosh: Favorites Menu
In Windows 98, Microsoft tried hard to merge the standard user interface with a web browser. The Favorites menu is a prime example of this. It can hold both shortcuts to web pages and shortcuts to folders; you can add either one by choosing Favorites → Add to Favorites from Internet Explorer, an Explorer window, or a folder window. You can manage all your favorites at once by choosing Favorites → Organize Favorites.
Note
If you’re using system software before Mac OS 8.5, you can use the Apple menu to perform roughly the same function as the Favorites menu. To do so, make an alias of the folder or file you want easy access to. Put that alias in the System Folder → Apple Menu Items folder. As soon as you do so, the item becomes available from the Apple menu. For more information, see Shortcuts and Start Menu.
Mac OS 8.5 and later has a Favorites command, too. It’s in the Apple menu; it also shows up as a pop-up icon in the Save and Open dialog boxes of many programs. The main difference between the Macintosh Favorites menu and the Windows Favorites menu is that the Macintosh Favorites menu is designed to hold local items—Apple doesn’t attempt to lump web pages and folders together.
To add a file, disk, or folder to your Favorites menu, highlight its icon and then choose File → Add to Favorites. (Alternatively, you can Control-click an icon in the Finder and choose Add to Favorites from the contextual menu that appears.) If you’re using a modern program—technically, one that supports what Apple calls Navigation Services—you’ll see the Favorites pop-up icon in the dialog box whenever you are opening or saving a file. (This icon looks like a folder with a bookmark on it.) You can also add an item to the Favorites menu by choosing Add to Favorites from this popup icon wherever you see it.
Faxing
On the Macintosh: Faxing
Any Macintosh equipped with a fax modem can send and receive faxes, just as you can on a Windows PC. However, Apple doesn’t make fax software—no fax program is a standard part of the Mac OS, as it is on Windows. As a result, the instructions for sending and receiving faxes are different depending on the fax software that came with your fax modem.
The most common fax modem is the one built into every iMac, iBook, and most Power Macintosh and PowerBook G3 models. It comes with a third-party fax program called FaxSTF. Here’s how it works:
To send a fax. Prepare the text of your fax in any Macintosh program, such as a word processor. While pressing the Option and Command keys, choose File → Fax. (The command that normally says Print changes to say Fax when you depress those special keys.) In the resulting dialog box, click Fax Numbers → Temporary Address. Now you can specify your fax recipient’s name and fax number; click Send to send the fax. (You can build a permanent list of fax addressees using the Fax Browser program described next.)
To receive faxes. If you’d like your Macintosh to serve as a fax-receiving device, open the Macintosh HD → FAXstf folder, and then open the Fax Browser folder inside. Choose Edit → Settings → Fax Modem, and adjust the control that specifies how many rings should elapse before the computer answers the phone. (When a fax comes in, your Apple menu will blink. Launch Fax Browser to read, and, if you like, print the fax.)
Configuring your home or office so that the computer gets its own line is, of course, up to you.
File Menu
On the Macintosh: File Menu
There are two things to keep in mind about the File menu in Windows folder windows that are different on the Macintosh. First, the contents of the Windows File menu change radically depending on what’s selected—that’s not true on the Macintosh, where menu items are grayed out when they aren’t available. Also, programs can add menus to the File menu in Windows folder windows, which isn’t generally true on the Macintosh. So, whereas you may have commands for adding files to Zip archives or using PGP (Pretty Good Privacy—an encryption program for protecting data from prying eyes) to encrypt or decrypt the selected files, those functions are handled in alternate ways on the Macintosh.
Explore. After highlighting a folder or disk icon in Windows, choosing File → Explore displays a two-pane Explorer interface. There’s no equivalent on the Macintosh, although Finder windows can show the contents of nested folders in List views.
New (command). For certain types of documents, Windows puts a New item in the File menu; choosing File → New creates a new copy of the document type you choose. On the Macintosh, you instead select the file, choose File → Duplicate (Command-D), then double-click the newly created file to edit it.
New (menu). From File → New, Windows lets you create new folders, shortcuts, and a variety of documents, such as sound files and text files. The Mac’s File menu offers equivalent commands only for New Folder (File → New Folder) and New Shortcut (File → Make Alias).
Quick View. There’s no equivalent to Quick View on the Macintosh.
Send To. The commands in the Windows File → Send to menu let you copy the selected file to a floppy disk, or the Desktop as a shortcut, or to programs that register themselves as destinations. There’s no equivalent menu command built into the Mac OS.
Create Shortcut. The Windows Create Shortcut command is essentially identical to File → Make Alias (Command-M) on the Macintosh. See Shortcuts for more information.
Delete. Choosing File → Delete in Windows is the same as choosing File → Move To Trash (Command-Delete) in Mac OS 8.5 and later. Most Macintosh users just drag files to the Trash or select the files and press Command-Delete. See Recycle Bin.
Rename. The Windows Rename command opens a filename’s editing rectangle, which you can also accomplish by simply clicking the filename. The Mac OS has no specific Rename command—see Renaming.
Properties. The Macintosh equivalent to the Properties command is File → Get Info (Command-I), which opens the Get Info window for the selected items. Note that if you have multiple icons selected, the Mac OS opens one Get Info window for each, rather than treating them as a group, as Windows does. For more information, see Properties Dialog Box.
Work Offline. Since Work Offline is an artifact of the Windows 98 pseudo-web interface, there’s no equivalent on the Macintosh.
File Sharing
On the Macintosh: File Sharing
With Windows 95, Microsoft added file sharing, which has been a feature of the Mac OS for years. With file sharing, you can mount a remote shared folder as a disk on your Desktop and use it just as you would any other disk.
Configuring file sharing. Configuring file sharing for your own use is easy, though it gets more difficult if you want to provide different access privileges to different users.
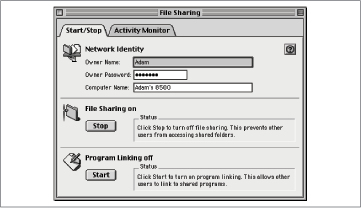
In Mac OS 8 and later, open Apple menu → Control Panels → File Sharing. If you’re using Mac OS 7.6 or earlier, open Apple menu → Control Panels → Sharing Setup.
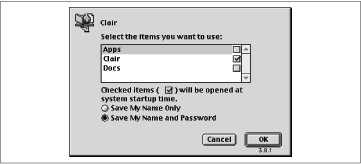
Enter an owner name (your name), an owner password (optional), and a name for the Macintosh (see Figure 30-1).
Click the Start button to turn on file sharing. It may take a short while to start up, during which time the button changes to Cancel. When file sharing is on, the button turns to Stop. To turn off file sharing, click Stop. If you wish to share your entire hard disk and access it yourself from other locations on the network, you’re done. If, however, you want to provide access only to specific folders, proceed as follows.
Open Apple menu → Control Panels → Users & Groups.
Click New User → Identity, and enter a user name and password for the coworker to whom you’re giving access to your hard disk.
Close the Users & Groups control panel, and then select the disk containing the folder you want to share. Choose File → Sharing.
Click “Share this item and its contents,” and then use the pop-up menus to assign an owner and users or groups, along with the desired privileges. Your options are Read & Write, Read only, Write only (Drop Box), or None. Repeat this step down through the hierarchy to the folder you want to share. The tricky part is that all folders down to the one you want to share must be shared, though they don’t have to have any access privileges.
Once file sharing is on, open Apple menu → Control Panels → File Sharing → Activity Monitor to see who is connected to your Macintosh (Mac OS 8 and later). In Mac OS 7.6 and earlier, open Apple menu → Control Panels → File Sharing Monitor to achieve the same result.
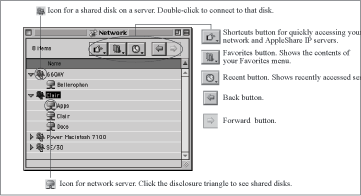
Accessing files via file sharing, method 1. To connect to a machine running file sharing and access files, follow these steps in Mac OS 8.5 and later. For more information on using Network Browser, see Network Neighborhood.
Open Apple menu → Network Browser (see Figure 30-2).
Either click the disclosure triangle next to a shared computer or double-click the computer’s icon to display the login dialog box.
Enter your user name and password.
Double-click the disk in the Network Browser window to mount it as a disk on your Desktop.
Accessing files via file sharing, method 2. The instructions are slightly different for versions of the Mac OS prior to Mac OS 8.5, although they also still work in Mac OS 8.5 and later. For more information about the Chooser, see Network Neighborhood.
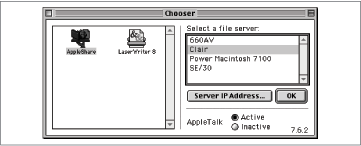
Open Apple menu → Chooser → AppleShare (see Figure 30-3).
Select the desired server and click OK to display the login dialog box.
Enter your user name and password.
In the dialog box that appears, select the disks you want to mount, and click OK. If you want to mount these disks on every startup, check the box next to them (see Figure 30-4).
Simplifying access. There are several ways you can simplify the process of mounting shared disks over the network:
Set them to mount at startup every time you turn on the Macintosh.
Make an alias to the disk, or to a folder on the disk. Thereafter, when you open the alias, the Finder automatically connects to the shared disk, asks for your password, and mounts the requested disk or folder on your Desktop.
Caveats. You should keep a few facts about network volumes in mind:
To open a file that’s sitting on the Desktop of a Macintosh you’re accessing over the network, open the hard disk. In the main hard disk window is a folder called Desktop Folder—open it to view the files sitting on the Desktop.
If you drag a file from a remote disk onto your own Desktop, you make a copy of it there.
To remove the icon of a shared disk from your Desktop, drag its icon to the Trash—or select it and then choose File → Put Away. You might want to do this to reduce the clutter on your Desktop.
When you drag files from the remote disk to the Trash, you’re actually putting them into an invisible Network Trash folder on the remote disk. As with any items in the Macintosh Trash, these items will remain there until you use the Special → Empty Trash command. Sometimes when you remove a disk from your Desktop, though, the Finder warns you that items you’ve deleted from the remote disk will be deleted permanently.
Whenever you’re accessing the remote disk, you can see the network access indicators flash in the upper-left of the menu bar, to the left of the Apple menu icon.
File Translation
On the Macintosh: File Translation
The most frustrating aspect of working with Macs and Windows-based PCs is file translation. It’s hard enough to move files back and forth physically (see Transferring Files to the Macintosh), but trying to find the appropriate translator for them can be truly annoying. You have three options when trying to share Windows files with programs on the Macintosh: use cross-platform applications, rely on universal file formats, or use file-translation software.
Cross-platform programs. The easiest way to share files between Windows and Macintosh programs is to use programs that have almost identical versions on both platforms. Most Microsoft, Adobe, and Macintoshromedia applications fall into this category, as do many other popular programs. See Cross-Platform Programs for a list.
Note that you must generally use parallel versions of cross-platform applications for file formats to be similar. For instance, you might have trouble opening a Windows Word 97 document in Word 4 on the Macintosh.
Even when cross-platform applications don’t share the same file format, they generally come with translators that let you read and write the appropriate formats. Sometimes, as with older versions of Microsoft Word, you may have to visit the company’s web site to find the appropriate translators.
Universal file formats. Some file formats are sufficiently universal that most applications in the same category (graphics, word processors, etc.) can read them. For instance, any word processor can read a text file, and almost any word processor can read RTF (Rich Text Format) files. Similarly, any graphics program should be able to open a GIF or a JPEG file. For more details, see GIF, JPEG, and similar entries.
You can use these universal file formats to move data between programs that cannot otherwise read each other’s files. But keep in mind that universal file formats don’t offer as many features as proprietary file formats. In other words, if you save a file from Word 97 as RTF, and then try to open the resulting document in WriteNow on the Macintosh, you may lose some formatting in the process.
Note
When moving a file to the Macintosh, generally you don’t need to add any three-letter suffix to its name, as on Windows. A Macintosh can identify, for example, an RTF file automatically, even if its name doesn’t end with the .rtf suffix.
File translators. If you need to convert files from one format to another, you need a file-translation utility.
The best utilities for translating between PC and Macintosh file formats come from Data-Viz. This company’s MacLinkPlus can convert most Windows word-processing and spreadsheet files to Macintosh equivalents, and Conversions Plus converts most Macintosh files in their Windows equivalents. (MacLinkPlus was included with the Mac OS until Mac OS 8.5.)
Both programs offer a long list of translators, plus tips on dealing with common formats for which DataViz has no translators. No file translation product can be perfect, but DataViz’s products are among the best. For more information, visit http://www.dataviz.com/.
A number of older Macintosh programs supported an Apple technology called XTND, which could translate many popular file formats. XTND is moribund today, but you may still run into it on occasion, and it’s worth trying if you don’t have MacLinkPlus.
File Types
On the Macintosh: File Exchange Control Panel, File Types, Type Codes, Creator Codes
When it comes to figuring out which application opens when you double-click a document, the Macintosh and Windows work quite differently. Windows relies entirely on three-letter filename extensions, whereas the Mac OS uses hidden, four-letter type and creator codes for every file.
The creator code specifies the application that created the file (iBIM for Photoshop, MSWD for Microsoft Word, etc.). and the type code specifies what sort of file it is (JPEG, GIF, PICT, etc.). Together, these codes define what file icons look like and what happens when you double-click a file in the Finder.
Although shareware programs can change these type and creator codes, most Macintosh users don’t bother, because you can generally open files of standard types in a variety of different programs as long as you use File → Open rather than double-clicking. For example, Microsoft Word can open any file, from text to graphics to web pages, in this way. Once you have the file open in the desired program, saving it changes its creator code, making it correspond to the program you most recently saved it from.
If you encounter documents that lack type or creator codes, here are several ways to open them automatically:
Drag such an unidentified document icon onto the icon of the application. For example, you can drop word-processing document icons onto Word 98’s icon to open them.
Map these files’ Windows filename suffixes to the desired program in Apple menu → Control Panels → File Exchange → PC Exchange. For instance, if you transfer a Microsoft Word document from Windows to the Macintosh, but double-clicking the document doesn’t open it in Word, add the .doc extension to the filename and try again. The File Exchange control panel should recognize the extension and open the file in Word.
In Apple menu → Control Panels → File Exchange → File Translation, set up a translation to open files of a specific type in an application you choose. Click Add, select a representative document, and then choose your desired application from the dialog boxes that appear.
Filenames
On the Macintosh: Filenames
DOS and Windows 3.1 supported only the so-called “eight-dot-three” filenames: eight characters, a period, and then a three-letter extension. If you believe the brochures, Windows 95 radically increased the maximum length of filenames to 260 characters. Unfortunately, behind the scenes, the eight-dot-three system lurks as a parallel filename universe. Every Windows 95/98/2000 document still requires a three-letter extension, even though it’s often hidden; moreover, you’ll encounter thousands of files that retain the eight-dot-three convention in order to remain compatible with Windows 3.1 or even DOS.
In contrast, filenames in the Mac OS have always had a 31-character limit. You can add three-letter suffixes if you like, but they’re merely cosmetic. Add the suffixes, though, if you plan to transfer these files to another computer platform, such as Windows or Unix. For instance, HTML, JPEG, and GIF files generally have .html, .jpeg, and .gif extensions.
Reserved characters. You’re not allowed to use ?, >, :, /, or any of ten other symbols in Windows filenames. On the Macintosh, on the other hand, the only symbol you’re not allowed to use in a filename is the colon (:). That’s because on the Macintosh, a colon is essentially the separator to indicate directory structures, much like Windows uses the backslash. Whereas a path in Windows might look like this: \Windows\Multimedia, the Macintosh internally stores paths like this: Macintosh HD:System Folder:Preferences. If you try to type a colon in a filename, the Finder replaces it on the fly with a dash.
Case sensitivity. Both Windows and the Mac OS are case insensitive—you can’t create files called FILENAME and FileName in the same directory. That said, both systems preserve case in filenames, so you can use mixed case without fear of losing the capitalization.
Changing a file’s name. To rename a Macintosh file, click once on its filename or click once on the icon and then press Return. Either way, a special editing rectangle appears; type the new name, or edit the existing name. Press Return or click elsewhere to confirm the new name.
Editing filenames. You can edit filenames using all the basic tools you’d expect in a text-editing environment, including the arrow keys; both the Delete key and (in Mac OS 8) the Del key; and Cut, Copy, and Paste.
Find
On the Macintosh: Find, Sherlock
In Start → Find, Windows provides utilities for finding files or folders on your computer, computers on your network, information on the Internet, and people (the last two are available only in Windows 98). On the Macintosh, you use Apple menu → Sherlock (Mac OS 8.5 and later) or Apple menu → Find (previous systems) to achieve the same purpose.
Files or folders. To search for a Macintosh file by its name, location, date, file type, or size, choose File → Find. Doing so opens the Find File tab of Sherlock (or the Find File window prior to Mac OS 8.5).
The Sherlock or Find File utility offers quite a bit of flexibility, letting you search all disks, local disks, local disks other than CD-ROMs, mounted servers, on the Desktop, only within a selected group of folders, or on a specific disk. Once you’ve chosen the location to search, you can use the criteria menu to search for files and folders by name, size, kind, label, creation date, modification date, version, comments, lock attribute, folder attribute, file type, and file creator. For each criteria, Sherlock/Find File provides appropriate variables and choices; for instance, if you choose to search for a file by size, you can then choose whether you want to find files whose size is greater than or less than a number you enter. You can also combine search criteria by clicking the More Choices button.
Note
Hold down the Option key when you click the criteria menu to reveal three additional options: name/icon lock, custom icon, and visibility.
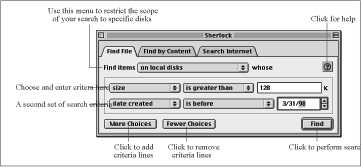
Searching for files by size or date. Here’s an example of how you would use Sherlock. Suppose you want to find a file larger than a megabyte that you created last year. See Figure 30-5 for how the Sherlock window should look.
Choose Apple menu → Sherlock → Find File to open Sherlock.
Choose “on local disks” from the Find items menu.
Choose “size” from the criteria menu, “is greater than” from the next menu, and enter 1024 in the text field.
Click More Choices to add another set of criteria.
Choose “date created” from the second criteria menu, “is before” from the next menu, and enter January 1 of this year (you can either type or use the up/down arrows to change the numbers).
Click Find to perform the search.
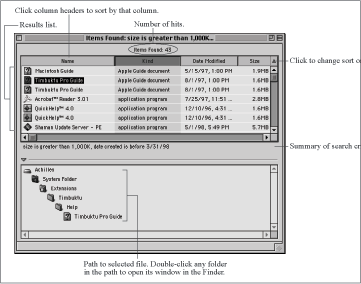
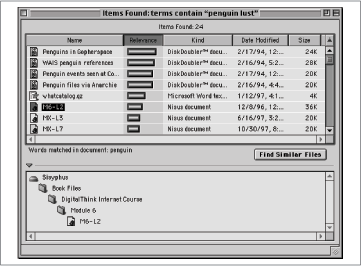
Sherlock/Find File then opens a Results window that lists files matching your search criteria (see Figure 30-6). The window works much like a Finder window—you can sort the list by clicking on the column headers, open a file by double-clicking it, or even drag a file icon to another open window to move or copy it. The pane at the bottom of the window, which can be expanded by clicking the disclosure triangle, shows the full path to the file; double-clicking any of the folders in the hierarchy opens that folder.
Searching for text within files. In Windows, you can search for text within your documents, but it’s a straight brute-force search. In versions of the Mac OS prior to 8.5, you can do the same sort of straight text search by holding down the Option key, clicking the criteria menu, and choosing “contents.”
In Mac OS 8.5 and later, Sherlock includes a smart text search. After first letting the program index your hard disk, cataloging every word in every document, you can perform impressively fast searches for words and ideas inside your documents—and enjoy such advanced features as relevance ranking.
To perform a content search in Sherlock, follow these steps:
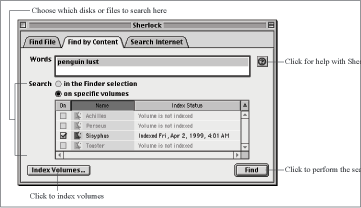
Open Apple menu → Sherlock → Find by Content.
Click Index Volumes, and check the volumes you want to index. Indexes are big, and the indexing process is slow, so index only disks that contain useful content. Consider using the Schedule feature to let the Macintosh create its file indexes overnight.
Once your disks are indexed, enter text you want to find in the Words field, select which volumes to search, and click Find (see Figure 30-7). You can also select files or folders in the Finder, and then click the “in the Finder selection” radio button to search just within the selected files or folders.
Sherlock presents a results window (see Figure 30-8) sorted by relevance (the likelihood that the document is what you wanted). You can sort the window in other ways by clicking column headers.
Click Find Similar Files to perform a content search for files whose contents are similar to the file or files you have selected.
Computer. The Mac OS has no Find command for servers on a network. Of course, this is only a problem if you’re on a huge network.
On the Internet. Microsoft’s feature for searching on the Internet is really only a link to the web page you’ve defined as your search site; choosing Start → Find → On the Internet merely opens a web browser window to that page.
Note
In Sherlock’s Edit → Preferences dialog box, you can define a Finder label to apply to folders you don’t want indexed. (Apply Finder labels by highlighting folders, and then choosing File → Label. Alternatively, Control-click a folder in the Finder, and then choose the appropriate label from the contextual menu that appears.)
Mac OS 8.5 and later, on the other hand, lets you search a wide variety of Internet sites from within the Mac OS itself. Sherlock uses plug-ins, small files that communicate with specific search engines (such as Yahoo and Alta Vista); these files are stored in Macintosh HD → System Folder → Internet Search Sites. To install a new plug-in that you’ve downloaded from the Internet, drop it on the System Folder; the Finder will place it in the Internet Search Sites folder automatically.
Note
Sherlock’s Find by Content feature locates files according to “fuzzy logic,” not by explicit phrases. That is, it tries to find documents that match your search terms in concept—you can’t find documents that contain only the exact phrase “wombat migration patterns,” for example.
You can find large collections of Sherlock plug-ins at various web sites, including the Apple-Donuts site at http://www.apple-donuts.com/sherlocksearch/ and the Sherlock Collection at http://moriarty.mit.edu/Sherlock/All.html.
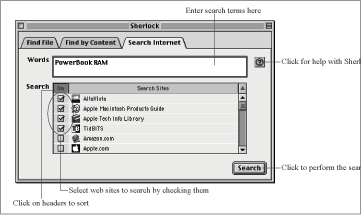
To search for information on the Web using Sherlock, follow these steps:
Choose Apple menu → Sherlock → Search Internet.
Enter your search terms in the Words field.
In the Search list, check the search sites you wish to search. Note that you can click the On column header to sort the list by the sites you have checked previously (see Figure 30-9).
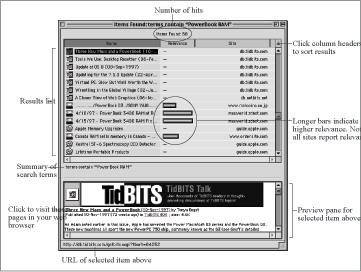
Click Search. Sherlock connects to each of the listed sites and performs the search. When it’s done, Sherlock organizes and presents the results to you (see Figure 30-10).
In the results window that appears, you can sort the results by name, relevance, and site by clicking the column headers. When you click a result, a summary appears below the list, complete with an icon identifying the site, a banner ad, and some of the text of the page.
When you’ve found a page that you want to read in its entirety, either double-click the result in the list, or click the page’s title in the summary. Sherlock sends the URL to your web browser for display.
People. The Windows Find function can also find people (such as phone numbers and mailing addresses). This function relies on an Internet connection and a variety of directory web sites such as WhoWhere. The revamped Sherlock program in Mac OS 9 has a search icon dedicated to locating such personal data; previous versions, however, had no such built-in facility.
Fkeys
On the Macintosh: Function Keys
See Function Keys (Fkeys).
Floppy Disks
On the Macintosh: Floppy Disks
Although floppy disks are becoming less important in both Windows and the Macintosh, they remain popular for transferring small files. Unfortunately, Windows and the Macintosh format floppy disks differently, so they cannot read each other’s disks without special software. On the Macintosh side, that software is File Exchange, a control panel that comes with the Mac OS. In Windows, various utility programs let you read Macintosh floppy disks; see Transferring Files to the Macintosh for details.
Inserting floppy disks. The Macintosh has no My Computer icon. Instead, disk icons appear on the screen only when a disk is actually inserted in the machine. Shortly after you insert the disk, you’ll find its icon on the right side of the screen.
Formatting disks. Windows prompts you to format blank disks when you try to use them, and the Mac OS works similarly. However, since the Macintosh accesses disks as soon as they’re inserted, the Mac OS prompts you to format the blank disk as soon as it’s inserted. You can also reformat disks manually; see Formatting Disks.
Booting from floppy disks. Every Macintosh comes with a CD-ROM that can start up the computer, and that CD-ROM may contain the disk image of a Disk Tools disk that can also start up Macs with floppy drives. For the different ways of booting a Macintosh from floppy or CD-ROM, see Boot Disk.
Ejecting a floppy disk. You’ll quickly discover that a Macintosh doesn’t have a disk eject button, as Windows machines do. To eject a disk, click its icon on the screen and choose either File → Put Away or Special → Eject Disk. (Or do what the Macintosh folk do—drag the disk’s icon to the Trash to eject it.)
Focus
On the Macintosh: None
In Windows, focus is the subtle highlighting that indicates which element of the window or dialog box is currently selected. You frequently change the focus by pressing the Tab key, for example.
Macintosh dialog boxes don’t use the focus mechanism, and no Macintosh user will know what you’re talking about when you use the term focus; indeed, as described in Dialog Boxes, you generally can’t control Macintosh dialog boxes from the keyboard at all.
Still, the Macintosh displays subtle colored highlighting to indicate its version of focus in several circumstances. When you drag an icon into a Macintosh window at the Desktop, for example, you’ll see a thin colored lining appear just inside the window borders to indicate that the Macintosh understands your gesture.
In these dialog boxes, the Tab key lets you switch focus subtle color cues tell you which area is highlighted. (You can change this highlighting color in the Appearance control panel.)
Folders
On the Macintosh: Folders
At their heart, folders are almost exactly the same in Windows and on the Macintosh—they’re containers for holding files and other folders. You can move and copy folders just as you would files, but the two operating systems work slightly differently.
Special folders. Some folders have special functions on the Macintosh. You’ll note that, especially in Mac OS 8.5 and later, they display specially designed icons to indicate that these are OS-created folders. For a list of those folders on the Macintosh, see Table 30-1. Note that all of them are stored in the System Folder.
Folder | Function |
Apple Menu Items | Items in this folder appear in the Apple menu. See Start Menu. |
Appearance | Stores sound effects and Desktop background pictures use by the Appearance control panel. |
Application Support | Software companies can store support files for their applications in this folder, though few do currently. |
ColorSync Profiles | Contains ColorSync profiles—files that describe, to the Mac’s color software, various color printers, monitors, and scanners, in order to maintain color consistency throughout the color management system. |
Contextual Menu Items | Items in this folder add entries to contextual menus accessed by Control-clicking. See Right-Click. |
Control Panels | Contains control panels that let you configure the Mac OS. See Control Panel. |
Control Strip Modules | Items placed in this folder add utilities to the Control Strip. See Tray. |
Extensions | Holds extensions—start-up files that modify the operation of, or add features to, the Mac OS. See Drivers. |
Favorites | Contains aliases to commonly used files and folders for quick access from the Favorites menu. |
Fonts | Contains fonts. |
Help | Contains help files for the Mac OS. See Help. |
Internet Search Sites | Holds Sherlock plug-ins for searching Internet web sites. See Find. |
Preferences | Stores user preferences for every application. See Registry. |
PrintMonitor Documents | Contains temporary files while they’re printing in the background. See Printing Files. |
Recent Applications | Contains aliases to the most recent applications you’ve used. |
Recent Documents | Stores aliases to the most recent documents you’ve used. See Documents Menu. |
Recent Servers | Holds aliases to the most recent servers you’ve mounted onto the Desktop. See Network Neighborhood. |
Scripting Additions | Contains scripting addition files, each of which adds a certain specialized function to AppleScript. See Batch Language. |
Scripts | Stores AppleScripts that get triggered when you add items to, or just open, certain folders. See “Folder actions,” later in this entry. |
Shutdown Items | Contains applications, or aliases of them, that run when you shut down the Macintosh. |
Startup Items | Stores files or folders, or aliases of them, that open when the Macintosh starts up. See StartUp Folder. |
The most important Macintosh folder of all, of course, is the System Folder—the exact analog of the Windows folder on a Windows PC. It stores the operating system itself.
Folder actions. Mac OS 8.5 exposed a feature of the Mac OS that’s been helpful for some time. If you drop a control panel on the System Folder icon, the Mac OS tells you that it’s moving the file to the appropriate folder, Control Panels in this case. In essence, the System Folder recognizes certain types of files and can perform actions specific to them, such as route them to a specific folder.
Beginning in Mac OS 8.5, you can attach an AppleScript script to any folder as a folder action. Whenever somebody opens, closes, or drops a file into that folder, the folder action script runs—for example, printing out the newly deposited file and then automatically forwarding it to the executive editor. To assign an action to a folder, Control-click the folder, choose Attach a Folder Action, and choose a script. You can find some sample scripts in Macintosh HD → System Folder → Scripts → Folder Action Scripts. Once a folder action is attached to a folder, a small script badge is added to the folder icon. You can remove folder actions by Control-clicking the folder and choosing Remove Folder Action.
Folder icons. You may have noticed that many of the special folders mentioned above have custom icons. In fact, you can assign a custom icon to any folder other than the special folders. For more information, see Icons.
Fonts
On the Macintosh: Fonts
One of the most attractive aspects of working with graphical interfaces like Windows and the Mac OS is that they let you create documents using different fonts. Before graphical interfaces, fonts were specific to programs, rather than being accessible to any program.
Types of fonts. As on Windows, fonts on the Macintosh come in two varieties: TrueType and PostScript. Functionally, the two font technologies are similar, although they use different underlying mathematical algorithms. TrueType fonts are predominant on both Macintosh and Windows because they offer many advantages: for example, they appear smooth and attractive at any size, both on screen and when printed; furthermore, on the Macintosh, each TrueType font requires only a single font file in your System Folder, making font management simpler.
Note
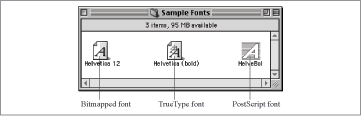
Technically, there’s a third kind of font format—bitmapped fonts. Bitmapped fonts are used on the Macintosh only for hand-tuned screen fonts at specific sizes.
PostScript fonts, on the other hand, are more frequently used in professional publishing and graphics, despite several drawbacks—each font requires numerous components to manage in your System Folder (separate files for the screen display and print out, for example), and these fonts can look jagged on the screen unless you’ve also installed Adobe Type Manager (ATM). Nonetheless, a wider variety of high-quality fonts are available in PostScript format, and most professional publishing equipment works better with PostScript than with TrueType fonts.
Identifying TrueType versus PostScript. To view the actual font files installed on a Macintosh, open System Folder → Fonts. Inside, double-click a font “suitcase” file (so-called because the file icon resembles a little briefcase) to examine its alphabet style. You can identify the different types of fonts by their icons—see Figure 30-11 for the three different types. Also, screen fonts generally have a font size number in their names, and TrueType fonts may include styles in parentheses after their names.
Font suitcases. In Windows, if you look in the Fonts folder, you may see a separate font file for each font variant—Arial, Arial Black, Arial Bold, Arial Bold Italic, and so on. You may see the same situation on the Macintosh, but more often, all the necessary software for a particular TrueType font is stored in a single font suitcase. PostScript fonts, on the other hand, may fill your Macintosh Fonts folder—these fonts require a suitcase file for the on-screen letter shapes, and a separate printer-font file for each style (bold, italic, bold italic, and so on).
Installing and removing fonts. Installing and removing fonts on the Macintosh is easy—just drag the font files into or out of the System Folder → Fonts folder. However, there are two caveats:
You can install fonts by dragging them into the Fonts folder at any time, but these newly added fonts won’t show up in the Font menus of any applications that are running until you quit and relaunch. (A message will tell you as much.)
You can’t remove fonts from the Fonts folder (or combine fonts into suitcases) while any applications other than the Finder are running.
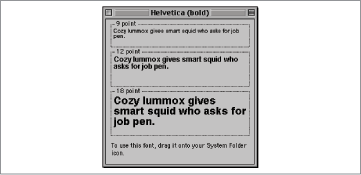
Viewing fonts. To see what a font looks like, double-click it. A PostScript screen font suitcase opens to reveal a sample sentence in a single point size, whereas a TrueType font suitcase opens to display sample sentences in three sizes: 9 point, 12 point, and 18 point (see Figure 30-12).
Choosing fonts. Using fonts in applications is easy—just choose a font from the Fonts menu. You can also choose among several Macintosh interface fonts—those used in menus, Windows, and so on—by choosing Apple menu → Control Panels → Appearance → Fonts; for details see Display Control Panel.
Font-size differences on Windows and the Macintosh. If you’ve ever viewed the same web page or Word document on both Windows and the Macintosh, you may have wondered why the two platforms seem to render the same fonts at different sizes. For instance, a web page that looks good in Windows has tiny text on the Macintosh, and a document that looks fine on the Macintosh has huge text in Windows.
Note
Another way to sample various fonts on the Macintosh is to choose Apple menu → Key Caps. Use the Font menu in the program that appears to specify the typeface you’d like to sample.
The problem is related to the fact that the Mac OS assumes a screen resolution of 72 dpi, while Windows assumes a screen resolution of 96 dpi. For a detailed explanation of the problem, see Geoff Duncan’s article on the issue in TidBITS at http://db.tidbits.com/getbits.acgi?tbart=05284.
Unfortunately, there is no easy way around the problem, although workarounds exist if you only run into the problem occasionally.
On the Web, if you see a page whose text is way too small or too large, you may be able to increase or decrease the size of the text for that page, depending on your web browser. Look for Font or Text Size commands in the View menu.
If you’re using Microsoft Word, you can scale the document up for the Macintosh or down for Windows using the Zoom menu on the main toolbar. Or, if you must work in a style sheet-heavy document for a long time, you can redefine the main styles to use a larger or more readable font. For instance, when opening a Windows document that comes in Times 10-point type—a nearly unreadable style on the Macintosh—consider redefining the Normal style to the Mac’s New York or Palatino 12-point font.
Formatting Disks
On the Macintosh: Formatting Disks
You can format Macintosh disks in several ways.
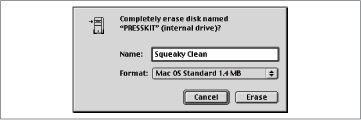
Floppy disks. To erase or format a floppy disk on the Macintosh, follow these steps:
Insert a disk. If it’s brand-new and unformatted, you’ll promptly be shown the dialog box illustrated in Figure 30-13. If the disk has already been formatted and you’d like to erase it, select its icon and then choose Special → Erase Disk. The Finder displays the Erase Disk dialog box.
Give the disk a name.
Choose the desired format: Macintosh or DOS. (Ignore ProDOS, which is an Apple ][ format rarely used these days.)
Click Erase.
Zip and Jaz disks. You can use a Macintosh to reformat Zip and Jaz disks for use on a Windows machine, just as you can with floppies—but in this case, the Mac’s Erase Disk command doesn’t offer you the choice of Macintosh or Windows. Instead, you must use the Iomega Tools software to reformat a Zip or Jaz cartridge for use by a different operating system.
Hard disks. To reformat a Macintosh hard disk, you use the Drive Setup program that came with the computer. For details, see Hard Disks.
Function Keys (Fkeys)
On the Macintosh: Function Keys
Although every Macintosh keyboard has a row of function keys along the top, just like PC keyboards, only a few have functions in the Mac OS itself. (The ones that work are F1 through F4; they correspond to Undo, Cut, Copy, and Paste.) These keys have functions in only a few programs, especially cross-platform programs like those from Microsoft; otherwise, assigning these Fkeys to a useful purpose—such as launching your favorite programs—is up to you. If you have an iBook or late-1999 iMac model, just press one of the higher-numbered Fkeys to program it; the Macintosh asks what file you want associated with this Fkey from now on. On other Macintosh models, you need a macro program or a shareware program like QuickPop, which you can find at http://www.northcoast.com/~jvholder/qpdesc.html.