Chapter 32. H
Hard Disks
On the Macintosh: Hard Disks
Although hard disk technology is essentially the same on both PCs and Macs, there are a number of differences.
Hard disk icon positioning. The first time you use a Macintosh, you may be alarmed to discover that no My Computer appears in the upper-left corner of your screen. On the Macintosh, there’s no equivalent to the My Computer icon; instead, your disk icons appear individually at the right side of the screen—and only when disks (CD, Zip, floppy, and so on) are actually inserted into the machine. In other words, the absence of a CD icon doesn’t mean that your Macintosh doesn’t have a CD-ROM drive—only that no disc is inserted at the moment.
IDE versus SCSI. Most PC hard disks are IDE (Integrated Drive Electronics) drives, which merely means that the hard disk controller is integrated with the drive. The better term is ATA (AT Attachment), which is a specific type of IDE drive. ATA-IDE hard disks are popular because they’re fast and cheap. Until the early 1990s, they were also limited to the PC world, since Macs had always come with SCSI-based hard disks instead. As Apple sought to lower prices, however, ATA-IDE became the standard internal hard disk format for all Macintosh models.
SCSI hard disks are less common in the PC world than on Macs. (Until 1998, every Macintosh model included a SCSI connector on the back panel, suitable for attaching external SCSI hard disks.)
ATA-IDE drives are generally cheaper and slightly faster than SCSI hard disks, simply because the SCSI controller chip adds some overhead. However, because each SCSI drive has its own controller chip, multiple SCSI drives attached to the same computer can all work simultaneously. In contrast, you can connect only two ATA-IDE drives (a master and a slave), and they can’t operate simultaneously, which means that copying files between two such drives can take longer. Details on what is possible with different Macs vary; more information is available in a thread on TidBITS Talk, at http://db.tidbits.com/getbits.acgi?tlkthrd=551.
Boot disks. Some PCs can boot from disks other than the C: hard disk drive and the A: floppy drive. (This feature is BIOS-specific; many PC users don’t even realize it’s possible.) However, on the Macintosh, any disk, floppy, hard, or CD-ROM, can start up the machine. For more information, see Boot Disk.
Internal versus external. Thanks to the two-drive limit of ATA-IDE hard disk chains, it’s relatively uncommon to see PCs with external hard disks attached. The fact that older Macintosh models had small internal hard disks and an available SCSI port on the back, on the other hand, makes external hard disks common on these older machines.
Compression. You might be accustomed to compressing your PC hard disk using Microsoft’s DriveSpace program. Although drive compression technologies were once available for the Macintosh, they’ve all fallen by the wayside as hard disk sizes increased and prices dropped. The trade-offs of slightly reduced performance and greater chance for lost data in the event of disk corruption caused the Macintosh market to reject these programs years ago.
Disk maintenance. Although hard disks may physically last for many years, it’s important to perform routine disk maintenance to keep the data structures (such as directories and lists of bad blocks) up to date. If you don’t, your disk may suffer an increasing level of data corruption, which could cause crashes or even catastrophic data loss.
For more information about performing routine disk maintenance, see Disk Defragmenter and ScanDisk.
Disk formats. Just as Windows 98 marked the introduction of FAT 32, a more-efficient and capable disk format than the previous FAT 16 format, Mac OS 8.1 introduced Mac OS Extended format, commonly known as HFS Plus (the older Mac OS Standard format is known as HFS). You can tell how any Macintosh hard disk has been formatted by selecting its icon and then choosing File → Get Info (Command-I).
To understand the consequences of these different hard disk formats, it helps to understand the concept of a block—one individual “parking place” for data on the hard disk service. On Macintosh hard disks formatted using the older HFS scheme, these blocks were fairly large—64 K on a 2-GB disk, for example. Because each file on a hard disk consumes a minimum of a single block, even the tiniest text file would therefore take-up 64 K of space. Cumulatively, all of these small files wasted vast amounts of hard disk space.
In contrast, the blocks used by the HFS Plus formatting scheme (HFS Plus) are tiny—4 K. As a result, small files take up much less space, resulting in overall space savings.
You can convert an HFS hard disk to HFS Plus in two ways: by erasing and reformatting the drive or by using a program called PlusMaker from Alsoft. For more information, visit http://www.alsoft.com/.
Reformatting. You can initialize a standard Macintosh hard disk in one of two ways. Both methods require you to boot from another disk (such as the system CD-ROM that came with the machine), since you can’t reformat the boot disk.
Select the hard disk icon in the Finder, and then choose Special → Erase Disk. If you’re running Mac OS 8.1 or later, you’ll be offered a choice of Mac OS Standard (HFS) format and Mac OS Extended (HFS Plus) format.
Run Drive Setup (which comes with all Macs—on the system CD-ROM, for example), select the hard disk icon, and then click Initialize. Initializing takes only a minute or two.
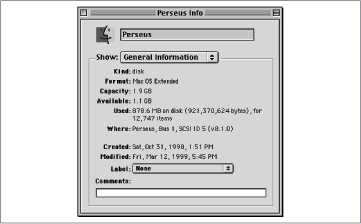
Space questions. When using a Macintosh for the first time, you might want to see how large its hard disk is and how much of that space is free. In Mac OS 8, select the hard disk icon and then choose File → Get Info (Command-I). The Get Info window provides all the information you need (see Figure 32-1), including total capacity, space available, and space used.
In versions of the Mac OS prior to Mac OS 8, the procedure is more complicated:
Open Apple menu → Control Panels → Views.
Turn on the “Show disk info in header.” checkbox.
Close the Views control panel.
Open any window. The amount of space used and available appear at the top of the window. You must manually add them together to arrive at the total size of the disk.
Help
On the Macintosh: Help
To view the Mac’s online help screens, open the Help menu. (If you’re running system software before Mac OS 8, this menu looks like a question mark or light bulb at the right side of the menu bar.) Three forms of help may be available in the Help menu: balloon help, Apple Guide, and, in Mac OS 8.5 and later, Mac OS Help. (As in Windows, the presence of one form or another of help depends on the enthusiasm of the software company who created the program you’re using.)
Balloon help. The concept behind balloon help is simple. After you choose Help → Show Balloons you point the cursor at some bewildering onscreen interface element or menu command and a cartoon speech balloon pops up to describe the element’s function. Unfortunately, balloon help isn’t available in every Macintosh program; when it’s available, balloon help can be useful indeed (see Figure 32-2).
When you’ve learned what you need to know, turn off balloon help by choosing Hide Balloons from the Help menu.
Apple Guide. Apple Guide provides online help for the Mac OS and many Macintosh applications. Apple Guide is more task-based than Windows Help—a typical entry in an Apple Guide index is: “How do I adjust the speaker volume?” Apple Guide, like some Windows Help entries, uses sequential help screens to walk you through common tasks; unlike Windows Help, Apple Guide offers bright-red, marker-like, animated “coach marks” to draw your attention to certain menu items and buttons.

Although it can be an extremely helpful system, Apple Guide isn’t, alas, available in many Macintosh programs. (Quicken, programs from the former Claris Corp., and the Mac OS itself are a few programs that include it.) Check the Help menu for a command called Guide—that’s probably it. You can also press the Help key to bring up Apple Guide.
When you choose the appropriate Help command, the Mac OS displays the Apple Guide windoid (a special type of window that floats above all other windows that are currently open—see Figure 32-3).
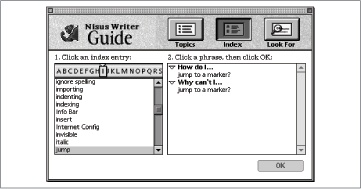
Just as in Windows Help, Apple Guide offers three ways of accessing help information. They’re identified by buttons at the top of the Apple Guide window called Topics, Index, and Look For.
Topics lists general topic areas. When you select an area by clicking it, the list of individual help entries appears in the right-hand scrolling list.
Index lists terms alphabetically. Click a term to view corresponding help entries in the right-hand scrolling list.
Look For lets you search the entire Apple Guide file. Type a search term and then click the Search button.
Once you’ve found a useful help entry, click its name and then click the OK button. Apple Guide opens a new instruction windoid that provides interactive instructions on performing the task at hand. If the help information isn’t what you wanted, you can return to the main Apple Guide windoid by clicking the Up navigation arrow. When you’re done, click the close box to close the windoid.
Mac OS Help. In part because Apple Guide doesn’t make it easy to browse for information quickly, in Mac OS 8.5, Apple introduced a new Mac OS Help format, which uses a program called Help Viewer. Like Windows Help, Help Viewer provides a pane-based browser for navigating help information. The help screens can include text, graphics, and links, just as in a web browser (see Figure 32-4). To access help for using the Mac OS, choose Help → Mac OS Help.
The left pane contains topics; double-clicking a topic reveals sub-topics in the right pane. Double-clicking a sub-topic opens yet another window for the help content; if you’ve chosen the wrong sub-topic, you must click the Back button and start over.
You can also type in the search field and then click Search to look through the entire Mac OS Help program. (The Help Viewer’s search function uses Apple’s Sherlock searching technology, so it ranks the results by relevance.)
On some Mac OS Help screens, you may even see a Show Me button. Clicking it opens up a page of the older Apple Guide help mechanism, which walks you through performing one task or another.
HyperTerminal
On the Macintosh: None
Windows comes with a simple terminal emulation program called HyperTerminal, which you can use to connect to old bulletin boards and for troubleshooting modem problems. There’s no equivalent in the Mac OS, although you can download one like the shareware Zterm, which is one of the most popular. It’s at http://hyperarchive.lcs.mit.edu/HyperArchive/Archive/comm/term/zterm-101.hqx. Many other Macintosh fans use the Communications window of Claris-Works or AppleWorks, an integrated office suite that comes preinstalled with every iMac and some other Macintosh models.

If you’re trying to connect to an Internet site using the PPP control panel in Mac OS 8.0 or 8.1, or the Remote Access control panel in Mac OS 8.5 and later, you can access a terminal window to log in manually, which can be a help when troubleshooting:
Open Apple menu → Control Panels → PPP (or Remote Access).
Click Options → Protocol.
Check “Connect to a command-line host” and “Use terminal window.”
When you connect, you’ll see a small terminal window for entering necessary login commands.