Chapter 38. N
NetBEUI
On the Macintosh: AppleTalk
The standard protocol for communicating between PCs running Windows is NetBEUI, which stands for NetBIOS Extended User Interface. The comparable proprietary networking protocol in the Macintosh world is AppleTalk. If you’re interested in connecting Macs and PCs, stick to a common protocol like TCP/IP.
Netscape Navigator/Communicator
On the Macintosh: Netscape Navigator/Communicator
The Macintosh and Windows versions of Netscape Navigator and Communicator are even more alike than the corresponding versions of Microsoft Internet Explorer. You can learn more about the Macintosh version of Netscape Communicator, and download a copy, from http://www.netscape.com/computing/download/index.html.
Net Watcher
On the Macintosh: File Sharing Control Panel, File Sharing Monitor
If you need to see who is connected to your Windows hard disk over the network, use the Net Watcher utility. On the Macintosh, you can see connected users and shared items in Apple menu → Control Panels → File Sharing → Activity Monitor (or, in versions of the Mac OS prior to Mac OS 8.1, in Apple menu → Control Panels → File Sharing Monitor).
Once you’re viewing the lists of connected users and shared items (see Figure 38-1), you can do two things:
To disconnect users manually, click a user’s name and then click Disconnect.
To view the sharing privileges for a shared item, select its icon and then click Privileges. Doing so opens the same informational dialog box that appears when you select a folder’s icon on the Desktop and then choose File → Get Info → Sharing.
Network Control Panel
On the Macintosh: AppleTalk Control Panel, TCP/IP Control Panel, File Sharing, Printer Sharing
The Network control panel in Windows offers settings for every conceivable aspect of Windows networking. On the Macintosh, the same features are scattered among several different control panels, as follows:
Network components. In the Configuration tab of the Windows Network control panel, you work with four kinds of network components:
Client
Client components help you connect to servers on your network. On the Macintosh, you need the AppleShare extension to access remote file servers. The AppleShare software itself is located in Macintosh HD → System Folder → Extensions, but you access it by choosing Apple menu → Chooser → Apple-Share, as described later.
Adapter
Adapter components let you configure the physical network interfaces, such as Ethernet cards. On the Macintosh, you don’t need to configure such devices manually, so there’s no equivalent to adapter components. The closest you might get are drivers that let the Mac OS recognize the network card, if you aren’t using the built-in Ethernet port. Such drivers would go in Macintosh HD → System Folder → Extensions. Check the network card documentation for details.

Protocol
Protocol components let the PC speak specific protocols, or network languages. Computers on the same network can talk to one another only if they support the same protocols. To configure the Macintosh to support TCP/IP, you use the TCP/IP control panel. Similarly, the AppleTalk control panel lets you configure the Macintosh to work on an AppleTalk network.
Although control panels are the front end for working with these protocols, accompanying support files are stored in Macintosh HD → System Folder → Control Panels and Macintosh HD → System Folder → Extensions.
Service
Service components let you share folders and printers with other people on your network. File sharing on the Macintosh is handled by the File Sharing control panel; printer sharing (which is generally necessary only for inkjet printers; most Macintosh laser printers are designed to work on a network to begin with) requires the Printer Share extension. See File Sharing (for details about the Macintosh equivalents to the Identification and Access Control tabs) and Printer Sharing.
Configuring Macs to work on AppleTalk networks. Configuring a Macintosh to communicate with other Macs on the same network using AppleTalk is extremely easy. Assuming that you’ve made the necessary physical connections, open Apple menu → Control Panels → AppleTalk, and then choose the appropriate network type from the Connect via menu: Ethernet, Printer Port (if you’re using the slower, but less expensive, PhoneNet cables), Infrared, and so on. When you close the AppleTalk control panel, the Macintosh will be able to communicate with other Macs and printers on the AppleTalk network.
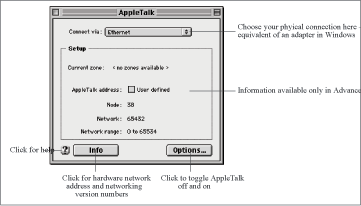
The AppleTalk control panel has three modes: Basic, Advanced, and Administration. You switch between them by choosing Edit → User Mode (Command-U).
In Basic mode, you can specify a port for connecting to the AppleTalk network: Modem, Printer, or Ethernet, for example. If your network has multiple zones, you can select a zone as well.
In Advanced mode, you’re also given the option to define your AppleTalk address’s node and network (see Figure 38-2). A hint: Network numbers should be in the upper range of the 0 to 65534 range—if you see a very low number there, it may cause problems for Apple’s LaserWriter Bridge software. In general, though, there’s no reason to change your AppleTalk address, since it’s assigned automatically.
In Advanced mode, two buttons also appear: Info, which provides information about your network address and software versions, and Options, which lets you turn AppleTalk on and off.
Administrator mode enhances Advanced mode by adding lock buttons that let an administrator lock the settings.
Along with the three user modes, you can also create and switch between different configurations in the AppleTalk control panel. Storing different network configurations in this way is especially useful for PowerBooks that move between different networks. For instance, at work you might connect to an AppleTalk via an Ethernet network, and at home you might use a PhoneNet network to connect to a printer.
The easiest way to create these configurations is to follow these steps:
Open Apple menu → Control Panels → AppleTalk.
Choose File → Configurations (Command-K) to open the Configurations dialog box.
Select the default configuration, and then click Duplicate.
Select the newly made copy configuration, click Rename, and then give it a unique name (see Figure 38-3).
Click Make Active to make your new configuration active.
Because your new configuration was a duplicate of the previous default configuration, it has the same settings. Change the settings as desired—by choosing an alternate connection method from the Connect via menu, for instance.
Close the AppleTalk control panel, saving changes when prompted.
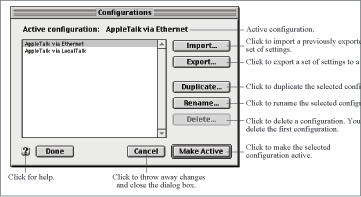
Switching between configurations is as easy as selecting a configuration in the Configurations dialog box and clicking the Make Active button. When you change configurations, you don’t have to restart the computer, as you would on Windows.
Configuring Macs to connect to the Internet.
As in Windows, there are two basic ways to connect to the Internet: via a modem and via a network that has an Internet connection. (See Dial-Up Networking Folder.) The procedures are similar:
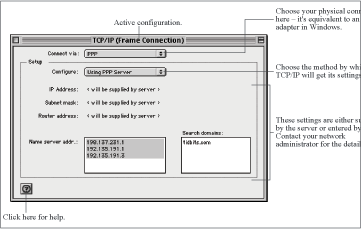
Open Apple menu → Control Panels → TCP/IP (see Figure 38-4).
From the Connect via pop-up menu, choose either PPP or Ethernet. Choose PPP if you’re connecting via modem, and choose Ethernet if your Ethernet network is connected to the Internet.
Next, from the Configure menu, choose the method by which your connection will obtain its settings. The choices are Manually (which requires you to enter all your settings by hand), Using PPP Server (which shows up only if you’ve chosen PPP as the connection method), Using BootP (which picks up settings from a server on your network), Using DHCP (which picks up settings from a server on the network), and Using RARP (which picks up your IP address from a server, but none of the other settings).
If you’re connecting via PPP via a modem from home, choose Using PPP Server. If you’re connecting via Ethernet, the most likely choices are Using DHCP, Using BootP, or Manually. If you don’t know which to choose, contact your network administrator or ISP for help.
If you’ve chosen Manually from the Configure menu, enter your IP address, subnet mask, router address, and DNS servers (one per line) in the appropriate fields. You cannot guess at these numbers—if you don’t know them, contact your network administrator and ask. Fill in all the blanks except those where you see the words “will be supplied by server.”
When you’re done, close the TCP/IP control panel to change the configuration. There’s no need to restart.
Like the AppleTalk control panel, the TCP/IP control has three modes, Basic, Advanced, and Administration. Once again, you switch between them by choosing Edit → User Mode (Command-U). Basic mode is all most people ever need to use. Advanced mode lets you specify a few additional options—ignore them unless your network administrator so instructs you. Administration mode provides the same options as Advanced mode, but adds little lock buttons that enable an administrator to lock the settings.
Also like the AppleTalk control panel, you can create and switch between multiple TCP/IP configurations. The process is the same as in the AppleTalk control panel. You might want multiple TCP/IP configurations if you connect to an ISP via a modem some of the time and via a network at other times. Or perhaps you have accounts with multiple ISPs that require different configurations.
Network Neighborhood
On the Macintosh: Chooser, Network Browser
To find and mount a server on your network using Windows, you’re used to opening the Network Neighborhood that’s on your Desktop. In Mac OS 8.5, the Network Browser performs exactly the same function. In older versions of the Mac OS, the only way to choose from your available AppleShare servers is through the Chooser (Apple menu → Chooser).
For more information about sharing files and printers, see File Sharing and Printer Sharing.
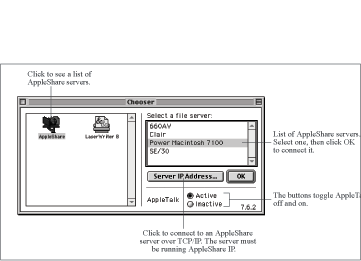
Using the Chooser to access file servers. To mount an AppleShare server using the Chooser, follow these steps:
Open Apple menu → Chooser.
Click the AppleShare icon to display the list of available servers (see Figure 38-5).
In the “Select a file server” list, select a server name and click OK (or doubleclick the server name). Alternatively, if the server you want is running Apple-Share IP and you’re running Mac OS 8 or later, click Server IP Address, enter the IP address for the server, and then click Connect.
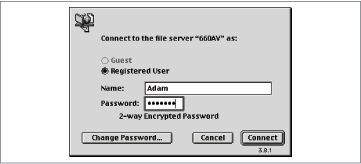
Enter your user name and password, and then click Connect (see Figure 38-6). If you’re connecting to one of your Macs as the owner, enter your owner name and owner password as you defined them on that Macintosh in the File Sharing control panel.
Choose the shared disks you want to mount on your Desktop, and then click OK.
If you want the shared disks to appear on the Desktop automatically every time you boot the Macintosh, select the “open on startup” checkbox. Specify whether you want to store your user name only (at which point you’ll have to enter your password every time), or both your user name and password (see Figure 38-7).
Once the AppleShare volume appears on your Desktop, you can use it just as you would any other disk, although it will respond slowly in comparison to hard disks.

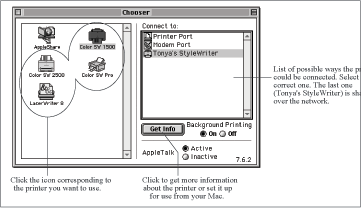
Using the Chooser to access shared printers. To access a shared (or network) printer using the Chooser, follow these steps:
Open Apple menu → Chooser.
Click the icon corresponding to the type of printer you want to access (see Figure 38-8). If your network includes multiple zones, click the appropriate zone name in the bottom of the window.
In the “Connect to” list, select the name of the shared printer and then click OK (or double-click the printer name).
Enter your password, then click OK.
Close the Chooser. The Macintosh creates a Desktop Printer icon for the shared printer and designates it the default printer. For more information on using Desktop Printers, see Printing Files.

Using Network Browser to access file servers. If you have Mac OS 8.5 or later, you can use the enhanced Network Browser program to connect to other networked computers.
Open Apple menu → Network Browser (see Figure 38-9).
Either click the disclosure triangle next to a shared computer’s name, or double-click the computer’s icon to display the login dialog box. Alternatively, if the server you want is running Apple-Share IP, choose Connect to Server from the Shortcut button (a hand icon), enter the IP address for the server, and click Connect.
Enter your user name and password. If you’re connecting to one of your Macs as the owner, enter your owner name and owner password as you defined them on that Macintosh in the File Sharing control panel. Network Browser displays the available disks on the remote server.
Double-click the desired disk in the Network Browser window to mount it as a disk on your Desktop.
Network Browser can’t set disks to mount automatically at startup. For that purpose, you’ll still have to rely on the Chooser, as described earlier.
Networking Macs and PCs together. Thanks to some ingenious software tools, Macs and PCs can exist on the same network, sharing hard disks and printers as though there were no OS difference whatsoever.
Consider, for example, the Macintosh-side software known as DAVE (http://www.thursby.com/). It adds Windows’ NetBIOS networking protocol, which permits the Macintosh to connect to Windows machines (versions 3.1, NT, or whatever). DAVE requires no installation on the PC side. Once DAVE is running, PC users see Macs and Macintosh printers through the standard Network Neighborhood program; Macintosh users see PC volumes through the Chooser or Network Browser.
DAVE is great for introducing a Macintosh minority to a larger PC network. If you’re in the opposite situation, adding a few Windows machines to a predominantly Macintosh network, buy PC MACLAN instead (http://www.miramarsys.com/). It lets a PC access the network’s Macintosh printers and hard disks through the standard Network Neighborhood interface. In fact, if you launch the included AppleShare Server software on the Windows machine, the PC can also become available to the Macs on the network—using the same Chooser or Network Browser software the Macintosh users would ordinarily use to access other networked Macs.
Networking
On the Macintosh: Networking
In today’s networked world, large portions of both the Mac OS and Windows are linked to networking. The following entries should get you started in networking on the Macintosh.
For Internet-specific references, see Internet.
For information about basic Macintosh networking, see Network Control Panel.
For information about sharing files on the Macintosh, see File Sharing.
For information about sharing printers on the Macintosh, see Printer Sharing.
For information about connecting a Macintosh to the Internet via a modem, see Dial-Up Networking Folder and Modems.
For information about connecting a Macintosh to the Internet via a network, see Network Control Panel.
For information about transferring files from a Windows-based PC to a Macintosh via a network, see Transferring Files to the Macintosh.
Notepad
On the Macintosh: SimpleText
Windows ships with both Notepad, a simple, no-formatting text editor, and WordPad, which offers a few more word processing features. The Mac OS equivalent is SimpleText, which offers a similar level of text-editing features, including the capability to set text fonts, sizes, and styles. SimpleText can also find text in a document, display graphics, record and play back sounds, and speak selected text.
SimpleText can open only documents that contain less than 32K of text, although if a document is larger than 32K because of included graphics or sounds, SimpleText can open it.
Few Macintosh users use SimpleText to create documents; it’s mostly used as a reader for ReadMe files. As a result, finding SimpleText can be tricky. Look first in Macintosh HD → Utilities, and if it’s not there, choose File → Find and search for “SimpleText” to see where it has ended up. It’s common for applications to install a copy of SimpleText, so you may find multiple copies—feel free to throw out all but the most recent one (check dates by scanning the Date Modified column of the Find window).
Num Lock Key
On the Macintosh: Num Lock Key
Older PC keyboards lacked separate cursor keys; in those days, a press of the Num Lock key turned the number keypad into its alternate function as cursor keys.
That workaround is no longer necessary in this age where every keyboard has a separate bank of cursor keys. Even so, the Num Lock key still appears on most Macintosh keyboards; it’s virtually useless except in certain Microsoft programs. For example, in Microsoft Word, pressing this key performs its time-honored function of turning the number keypad into cursor keys.