Chapter 40. P
Page Setup
On the Macintosh: Page Setup
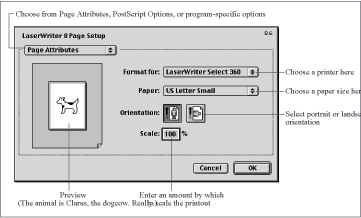
As in Windows, the Page Setup command is available in almost every program’s File menu. It offers a dialog box where you can specify page size, margins, and other program-specific options related to printing (see Figure 40-1).
Most people use the Page Setup dialog box to choose a paper size, orientation, and scaling percentage. You can also change a number of PostScript settings in the PostScript Options panel, accessible by choosing PostScript Options from the pop-up menu. Generally the defaults work fine.
PageMaker
On the Macintosh: PageMaker
If you’ve become accustomed to using PageMaker under Windows, you should have little trouble switching over to PageMaker on the Macintosh. Moving files between platforms may be more complicated, most often because the fonts may not be identical on the two platforms.
Keep in mind that your Macintosh version of PageMaker can open documents created by the same-numbered Windows PageMaker version, but can’t open older (or newer) Windows PageMaker documents.
For more information about PageMaker and its successor, InDesign, visit http://www.adobe.com/.
Paint
On the Macintosh: None
Long ago, the Macintosh shipped with MacWrite and MacPaint, but Apple soon removed them from the package to encourage third-party developers to create better word processors and painting programs. Today, the equivalent features are found in AppleWorks, a software suite included with every iMac and iBook. On other models, however, no painting software is included with the Mac OS. (The Macintosh shareware download sites are filled with inexpensive Macintosh painting programs—see Web Sites for Macintosh Software and Information for some links.)
Parallel Ports
On the Macintosh: Printer Port
Along with serial ports, PCs generally have parallel ports, which are used primarily for connecting to printers. The Macintosh has never had a parallel port; older models featured a pair of serial ports called the modem and printer ports, and current models offer USB ports instead. Most Macintosh inkjet printers connect via a serial cable to the printer or USB port; networked printers connect to the Ethernet jack. For more information about the printer port, see Serial Ports.
Passwords Control Panel
On the Macintosh: Password Security Control Panel
Windows offers minimal security through its login dialog box, which is primarily meant to control access to the network and to user profiles. Starting in Mac OS 9, every Macintosh has industrial-strength security through its Multiple Users control panel. Laptop and networked Macs offer security, too. (If you use an earlier verion of the Mac OS on a desktop Macintosh, no security software is built in, but add-on software that provides password protection is available.)
Basic access. Users of Apple laptops can set up the Password Security control panel (Apple menu → Control Panels → Password Security) to require a password at startup. The security offered by the Password Security control panel is quite good, since it works at the hard disk driver level.
Network access. If you’re concerned about other people using your Macintosh to access private information on the network, don’t save your name and password when setting network volumes to mount automatically in the Chooser. If you choose to have the Mac OS remember only your name, you’ll be prompted for your password when the Mac OS first attempts to access the network volume. For details, see Network Neighborhood.
Paste
On the Macintosh: Paste
The Windows Paste command (Ctrl-V) pastes whatever is in the clipboard; the Mac’s Paste command (Command-V) works exactly the same way.
The only difference: on the Macintosh, the Cut, Copy, and Paste commands work only on material in your documents. They can’t operate on files, as in Windows. See Edit Menu for details.
PC Cards
On the Macintosh: PC Cards
PC Cards, originally known as PCMCIA cards, are credit card-sized expansion cards commonly used to provide modem or network features to laptops that otherwise lack them. Other uses of PC Cards include hard disk storage, RAM expansion, ISDN adapters, and even GPS systems that use the Global Positioning System satellites to locate your exact position on the planet. The PC Card specification was created by a consortium of over 300 companies, including IBM and Apple, and it enjoys wide acceptance in both the PC and Macintosh worlds, at least for portable computers.
There are three types of PC Cards. Type I cards were designed to be only memory expansion cards; they’re 3.3mm thick. Type II cards have many more functions, but are the same size. Type III cards, usually hard disks, are 10.5mm thick. Each type is backward compatible, so you can insert a Type I card into a Type II or Type III slot. Better yet, most Macintosh and PC laptops offer a pair of Type II slots on top of one another; the advantage of this arrangement is that you can insert either two Type I or Type II cards, or a single Type III card.
Using PC Cards on the Macintosh is exactly like using them in Windows. You don’t have to turn the computer off before inserting or removing PC cards. Unlike Windows, which has a PC Card control panel for managing installed PC Cards, the Mac OS treats PC Cards the way it treats removable disks: when you insert a PC card, it icon appears on the Desktop. You can insert a card at any time, but to eject one, you must choose Special → Eject or drag the icon of the PC Card from your Desktop to the Trash.
PC Cards require driver software to work with the Mac OS. Generic drivers for standard types, such as modem or Ethernet cards, are built into the Mac OS, but for less common PC Cards, you need special software. Unfortunately, many interesting and useful PC Cards come with driver software only for Windows; you can’t use every PC Card in a Macintosh. If you wish to use an unusual PC Card in a Macintosh, contact the card’s vendor to see if it offers Macintosh driver software.
PCI Slots and Cards
On the Macintosh: PCI Slots and Cards
Over the years, PCs have sported different types of expansion slots and compatible expansion cards, including those based on the ISA bus, the EISA bus, the VESA Local Bus (VL-Bus), and today’s modern PCI bus.
On early Macintosh models, the most common slot type was known as the NuBus specification, which was created by Texas Instruments. NuBus never caught on outside of the Macintosh world, where it was used for many years.
A few Macintosh models included highspeed expansion slots called “processor direct slots” (PDS) instead of, or in addition to NuBus. Although fast, PDS slot designs varied by Macintosh model, making widespread acceptance difficult.
Several years ago, Apple eliminated both NuBus and PDS expansion slots from Macs in favor of the PCI (Peripheral Component Interconnect) bus that’s also the standard in the PC world. As a result, many more card manufacturers have created Macintosh versions of their cards (generally by simply writing Macintosh drivers). The economies of scale also means that prices on PCI cards for the Macintosh are often lower than prices for comparable NuBus cards.
Installing a PCI card in a Macintosh is essentially the same as installing one in a PC. Note, however, that the process of opening some older Macintosh models may be difficult. (Apple’s most recent Power Macs are extremely easy to open for installing new cards.) Refer to the Mac’s manual for instructions on opening the case and installing the PCI card.
Don’t assume that you can use a PCI card sold for use in a PC in a Macintosh. You may be able to, but check with the card’s manufacturer first to confirm that driver software is available.
PCMCIA
On the Macintosh: PCMCIA
The PCMCIA (Personal Computer Memory Card International Association) specification for credit card-sized expansion cards was considered far too difficult to remember or say (wags claimed it stood for “People Can’t Memorize Computer Industry Acronyms”), so PCMCIA cards are now officially known as PC Cards.
Personal Web Server
On the Macintosh: Web Sharing Control Panel
Windows 98 and Windows 95 with Internet Explorer 4.0 include Personal Web Server. This software turns your PC into a small web server, so that you can publish web pages on your hard disk for anyone on the Internet, or—or commonly—on your intranet—to see. On the Macintosh, you get the same feature with the Web Sharing control panel, which first appeared with Mac OS 8. (If the Web Sharing control panel isn’t in your Control Panels folder, you can reinstall it from your original Mac OS CD-ROM.)
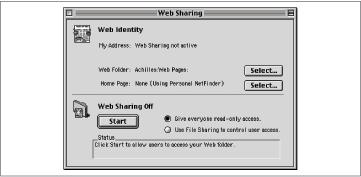
Using the Web Sharing control panel is easy; the hard part, as on Windows, is ensuring that your Macintosh has a full-time connection to the Internet or office network and making your Mac’s private web address known to the appropriate people. To turn on Web Sharing, follow these steps:
Open Apple menu → Control Panels → Web Sharing (see Figure 40-2).
Click the top Select button to select a folder that will contain your web pages. Select the folder from the Open dialog box that appears.
Click the bottom Select button to designate a document in your web folder as your home page. This step is optional—if you leave the Home Page set to None, Web Sharing uses Personal NetFinder, a Finder-like view of the files in your web folder.
Choose whether you want to give everyone access or restrict access to the settings in the Users & Groups control panel. See File Sharing for details on access privileges.
Click the Start button.
Once Web Sharing has been turned on, any HTML files in your web pages folder become available to anyone connected to your Macintosh. The Web Sharing control panel reports your address (which may change, if you use a dialup connection to the Internet); choosing Edit → Copy My Address puts the URL to your web site on the clipboard for pasting into email or web browsers.
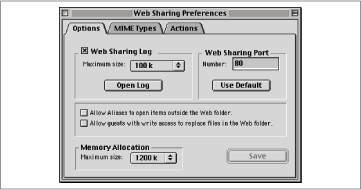
A few other capabilities are available in the Web Sharing Preferences window, which you open from Edit → Preferences (see Figure 40-3).
You can ask Web Sharing to keep a log of all the people who access your web pages, set a maximum size for the log, or control how Web Sharing should handle aliases and write access.
Photoshop
On the Macintosh: Photoshop
Adobe Photoshop has become the standard program for photo editing and image production for both Macintosh and Windows users. The program is identical on both platforms, and you can exchange Photoshop files—as well as GIF, TIFF, EPS, and other graphics files, of course—without any conversion. For additional information about Photoshop, visit Adobe’s web site at http://www.adobe.com/.
Power Management Control Panel
On the Macintosh: Energy Saver Control Panel
If your PC supports the Advanced Power Management specification, the Windows 98 Power Management control panel (called the Power control panel in Windows 95) offers control over the energy saving features of the computer. On the Macintosh, look for these features in the Energy Saver control panel, located in Apple menu → Control Panels → Energy Saver.
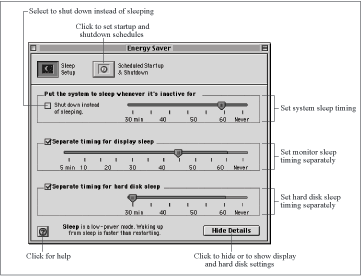
All current (and most recent) desktop Macs and all Apple laptops support three different energy saving features. A slider bar in the Sleep Setup panel lets you specify what period of inactivity must elapse before the entire system goes to sleep or shuts down. Click the Show Details button to reveal slider bars that govern when the monitor goes to sleep and the hard disk stops spinning to save power (see Figure 40-4).
It’s easiest to use just the system sleep settings, but you can set the monitor and the hard disk to sleep on different schedules, as shown in Figure 40-4.
Using these power-saving features can save hundreds of dollars worth of electricity over the course of the year, especially if you have more than one computer. Although various hibernation and standby modes on PCs have been known to cause problems, sleep mode on the Macintosh generally works very well.
If you’re used to leaving your computer on for backup or other automated maintenance tasks that take place in the middle of the night, you can use the options in the Scheduled Startup & Shutdown panel to, for instance, start up the Macintosh at 2 A.M. and shut it down at 6 A.M., except on weekends.
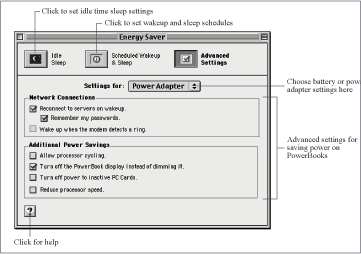
On PowerBook and iBook laptops, the Energy Saver control panel’s Sleep Setup panel is called Idle Sleep; the Scheduled Startup & Shutdown controls are relabeled Scheduled Wakeup & Sleep. A third panel, called Advanced Settings, offering several power-saving settings that make sense only for laptops (see Figure 40-5).
For each set of laptop settings, you can choose either Battery or Power Adapter from the pop-up menu. In other words, you can define one set of preferences that governs power savings when the computer is running on battery power, and a different set when the laptop is plugged into the wall.
Power Switch
On the Macintosh: Power Key
In general, you turn each brand of PC on or off differently. But every Macintosh made today turns on and off exactly the same way: you simply press the power key on the keyboard. If the computer is off, it turns on; if the computer is running, a dialog box appears offering Restart and Shut Down buttons, exactly as in Windows.
Some older Macintosh models, such as the LC and 6100 series, don’t offer this method of starting up and shutting down. On these models, you turn on the computer by pressing a physical switch; you shut it off by choosing Special → Shut Down, and then pressing the physical switch again.
Print Screen Key
On the Macintosh: Screen Capture
For information about how to take snapshots of screen images, see Screen Capture.
Printer Sharing
On the Macintosh: Printer Sharing
Windows lets you share printers attached to your PC in much the same way you share folders on your hard disk. On the Macintosh, network printers, such as most laser printers, are automatically available to every Macintosh on the network—no configuration necessary.
Setup on your part is only necessary if you want to make an inkjet printer, such as Apple’s discontinued StyleWriter, available to the network. To do so, follow these steps:
Make sure you have the Printer Share extension and the appropriate printer driver for your printer in the Extensions folder of all your Macs.
On the Macintosh to which the printer is connected, open Apple menu → Chooser, click the icon for the printer you want to share on the left side of the Chooser, and then click the Setup button. The Sharing Setup dialog box appears.
Select “Share this Printer,” enter a name for the printer, and (if you want to prevent some people on the network from printing on it), enter a password (see Figure 40-6).
Click OK to close the dialog box and start sharing the printer.
To access the shared printer from another Macintosh, open Apple menu → Chooser, click the icon for that printer, and then select it in the “Connect to” list underneath Printer Port and Modem Port. Click the Get Info button to see which fonts aren’t installed on the Macintosh connected to the printer—stick to fonts that are installed on both Macs for high quality printing.
Note that you can’t share an inkjet printer attached to a Macintosh with a PC on the same network.
Printers Folder
On the Macintosh: Desktop Printers
In Windows, you configure and access your printers from My Computer → Printers. When you’re using Mac OS 8 or later, you use Desktop Printers, which are icons that appear on your Desktop (although you can move them anywhere you like). These Desktop printer icons offer quick access to printouts in progress, and make it simple to direct a particular printout to a certain printer (if you or your office has more than one printer).

Creating a Desktop Printer. Creating a new printer icon requires use of the Chooser. Follow these steps:
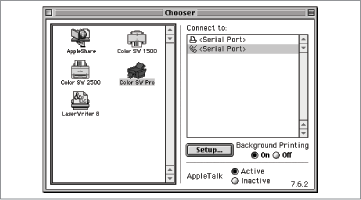
Open Apple menu → Chooser.
Select the icon representing your printer on the left side of the Chooser (see Figure 40-7).
Indicate how it’s connected to the Macintosh in the Connect to list.
Click Setup and set any desired options.
Close the Chooser.
The Chooser creates an icon for the printer on your Desktop. You can move it or rename it as you like.
Configuring printers. To change the setup of a printer after you’ve created its Desktop icon, double-click the icon to open the print queue window. Then choose Printing → Setup. You can change such options as memory configuration and installed paper trays, depending on the individual printer.
Printing to a Desktop Printer. Although you’re most likely to print from within programs by choosing File → Print, you can also print documents by dragging them to a printer’s icon, or to the open print queue window. The Macintosh then launches the program that created the document—and prints it. For more information about printing, see Printing Files.
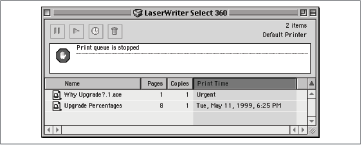
Modifying the print queue. When you’re printing multiple files, you can manipulate them in the print queue window, accessible by double-clicking a Desktop Printer icon (see Figure 40-8).
In the print queue window, you can start and stop a printout in progress, select individual printouts and schedule them for specific times, and delete printouts-in-waiting from the queue. You can also drag the printout icons around to print them in a different order.
Finally, in the Printing menu (which appears when the print queue window is open), you can specify whether you want to see alert messages when printing using manual feed; you can also designate a particular printer to be your default printer.
Printing Files
On the Macintosh: Printing Files
Once properly configured, printing on the Macintosh works almost exactly the same way it does in Windows. For information about setting up Macintosh printers, see Page Setup, Printers Folder, and Printer Sharing. For information about font handling on the Macintosh, see Fonts.
As in Windows, there are several different ways of printing on the Macintosh.
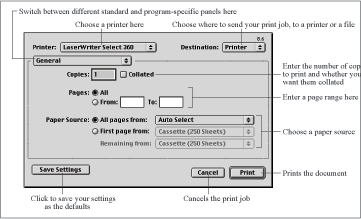
From within an application, choose File → Print (Command-P) to display the Print dialog box, where you can choose which printer to use, which pages to print, how many copies to print, and any other program-specific options (see Figure 40-9).
Drag one or more document icons to either a Desktop Printer icon or an open print queue window (accessed by double-clicking a printer icon). (See Printers Folder for details on these printing components.) When you do so, the Mac OS launches the necessary application, displays the Print dialog box, and then prints the document.
The Mac OS can print in the background, just as on Windows.
Troubleshooting. Although printing is generally a straightforward process, sometimes things can go wrong. Here are a few common problems and solutions:
The Finder reports, via an alert dialog box, that the printer could not be found on the network. The printer may still be warming up and not yet ready to receive print jobs. If that’s not the problem, check the cable connections.
Fonts seem large and crude. Make sure you’re using a TrueType or PostScript font (with ATM installed). Also be sure to use fonts that were designed for printing, rather than for onscreen use. For more information, see Fonts.
Program Files Folder
On the Macintosh: Applications Folder
Most Windows installation programs deposit new software in your Program Files folder. The Macintosh is less regimented about storing programs in specific places; although there’s an Applications folder on your hard disk, you don’t have to store your programs there—and most software installers don’t even put new programs there.
In short, feel free to use the Applications folder or not as you wish. You could even create a Program Files folder on the Macintosh and use it as you would in Windows. See Programs Menu.
Programs
On the Macintosh: Applications
For a list of programs that work on the Macintosh just as they do in Windows, see Cross-Platform Programs.
Programs Menu
On the Macintosh: User-created Programs Menu
Windows users are accustomed to being able to open any program from Start → Programs—a feature not available when you’re using a Macintosh. The Mac OS doesn’t attempt to group programs in this way—creating such an arrangement is left up to you. As a result, Macintosh users often put aliases (see Shortcuts) of their frequently used programs in the Apple menu, in the Favorites menu, or on the Desktop.
To create your own Programs menu on a Macintosh, therefore, follow these steps:
Open Macintosh HD → System Folder → Apple Menu Items.
Choose File → New to create a new folder in the Apple Menu Items folder. Name it Programs and open it.
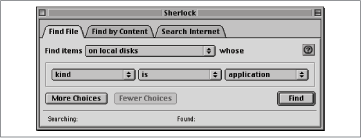
Choose File → Find to open Sherlock.
Search for items whose kind is application (see Figure 40-10).
In the Sherlock results window, choose Edit → Select All to select all the applications. If you don’t want certain applications to appear in your Programs menu, Shift-click their icons to deselect them.
Once you have the proper set of icons selected, hold down the Command and Option keys and drag the icons into your Programs window. The Mac OS responds by making aliases of all the dragged icons. Feel free to create additional folders inside the Programs folder, moving aliases into them for even better organization.
Now you can launch all your programs by choosing them from Apple menu → Programs, exactly as in Windows.
Properties Dialog Box
On the Macintosh: Get Info
Whenever you need to change a setting in Windows, you use the Properties dialog box. There’s no such universal command on the Macintosh. The properties for an individual Desktop icon—disk, application, document, or whatever—appear when you select the icon and then choose Edit → Get Info; in applications, you generally adjust your settings using a command like Preferences, Options, or Settings.
Beginning with Mac OS 8.5, Apple divided the Get Info windows into multiple panels; you switch among them using the pop-up menu, as shown in Figure 40-11.
General Information. The General Information pane, which opens first, gives you basic information about the icon you selected, including its kind, size, location, creation and modification dates, version, label, and comments. The information for an alias also identifies the location of the original file (and provides a button that takes you to it).
Sharing. The Sharing panel appears only for folders, disks, and programs, all of which can be shared over a network. See File Sharing for details.
Memory. Only programs have the Memory panel, which lets you modify the memory requirements for the application. See Memory Usage for more information.
Status & Configuration. Only Desktop Printers show the Status & Configuration panel, which provides information about the printer hardware. See Printers Folder for more information about Desktop Printers.

Fonts. Again, only Desktop Printers have a Fonts panel, which show a list of fonts installed in the printer.