Chapter 42. R
RAM Upgrades
On the Macintosh: RAM Upgrades
If you’re familiar with the basics of buying and installing RAM on the PC, you’ll have no trouble doing so on a Macintosh. In fact, you’ll find it far simpler to buy RAM for your Macintosh; you have far fewer variables to contend with.
What kind to buy. As with PCs, different models of Macs accept different types of SIMMs (30-pin in older Macs, 72-pin in newer models) or DIMMs, different speeds of RAM, different voltages, and so on.
To discover what kind of RAM upgrade boards your particular Macintosh model needs, consider downloading GURU, short for “GUide to RAM Upgrades.” Released as freeware by RAM vendor NewerRAM, Inc., GURU is a database of information about every Macintosh model. Using GURU, you can determine everything you need to know about what RAM you should buy for a given Macintosh model, how much RAM that Macintosh can hold, what RAM speeds it supports, and whether the Macintosh supports memory interleaving (a method of increasing speed that requires you install RAM in specific slots). You can download GURU from http://www.newertech.com/software/guru.html; revised versions regularly appear, covering newly released Macintosh models.
If you’re researching Macintosh memory upgrades from your PC, you can find much of the same information at http://www.newerram.com/findmem.html.
How much RAM to buy. Even with the information from GURU, you may still wonder how much RAM you should install. As on the PC, more is always better, and successive versions of the Mac OS require ever more RAM. Use Table 42-1 as a quick reference for how much you’ll need.
Installing the RAM. After you’ve purchased your RAM boards, installing them works precisely as it does on the PC. Open the computer’s case, search the motherboard (the large circuit board) for corresponding slots, and snap the new RAM boards in. Today’s RAM slots are designed so that you can’t install an upgrade board improperly—only when facing the correct direction. Tiny plastic clips at each end of each board snap inward to secure the board’s ends.
RAM Usage
On the Macintosh: RAM Usage
See Memory Usage.
Recycle Bin
On the Macintosh: Trash
Like the Recycle Bin in Windows, the Macintosh Trash provides a holding place for files and folders before they’re deleted for good. The basics of the Recycle Bin and the Trash are similar, although there are a few differences.
Deleting Items. In Windows, you can move files and folders into the Recycle Bin in numerous ways. On the Macintosh, you move icons into the Trash in any of these ways:
Drag icons onto the Trash icon.
Select one or more items in the Finder and then press Command-Delete. This feature, which parallels the use of the Del key to delete files in Windows, arrived with Mac OS 8.
Select some icons, and then choose File → Move To Trash.
Control-click an icon in the Finder, and then choose Move to Trash from the contextual menu.
Unlike Windows, the Macintosh doesn’t ask to confirm the deletion when you move icons to the Trash—only when you later actually empty the Trash.
Recovering items. Recovering a file or folder from the Trash works just as you’d expect from your experience using the Recycle Bin. Double-click the Trash to open it, and then drag an item out of the Trash window.
In Windows, when you set the Recycle Bin window to the Details view, information columns reveal the original locations and deletion dates of the window’s contents. You can’t view this kind of data on the Macintosh.
On the other hand, the Macintosh offers a unique feature of its own: if you select icons in the Trash window and then choose File → Put Away (Command-Y), the icons leap back into the folders from which you originally dragged them, even if it was weeks ago. Of course, if you don’t know where the original locations are ahead of time, you might have to use File → Find to find where the files end up.
Emptying the Trash. In Windows, you may never even think about emptying the Recycle Bin, which automatically deletes the oldest files when it gets to a certain preset size. The Macintosh, however, never automatically empties the Trash. To remove files from the Trash permanently, choose Special → Empty Trash in the Finder. (You can also Control-click the Trash and choose Empty Trash from the contextual menu.)
Unfortunately, there’s no built-in way on the Macintosh to delete just a few files from the Trash or even to delete just the files on a specific disk.
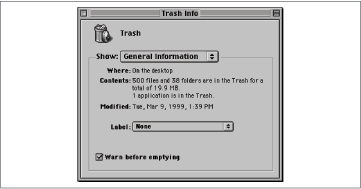
When you empty the Trash, a message tells you how many items are in it and how much space they take up; you’re asked if you’re sure you want to remove the items permanently. If you tire of clicking the confirmation button each time you empty the Trash, follow these steps:
Select the Trash can icon.
Choose File → Get Info (Command-I). The Trash Info window appears, as shown in Figure 42-1.
Uncheck the “Warn before emptying” checkbox.
From now on, no confirmation message will appear when you empty the Trash. The Trash’s Get Info window also tells you what’s in the Trash, splitting the listing out between files and folders, and counting applications separately.
Trash notes. Although the Macintosh Trash lacks the automatic emptying feature of the Recycle Bin, it does have a few useful features that aren’t present in Windows. For instance, in Windows, the Recycle Bin protects files only on hard disks; if you drag a file from a floppy disk, Zip disk, or network drive to the Recycle Bin, Windows deletes it immediately. On the Macintosh, every disk has its own Trash (in the form of a hidden folder)—a fact that explains why an empty Trash can may suddenly bulge when you insert a new disk, for example. Servers have hidden Network Trash folders in addition to the standard hidden Trash folder; this system prevents you from seeing, in your Trash can, all the deleted items in the Trash of every Macintosh on the network, which might be overwhelming.
In Windows, if you drag the icon of a disk to the Recycle Bin, all the files on that disk are deleted. On the Macintosh, doing so simply ejects the disk. (To erase all the files on a Macintosh disk, open the disk’s window, select all the files and folders, and then drag the selection to the Trash. Alternatively, just select the disk’s icon and then choose Special → Erase Disk.)
Regional Settings
On the Macintosh: Date & Time, Numbers, and Text Control Panels
In Windows, you use the Regional Settings control panel to modify how Windows displays dates, times, numbers, and currencies in countries other than the U.S. On the Macintosh, you make such settings in three different control panels: Date & Time, Text, and Numbers.
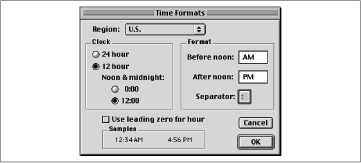
Date & Time control panel. In the Date & Time control panel’s Date Formats and Time Formats (see Figure 42-2) dialog boxes, you can choose a country from a menu or create your own custom settings. Either way, the Macintosh automatically shows dates and times in the format appropriate for the country you chose. (You’ll see the new date formats in, for example, the Date Modified column of Desktop list-view windows.)
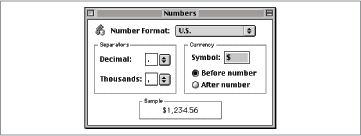
Numbers control panel. The Mac’s Numbers control panel lets you select decimal and thousands separators and choose a currency symbol (see Figure 42-3). Here again, you can specify the settings by choosing from predefined country settings. You can’t specify the number of digits in a group, as you can in Windows.
You may have to hunt to see the effect of changes you make in the Numbers control panel. Excel, for example, uses the currency you choose when you apply the Currency format to selected cells.
Text control panel. In addition to the date, time, number, and currency settings, the Mac OS also lets you specify how text behaves according to international customs. Behaviors include sort order, case conversion, and word definitions. You can choose a script system (such as Kanji or Cyrillic) from the Script menu and then a country from the Behavior menu in the Text control panel (see Figure 42-4).

Registry
On the Macintosh: Preferences Folder
Windows stores configuration settings and preferences for both the operating system and applications in the Registry, a system-level database file. On the Macintosh, the closest equivalent is the Preferences folder (located at Macintosh HD → System Folder → Preferences). Applications generate preference files in this folder; some applications create entire folders of configuration files within the Preferences folder for this purpose.
Here’s what you need to know about Macintosh preference files:
You can’t edit them manually, as experienced Windows users can do in the Windows Registry. You can make a change to a preference file only by launching the parent application and changing the preference settings there.
Files and folders within the Preferences folder must be in the Preferences folder to work. In other words, you can reset most programs to their default settings merely by moving the appropriate preferences file out to the Desktop and then launching the program. Reverting to your old preferences is then as easy as putting that application’s preferences file back into the Preferences folder.
If you want to copy an application from one Macintosh to another, you generally don’t need to copy the preferences file. If you do, however, the copy will have exactly the same settings.
A corrupted preference file—an occasional occurrence on the Macintosh—can explain a wide variety of strange behavior in a particular program. Deleting the preference file is a common, and powerful, troubleshooting technique; the next time you launch the program in question, a fresh and uncorrupted preference file is generated automatically.
Renaming
On the Macintosh: Renaming
Renaming icons on the Macintosh works the same way as in Windows, although it requires one click less. To rename a file on the Macintosh, follow these steps:
Click once on the name portion of the file’s icon, and then wait for a moment until the “renaming rectangle” opens around the filename. Alternatively, select an icon and then press Return to select the name for editing. (There’s no Rename command on the Macintosh.)
Make your changes. You’re free to use the Cut, Copy, and Paste commands in the Edit menu. You can also use any character except the colon (:); far fewer characters are off-limits on the Macintosh than in Windows.
To save your changes to a name, either press Return or click outside the name.
Restrictions. You can’t rename the Trash. If file sharing is turned on, you can’t change the name of disks that are being shared until you turn file sharing off.
On the other hand, renaming files on the Macintosh—even system files—rarely produces instability and problems, as it might in Windows.
Reset Switch
On the Macintosh: Reset Switch
When you suffer from a truly serious crash in Windows that locks up everything so even Ctrl-Alt-Delete doesn’t work, you push the Reset switch. If even that technique doesn’t work, you turn the PC off and back on again.
The Macintosh works exactly the same way. If the computer locks up, press Command-Option-Esc to force quit a locked program; if that doesn’t work, type the Reset keystroke. On most Macintosh models, this is Control-Command-power key. (The Power key, which you use to turn the Macintosh on, is in the upper-right corner of your keyboard.)
Rarely, a crash prevents the keyboard reset keystroke from working, at which point you’ll have to turn the power off and back on again using the power switch on the Macintosh itself. If even that fails, unplug the power cord from the wall.
Resizing Windows
On the Macintosh: Resizing Windows
In Windows, you resize a window by dragging the resize handle in the lower-right corner. The Macintosh has exactly the same resize handle, and it works in exactly the same way.
You can’t, however, resize a Macintosh window in only one dimension by dragging any edge, as you can in Windows.
For information about changing the size of windows with a single click, see Minimizing Windows and Maximizing Windows.
Restart
On the Macintosh: Restart
After installing new software, or when you’re experiencing problems and want to start afresh, you restart your PC. The same situation applies to the Macintosh.
To restart a Macintosh manually, choose Special → Restart. Alternatively, press the Power key and click Restart or press the R key. If any documents require saving, you’ll be asked if you want to save them; as in Windows, if you click Cancel when asked to save a document, you abort the restarting process.
Right-Click
On the Macintosh: Control-Click
The standard Macintosh mouse has only a single mouse button; as a result, you can’t right-click objects to summon contextual menus, as you can in Windows. Instead, Control-click objects. Third-party mice with multiple buttons are available.
Run
On the Macintosh: None
Despite the fact that the move from DOS to Windows encourages PC users to use the graphical interface instead of the DOS command line, many users still prefer to launch programs in Windows by choosing Start → Run and typing the name of the program to run. There’s no equivalent in the Mac OS, so you’ll have to resort to alternative methods. See Opening Files for the possibilities.