Chapter 43. S
Safe Mode
On the Macintosh: Extensions Off
In times of troubleshooting, you wouldn’t get far without some means of starting a computer from Ground Zero, its native, virginal, factory-fresh state, free from any software you’ve added to its operating system. In Windows, this condition is known as Safe Mode.
On the Macintosh, restoring the OS to its bare minimum components is called booting with extensions off. To do so, restart the computer while pressing the Shift key. When you see the words “Extensions off” or “Extensions disabled” on the screen, you can release the Shift key; the Macintosh is now running without any system add-ons, such as extensions, control panels, startup items, and so on.
Without these helpers, the Macintosh can’t read CD-ROMs, go online, send faxes, connect to networks, and so on. On the other hand, the computer should start up especially quickly and run exceptionally smoothly. The troubleshooting work is halfway done: having determined that whatever problem you’re having is a result of corrupted or conflicting extensions, you can now begin the business of determining which ones are causing the problem. For details on this process, see the sidebar “Mastering the Extensions Manager” in Troubleshooting.
Saving Files
On the Macintosh: Saving Files
You save documents on the Macintosh exactly the way you do in Windows: by choosing File → Save or by pressing, in the Macintosh case, Command-S.
Only a few differences are worth noting:
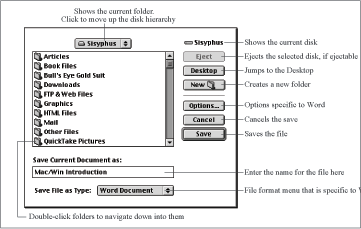
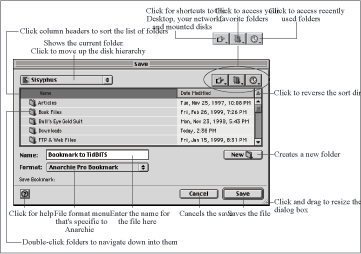
When saving a document for the first time, you may encounter either of two slightly different Save dialog boxes, depending on the version of the Mac OS you’re using and the specific program you’re using. In Mac OS 8.5, Apple has replaced the old-style Save dialog box (see Figure 43-1) with a superior Save dialog box using a technology called Navigation Services (see Figure 43-2).
At this writing, however, few programs take advantage of the new Navigation Services look or features. Most of the time, therefore, you’ll encounter the old-style Save dialog box. Fortunately, the process of saving is relatively similar in both and follows these basic steps:
When you name a file you’re saving for the first time, you can use any punctuation except the colon (:). Filenames can be up to 31 characters long, and filename suffixes or extensions aren’t necessary. Enter a name for the file. For more information, see Filenames.
The old-style Macintosh Save dialog boxes don’t let you switch to any other program while you’re using them. In the new Navigation Services dialog boxes, you can switch to another program while saving, just as you can in Windows. See Dialog Boxes for details.
You can’t move the old-style Save dialog boxes around on the screen, as you can the new Navigation Services dialog boxes.
ScanDisk
On the Macintosh: Disk First Aid
ScanDisk is the built-in Windows program that can repair minor disk corruption. On the Macintosh, you use Disk First Aid for this purpose. (As on Windows, commercial programs like Norton Utilities offer additional features, including file recovery.)
Disk First Aid usually sits in Macintosh HD → Utilities. It’s simple to operate:
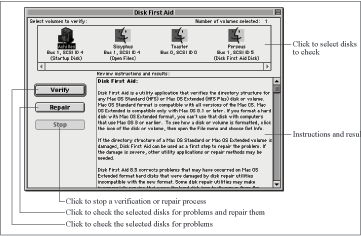
Double-click Disk First Aid’s icon to launch the program.
Click the icon of the disk you want to check. To select multiple disks, Shift-click their icons (see Figure 43-3).
Click Verify to verify—generate a report on—the selected disks, or click Repair to verify and repair the disks. Verify makes no change to the disks, whereas Repair fixes any problems it finds.
Scheduled Tasks
On the Macintosh: Macros
In Windows, you can schedule certain tasks, such as a ScanDisk run, to take place automatically on a regular basis. There’s no built-in equivalent feature on the Macintosh.
On the other hand, you can schedule some events in the Mac OS, including startup and shut down times (do so in the Apple menu → Control Panels → Energy Saver → Scheduled Startup & Shutdown). You can also set a schedule for Sherlock’s Find by Content feature to index your hard disk in, for example, the middle of the night. For more information on Sherlock, see Find.
Scraps
On the Macintosh: Clipping Files
In Windows 98, you can drag text and graphics out of certain programs to the Desktop to create a scrap file. Relatively few applications support this feature, so it’s not widely used in Windows yet. On the Macintosh, however, the equivalent feature, clipping files, is popular and useful. Not all Macintosh programs support clipping files, but most recent ones do.
To create a clipping file, select some text or a graphic in a document window; drag it clear out of the window and onto the Desktop. At any time, you can double-click the resulting clipping file on your Desktop to view its contents. To use a clipping file in another document, drag the clipping file’s icon from the Desktop to the desired point in an open document.
Screen Capture
On the Macintosh: Screen Capture
For writers of computer books, magazines, and manuals, the screen capture, or screen shot, is a vital tool: it’s a graphics file that shows what was on the screen at a precise moment. In Windows, you create screen shots by pressing Print Screen or Alt-Print Screen. On the Macintosh, too, you press specified keyboard keys to create screen shots, as outlined in Table 43-1.
Notice the patterns. The key combinations that include the 3 key take a snapshot of the entire screen, whereas those that use the 4 key take a snapshot of a portion of the screen. Adding Control copies the snapshot to the clipboard rather than saving it to a file; finally, if Caps Lock is down, the screen shot is neatly trimmed to include only the window or menu you click after pressing the key combination. Each time, a satisfying camera-shutter sound accompanies the creation of the screenshot.
As on Windows, more powerful screen capture utilities can do things such as saving snapshots in different file formats. Snapz-Pro is one popular example (Ambrosia Software, http://www.ambrosiasw.com/Products/SnapzPro.html).
Screen Savers
On the Macintosh: Screen Savers, Energy Saver Control Panel
The Macintosh has no built-in screen saver. Of course, you can buy one, such as the popular After Dark from Berkeley Systems (http://www.berksys.com/products/afterdark/). On the other hand, the Mac OS can save your screen far more effectively than any screen saver software by simply darkening your monitor after a specified period of inactivity. For more information, see Power Management Control Panel.
SCSI
On the Macintosh: SCSI
SCSI, which stands for Small Computer Serial Interface, is a popular means of attaching high-speed peripherals, such as scanners, Zip and Jaz drives, tape drives, and hard disks, to both Macs and PCs. Because SCSI was built into every Macintosh for many years, products connected by this technology became far more common in the Macintosh world than the PC world.
Function | Key Combination |
Saves the image of the entire screen as a file, called Picture 1, on your startup disk. | Command-Shift-3 |
Copies the image of the entire screen to the clipboard. | Control-Command-Shift-3 |
Saves the image of a rectangular section of the screen, which you select by dragging, into a file called Picture 1 on your startup disk. | Command-Shift-4 |
Copies the image of a rectangular section of the screen, which you select by dragging, to the clipboard. | Control-Command-Shift-4 |
Captures the image of one particular open menu or window, which you select by clicking, into a file on the startup disk called Picture 1. | Caps Lock-Command-Shift-4, and then click the desired window |
Copies the image of one particular open menu or window, which you select by clicking, to the clipboard. | Caps Lock-Control-Command-Shift-4, then click the desired window |
For the most part, SCSI devices are storage devices—hard disks, removable cartridge drives, and tape drives.
Two complexities of SCSI technology can cause trouble on any kind of computer—SCSI IDs and termination. Every SCSI device must be set to an ID number between 0 and 6. If you have an older Macintosh whose internal hard disk uses SCSI technology, its ID is 0. (Technically, the Macintosh itself is a SCSI device, too, whose ID is 7.) If you inadvertently attach two SCSI devices with the same ID number to a single Macintosh, dramatic system errors can occur—crashes, bombs, inability to start up, and even multiple copies of the same hard disk icon appearing on the Desktop. The bottom line: use the push button control or wheel on each SCSI gadget to specify a unique ID number before attaching it to a computer.
The other chronic SCSI hazard: If you attach several SCSI devices to a single Macintosh, one gadget connected to the next, you must terminate (attach a special transistor plug designed for this purpose) the far end of the chain. Fortunately, an increasing number of today’s SCSI devices include built-in active termination, which turns termination on or off automatically as needed.
Usually, it’s easy to daisy-chain four or five SCSI devices (including internal devices). But if you try to add more devices, it’s a total crapshoot; the devices may not even work unless you try breaking the termination rules. If you must get that ambitious, be sure to perform ritual tofu sacrifices to the SCSI gods beforehand.
The complexity and crankiness of SCSI technology, incidentally, helps to explain why Apple eliminated it from new Macintosh models starting in 1998. SCSI has been replaced in all desktop Macs by the idiot-proof and almost infinitely expandable USB and FireWire technologies.
Serial Ports
On the Macintosh: Modem Port, Printer Port
PCs generally provide one or two RS-232 serial ports for connecting modems and other peripherals. For many years, every Macintosh model also offered two serial ports, although they were RS-422 ports with DIN-8 connectors (see Figure 43-4). (Current Macintosh models come with the far faster and more expandable USB ports instead.)
On Macintosh models that included serial ports, a small telephone icon designates the modem port, and a tiny dot-matrix printer icon identifies the printer port. But despite the names, the two ports are generally interchangeable. Most software that requires serial ports, such as PalmPilot or printer software, lets you choose whether you’re using the modem port or printer port.
There is one significant exception to the interchangeable nature of the two ports. To connect a Macintosh to a LocalTalk network, the LocalTalk or PhoneNet connector must be connected to the printer port.

Settings Menu
On the Macintosh: None
In Windows, the Start → Settings menu, for which there’s no direct equivalent on the Macintosh, provides access to a number of commands:
Control Panel
For information about accessing control panels on the Macintosh, see Control Panel.
Printers
For information about configuring printers, see Printing Files.
Taskbar
For information about the Macintosh equivalents to the Taskbar and Start Menu, see their entries.
Folder Options (Windows 98)
For information about file types (such as you would find in the Folder Options dialog box), see File Types.
Active Desktop & Windows Update (Windows 98)
The Macintosh has no equivalent for the Active Desktop or Windows Update items in the Settings menu.
Shift Key
On the Macintosh: Shift Key
As on Windows, the Shift key does far more on the Macintosh than simply produce capital letters:
Hold down the Shift key while the Macintosh boots to prevent all startup items—control panels, extensions, and items in the Startup Items folder—from loading. This trick is extremely useful for troubleshooting; if the Macintosh has been acting up, this technique rules out extension conflicts (a common cause of instability). Keep in mind that many features of the Mac OS won’t be available—CD-ROM, Internet connection, and so on—if you boot with the Shift key down.
Shift-click icons in a Desktop window to select more than one simultaneously, exactly like Ctrl-clicking in Windows.
Shift-click items in a scrolling list to select a continuous range of items in the list.
In situations where the Tab key is used for navigation (to move between fields in a dialog box, for example), adding Shift reverses the direction of the navigation, exactly as on Windows.
When dragging to create a line or rectangle (for example) in a graphics program, hold down Shift to produce a perfectly straight line or perfectly symmetrical rectangle.
Shortcuts
On the Macintosh: Aliases
A Windows shortcut is an icon that represents some other file, folder, or disk and takes up very little disk space, yet opens the original icon when double-clicked. In effect, it lets a file, folder, or disk icon be in more than one place at once. A common usage: put the shortcut for a commonly used item in your Start menu or on your Desktop. On the Macintosh, the equivalent icon duplicates are called aliases.
To create an alias, select the icon of a file, folder, or disk in the Finder. Choose File → Make Alias (Command-M). (Alternatively, Command-Option-drag it to a different window, or Control-click it and choose Make Alias from the contextual pop-up menu.) The Finder creates the alias, appending the word “alias” to the filename (see Figure 43-5). In Mac OS 8.5 and later, alias icons are marked by a small arrow, exactly as on Windows shortcuts; in all OS versions, alias names appear in italic type.
You may wish to remove the word “alias” from the name, since the italics make its identity as an alias clear. You can move or copy aliases anywhere you want and use them just as you would the originals.
To find the original of an alias, Control-click it, and choose Show Original from the popup contextual menu.
Macintosh aliases are smarter and less likely to stop working than Windows shortcuts, particularly those created in Windows 95. If you move, rename, or even copy an alias to a different disk, double-clicking still opens the original file. If necessary, the Mac OS will even mount remote AppleShare servers (other shared hard disks on the network), if that’s where the original file was located.

Shut Down
On the Macintosh: Shut Down
Exactly as with the PC, you shouldn’t shut down a Macintosh simply by cutting its power. If you do so, the Macintosh complains at the next startup, and modern Macs then run the Disk First Aid program to check for any hard disk corruption that your rash action may have caused.
To shut down a Macintosh, choose Special → Shut Down, or press the Power key; click Shut Down in the dialog box that appears (or press Return). The Mac OS then quits all open programs, prompting you to save any changes in open documents. Finally, the Macintosh shuts off. (Some old Macintosh models may prompt you to switch them off manually, much like PCs without Advanced Power Management.)
Sorting Files
On the Macintosh: Sorting Files
When you’re faced with a folder containing a large number of files, sorting the files makes it easier to find the one you want. For more information on sorting files in Desktop windows, see View Menu.
You can also choose a sorting criterion from View → Arrange Icons, but clicking column headers is easier.
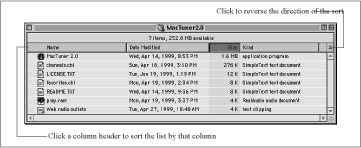
View as List. The Mac’s List View closely resembles Details view in Windows; to sort files in a List View window, click the name of the appropriate column at the top of the window. For example, to sort the files alphabetically by name, click the Name column header, exactly as in Windows. To reverse the direction of the sort, click the pyramid icon to the right of the column headers (see Figure 43-6).
Alternative methods exist: you can also choose a sort order from View → Sort List, or Control-click the window and choose a sort order from Sort List.
View as Icons and View as Buttons. As you can read in View menu, the Macintosh offers two other views of the icons in a particular Desktop window: Icon View and Button View. When you’re using either of these views, the View → Arrange command sorts the icons in the window. You can arrange icons by name, modification date, creation date, size, kind, or label by choosing the appropriate item from View → Arrange (or by Control-clicking the window and choosing the desired item from the Arrange pop-up menu).
If you rearrange icons in the window, resize the window, or add or remove icons, the icons in a window don’t ordinarily arrange themselves to accommodate the new configuration. To force the window to reflect the changes, choose View → Clean Up.
If you’d rather not have to use this Clean Up command repeatedly, use one of the View → View Options → Keep Arranged commands, which make your icons snap to their proper positions whenever you adjust the window or change the number of icons in it. This configuration works much like Windows does when you choose View → Arrange Icons → Auto Arrange.
Sound Recorder
On the Macintosh: SimpleSound
Windows includes a basic sound recording and editing program called Sound Recorder. The Mac’s simpler equivalent is called SimpleSound, accessible from Apple menu → SimpleSound.
SimpleSound can record a sound, play a sound, and manage your alert sounds. Of course, you can also do all of this in Apple menu → Control Panels → Monitors & Sound → Alert Sounds → Add. SimpleSound’s primary advantage is that only RAM limits the length of the sound you record; the Monitors & Sound method arbitrarily truncates any sound at 10 seconds.
Playing sound files. To play a sound file on your hard disk, open SimpleSound. Choose File → Open, navigate to and open the sound, and then choose Sound → Play.
Recording your own sounds. The most interesting use of SimpleSound is its capability to let you add your own sounds. You might decide, for example, to create your own error beep, to supplement the six basic ones that come with the Macintosh. Follow these steps in SimpleSound (or in the Alerts panel of the Monitors & Sound control panel).
Before attempting to record sounds, make sure the Sound Monitoring Source in Apple menu → Control Panels → Monitors & Sounds → Sound is set to the sound source you want to record, such as External Mic.
Choose Apple menu → SimpleSound (or Apple menu → Control Panels → Monitors & Sound → Alerts).
Click Add. The recording controls shown in Figure 43-7 appear.
Click Record; while the virtual tape is rolling, produce some sound. To stop recording, click Stop. Make an effort to prevent recording “dead air” at the end of your sound—alert beeps should be short.
Click Save and name the sound.
To review your sound, click it in the Alerts list.
If you don’t get it perfect on the first try, click Remove (Delete if you’re using Monitors & Sound) to remove the sound, and then try again.

Turning your sound into a file. At first, it may occur to you that your sound is only accessible via the list of alert sounds. Fortunately, however, you can easily turn it into a standalone file, suitable for importing into a multimedia program or emailing to a friend.
To do so, open Macintosh HD → System Folder → the System “suitcase” file. Inside, you’ll see all your alert sounds represented as icons. Drag one out of the window and onto the Desktop, where it becomes a stand-alone file. The most common Macintosh sound format is known simply as the System 7 format. The shareware world is filled with programs that can convert System 7 sounds into other formats, such as the Windows-compatible AIFF format; see Web Sites for Macintosh Software and Information for links.
Sounds Control Panel
On the Macintosh: Appearance Control Panel’s Sound Tab, Monitors & Sounds Control Panel’s Alerts Panel
Exactly as in Windows, in Mac OS 8.5 and later, you can associate sound effects with various Desktop events—opening and closing windows, opening menus, using scroll bars, and so on.
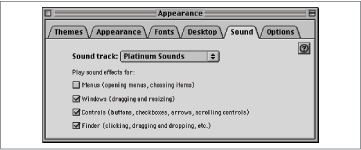
Appearance control panel. To turn on the sound effects in Mac OS 8.5 or later, open Apple menu → Control Panels → Appearance → Sound. From the Sound Track popup menu, choose Platinum Sounds. (Apple originally intended to include various sets of sounds, but included only the Platinum Sound set in the release version of the OS.)
When you do so, you’ll see that the control panel offers individual control over the four categories of sound: menus, windows, buttons, and Finder mouse actions (see Figure 43-8).
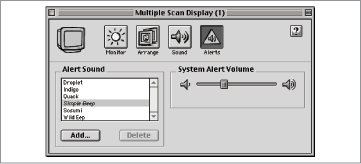
Monitors & Sounds control panel. To choose a different error beep, visit Apple menu → Control Panels → Monitors & Sound → Alerts, where you can switch between alert sounds, change the alert sound volume, add new ones, and remove sounds you don’t like (see Figure 43-9). (Note that in Mac OS 9, Monitors & Sound has been split into two control panels, named Monitors and Sound.)
Speech Recognition
On the Macintosh: Speech Recognition
The Macintosh comes with one built-in form of speech recognition, called PlainTalk. Once you’ve equipped your Macintosh with a microphone, you can use PlainTalk primarily for launching programs—you can say “Computer, open Microsoft Word” to launch Word. If you’re handy with AppleScript, the built-in Mac OS automation software, you can use PlainTalk to open mini programs that open menus, process data, copy and paste, and so on. For more information about PlainTalk, and to download the latest version, visit http://www.apple.com/macos/speech/.
However, PlainTalk has no capability for learning your voice, and isn’t usable for dictation. If you’re interested in speech dictation software on the Macintosh, your prospects once were limited, but now are rapidly improving.
Dragon NaturallySpeaking, the best-selling continuous-speech recognition program for Windows, is being developed for the Macintosh. Dragon Systems hopes to release the Macintosh version by the end of 1999. For more information about NaturallySpeaking, see http://www.dragonsys.com/.
A Macintosh version of IBM’s popular Via Voice speech-recognition software is also slated for release in winter 1999. IBM (http://www-4.ibm.com/software/speech) promises that it will be inexpensive and fast.
A startup company called MacSpeech, founded by former Dragon employees, is also hard at work developing a continuous-speech recognition program for the Macintosh. The progress of their product, which is based on the Phillips speech-engine technology, is posted at http://www.macspeech.com/.
Stand By
On the Macintosh: Sleep
Every recent PC—technically, those that comply with the Advanced Power Management (APM) standard—offers a Stand by, or Suspend, mode. In this state, the computer requires less power, yet springs fully back to life when you press a key. The Macintosh offer a similar feature, called Sleep.
PCs in standby mode may disconnect from the network, and some programs may crash upon waking. The only downside of putting a Macintosh to sleep, on the other hand, is that Apple laptops (but not desktop Macs) lose their network connections.
To put a Macintosh into sleep mode, choose Sleep from the Special menu in the Finder. (If you have an Apple laptop, simply close the lid.) Alternatively, press the Power key on the keyboard; when the dialog box appears, click the Sleep button or press the S key. To wake up a Macintosh that’s asleep, press any key on the keyboard (moving the mouse won’t do it).
Using the Mac’s Energy Saver control panel, which is similar to the Power Management control panel in Windows, you can set the Macintosh to go to sleep automatically after a specified amount of time. The Energy Saver control panel can even wake the Macintosh up, or shut it down, at specific times, too. That trick is handy if, for instance, you want the Macintosh to wake up briefly in the middle of the night to back up, after which it will go to sleep again.
Start Menu
On the Macintosh: Apple Menu (and others)
If anything made Macintosh proponents cry, “Stop, thief!” when Windows 95 debuted, it was the Start menu—a close equivalent to the Mac’s Apple menu. Here, at the left side of both computer screens, is a central menu that you can configure to list anything you find important. Here’s a rundown of the Start menu’s contents, and where to find the Macintosh equivalent of each command.
Shut Down. On the Macintosh, you’ll find the Shut Down command in the Special menu. You can also shut down the Macintosh by pressing the power key. For more information, see Shut Down, Stand By, and Restart.
Log Off (Windows 98). In Mac OS 9, the Multiple Users profile duplicates this feature of Windows; in previous Mac OS versions, there’s no equivalent to the Log Off command. For additional information, see User Profiles.
Suspend. This Windows 95 command is the precise equivalent of the Mac’s Special → Sleep command; see Stand By.
Run. The Macintosh isn’t descended from a command line operating system like DOS; it has no Run command.
Help. To access online help for the Mac OS, choose Help → Mac OS Help in the Finder. For more information, see Help.
Find. To search your Macintosh for files, choose Apple menu → Find—or, in Mac OS 8.5 and later, Apple menu → Sherlock. For more information, see Find.
Settings. Most Macintosh settings are accessible from Apple menu → Control Panels. See Control Panel for additional details.
Documents. Windows keeps track of recently accessed documents in Start → Documents; the Macintosh tracks them in Apple menu → Recent Documents. See Documents Menu for more information.
Favorites. In Windows, a “favorite” can either refer to a folder or a web page. On the Macintosh, a favorite can be any icon—folder, disk, document, application, and so on. For more information, see Favorites Menu.
Programs. You’re probably used to accessing most of your programs from Start → Programs. The fact that the Macintosh doesn’t offer a single centralized list of every application on the computer may throw you at first. Instead, the Mac’s Apple menu → Recent Applications command lists only the most recently used applications. For details, see Programs Menu.
Your own files, folders, and programs. Above the default items in the Start menu is an area where you, and programs you install, can add new commands to the menu. The Mac’s Apple menu is equally customizable; Macintosh fans often modify it heavily, loading it up with aliases of frequently used folders, documents, web sites, disks, network servers, and applications.
To edit your Apple menu, follow these steps:
Open Macintosh HD → System Folder → Apple Menu Items.
To add an icon to the Apple menu, drag it, or an alias of it, into the Apple Menu Items folder. The Apple menu changes immediately to display the new item.
To remove something from the Apple menu, drag its icon out of the Apple Menu Items folder.
To open something listed in your Apple menu, simply choose its name. When you do so, you may be surprised to discover a dramatic difference between the Macintosh Apple menu and the Windows Start menu: on the Macintosh, if you click the name of a disk or folder in the Apple menu, that disk or folder opens. You’re not forced to continue onto the hierarchical submenu of the folder’s contents to make a selection, as in Windows.
The Apple menu’s contents appear alphabetically. If you want to group similar items, consider prefixing them with a special character, such as the bullet character (Option-8). You can also make some files list first by preceding their names with a space.
Startup Folder
On the Macintosh: Startup Items Folder
In Windows, if you want a certain program or document to open every time you boot the PC, you can place a shortcut to the program or document in the StartUp folder. The Mac’s Startup Items folder is exactly the same idea.
To add an item to the Mac’s Startup Items folder, first open Macintosh HD → System Folder → Startup Items. Then drag a document, folder, disk, network server, or program—or the alias of any these items—into the Startup Items folder. (See Shortcuts if you’re not sure how to make an alias.) The next time you boot the Macintosh, that file will open automatically.
You can disable a startup item by dragging its icon out of the Startup Items folder. You can also use the Extensions Manager control panel to manage startup items. Follow these instructions:
Open Apple menu → Control Panels → Extensions Manager (see Figure 43-10).
Scroll down in the list to Startup Items. (Hint: Click the disclosure triangles next to Control Panels and Extensions to hide those items and make the list much smaller.)
To disable a startup item so that it doesn’t launch at startup, deselect its checkbox.
To enable a disabled startup item so that it will launch automatically at startup, select its checkbox.
Close Extensions Manager.
Restart the Macintosh to see the results of your changes.

Suspend
On the Macintosh: Sleep
In Windows 98, Microsoft changed the name of the Suspend command. For details, see Stand By.
System Information
On the Macintosh: Apple System Profiler
In Windows, you can use the combination of the System Information program and the Windows Report Tool (available from Tools → Windows Report Tool in System Information) to learn more about your system and provide details to tech-support staff.
In Mac OS 8 and later, you can use the Apple menu → Apple System Profiler program to report the same kind of information (see Table 43-2), suitable for printing or sending via email.
To use Apple System Profiler, launch the program. Use the Select menu to open various reports. If you want to read all the reports, or if you need to send a report to someone else, choose File → Create Report, and then select the desired options in the dialog box that appears. Apple System Profiler displays the report in a scrolling window; you can save it to disk by choosing File → Save As.
If someone sends you an Apple System Profiler report (usually called ASP Report), you can view it in any word processor. You can also double-click its icon to view it in Apple System Profiler.
Report | Comments |
System Overview | Lists information about your Macintosh, including machine type, CPU type and speed, and various memory configurations. |
Networking Information | Provides details about file sharing, your network configuration, the chosen printer, network software versions, and your Internet configuration. |
Volume Information | Shows the name, kind, size, free space, SCSI bus, SCSI ID, and other information about your disks. |
Device Information | Provides much the same information as the Volume Information report, but focuses on the physical devices, including hard disks, CD-ROM drives, and more. |
Control Panel Information | Lists all of your control panels, indicating which are currently turned on. This report can display all control panels, only Apple control panels, or only non-Apple control panels. |
Extension Information | Lists all of your extensions, indicating which are currently turned on. This report can display all extensions, only Apple extensions, or only non-Apple extensions. |
System Folder Information | Lets you know if more than one System Folder is on your startup disk. |
Application Information | Lists the applications on your startup disk. |
System Menu
On the Macintosh: None
Windows provides the system menu in the upper-left corner of every title bar. Commands in the system menu let you minimize, maximize, restore, resize, move, and close the window using either the mouse or the keyboard. The Macintosh has no equivalent to the system menu.
System Monitor
On the Macintosh: About This Computer
The Windows System Monitor utility lets you watch how Windows itself is working. System Monitor provides a vast number of charts, including things like Processor Usage, Disk Cache Size, Unused Physical Memory, and so on.
Although third-party utilities provide some of the same features on the Macintosh (such as the shareware Peek-a-Boo, available from http://www.clarkwoodsoftware.com/peekaboo), the Mac OS has nothing comparable—except, perhaps, the About This Computer window, accessible from Apple menu → About This Computer when you’re in the Finder. It shows how much memory is allocated to different programs and how much they’re actually using, along with the details of the RAM and virtual memory configurations of the Macintosh. For more information, see Memory Usage.